
flowingtune-a
143 posts
22, she/her. i write. canon is always optional.
Don't wanna be here? Send us removal request.
Statistics
We looked inside some of the posts by flowingtune-a and here's what we found interesting.
Average Info
Notes Per Post
807K
Likes Per Post
448K
Reblog Per Post
358K
Reply Per Post
690
Time Between Posts
3 days
Number of Posts By Type
Text
13
Note
3
Photo
1
Last Seen Tumblr Blogs


Fun Fact
China blocked Tumblr because of pornography and censorship problems in 2013.


Text
You really need to make non-tragic past for your characters, significant people and events that impacted their lives, non-dramatic mundane moments that shaped them, happy memories, bitter memories, embarrassing memories.
Like yes the space princess lost her whole civilization, but did she have friends before that? Favorite place? Does she miss the sound of her favorite music she use to listen to?
35K notes
·
View notes
Text
Asking out on a date
"So... you free on Friday?"
"There is a new restaurant down the street. Maybe you would like to try it out together?"
"I wanted to ask for a while, so... can I take you out on a date?"
"Tell me a time and a place and I'll be there."
"Let's skip the small talk and just go on a date."
"I have a book full of date ideas. Can you help me trying them out?"
"Hey, I've got this wild idea: you, me, and a cup of coffee. What do you say?"
"I'm going to pick you up, you don't need to worry about anything. You just need to be pretty. Which shouldn't be a problem, since you always are."
"Should we make it official with a real date?"
"I dreamed about us going on a date. Should we make it a reality?"
"There's this fancy restaurant I'd like to try, but I'm sure the food will taste better if you are there with me."
"I could show you a good time."
"So, this was basically a date right? Wanna try a real one?"
"I think I found the perfect date spot. Care to try it out?"
"Let's take this to the next level and go on a date together."
If you like my blog and want to support me, you can buy me a coffee or become a member! And check out my Instagram! 🥰
1K notes
·
View notes
Text
Making Gifs Part 2: Photopea
This is part 2 of my own personal gifmaking guide. Please read Part 1 to learn about how I capture the sequential screencaps to make my gifs.
Once you have your screencaps, open Photopea. They have a very simple guide on how to make animations in their help guide. I will be going into much more detail.
Note: ***Tumblr has a limit of 10mb for the filesize of each gif, and recommends no wider than 540 pixels. If your gif is wider than 540 pixels Tumblr will resize it, and it will cause the quality to be reduced, and also take much longer for the gif to load in your post.***
1. RENAME CAPS:
First things first. Rename all of your caps that you will be using for a gif to have the prefix _a_ on your computer. Select all and right-click on the FIRST file and select Rename (windows) and type _a_. Windows will add the numbers.
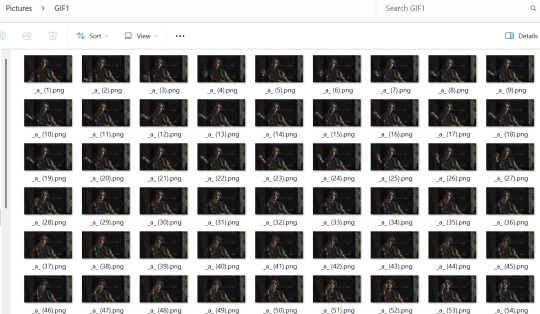
For most gifs, try not to have more than 60 frames as it will make the gif too large to upload to Tumblr. I usually aim for 45-50 frames max for most of my gifs.
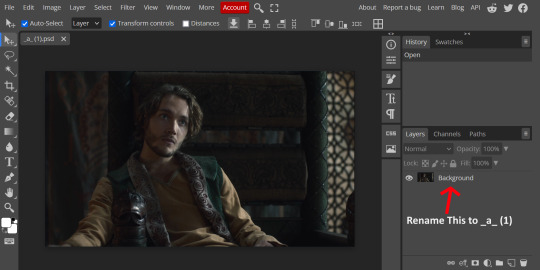
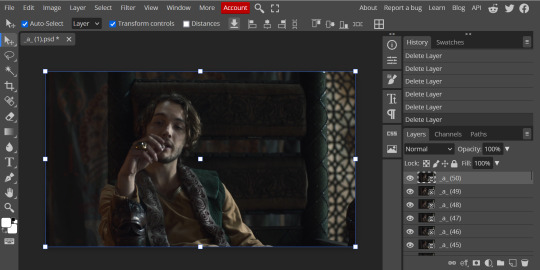
2. IMPORT FRAME #1:
Drag and Drop _a_ (1).png into Photopea. Rename the layer from Background to _a_ (1)
3. IMPORT IMAGES:
Select all the rest of your images from the folder on your computer, and drag and drop ON TOP OF the image (not the layers section). Make sure the file you grab to drag/drop is the next one in the sequence (so _a_ (2).png in this case. Otherwise they will be out of order. If you do it right, you will see the layers section on the right get populated with your caps in reverse order, with 1 at the bottom and the last one at the top.
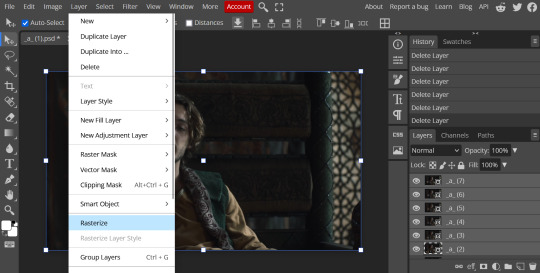
4. RASTERIZE:
Next, select all of the layers (on the right, by holding CTRL and clicking on each layer), go to Layer > Rasterize. They are currently Smart Layers, and if you keep them this way the sharpening will not apply (for some reason, I have no idea why that is)
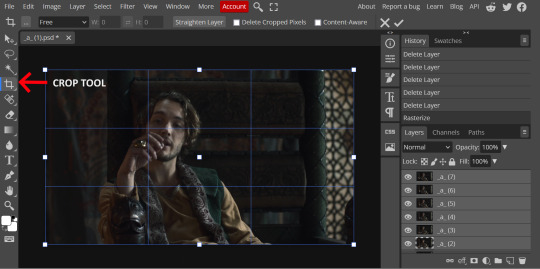
5. CROP:
Next, crop your gif. This tool is on the left menu. You do not have to have all the layers selected for this, it will crop all layers together. Move the blue lines at the edges until the frame is cropped how you like. Be mindful of the character moving in other frames; you may want to check your other layers to make sure nothing important gets cropped off in another frame. Once the blue lines are where you want them, click the checkmark at the top right to finish the crop.
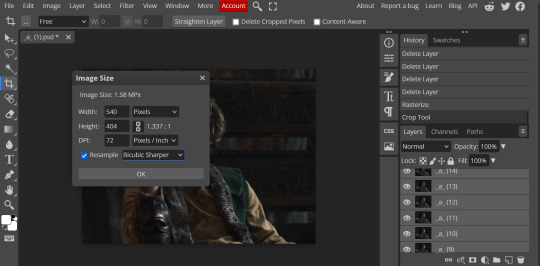
6. RESIZE:
Resize your gif so that it is 540 pixels wide. Go to Image > Image Size in the top menu. Make sure you choose "Bicubic Sharper" as the resample mode. Once this is done, you will see your image is tiny, so go to the Zoom tool (on the left menu, the magnifying glass near the bottom) and select Fit the Area at the top of the screen so you can see what you are doing.
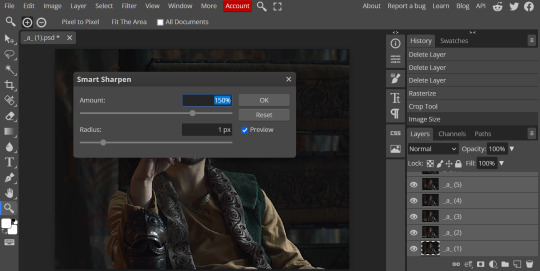
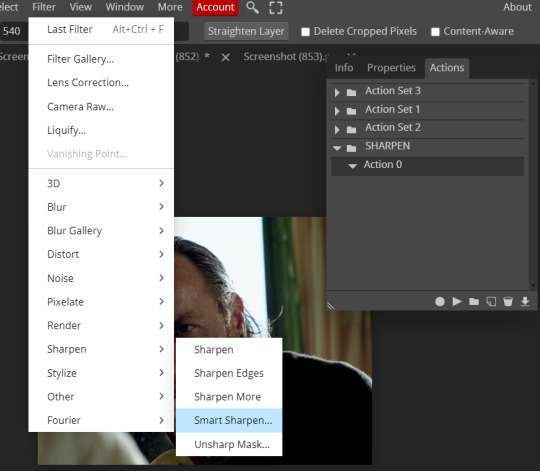
7. SHARPEN:
Next is sharpen. Select all your layers again (on the right), then go to the top menu: Filter > Sharpen > Smart Sharpen. The default settings here are for 150%, and that is good for most things.
8. ADJUSTMENTS
This is the tricky part. You now need to adjust the brightness, contrast, exposure, color balance, and saturation. This will vary from gif to gif how much to adjust these values. I will show how I adjusted this one and you can apply that to whatever gif you are making.
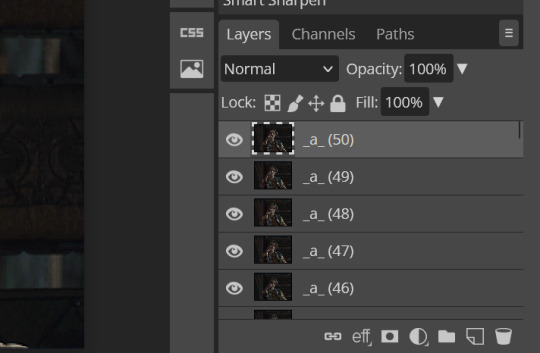
For starters, since this show is SO DARK, you will need to brighten it. There are many ways to do this, but I found the method that works best for me is adjusting the Levels.
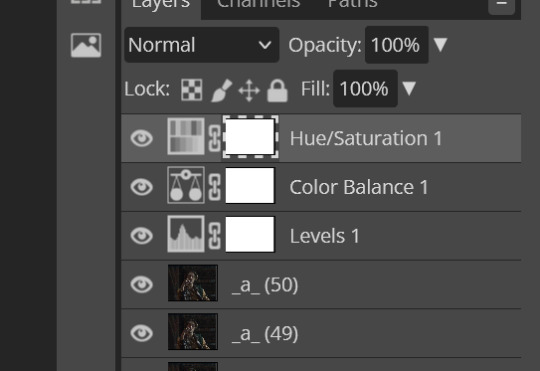
First off, in order to make adjustments, make sure you scroll all the way to the top of your Layers panel and make sure only the TOP LAYER is selected. Otherwise the adjustments will only be applied to whatever is BELOW the selected layer. You want all of them.
8a. ADJUST LEVELS
Next, go to Layer > New Adjustment Layer to pull up all your adjustments. For this first example we will use Levels, which is the second from the top.

You will see a histogram like this one:
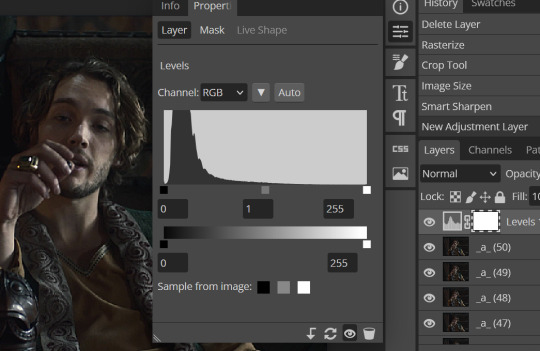
This is a lot of information about the image, but pay attention to where the curve starts and stops. On the left, you see a "0". That is your dark point. This image is slightly washed out so I need to move that adjustment to the right so that the little square is just below where the curve starts. The third number is "255" and this is your bright point. The images are very dark so most of the graph is shifted to the left (dark) so in order to brighten, move the third square (the white one) so that the second square (grey one) is just at the edge of where the curve drops off on the right.
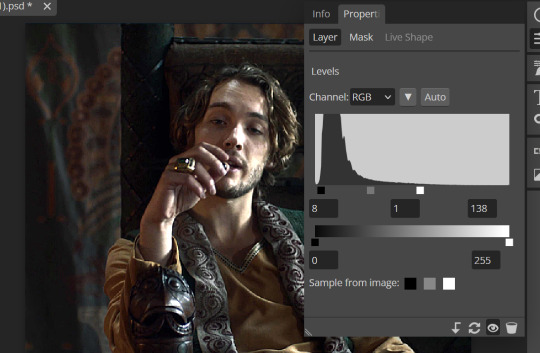
You can now see the numbers changed. Moving the first dark square will enhance your contrast, and moving the THIRD square will enhance your brightness. It is usually not necessary to move the second square, but you can experiment with this by moving things around and seeing how it affects your image. After this, it may be necessary to also increase the Exposure and Brightness if it is still not bright enough, but most of that can be done here.
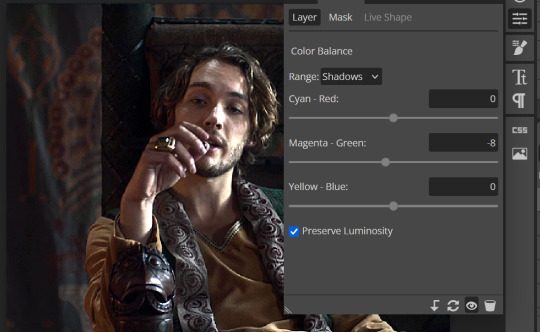
8b. ADJUST COLOR BALANCE
Again go to your Layer > New Adjustment Layer > Color Balance to get this tool. This is a neat one with A LOT of variables, so play around with it to get the colors to look how you want. A lot of the raw video tends to have a bluish or greenish cast to it, so you just move the sliders to get rid of the cast and make the colors look how they are SUPPOSED to.
In this case there is a very slight greenish cast to the pictures so I will adjust that slider to compensate. The Range (at the top) you can select Shadows, Midtones, or Highlights, depending on where the color cast is located. Usually I stick to Shadows but sometimes will use Midtones if the color cast is really bad. Make sure Preserve Luminosity is checked.
8c: ADJUST SATURATION
Layer > New Adjustment Layer > Hue/Saturation. This will brighten up your colors. This tool is VERY COOL in that you can select color families to selectively increase or decrease the saturation of. Under Range you can choose Master, which is all colors, or choose only Red, Yellow, Green, Cyan, Blue or Magenta. The slider at the very bottom (when a single color is selected) allows you to set the range of colors to. I chose Master and increased the saturation of all colors, but be careful as this can make skintones look VERY orange. So select other colors in the Range to adjust single colors only.
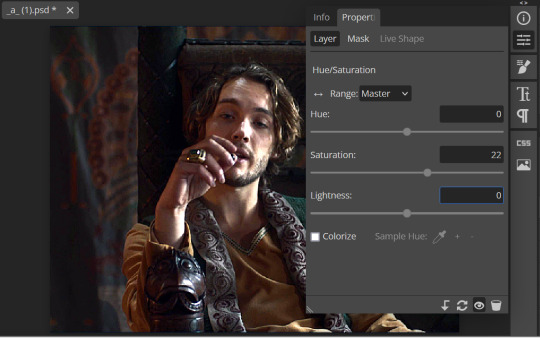
With this tool you can also change the HUE (which is changing the overall colors to a different color, like shifting all the reds to orange) and Lightness (which may or may not be necessary if you did the Levels correctly)
If you need to go back and change something in your adjustment layers, you can do so by clicking on the white box in the Layers section next to whatever you need to adjust.
There are many other Adjustment Layers you can play with, so have fun and experiment!
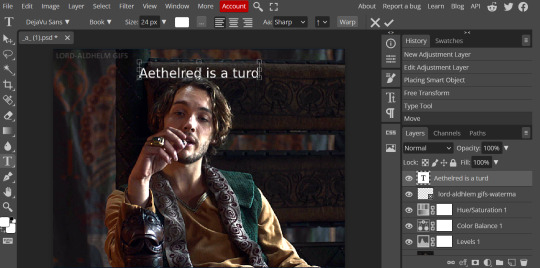
9. ADD YOUR WATERMARK AND TEXT
Next, you can add a watermark if you have a premade file, by dragging and dropping it on the image. Then move it around to where you want it, resize it if needed, and change the opacity if it is too bright. Make sure this layer is the TOP layer.
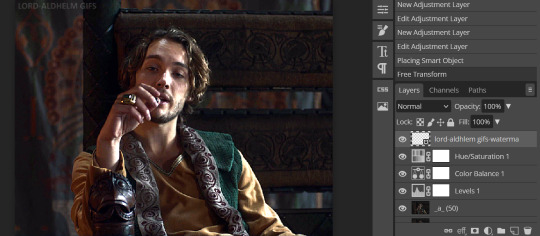
To add text (for subtitles or effects) simply click on the Text icon in the left menu (the T) and click anywhere on the image and start typing. You can change the font, color, size, and style in the menu on the top. Move the text around by using the Select tool (arrow on the left) Again make sure this is the TOP LAYER so that it will be present over the entire gif.
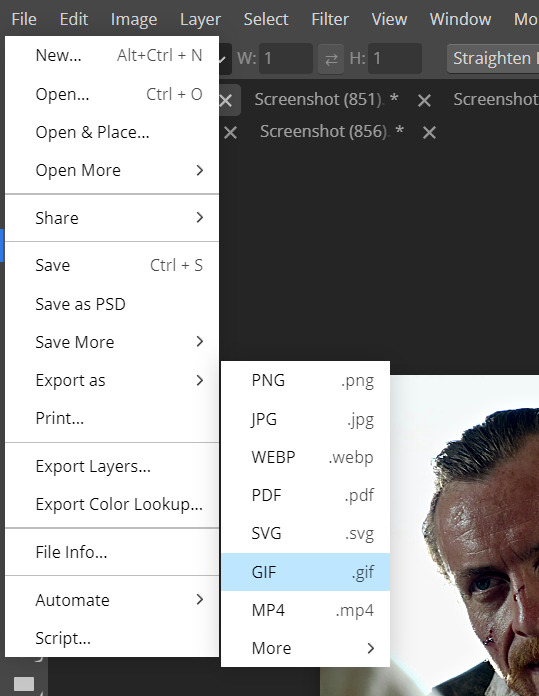
10: EXPORT YOUR GIF
File > Export as > GIF
A pop up dialog will appear and you can change some settings here if you want. I usually don't. Pay close attention to the filesize (at the bottom) and make sure it is under 10mb. Keep the quality at 100%. And most importantly MAKE SURE DITHER is checked! This will prevent compression artifacts from ruining your gif.
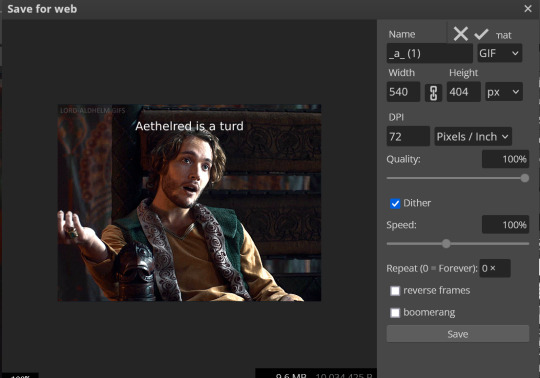
Save the file to your computer and VIOLA! Gif!
Have fun!
79 notes
·
View notes
Note
yes would love a tutorial please bc i struggle w coloring for the most part
ok SLAY! i promise coloring isnt as daunting as it may seem<3
i'll just walk u through the process of what i usually do!
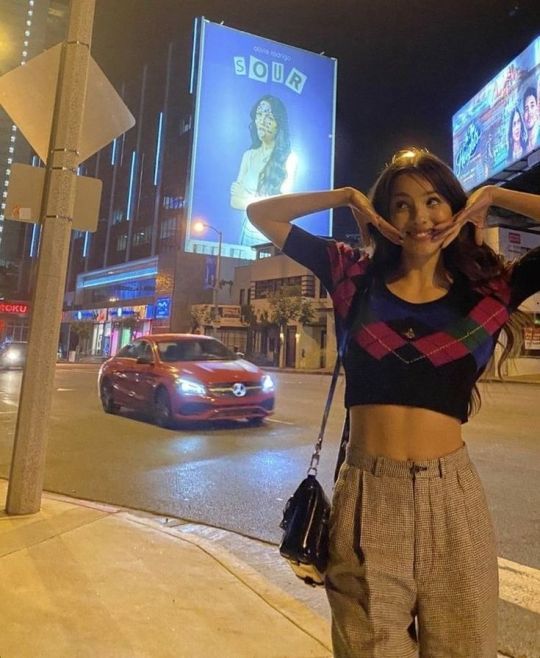
we're gonna be using this very cute pic of olivia rodrigo!

as of late, i always start with a levels layer!
i move the little white square to the left to brighten the highlights/pic as a whole (how far to the left depends on how dark ur original image is! bcuz this one was kinda dark, i moved it pretty far!)
i move the middle gray square to bring back depth that you lose when brightening an image, aka im increasing the contrast
i move the little black square to dark the shadows and darker parts of the pic!
with the levels layer, you're basically just changing the lighting of ur image!

next i used a curves layer to brighten the image even more! this is optional and i dont always do it, but i wanted to make things pop!

next i use the selective color (which changes only certain colors in an image, instead of the entire thing like you'd get with a hue/saturation layer) bcuz the picture is yellow as HELL
bcuz i was trying to make it less yellow, i went to the yellow tab, and moved the yellow slider! i moved the slider to the left to subtract it basically!

bcuz that didn't entirely remove the yellow tones, i did the same thing but only the "neutrals" tab, which effects the entire pictures color, not just a certain one

bcuz the blacks/dark tones now weren't as dark as i wanted, i then went to the blacks tab and increased the black!

lastly i just increased the vibrance to make the colors pop! (i usually do this after my levels and curves but i forgot and its all the same in the end fhhfh)
here's the original pic and the colored one side by side so u can see the differences!

let me know if this was unclear and if u have any more questions!! i hope this was at least a little bit helpful <3
11 notes
·
View notes
Photo


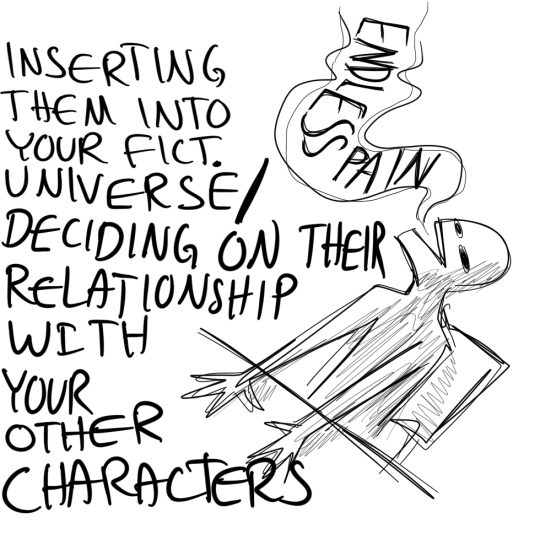
the suffering never ends
716K notes
·
View notes
Note
Hey so you're fucking disgusting!
according to most popular ao3 fics, characters say this to each other before they have sex. but as much as I’m flattered by the courting, I’m afraid I don’t fuck someone who looks like this

but good luck though! maybe the next person will be desperate enough to take you under their sheets ❤️
1K notes
·
View notes
Text
birthday prompts for loversss !
(feel free to usee<3 tag mee!! inspired by my b'day haha. plot twist is i am single :))
staying up to wish them at midnight
you bring them a cake, singing hbd, but all their attention is on you.
hugs you, tearing up, breaking down because nobody has done this for them ever
intimate b'day celebrations like it's just you and them and every whisper of hbd and well wishes are so comforting <3
cupcake b'day celebrations!
them hugging u from behind as they watch u make a wish
"what did u wish for?" u ask as a soft murmur and they say, "you. to never let u go."
i celebrated my bestie's b'day and she said to me,
^ "thank u for loving me every year and making me feel like i am being loved by someone,"
^ "knowing that, that someone is you, is what matters." (i won in LIFEE)
"how's my favorite b'day girl/boy doing?" :))
maybe it's their first time having their b'day being celebrated, :(
and all they can do is bury their face into ur neck and cry. the cake abandoned for a moment until they gain composure.
when they write u letters on ur b'day,
or give u thought-out gifts.
wiping cake from the corners of their lips
or alternatively just kissing it away, making them fluster. (uhm.. didn't happen on my bday, who's lyINGG-)
a quiet whisper of happy birthday,
tight hugs and lingering kisses throughout the day, and just feeling loved by the other person. feeling their emotions of gratitude to have u in their life!
telling them or writing to them, "It's your [age] birthday, and so [age] reasons why I love you." (eg: 20th, 19th and so on)
1K notes
·
View notes
Note
I have to ask how you do gifs for bg3!! Do you record your whole gameplay then splice the moments, or do you just have a hotkey to screen record and how do you edit and augh i have so many questions, i'd love a quick lil tutorial (if you want!!). I wanna do my tav justice :')
Hi hi! Sorry this has taken me a while to get back to! I'm very very new to gif making, like, literally started making them on Dec 31st to count in the New Year hahaha, however, I've am blessed with many, many GIF maker friends that have been helping me and some of them have made really good tutorials and others have shared some really good tutorials, which I shall link here because I am in no place to make one myself, not yet anyways! [I have not used all of these, however these have been shared among friends and if anyone is getting into giffing you may find them helpful!] Tutorials: @snug-gyu - Colouring Tutorial @quokki - Full giffing process - tutorial @seonghwasblr - Tutorial @hanjesungs - Colour Table Tutorial @scoupsy-remade - Tutorial @renjunniez - Gif tutorial & extra tips @ashleysolsen - Giffing Masterpost @woozis - Tutorial @kangyeosaang - How to pan gifs & how to fix grainy gifs @theedorksinlove - Tutorial @saw-x - Guide for beginners @brainwasheds - Sharpening Gifs @jjnxs - Gifs on Gifs
Also this video helped a lot, which I helped me understand it better more easily. Though I make all my gifs in photoshop. For capturing I record my footage through OBS and import it into DaVince Resolve where I cut up the sections I want to use, because I record a lot at once so it's easier for me that way since I know my way around editing videos and then bring my photo editing skills in after in Photoshop to enhance them. But you can also do this in Photopea which is basically a free photoshop and the video I linked also covers how to use this website! I also film all of my stuff using Otis' freecam mod! I hope this helps! ❤ [I will keep adding to this list as my friends recommend me more, I find the more resources and different ways things are explained sometimes the better!]
86 notes
·
View notes
Text
GIFMAKING TUTORIAL: PHOTOPEA (for Windows)

Screencapping
Gif Width/Size Limit/Ezgif
Loading Frames
Cropping and Resizing
Rasterize/Make Frames
Sharpening
Coloring (not detailed. Links to other tutorials included)
Exporting
Obligatory Mentions: @photopeablr ; @miwtual ; @benoitblanc ; @ashleysolsen Definitely check out these blogs for tips, tutorials and resources, they're a gold mine. Finally I recommend browsing the PHOTOPEA TUTORIAL / PHOTOPEA TUTORIAL GIF tags. DISCLAIMER: English is not my first language and I'm not an expert on what I'm going to discuss, so if anything's unclear feel free to drop another ask.
1. SCREENCAPPING -> PotPlayer (the one I use) or MVP or KMPlayer
INSTALL PotPlayer (tutorial)
Play your movie/episode and press Ctrl + G. The Consecutive Image Capturer window will pop up. Click Start to capture consecutive frames, Stop when you got what you needed.
Where it says "Image Type -> Format" I recommend picking PNG, for higher quality screencaps.
To access the folder where the screencaps are stored, type %appdata% in windows search, open the PotPlayerMini64 folder (or 32, depending on your system) and then the Capture folder. That's where you'll find your screencaps.

Admittedly MVP is a lot faster but I prefer Potplayer because it generates (at least in my case) higher quality screencaps. MVP kind of alters the hue and it made it harder for me to color my gifs. Still, if you're interested in how to use it, I recommend this tutorial.
As for KMPlayer, every tutorial out there is outdated and I couldn't figure out the new version of the software.
2. GIF WIDTH/HEIGHT, SIZE LIMIT, EZGIF OPTMIZER
At this point you should already know how big your gifs are going to be. Remember the ideal gif width(s) on tumblr are 540 px / 268 px / 177 px. These specific numbers take into account the 4 px space between the gifs. No restrictions on height. Here are some examples:

You can play around with the height (177x400, 177x540, 268x200, 268x268, 268x350, 268x400, 540x440, 540x500, 540x540 etc) but if you go over the 10 MB limit you'll either have to make your gifs smaller/delete some frames.
OR you can go on ezgif and optimize your gif, which is usually what I do. The quality might suffer a little, but I'm not really (that) obsessed with how crispy my gifs look, or I'd download photoshop.

Depending on the gif size, you can decrease the compression level. I've never had to go over 35. It's better to start at 5 (minimum) and then go from there until you reach your desired ( <10mb) gif size. Now that I think about it I should have included this passage at the end of the tutorial, I guess I'll just mention it again.
3. LOAD YOUR FRAMES
File -> Open... -> Pick one of your screencaps. The first one, the last one, a random one. Doesn't matter. That's your Background.
File -> Open & Place -> Select all the frames (including the one you already loaded in the previous passage) you need for your gif and load them.
(I recommend creating a specific folder for the screencaps of each gif you're going to make.)
WARNING: When you Place your screencaps make sure the Crop tool is NOT selected, especially if you've already used it and the width/height values have been entered. It will mess things up - I don't know why, could be a bug.
You can either select them all with Ctrl+A or with the method I explained in the ask: "when you want to select more than one frame or all frames at once select the first one, then scroll to the bottom and, while pressing Shift, select the last one. this way ALL your frames will be selected".
WARNING: Depending on how fast your computer is / on your RAM, this process may take a while. My old computer was old and slow af, while my new one can load even a 100 frames relatively fast, all things considered. Even so, I recommend ALWAYS saving your work before loading new frames for a new gif, because photopea might crash unexpectedly. Just save your work as often as you can, even while coloring or before exporting. Trust me, I speak from experience.
Now you can go ahead and delete the Background at the bottom, you won't need it anymore.
4. CROPPING AND RESIZING
Right now your screencaps are still smart objects. Before rasterizing and converting to frames, you need to crop your gif.
Technically you can rasterize/convert to frames and then crop, BUT if you do it in that order photopea will automatically delete the cropped pixels, even if you don't select the "Delete Cropped Pixels" Option. Might be another bug, unclear. Basically, if you crop your gif and then realize you cropped a little too much to the left or the right, you can go ahead, select the Move Tool (shortcut: V) and, after selecting ALL YOUR FRAMES, move them around on your canvas until you are satisfied. You won't be able to do this if you rasterize first and then crop, the excess pixels will be deleted. I don't know why, I found out by accident lol.
CROPPING
(Cropped pixels: the gray/opaque area outside of the selected area. That area disappears once you press enter and crop, but the pixels are retained, so you can move the frames around and reposition them as you like. In this case I could move the frames to the left and include Silver's figure [curly guy in the foreground] in the crop)
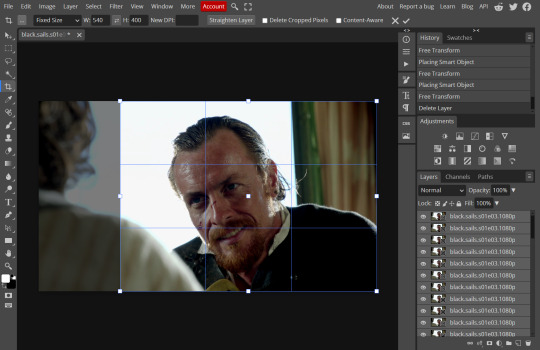
After deleting the Background, you will need to select all your frames (using the Shift key), use the C shortcut on your keyboard to choose the Crop tool. Or you can click on it, whatever's more convenient. Once you do that, a dropdown menu is going to appear. You need to select the "FIXED SIZE" option, as shown in the following screencap.
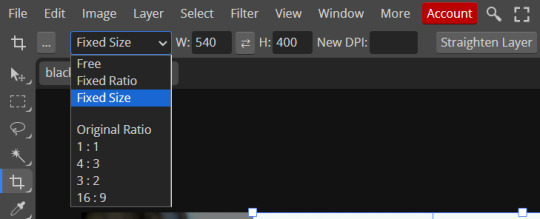
Once you do that, you can type in your desired width and height. Do not immediately press enter.

Your work area should now look like this. Now you can click on one of the white squares and enlarge the selected area until the edges are lined up. You can then move it around until it covers the area you wish to gif.
WARNING: to move the big rectangle around, you're gonna have to click on a random point of the work area, PREFERABLY not to close to the rectangle itself, or you might accidentally rotate it.

See? When your cursor is close to the selected area it turns into this rotating tool. Move it away until it reverts to your usual cursor, then you can start moving the rectangle. Press Enter when you're satisfied with the area you selected.
RESIZE
This isn't always necessary (pretty much never in my case) - and it's a passage I often forget myself - but it's mentioned in most of the tutorials I came across over the years, so I'd be remiss if I didn't include it in mine. After cropping, you'll want to resize your image.
IMAGE -> Image Size...

This window will pop up. Now, should the values in the Width and Height space be anything other than 540 and 400 (or the values you entered yourself, whatever they might be) you need to correct that. They've always been correct in my case, but again. Had to mention it.
5. RASTERIZE & MAKE FRAMES
Now that your screencaps are cropped, you can go ahead and convert them.
LAYER -> Rasterize (if you skip this passage you won't be able to Sharpen (or use any filter) on your frames at once. You'll have to Sharpen your frames one by one.
Photopea doesn't feature a timeline and it's not a video editor, which makes this passage crucial. When you select all your smart objects and try to apply a filter, the filter will only by applied to ONE frame. Once you rasterize your smart objects and make them into frames, you can select them all and sharpen them at once. Unfortunately this also means that you won't be able to - I don't know how to explain this properly so bear with me - use all smart filters/use them in the same way a photoshop user can. For example, you can sharpen / remove noise / add noise / unsharp mask... but you can't act on those filters in the same way a photoshop user can. When you work on smart objects you can change the blend mode - which is critical if you decide to use a filter like High Pass. If you simply apply a high pass filter on photopea you won't be able to change the blend mode and your gif will look like this (following screencaps). Or rather, you will be able to change the blend mode by clicking on the little wheel next to "High pass" (circled in green in the 2nd screencap), but you'll have to apply the filter to each frame manually, one by one.

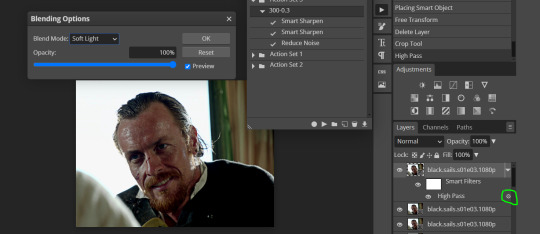
Then you can rasterize/make into frames, but it's extremely time consuming. I did it once or twice when I first started making gifs and it got old pretty soon haha.
Layer -> Animation -> Make frames. This passage will add "_a_" at the beginning of all your frames and it's what allows you to make a (moving) gif. As I said in the ask, if you skip this passage your gif will not move.
6. SHARPENING
Some people prefer to color first and sharpen later, but I found that sharpening filters (more or less) dramatically alter the aspect of your gif and already brighten it a bit (depending on your settings) and you may end up with an excessively bright gif.
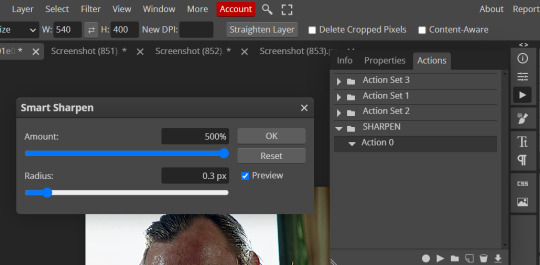
Now, sharpening settings are not necessarily set in stone. The most popular ones are 500/0.4 + 10/10, which I use sometimes. But you may also need to take into account the quality of the files you're working with + the specific tv show you're giffing. I've been using different settings for pretty much every tv show I gif, especially in the last couple months. Some examples:

followed by
OR
AMOUNT: 500% RADIUS 0.3px followed by AMOUNT: 20% (or 10%) RADIUS 10px
You'll just need to experiment and see what works best for your gifs.
Some gifmakers use the UNSHARP MASK filter as well (I think it's pretty popular among photopea users?) but it makes my gifs look extra grainy, makes the borders look super bright and it clashes with my coloring method(s), so I use it rarely and with very moderate settings. Something like this:

Again, depends on the gif and on what you like. I've seen it used with great results by other gifmakers!
REDUCE NOISE
Sometimes - and this is especially the case for dark scenes - your gif may look excessively grainy, depending on how bright you want to make it. Reducing noise can help. Keep it mind, it can also make it worse and mess up the quality. BUT it also reduces the size of your gif. Obviously, the higher the settings, the more quality will suffer.
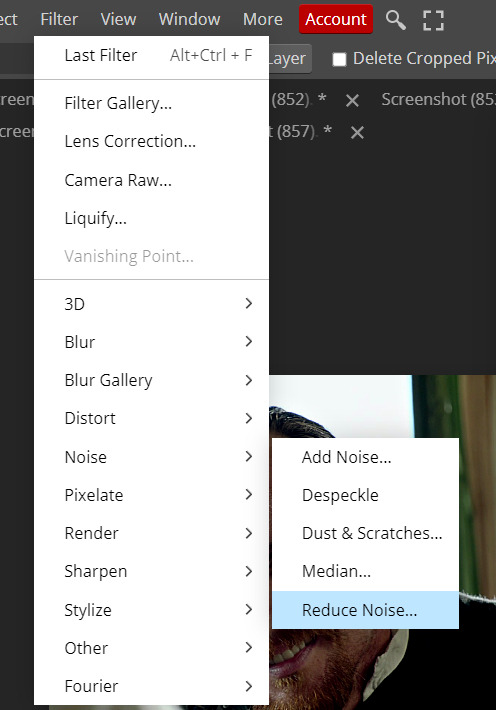

These are my standard settings (either 2/70% or 2/80%). It's almost imperceptible, but it helps with some of the trickier scenes.
ADDING NOISE
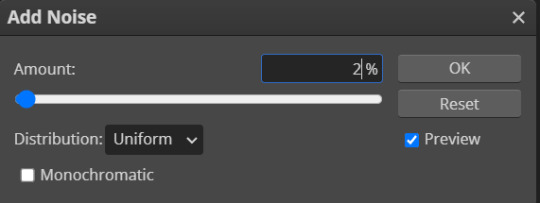
Adding noise (1% or 2% max) can sometimes help with quality (or make it worse, just like reduce noise) but it will make your gif so so so much bigger, and occasionally damage the frames, which means you won't be able to load your gif on tumblr, so I rarely use it.
You'll also want to create ACTIONS which will allow you to sharpen your gifs much faster.
HOW TO CREATE AN ACTION ON PHOTOPEA
The Action Button (shaped like a Play button as you can see in the following screencaps) may not be there if you're using photopea for the first time. If that's the case click on the magnifiying glass next to "Account" (in red) and type "actions". Press Enter and the button should immediately show up.
Once you do that, click on the Folder (circled in yellow)

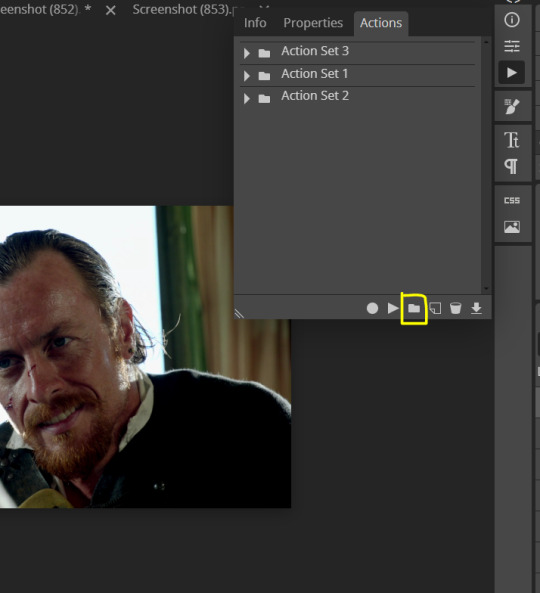
and rename it however you like.

now click on New Action (circled in red). now you can press the Recording button (circled in green)

Now
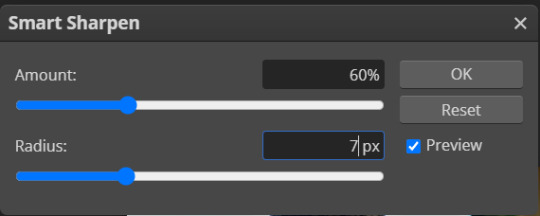
FILTERS -> Smart Sharpen
and you can enter your values. Then you repeat this passage (WITHOUT pressing rec, WITHOUT pressing new action or anything else, you just open the smart shapen window again) and, if you want, you can sharpen your gif some more (10%, 10px, or anything you want.)
Maybe, before creating an action, experiment with the settings first and see what works best.
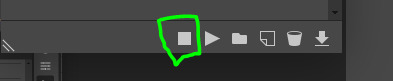
When you're satisfied, you can PRESS STOP (it's the rec button, which is now a square) and you can DOWNLOAD your action (downwards facing arrow, the last button next to the bin. Sorry, forgot to circle it) .
You need to download your action and then upload it on your photopea. When you do, a window will pop up and photopea will ask you whether you wish to load the action every time you open the program. You choose "Okay" and the action will be loaded in the storage.
When you want to sharpen your gif, you select all your frames, then you click on the Play button, and select the Action, NOT the folder, or it won't work.

Actions can also be created to more rapidly crop and convert your frames, but it doesn't always work on photopea (for me at least). The process is exactly the same, except once you start recording you 1) crop your gif as explained in step 4, 2) convert into frames. Then you stop the recording and download the action and upload it. This won't work for the Rasterize step by the way. Just the Animation -> Make Frame step.
7. COLORING
Now you can color your gif. I won't include a coloring tutorial simply because I use a different method for every tv show I gif for. You normally want to begin with a brightness or a curve layer, but sometimes I start with a Channel Mixer layer to immediately get rid of yellow/green filters (there's a tutorial for this particular tool which you will find in the list I mention in the link below)
[Plus I'm not really an authority on this matter as my method is generally... fuck around and find out. Two years of coloring and I still have no idea what I'm doing. 70% of the time.]
Simple Gif Coloring for Beginners -> very detailed + it includes a pretty handy list of tutorials at the bottom.
8. EXPORTING
Now you can export your gif. Some gifmakers export their (sharpened) gifs BEFORE coloring and then load the gifs on photopea to color them. I'm not sure it makes any difference.
FILE -> EXPORT AS -> GIF
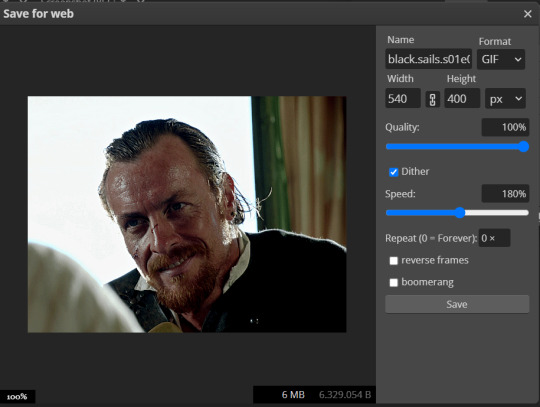
(not colored, just sharpened)
As you can see, unlike photoshop the exporting settings are pretty thread bare. The only option available is dither - it sometimes help with color banding - which, and I'm quoting from google for maximum clarity:
"refers to the method of simulating colors not available in the color display system of your computer. A higher dithering percentage creates the appearance of more colors and more detail in an image, but can also increase the file size."
SPEED
When you export your gif, it will play at a very decreased speed (100%). I usually set it at 180/190%, but as for every other tool, you might want to play around a little bit.
GIF SIZE/EZGIF OPTIMIZER (See Step 2)
And that's it.
P.S.: worth repeating
Save your work as often as you can, even while coloring or before exporting.
509 notes
·
View notes
Text

✨ Simple Gif Colouring for Beginners ✨
I wrote up my basic gif colouring process for a friend recently, but a couple of people here mentioned they'd also find it helpful! so, as requested, this is a beginner-friendly walkthrough of the way I colour my gifs :) it's aimed at brand new gif makers with no prior experience with photoshop or photo editing.
when I first started gif making I found colouring and photoshop in general suuuper daunting, so I've tried to simplify everything here as much as possible. hopefully this will be relatively easy to follow and not too intimidating!
a couple of things to begin with:
I'm only talking about colouring here - this is not a full gif making tutorial. I've linked to some of my favourites of those here!
I personally like to make bright, 'clean' looking gifs with vibrant but natural colours, so that is the style of colouring this tutorial is geared towards. most of gif colouring is subjective and about personal taste - the only thing that I'd say is possible to get wrong is skin tones, which I talk about a lot in this guide.
as I mostly gif Thai dramas, most of the advice is geared towards colouring for East Asian/South East Asian skin tones - but the techniques should be fairly universally applicable (and here are some tutorials that talk about gif colouring for other skin tones).
I'm not an expert! I'm not claiming this is the best or the only way to colour gifs - it's just how I do it.
this post is very image-heavy. if the images aren't loading (or the gifs are running slowly or cutting/looping weirdly), then try viewing the post in its own tab (rather than on the your dash or someone's blog) and refreshing the page.
okay, full walkthrough beneath the cut!
contents:
1. intro a. natural gif colouring goals b. very very basic colour theory 2. super simple colouring (the essentials) a. curves b. selective colour (and skin tone correction) c. hue/saturation d. saving and reusing colouring e. another simple colouring example 3. other adjustment layers a. brightness/contrast b. levels c. vibrance d. colour balance e. channel mixer 4. troubleshooting a. curves b. saturation 5. fin!
1. intro
the colouring part of gif making can be super overwhelming, especially if (like me when I first started!) you're completely new to photoshop and/or have no experience with colour theory or photo/video editing.
if you're opening photoshop and making gifs for the first time, I highly recommend getting used to making a few basic, uncoloured gifs to begin with. just to practice, rather than post anywhere (though you can always come back and colour them later if you want) - but it'll make the rest of the process much easier if you're already beginning to get used to working in timeline mode of photoshop. give yourself a bit of time to practice and get a feel for things like how many frames you tend to like in a gif, where you like to crop them for the best loop, what kind of aspect ratio you like etc* - so that you're not trying to navigate all of that for the first time on top of everything else!
* frames: for me between 60-90 frames is ideal, but 40-120 frames is the absolute min-max I'd personally use in a normal gifset loops: for the smoothest loops, try to avoid cutting someone off mid-movement or mid-word if possible. aspect ratio: for full-size (540px) gifs, I tend to go for either 8:5 (slightly 'skinnier' gifs), 7:5, or 5:4 (particularly big, thick gifs lmao)
✨ natural gif colouring goals
part of what can be so daunting about starting gif making is not knowing where to start or what you want to achieve. this is definitely something that gets easier with practice - the more gifs you make, the more you'll get a feel for what kind of look you like and the more instinctively you'll know how to get there. it also helps to see if any gif makers you like have made "before and after colouring" posts - these can help with getting a sense of the kinds of changes made through gif colouring. here's one I made!
in general, I like to make my gifs bright and 'clean' looking, with vibrant but natural colours. these are the things I'm usually hoping to achieve with colouring:
brighten dark scenes
remove muddy, yellowish lighting or filters
saturate colours
correct any skin lightening filters or overexposure
make lighting and colours as consistent as possible between gifs within a single gifset, especially gifsets featuring gifs from multiple scenes/episodes/videos
this guide is focusing on natural colouring, but of course there are many cool ways to make stylised/unnaturally coloured gifs. imo you'll need to master these basics first, but if you want to learn how to do things like change the background colour of gifs or use gradients or other cool effects, then @usergif's resource directory has loads of super helpful tutorials!
✨ very very basic colour theory
[disclaimer! I don't know shit about fuck. I do not study light or art. this is just an explanation that makes sense to me exclusively for the purposes of gif making.]
the primary colours for light/digital screens are red, blue, and green. having all three colours in equal measures neutralises them (represented by the white section in the middle of the diagram).

so to neutralise a colour within a gif, you need to add more of the colour(s) that are lacking.
in practice this usually means: the scene you want to gif is very yellow! yellow is made of red and green light, so to neutralise it you need to add more blue into your gif.
it can also mean the reverse: if you desaturate the yellow tones in a gif, it will look much more blue.
looking at the colour balance sliders on photoshop can make it easier to visualise:

so making a gif more red also means making it less cyan.
removing green from a gif means adding magenta.
taking yellow out of a gif will make it more blue.
tl;dr:
neutralise yellows by adding blue (and vice versa)
neutralise reds by adding cyan (and vice versa)
neutralise green by adding magenta (and vice versa)
2. super simple colouring (the essentials)
starting with a nice sharpened gif in photoshop in timeline mode. (these are the sharpening settings I use!)
some scenes are much harder to colour than others - it helps to start out practising with scenes that are bright/well-lit and that don't have harsh unnaturally coloured lights/filters on. scenes with a lot of brown/orange also tend to be harder.
I usually save a base copy of my gif before I start colouring just in case I end up hating it, or find out later that it doesn't quite fit right into a set and need to redo it etc.
so here is my base gif!

it's an okay gif, but it has a bit of a yellow tint to it that I want to reduce.
colouring is easiest to do in adjustment layers, which can be found under layer -> new adjustment layer - or for me they are here:

there are lots of different types of adjustment layers that do lots of different things - but for me the absolute essentials for colouring are curves, selective colour, and hue/saturation.
I also use brightness/contrast, levels, exposure, vibrance, colour balance, and channel mixer sometimes, depending on the gif - but I use curves, selective colour, and hue/saturation on every single gif.

✨ curves layer
the first thing I always do is a curves layer. when you first open one it will look like this:

first I usually click the ‘auto’ button, just to see what happens. sometimes it makes a big difference (it usually brightens the gif a lot) - but on this gif it didn’t do much.
if it had made the gif look nicer then I would have kept it and added a second curves layer on top to do the rest of these steps.
the next step is selecting the white and black points with the little eyedropper tools.
the bottom eyedropper lets you pick a white point for the gif. click somewhere super light on the gif to see what happens - for this gif, I clicked on the lampshade on the left. if it looks weird, I just undo it and try somewhere else - it usually takes a few goes to find something that looks good.
here's what that did to the gif:

then I pick the top eyedropper and use it to pick a black point by clicking somewhere really dark, again playing around until I find a black point that looks good.
here's what the gif looks like after picking the white and black points:

this can take some experimenting, but you can make super easy drastic changes to your gif just with this. in this case, the curves layer took out a lot of that yellowy tint.
and this is what the curves graph looks like now:

you can click and drag those lines to make further changes if you want - I usually leave them alone though. the colours of the lines indicate which colours have been changed in the gif - for example, you can see from that steep blue line on the graph that blue has been added to neutralise those yellows.
next I usually do another curves layer and just press the ‘auto’ button again to see what happens. usually it brightens the gif a bit more, which I like.
‼️if nothing is working: usually with a bit of fucking about a curves layer works well - but sometimes you can’t find a good white and black point anywhere, and instead your gif turns wacky colours and nothing looks good. this happens more often with very heavily colour tinted scenes :( the troubleshooting section at the end goes over some options, including starting with a levels layer instead.
✨ selective colour (and skin tone correction)
skin tones are made up of a mixture of yellow and red.
removing yellow (or adding blue or red) to a gif will make the skin-tones too red - and removing red (or adding cyan or yellow) to a gif will make the skin-tones too yellow.
adding blue to this gif with the curves layer took out the yellowy tint, which I wanted - but it also took the yellows out of Kim's skin tone, which I don’t want. so I need to put yellow back into the skin tones specifically - without putting it back into the rest of the gif.
selective colour layers let you select an individual colour and adjust the levels of other colours within that colour. you can change how yellow the green shades are, or how much cyan is in the blues, for example.
I need to add yellow back into the red tones to correct the skin tones on this gif. this is the case for most gifs in my experience - the vast majority of the time, unless a scene is very heavily tinted in another colour, a curves layer will add blue/remove yellow.
in the 'colors' dropdown, select the 'reds' section and drag the 'yellow' slider higher - this will add more yellow into just the red shades within the gif.

the amount of yellow you need to add back into the reds depends on how much yellow was taken out of the gif initially - I just play around with the slider until it looks right. if you're not sure, it helps to have some neutrally-coloured (not white-washed!) reference photos of the people in your gif to compare to.
here's the result. Kim's skin is a lot less pink toned and much more natural looking:

✨ hue/saturation
this adjustment layer lets you adjust the hue and saturation of the gif as a whole, and also of each colour individually.

I don't use the hue or lightness sliders unless I'm trying to do something more complicated with the colouring.
clicking the dropdown menu that says 'master' lets you edit the saturation of each colour individually. this is useful if your gif is still super tinted in one colour.
I thought the yellows on this gif were still slightly too bright, so I switched to the yellow channel and desaturated them slightly. (remember if you do this then you need to go back to selective colour and add more yellow into the red skin tones to balance out the desaturation!)
then I increased the 'master' saturation of all the colours to +5:
I usually find the right amount of saturation is somewhere between +5 and +12, but it depends on the gif.
‼️if the gif feels undersaturated, but the saturation slider isn't helping/is making the colours worse, try a vibrance layer instead.
done!

✨ saving and reusing colouring
you can copy and paste adjustment layers between gifs to make your colouring even across each of your gifs for one scene - so if you're making a set of multiple gifs of the same scene, or you think you might want to gif the same scene again in the future, you can save it as a psd so you can reuse the colouring again later.
each gif's colouring will then still need tweaking - different cameras/angles/shots of the same scene can still start out with slightly different colouring.
I recommend uploading the gifs as a draft post on tumblr so you can see what they all look like next to each other and catch any inconsistencies.
✨ another one! (speedrun!)

HI KEN!
the white point for the curves layer was in the window behind them.
the curves layer removes the muddy yellow tint, but again it makes their skin tones (especially Ken's) very red toned, which is adjusted by the selective colour layer.
3. other adjustment layers
imo many many gifs can be coloured really nicely with just those three adjustment layers, but some need different adjustments.
✨ brightness/contrast

pretty self explanatory!
I personally usually avoid using the 'brightness' slider because I rarely like the effect - I only tend to use the 'contrast' one.
the 'auto' button is sometimes useful though, especially if you’re struggling with the curves layer.
✨ levels

levels alters the white and black points of the gif, like curves - but unlike curves it doesn't also alter other colours.
use the sliders beneath the graph to alter how dark/light the gif is. you can slide the black slider further to the right to make the blacks darker, and the white slider to the left to make the whites lighter.
levels is a good place to start if your curves layer isn't working.
(I'm going to hit the image limit for this post lol so here are some screenshots of a table I made to demonstrate this rather than actual gifs. sorry!)


on both sides, I dragged the sliders up to where the big jumps are on the graph - this is usually a good place to start!
✨ vibrance
vibrance... makes the colours more vibrant. it's more subtle than saturation.
it's really helpful for gifs that feel grey. sometimes adjusting saturation just makes the greys kind of weirdly tinted, but a vibrance layer can fix that.

vibrance is much more subtle!
✨ colour balance

colour balance affects the overall balance of colours within a gif.
it's good for scenes with heavy tints.
I tend to stick to the 'midtones' dropdown, but you can also alter the colour balance within the shadows and highlights if you want.


✨ channel mixer
I avoided channel mixer for such a long time because it scared me. but it's great for scenes that are very heavily tinted in one colour.
basically, it works with the levels of red, green, and blue within a gif. you select an output colour and then play around with the levels of the colour you selected within each other colour.
kind of the reverse of selective colour?

so in the 'blue' channel, the levels of blue are at 100%, and the levels of red and green are at 0% - but you can impact how much blue is in the reds and greens and blues.
this tutorial explains it well - but imo the best way to get to grips with channel mixer is just to play around with it a bit (sorry)
(when I made this guide for my friend, I also made a slightly more complicated gif colouring walk-through that included using channel mixer. there isn't space to include it within this post, but if anyone is interested I could always upload it as an 'intermediate' gif colouring tutorial - lmk!)
4. troubleshooting
‼️curves
usually with a bit of fucking about a curves layer works well - but sometimes you can’t find a good white and black point anywhere, and instead your gif turns wacky colours and nothing looks good. this happens more often with very heavily colour tinted scenes :(
for example, with this base gif:

using many of the brightest points as a white point turn it wacky colours, like this:

yikes :(
some options for these cases:
try brightening the gif first with the 'auto' button on the curves layer or with a levels layer. having a brighter gif to start with can give you better options for picking a white point.
try finding an alternate, whiter/brighter white point. look for places the light reflects - on this gif, using the light on Porsche's cheekbone works well as the white point. it also helps to find places that would be white if the scene wasn't tinted - the lightest part of a white shirt is often a good place to start, for example.
skip the curves layer, and instead use a levels layer to alter your white/black points, and colour balance or channel mixer to balance the colours.
‼️over/undersaturation
if your gif (especially the skintones) is looking a little washed out or lifeless, it might be undersaturated. boost that saturation - or if that's not working, try a vibrance layer.
oversaturation is often easiest to spot in the mouths and ears of any people in a gif. if the mouths are looking unnaturally, vibrantly red, then you've gone too far with the saturation.
5. fin!
and done! I hope this was coherent helpful to somebody.
if there's anything that I've missed or that doesn't make sense pls feel free to shoot me an ask or a message and I'll do my best to help! I've also collated a bunch of additional reading/resources below.
happy gifmaking 🥰
✨ some links!
photoshop basics by @selenapastel
gifmaking for beginners by @hayaosmiyazaki
gifmaking guide for beginners by @saw-x
dreamy's gif tutorial by @scoupsy-remade (includes instructions on how to blur out burned-on subtitles or annoying video graphics)
beginner's guide to channel mixer by @aubrey-plaza
how to fix orange-washed characters by aubrey-plaza
colour correcting and fixing dark scenes by @kylos
does resampling matter? by usergif
how to put multiple gifs on one canvas by @fictionalheroine
watermarking using actions by @wonwooridul
resource directory by @usergif
921 notes
·
View notes
Text
PHOTOPEA QUALITY ACTION SET by @loviestudio
This action set was made in Photopea, and it will work better on it. (The set works on Photoshop as well, but with tiny differences!)
CONTENT
1 Action file (ATN) with the set, containing four actions: 3 variations of the effect (light, medium and strong), and 1 sharpen action.
TERMS
Before/after preview here!
Like and/or reblog to help a creator.
Don’t repost, re-upload or put it on packs and/or google drive. Don’t claim my resources as your own.
Don’t use my resources as a base or copy them.
Credits are not mandatory, although I’d love to see your edits!
My resources are free for personal/non-commercial use only. For commercial use, you must pay for the download. If you paid for the download, you are authorized to use it commercially. Reach out to me for more info or if you have questions about my resources license.
Follow me for more resources! ♡
This is a free resource, but you can buy it with points on DeviantArt to help out a creator or download it for free on Ko-Fi. Thank you!
154 notes
·
View notes
Text

How to add a psd in photopea. Once I make a new PSD coloring I will do a tutorial on how to edit my colorings to fit your muses needs / etc. This is pretty much the same for PHOTOSHOP ( TUTORIAL FOR THAT HERE ) but I made one for photopea as well.
Keep reading
85 notes
·
View notes
Text
6 soft colorings (a photoshop pack)
This is a repost of a resource I shared on my rp blog almost a year ago. This pack contains 6 gentle colorings that work on most skin tones with minimal risk of whitewashing.
Do not repost, redistribute or claim as your own ! Other than that, you do not have to credit me every time you use this coloring. Likes and reblogs are appreciated !
This is a FREE RESOURCE If you decide to buy it or donate via my Ko-fi, I thank you from the bottom of my heart for supporting me ♡
DOWNLOAD HERE.
⚠️ DISCLAIMER ; A coloring is not a magical potion, if you use it over a whitewashed or extremely satured/desaturated picture, the coloring will not work. It is vital that you adjust the layers I've marked on the file to preserve the colors.
316 notes
·
View notes
Text

#137 “ CHILLED ” by jessource.
an original and free psd. if using please like / reblog and don’t forget to leave credit somewhere visible.
don’t redistribute, steal or claim as your own.
any issues, don’t hesitate to contact me.
[ DOWNLOAD FREE FROM PAYHIP ]
37 notes
·
View notes
Text

☆ ZERO'S FREE PSD ARCHIVE.
pay what you can. download.
HELLOOOO FREE PSD PACK TIME!!! this pack has 50+ archived, current, and future psd colorings, all for free, all in one place. one link, and you have access forever to old and new psd's. this pack is constantly being updated! for free, or donation. credit is required, don't use in paid commissions, redistribute/pass off as your own. edit as you wish.
↪ if you like what i do and want to support me, please consider joining my membership tier for only $5/month, or buy me a ko-fi!
290 notes
·
View notes
Text

☆ ANGEL.
pay what you can. download.
ANGEL keeps all the color dynamics + values while creating a red and blue palette, with pops of glowy highlights. credit is required, don't use in paid commissions, redistribute/pass off as your own. edit as you wish.

129 notes
·
View notes