
Progress and development of my art skills, graphics design, animation and many more!
Don't wanna be here? Send us removal request.
Statistics
We looked inside some of the posts by expandabro and here's what we found interesting.
Average Info
Notes Per Post
0
Likes Per Post
0
Reblog Per Post
0
Reply Per Post
0
Time Between Posts
6 days ago
Number of Posts By Type
Photo
2
Video
7
Text
8
Last Seen Tumblr Blogs


Fun Fact
Tumblr was named as a finalist in Lead411’s New York City Hot 125 in Aug 2010.
Photo


This is the armature I made which was made with a wire foundation so it is flexible and used aluminium foil to add a bit more of mass and mesh to shape the armature similar to a hand. I then added a polymer clay to add further details on the hand. Lastly, added a glove to make it look more like a hand. I really enjoyed making this as it looks very realistic and it is fun to make different gestures with this hand
0 notes
Video
tumblr


This is out smudge and click and behind the scene. Personally I had a lot of fun working with different materials
0 notes
Video
tumblr
This is the original Stop motion animation without the keying done in After effects
0 notes
Video
tumblr


this is the cutout animation that was done with team effort. We decided to follow the pirate theme and also pick a nursery rhyme called “The Wellerman for kids- A Twinkl Sea Shanty!” To prepare for this animation we had to cutout several character which fit the theme of pirates and other assets like ships, water, wind, thunder and rain. Then with the help of dopesheet I was able to create a lipsync for the pirate to speak. After recording we decided to compile all the images together and add the music in the background and timed it so it fits with the music and it is in sync
0 notes
Video
tumblr
This is my pixilation animation and I made this animation using an app called Stop Motion Studio. In order to make this animation I needed a Tripod to hold my phone camera and take pictures which is later compiled into an animation. Similarly, I’ve also taken picture of the bottle as the substance inside of it was being consumed which was then reversed so it looked like the bottle has been refilled. I made the animation in 3 section, the first part was me walking to the bottle and drinking it. Second part is the bottle refilling and lastly its the end title.
I also decided to add some sound to the animation to make it feel more alive. Overall, I am really happy with the final product
0 notes
Text

these are some development work i made for the 3D house I made. This shows many ideas which I had in mind and ultimately decided to go with the top left design
0 notes
Photo


This is my 3D house which I made in Blender. I am happy with the look of the final product but it could’ve been better in my opinion. I decided to go with a winter theme so I decided to add snow and it is on the ground and the top of the house. I was struggling a bit to make the snow feel more realistic. To overcome it I selected the top faces of the roof and then decided to add the snow using a modifier. Doing so you see a layer of snow on the roof of the building. I also added some trees next to the house because there was too much negative space. To make the surrounding and the atmosphere look more fitting with the snow theme I added a fog which was done by using volumetric scattering and lowering the density. Finally to make all of the objects and the theme come together I decided to add a moon in the background with a light source and emission
0 notes
Video
tumblr


This is the stop motion work that was made with group effort, I really like the outcome of the final product, I did the compositing and the sfx for the animation so it fits better with the environment. The actual animation was shot in front of a blue screen which I then keyed out the blue screen from the background using Adobe After Effects. I used this background from Devianart which was free to use and it was made by LionGuardKujenga https://www.deviantart.com/lionguardkujenga/art/TLG-Jungle-BG-3-867118642
I also used a grass on the foreground to add depth to the stop motion model and the background and I got a royalty free png from online at https://www.pngwing.com/en/free-png-ydwhw
0 notes
Text
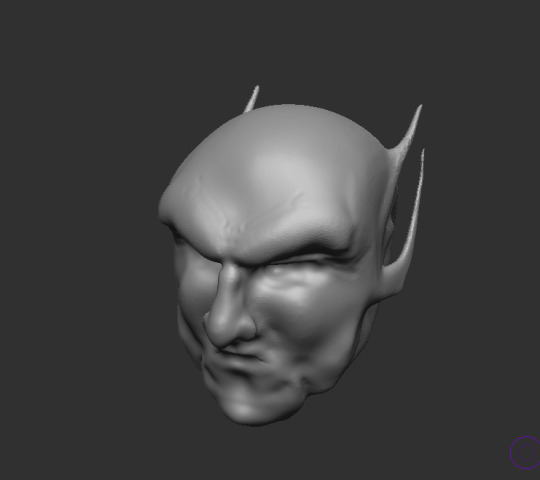
zBrush experimentation

This is the updated version of my model which I made with Zbrush. I decided to add more details to the face and changed some of the structures. I also decided to add some horns coming out of the head and a scar on top of the eye. I used the snake brush tool to make the beard and the pinch tool to make the horn. To add more structure to the model I added a bit of the torso. Some challenges i faced while making this model is that i reached the max polygon count so i had to lower the resolution a few times in order to continue to work further. Overall I am happy with the product i was able to achieve
0 notes
Text
zBrush
This is a character I made with ZBrush. This is my first time exploring this software and it is really fun experiment around with the different tools. This is my first model and hoping to further develop the design with more experimentations
0 notes
Text
Take
The final work of the module, I decided to take a complex approach for the take, I focused on character acting, emotion and use of camera and choreography. I initially made the take almost 30 seconds long but shortened it because I felt some of the scenes was not needed. The animation opens up with a closeup shot of the character and then the camera moves back to medium shot where it show the expression of the character. I then followed it up with few impact frames to add some weight to the scenes and make the scene look and feel more intense. Following that scene there is a big explosion where camera goes through the smoke and reveals the character inside in his transformed state. The scene later progresses to another extreme close up shot of the characters eyes as he looks directly towards the camera. I’ve added some sound effects of explosion and moving smoke which synchronizes well with the scene. The moving smoke sound effect worked really well because it emphasises the speed of the camera as it goes through the smoke. Furthermore, the character acting looked very fluid especially on the first scene before the camera cuts to the explosion. I followed another animator’s auteur trait when it comes to character acting, he is an animator from japan called naotoshi shida and here is an example of his work:

there is a split second of disproportionate figure which works really well because it adds the sense of power and strength and makes the scene feel more intense. It also works and has a sense of realism to it because of the camera position and the camera angle which creates foreshortening as the camera moves back. Overall, I was able to achieve a pretty fluid and consistent animation and it was animated on 24 frames per second with an average holding of 3 to 4 frames per shot to achieve the right timing for the right movement
0 notes
Text
Bouncing Ball animation
One of the fundamental of animation, this helped me understand the timing of the animation and the spacing. The spacing helped me maintain the speed of the ball and the timing helped me to bounce the ball. Since its a bouncing ball the ball had to be applied with physics e.g. first bounce will be higher than the second one and so on and so forth. This animation was done in 24 frames per second but nothing was altered. I was able to get the timing of the bouncing ball without slight altercation. At the end, I was able to achieve a fluent animation with good timing, spacing and consistency
0 notes
Text
Moving Arm
The moving arm in my humble opinion was rather challenging compared to the other animations because the hand moves in a loop and there is no locks in the joints. In order to achieve a realistic animation of the moving arm I had to understand the physics and how a figure with 3 joints would move when it accelerates, when it rotates and when it decelerate. The animation was done is 24 frames per second but was slightly altered by holding few frames longer than 2 frames. Doing so I was able to achieve a very fluid animation and also add a weight to the arm
0 notes
Text
Head Turn
For the head turn I decided to come up with a simple design of a character who I believe can show emotions very easily. In order to make the animation more expressive I made the eyebrows move and widen up his eyes as he reacts. To add a sense of realism I made the character blink and also made his mouth open as he reacts. The head turn was also animated in 24 frames per second but was slightly altered by holding some frames for longer than 2 frames. By having the right consistency and retiming the frames, I was able to achieve a fluid animation
0 notes
Video
tumblr
This is my walk cycle, I decided to go with a casual walk animation however the animation shows posture and confidence, it was animated in 24 frames per second but I held few frames for longer than 2 frames therefore the steps feels more natural. There is also a slight head movement which adds a sense of realism to the work; as the figure walks the head slightly lowers when the feet is the farthest away from the other feet
0 notes
Video
tumblr
Emotional sack, I have tried to implement all the techniques learnt up until now on this work, This animation was shot in 12 frames per seconds, however in order for it to flow better I have decided to hold few frames for longer therefore the movement looks more realistic and the sack feels more alive. I have also created a planner for the animation
I have made some slight changes to it and made the sack be in the middle of the frame rather than to the side
0 notes
Text
Gilliam Terry

Terry Gilliam also known as Terrence Vance Gilliam is a British filmmaker/animator who was born in America in November 1940. He is known for his distinct cutout animation/illustration style. ‘Monty Python’s Flying Circus’ is one of his well known and well recognised work. He worked on the opening credits for the TV show; few examples of his work:


0 notes