
Don't wanna be here? Send us removal request.
Statistics
We looked inside some of the posts by edwardlewis-stuff-blog and here's what we found interesting.
Average Info
Notes Per Post
80K
Likes Per Post
47K
Reblog Per Post
32K
Reply Per Post
92
Time Between Posts
4 months ago
Number of Posts By Type
Text
17
Last Seen Tumblr Blogs


Fun Fact
If you dial 1-866-584-6757, you can leave an audio post for your followers.


Text


My friends and I found this beetle on our college campus, we think it's a female elephant beetle. The photos were all taken by my friend (photography_dex on instagram).
https://www.instagram.com/photography_dex/
Go check him out.
7K notes
·
View notes


Text
GIRLY JUST FOUND OUT ABOUT CYERCE ELEGANS


If Cyerce nigricans is a butterfly, then this is a fairy... Cyerce nigricans for comparison:


71K notes
·
View notes
Text
How to Add a Friend on Steam Mobile or Desktop
Steam is an online portal which provides various features like you can buy and play games, share artworks, screenshots and even games. You can find and add friends to your Steam account and share your games with them.

Here is how to add a friend on Steam Mobile or Desktop:
Way to Add a Friend on Steam (Mobile)
Without adding at least five dollars to your Steam account, you’re not able to add your friends on Steam. So, to add friends on Steam, you have to spend a minimum of five dollars. If you’ve already added then jump to the below steps. If you haven’t then first add the amount after that follow the steps to add your friends.
Steps:
1. Tap on the ‘Steam’ icon from your home screen to launch the app.
If you’ve previously logged in with your account, then you’ll see the last-opened page when you open the app. if you haven’t then,
2. Type your Steam account’s username and password.
3. And then tap on ‘Login.’ After login, a confirmation code will be forwarded to your Steam email by Steam Support.
4. Open the email address and check the mail received from Steam Support.
5. Enter the five-character code on the prompted window to confirm your identity.
6. Now, tap the ‘Hamburger’ icon on the Steam main screen.
7. Select ‘Friends’ from the menu. If you’ll see ‘Chat’ option instead then tap on it.
8. Go to ‘Search bar.’ In iPhone, you’ll need to swipe down, and in Android, you can directly open it by using the ‘magnifying glass’ icon located at the upper-right corner of your Android screen.
9. Enter your ‘Friend’s or Group’s name’ into the bar. As you enter the name, resulting usernames will start appearing on your screen below the search bar.
10. Tap on ‘All Players’ (Android) or ‘Search All Players’ (iPhone) below the search bar.
11. Tap on the ‘Username of your friend or group.’ If you’re on Android, then you need to first tap on the name below the search bar and then on the following page.
12. And then tap on ‘Add Friend’ below the profile picture of your friend.
That it! Friend request will be sent to the selected user. Once it will approve your friend will be added to your Steam friends list.
Way to Add a Friend on Steam (Desktop)
Without adding at least five dollars to your Steam account, you’re not able to add your friends on Steam. So, to add friends on Steam, you have to spend a minimum of five dollars. If you’ve already added then jump to the below steps. If you haven’t then first add the amount after that follow the steps to add your friends.
Steps:
1. Go to http://store.steampowered.com/. This will take you to the Steam website, and Steam home page will be on your desktop.
2. Now, log in with your Steam account.
If you’ve already logged on your PC with your Steam account, then your username will display on the top of the page. Take your mouse cursor over the username.
To log in on Steam:
• Click on ‘Login’ near the upper-right corner of the Steam home page.
• Type your Steam account’s username and password and then log in.
3. Click on ‘FRIENDS’ from the drop-down option. This will open your Steam Friend’s page.
4. Click on ‘+ADD FRIENDS’ button. This is at the right side of the Friend’s page.
5. Click on the Search bar and enter your ‘Friend’s or Group’s name’ into it. As you enter the name, resulting usernames will starts appearing on your screen below the search bar.
You can click on ‘Individuals or Groups’ option below the search bar to select a category and narrow search results.
6. Click on ‘ADD AS FRIEND’ button at the right of the username you want to add from the results. That it! Friend request will be sent to the selected user. Once it will approve your friend will be added to your Steam friends list. If you can’t add friends from your Steam profile page then maybe your account is in ‘Profile private’ state, add your friends and enjoy gaming with them.
Edward Lewis is a Microsoft Office expert and has been working in the technical industry since 2002. As a technical expert, Edward has written technical blogs, manuals, white papers, and reviews for many websites such as office.com/setup.
Source : https://officesetup2019.com/blog/how-to-add-a-friend-on-steam-mobile-or-desktop/
3 notes
·
View notes
Text
How to Add a Friend Code on Nintendo 3DS
You know you can add your friend on Nintendo 3DS and play the game together. Not only play games you can view each other’s online status and favorite games also. Adding a friend on Nintendo 3DS is simple you just need Friend code if you’re adding them online. And offline procedure even requires a Friend code and internet connection.

Here is how to find your own Friend Code and add your friend online and offline:
How to find your own Friend Code
You can also use your own friend code to add friends. If you have your own Friend code, then you can share it with your friend you want to add. If you haven’t your Friend code, then you can follow the below steps to find the code and note it down.
Steps:
1. Take your Nintendo 3DS and power it on.
2. Look for the ‘Friend List’ icon. It is an orange color face smiley icon on the top of the screen.
3. Click on the ‘Friend List’ icon. When you’ll get it.
4. Click on your ‘Friend Card.’ Friend card is just next to the gold crown icon and has a picture of your Mii on it.
5. Look at the bottom of your Mii code there is your friend code.
That’s It! Note your friend code and share it with the person you want to add as friend.
How to register for a New Friend on Nintendo 3DS
You can register by both online and offline procedure. If your friend is near you means within the range capacity of Nintendo 3DS signal then you can add your friend offline and even without using Friend Codes. If your friend is far away, then you can register online for this both of you should have a network connection.
1. Take your Nintendo 3DS and power it on.
2. Look for the ‘Friend List’ icon. It is an orange color face smiley icon on the top of the screen.
3. Click on the ‘Friend List’ icon. When you’ll get it.
4. Click on the ‘Register Friends’ icon at the top-right corner. This icon is also the same as the Friend list icon means it also has a smiley face icon in orange color.
5. Click on ‘Internet’ option, when the menu opens.
Note: if you’re registering offline then select ‘Local’ instead of the Internet.
6. Now, you’ll be asked for your friend’s 12 digits Friend Code, and touch screen num-pad will launch.
7. Enter your Friend’s 12 digit Friend code.
8. And then click on ‘OK.’
That’s it! Once your friend registers your Friend code, his/her full details will come in their card. If they haven’t registered you and your Friend code yet, then a gray color Placeholder Friend card will appear and ask you to enter their profile name. If your friend already registered your Friend code or information then automatically his/her Friend card will appear on your screen with all details filled out. Once the registering process will complete. Now, you and your friends can watch online status, favorite games of each other and also play games together.
Edward Lewis is a self-professed security expert; he has been making the people aware of the security threats. His passion is to write about Cyber security, cryptography, malware, social engineering, internet and new media. He writes for Norton security products at norton.com/setup.
Source : https://how-to-setup.net/how-to-add-a-friend-code-on-nintendo-3ds/
0 notes
Text
How To Modify Brightness On Your Windows PC?
Modifying the level of brightness on a system is simple. And the best part is that it can be changed as many times the user wants.
The correct sequence of steps for modifying the level of brightness.
Method of changing the brightness
1. Firstly, go to Notifications, and then the Action Center.
2. Next, note that, over there, you’ll find a square box having the symbol of sun on it.
3. After that, choose that option to change brightness level. It starts at 0% and can be extended to 100%.
4. Select the brightness level that suits you the most.
5. Then, do a right click on the brightness button in Action Center.
6. Observe that an option of Go to Settings will get displayed on the screen.
7. Choose it by doing a left click on it.
8. After that, go through the advanced brightness settings and do changes in the level of brightness according to your preference.
Want to know about dynamic brightness setting?
Immediate below the bar for changing the brightness settings will be an option of ‘Change brightness automatically when lighting changes’ present after it. This enables the system’s webcam to sense the level of the light wherever you are working and manages the screen brightness accordingly.
· For instance, if you’re working under the bright sun and this option is turned on, then it will match the brightness level with it and make your screen brightness more bright.
· This reduces the strain on our eyes. However, if this feature annoys you, then you can even switch it off quickly.
Want to know about night light settings?
Just below the dynamic brightness setting is an option present for turning off/on the night light feature. The function of this feature is to decrease the level of blue light coming out of your system. This makes everything to look like an orange color. Many people say that blue light encourages people to work more by not letting them sleep. So at night, you should prefer decreasing the level of this option as much as possible.
What should be done with the given night light feature?
1. Firstly, switch on the night light option.
2. After that, press on night light settings.
3. Then, you’ll observe ‘turn on now’ option. Tap on it to have the night light activated throughout the whole day.
4. Immediately next to it, you’ll be able to see a colored bar. Move the line on this bar towards leftward or rightward to adjust the amount of orangeness and bluish that you would like to have in the screen at the time night light option is turned on.
5. The last option will be night light schedule. Turn on a Schedule night light for the feature to turn on and off during the same time on a daily basis. Prefer sunrise to sunset to make the night light feature get modified at the time of its requirement throughout the whole day or choose set hours to adjust it every time by yourself.
Edward Lewis is a self-professed security expert; he has been making the people aware of the security threats. His passion is to write about Cyber security, cryptography, malware, social engineering, internet and new media. He writes for Norton security products at norton.com/setup.
Source : http://gonorton-com.com/blog/how-to-modify-brightness-on-your-windows-pc/
0 notes
Text
How To Fix Webcam Not Working Problem On Windows 10?
A webcam is essential for video calling. Many of the times, a webcam stops working. It is not a big issue. This problem can be solved easily so don’t panic. At the same time, mark that Windows 10 consists of an option that can turn off the webcam in every app.

Go through Windows Camera Options
Luckily, from the Settings, you can turn off webcam in every app of Windows 10. Note that if you switch off your webcam from the Settings itself, then the desktop apps will also not be able to use it any of the ways.
To fix your webcam and make it work like earlier, do the following:
Firstly, go to Settings.
Then, click on Privacy.
After that, press on Camera.
Make sure on top it says that the ‘Camera access for this device is on.’
Note: If by chance, it shows that the ‘Camera access is off,’ then press on the ‘Change’ option and turn it ‘On.’
Immediately below that, make sure that ‘Allow apps to access your camera’ is turned ‘On.’ If it is switched Off, then none of the applications on your device can use the camera. Only the Windows OS shall get to use the camera for options like Windows Hello.
Below ‘Choose which apps can access your camera’ make sure that the application that wished to use the camera is not named over there and switched ‘Off.’ If it is, then turn in ‘On.’
Make sure that your Webcam is not turned off in some other way
If earlier, you have turned off the webcam from the ‘BIOS or UEFI’ firmware settings on your device, then this is the perfect time to switch it on.
It can even be possible to enable the webcam in Windows 10 from Device Manager.
Download or update webcam drivers
You might know that Windows generally tries to download the device drivers as soon as you connect any device to it. But sometimes, this doesn’t happen. In such cases, you require to do it with the help of webcam maker’s websites.
If you have older installed drivers, then visit the webcam maker’s website.
After that install newer driver collection to update the system drivers.
Fortunately, your webcam maker’s website may also offer you some ways by which you can make your webcam work.
Edward Lewis is a creative person who has been writing blogs and articles about cybersecurity. He writes about the latest updates regarding mcafee.com/activate and how it can improve the work experience of users. His articles have been published in many popular e-magazines, blogs, and websites.
Source : https://setmcafee.com/how-to-fix-webcam-not-working-problem-on-windows-10/
0 notes
Text
CES 2019: Best Foldable Phones Slated To Release This Year
CES 2019 unfolds many technical improvements and shows us the glance of upcoming technology and enhanced equipment. Among many questions which come up in our minds, “can we fold a smartphone?” is answered by CES 2019.

If you are also looking for the answer to the same question, the answer is “yes”, we can fold a smartphone, but how? The answer is very simple, any way or according to your wish but there is a single condition that you can’t do it with your current one. You have to wait for some time for the official launch of a foldable smartphone which is about to launch in the market.
A Chinese company, Royole, introduced a foldable Smartphone in CES 2019 and confirmed the existence of a foldable smartphone. The presentation of 7.8 inched device which is between a smartphone and a tablet with Android operating system.
You can fold it very easily like a paper and found no difference or difficulty in its functioning or performance. The bulky device becomes quite small after folding it in comparison to its unfolded version. You can find large separation in both the screen after folding it.
Do you want to buy?
Yes, of course. You can buy the developer version of it by paying a hefty sum. It contains the initial feature and applications. You can get different application software with it. Whenever you fold the phone, all software and apps flip into a single screen.
Are there any other competitors?
There are many other players are already in the market and providing some really amazing features with folding experience. Here are some big names with their products.
Samsung: Samsung also stepped into the foldable phone market with its Samsung Galaxy X. It has two 4.6 inched display and turns as a 7.29 inched tablet after merging the two screen. Samsung named it Infinity Flex Display.
MOTOROLA RAZR: Another smartphone giant come with the new version of its most successful model “Moto Razer” with new foldable screen feature. It will establish its iconic model once again in the market with its exciting 9-inch screen and other latest update.
LG: LG is also set to launch its thin and transparent, foldable display in early months of 2019. It will keep LG in the race of foldable screen smartphone.
APPLE FOLDABLE iPhone: Apple iPhone attract everyone. Let assume that if you can flip it or fold it. The folding screen experience is like ice on the cake kind of experience of Apple lovers. It already announced last year an Apple Inc-field patent which emerged for Electronic Devices with Flexible Displays.
Huawei: Last but not least, Huawei is also going to spread its wings in the foldable smartphone market. It committed that it will frame its most awaited patent diagrams of a foldable Huawei phone by March of 2019.
So, the foldable smartphone is going to start a new era of mobiling, and we will get some other additional features with it very soon.
Edward Lewis is a creative person who has been writing blogs and articles about cybersecurity. He writes about the latest updates regarding mcafee.com/activate and how it can improve the work experience of users. His articles have been published in many popular e-magazines, blogs, and websites.
Source : https://mcafee-activate-key.com/ces-2019-best-foldable-phones-slated-to-release-this-year/
0 notes
Text
How to Find Friends on Spotify
Spotify is the user favorite streaming application which also allows the user to download the liked songs on their Spotify account. Spotify permits the users to find out the song with their other friends. If you like to use this function will permit you to enjoy more services provided by Spotify. Interact with new people who have the same interests as you.

Open Spotify
• Open the “Spotify” site.
• Press on “Log In” given in the right side. You will get a login webpage, and there you have to enter the necessary information while creating a new account on Spotify which include your first or last name, protected password, email ID, recovery email address and date of birth.
• Click “Log In” after typing all the information. You will find this option at the end of the webpage.
• Verify that you have logged in. Once you make a new account on Spotify, then go back to the Spotify front page and search that “Log in” URL at the right side and it will show a username of your Spotify account.
• Go to the “Spotify” app. In case you are not able to see the Spotify app:
Open the “Home Screen” and press on the “Spotify app” symbol on your iOS or Android device. Press on “Spotlight” button located in the right side of the display, enter in “Spotify” and after that, press on the “Spotify Search Result on your Mac. Press the “Start” option on the left side of the display, enter “Spotify” in the given section and after that, press on the “Spotify Search Result” on your Windows. Follow the Particular Friend
• Search the username of that friend you wish to follow. This is not compulsory that the Spotify username is same as your first or last name, so if you wish to add new friends, then you have to ask for their usernames to add them in your Spotify account.
• Press on the “Search Bar” button. It is located in the top of the display, which is white.
Press on the “Three Horizontal Lines” located in the left side of the display to get a menu page which includes the “Search” feature on your phone application. Press on “Search” button to start it. • Enter the “spotify:user:(username)” in the given section. Change “Username” among the username of that friend you wish to add in your Spotify account.
It is the step for adding users of Spotify, but not the step for adding artist in your account. • Press the “Enter” option. In case you had written a correct username of that friend, then you can see the profile picture of that person on your screen.
• Click the “Follow” option. It is the option will come under your friends’ username.
• Go back to the “Activity” feed. You can view a “Live Status” of the song which is listened by any of your friends. Follow the given steps to go back to the activity feed:
Press the “Activity” option given in the “Sidebar” on the left column of the display on your desktop. Press the “Three Horizontal Lines” located in the left side of the display to drag up the menu page on your phone application. After that, click “Activity” feed. Follow the Facebook Friends
• Click on “Find Friends” option. Search this option in a section located on the right side of the Spotify app’s screen.
• Sign In on your Facebook account. In case you are not log in For Spotify with the Facebook account, press on the “Connect to Facebook” option and type the login information’s to get a full list of the Facebook friends who have an account on Spotify. • Add the Facebook Friends. Press on the “Username” of Facebook friends whose song status you want to check.
Edward Lewis is a self-professed security expert; he has been making the people aware of the security threats. His passion is to write about Cyber security, cryptography, malware, social engineering, internet and new media. He writes for Norton security products at norton.com/setup.
Source : https://how-to-setup.net/how-to-find-friends-on-spotify/
0 notes
Text
How to Enable Pop-ups on Google Chrome
Most of the websites have pop-ups as it aids them to work correctly on your system. You can permit pop-ups in computers and smartphones. If you disable the pop-up feature in your default browser, then it will not show you the information regarding any particular website on your home screen.

Google Chrome on the Desktop
• Go to Google Chrome.
• Press the “Three lines” icon.
You will get this option in the right column of the webpage. A pull-down menu list will come on your screen.
• Tap “Settings” app.
It is located at the end of the pull-down menu list.
• Go down and press “Advanced” option.
You will find this option at the end of the webpage. Click on it and a full list of other options will appear on your screen.
• Go down and tap “Content Settings.”
It is located at the end of the “Privacy& Security” option.
• Press the “Pop-ups” tab.
You will get this at the end of the webpage.
• Click the grey “Blocked” button.
It is located in the right column of the webpage. This button will change into an azure color, indicating that the Google Chrome is permitting pop-ups.
The Pop-ups can be turned on for a particular website by pressing the “Add” button under the “Allow” heading, entering into a site address after that, tapping the “ADD” button. Google Chrome on iOS device
• Unlock Google Chrome.
Press the “Google Chrome” application symbol, and this app is of cherry, blond, olive, and an azure circle.
• Click the “Three lines.”
It is located on the right side of your desktop. You will get a pull-down menu list on your screen.
• Press the “Settings” app.
You will find this at the end of the pull-down menu option.
• Click “Content Settings” option.
Search for this option in the center of the desktop.
• Press “Block Pop-ups.”
You will get this on the upper side of the desktop.
• Press the blue “Block Pop-ups” button.
This will change the color of the button into white. It will disable the pop-up blocker and it will permit pop-ups option given in the Google Chrome.
��� Click “Done.”
It is located on the right side of the desktop.
Google Chrome on Android
• Click “Google Chrome.”
Press the “Google Chrome” application symbol, and this app looks like cherry, blond, olive, and an azure circle.
• Press the “Three lines” symbol.
You will get this option on the right side of the desktop. Clicking it prompts a pull-down menu list.
• Click “Settings” app.
It is located at the end of the pull-down menu list.
• Press the “Site Settings” option.
You will get this option at the end of the desktop.
Go down to get the Site Settings option. • Click “Pop-ups.” You will get this option in the center of the desktop. It will show the webpage of Pop-ups. • Press the grey “Pop-ups” button.
Edward Lewis is a creative person who has been writing blogs and articles about cybersecurity. He writes about the latest updates regarding mcafee.com/activate and how it can improve the work experience of users. His articles have been published in many popular e-magazines, blogs, and websites.
Source : https://setmcafee.com/how-to-enable-pop-ups-on-google-chrome/
0 notes
Text
How to Edit Videos on Windows
Windows has several programs which control your computer. It manages all the saved files or folder on the system and hardware which is attached to your system. Windows permit the user to come in contact with the system. The user can do video clip editing on Windows, or they can take the help of their hand to use the worldly software.
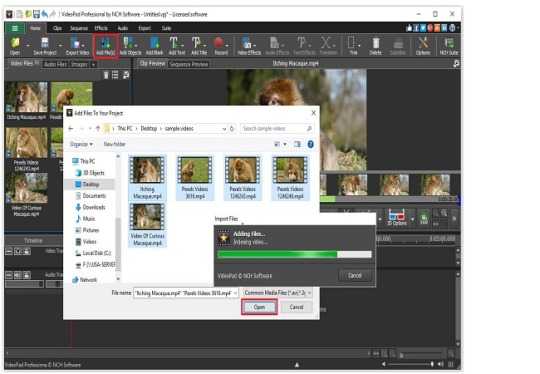
Steps to Edit a Video Clip on Windows
• Move the video clips to the system. In case the video clips are stored on your Android or iOS device, then move the video clips to the system before connecting both of them.
In case the video clips are placed on the “Video Camera,” you have to pair the “Video camera” to the system through Universal Serial Bus or place the “Camera Secure Digital Card” in the system. Choosing the PC camera or Secure Digital card into the “Explorer File Manager,” then go to the “Data Center Infrastructure Management” file and moving the folder in the system. • Search the “Video Clips” you wish to edit. Open the file or the place on the system where you wish to save that video clip.
• Right-click the “Video Clip.” By clicking on the video clip, it will open a page of pull-down list on the system.
In case there is no right-click option in the mouse, Press the right-hand column of your mouse and with the help of your two fingers press the mouse button. In case the system has a touchpad option, then with your two fingers press the touchpad or click the right-hand column of the touchpad. • Choose “Open With” button. It is located in the pull-down page. Choosing “Open With” button will show a navigation page.
• Press ‘Photos.” You will get this into the navigation page. After clicking on “Photos” option, it will show the video into the photos application on your screen.
• Tap “Edit and Create” button. This button is located on the right-hand side of the desktop. It will show a pull-down page on your screen.
• Press “Create a movie with text” option. It is located on the pull-down page.
• Give the title to the project. Enter any title for the project after that, press “Ok” button.
• Pull the “Movie Clip” in the place where you wish to edit. Press and pull the “Movie Clip” given in the left-hand column of the desktop in the “Storyboard” bar located at the end of the desktop.
• Edit the “Video Clip” option. There are many options for editing the video clip which will appear on your screen. Choosing one of the options for editing the video clip: • Trim. Press “Trim” option after that, transfer the colorful “Sliders” at the end of the desktop to cover that place where you wish to keep it. If there is any file located at the “Left- hand Slider” or “Right-hand Slider” will get removed. Tap “Done” button to save the changes you had made. • Resize. Tap “Resize” option after that, press “Remove Black Bars” or “Shrink to Fit” option into the given page. • Filters. Press “Filters” option, choose a “Filter” located on the right-hand column of the desktop after that, tap “Done” button. • Title. Tap “Text” option, type a “Name,” choose different types of format option underneath the “Name’s Text.” • Motion. Press the “Motion” option, choose a “Motion option given on the right-hand column of the webpage after that, press “Done” button.
Edward Lewis is a creative person who has been writing blogs and articles about cybersecurity. He writes about the latest updates regarding mcafee.com/activate and how it can improve the work experience of users. His articles have been published in many popular e-magazines, blogs, and websites.
Source : https://mcafee-activate-key.com/how-to-edit-videos-on-windows/
0 notes
Text
How to Fix a Frozen Mac
You can call it spinning beach ball, pizza wheel or the spinning pinwheel of death. Call it whatever you want that multicolored ball which shows up on the screen of your Mac and doesn’t disappear. It is a sign that your processor got stuck. It is frozen. Follow the steps given below to fix the frozen Mac.

How to Unfreeze the Mac?
Force quit a frozen program
If you can access your computer even if the program is frozen, then force quit the program. You can continue using the computer.
1. Tap the desktop for switching away from frozen apps.
2. Tap the Apple menu.
3. Choose Force Quit.
4. It will get closed.
5. Tap Command+Option+Esc for opening Force Quit.
6. Choose a frozen program and tap Force Quit.
7. Hold on to the Option key and Ctrl.
8. In the dock, tap the icon of the app.
9. Choose Force Quit.
Reboot the frozen Mac computer
When the system stops, and you can’t open the Force Quit menus, then allow the computer to reboot. Users can do these by following ways given below. It can be done even if the mouse is immovable.
1. Tap the Command+Ctrl+Eject for forcing the machine to boot again.
2. Go to the uppermost righthand corner to find the Eject key.
3. Eject keys will not be there in new MacBooks.
4. When the keyboard command isn’t working there is no Eject key then tap and check the power switch.
5. Power button will be there in the upper right-hand corner of Macbook.
How to troubleshoot the problem?
Know whether the issue is there with the system or the program. If the freezing takes place while running a particular application, then it may be possible that the program is at fault. When the freezing is occurring randomly, then there may be an issue with performing daily tasks.
There can also be issues among the running arrangement. When the system is solidifying up while using a peripheral, it is possible that the USB drive is creating a problem. Get a common idea for fixing up the efforts.
Check the free space
If the boot drive is found running out of space, then instability of the system can be caused. A minimum of 10 GB space should be there. Users will start facing errors if there is less space than this.
1. Tap the “Apple Menu” and choose About this Mac for checking about the available space.
2. Tap Storage tab for viewing the used and open space.
3. Erase some programs and files that are not needed by the user anymore.
Update the apps and the operating system
Maybe the freezing was because of a known bug. Update the software to fix the problems
1. Tap Apple menu and choose Software Update.
2. Launch and install any of the available updates.
3. Use this tool for finding and installing the updates.
4. Update all the non-app store apps individually.
5. If the users have installed the programs out of the application, then users require running each of the program update tools.
From the website install the latest version.
Disconnect the peripherals
Many times, the issue with the equipment can make the screen frozen.
1. Plug out all of the tools like the scanners, printers, etc.
2. Plug in the devices back at a time.
3. Test each one for seeing if the freezing takes place.
4. Users can quickly know about the device that is causing the issue.
5. If there is a particular device that is causing the system to freeze, then check out if the same issue is with the device.
Go for a Safe Boot
1. A safe boot will be helping in fixing up the issues if nothing is helping.
2. The critical files will auto perform various troubleshooting scripts.
3. Restart the Mac and hold Shift for starting a safe and secure boot.
Edward Lewis is a self-professed security expert; he has been making the people aware of the security threats. His passion is to write about Cyber security, cryptography, malware, social engineering, internet and new media. He writes for Norton security products at norton.com/setup
Source : https://johnnypotterblogs.wordpress.com/2019/02/08/how-to-fix-a-frozen-mac/
0 notes
Text
How to Fix an iPhone that Keeps Shutting Down?
There is nothing more irritating than to see your iPhone dying each minute. Whatever we want to do from communication to entertainment, we are dependent on our smartphones. When the iPhone keeps on shutting down for no reason, then it undoubtedly gets very annoying.

What are the causes behind this accidental shut down?
Several things are there that can cause this issue. It can happen due to some water damage and faulty apps. In several instances, the reason is the battery. Many methods are there through which one can know if the problem lies within the battery. You will get to know about many issues after going through this article. Follow these easy steps to fix iPhone.
Hard resetting the iPhone
Restart the iPhone if you are facing this problem of random shutting off. There is a special kind of restart needed here, known as hard resets. Hard reset is entirely different from the normal reboot because it resets the operating system deeply. If the issue lies within the app, then follow the below-given steps to clear the problem.
1. There is a slight difference in steps based on your iPhone type:
2. If there is “iPhone 8” and “iPhone X” then tap and clear sound up switch.
3. Tap and release volume down button.
4. Tap and hold side button.
5. If you are having iPhone 7 then just hold down volume down and the Side button altogether.
6. Moving towards the remaining models, press the Home switch given below and the on/off/side switch altogether.
7. Just hold it till screen goes dark.
8. You will see the Apple logo now.
9. Release the button and let your iPhone startup usually.
How to Update Operating System of iPhone
In some instances, iPhone shuts down randomly; the issue is with the operating system. Update to the latest version if hard reset isn’t working well. Two ways are there through which one can update to most recent version.
Updating iOS on the iPhone wirelessly.
Updating iTunes to the newest way.
1. Click Settings.
2. Click Notifications.
3. Click on each of the apps that have been listed in the particular section.
4. Move the allow notifications to white.
5. Now update the operating system.
6. When you are done with the update and phone has been started again.
7. Repeat 1st and 2nd steps.
8. Now turn off the notifications.
9. Check the health of your battery. (iOS 11.3 and Up)
If your iPhone is running iOS 11.3 or higher. There is a feature that is designed primarily for pinpointing battery issues. Two pieces of information give two pieces of information- Maximum charging capacity of battery and battery’s strength. If you want to see the battery of your phone then go through these steps:
1. Click Settings.
2. Click battery.
3. Click Battery Health.
The menu of Maximum capacity will show total charging capacity of the battery. Higher will be better. If Maximum Maximum battery is showing up at low, then it can be a sign of battery issue.
Peak performance capability is going to tell you if the phone’s performance is decreased due to the battery. It can be a sign that battery is infected. Health section of the battery is going to tell you if it has been replaced.
Using DFU, restore iPhone from the Backup
When iPhone shuts down unexpectedly then take a further step. DFU restore. It means Disk Firmware Update. It sets up a fresh installation of all sort of software on iPhone. You will need a computer with iTunes installed. Follow the steps given below after that:
1. Plug in iPhone to the system through USB.
2. Tap Back Up now for making up a backup of iPhone from iTunes window.
3. Keep your phone to DFU mode now; it will depend on the type of your phone.
If you have an iPhone X and iPhone 8, simply tap and release volume up button, volume down, then tap and hold the side button again. Press the top button for some time and tap and press the volume button when the screen goes black. Wait for some time, release the side button but keep holding volume down. Leave the button when iPhone appears in iTunes.
At the similar time, tap and hold on/off button for iPhone7. If you recognise any window saying iTunes detected an iPhone then release volume down button. When your phone screen turns out to be black, then you are in DFU Mode.
Steps are similar for all the models as for iPhone 7. The only difference is that at the place of volume down button, you have to hold down on/off switch.
Edward Lewis is a Microsoft Office expert and has been working in the technical industry since 2002. As a technical expert, Edward has written technical blogs, manuals, white papers, and reviews for many websites such as office.com/setup.
Source : https://johnnypotterblogs.wordpress.com/2019/02/08/how-to-fix-an-iphone-that-keeps-shutting-down/
0 notes
Text
How to Fix 504 Gateway Timeout Error?
It is an HTTP status code which means that a server won’t get a response on time from a different server. A “504 Gateway Timeout Error” means that web server that is attempting to load a page didn’t get a response from another server from where it needs information. It is known as 504 error. The reason behind the name is that HTTP status code that web uses to explain that sort of error. There can be many reasons behind that particular error.

In simple words, 504 takes place when a different computer, the one that the site you are getting the 504 messages on, doesn’t control but relies upon, isn’t communicating with it. If you see Fixing 504 Errors on Site, then try to fix it on your own.
How will you know if the Error is 504?
Individual websites can personalise how can they show errors of gateway timeout, you will see any of them:
· Gateway Timeout Error
· Gateway Timeout 504
· 504 Gateway Timeout
· HTTP Error 504- Gateway Timeout
· 504 Error
· HTTP 504
Users will see 504 gateway Timeout error inside the window of internet browser. It will typically show like the regular windows. You could see a site’s similar headers and the footers with a nice message of English on the page. You might see it on all white page with “big 504” at the head. It will be the same message, no matter how is the website showing it. Don’t be surprised if 504 Gateway Timeout errors show in any net browser; it can be displayed in any web browser, in any operating system and device. You may even get it on iPhone, Android, Tablet, in Mac, Safari, Windows 10 etc.
Probable causes behind the error
At most time, the 504 Gateway error means that whenever another server is taking so much of time that it shows up Timing Out, it means that it is not working correctly. As this error is an error of network or the server. The issue doesn’t lie with your computer or network connection.
Ways to Fix 504 Gateway Timeout Error
Follow below-given steps to Fix the Error
1. Try the web page again by tapping the button Refresh, click F5 or trying URL from address bar. Even if the 504 Gateway Timeout error is showing a failure outside of the control, then the fault may be temporary. Just retry once, it is the easiest thing to do.
2. Start all of the network devices again. Sometimes the issue lies within the user’s router, switches or some other hardware. Restart these devices for resolving the problem as soon as possible.
3. Got to your browser, look at the proxy server settings and ensure that they are correct. Inaccurate agent settings can create 504 error.
4. Just modify your servers of DNS, replace them if all devices have a similar error. It is possible that an issue causes an error with the DNS servers.
5. If nothing is helping so far, then contact to the website. Sometimes site administrators are working on it already for fixing up the cause. Look at the Website Contact Info page for knowing about famous sites. Many websites are having social networking accounts. Some of them even have email addresses.
6. Go to your ISP. If you followed all the steps given above and still not finding any flaw then just contact your ISP provider.
7. Keep checking the site regularly as it may start working soon.
Edward Lewis is a creative person who has been writing blogs and articles about cyber security. He writes about the latest updates regarding mcafee.com/activate and how it can improve the work experience of users. His articles have been published in many popular e-magazines, blogs and websites.
Source : https://johnnypotterblogs.wordpress.com/2019/02/08/how-to-fix-504-gateway-timeout-error/
0 notes
Text
Pokemon GO Rolls out Lunar New Year Event and Shiny Spoink
Niantic has been introducing new content with every new challenge events and raid battles for trainers and this time Pokémon GO is celebrating the Lunar New Year Event.

With the latest update, Pokémon GO players can experience an entirely new theme to the game with celebratory artifacts all around the map which surely provides players with a complete new in-game experience.
As developers at Niantic have recently introduced much-awaited generation 4 Pokémon and evolution to the game, they have continued this trail of new gen 4 Pokémon by adding a new Shiny Spoink with this Lunar New Year Event.
This Lunar New Year Event will be accessible for trainers from February 4th and will last until the February 13th and during this period players will experiences an increase in the spawn rate of Pokémon.
Trainers have a very high probability of spotting a number of Chinese zodiacs related Pokémon like the Spoink, Poochyena, Torchic, Mareep, Dratini, Mankey, Rattata, Ekans, Mareep, Electabuzz, Buneary, and Ponyta.
Lunar New Year event would not only increase the spawn rate of the Pokémon in-game, but it would also provide trainers with double catch XP and massive boost in XP gain by evolving a Pokémon.
Also, Niantic has recently introduced new Luck Pokémon feature for players who trade their Pokémon. As with the Lunar New Year celebration on the go, players will also receive increased chances of attaining a lucky Pokémon by trading.
In this new update, trainers have an opportunity to catch a shiny Spoink for themselves which is a Psychic-type Pokémon.
As many trainers have already spotted this upcoming Pokémon to the title, fans have got some hints of the appetence of this shiny skin.
Although Spoink has a grayish skin color with a pink ball balanced at the top of his head, still instead it is believed to have pink hue skin and a gray ball over its head for the shiny variant of this Pokemon.
Spoink is a pig style Psychic-type Pokémon and can prove to be a great addition to the game, providing trainers with new gen 4 Pokémon for their team.
With fans eagerly waiting to catch new and exclusive Pokémon with attractive new skins have an optimal opportunity to catch Spoink in the Lunar New Year Event celebrations as it is not very challenging to catch this cute little pocket monster.
Trainers have ample time to grab onto this Pokémon until 13th February as a new valentine’s day event is scheduled for the 14th February, so trainers out there should catch as many Spoink as possible and enjoy the celebratory experience in Pokémon GO.
Edward Lewis is a self-professed security expert; he has been making the people aware of the security threats. His passion is to write about Cyber security, cryptography, malware, social engineering, internet and new media. He writes for Norton security products at norton.com/setup
Source : https://johnnypotterblogs.wordpress.com/2019/02/06/pokemon-go-rolls-out-lunar-new-year-event-and-shiny-spoink/
0 notes