Video
youtube
Behind the Fudge : Fudge Kitchen Edinburgh - a short documentary
0 notes
Text
My contribution: Second Assesment
Throughout the second assessment I was mainly focused on filming and editing as I had the most experience within the group. I had created the news reel, news opening sequence and the title sequence. Although I was more than happy to do these assigned tasks I felt I could have done better in filming the main footage had I had access to a stabiliser and the appropriate sound recording equipment as I felt my footage was shaky and the audio could’ve been better (in comparison to the news reel footage which had a lav mic.).
youtube
Overall I felt we had worked succesfully as a group however the final product could have been better with more time and access to the right equipment.
0 notes
Photo
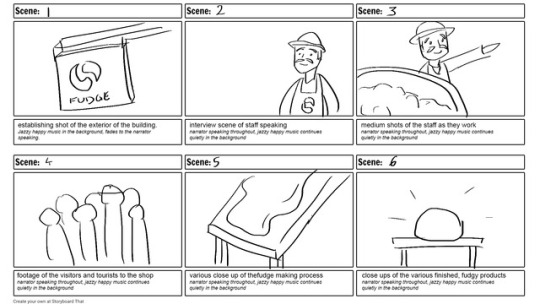
Storyboard
[PREPRODUCTION]
Due to the short time span of the documentary, the storyboard is concise and will consist of a mix of the general shots established within the storyboard.
0 notes
Text
Documentary Location Information
[PREPRODUCTION]
The Edinburgh Fudge Kitchen, like many of the stores within the Royal Mile are small and limited in space which is a major factor to the creation of this documentary.
Camera Plan, Lighting & Audio Filming will be done solely by myself and will be done, handheld, with a Canon 750D and a 50mm lens. Most of the B-roll shots will consist of closeups of the fudge and its making process, along with medium shots of the staff as they create the product. Lighting will solely be reliant on the outdoor light so filming must take place during daylight. Due to the tight space and nature of the store, large lights and reflectors are not feasible so using the 50mm lens allows for a lower aperture to allow more light into the lens naturally. Audio from the interview will be captured using a shotgun mic (Rode Mic Pro). A lavalier mic was preferred due to the lack of need for distance between the user and the mic and its inconspicuous nature, however no lavalier mics are currently available.
Risk Assesment Although there are minimal risks involved with this project, they will be addressed as follows:
Close proximity to hot, melted sugary, confectionery- Creating fudge consists of cooking the ingredients in a brass pot and pouring out the contents over a marble table. Such risks involve spillage but will be avoided by remaining vigilant of space - this is also helped by the nature of the lens and the camera sensor as it requires me to be a good distance from the subject in order for it to be in frame and in focus.
Large groups of people visiting the store- Large groups of tourists often come into the store, quickly filling up the limited space provided by the store. Risks involve physical injury to both myself and the people. This is avoided by remaining within the fenced off staff zones which not only allow me to move freely but also ensure the safety of the visitors to the store.
0 notes
Text
Documentary Treatment
Everyone loves fudge. At the Fudge Kitchen they handcraft their fudge with a passion passed on from nearly 200 years of fudge making! The Edinburgh Fudge Kitchen is situated on the historical Royal Mile at the heart of Edinburgh with several hundred visitors every week, attesting to Edinburgh’s love for real fudge.
This documentary is a short 2min, unscripted film that details the creation of real, handcrafted fudge at the the Edinburgh Fudge Kitchen. Using handheld shots with a shotgun mic, this short documentary walks through each step of the fudge making process as well as the brief history of the Fudge Kitchen. From the weighing of the ingredients to the slicing of the fudge, this film will engage audiences with its short, modern editing style and the MANY close up of the delicious confectionary. With a jazzy up- beat track, and the narration from one of the long time staff of the Kitchen, this short documentary will be anything but boring.
0 notes
Text
Fundamentals of Sound
Sound is the deciding factor for any film or video in determining how professional it can appear. Unlike lighting, sound can rarely be fixed in post production so it’s important to capture it correctly during production with the right equipment. The built in microphones of DSLRs are often insufficient for capturing clear, quality sound so we use various microphones depending on the situation.
youtube
Shotgun Microphones
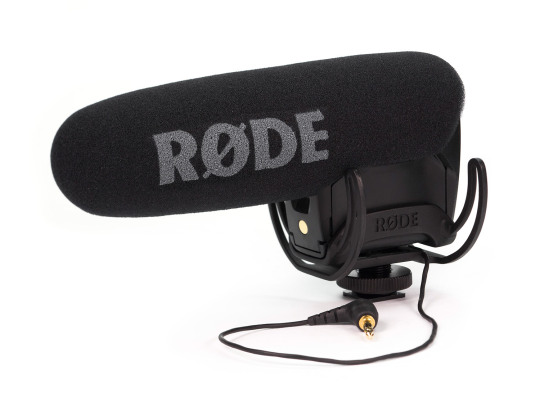
Shotgun mics like this Rode Mic Pro, are directional microphones meaning they’re good at picking up sound from a specific source but must be pointed in its direction for a proper sound capture. Shotgun mics are most effective when the speaker is at a distance and stationary. These mics can be mounted on top of a camera; or attached to a boom pole in order to get closer to the source of the sound. With the pole method, monitoring with headphones are a crucial aspect in order to ensure the correct levels of sound are being recorded.
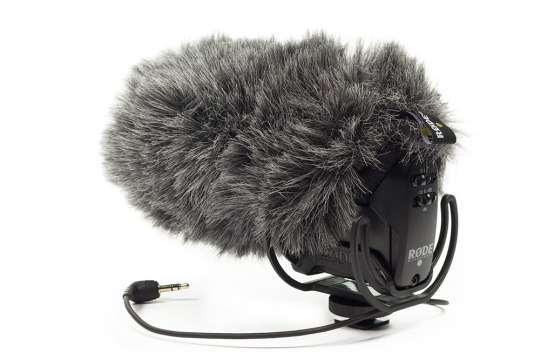
When outside, the shotgun microphone should be covered with a windscreen (also known as a ‘deadcat’ for obvious reasons), in order to minimise the sound of the wind which hinders the final output. This works due to the fur - like material that breaks up the wind and creates a clean, crisp sound capture.
Lavelier Microphones
When shotgun mics are not available or appropriate, lavalier mics are also another viable (and often times cheaper) alternative for sound capture. Lavalier microphones (or lav. mics/ lapel mics.) are small, clippable microphones that are often used in interviews or film. They are often either taped to the chest or attached to the lapel. These mics are non intrusive and inconspicuous, meaning they can be hidden fairly well so they are perfect for capturing sound from an individual source while maximising mobility for the wearer. Lavalier mics must be attached at least 25cm away from the mouth or the recorded sound may be muffled (as heard in the video).
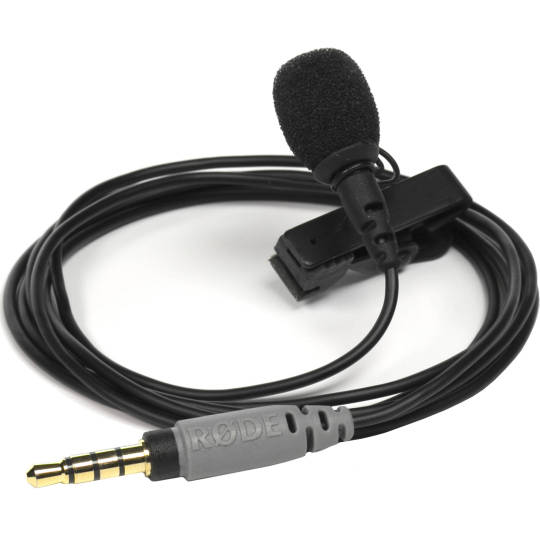
Lav. mics can also come wireless, in such a case a receiver must also be used in conjunction with the mic and care must be taken to ensure that both pieces are on the same frquency so as to be able to communicate with one another.
0 notes
Text
Fundamentals of Lighting
Lighting is a key aspect to every film and photo. It can elevate any image or video from amateur to professional and highly influences the mood and atmosphere of the final product.
youtube
Lighting Your Subject
When lighting your subject, the basic lighting set up is the 3 point lighting method.
1. The Key Light - the key light is the main lighting source of your subject and will affect the overall mood. It is often positioned to one side of the subject, so one side will be well lit and the other side containing some shadow.
2. The Fill Light is the supporting light for the Key Light and is often positioned on the opposite side of the Key light. It’s named so, as it ‘fills in’ the shadows casted by the key light. It is often softer and less intense compared to the key light in order to create even lighting for the subject. However by further decreasing the intensity of the light it can make the subject look more dramatic.
3. Backlight is as exactly as it sounds. It lights the subject from behind and its main purpose is to separate the subject from the background. In comparison to the key and fill light it is not as crucial as is more for extra definition and effect.
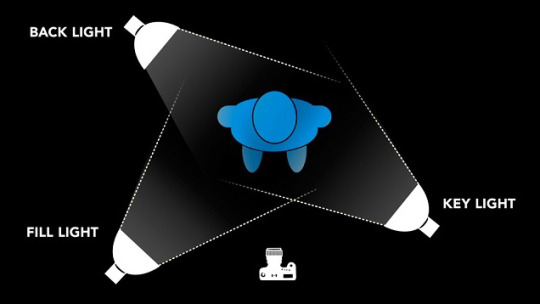
Reflectors Another quick, yet effective method people use to control lighting is the use of a reflector. The reflector is a great tool when there is insufficient lighting and helps to gain more control of the lights and shadows. Reflectors can come in various colours which can alter the colour/ temperature of the reflected light.
White Balance & Temperature
White light is never always pure white but rather come in varying tints and temperatures. Temperatures range from cool blues to intense orange and in order to compensate and create a more realistic and desirable lighting we use the white balance. The white balance feature of a DSLR takes into account the temperature of the lighting and renders what is meant to be white, as true to white as possible.
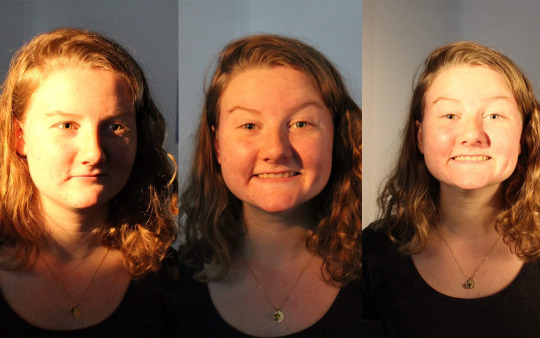
Experimenting with lighting, reflectors & white balance
In the first image is a single intense, tungsten light source which creates a harsh shadow on the other half of the subjects face. In the second image we used a reflector to balance out the shadows which was very effective in creating a more even lighting throughout the subjects face. And in the final image we put into use the white balance. By selecting the tungsten white balance setting on the camera, it greatly reduced the saturation of the image creating a more realistic skin tone.
0 notes
Text
Frame Rate & Shutter Angle
FRAME RATE
Frame rate simply means how many frames are captured every second. The standard frame rate in the European PAL system is 25fps but this varies throughout the world. The higher the frame rate used, the more frames that are captured therefore the higher the amounts of data are used. However high frames are necessary for slow motion as there are more frames to distribute over the given amount of time. If there are insufficient number of frames, the footage when slowed down will appear jittery as seen in this video.
youtube
SHUTTER ANGLE
Shutter angle is the relationship between shutter speed and frame rate. Typical film use a 180º shutter angle as this depicts a more realistic film with the right amount of motion blur. A smaller shutter angle such as 45º creates a more stylised and bold film as motion blur is minimal. A shutter angle above 180º such as 270º or 360º creates a more blurry and soft image as the amount of motion blur is increased in comparison to the typical 180º.
youtube
0 notes
Text
Rolling Shutter
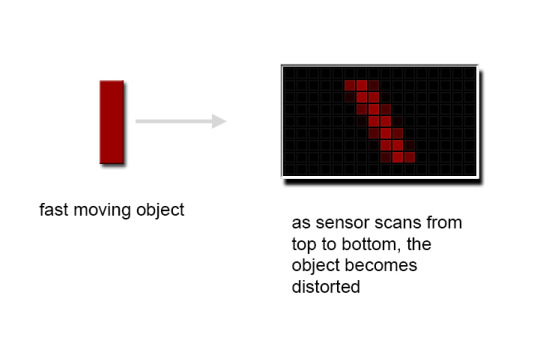
Images and video are recorded and captured as the image scans across the sensor. As the image scans from the top to the bottom of the sensor, the image may be scanned in varying points in time (albeit it could be fractions of a second) and this scanning motion is what is referred to as the ‘rolling shutter’. Because it takes time to scan from top to bottom of the sensor, this difference in time is what allows fast moving objects to appear distorted in the final image. This distortion makes the subject appear ‘wobbly’ or ‘like jello’. Both film and digital cameras are equally likely to experience this effect.
youtube
Sample clip of a rolling shutter effect. Notice the sides of the monitor and how they go from straight to slanted.
0 notes
Text
Flickering in Digital Videos
When filming under fluorescent lighting, a flickering effect may be observed in your videos. Understanding the fundamentals of fluorescent lights helps to avoid this problem.
Light Frequencies
Fluorescent lights work by producing pulsating, alternating currents of light at high frequencies. Although not visible to the human eye, these light pulses can be picked up by your camera. There are two common frequencies used throughout the world: -50Hz for Europe, Africa and most of Asia -60Hz in the Americas.
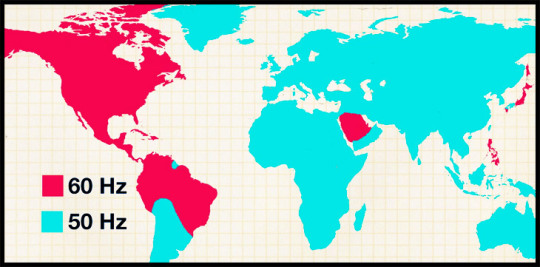
Fluorescent Light Frequencies Map (Untamed Science, 2017)
Because of these varying frequencies, DSLR comes with settings to adjust as such. The PAL system allows for frame rates of 25fps to be used in fluorescent lights with frequencies of 50Hz. The NTSC system allows for frame rates of 30fps and are to be used where light frequencies are at 60Hz.
Flickering appears as flashes throughout video and occurs when the combination of shutter speed and frame rates misalign with the frequency of the light and varying degrees of light are then captured.

The frames are misaligned with the pulses of light so the intensity of light is inconsistent, causing the flickering.

Here the frame rate is aligned with the light pulses so the output of light is constant (AKA flicker free video).
youtube
Solution?
In order to overcome this problem use a frame rate and shutter speed that is divisible by the light frequency to some integer. Check your DSLR system setting, making sure to use the one appropriate to your region!
0 notes