


Text
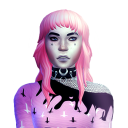
so anyway EA you better give us a free update where we can make sims that use mobility aids, braces, etc. or i’m gonna beat you with my cane.
i’m still alive, just went through stuff, had to work a lot, coming to terms w physical disability, buncha fun things. i wanna try modeling for ts4 again soon.
7 notes
·
View notes
Photo


30,000 followers pack! (11 items!)
SO! this has been in the works for a while, my fingers are numb but I have a smile on my face. I still remember hitting 1000 followers and how excited and happy I was. It’s honestly amazing because I never ever thought I’d get to 10k, let alone thrice that. I’m so so so grateful for you guys, and the community that i’ve been a part of for over 6 years now. I really wanted to push myself to get as many things as I could make, out for you. This is the biggest pack I’ve ever made and I’m very excited and lucky that I get to share it with you.
Love you all
-Molly x
11 items!
everything is suitable for all genders ♡
everything is bgc!
DOWNLOAD
(AVAILABLE ON PATREON, RELEASED 28TH OF FEB.)
7K notes
·
View notes
Text
i’m still alive, just went through stuff, had to work a lot, coming to terms w physical disability, buncha fun things. i wanna try modeling for ts4 again soon.
7 notes
·
View notes
Photo


Still Charmed & Kicking - October’20 CC Pack
Katherine Top ♡
ts3 to ts4 conversion;
base game compatible;
custom thumbnail;
35 swatches;
all lods;
shadow map included;
don’t edit mesh or texture, recolors are allowed;
Arella Dress ♡
ts3 to ts4 conversion;
base game compatible;
custom thumbnail;
37 swatches;
all lods;
shadow & normal map included;
don’t edit mesh or texture, recolors are allowed;
Fleur Blouse ♡
ts3 to ts4 conversion;
base game compatible;
custom thumbnail;
2 versions;
all lods;
shadow map included;
don’t edit mesh or texture, recolors are allowed;
Agatha Outfit ♡
ts3 to ts4 conversion;
base game compatible;
custom thumbnail;
21 swatches;
all lods;
shadow & normal map included;
don’t edit mesh or texture, recolors are allowed;
Carly Trousers ♡
ts3 to ts4 conversion;
base game compatible;
custom thumbnail;
20 swatches;
all lods;
shadow map included;
don’t edit mesh or texture, recolors are allowed;
Lucy Boots ♡
ts3 to ts4 conversion;
base game compatible;
custom thumbnail;
11 swatches;
all lods;
shadow map included;
don’t edit mesh or texture, recolors are allowed;
Download: Patreon [ Early Access ]
Спасибо падлюке @ms-marysims за обработку скринов падла!
@maxismatchccworld @simblrcollective @wifemomsimmer @s4library <3
VK Group
4K notes
·
View notes
Photo
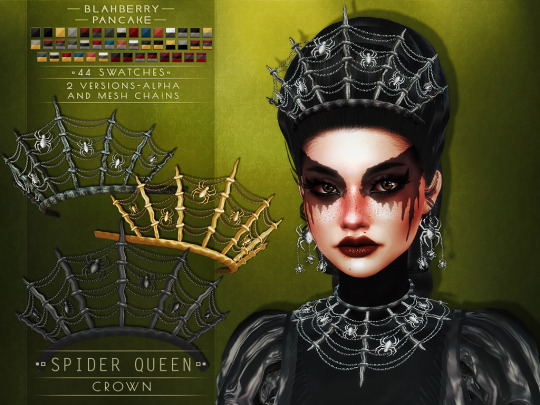
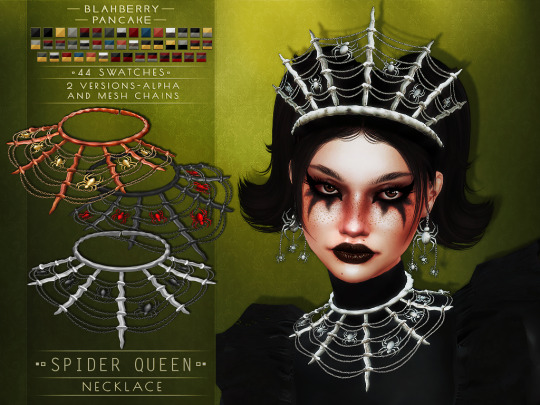
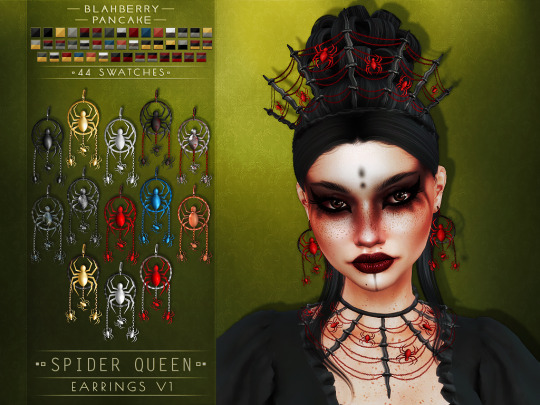
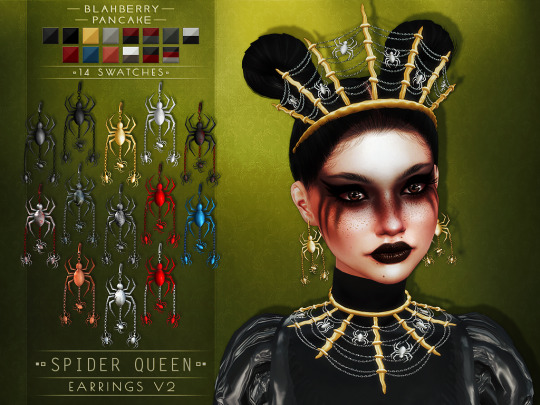
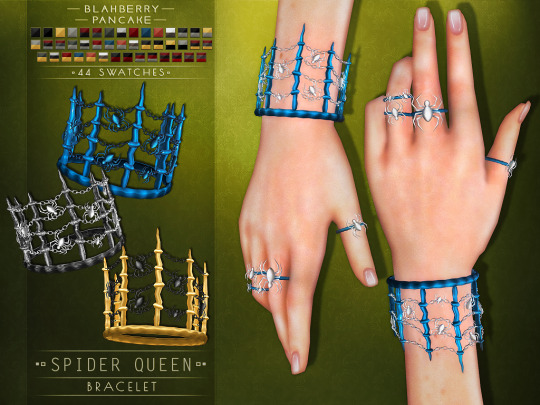
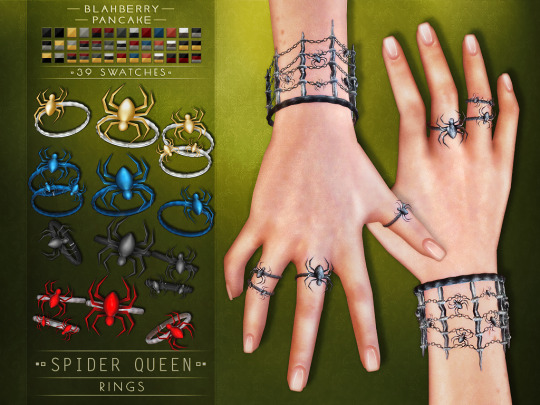
Soo I’m veeeeery much late for Halloween with my set but life happens, you know. Besides, 90% of my cc fits in with the halloween aesthetic all year round haha. Hope you still enjoy it!
○● DOWNLOAD ●○
- Spider Queen Set - Patreon Early Access -
(the set will be released for public in 2 weeks - 19.11.2020)
__________________________________________________
!!!!!!!!!! IMPORTANT !!!!!!!!!!
Crowns and Necklaces have 2 versions - mesh (very high poly) and alpha (lower poly). They’re included in one zip file and you can have both versions in your game or just choose one of each.
You can see how the sets look with full mesh on the previews of the crown and earrings v2 and the alpha versions on previews for the necklace and earrings v1!!!
Rings and Bracelets have Left and Right versions that can be worn at the same time on both arms or separately. You can only choose one swatch for them because they both take the whole ring and bracelet texture spaces so wearing other things that require that space will also make the other item change the textures.
__________________________________________________
*NEW MESHES*
- hat, necklace, earrings, bracelet & ring categories
- crowns & earrings unisex
- crown - 31k poly
- crown ALPHA - 9k poly
- necklace - 29k poly
- necklace ALPHA - 12k poly
- earrings - 9k poly
- bracelet - 15k poly
- rings - 8k poly
- all LOD’s
- custom thumbnails
- base game compatible
- crowns compatible with hat slider.
TERMS OF USE
827 notes
·
View notes
Photo


i don't need no 🕯 𝕔𝕒𝕟𝕕𝕝𝕖𝕝𝕚𝕘𝕙𝕥
152 notes
·
View notes
Photo


○● DOWNLOAD ●○
- Doe Antlers -
- Deer Antlers -
- Doe Antlers KIDS -
- Deer Antlers KIDS -
*NEW MESHES*
Works with @absolutelyiconic‘s hat slider & @redheadsims-cc‘s kids hat slider (recommended)
- hat category
- unisex
- 14 & 15 swatches
- all LOD’s
- HQ compatible
- custom thumbnails
- base game compatible
TERMS OF USE
If you like what I do, you can support my patreon ♥
824 notes
·
View notes
Photo

not sure how to make an introduction for this tutorial. i might have gone too extra because it’s so long…but this is highly requested and i said i would do this as detailed as possible, so here we go!
Keep reading
2K notes
·
View notes
Note
Hi marg, do you know of any video tutorials that teaches you how to import poses and make render scenes for blender 2.79? I managed to import my sims from simripper, but other than that I am so lost and the videos I've seen were used a different blender version? (I'm a beginner) Thank you so much and sorry to trouble you.
SO from the tutorials I’ve seen online, this is probably the closest I can find to an explanation of how to import the rig
making a sim render @ 4:00
however even that one gets a little complicated because it’s an animation so what I did was basically follow depthofpixels tutorial + but instead of opening up a BLANK rig, I export a custom pose right off the bat, open it, and then import the DAE file. Then I link the ripped sim to the posing rig how piph mentions in the tutorial.
As for importing objects, you can just export mesh files from s4s, and then hit append to bring them to your scene. I’d follow this speed render by illogicalsims
here is a list of the other renders i’ve watched, hope they are helpful for you too:
blender render sims 4 art
shespeakssimlish’s how to make render
how to make studio lighting in blender (not specifically sims but good info)
how to add rim lighting to your render
posing tutorial for how to commit your pose so the render doesn’t generate the rig weird -- you might not need this but i struggled for five minutes yesterday bc my sim kept t-posing when baking the render bc I hadn’t like committed the pose to the rig lmao
adding a note that blender 2.8 is more fun for renders than 2.79. However, if you want to use 2.79 you can follow any tutorial that has blender 2.76 or 2.78 with 2.79.
ALSO i wish i remembered vibrantpixels’ list of tutorials HERE when rendering, has super useful stuff i took a hot minute to learn through bad googling.
189 notes
·
View notes
Photo


Re-did my game so I re-did Nox too. Probably the best hair for them I’ll find.
3 notes
·
View notes
Photo

Shine like the whole universe is yours.
245 notes
·
View notes
Text
IV. The most useful meshing tools in Blender
(Previous: IIIb. Method II: The sneaky way)
Only in my own, very subjective opinion, of course. I bet many other creators would disagree with me on this selection, but those are the tools I use almost every time when I mesh something new.
This part is going to look a bit different that the previous ones: it won’t be a step-by-step guide, but rather a short explanation of different options (some of which I already partially covered) and their possible usefulness, so that you could just implement whichever you want in your own projects.
1. Snap to symmetry
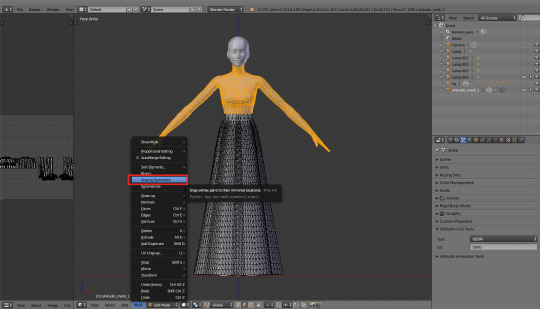
You can find this option in that dropdown (dropup?) menu hidden under the ‘Mesh’ button, in the bottom bar. It does just what it says on the tin: if a vertex on the left side on your mesh has it’s exact equivalent on the right side (so, let’s say, vertex A has x = 20, and vertex B has x = -20, and y and z are the same), Blender will recognise them as mirrored.
Make sure to use this option only on parts which really are symetrical! Otherwise you might end up with some of your vertices being symmetrised and others not, and then it’ll all become a hot mess. So, in case of our dress, you shouldn’t use it on the skirt, but it’s perfectly safe to use it on the upper body parts, which are, by default, completely symmetrical – even if Blender doesn’t necessarily know it yet. Of course, that applies only if you used the same top as me – I can’t speak for others!
2. X mirror
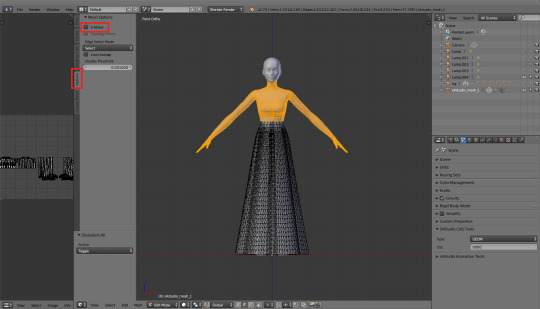
A follow-up to the whole symmetrising process. You can find that option in the toolbar on the left (T), in the ‘Options’ tab. Just tick it. And now select any vertex of your symmetrised top and move it wildly around. You’ll notice that the same happens on the other side of the mesh as well.
3. Proportional editing
I know, I know, we’ve already used it so many times…! But proportional editing is pure magic and I think it deserves another mention. Depending on the falloff type, you can use it to quickly create a variety of different shapes. Just as a reminder: you turn it on by pressing either O (for all vertices) or alt+O (only for connected vertices) and then select the falloff type in that bottom bar. By default it’s set to ‘Smooth’, which is probably the most universal option. You can make a bigger or smaller area affected by your edits by moving the mouse scroll – by default it’s set to VERY big, so probably your whole mesh will be moving. Don’t panic and just scroll until you see a white circle – that’s exactly the ‘affected area’.

Why mention it now? Because combined with the 2 previous tools it’s a perfect way to make those 1890s puffs! Let’s take a look at it, shall we?
Czytaj dalej
471 notes
·
View notes
Photo
Thank youuuuu ;v;

DOLLTRAIT - MARSHMALLOW TOP
- Scratch-Made Mesh
- Base Game-Compatible
- All LODs
- Custom Thumbnail
- 10 Swatches
*Fishnet gloves not included.
1st time successfully modeling something for the Sims 4. Will be incompatible with some meshes as parts of the UV are in the bottom right template spot.
Loosely based off this.
The non-grayscale colors are a bit funky-looking imo so if anyone can share how people get baked AO to look good on colored textures with Photoshop or Blender, I’m all ears. Any feedback is welcome, actually, just please be nice.
If you use this, feel free to tag me ^_^ I love seeing people use my stuff.
Download: Patreon (Free)
@maxismatchccworld @simblrcollective @s4library @mmfinds
You can find my other 3D work on ArtStation.
45 notes
·
View notes
Text
Dude if no-one boosts the top I made I s2g I will cry like an infant.
1 note
·
View note
Photo

The Sims 4 Creating Poses Tutorial – Posing against the Wall
Blender Hotkeys Cheat Sheet + EA’s Rigs for posing: katverse.com
Other Posing Tutorials:
How to Create Custom Poses
How to Create CAS Poses
How to Create All in One Pose Pack
How To Make Poses With Accessories
How to make poses for Different Height Sims
How to Create Couple/group Poses
How To Make Poses With Objects
Pose helper aka custom rigs for creating poses
Make posing easier by adding IK targets
How To work with Facial Expressions
⋆★⋆ Subscribe to my Youtube channel ⋆★⋆
youtube
Happy Posing! 💃
353 notes
·
View notes
Photo
DOLLTRAIT - MARSHMALLOW TOP
- Scratch-Made Mesh
- Base Game-Compatible
- All LODs
- Custom Thumbnail
- 10 Swatches
*Fishnet gloves not included.
1st time successfully modeling something for the Sims 4. Will be incompatible with some meshes as parts of the UV are in the bottom right template spot.
Loosely based off this.
The non-grayscale colors are a bit funky-looking imo so if anyone can share how people get baked AO to look good on colored textures with Photoshop or Blender, I'm all ears. Any feedback is welcome, actually, just please be nice.
If you use this, feel free to tag me ^_^ I love seeing people use my stuff.
Download: S4S | TSR
@maxismatchccworld @simblrcollective @s4library @mmfinds
You can find my other 3D work on ArtStation.
45 notes
·
View notes