
Don't wanna be here? Send us removal request.
Statistics
We looked inside some of the posts by do-it-yourself-78 and here's what we found interesting.
Average Info
Notes Per Post
16
Likes Per Post
4
Reblog Per Post
0
Reply Per Post
12
Time Between Posts
8 days
Number of Posts By Type
Text
5
Last Seen Tumblr Blogs


Fun Fact
The “We are the 99%” Tumblr blog became the slogan for the Occupy Wall Street movement.
Text
DIY: Paper cup telephone
Have you ever seen those movies where the kids make paper cup phones and run them through the vents to talk to each other... For example the movie Grownups all the kids talk to each other on paper cup phones.

These phones actually work super well and are so much fun to do with friends or siblings if you run them all throughout the house. I and my sister did this when she was in her room and I was downstairs. We hooked up the paper cups and talked for a long time just laughing and having fu. It was definitly one of my golden memories because we got along so well. Even my mom joined along after and hooked up another phone to ours in her room so we could all talk to eachother for a while. And we kept them up for a fews days after which was really sad when we had to take them down.
Step 1:
You'e going to start off by poking or cutting a hole through the cup that should be just large enough to shove a string down the hole

Step 2:
Cut a string of rope a minimum of 5 inches long but you can choose how long it gets. And what color rope do you use. Then you will pull either side of the string through the cup.

Step 3:
Tie any type of paper clip to the end of the string so the string does not fall or slip out of the hole.

Step 4:
After you've done all that you can pass the cup off to a family member or friend and get them to go to a distance where the rope tightens up and you're good to start talking to each other. I hope this Diy crafts helps other kids create memories just like I did.
1 note
·
View note
Text
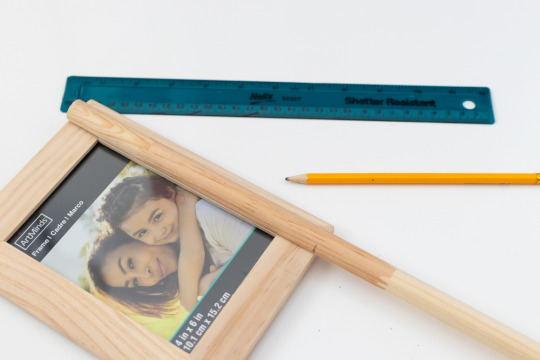
DIY: Wood picture frame
Have you ever given a gift of photo to a friend or family, or have been looking for a frame for your picture? Or even just to make your house look different and add an extra poof of decoration or color. Well, this DIY craft is for you... This craft is super simple as makes everything look better and makes your gift better. I personally would know this because I have created something like this in the past to put up a photo of my family for Christmas one year it was the year after my dog ended up passing away so I had put a photo of him in the frame. And surprised my family with it and we put it up on our wall at our old house.
Items you will need:
Wood frame
Hand saw (or preferred replacement)
Half-circle trim, 1/2 inch
Ruler
Paint (Color and paint of choice)
Glue (preferably glue gun)
A Paintbrush
Sandpaper (Optional but recommended)
Step 1:
To begin you will need to choose the orientation your frame will be (Horizontal or Vertical). And then measure where to cut the wood trim.
Step 2:
Next, you're going to need to you the saw or preferred object to cleanly cut all the pieces of wood the same length. I would recommend using sandpaper after to smooth out the cuts.
Step 3:
Repeat the process we just did but with the smaller pieces that go in the middle bottom of the frame. Make sure to carefully measure, cut and sand the pieces
Step 4:
For this step, you can use a glue gun or wood glue to stick your pieces to the picture frame.

Step 5:
In this final step, you will paint the picture frame whatever color you wold like or what fits best.

This picture frame can hold so many great memories. And share great times. It can also bring people together and make someone happy. Sometimes memories are worth more than anything. In my case, mine was to remember my dog. "The life of the dead is placed in the memory of the living."― Marcus Tullius Cicero
0 notes
Text
DIY: Paper Flowers
In the past, I've bought dozens of flowers for people. And within only a few days they're barely hanging on... When I've bought flowers in the past for my mother I've realized that they only last so long even with intense care in attention sometimes it's just not enough. Adding on to that with the car and attention needed sometimes you just don't have the time and attention to do that stuff. Therefore there's a great alternative PAPER FLOWERS!!. Flowers made out of paper are much cheaper and last forever and they require much less care, they also mean a lot more to people because it takes time out of your own day to make these. Plus there are so many different variations of flowers you can make but today im only going to be sharing one variant of many. In the past iv'e bought flowers for mothers day, fathers day and just gifts in general. But one year when I was 5 years old 1 month after my birthday my fish named Greg ended up passing away. So I wanted to host a small funeral in my back yard with flowers and everything. It was so cold at that time that the flowers would've just died so instead as a family we all make some paper flowers to stick on the little gravestone.

Supplies needed!:
Paper (Preferably thin or light)
Scissors
Glue
Make a paper square:
Start with a piece of paper, preferably thin or light paper
Fold diagonally in half:
Fold the square diagonally in half to make a triangle like the image below.

Fold in half:
Now with your triangle, you're going to fold it again and make a smaller triangle
Fold in half again:
Fold the triangle again into an even smaller triangle which should end up looking like this

Rotate and fold:
Rotate the piece of paper so that the paper is positioned vertically and the solid corner is at the bottom
Then you going to bring the triangle's short side towards the triangle's long side

Cut above the straight area:
Use scissors to cut the horizontal straight-edge extra paper. Just like below

Draw an arc and cut on the line:
Draw the arc from the top of the paper and end about 1/2 an inch from the bottom. This arc will be the part that defines the shape so experiment as you wish.

After that step is finished you finish:
Unfold the brand new beautiful paper flower that you can customize and have hundreds of different colors and variants. Now you can give your parents or friends a quick fast and meaningful gift that will last forever.
4 notes
·
View notes
Text
DIY: Light switch covers
Have you ever wanted to add some pop to your house and make your house different from others? Or even if you are just bored and want to do crafts with yourself or even a fun activity with your kids. Even if they're extremely young with no experience this craft is super simple and requires no skill whatsoever. When I was younger I used to even make stuff like wallets and stickers just like this and it was a blast. I remember when I made my dad a wallet made of tape and gave it to him he absolutely loved it. It didn't last very long because he loses his wallet all the time but it was the thaught that counts.
Materials:
Light plate and outlet covers
Mod Podge (4$) or you can try a different type of glue
Fabric of your choice
Waxed paper
Rubbing alcohol
Tools:
Sharp scissors
Sponge brush
Water soluble pen
Instructions:
Clean your light plate cover with rubbing alcohol and put the screws to the side
Trace your outlet and light switch cover onto the opposite side of your fabric.
Cut out each tracing with an additional half inch of space between the outer edge of each tracing and the edge of your fabric piece. Make sure to also cut holes for the screws and the light switch.
Make sure you still have pen lines to rinse them off in the sink and pat your fabric dry.
Put a layer of Mod Podge or glue on your plate cover line up your fabric cut-outs and place the fabric wrong side down. Be careful to get the little screw holes right.
Add Glue or Mod Podge on the edges and fold the fabric over. Trim the fabric if necessary.
Apply a layer of Mod Podge or Glue over the outside of the front of the plate cover
Use clothes pins to hold in place if needed. But, remove them before the project dries after the fabric settles let the plates dry.
Then it's done replace the the outlet covers. And screw it in.

1 note
·
View note
Text
DIY: Paper airplane
Nowadays there are so many skills fathers need to pass on to their sons or friends to friends, cousins to cousins, etc... Like skipping stones, fishing, and of course, making the perfect paper airplane. When I was younger my father did all those activities with me including making a paper airplane every week and taking it out to see who would go the furthest his of course won which caused a tradition and every year I was getting closer and closer until I got it. And instead of making a plain old boring one you barely remember make one that flies far.

Firstly ur gonna start by folding then unfolding the paper in half and making a crease in the center

2. Fold both sides of the top corner till they meet the crease

3. Fold the top of the airplane down so it looks like a envelope. Make sure to leave about half a inch at the bottom like in the image below:

4. Fold the top corners in again into the middle. There should be a small triangle at the bottom show like in the image below:

5. Fold the small triangle that u have to hold the previous fold in place

6. Fold in half, but make you sure you fold it outwards. You want the previous triangular fold to be visible on the bottom edge like in the image below:

7. Fold the wing down so its edge meets the bottom edge of the airplane. And repeat on both sides

8. AND BOOM YOU'RE DONE TADAAAA (it should look like this)
10 notes
·
View notes