Don't wanna be here? Send us removal request.
Statistics
We looked inside some of the posts by coralchoral and here's what we found interesting.
Average Info
Notes Per Post
537K
Likes Per Post
267K
Reblog Per Post
270K
Reply Per Post
180
Time Between Posts
3 days
Number of Posts By Type
Text
15
Photo
2
Last Seen Tumblr Blogs


Fun Fact
In 2020, 44% of users from Denmark used Tumblr daily.
Text

Agates carved into orange slices by wutong_crystal_carvings.
Source: x
35K notes
·
View notes
Text
the next conclave is going to be called 2 con 2 clave and they have to elect 2 popes
23K notes
·
View notes
Photo
#animated gif#animal crossing#today felt like an animal crossing kind of day#i wanted to run errands outside in the rain#or maybe it was just the whimsy of carrying an umbrella in a light shower
15K notes
·
View notes
Text

I cannot believe it, but we have just breached 100,000 lifetime downloads! Thanks to everyone who has listened so far to this weird and wild show. If you like monsters, haunted houses, monster houses, haunted monsters, and fake true crime, join our ever growing neighborhood on Spotify or wherever fine podcasts are found~
#shelterwood#horror#suburban gothic#audio fiction#audiodrama#audio drama#horror podcasts#podcast#oh wow what a coincidence#commemorating the night I binged the entire series upon just learning about it yesterday
43 notes
·
View notes
Text

Potter Puppet Pals: The Mysterious Ticking Noise is old enough to vote
1K notes
·
View notes

Text
everyone make sure to set out cheese & crackers for neil tonight <3

120K notes
·
View notes
Text
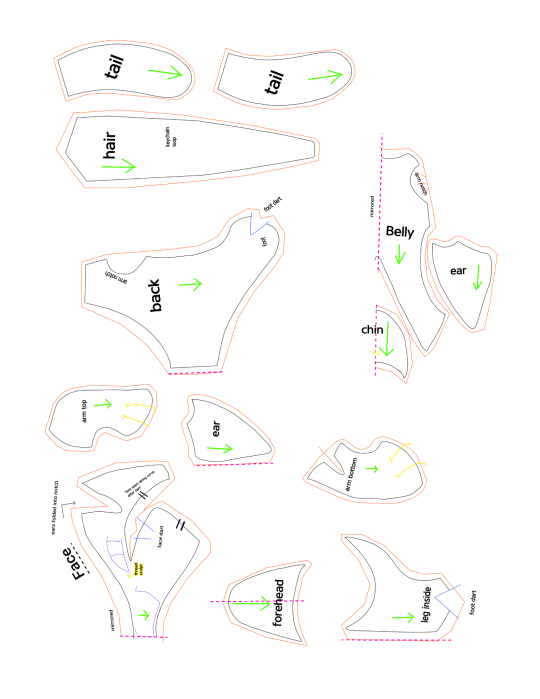
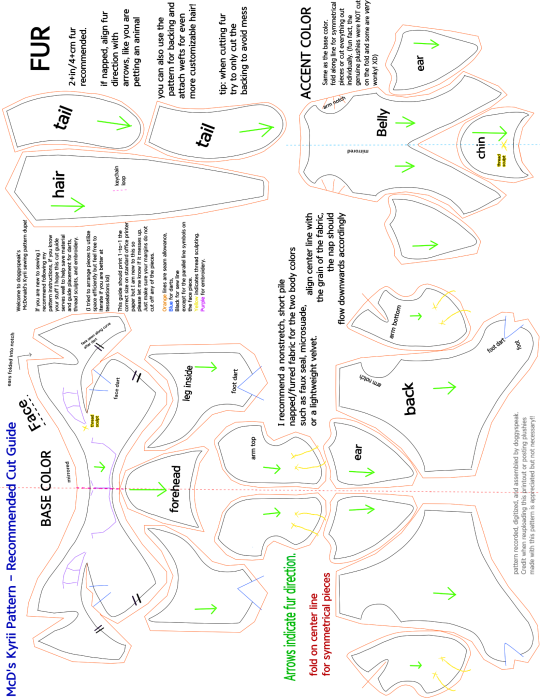
✩ Make your own Kyrii Plushie ✩
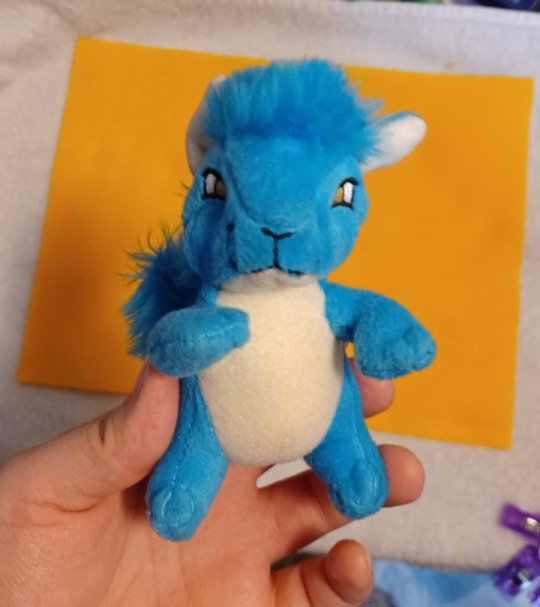
Thank you @free-sewing-patterns and @jestersneopia for asking so kindly for me to release my pattern dupe! :3 These guys are very intricate little plushies so I did my best to make something comprehensive. I also made detailed instructions which I will include after the readmore, so long post ahead!
McD's Plush Kyrii
What you will need:
•The two included images printed on 8.5"x11" (A4/Letter) paper.
•Enough of your desired Fabrics (reference the pattern size on your paper, you don't really need much at all)
✩ I recommend a short pile faux fur or other nonstretch fabric for the two body colors, and a long pile (1-4cm) faux fur for the mane and tail.
✩ You can also make the mane and tail using yarn or doll hair wefts by attaching them (sewn or glued) to a backing fabric like cotton or felt.
•Scissors or precision knife to cut fabric.
•Sewing implements (needle, pins, thimble, thread scissors, etc.)
•Thread matching one or both of your body color fabrics.
•black thread or embroidery floss for the mouth embroidery.
✩embroidery floss or thread in your desired eye colors (recommended a white for sclera, an iris color, and a black for outlines)✩OR✩buttons or safety eyes in your desired size and color.
•Stuffing (two or three handfuls of polyfill will do the job)
✩ribbon or cord to use as arm tension band and/or a loop to clip hardware like keychains and backpack hangers.
((✩ optional ))
General note: default suggested stitch length is 3mm apart unless stated otherwise.
Step 1
Print out the pattern, making sure to format your printer to use the full page with no margins. Check print preview to be sure nothing is cut off. (I made the piece inventory sheet to sort of offset any default margin weirdness but I'm new to this so let me know if it messes up.)
Step 2
Conceptualize your design and gather your materials. Are you cloning one of the plushies already out there, or making your own design? It is always good to keep reference on hand during any art project!
What special design elements are you translating to plush form? Keep in mind this pattern is small and intricate and it might be easier to omit or simplify certain design elements if you are working from something more detailed.
The cutting guide assumes 1 base color, 1 accent color, and 1 fur color with no significant shape, size, or design difference to the original McD's plushie. (Only a few fixes for symmetry and fur direction.)
Step 3
Prepare your base material for cutting. If you are doing embroidery or applique designs this may be easier while the fabric is flat and whole. Same with fur wefting, do anything like that while you have one big piece of fabric to work with. Trace the pattern pieces using chalk, heat erase pen, or some other washable marking tool using the cut guide provided. (I recommend cutting out any shape you need to add details to from the pieces inventory page, then trace those pieces on your fabric in roughly the same positions as the cut guide page.) Then do any embroidery or details you need to do while the pattern is flat.
Embroidery tips:
• Use a stiff backing piece like interfacing or felt behind your fabric to make the embroidery more durable and stiff.
•Use a back stitch or chain for lines, line in color for crisp color-changes.
•Parallel vertical lines close together catch the light and read as blocks of color best.
•Don't use stitches that are too long or loose, build stitches up diagonally like a brick pattern instead, the key is to attempt to stay parallel.
•If you are using sewing thread instead of embroidery thread, use two or three strands at once to save time.
•When you are done, cut away your backing fabric/interfacing a little outside where your embroidery stops so as not to interfere with future seams.
Step 4
Cut out your materials. If you didn't need to trace from the pieces inventory for pre-cut details, then you can just pin the cut guide paper to your fabric and cut it directly. Otherwise simply follow your trace and cut out your pieces. Be sure to keep track of which pieces go on the left and right of your plushie.
Step 5
Begin assembly by sewing all your darts first, those will be on each side of your face, inner leg, arm bottom, belly, and back pieces. Follow the blue lines that appear anywhere that says "dart" and any sew lines that create a V-like dip in the perimeter of the piece (like the arm bottom and belly pieces). Fold the seam allowance inside your seam so that the right sides of the fabric end up with a clean, unnoticeable seam. I recommend a tight, short straight-stitch about 2mm apart on darts.
Step 6
Make the loose body parts.
Sew together ears, arms, and tail by placing right sides together and sewing around based on the solid black lines in the pattern.
•Each ear will have a base color piece and an accent color piece. Make sure their shape lines up so that right sides of the fabric are together. The ear pieces are fairly flat and their sew lines should line up perfectly. Use any stitch you are comfortable with, straight stitch about 3mm apart works just fine.
•Sew one top arm piece and one bottom arm piece together for each arm. The discrepancy in their shapes creates a slight twist that gives the arm part a tube-like shape. I recommend pinning the pieces at the ends and wrist first to get the tension/gathering correct on the arm part. Any stitch works but a straight stitch will probably be easier to keep track of tension with or to rip if you make a mistake and need to retry. Keep it tight, about 2mm apart.
•For the tail, sandwich your pieces right sides together so that all the fur is tucked inside and you can sew the edges with a secure stitch like a whip or back stitch.(about 3-4mm apart) You might need to pick or brush out the fibers if they get caught in the seam.
Once you finish each piece, flip it inside out, wrong sides should remain inside while the right sides of the fabric show and all seam allowance remains inside. If any edges are having trouble flipping inside out, use a thin tool like a crochet hook or chopstick to prod them from the inside.
Stuff the 2 arms until they hold a 3D shape, firm fill recommended. Leave the other pieces in this step unstuffed.
You should have two ears, two arms, and one fluffy tail.
Step 7
Shape the face.
With the dart now sewn into the cheek, the two seams with the || registration marks should be much closer in length. Line the seam up according to the marks and fudge the rest of the length using tension. I recommend using a ladder stitch on the right sides while keeping in mind the general size of the seam allowance.
Repeat on the other side.
When you are done, your face piece should have curvy cheeks.
Step 8
Build up the head.
Connect the forehead piece to the face piece, the curve's center goes right above the nose.
Sew in the chin piece along lower jaw.
There is a bit of leeway into how long the ears will be and which angle they stick out. For best results, give it a test right side out and pin where you like the ears to stay.
The ears go into the notches on the top of the face piece, about half of the ear should fit into that notch. Sew it into that notch, any remaining ear folds around that top seam towards the forehead and is stitched down to give the ear a slight curve that helps it remain upright.
When you're finished you should have the (bald) head.
Step 9
Construct the body.
Sew the two inner leg pieces onto the sides of the belly piece.
Sew the back pieces onto the belly and inner leg piece, leaving the arm notches alone to make the arm holes. Sew all the way around the inner leg and to the center line on the belly where the dart seam sits. There may be some overlap/extra on the back piece.
Sandwich the tail between the two back pieces and sew them together. You can adjust the angle of the tail before you sew it in, the original plushie has its tail sticking up behind the back. (Tip: if you fully close the tail seam you can use a loose couple of stitches to attach it to the body to make a hanging tail that wags when you pick up and shake the plushie.)
Your current parts should be a head, a body, two arms, and the hair piece.
Step 10
Attaching the hair piece to the head.
(OPTIONAL): First, if you want to add a keychain loop like the original plushies, snip two tiny holes into the backing of your hair piece about 6mm apart and feed a small length of cord or ribbon inside to create a loop on the outside.
Leave plenty of slack on the ends of the loop for a more sturdy hold.
Secure the loop and holes with a lot of sewing and/or glue to keep the fur fabric from fraying. Stitch down the ends of the cord/ribbon to the backing of your hair piece.
Start sewing the hair piece to the head beginning with the hairline along the forehead to get it nice and clean. Next sew across the ears and down the face piece on both sides.
Your head should now have hair, with the rest of the mane hanging down behind.
Step 11
Sew head to body.
Make sure the chin piece lines up to the belly piece, the bottom of the head should line up with the rest of the back piece on either side.
Next, sew down one side of the hair piece to the back piece, connecting the bottom edge to the seam near the tail and stopping.
Leave the other side seam of the hair piece open for arm adjustment and stuffing.
Step 12
Attach the arms.
Tension Band Explanation:
The original plushies have an arm tension band inside to keep the plushie's shape and seams intact when pulling on the arms. Generally I think this can be skipped without much issue, but could be a good idea if you plan to use this as a bag hanger or keychain plush, as the arms are the extremities most susceptible to getting caught on things, and when they are secured more comprehensibly they are less likely to rip the plush apart when yanked. Not a big deal if you just plan to keep them around the house.
(OPTIONAL): If you want to install your own arm tension band, start with the plushie right-sides-out. Sew the band to one arm and pull it taught through the chest to the other arm, securing the tension band before sewing the arms into the body piece.
To sew the arms, be sure to pose them and pin them in place right-side out first. (originals usually have one arm down and the other up on their chins/waving, though they vary a lot and there are plenty of ways to position them for different expressions.)
Then, either turn insideout again or ladder stitch the arms into place.
Almost there! You should have all your pattern pieces together at this point.
Step 13
Stuffing the plushie.
Make sure your plushie is right side out, with no incorrect seams or holes other than one of the seams between the hair piece and back piece. If you need to, gently prod a crochet hook or chopstick along the backs of seams to turn them out.
OPTIONAL: To make a weighted plush, add a small mesh bag of plastic pellets or weight of your choice to the bottom of the plushie before stuffing.
Add in your polyfill, pillow fluff, yarn fibers, scraps, or whatever you decide to stuff the plushie with, paying attention to the density of the stuffing.
I recommend keeping the head and feet more densely stuffed to keep their shape while leaving the body a bit more loose for a squishable belly.
Step 14
Close up the last seam.
Using a ladder stitch, close up your last seam, pulling tight and tying off your thread at the end for a clean, invisible seam.
Now that all the seams are in, you can now brush or pick any long fibers from the hair and tail out of the seams.
The plushie is whole! You can keep it like it is, or do some thread sculpting for a more finished look!
Step 15
Thread Sculpting.
(OPTIONAL):
Using thread in the color of your body fabrics, you can pull tension at various points to create a more sculpted shape. The original had two through the face (vertically through the chin up behind the forehead, and horizontally between the corners of the eyes), and two over top of each hand and foot to look like the separation of the toes. See the original pattern pieces for precise placement.
And that's it! You should have a finished plush kyrii!
If you have any questions or concerns please contact doggyspeak. Feel free to use this pattern, share it, or edit it with or without credit.
PLEASE DO NOT SELL THIS PATTERN OR INSTRUCTIONS! IT IS BOTH NOT ORIGINALLY DESIGNED BY ME AND ALSO SOMETHING I'VE WORKED VERY HARD ON!
If you would like to see more pattern reconstructions from me, show me your finished plushies and provide feedback and suggestions to me. I would love to see what you have made and hear what you'd like to see next! ^o^
209 notes
·
View notes
Text

Happy Trans Day of Visibility
i love you more than words can say ♥︎ 🏳️⚧️⚧🏳️⚧️
15K notes
·
View notes
Text
6 notes
·
View notes
Text
This is pretty solid!
In my own interpretation, I thought it was less about moral dichotomy and more about making and breaking cycles. As in, historically, disastrous Flames have repeatedly happened, and that Solaris returns to its living lamplight form and is entrusted to the royal family every time.
I mean, I figured they were the royal family Because Of this divine ordinance, that they were chosen by Solaris to tend to it and eventually use its power for good or for evil. Being associated with the sun and time also associates Solaris with the repeating cycle of day and night, hence splitting into beings of Fire and Darkness.
The eagle has some phoenix symbolism in there, too, which has its own cycle of rebirth involving fire, and explains Solaris being a baby-flame at any point.
The fact that both the Flames of Disaster(bad) and Flame of Hope(good?) had historical precedent and seemed to be common knowledge, hence Eggman learning about it, implies that they've both happened at some point.
(Unless of course the religious festival is propaganda, centering the princess making a big declaration of Fire Good despite having her own personal knowledge and trauma that Fire Bad. The moral implications of any governing body expressing that their fire is a good thing despite people seeking its use as a weapon with historic precedent is its own long post)
(It also seemed like the Flames hadn't happened in living memory for the people of Soleanna? It didn't feel like it was talked about at length except for the exact dialog quoted in the post above. Probably because the main characters are fairly young, but it seemed like Solaris in lamp form while Elise was a toddler may have meant that a Flames Event had only just happened, potentially even being the cause of the loss of Elise's mother, though that's a big stretch of speculation.)
Anyway, Elise's father breaks the historical phoenix rebirth cycle out of grief and splits Solaris, putting Elise in a new cycle of the fire ceremony and reliving her trauma. Then Eggman breaks that cycle out of greed seeking the Flames of Disaster and introduces Sonic into Elise's life. Sonic gets into a loop of saving her from Eggman. Mephiles breaks the Time Loop that would have resulted in Silver's future by fusing with Iblis as Elise releases it, then Elise must cut the knot by taking fate into her own hands and blowing out Solaris in lamplight form.
And while it does seem like Solaris was used as a tool throughout, only able to express its discontent with the EMP blast and later through Iblis's rage and Mephiles's theatrics (including Shadow Generations?)...
Elise was also used as a tool, mainly to contain/release Iblis at others' whims. In-game she was treated as a macguffin, a prize to be won, a power-up, and all of her character development was in melodramatic cutscenes.
Elise and Solaris are narrative foils. When Solaris regains control of itself, its first and only act is to destroy all of time out of revenge, so it has to be taken down for our heroes to continue to exist. When Elise takes control of her life, she restores the timeline.
I think what I'm getting at is that the weird sympathy for Solaris is part of the same coin as Elise, who has gradually seen some redemption in the fandom thanks to nineteen(!!) years of hindsight, and the parallels between her narrative and Solaris.
A lot of people recently—as in, a weirdly high number of people—have been posting about how Solaris as a deity is a sympathetic figure, and how he was a victim in the grand narrative of Sonic ‘06.
This post is neither meant as a “gotcha” nor is it attempting to disprove or devalue this reading of the narrative, in fact I’m actually going to demonstrate how moral ambiguity is a theme that ‘06’s story definitely and intentionally explores, but I do want to just… point out what’s textually stated about Solaris in the game’s story.
To best illustrate what I’m getting at, I want to talk about Solaris chronologically. To do that, we need to discuss some deep lore that has come up on my blog several times in the past. (And no, it’s not the fact that the owner of the shops in Soleanna is named Enrique.)


Most people know that Solaris is represented by an eagle in Soleanna’s religion, but for those who missed the symbolism, Soleanna’s crest depicts an eagle standing proud with wings outstretched underneath a simplistic depiction of the sun, with the prominent feathers protruding outward in a manner reminiscent of sunbeams. Considering Solaris is known as Soleanna’s sun god and the eagle here is clearly represented as being a proxy for the sun (with the wing-sunbeams and all), and based on the fact Solaris’ physical form heavily resembles an eagle, it’s safe to say the eagle became a symbol in Soleanna due to worship of Solaris.

Additionally, the stained glass murals found in Kingdom Valley seem to show the eagle—Solaris—having some connection to or dominion over the day cycle, with the mural depicting this in a serene, positive light.
With that connection in mind, I would like to bring up the most insanely loaded and impactful throwaway NPC dialogue of any Sonic game:

Now, I’ve posted about this dialogue plenty before, but I wish to reiterate how this completely missable dialogue from some random woman in Soleanna’s New City contains deep lore that is heavily implied to be the origins of Soleanna’s symbol of their god, and may even be an origin story for Solaris’ worship in general.
The story is about Soleanna being overtaken by huge flames, until out of nowhere a huge eagle saves it. We know that Solaris’ physical form has the appearance of an eagle, so it’s barely conjectured to say that this story represents Solaris saving Soleanna—otherwise it would literally just be a narrative red herring. Additionally, the NPC specifically says that some people still believe the story to be factual, so this is clearly meant to be some manner of biblical non-fiction in the Solaris religion.
Clearly, this event sparked worship of Solaris, which, as previously mentioned, was viewed by the people of Soleanna as a positive deity—the “Eternal Sun,” which was paid homage to via the Festival of the Sun, which involved (description from the game’s official guide but this is also just what’s shown in the intro cutscene) “lighting a beautiful fountain of fire, bathing the city in the crackling glow of a thousand flames,” which I would say is representative of the great fires that overtook the ancient Soleanna, then afterwards “fireworks fill the sky, and there is much rejoicing by the general populace.” I would consider this as representing Solaris appearing from the call of the flames, but that’s conjecture—all that we need to focus on is what’s textually stated, which is that fact that there’s “much rejoicing by the general populace.” This is mirrored by the dialogue heard in-game, in which Elise, whilst lighting the fountain, prays: “Sun of Soleanna, guide and watch over us with your eternal light.”
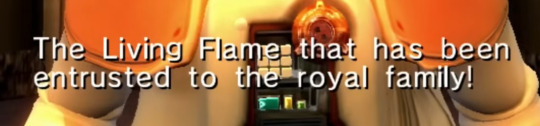
The next event that we know of chronologically is, after somehow taking the form of a meager sentient flame, Solaris was entrusted to the royal family as the “Flame of Hope.” We don’t know how this happened, just that it did.
Later down the royal family lineage, we get to Elise’s father, the Duke of Soleanna. At some point, his wife—Elise’s mother—died, and conveniently the Duke then became infatuated with the altruistic idea of harnessing the power of time to allow his people to rectify past mistakes and avoid bitter fate. To that end, he started the Solaris Project, which aimed to study the Flame of Hope the royal family had been entrusted with and, more bluntly, manipulate the super-dimensional god-being Solaris for its power.
It is noted that the Living Flame had to grow larger for this power to be harnessed.

It is explicitly stated in-game that Solaris disagreed with this treatment. During the cutscene “The accident 10 years ago” which shows the Solaris Project experiment failing, a scientist notes that out of nowhere an electromagnetic pulse has been generated, which is causing a meltdown. The Duke responds to this by saying, “Why, Solaris? Why do you refuse to listen to my voice?” which suggests that Solaris itself generated the EMP, despite the fact that this causes it to fracture.
Furthermore, the game’s official guide (which should admittedly be taken with a few thousand grains of salt, as it’s a Prima Games guide and those are rather notorious) has this to say regarding Solaris and the experiment:

So, pretty cut and dry when you view it all like that in isolation, right? Solaris was a benevolent god that was abused by the duchy of its people and driven berserk from said abuse, which is why even after reforming its darkness and wrath it still sought to destroy all time. The Duke of Soleanna sucked bad and Sonic ‘06 is a narrative about… god dying for no reason? And the ending of Sonic ‘06 with Elise extinguishing Solaris represents, uhhh… deicide? Elise is perpetuating the cycle of abuse???
Obviously no hate to people who prefer viewing Solaris in a strictly sympathetic light (I literally wrote a fanfic with that as a partial premise), but you have to admit that it muddies the narrative. And, additionally, what a lot of people ignore when they come to that conclusion is the fact that Solaris had known malevolence.
First of all, consider the fact that the Flames of Disaster were a known thing in Soleanna’s faith—specifically known as Solaris’ wrath.


And when you remember the fact that Solaris takes the form of fire, and is known to be the being whose wrath is released in the form of flames,
Suddenly the story of the eagle has an alternative reading!
I am SO firmly in the camp that that NPC’s one-off dialogue is meant to suggest that Solaris manipulated its way into a position of worship, and that it being reduced to a meager flame was a saving act—which is why said flame was then entrusted to the royal family.
As stated above, this isn’t even an unheard of concept: Elise just casually tells Sonic about the potential of the Flames of Disaster, and all of Eggman’s actions throughout this game hinge on the fact that he wants to take the power of said flames (which he already knows about, just not how to channel) for himself.
Not to mention the fact that the component parts of Solaris don’t do the sun deity any favors. Iblis is literally a destructive manifestation of blind wrath, and Mephiles is a misery maximalist who literally overcomplicates plans to a fault just so the absolute most amount of karmic irony and sheer misfortune can underline all of his actions.
So… Solaris was vastly malevolent, ergo the Duke’s actions were completely justified, and Sonic ‘06’s narrative is about defeating ontological evil?
Also probably not!
A major theme of Sonic ‘06 is the dichotomy between the actions of an individual and the impact those actions have on the whole of society/the future—impact those actions hold in general:
Elise’s decision to sacrifice her relationship with Sonic by unmaking the instigating event of their meeting from the timeline, all to save the future, that’s just the underlining of this theme. There’s also the fact that Elise had to bear the Flames within her and repress her emotions in order to lead her people and hold back Solaris’ wrath, and the fact that Silver grapples with the idea that to save his future he has to personally kill an individual. Shadow has that whole moment where he says if the world chooses to become his enemy he’ll still fight like he always has, and even Amy gets the (admittedly pretty funny) line where if she had to choose between the world and Sonic, she’d choose Sonic—and for what it’s worth, that arguable ideology did plant the seeds of Silver questioning whether what he was doing was right or wrong. Even Blaze, who’s notoriously underutilized in ‘06, sacrifices herself to seal away the flames of Iblis for good.
I feel like the intended reading you’re supposed to have is that, yes, Solaris was terrible and did terrible things, but the Duke of Soleanna and contributors to the Solaris Project were also terrible and attempting to harness powers no mortals should possess, and both sides acted in manners that impacted the wider world in direct and indirect ways. It’s supposed to be a little difficult to work your head around and completely justify in one direction or the other—it’s trolly-problem-esque, in that sense.
So, in conclusion… all of this being said, there is still room to be made and interesting narratives to be constructed around the idea that Solaris was a victim—and personally I agree there’s some sympathy to be felt for the Flame and the experimentation it underwent even with its malevolence—but I feel like the actual narrative presented is much more intentionally nuanced.
#sonic 06#sonic the hedgehog#long post#theres also a whole lot about misogyny I'm glossing over#ppl choosing to give Solaris a more sympathetic look because Mephiles is cool and what was his deal?#when Elise is Right There going through it#I also. have an 06 rewrite. um. kinda
142 notes
·
View notes
Photo


SINGIN’ IN THE RAIN dir. Stanley Donen + Gene Kelly
124K notes
·
View notes
Text

#and if youre desperate for Str Wrs then SWTOR is FREE TO PLAY#Its like what if the str wrs Hotel worked and had years of content already#it is an mmorpg but the plot is very centered around your character#appalling that they cant give extraordinary experiences with a franchise like str wrs but too many cooks and all that#played swtor with some work friends for a long while but we moved on to WoW and then fizzled out on mmos#I do recommend astralspiff also
46K notes
·
View notes