I'm Caity, I'm 19, and this is just my shitty little personal blog, with stuff about me, off of my main fandom blog. Talk to me, ask me shit, whatever.
Don't wanna be here? Send us removal request.
Photo
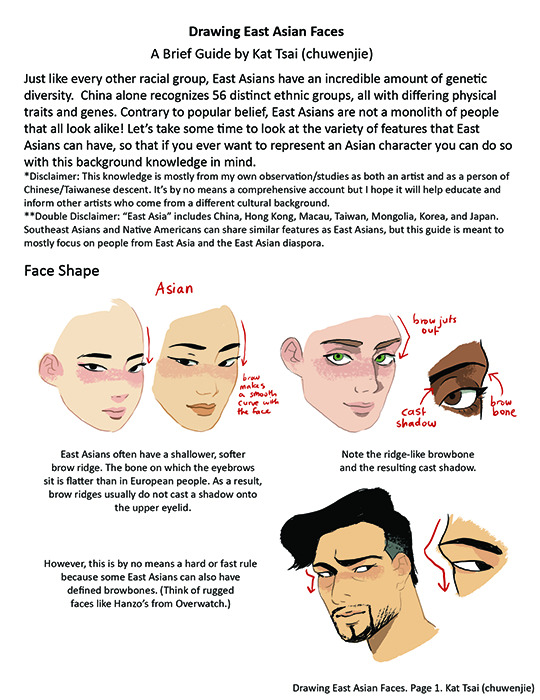
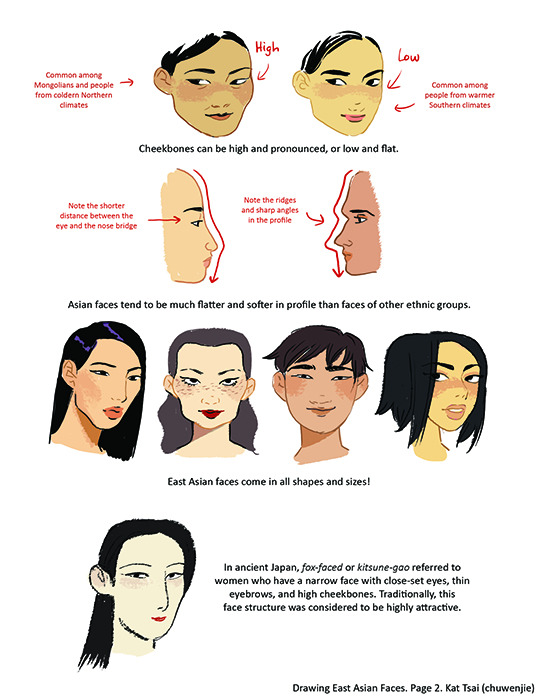
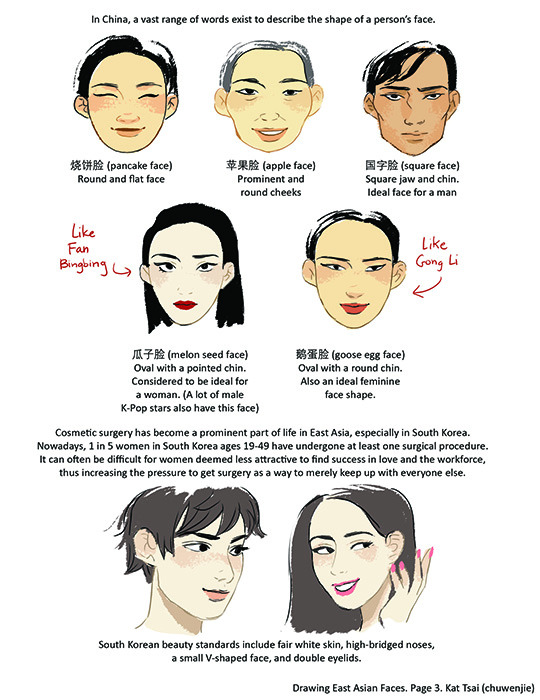
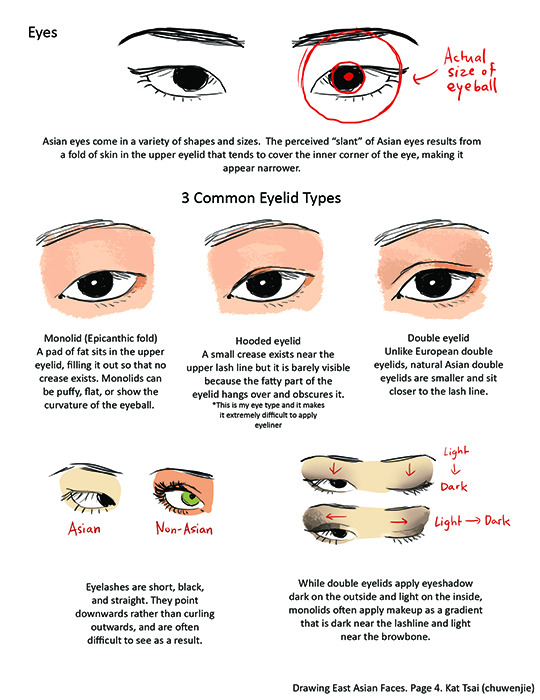
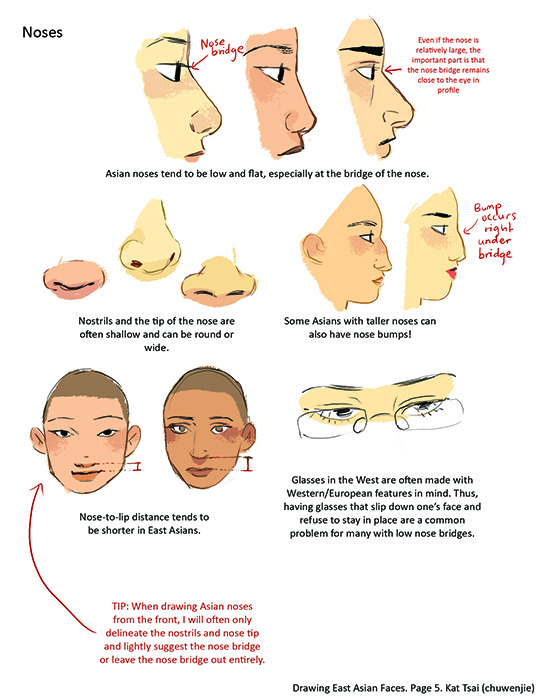
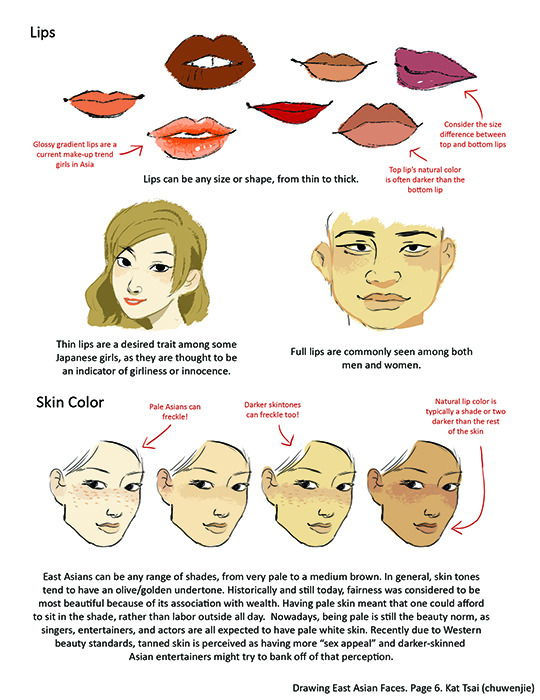
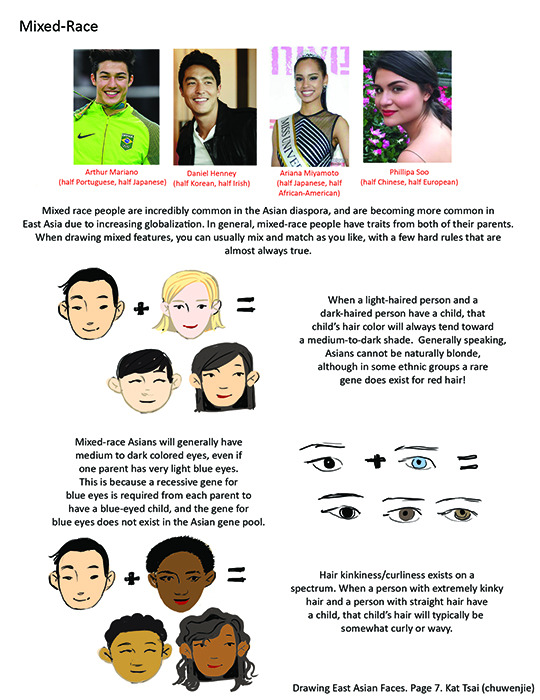
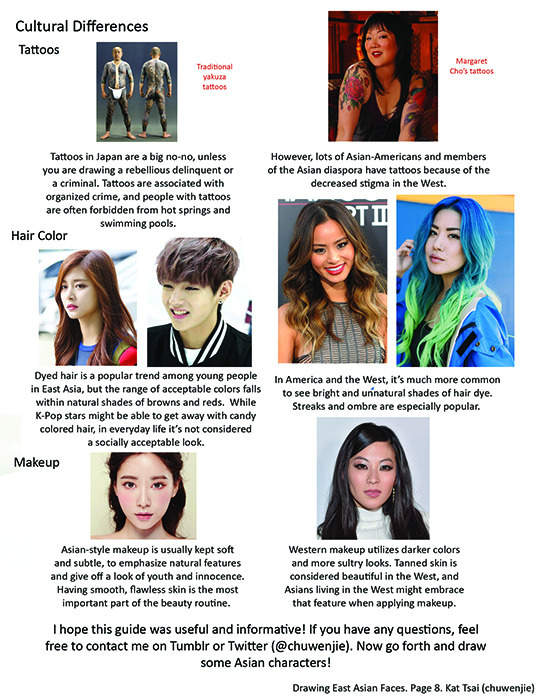
A compilation of stuff I know about drawing Asian faces and Asian culture! I feel like many “How-To-Draw” tutorials often default to European faces and are not really helpful when drawing people of other races. So I thought I’d put this together in case anyone is interested! Feel free to share this guide and shoot me questions if you have any! I’m by no means an expert, I just know a few things from drawing experience and from my own cultural background.
262K notes
·
View notes
Note
hey, i saw your drawings, and i have to say that you slay drawing !!!!!!! the question, any tips on drawing hands?
First try drawing out the palm and basic area of where you want the fingers to be

Then draw in where you want the fingers to be

Connect everything!

Clean up and then you’re done!

842 notes
·
View notes
Photo
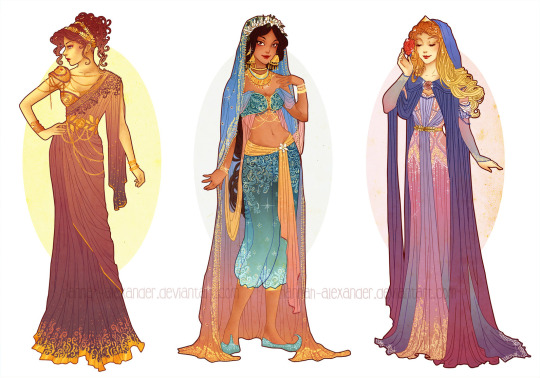
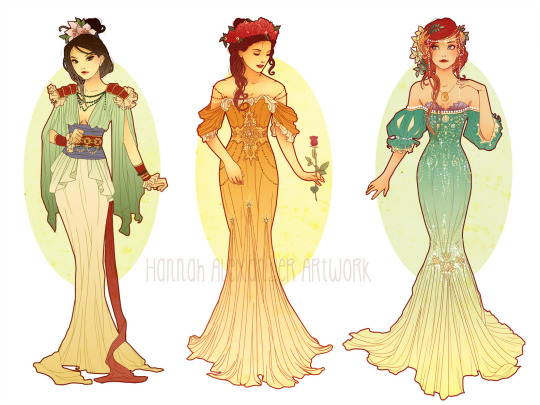


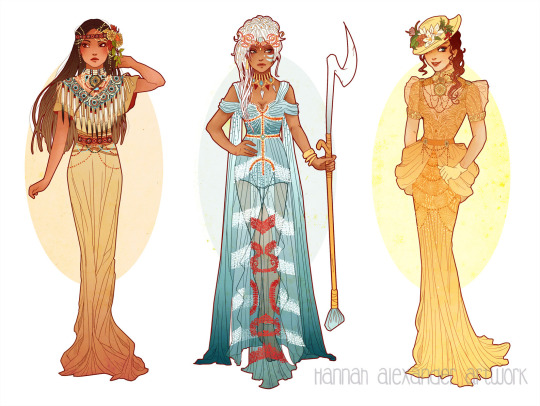
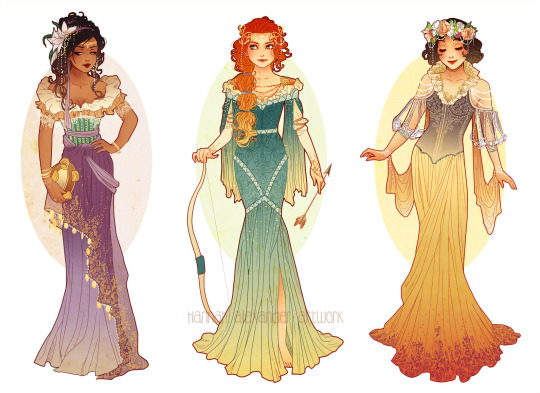
Hannah Alexander - http://neverbirddesigns.tumblr.com - https://www.etsy.com/shop/neverbirddesigns - http://www.redbubble.com/people/neverbird - https://www.youtube.com/channel/UChouZJ5VI49OnRAMlYKZCXA - https://instagram.com/hannah_alexander24
238K notes
·
View notes
Text
Looking for a random cause of death for a character? Click here.
Looking for a random city? Click here.
Looking for a random city that people have actually heard of? Click here.
Need a random surname for a character? Click here. (They also give prevalence by race, which is very helpful.)
Helpful writing tips for my friends.
314K notes
·
View notes
Photo


Help, I’ve fallen into a pit of Rose/Greg cuteness & I can’t get out. X_X Awful preview for giving us young Greg. I want this episode so BADLY!
I’ll color this at some point, but I was just happy to finish this as it is & wanted to share~<3
79K notes
·
View notes
Photo


Look: these boots are very, very simple. Actually sewing them together is no problem once you’ve got it drafted.
It is, essentially, a sock. A sock with a fancy cuff, with a sole glued to the bottom. It is also zipper-free. You are going to make a sock that fits over a shoe, and you are going to use a knife to peel off the edges of the sole, tuck the fabric under, and then glue the soles back in place so you have a nice, clean edge.
You will need:
Spandex fabric in whatever color you need.
Extra spandex fabric with the same amount of stretch for drafting your pattern.
Pattern paper.
A pair of ballet flats (or whatever shoe type you need.) Make sure you get the right “shape”; Supergirl’s boots, for example, have a pointed toe, and look out for sole color; we usually just go with black because anything else will get dirty/paint will chip. You also want to find one with an easily removed sole; as a general rule, the cheaper the shoe, the easier time you’ll have with it. We usually spend about $5 tops on our flats, haha. If you’re trying to do heels, be very, very cautious; if you damage the structural integrity of the shoe, you might be in some trouble when you need to walk on them. You also want to make sure they are as basic as possible; remove any bows and whatever possible.
An exacto knife.
Hot glue
Usual sewing implements; pins, scissors, rulers, whatever.
You can draft it yourself easily: take your scrap fabric and wrap it around your leg as I’ve pictured above in the pink, and pin it along the back. You want to make it snug, but not so snug that you can’t get your foot out of it either. POINT YOUR TOE WHILE YOU DO THIS. Additionally, wear the shoe while you pin it around your foot; it’ll need to fit over the shoe in the end anyway. Don’t worry about the bottom of your foot; it’s easier if you make the curve under your heel snug, and the front of your toes, but you’re not going to be closing off the bottom.
When you have it pinned neatly and evenly, trim the edges down. Leave enough excess for seam allowance along the back, and enough for tucking on the bottom. (Tucking into the sole, that is.) Take it off your foot and you should have some weird shape (like a mirrored version of the pattern I have pictured above.)
Now: if you trace that onto pattern paper and smooth out any raggedness you may have made in cutting, you have your basic pattern. Then all you have to do is alter the top of the pattern: a /\ point for Wonder Woman, a V for Supergirl, etc. Because we’re making Supergirl, here, you’ll want it to be in two pieces, as shown in the pattern above. Wherever you cut to change the design, be sure that you add seam allowance (as you can see on our bottom pattern.) Also make sure that the top edge of your sock is snug enough to your calf that you won’t have to constantly bend to fix them.
I’ve taken pictures of my and Christine’s patterns. Obviously, if you don’t want a seam down the front, you need to cut the fabric on a fold. You will need four of the top cuff and two of the “sock”; the top cuff is two-layered so it’s got a clean top!
Sew all the cuffs: in the last picture, that’s what they should look like. First, sew them all at the back seam. Then layer them together to sew the top seam, so that when you fold them right-side out, you have finished cuffs as pictured. Topstitch whatever you want.
Sew the sock’s back seam.
Sew the cuff to the sock. Be very careful about the corners, so that they are sharp. Again, topstitch whatever works.
Use the exacto-knife to separate the shoe from the sole. Don’t take the whole sole off — you don’t want to pop it out of alignment, or compromise TOO much of the shoe’s integrity. You just need enough opened that you can tuck the bottom edge of your sock into the space between.
Once your whole sock is finished, it’s time for the crazy part: put it on, with your shoe. Then, with the help of a friend or with the acknowledgement that your spine will hurt trying to do it to yourself, start putting the bottom edge of the sock under the edge of the sole, and gluing in place. We have found hot glue works best because it hardens/sets fast: anything else and you may be stuck sitting there wearing your shoes for HOURS trying not to ruin your work.
Now you have boots.
Go kick some supervillain ass, girl.
13K notes
·
View notes
Photo

HEART EATER!
you can buy this design on a shirt here or here!!
4K notes
·
View notes
Photo


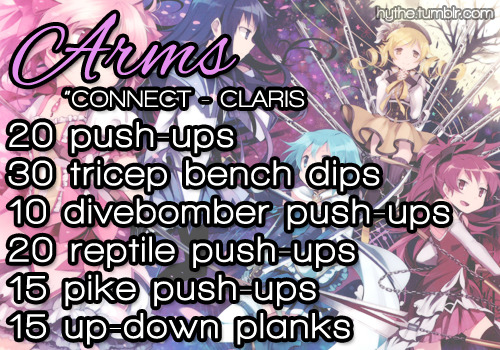
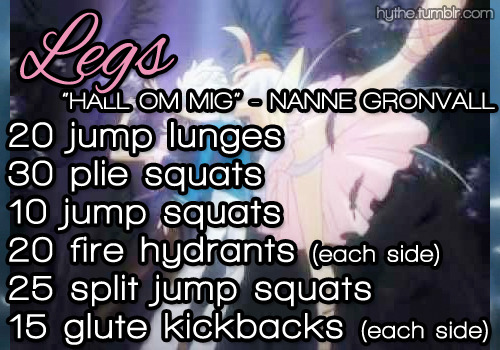
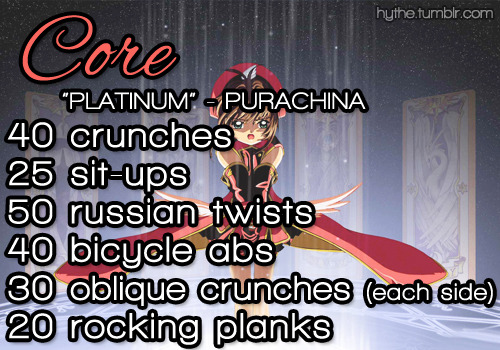

Because no one ever said saving the world would be easy. Get ready to slay every witch and soldier of Darkness that stands in your way… and look fabulous while you do it, too!
After getting such awesome feedback from my Sports Anime Workout Routine, I decided to make another one - this time, inspired by the kickass magical girls of the anime world!
Just like before, you don’t need ANY equipment for this routine! No gym membership required - you don’t even have to leave your room or put on real-people pants. (Bless.) If you’re more advanced and want to bump it up a little, add some 5-15 lb. weights on some of the moves, but otherwise, all you need is your body!
Here’s how it works: Queue up all of these songs, whether it’s in iTunes, YouTube, SoundCloud, or another music player of your choice. Hit “Play.” Your goal is to get through all of the designated exercises before the song is over. If you don’t make it, replay the song until you’re done! Then move on to the next one. Try to rest as little as possible between each exercise (and each song!) for the best results.
If you’re struggling and want to give up, keep pushing. It’s when you want to quit that the magic starts to happen. Believe in yourself and your own abilities. True power comes from within, after all!
PLAYLIST
Cardio: Sailor Moon Crystal - "Moon Pride" Arms: Puella Magi Madoka Magica - "Connect" Legs: Princess Tutu - "Hall Om Mig" Core: Card Captor Sakura - "Platinum"
As always, if you still (somehow) have energy left after all of that, burn it out in the bonus cardio round:
Cardio Burnout: Revolutionary Girl Utena - "Rinbu -Revolution-" (Updated 03.01.15)
For more anime-related workouts, check out my workout tag! :D
15K notes
·
View notes
Video
tumblr
YOU ASKED FOR ANOTHER ONE AND ITS TERRIBLE IM SORRY I TRIED TO WARN YOU IM A TERRIBLE TEACHER
13K notes
·
View notes
Photo


BFFs outing yesterday We all actually had the same day off, so we decided to go to this great little arcade downtown called Gotcha Gachupon. It was a lot of fun, and I can’t wait to go back. Also, I am terrible at posing for photos. Like, what is my body doing?
57 notes
·
View notes
Text
the "cute but deadly" squad
Leo, Cancer, Gemini, Scorpio, Aquarius, Aries
110K notes
·
View notes
Photo

My wig, it’s ruined!
I know what you’re thinking. Everyone who’s owned a synthetic wig has thought it. Here you have one of your older wigs - or maybe one you just didn’t take very good care of ;) - that you wanted to wear again. Alas, it’s matted and tangled, or dry and brittle, maybe even all of the above! How will it ever be wearable in this state? Fear no more! For here is your solution.
What yo’ ass is gon’ need:
Fabric Conditioner. (Cheap or expensive brand will do)
A washbasin, a bucket, a bathtub, or anything wide and deep enough to soak your baby in.
Detangling spray (optional)
Any shampoo and conditioner.
A brush with plastic bristles, preferably the ones with the little heads. (I don’t know the word ;A;)
The patience of a saint.
Before we begin, may I also suggest that if you have sensitive skin you invest in a pair of plastic gloves and a long sleeved shirt. Just in case (/^__^)/ <3
Let’s start!
Step One Begin to fill up your container of choice with cold to lukewarm water. Aim to keep the the temperature no hotter than room temperature, so we don’t damage the fibers. Mix in a little shampoo and conditioner, and add in however much fabric softener you feel necessary. Some tutorials give exact amounts, as I was using a large bath I wasn’t able to measure how many parts water I had, so I just added it in until I felt it was around 3 parts water 2 parts fabric softener. The water felt slippery to the touch. Swish the water around and mix it well, remember what I said about the gloves!
Step Two If you have detangling spray at hand, use it now~ If not, no worries, I didn’t use any. It’s still doable. Brush your wig out. It doesn’t need to have all the tangles brushed out, just the ones that can be easily done (PS. I also find it better to use the brush vertically rather than horizontally, it gets the job done quicker and better)
Step Three Carefully lower your wig horizontally into the fabric softener mix and swish it around gently. Add more conditioner if you feel it’s in need of it. Leave it to soak for as long as you wish. Leave it in for however long you want. I left mines in only for a little over an hour and a half, as opposed to the recommended five days. The ends are still a little frayed and dry, as you can see, so I would leave it in overnight or for a couple of days if your wig was anything like mines was. But worry not, if you need your wig soon and just can’t afford to leave it in for that long, an hour will do. As you can see, even a short period of time on my wig cleaned up the most of it, bringing back it’s shiny smoothness~
Step Four After soaking your wig for however long you so desire, gently untangle the wig with your fingers. If you have a straight wig, you can run a brush through it very gently, being extra careful not to pull too hard on the fibers. Now, you can either a) Leave it to air dry, or b) Blow dry it on a cool setting. Please note: If you do choose to blow dry, please blow dry it with the dryer facing from the top down. Keep it pointing towards the ends of the hair. By now, your wig should be looking shiny and new! Give the ends a little trim if you so desire, spray some heat protector on it and style that baby up if you want, or just leave it be~
The wig I used it a straightened Rhapsody in Rose from Gothic Lolita Wigs! I bought it early 2013.
1K notes
·
View notes
Photo

rory’s spessartite (garnet/jasper) design is like basically flawfree so i had the mighty need to doodle right quick. please go follow them, their SU fanart (and art in general) is A+++
10K notes
·
View notes
Conversation
Signs as Dads
Aries: Dad in the bleachers, yelling
Taurus: Dad that turns the car around
Gemini: Hot Dad
Cancer: Dad that loves romantic comedies
Leo: Dad that loves sweaters
Virgo: Dad that dresses like a teenager
Libra: Dad that wears crocs and socks
Scorpio: Biker Dad
Sagittarius: Gardener Dad
Capricorn: Country Dad
Aquarius: Got kicked out of the zoo Dad
Pisces: Dad that talks on the phone too loud
53K notes
·
View notes

