Statistics
We looked inside some of the posts by appletun and here's what we found interesting.
Average Info
Notes Per Post
530K
Likes Per Post
306K
Reblog Per Post
224K
Reply Per Post
426
Time Between Posts
6 days
Number of Posts By Type
Text
14
Note
2
Photo
1
Last Seen Tumblr Blogs


Fun Fact
After the announcement of the deal with Yahoo!, there were 170K signatures of unhappy Tumblr users petitioning to prevent the sale in 2013.


Text
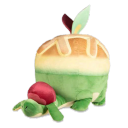
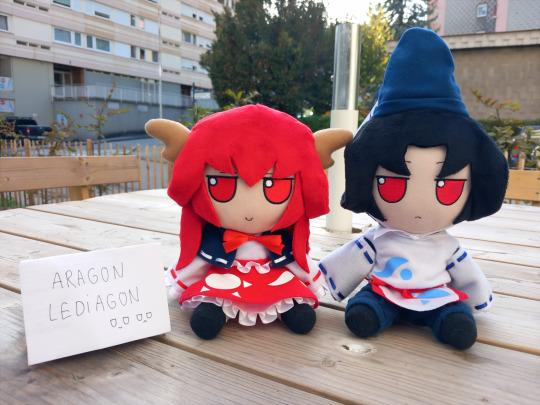
Fumo plush pattern I made for customs making
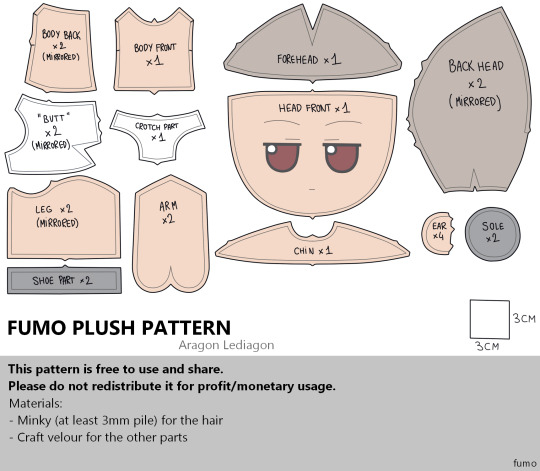
This is a pattern I made from scratch and that I use for making my customs. It is based on the v1.5 models. Its the definitive version since I made tests before, as I said its from scratch, I could never sacrifice a legit fumo and bootlegs arent reliable for patterns snatching imo since their quality varies.
This is mainly for hand sewing and fairly beginner friendly. I havent tried on a machine because I dont trust these for such small details so I cant garantee you it will looks good if you assemble it with a cheap machine.
Seam allowances and other guides to match the pieces are included there.
I didnt include more hair pieces like the bangs because it would be too specific and this is a general pattern, not one for making [specific character]. I do these parts from scratch as well. If anyone would like help with hair of a specific character I can help (as long as its a character I know, else it would require me to use more time studying the design).
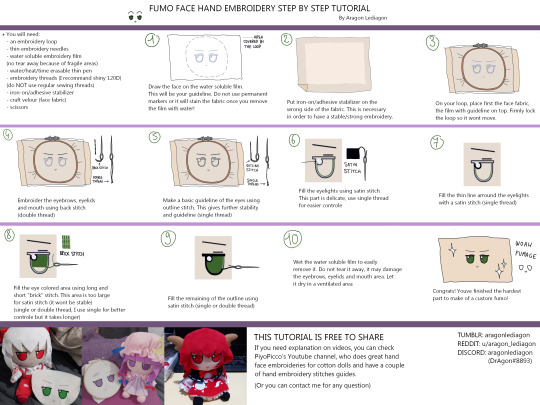
Make the design of the face before cutting the pattern. Methods I recommand using are: machine embroidery (the best), hand embroidery and heat transfert vinyle (require some skills). Ive made a hand embroidery tutorial a while ago. You can also maybe use the face of an existing fumo but its either very costly if you use a legit, or might not get good results if you use a cheap bootleg.
This PNG should be 1:1 scaled but ive added a square on the corner for good mesures. I dont use foot mesures (and i dont know how to use it) so its only cm sorry.
For any additional question, anyone is free to message me.
Customs ive made using this pattern:

Hand embroidery tutorial I mentionned (not at all lazy to link my post):
5K notes
·
View notes
Text
General PSA's for begginer alt crafting
- superglue heats up when in contact with fiber, your craft can start smoking or even catch on fire
- you can wash clothing painted with acrylic paint in the washing machine if you turn it inside out and use the lowest temperature
- don't put painted clothes in the dryer.
- you can wash clothes with metal bits in the washing machine but use the handwashing setting, dry the metal bits with a paper towel before hanging them to dry, and know that it WILL be loud
- synthetic dye is needed to dye synthetic fibers and requires a long time simmering in a boiling pot. This WILL stink up the house and you NEVER want to make food in that pot again
- faux leather is vinyl not leather. Get vinyl paint to paint on it
- don't use your teeth as tools, they don't regenerate. Reconstructing enamel costs a small fortune (ask me how I know.)
- when handsewing a lot through thick fabric get thin needles, it will require less force and be less taxing on your wrists. When machine sewing get a higher grade needle (~130 for jean)
- embroidery floss is overpriced and not as strong as it looks. For sewing on heavy stuff get denim thread, it will last forever
- don't feed a 60$ home sewing machine ten layers of denim before you learn how much a servicing fee costs, these things are dellicate
- spray paint is best applied from 30-40cm away, in swift movements. Putting too much or applying from too close will cause drips. You can sand them down and apply a new layer of paint AFTER they dry. Wipe the can nozzle after painting if it's messy, you don't want it to clog and become unusable
- water based markers on fabric will bleed, if not instantly then with time, alcohol markers will fade with time
- most fabric glues are machine washable up to a certain temperature. modgepodge is not waterproof, hitack is handwash only. Check the instructions
- the flatter the surface the easier hot glue will peel off. Faux leather stands no chance, fibers like yarn will hold it best, but is impossible to remove the glue from them in the future
- rivets are a thing that exists, only require a hammer to install and can be used as permanent fabric attachment
- studs, gromets and other metal junk at small fabric stores are laughably overspriced
- acetone (found in nail polish remover) will remove acrylic stains out of furniture, flooring and faux leather, if used in excess can damage the laquer. Can also be used to remove prints and glue off of plastic (do a small test before commiting, might melt the plastic it it's grade is low)
- residue from stickers (and k-tape) can be removed with oil
- acrylic stains cannot be removed out of clothing or carpet so protect your area before painting and don't wear clothes you care about
- if your thread keeps getting tangled or snagging while handsewing try waxing it
- you can lock in screw-in spikes with screw lock glue if you're scared of them falling off because they unscrew
- you can add washers to screw-in spikes if you're scared of them falling through flimsy fabric or too big of a hole
- if you're making anything out of soda cans have a metal file on hand, they are deceptively sharp and will hurt you and rip through fabric you're installing them in
- bleach can be found in mold killing spray (don't touch that shit with bare hands. chemical burn.)
- fabric paints are no different from slightly dilluted acrylic. You can make it yourself by adding a bit of fabric softener to acrylic or honestly even water
- if you are setting anything with an iron use parchment paper or a pressing cloth to pervent your stuff from sticking to your iron and ruining it
- if you want a safety pin somewhere permanently pinch it shut with pliers
- as much as you can, avoid putting glue on clothing, it makes it really hard to change your decisions later on and upcycle the project in the future
- kiss your friends
13K notes
·
View notes
Text
THERE IS. a website. that takes 3D models with seams and pulls it apart to make a plushie pattern and informs you where things need to be edited or darts added for the best effect. and then it lets you scale it and print off your pattern. and I want to lose my MIND because I've lost steam halfway through so many plushie patterns in the mind numbing in betweens of unwrapping, copying all of the meshes down as pieces, transferring those, testing them, then finding obvious tweaks... like... this would eradicate 99% of my trial and error workflow for 3D models to plushies & MAYBE ILL FINALLY FINISH SCREAMTAIL...
91K notes
·
View notes
Text
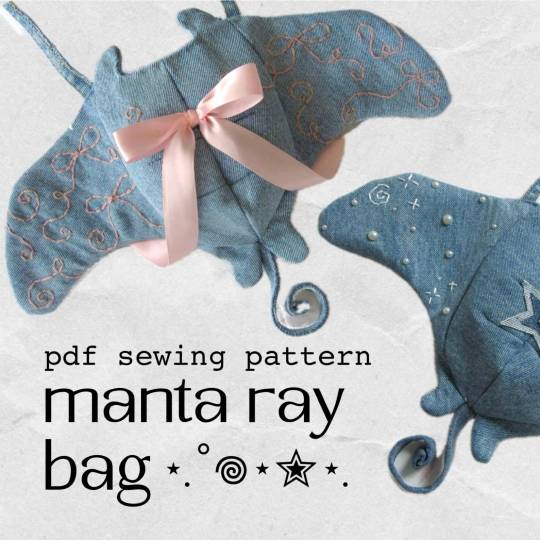
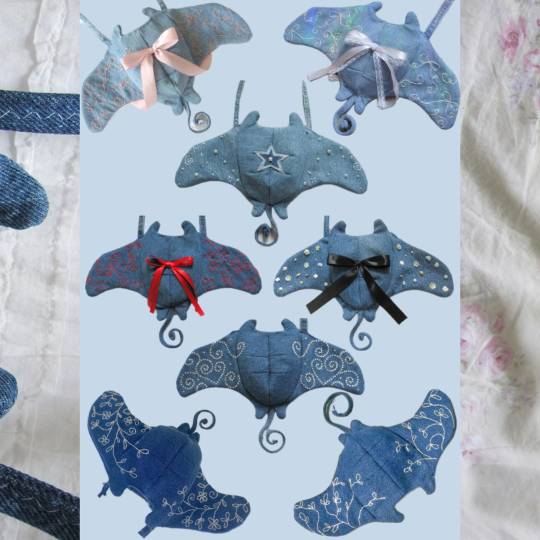
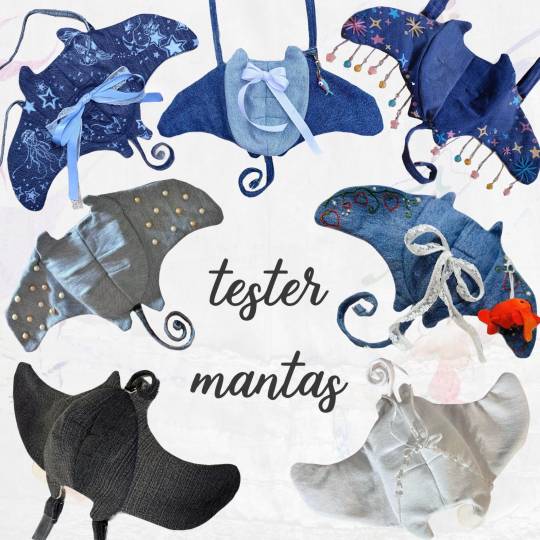
Manta ray bag PDF pattern by janiesdaisies | upcycle old jeans/denim
1K notes
·
View notes
Text

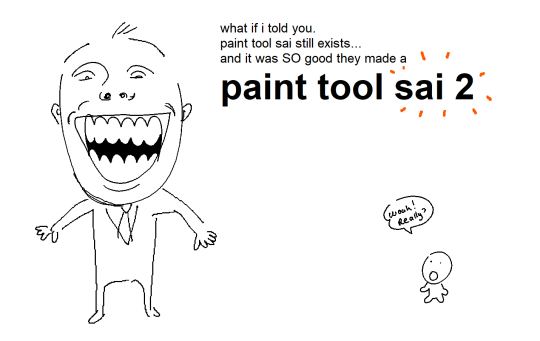
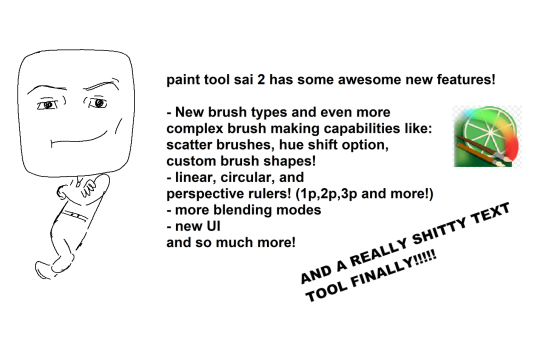
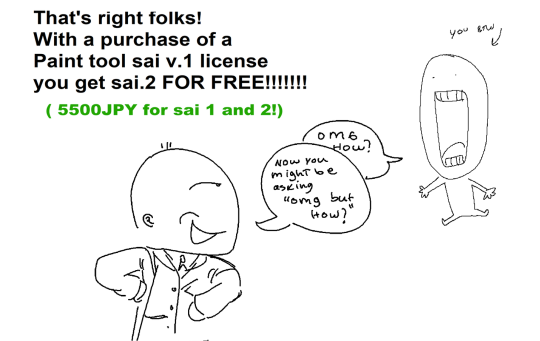


Paint Sool SAI
:P
#second slide very funny to me as a guy who's been using SAI for the last like 15 years and stubbornly refusing to move to any other program#yeah ive heard of it
3K notes
·
View notes
Note
could you please do a tutorial on how you do your risograph style drawings? they look so cool 😭😭


18K notes
·
View notes
Text

thinking about character specific speech bubbles
17K notes
·
View notes
Text
I have a new creation that i must share with you all... Introducing SNAIL TAPE


This is originally based on a 90s magazine pattern I found, which I just had to try.

However, the pattern wasn't quite right; it turns out that scotch tape dispensers used to be quite a bit slimmer! So i tested a few changes, and below is an up to date pattern. With added antenna of course!


(This fits standard scotch tape dispensers fairly snuggly, so if you want a bit more room add some width to C.)
If you make one please attach a picture, so we can see the snail army grow...
9K notes
·
View notes
Text


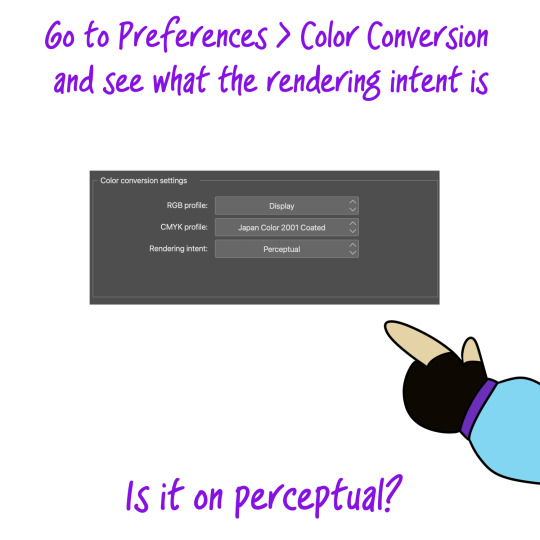


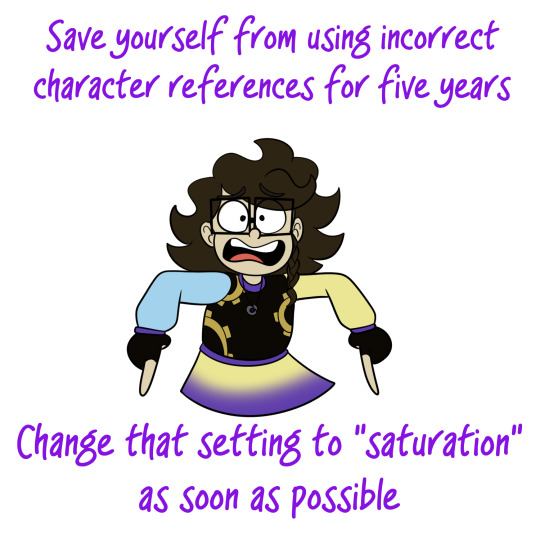
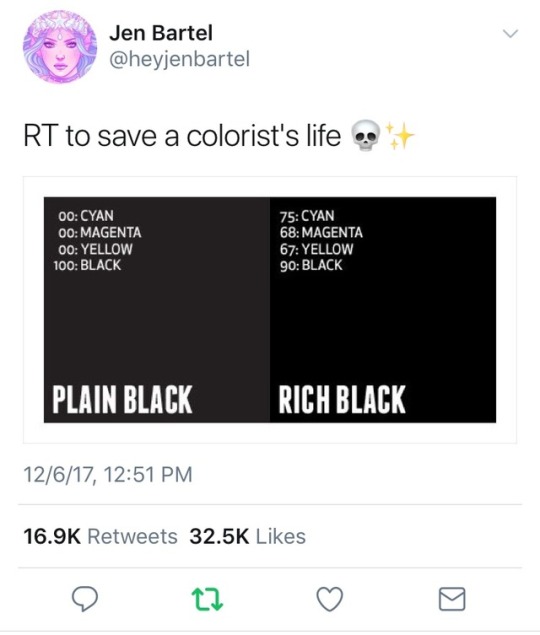
Just to make a point, every time I finished a panel of this I would export it as a PNG on the perceptual setting and use it as a color reference for the next panel
IT'S BAD
PLEASE CHECK YOUR COLOR SETTINGS
EDIT: If you're still having problems, it might help to switch from "Save/Save as" to "Export (as a) Single Layer". Just. Make SURE the box labeled "Expression Color" is set to RGB. I've been messing with this all day, and it looks like this combination of settings will allow exported PNGs to maintain their colors perfectly. To you. So far both Discord and Toyhouse still only display desaturated images and I cannot for the life of me figure out why
87K notes
·
View notes

Text
Bynine Art Rendering Tutorial
i've gotten about eight billion asks about how i render my art, so here's a full-scale tutorial! (this consolidates a lot of smaller past tutorials, so my apologies if this is old news to you lol...)
Step 1 - sketch! I draw multiple iterations in my real-life sketchpad first until I'm happy with the concept, then I either scan it or reference it for the digital sketch.

Step 2 - Lineart! I use a pixelated brush in Paint Tool SAI, as I find it makes the final result look nicer.

Step 3 - Flat colors! Good ol' paint bucket is all I need for this
Step 4 - Shading! What I'll do is copy the flat color layer and set it to pure white as an overlay. Then I'll shade this new layer with black so the original colors can peek through.

Step 5 - Noise! Switching over to paint.net, I apply a noise effect to add texture to the art.

Step 6 - Blur! A slight blur changes the feel from digital to traditional, or at least like scanned art.
Step 7 - Color correction! I bring out the yellow in the highlights and the blue-purple in the shadows, using paint.net's Curves tool.
There we go! I hope that's helpful. Let me know if you have any other questions!!
613 notes
·
View notes
Text
TSUM PATTERN!!!
retested it after digitizing everything to make sure everything's in order and everything's looking fine imo :3 here's a tsum made with this pattern with susato tsum for comparison:


here's the pattern, formatted for A4 size paper :>> guides are for lining the pieces up + ears/limbs placement
if you wanted to be really accurate with printing out the pattern: in my experience, setting the custom scale to 100% in the page setup will get the ruler on the page to be 1:1 with a real life ruler
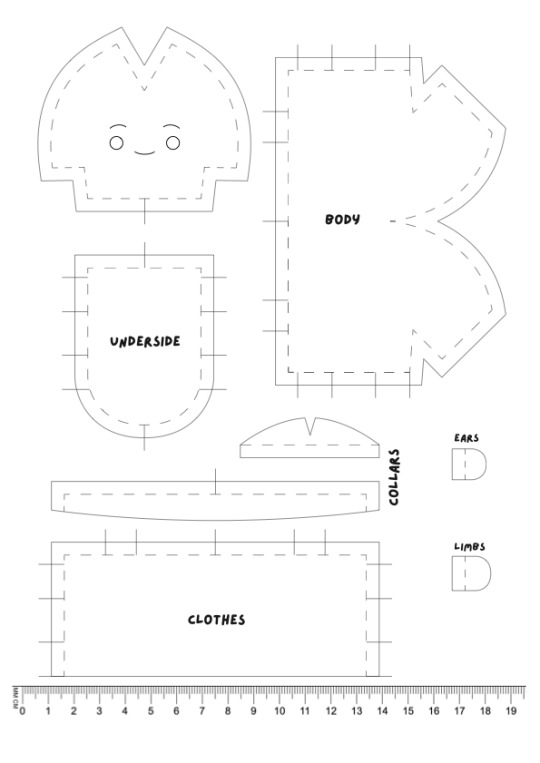
additionally: if you want the tsum to be as close as possible to official ones, they use non-stretchy fabrics for the underside part of the tsum. i only have minky but ironing on some lightweight fusible before sewing the pieces together made it non-stretchy ^^
it looks to me like they used a very thin faux suede with fusible interfacing for some structure (i could be wrong though as 1) i am not an expert in identifying fabrics and 2) i only took apart klavier tsum and no one else. but everyone else that i own seems to use the same fabric for the underside).
they also have a little bag of filler beads inside that weigh around 14.5g (bag they were in included), and the stuffing was ~8g if you wanna be REALLY accurate. anyway. enjoy!
236 notes
·
View notes
Note
You probably get asked this a lot, but how do you draw hands? Even when I'm tracing, they look so weird 🙃


I could probably go on and on and on about hands, but here are some key points I compiled! I LOVE drawing hands, and I never hesitate to use my own as a reference
25K notes
·
View notes
Text
17K notes
·
View notes