I am a Concept Artist and Illustrator currently studying an MA in Concept Art at Hertfordshire University.
Don't wanna be here? Send us removal request.
Text
Promotional Video
I compiled all my finished assets into a video promoting my project and myself as a practitioner. I am pleased to formally introduce my Major Study Project: SolarPunk
youtube
The complete art book will soon be available here: https://www.artstation.com/artwork/lGxddY
List of Third Party Assets
Unreal Engine 5 Level
MYTHRA TECH. (2022). Mediterranean Coast. [Online]. Unreal Engine Marketplace. Available at: https://www.unrealengine.com/marketplace/en-US/product/3a23dac323e646f38e2c7a744236478e?sessionInval [Accessed 29 July 2024].
3D Assets
Adobe Substance 3D Painter. (n/d). Smart Materials Library. [Online]. . Available at: https://substance3d.adobe.com/assets [Accessed 26 August 2024].
AlexDang. (2023). Scud ( Ballistic missile ). [Online]. Sketchfab. Available at: https://sketchfab.com/3d-models/scud-ballistic-missile-30cf91617bad4a4bb07d0856ccd55ff0 [Accessed 22 August 2024].
Martinez, G. (2020). FUNCTIONAL PROPELLER FOR PLASTIC DRYER. [Online]. Sketchfab. Available at: https://sketchfab.com/3d-models/functional-propeller-for-plastic-dryer-9a614d23ce254e2b8b5f49b1b5ef8 [Accessed 22 August 2024].
snrnsrk5. (2023). Soviet Heavy Tanks. [Online]. Sketchfab. Available at: https://sketchfab.com/3d-models/soviet-heavy-tanks-4ef5ac2028c0439b806a1c3fe298e67b [Accessed 22 August 2024].
videoanimateitalia. (2024). jet engine. [Online]. Sketchfab. Available at: https://sketchfab.com/3d-models/jet-engine-f5010f64424e415183c110c8e0132017 [Accessed 22 August 2024].
Assets by Quixel (Epic Games)
3D Assets
Binoculars leather case, candle Holders, concrete planter, Nordic forest rock, Medieval Banquet (all food assets), metal watering can, old Book, old cushion, small concrete planter, stone mortar, stone pestal, wax candle, wooden stool.
Plants
Boston fern, bracken fern, broom creeper, common coleus, common fern, crownbeard, mustard, rhazya, thyme.
Decals
Antique rug
Surfaces
Carpet_pgwfnwp0
Epic Games. (n/d). Quixel Bridge. [Online]. . Available at: https://quixel.com/bridge [Accessed 22 August 2024].
Photographs
Adobe Stock. (n/d). Sky Replacement Stock Images (Auto Sky Replacement). [Online]. . Available at: https://stock.adobe.com/uk/ [Accessed 22 August 2024].
macrovector. (n/d). Realistic set of gun flashes with fire sparkles and smoke isolated on black background vector illustration. [Online]. FreePik. Available at: https://www.freepik.com/free-vector/realistic-set-gun-flashes-with-fire-sparkles-smoke-isolated-black-background-vector-illustration_26764910.htm#query=muzzle%20flash&position=4&from_view=keyword&track=ais_hybrid&uuid=f1ce68de-e84c-440c-ab67-7a6e2b2ce4c7 [Accessed 26 August 2024].
Nudaveritas, S. (2023). a river running through a lush green valley. [Online]. Unsplash. Available at: https://unsplash.com/photos/a-river-running-through-a-lush-green-valley-1Ez51O4Otsg [Accessed 26 August 2024].
Quinan, M. (2015). Northern lights during night time. [Online]. Unsplash. Available at: https://unsplash.com/photos/northern-lights-during-night-time-R3pUGn5YiTg [Accessed 26 August 2024].
Walczuk, M. (2017). green aurora. [Online]. Unsplash. Available at: https://unsplash.com/photos/green-aurora-asc8mCGtSew [Accessed 26 August 2024].
Widodo, P. (2022). The hardest part of being candle is you must burn yourself out to light others. [Online]. Unsplash. Available at: https://unsplash.com/photos/a-lit-candle-in-the-dark-with-a-dark-background-sbOnhWT5UGA [Accessed 26 August 2024].
VectorStock. (n/d). Simple green and blue aurora logo modern vector image. [Online]. Available at: https://www.vectorstock.com/royalty-free-vector/simple-green-and-blue-aurora-logo-modern-vector-44315782 [Accessed 28 August 2024].
Promotional Video
Busti. (2019). Flip Dot Display Demo. [Audio]. [Online]. YouTube. Available at: https://www.youtube.com/watch?v=3YPhtsflhf0 [Accessed 26 August 2024].
Futurescapes - Sci Fi Ambience. (2023). Arrival: Relaxing Alien Sci Fi Music. [Music]. [Online]. YouTube. Available at: https://www.youtube.com/watch?v=9fu6soG89v8&t=3s [Accessed 26 August 2024].
0 notes
Text
Review & Evaluation: Individual Learning Processes
Review Blog Post #2
This major study project has been a vast learning experience for me in terms of technical skill, new software to explore as well as challenging old techniques or practices which might hold me back.
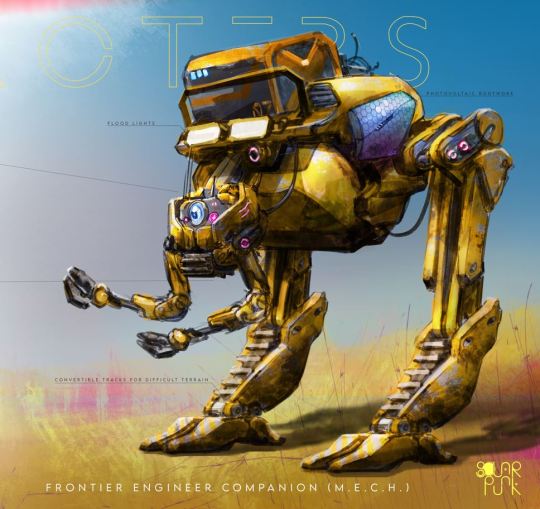
The most difficult concept art I created was the mech companion as it challenged my technical drawing skills. In the end I resorted to using 3D to help me as a perspective aid once I had the general design down. The basic model proved to still be a little challenging to create, however, the speed at which I was able to render by hand the final concept made it all worth it. While I'll still develop my technical drawing skills, it's a relief to know that 3D tools can help me out of a rut.
I pushed myself to learn new approaches to prop design on characters, in particular my focus for the Frontier Engineer was detail centric props, as tools are a vital part of an engineer’s kit. Artist Jude Smith was a massive inspiration for me for his detailed, well thought-out characters as he expertly blends sci-fi and traditional components. The main thing I learnt from analysing Jude’s work was the 3D volume he was able to capture in his designs. I particularly noticed the way he designed the armoured pieces to functionally form together, the gravity and weight given to attached props, like gloves and cables, and the volumetric flare of clothing to add movement and interest. I tried to really think about the way my accessories were made and worn, and how the pieces fitted together, and I was successful to some degree. I want to continue developing my working knowledge of costume elements like these to improve my work as a concept artist.
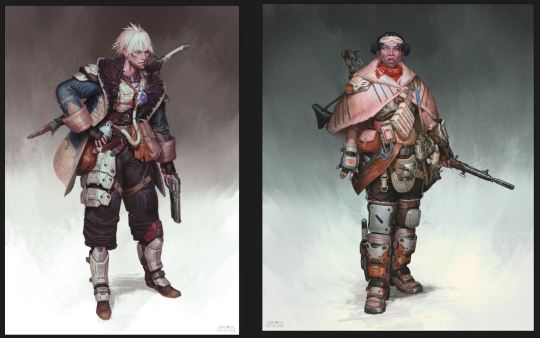
Smith, J. (2022).
My 3D skills have evolved tremendously learning the Unreal Engine 5 pipeline, learning better modelling techniques for cleaner geometry. I encountered a couple of errors in exporting it into unreal, but I was able to trouble shoot the model to have it import successfully.
Unreal Engine 5 was an entirely new experience for me, but I loved every minute of the creative power terraforming and set dressing gave me. I was able to carefully create the world I had been working so very hard to visualise the last few months, and seeing my models in the beautiful level by MYTHRA TECH was extremely satisfying and addicting. I found myself in a frenzy modelling props, unavailable to download for free, to achieve the look and feel I envisioned. The creative joy I felt in Unreal has left me with a thirst for level design which I would love to develop my skills in further. This creative zone is something I will definitely also be tapping into when I feel the resurgence of art block.
I think my practice has developed tremendously over the course of the module as well as the year. It has given me a thirst for experiencing new tools and exploration and helped me over-come my fears of new design territory and software.
References:
MYTHRA TECH. (2022). Mediterranean Coast. [Online]. Unreal Engine Marketplace. Available at: https://www.unrealengine.com/marketplace/en-US/product/3a23dac323e646f38e2c7a744236478e?sessionInval [Accessed 29 July 2024].
Smith, J. (2022). Meriwa. [Online]. ArtStation. Available at: https://www.artstation.com/artwork/aGmg60 [Accessed 22 June 2024].
Smith, J. (2022). Nero. [Online]. ArtStation. Available at: https://www.artstation.com/artwork/Penggy [Accessed 22 June 2024].
0 notes
Text
Management Review
Blog Post #5
I've been crunching as much as physically possible during the deadline week and made some excellent progress. I was able to finish up the art book including art and the descriptive text. This meant also finishing up my Unreal level as I showcased screenshots of it in the art book. I made some decisions about what content to swap out with what I had planned to deliver in my pre-production. I decided to leave the merchant's companion for a later date and instead dress the Unreal scene so that I could get some detailed beauty shots. This meant modelling some extra assets that weren't originally planned, and swapping out some planned for others more suited to my needs.
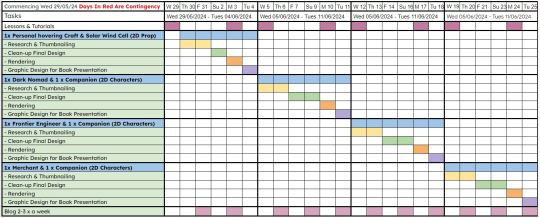
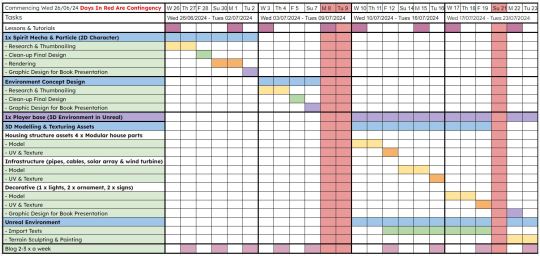

Colour key for "Tasks" column: Green = Completed, Yellow = In Progress, Red = Not Started & Behind Schedule.
The graphic design and quality of the art book took a lot longer than I thought, and I wish I had considered the length of time required to make such a polished presentation. I used chat GPT as a springboard for some of the art book's text, which was an excellent starting point for me to edit and refine.
I have yet to finish my presentation and promotional video, but I will be able to deliver something nice by tomorrow. I have some beautiful footage that I captured from Unreal as well as my curated art pages to show.
As the final management review, retrospectively I wish I had stuck a little closer to my Gantt chart, however, the experience has taught me that major projects are going to deviate from careful planning to some degree. It has also taught me a greater self-awareness of my own capabilities and limits which will be invaluable when planning my next project.
0 notes
Text
Major Study
Production Post #30
Finishing and Polishing Characters
After the 45 degree angle technical drawing disaster, I took to Maya to give my self a fighting chance of finishing this mech. I used the quad draw tool on top of a plane textured with my side view to map out the basic proportions.

I extruded and duplicated the quad-draw generated shapes to slowly build up the 3 dimensional aspect of the character. It was a little challenging to get it even to this stage, so I aligned the camera so that I could keep the head of the robot which I liked.

I painted the light and shadows in large blocks and shapes and went back in to hone smaller details like screws and joints. The ground work involved in this mecha made the rendering process in Photoshop a lot faster than I originally anticipated, which was a true testament to the power of 3D!
I finally added the object for the engineer to lean on by taking Sketchfab screen shots, one with the wire view to give it a blue-print feel.
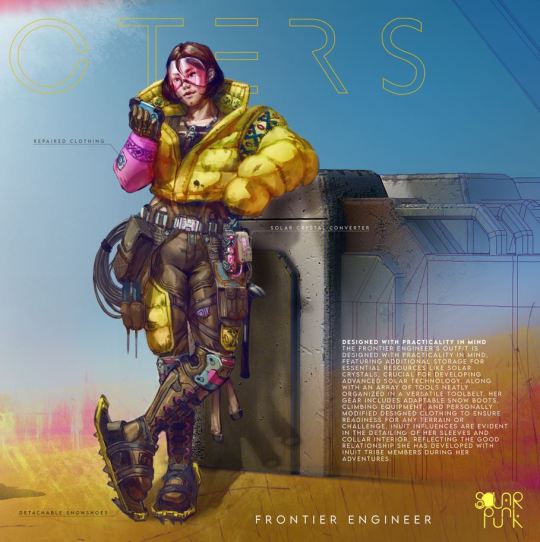
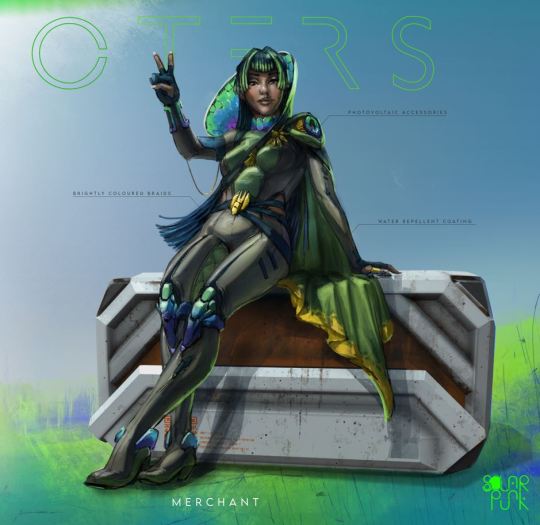
I finally finished rendering the Merchant, It was fun painting the various elements of her simplistic but unique outfit. I tried to have good brush economy while focusing on the fundamentals of good lighting. I try to really enhance the core of the shadow and the bounce light for a realistic look.
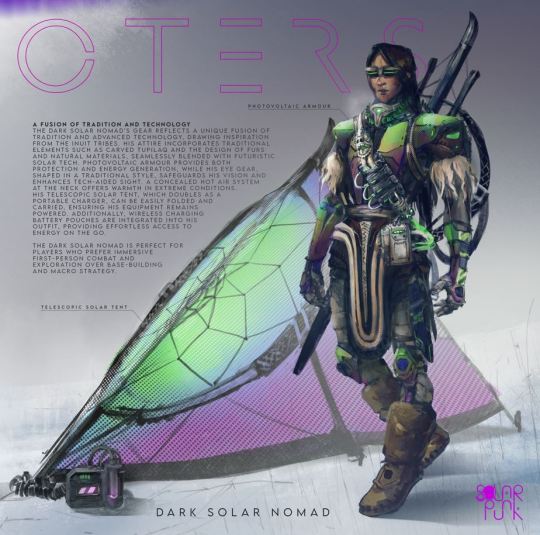
The Dark Solar Nomad's tent was in desperate need of greater thought. I replaced the spirit creature, which has its own page and is featured quite a lot, in favour of the solar tent, which I also made larger so that he can actually use it as a shelter, taking care to consider how he would carry it by including telescopic lightweight limbs in the design.
0 notes
Text
At the Forefront
Blog Post #10
The success of Baldurs Gate: characters and relationships
The game Baldur's Gate has achieved significant success due to many factors including its rich and immersive worldbuilding, which draws players deeply into the Dungeons & Dragons universe. The game's world is meticulously crafted, with a vast, interconnected environment filled with diverse cities, dungeons, and wilderness areas that feel alive and responsive to player actions.
Game reviewer ‘TheYamiks’ (2023) credited a lot of success of Baldur's Gate from its complex characters and the deep relationships that players can build with them. The game features a wide range of companion characters, each with their own backstory, motivations, and personal quests that evolve throughout the game. These characters are not just sidekicks; they are fully realised individuals who react to the player's decisions, form bonds with each other, and even engage in romance or conflict based on the unfolding story. These dynamic interactions that seem revolutionary in terms of player reception, offer a perfect chance to hone in on richer character design that reflect the breadth of the world. As Baldur's Gate’s popularity starts to affect new games in production, it’s a fun chance for concept artists to approach character design with the level of love one might have when designing their very own D&D character.
I would however note that the effectiveness of worldbuilding and character acting goes a long way, as the published art for Baldur's Gate 3, while still stunning, can look a little more junior compared to art of other AAA titles. This might be a reflection of their humbler beginnings before shooting up to viral stardom, but it also proves that you don’t have to in the 1% of concept artists to create beloved and believable characters, that rather it is the blend of character-driven storytelling and expansive worldbuilding allows Baldur's Gate to appeal to such a wide audience, from those who enjoy deep narrative and character exploration to those who relish strategic gameplay and world exploration, making it a standout success in the RPG genre.
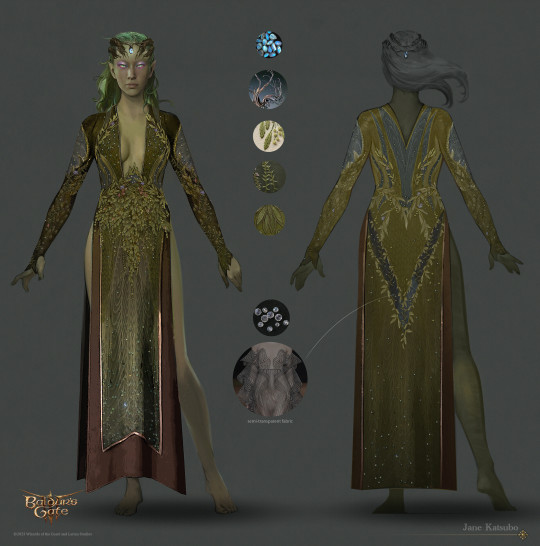
Jane Katsubo – Senior Concept Artist – Larian Studios – Baldur’s Gate 3
While I will not be able to recreate such detailed worldbuilding and depth in my own solarpunk project in time, I want the worldbuilding and the design behind my characters to be closely linked and rich with visual and narrative backstory.
References:
TheYamiks. (2023). The Success of Baldur's Gate 3. [YouTube video] Available at https://www.youtube.com/watch?v=a7DJeunN1qk [Accessed 19 August 2024].
0 notes
Text
Major Study
Production Post #29
Player's Base: Creating More 3D Assets & Set Dressing Cont.
A few weeks ago, Neal suggested adding elements to suggest family life, as children would be a key presence in a utopia. I decided to follow his suggestion of making a play area. I wanted to keep it very simple, but still conceptual, as I didn't have much time. I had a look at existing sci-fi play areas and decided to create a geodesic style atrium and slide.


I created a platonic solid object and changed the primitive setting to dodecahedron. I then beveled the edges, deleted the center-most faces, extruded it and beveled it again to created rounded bars.

To create the sand, I used the soft select tool and changed the settings to spline so that the curve dropped off and them leveled out, this allowed me to create dune-like peaks rather than the rounded lumps of the default setting.


I went to my go-to Substance Painter for texturing the model after UV-ing, I particularly liked the sand smart material as it looks so realistic. When adding grunge, I had to be very intentional as I didn't want to create a slide that would give children tetanus on the way down!

I imported all my models into unreal, finished the terraforming, terrain painting and foliage painting. I also darkened the textures with a multiply node so that they didn't appear too washed-out and over-exposed. This is the capture of the animated windmill and all the assets in place. I still plan to dress the patio with a table and food and add some foliage to the building between panels so that it's closer to the concept art.
I couldn't find a a suitable table model anywhere for free, I wanted something simple and charming without being to modern or ornate to create a juxtaposition between sci-fi and tradition. and so I created a very simple table and bench.


I warped some edges for a a more realistic and worn feel by rotating some faces very slightly. I also damaged one of the table boards to add a subtle rustic aesthetic.

When I brought it in for texturing in Substance, I didn't like how large the wood grain was on the table top so I resized the UV shells to give the table top priority over the table legs (and underside of course).


Creating a wine bottle was quite easy using the beveling tool - after the general proportions are created, select both edge loops of the neck and bevel it, increasing the subdivision count until it becomes smooth. In substance, I kept the label as straight as possible so that I could edit it in Photoshop with my own graphics. Having a blank version also means people can use my model from Sketchfab and customise it however they want!


The label and textures I added to the bottle are a cute little easter egg.
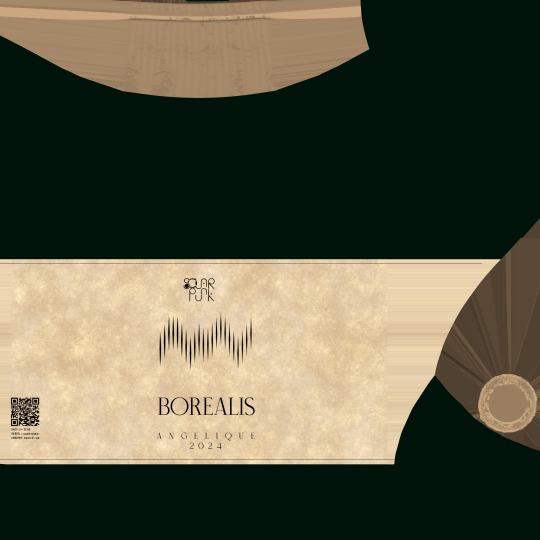
I modified this vector logo for the label:
https://www.vectorstock.com/royalty-free-vector/simple-green-and-blue-aurora-logo-modern-vector-44315782
To get the transparency effect for the glass, I had to create two separate texture sets by duplicating the material in the hypershader n Maya. and add transparency to the material in the material blueprints in Unreal as well.


I created a couple of wineglasses for this tablescape using a similar beveling technique I used on the bottle. I later added separate, translucent geometry for the wine. The material was a little hard to get looking realistic for the glass, but I found in the end that turning up the metallic node to 2 game very good results, as well as putting refraction up high.


I created soil in Quixel planters with a basic cylinder in UNreal and assigned a forest floor material to it from Quixel Bridge. The foliage from Quixel bridge was very beautiful, but it had a terrible LOD (level of detail) setting that would cause the plants to revert to flat image planes from not too far away.


I was able to find out about these settings for practically turning off the LOD levels, I wouldn't recommend this normally, but since all the assets are grouped to this small area the game's engine shouldn't find it too troublesome.

I also modeled and textured this very basic light to dress the front of the house for the night-time shots. I ended up using them to also light the trails.

To take high quality "photos" of my Unreal scene, I pressed "G" to hide the ugly toggles and set the high resolution screenshot capture detail to 3, which is 4k.

Links to my Sketchfab models:
References:
VectorStock. (n/d). Simple green and blue aurora logo modern vector image. [Online]. Available at: https://www.vectorstock.com/royalty-free-vector/simple-green-and-blue-aurora-logo-modern-vector-44315782 [Accessed 28 August 2024].
0 notes
Text
Major Study
Production Post #28
Player's Base: Set Dressing in Unreal
I'm becoming a little more confident in the materials blueprint editor as I customise values such as roughness, brightness and colour with some multiply nodes.

I use terrain painting to add realistic levels of gravel and sand.


I started shaping the hillock for the wind turbine.


I animated the blades slowly rotating in Maya, but the baked animations did not translate very well into unreal as I experienced my first physics disaster!

I decided to animate directly in Unreal using the below tutorial to guide me.
youtube
Adding a rotating actor and assigning it to the turbine static mesh.


It worked!

I started to carve my paths into the terrain using the erosion tool.

I adjusted the brightness of the material of these crates in the material blueprints editor.


My player's base area is coming along nicely and I'll be ready to add foliage soon!


0 notes
Text
Major Study
Production Post #27
Player's Base: Creating More 3D Assets


Texturing simple crates I made for set dressing the level.


I used soft select to gently twist the bend into the blades of the turbine.


I used a hexagon mesh png as an alpha for a normal map in substance, I used it to make the solar cells on the equipment.


A cute access panel detail.
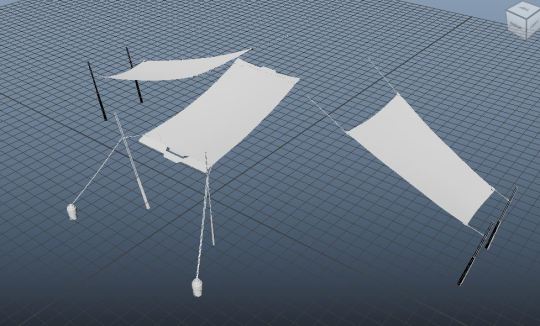


I created two canopies and duplicated the one on the right after UV mapping it so that the UV's would stack and the player wouldn't notice. I had some trouble with the auto folds generation of the smart material, but I was able to eventually modify the smart material generator.


I added the same solar cell technique used on the windmill to the panels of the house, I think it looks really cool!


The first attempt at modelling the main solar array ended up too grid like and rigid. I instead opted for a flared wing design where the panels overlap like feathers which was inspired by the design on the map.


The supports and lower utility, heatsink and battery section were all taken from the lower greebling of the house to save time. This is kitbashing and indeed saved a lot of time and created a design that I feel stands well on its own.


The uv mapping again used stacked uvs from the right side to the left side. This doubled the available resolution of the 4k max image size in substance painter. The central section was not mirrored to hide any mirroring of the textures on the sides.
0 notes
Text
Major Study
Production Post #26
Spirit Creatures


After downloading and assembling the models from sketchfab and adding my own geometry for the aircraft sections I applied a simple rust material with a normal map from cgbookcase and then added arnold mesh lights along the creatures interior to create an inner glowing effect. An HDRI was downloaded from Polyhaven to give something for the gloss to reflect. I knew that the scene would be slightly foggy or involve snow or dust thrown into the air so I added a depth pass from the Arnold render settings. When painting in photoshop i realised that it was taking far too long to paint behind all the hundreds of pieces carefully and was getting confused as to what was in front of what with the chaotic design. Having learned about matte passes at university I created my own simple surface shader materials and applied a different colour to each layer of significant depth or occlusion from the camera's perspective. I rendered this out, put it on top in photoshop and was able to use the simple magic wand tool to isolate sections to explode upwards in layers.

I edited the colour of the background from the spirit creature piece to be red in order to save time for a similar type of concept.
Below shows the light and energy elements being added, at first with an inner 'fog' carefully painted among the overlaying geometry using my matte pass, then adding in the chaotic energy ribbons between the appropriate layers.


The finishing touches involved rust particles blowing off of it and small explosions along its length and muzzle fire to accentuate the feeling of utter concentrated chaos. I was thrilled with how this turned out and how 3D can be used to save so much time in concept art.
References:
macrovector. (n/d). Realistic set of gun flashes with fire sparkles and smoke isolated on black background vector illustration. [Online]. FreePik. Available at: https://www.freepik.com/free-vector/realistic-set-gun-flashes-with-fire-sparkles-smoke-isolated-black-background-vector-illustration_26764910.htm#query=muzzle%20flash&position=4&from_view=keyword&track=ais_hybrid&uuid=f1ce68de-e84c-440c-ab67-7a6e2b2ce4c7 [Accessed 22 August 2024].
0 notes
Text
Major Study
Production Post #25
Spirit Creatures

I revisited my old work from the pre-production module and tried to update it to the new vibrant styles my project has evolved into.

I wanted to keep the spirit creature in a pure energy form, and visually link it to the auroras by having them float above it. I painted in a corrupted spirit cloud in the distance to build the visual story.


I began the chaos version by browsing for some military equipment on Sketchfab.
Jet engine https://sketchfab.com/3d-models/jet-engine-f5010f64424e415183c110c8e0132017
Propeller https://sketchfab.com/3d-models/functional-propeller-for-plastic-dryer-9a614d23ce254e2b8b5f49b1b5ef8de3#download
Tanks
Scud missile


After downloading the 3D assets for the SCUD launcher, soviet tanks, propeller and Mig fighter from sketchfab I created my own pieces for broken aircraft panels to look like a ribcage to add to the 'haunted' feel of the design. Finally I modelled a piece of a bow of a ship to put near the front to tie the propeller into the design and add to the randomness of land, sea and air military equipment combined into one beast.

A close up of the aircraft segment I made.


I had planned to use curve warp to angle the creature with full and easy control but this caused the geometry to implode even though it was combined. However I found that the curve warp tool did work, and I was able to modify the high and low bound of 3 different curve warps to get the pose that I wanted.


Arnold shaders and Arnold lights were used in this for the Arnold renderer.


A simple automatic map was created and as a tiled texture was used I scaled everything up to make it appear high quality.


Above shows the different render attempts to get the result that I wanted.


Above shows the z depth being added as a render pass for me to use for fog later in photoshop.


Layers of depth from the camaera's perspective were assigned different surface shaders to help with selection tools in photoshop later on.
References:
AlexDang. (2023). Scud ( Ballistic missile ). [Online]. Sketchfab. Available at: https://sketchfab.com/3d-models/scud-ballistic-missile-30cf91617bad4a4bb07d0856ccd55ff0 [Accessed 22 August 2024].
Martinez, G. (2020). FUNCTIONAL PROPELLER FOR PLASTIC DRYER. [Online]. Sketchfab. Available at: https://sketchfab.com/3d-models/functional-propeller-for-plastic-dryer-9a614d23ce254e2b8b5f49b1b5ef8 [Accessed 22 August 2024].
snrnsrk5. (2023). Soviet Heavy Tanks. [Online]. Sketchfab. Available at: https://sketchfab.com/3d-models/soviet-heavy-tanks-4ef5ac2028c0439b806a1c3fe298e67b [Accessed 22 August 2024].
videoanimateitalia. (2024). jet engine. [Online]. Sketchfab. Available at: https://sketchfab.com/3d-models/jet-engine-f5010f64424e415183c110c8e0132017 [Accessed 22 August 2024].
0 notes
Text
Major Study
Production Post #24
Solar Cell

To animate my solar cell, I duplicated the single one that I made after texturing it and used pivot snapping to a corner vertex then vertex snapping on the move tool while duplicating to snap together this array. To animate them I animated them all at once to flip over at the same time. Then I selected each row one by one and shifted it's keyframes along. The end result is exactly what I wanted and even works online in sketchfab. I can almost hear the flip dot sound.

Above shows the result with textures on. The images below show it being set up and working in sketchfab.


When creating an array of hexagon panels containing the smaller ones, I knew that the poly count would get too high so simply took a screenshot of the finished high poly panel from sketchfab and applied it beneath a layer of glass on the others to create the illusion that they are all as detailed.


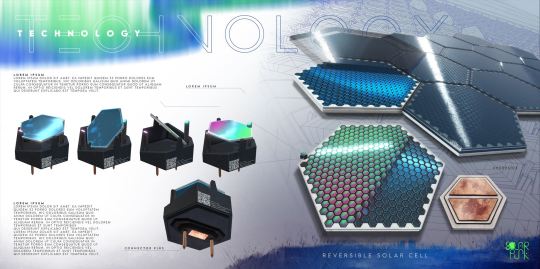
The above processes really enhanced my graphic design and I am particularly proud of this page and the presentation of it.
0 notes
Text
Major Study
Production Post #23
Solar Cell
youtube
The above video proved to be helpful reference on how flip dots work at an individual technical level. I was able to recreate this mechanism carefully and accurately in maya but with my own design.
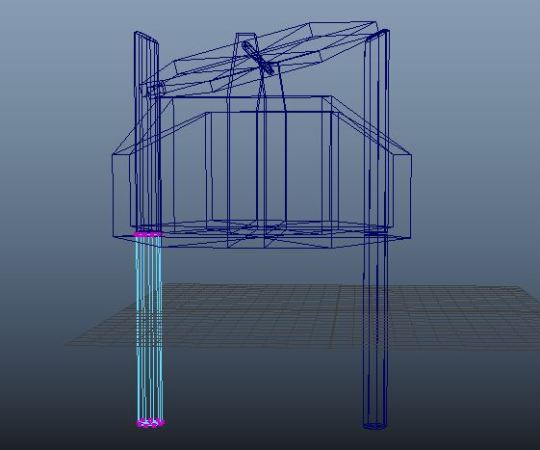


I then uv mapped it and textured it in substance painter.


Snapping was used in maya to lay these individual flip dot solar panel segments into a careful grid. I ended up making it more perfect by eye. I used duplicate special to speed up the process.


After animating it I baked the animations so that it would work on sketchfab or other 3D applications like unreal.


I notice that a lot of modern mecha and tech designs on artstation use qr codes to add a grounded yet futuristic element to their designs as this is something that all real-world tech has, from the components of a computer to the outside of a smartphone. I added a qr code linking back to my sketchfab as a cute Easter egg.
0 notes
Text
At the Forefront
Blog Post #9
The Importance of Concept Artists Learning Animation
While concept artists have been traditionally responsible for visualising ideas and creating early artwork that others will take forward to implement into a game or film, growing expectations from studios and audiences as well as advancements in software and AI, shows a compelling case for concept artists to expand their skill-set into animation whether 2D or 3D. Particularly when considering expanding into LED volumes. Truthfully, beyond the animated 2D concept art cut scenes in Homeworld, I struggled to find animated what one would consider traditional concept art in Google searches. This is despite having seen some more recently during a class tutorial. I did however find YouTube tutorials on how to animate 2D paintings be it for concept art or for Lofi backgrounds. I sincerely hope Google optomises the search results to allow better access to the medium.
Another area of practice where animations are invlauble in pre-production is storyboarding. Storyboarding is not new, but what brings it to the forefront of concept art is this expansion of roles that concepts artists, who are primarily pre-vis artists are expected to deliver. According to a CG Spectrum (2022) article, animations in previs can help many facets of a project such as clarifying the vision, helping to identify production challenges and impressively can even help get a project green-lit. The pre-vis success for production lies squarely at a concept artists feet, so it is logical to harness whatever tools necessary in your repertoire to secure a green-lit production for your client.
References:
Wall, S. (2022). What is an animation storyboard?. [Online]. CGSpectrum. Available at: https://www.cgspectrum.com/blog/what-is-an-animation-storyboard [Accessed 26 August 2024].
0 notes
Text
Management Review
Blog Post #4
I've had quite a few plates spinning this week, but I've managed to make some very good progress on the 3D elements of my project and also caught up on some of the concept designs for the characters by finalising the design of the merchant. I was also able to design the pages for the environmental concepts. Work I still have to catch up on are the spirit mecha, the merchant's companion and some introductory pages for the book including the technology page on the solar cell, as well as writing the text for each page. Looking at my Gantt chart, I am still a little over a week behind schedule. Due to my ill health, I was granted a week long extension, so I feel confident I will be able to complete the major elements from my Pre-production folder.
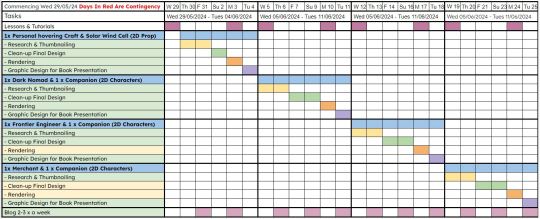
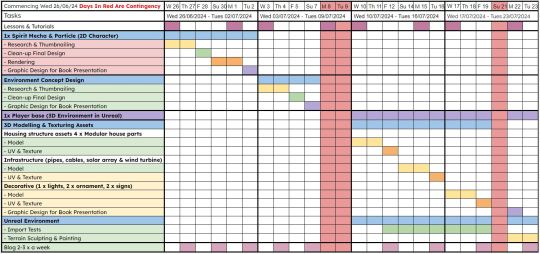

Colour key for "Tasks" column: Green = Completed, Yellow = In Progress, Red = Not Started & Behind Schedule.
This week I plan on completing my artbook, which also needs to include paint-overs from the Unreal environment, hopefully freeing up the final week to work on my presentation and promotional video as originally planned.
0 notes
Text
Major Study
Production Post #22
Player's Base: Graphic Design
I began the graphic design of the player's base pictures.
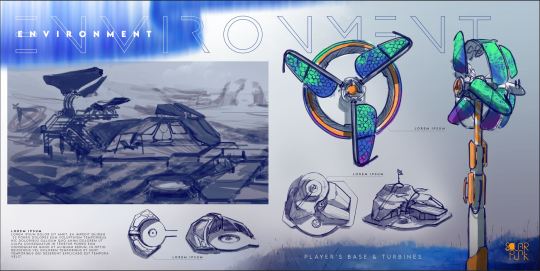
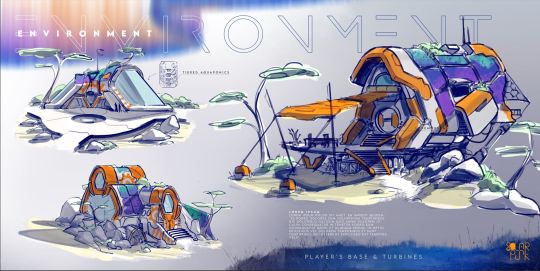
I also started working on the map that would present the overview of the player's homestead. To create the ecological map effect, I painted a "bump" map with blacks being the lowest point and whites being the highest, posterised it to around 15 levels and then used the filter option to select edges. This left me with a very custom height map that adds sophisticated visual interest.
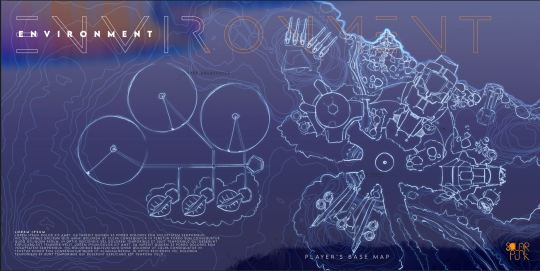
I thought it looked pale and washed out, so Leo suggested I try some techniques to visually define the paths and buildings.

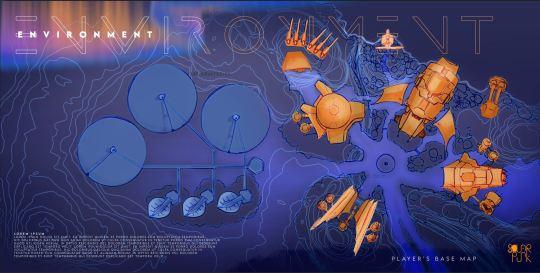
Leo's paintover.
I thought Leo's suggestion was really effective and went ahead and added some colour to buildings to really make them pop. I tried to used colour to indicate their altitude with the lighter oranges being the highest.
0 notes
Text
At the Forefront
Blog Post #8
The Design Success of Characters in Apex Legends While there are many aspects of Apex Legends that make it stand out in terms of success compared to other games in the genre such as Overwatch or Fortnite from the game mechanics to the maps, for many, including myself, it is the design of the characters. There is a good level of diversity and inclusive representation which helps players feel represented and seen. Each character or ‘legend’ has a distinct visual identity and differentiated silhouetted that makes them instantly recognisable even from afar in gameplay. Their designs are a blend of the futuristic with the fantastical along with realistic elements to their costumes and accessories. Their builds beneath their costumes and armor are also entirely different and they behave uniquely in gameplay too. For example Wraith's dark, hooded, stealthy appearance with tight fitting clothes and a sleeker array of accessories conveys her mysterious and agile nature. This is carried through in her gameplay abilities to phase through dimensions and become invisible to other players. In contrast the character Gibraltar has a huge muscular build which matches his knight-inspired futuristic armored outfit reflect his role as a ‘tank’ in combat with a focus on defensive abilities.
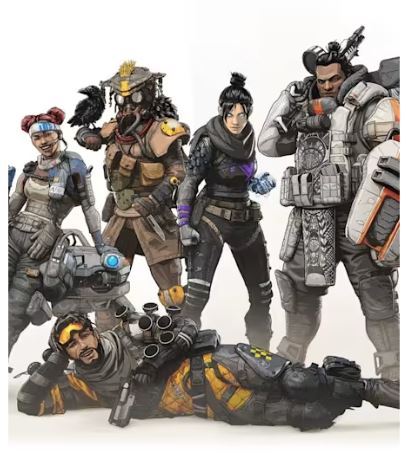
In critique of the characters from a similar game, Overwatch for example, reviewer, Blondeau noted that although the range of characters was indeed diverse in terms of ethnicity, gender and age, many of the female characters look extremely similar. “A gruff military woman hailing from Egypt has the same ass and bust and weight of an introverted teenage hacker from Mexico,”.
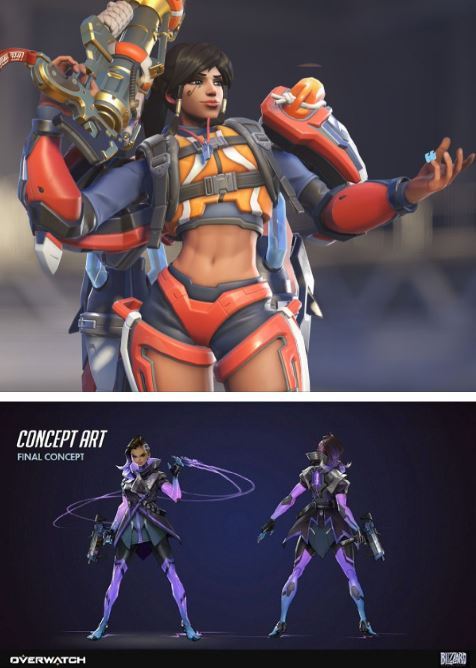
When comparing to Apex Legends, Blondeau noted that only one female character is dressed in a bodysuit (the aforementioned Wraith), which aligns with her role as a stealthy, elusive assassin. In contrast, "the other two women wear clothing that makes sense for both their respective roles on the battlefield and their lore, with Bangalore’s fatigues making sense considering her military upbringing and Lifeline’s breathable top and cargo pants fitting with her role as a combat medic." This shows how their outfits are thoughtfully designed to match both their functionalities in the game and their personal backstories.
I would like to ensure that the characters I design for my project are differentiated, relatable and appear to have made their own outfit choices based on what they do and their own personalities rather than just for the ‘gaze’ of the player.
References:
Blizzard Entertainment. (n.d.). Pharah - Heroes - Overwatch 2. [online] Available at: https://overwatch.blizzard.com/en-us/heroes [Accessed 18 August 2024].
WeWereRogue. (2019). [D&D 5e] Overwatch’s Sombra: Stealth Hacker. [Tumblr post] Available at: https://wewererogue.tumblr.com/post/187850307711/dd-5e-overwatchs-sombra-stealth-hacker [Accessed 15 August 2024].
Wright, S. (2019). Apex Legends: 3 best characters for beginners. [online] Red Bull. Available at: https://www.redbull.com/ie-en/Apex-Legends-best-characters-for-noobs [Accessed 15 August 2024].
Blondeau (2021). Apex Legends Has Better Character Designs Than Overwatch - Here’s Why. [online] TheGamer. Available at: https://www.thegamer.com/apex-legends-has-better-character-designs-than-overwatch-heres-why/ [Accessed 15 August 2024].
0 notes
Text
Major Study
Production Post #21
Player's Base: Texturing in Substance, Importing into Unreal, Material Blueprints


Baking the textures in Substance 3D Painter.


I began texturing while also experimenting with the different smart materiel presets.


I adjusted a preset to have white paint while keeping some of the smart rust and grunge filters.

The first colour pass and it's already looking so much like the concept art!

Unfortunately Unreal didn't not agree and the model caused Unreal to crash.

I realised I had used an older version of the .fx before the fix.

I loaded in the right .fbx with the material groups saved onto the model, this was such a massive relief.

I began plugging the materials into each material group.

My building in Unreal! This was such a satisfying moment for me to finally see.


I still need to texture and import the canopies for the model as well as terraforming and finding the right cliff-side perch for it.
0 notes