
Don't wanna be here? Send us removal request.
Statistics
We looked inside some of the posts by amy---reid and here's what we found interesting.
Average Info
Notes Per Post
14
Likes Per Post
2
Reblog Per Post
12
Reply Per Post
0
Time Between Posts
4 days
Number of Posts By Type
Text
11
Photo
6
Last Seen Tumblr Blogs


Fun Fact
Tumblr was attacked by a cross-site scripting worm deployed by the Internet troll group GNAA on Dec 3, 2012.
Text


Documentation of Final Assignment
Statement
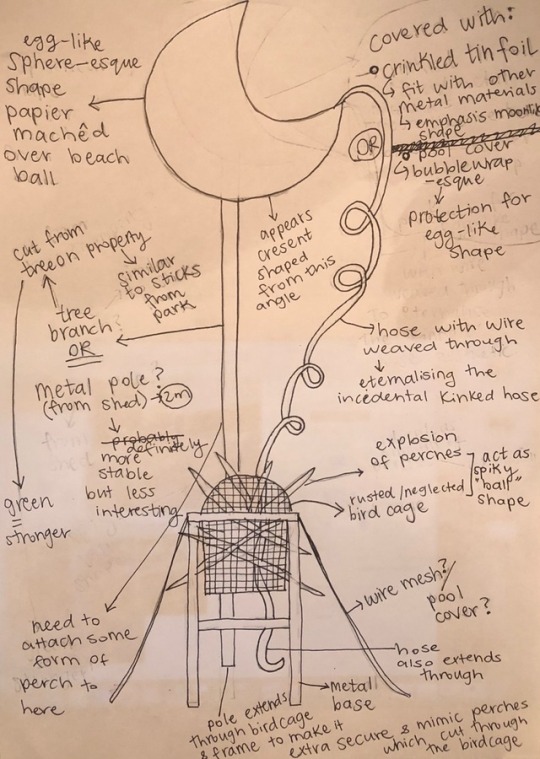
I didn’t want to spend a lot of money on this project as I’m trying to save money. This made the production process more difficult as I was working with salvaged materials. I was concerned for the structural integrity of the work. The base’s weight and footprint act to anchor the top heavy sculpture but also acts as a plinth, raising the work. The base is constructed as a decked box, with staggered planks to add visual interest. The plinth for the A4 paper flips the sculpture’s plinth, by placing the branch off-cut under the decked face. The branch sits in a circular hole drilled between two of the base’s planks. A box surrounds it on the underside, allowing it to be screwed in place. This attachment is disguised by placing mulch in the rectangular shape of the metal frame, almost making the branch appear like a live tree. The frame is attached to the base with screws, through pre-existing holes. It is off centre to both the base and the tree branch, which is also not centred. Ropes extend from each of the legs to the corners of the plinth, creating the bottom shape from the drawing. The bird cage rests on the metal frame but is jammed in place by the multitude of perches. This explosion of sticks forms the spiky shape in the drawing. It could also serve as a habitat for smaller birds. The branch also breaks through cage. As does the hose, spiralling upwards, wire preserving the not so incidental kink. This acts as the squiggly line from the drawing. The spherical silver nest hangs past the edge of the base, giving the work a constant potential kinetic energy. The nest also sways with the breeze, like a cradle being rocked. From the front it appears like the crescent shape from the drawing due to the opening. The opening appears like a gaping mouth, almost like the sceptre is screaming.
My work comments on materiality. A raw tree branch, sticks, wooden planks and bark mulch are forced to communicate with one another. There is a contrast between natural and man-made. Metal appears in the form of (what I assume was once) the legs of a chair, a rusted bird cage and the foil covered nest. Everything except the nest was salvaged from the verge, the park, dad’s shed, my craft cupboard or the workshop. The nest is something I made out of nothings. It is paper, flour, water, fabric, a bit of mould, salt, rubber bitumen, wood glue and tin foil. It’s form only came into being because of the beach ball which helped to create the void inside. Where the tinfoil has been rubbed away creates an interesting aesthetic, so I decided to leave it. It speaks of fragility and impermanence in the same way that rest of the neglected and rejected materials do.
1 note
·
View note
Text


Mary Miss’s ‘Ladder For a Beech Tree’, 1999
Underneath a large old copper beach tree Mary Miss placed an oversized ladder. It extends long the ground far out beyond the roots of the tree. Large numbers indicate intervals of twenty feet. From afar it can be used as a measuring device for the tree, comparing the length of the two.
Her work is not nature, but it exists within the natural environment. It’s flatness makes it feel almost like a mark on the site, but it can still be removed from the environment. It is not architecture either, but could perform a structural task like a building does. Thus, according to Krauss, it should be considered a sculpture.
Placing a ladder horizontally negates its intended function. Similarly, my work rejects the original function of its materials including: the hose, metal frame and tinfoil. While Miss’ work is made for flora mine is made for fauna, but both have the natural environment as their inspiration. The surface of the ladder under is reflective much like the tin foil coating of my nest.
0 notes
Text


Week 12 Documentation
GETTING THE HANG OF IT:
ISSUE 1: I had no idea how I would attach my nest, I was worried the branch would not hold it as it had become quite heavy.
SOLUTION 1: I decided to try hanging it with wire closer to the top of the branch so if it broke off I could hopefully try something lower down.
ISSUE 2: I wasn’t sure how to get it to hang at the angle I wanted
SOLUTION 2: the point on the inside that the nest balances on when at the right angels is where you should hang it from.
ISSUE 3: punching holes through with a pin wasn’t working (this is more of a confidence booster in my papier-mâché skills than an issue)
SOLUTION 4: I used a tiny drill bit to make two holes to thread wire through.
ISSUE 5: was worried the wire would tear through the fabric due to the weight of the nest.
SOLUTION 5: make a large wooden plater than would act like a washer to stop the wire tearing through.
ISSUE 6: was worried that the straight wooden plate would dig into the rounded interior of the nest and tear it.
SOLUTION 6: bend the wood by scouring it and then wetting it.
ISSUE 7: the light wood colour stuck out against the rest of the black interior.
SOLUTION 7: luckily there was some black paint in the workshop.
ISSUE 8: I didn’t think that one point would be strong enough to hold it up
SOLUTION 8: I attached the wire to two points at the top of the branch.
GETTING KINKY:
I wanted to make a hose stay in a kinked shape, like the swirly line from my drawing.
ISSUE 9: I had several hoses to chose from.
SOLUTION 9: decided upon the black one as it was similar to the rubbery black interior of the nest.
ISSUE 10: I didn’t know what length I would need.
SOLUTION 10: I used zip ties and an assistant to help hold the hose in place as I “drew” with it.
ISSUE 11: I could only feed the wire through so far before it would get stuck
SOLUTION 11: it seemed to go in easier the straighter the hose was so I enlisted some help
ISSUE 12: it got to a point where the wire just wouldn’t go in any further
SOLUTION 13: turned the hose around and fed wire from the other direction.
ISSUE 14: I didn’t know how I would attach it to the nest
SOLUTION 14: decided to coil up some extra hose (and hold it together with zip ties) and merely place it inside the nest.
STUMPED FOR A PLINTH:
ISSUE 15: I was unsure what to do for a plinth
SOLUTION 15: I realised I could use the stump I had cut from the base of the branch as a stand and had extra pine left over from making the base. I even staggered the planks so it would mimic the sculpture’s base.
ISSUE 16: I had to attach the planks of pine and couldn’t do it in the same way I had done the base.
SOLUTION 16: I found two pieces of scrap wood, use them as bars across the bottom and screwed into the underside of the planks.
ISSUE 17: I didn’t know how to hold the piece of paper in place or make it weather-proof.
SOLUTION 17: there was a piece of scrap acrylic that was almost the perfect size.
ISSUE 18: I didn’t know how to attach acrylic to wood
SOLUTION 18: I very carefully drilled clearance holes through the acrylic, measuring 5cm in from each edge. I then used silver screws to match the silver of my nest and the rest of the visible screws.
ROPES TO TIE IT ALL TOGETHER:
ISSUE 19: attaching the ropes to the base.
SOLUTION 19: I drilled clearance holes so it could slide through
ISSUE 20: the rope was fraying and wouldn’t fit through
SOLUTION 20: I taped the end, slid it through, then tied a not to hold it in place.
ISSUE 21: attaching the ropes to the metal frame
SOLUTION 21: luckily the legs were hollow, so I left enough rope to shove a decent length inside the legs to hold it in place.
ISSUE 22: I wasn’t sure which rope to send to which corner.
SOLUTION 22: I decided to go with the one that looked the most like my original drawing.
1 note
·
View note
Text


WEEK 11 DOCUMENTATION:
Two bases later and my branch is now standing up.
Base one. Found a door in the skip bin at the workshop which was roughly the size to correspond to my drawing. I would then attach the branch via a lengthy pin.
ISSUE 1: the drill bits in the regular section were no way near long enough to give the pin enough hold.
SOLUTION 1: used an extra long drill but to drill into the base of the branch.
ISSUE 2: the end of the pin was going to stick out beyond the base, due to the door not being completely solid, meaning it wouldn’t sit flat on the ground
SOLUTION 2: attached blocks of wood close to the centre of the door, around the bolt, making it appear like it was hovering.
ISSUE 3: when tipping the base upright the door completely collapsed, as it was not strong enough to support the heavy branch.
SOLUTION 3: Cut the branch off and try again with BASE TWO
BASE 2. I knew that this one needed to be stronger and heavier than the last. Used recycled pine from a pile at the workshop to create a base and then decked it. I decided to stagger the decking to create more visual interest.
ISSUE 4: a lot of the pine was either rotted, warped or a lovely combination of the two
SOLUTION 4: search for bits which were salvageable and cut off / chuck the rest
SSUE 5: there weren’t any screws that were long enough to strongly hold the pieces of wood together.
SOLUTION 5: Used the longest screws available, overdid the countersink in order to drive the screw further into the wood.
Attaching the branch.
ISSUE 6: needed to figure out a way to make a hole the circumference of the branch
SOLUTION 6: Drill a hole with an extra large bit, roughly the size of the branch.
ISSUE 7: the bit wasn’t long enough to cut all the way through the wood.
SOLUTION 7: Use a chisel to remove the already cut wood, then continue the rest of the way through.
ISSUE 8: The branch then sat inside the hole, but it was wobbling around a bit
SOLUTION 8: Make a box on the underside to screw the branch in place
ISSUE 9: I wasn’t able to get the screws in all the way, I still need to figure out how to fix this.
SOLUTION OPTION: I may need to make a base layer that the branch also slots into to hold it in place.
Attaching the metal frame. I decided to secure it at an angle slightly off centre to mirror the branch hole, which had to be off centre due to the odd number of planks (had to be drilled between two planks). The placement was also influenced by where the hole lined up with the planks.
ISSUE 10: some of the screws were not screwing all of the way in
SOLUTION 10: I believe this is because some of the holes are narrower than others, I will have to either make these holes bigger or leave these holes screw-less.
Fitting the branch inside the bird cage.
ISSUE 11: I had to cut the branch down for it to have a some-what consistent circumference to fit inside the hole. This meant that the fork of the branch would be the part that cut through the bird cage.
SOLUTION 11: I had to cut more wires than I initially planned to and pull them apart in order to jam the branch inside.
Weather-Proofing the nest.
ISSUE 12: Initially I wanted to keep the fabric as the outer layer, but through research found that clear water-proofing products were neither common nor cheap.
SOLUTION 12: I found some rubber bitumen in the workshop which dries black, I decided to use this instead, then cover the ball with foil. It was non-toxic, so I knew it would be bird-safe! Painting it on the inside would also help prevent the spread of mould.
Covering the nest. I decided to cover my spherical form with tin foil to tie in the metal frame on my base. I hoped the crinkled, metallic aesthetic would give the shape a moon-like quality again.
ISSUE 13: I didn’t know what glue would attach the metal foil to the water-proofed form.
SOLUTION 13: I used exterior wood glue as it would be weather-proof and dry clear. I watered the glue down a bit so it was easier to spread, and coated the ball in the same way I had during the papier-mâché process. The glue was not extremely tacky, but I’m hopeful that it should stick the foil once it dries.
1 note
·
View note
Text

Agasta Oleksiak’s “Yarn Bomb” Installation, 2011.
Commonly referred to as Olek, the so-called “crochet Guerrilla” covered Arturo Di Modica’s infamous ‘Charging Bull’ statue in New York. The craft work has the ironic use of warming the metallic bull, yet it’s function is not in use but as a political statement. Lippard argues that more educated women would move outside the domestic sphere for artistic inspiration. The 2011 phenomenon of “Yarn Bombing” takes this a step further. As street art interventions they bring the household craft of crochet into the public sphere. Olek’s work becomes a statement about elitist associations with certain materials; covering the traditional elite cast bronze sculpture with the domestic craft of needlework.
‘Charging Bull’ was placed without permission in front of the Stock Exchange in 1989. Olek’s coating pays homage to the original unauthorised street art - yet hers was removed by New York City Officials in less that two hours. A message that society, or perhaps just the socio-elite, still favours elite materials over the humble ones of craft work.
Olek uses the bull as merely a skeleton to give form to her neon woven skin. Yet her work does not maintain its shape wihtout the statue below. In the same way, my papier-mâché sphere gives shape to its foil covering; disguising the interior support under a superficial skin. While Olek’s work covers metal with craftwork, my sculpture gives a metal coat to the humble papier-mâché process.
0 notes
Text


‘Arboria’ by Architects of the Air (Alan Parkinson), installed in Melbourne’s Federation Square January 2018.
The artistic group Architects of the Air was founded by its artistic director Alan Parkinson. Parkinson designed the outside this 32-metre inflatable sculpture. From the outside the work appears as a 3-dimensional bouncy-castle like form. Inside it is a space, or void, of colourful tunnels and brightly lit domes for people to explore and engage with. It is playful and reminiscent of childhood exploration. Its interior has been compared to the odd combination of a womb and cathedral.
The work is formed by the void inside it. Created with the function of containing air, its subsequent uses are for people to enter inside, and to be views as an artistic form. The materials of its construction stand in contrast; the plastic is very much present while, although technically filled with air, the void inside appears as an absence or void. It is different from Heidegger’s example of Pottery in that it is the air within the sculpture which gives it the structure. It is not merely formed by the void but also the walls get their “self-supporting” nature from it also. Without the void being filled, the structure would collapse. The artist creates the form by manipulating the void within it, and in this sense it can still be seen as a “thing”.
It reminds me of the inflatable galleries we made in our very first class as well as the beachball I have been using for my own project. The “void” of air inside the beach ball is what has made my papier-mâché object into a “thing”. The work follows the theme of trees, both in its structure and with representations on its surfaces. Another link to my own work in which I have been utilising twigs and branches.
1 note
·
View note
Text


Week 10 Documentation:
This week I finished the papier-mâché moon-shape, including removing the beach ball.
ISSUE 1: the papier-mâché from last week had been going mouldy.
SOLUTION 1: adding salt to the glue acts as a preservative.
ISSUE 2: I had to get rid of the structure I was using last week to keep the ball in place while papier-mâché-ing as it had mould all over it.
SOLUTION 2: I made a structure by lashing a crate to a stool with some rope. This allowed me to easily rotate the ball which made the process faster and more efficient.
ISSUE 3: resting the ball on the crate was creating indents.
SOLUTION 3: I managed to shove my arm in between the ball and the structure to pop one out. I thought about getting some foam or newspaper to place under the ball but was almost finished with the process. In hind-sight I should have done this anyway as the ball has some indents from resting on the crate while drying.
ISSUE 4: After removing the beach ball, by partially deflating it, I realised that there was some mould on the inside of the structure.
SOLUTION IDEA: I think I will have to seal the inside so that the mould does not spread (it needs oxygen to grow).
I also managed to cut my branch and transport it to uni.
ISSUE 5: The branch was way too long for the project and would not fit in any of my family members cars.
SOLUTION 5: cut the branch down with a saw.
ISSUE 6: After cutting the branch it still wasn’t going to fit in dad’s car
SOLUTION 6: We decided to transport the branch in my dad’s FC Holden Ute.
ISSUE 7: We initially thought we should have the branch hanging out the back of the ute, but this would require tying a red flag to the end so no-one would run into it.
SOLUTION 7: We decided to strap it to the roof instead as it would be safer. It only hung over the front a little, and people do it all the time with their surfboards so we knew it would be legal.
ISSUE 8: We didn’t want the rough branch to scratch the paint on the roof
SOLUTION 8: so we lashed some rags around both sections of the branch which were resting on the roof.
ISSUE 9: We weren’t sure that our knotting skills would hold up to going 100km/h on the freeway
SOLUTION 9: We drove down the coast instead.
ISSUE 10: The rags were flapping around in the wind a lot and we were worried they might fly out.
SOLUTION 10: I made sure to watch them to see if they looked like they were coming loose.
1 note
·
View note
Photo


Week Nine Documentation
Last week I had considered cutting a branch off one of the trees on out property, but decided to wait. Good thing I did because early this week The Tree Amigos were cutting branches off trees in the park by my house. They were shredding them, so I asked if I could have one, around 2.5 metres in length. The boss cut the branch for me and even carried to my car for me.
ISSUE 1: Getting the branch to uni will prove difficult as it won’t fit in my car.
SOLUTION 1: After cutting it down to size it should fit in either my brother or dad’s car, so I will have to bribe one of them to help me.
ISSUE 2: I was running low on newspapers while papier-maché-ing the beach ball.
SOLUTION 2: I used some scraps of calico I’d been given by my work and bed sheets from the cupboard I’d saved to possibly use as drop sheets. This allowed me to cover more area quicker than with the newspaper. I think it will also work a bit like a mesh to make the structure stronger.
ISSUE 3: I was having trouble seeing where I had already been.
SOLUTION 3: I alternated between fabric and newspaper.
ISSUE 4: When checking on the beach ball to see if it had dried, I discovered that the bottom had become mouldy. Most of it had dried and seemed quite strong. The bottom, where it was sitting on the cardboard base, hadn’t been able to dry. It was the weekend when I checked so I didn’t have any materials to cut the layers away.
SOLUTION 4: I managed to find some scissors in the Print Studio cupboard to cut the layers away with. I left some layers that, although they were still wet, the mould didn’t appear to have reached. So hopefully they have dried by class tomorrow and I can re-apply the lost layers.
ISSUE 5: I am unsure how I can attach the branch to the papier-mâché part
SOLUTION 5: It may be possible to rest the ball on the curved branches which I noticed stem out from the main branch. I will have to test this. I may need to papier-mâché them into the ball. Alternatively I could drill through the ball, attach a block on the inside and indent the branch into it.
0 notes
Text

Franz West ‘Lemur’ 2009
Papier-mâché, styrofoam, metal, acrylic paint
175.3 × 134.6 × 61 cm
West is known for his colossal papier-mâché sculptures. This humble material is one I have been working with for my own sculpture this week. This weeks readings on Gelatin speak of the artist-as-enjoyer. I have definitely been having a lot of fun with this material. It’s a mentality I am trying to have as I create my sculpture, I want the process to be enjoyable. There is a certain comical nature to the idea of a gigantic sculpture in such a basic material. The process is reminiscent of a child doing papier-mâché over a balloon. West actually collaborated with Gelatin in 2012 for ‘Franz West & Gelatin: Zwei Epiphanien’. West’s misshapen masses also remind me of Gelatin’s enormous poo sculptures from their exhibition entitled “Vorm — Fellows — Attitude.” These sculptures encouraged the viewer to not take the art too seriously. I chose this work in particular as it could technically function as a Cockatoo Nest.
1 note
·
View note
Photo

Sol LeWitt’s ‘Four-Sided Pyramid’
first installation 1997, fabricated 1999
Sol Lewitt was a leading minimalist, conceptual artist. As was the case with much of his oeuvre, LeWitt made a plan for ‘Four-Sided Pyramid’ which was then executed by others. Thus removing the artist from the production of the work. The concept becomes elevated above the final executed artwork. As discussed in this weeks reading - the instructional art process can allow for freedom in interpretation by the receiver, depending on how detailed the instructions are. Although not the case for this sculpture, artistic instruction easily allows for multiple varied editions. These can be in entirely different locations as the artist’s presence is not required for their construction.
‘Four-Sided Pyramid’ is made of concrete joined with mortar. Its architectural-like form becomes its focus. LeWitt first used the terraced pyramid structure in the 1960’s in reference to a 1961 law limiting the height and bulk of skyscrapers. The form also references the ziggurats of ancient Mesopotamia.
1 note
·
View note
Text


Week 8 (and Study Break)
SOURCING MATERIALS:
Verge materials (collected in week 8 class)
-metal frame: to use as the structural skeleton of the base
-tree branch: to possibly use as the pole (later decided it’s too short)
-hoses: to thread wire through as a the swirly line.
Materials from shed at home (discovered during study break)
-bird cage: this was the home of my first pet, Charlie. It was through his passing that I first learnt about death. Its emptiness is therefore symbolic of absence. Several perches remained in the cage. I liked the idea of filling this void with a ridiculous amount of perches. This worked to create the spiky shape of my original sketch as well as render the once functional birdcage useless and sculptural.
-wire mesh: useful for making the base into splaying out from the base structure.
-pool cover (bright blue, bubble wrap esque): to use to cover the nest or attach to the base.
-2m metal pole: to possibly use as the stand for the nest.
Other materials
- sticks: to use as perches, sourced from the park next to my house.
Bought Materials
- $6 jumbo balloon: to use as base for papier mâché (unsucsssful)
- $5 jumbo beach ball: second attempt at papier mâché base
- 80c 1kg bag of flour: for papier mâché
- $2 roll of tin foil: to possibly cover the nest with
BEGINNIG CONSTRUCTION
I decided to make the nest spherical rather than extending the crescent shape in a two-dimensional manner. I decided paper machê would be a good way to make sure it wasn’t too heavy to elevate.
ISSUE 1: finding something spherical which I could papier mache that was large enough
SOLUTION 1: I found a confetti balloon in the party section of Big W which was 90cm. Although I strongly despise balloons I thought this was probably my best bet.
ISSUE 2: I had no idea how to blow up the balloon
SOLUTION 2: I blew the balloon up with a sports pump
ISSUE 3: The balloon had a tiny hole in it and thus was not inflating properly
SOLUTION 3: I covered the hole with double-sided tape (as it is flexible it would allow some give as the balloon expanded).
ISSUE 4: the balloon only got to about 60cm before it burst, merely adding to my hate for balloons.
SOLUTION 4: Plan B, find a blow up beach ball of a similar size which would be more durable. Managed to find one for $5 that was 1m in diameter.
ISSUE 5: I didn’t want to blow up a 1m beach ball with my mouth and the bike pump didn’t fit.
SOLUTION 5: dad helped me blow it up with his electric pump.
ISSUE 6: when beginning to papier mache it was difficult to hold the ball still
SOLUTION 6: short-term = I had my mum help me hold it & long-term: made a box out of cardboard which will hopefully hold it in place.
1 note
·
View note
Text


Week 7 Documentation
CHALLENGE 1:
I attempted to cut the star-like shake out of wood and then the modeling foam.
SOLUTION 1:
I decided to make that section out of cardboard as I could cut it with scissors.
CHALLENGE 2:
I wasn’t sure how to bend the modelling hairs without it snapping.
SOLUTION 2:
I scoured it on one side to allow it to bend
CHALLENGE 3:
when measuring out my original drawing I had to figure out how to measure the curved line
SOLUTION 3:
I used string to trace along the line then measured the length of the string.
CHALLENGE 4:
After looking at my finished maquette I decided it looked too 2-dimensional
SOLUTION 4:
I tilted the top shape so that the wire stuck out at an alternate angle. I am also hoping to make the Star-like shape into a spiky ball.
CHALLENGE 5:
I found it difficult imagining what materials i could use when colouring as I knew I wanted to source them very cheaply.
SOLUTION 5:
have some fun with the colouring by going very bright then consider more carefully once I’ve source some materials.
0 notes
Photo

Mike Godell‘s ‘Birdcraft’, 2012
Located at the Stevens Point Sculpture Park, Godell’s sculpture functions as a habitat for an endangered bird, the Chimney Swift. So named as they often nest in chimneys. The decline in use of the chimney has lead to a loss in habitats for these birds.
The inner nesting chamber (366cm tall, 40 by 40cm) is concealed behind the sculptural shell. It’s upright structure and rough walls are perfect for Chimney Swifts, who build their nests on vertical, textured surfaces. The nest itself is made of twigs woven then attached with saliva. An even temperature is maintained through the gap between the inner and outer shells. A collar at the top provides shade while a removable mesh screen allows air flow, annual cleaning and the potential for viewing nesting Chimney Swifts.
The reading this week provides a guide to creating a practical artificial hollow for the Carnaby cockatoo. Similarly, Godell has carefully considered the functional components of his work as a bird’s nest. The work is made of mostly recycled materials, much like we are encouraged to do for our final project.
3 notes
·
View notes
Photo

Ai WeiWei’s ‘Han Dynasty Urn with Coca-cola logo’ 1995
Paz compares Art, Craft and the Industrial objects. This work plays with the barriers between these categories. It is still a functional, unique craftwork. But by writing on it, Ai Wei Wei has combed something ancient with something modern - making us consider their relationship. This work has been elevated to art merely because the artist has brought it to our attention.
The Chinese artist branded an ancient craftwork with one of the most prominent symbols of globalisation. This highlights the move away from human-made to the mass produced. The work can be read in terms of both the destructive and creative impact the West has had on China.
1 note
·
View note
Photo


Week 6
ISSUE 1: I was unsure how to attach both the sculpture and the birdhouse to the plinth,
I wanted them to be stable.
SOLUTION 1: I attached blocks of thick wood from the scrap bucket to the underside of the plinth. The birdhouse was attached to the metal stand with a pressure fit, the same for the base. The sculpture is attached with a pin in the middle finger. Both the stand and the pin extend into the blocks underneath to give extra stability.
ISSUE 2: Drilling the hole into the finger for the pin proved to be difficult as the wrist and hand were not at the same angle to clamp.
SOLUTION 2: Mike demonstrated an intricate array of clamps, which allowed for the drill press to drill into the finger not on an odd angle.
ISSUE 3: I was unsure of what to use for a handle because I wanted it to be significant
SOLUTION 3: I came up with the idea of doing a mini “hand-le”, the result was actually quite cute which stands in a nice irony to the aggression of the overall theme.
ISSUE 4: I wasn’t sure how to cut out a shape so small
SOLUTION 4: I decided to hone the skills I’d been developing in the print-making unit to “carve” the hand out of MDF with my lino tools. This is a much safer option than trying to cut on a machine!
ISSUE 5: I knew I wanted a natural wood finish for my plinth but had no idea what to use to finish it
SOLUTION 5: I did a few tests with some natural oils that Guy had, orange and linseed. I didn’t see a huge difference between the two, the orange was slightly darker and more (who would have guessed) orange. There was more of the orange oil and I felt the colour would tie in wiht some of the tones of the painting on the wood.
ISSUE 6: I was having trouble deciding what to do with the thumb for the sculpture.
SOLUTION 6: In the end I decided to wedge it into the hole to render it non-functional.
1 note
·
View note
Text


Week 5 documentation
ISSUE 1: I didn’t know how to cut the assymetrical hole
SOLUTION 1: drilled a asymmetrical hole on the drill press then used the machine in the mode finishing workshop with a detachable blade to insert it inside the hole.
ISSUE 2: The machine was smoking as I was trying to force it around a tight corner
SOLUTION 2: cutting out small sections at a time, trying to stick with mainly straight lines
ISSUE 3: there was a bunch of holes and gaps in my plinth and I wanted it to be smooth and polished to contrast with my rough birdhouse and sculpture
SOLUTION 3: I used putty to fill the gaps
ISSUE 4: when drilling through the door pice to insert the dowel I drilled too close to the edge and it began to splay out
SOLUTION 4: I turned the door piece around so that this wasn’t visable from the outside
ISSUE 5: I was worried that the door was going to be too tight and not open / close properly
SOLUTION 5: I put some pieces of paper in between the door and the wall so when glued together it would have enough clearance to be able to function
ISSUE 6: I hadn’t put a stopper on the inside before putting the birdhouse together
SOLUTION 6: I glued a small piece of MDF inside, to stop the door from falling too far in, and held it in place with an adorable baby clamp
0 notes
Photo


‘Confederate Tea’, Roberto Lugo, 2014
This ceramic sculpture manifests in the shape of a teapot. There is a contrast between the confederate flag and the figures of Frederick Douglass (American social reformer) and Notorious B.I.G. (American rapper). Lugo says “my work and my life are really about bringing my culture and my background to places where they don’t necessarily belong.” The more we see people of colour represented in these kinds of places the quicker it will become normalised. The function of the object is as a vessel to hold and serve tea. But Lugo believes pottery is useful in more than just this inherent function. He plays with the idea of craft, the fact that the object has an applied function is integral to the reading of the work. The whole idea is that if completely different groups of people can sit down to tea, maybe they could learn a lot from one another and in doing so be able to settle their differences. The teapot gains significant usefulness in its ability to manifest ideas, make people think and hopefully start conversations.
1 note
·
View note