Statistics
We looked inside some of the posts by 44summers and here's what we found interesting.
Average Info
Notes Per Post
947K
Likes Per Post
465K
Reblog Per Post
481K
Reply Per Post
294
Time Between Posts
8 days ago
Number of Posts By Type
Text
4
Photo
11
Note
2
Last Seen Tumblr Blogs


Fun Fact
Total funding amounts to $125.3M.
Text
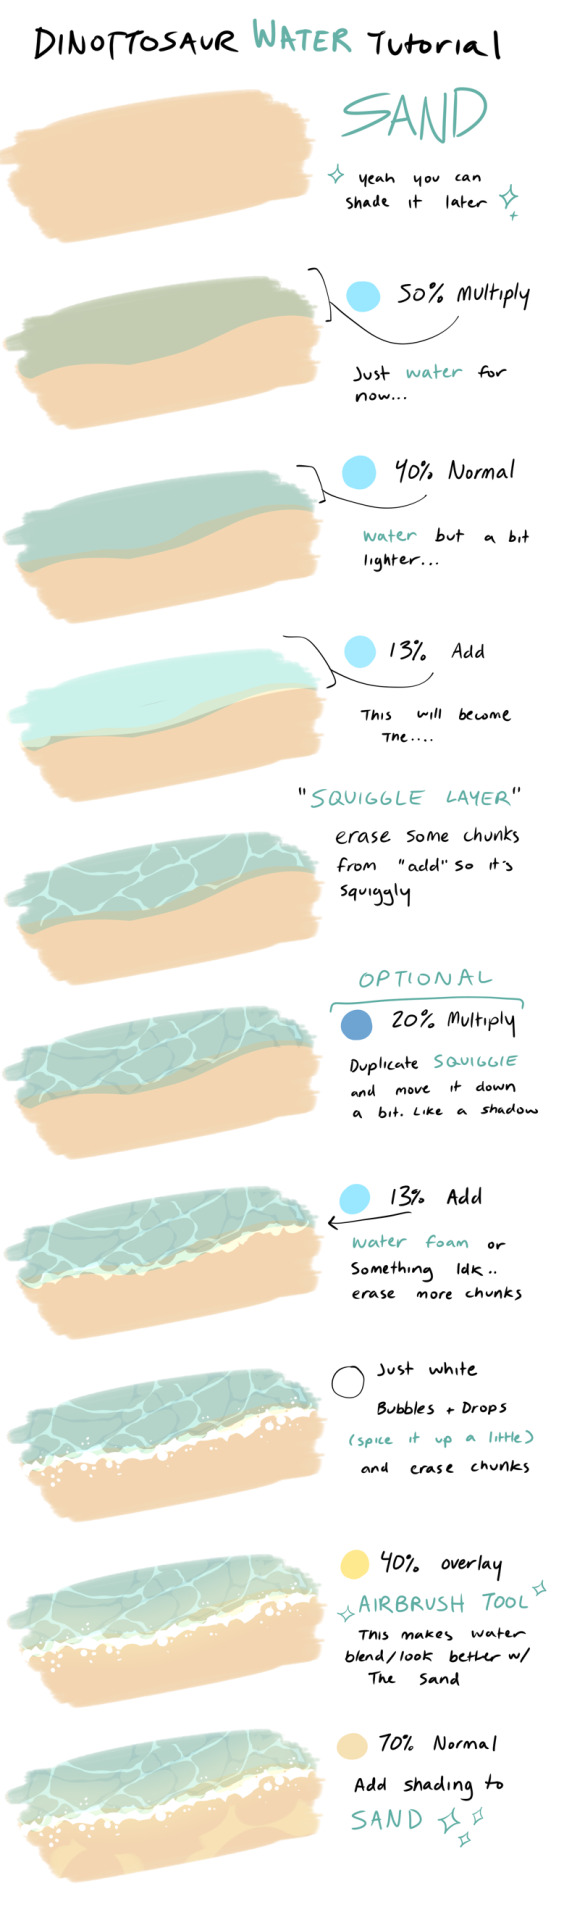
i made a tutorial on how to draw beach water or somthing idk
29K notes
·
View notes
Photo
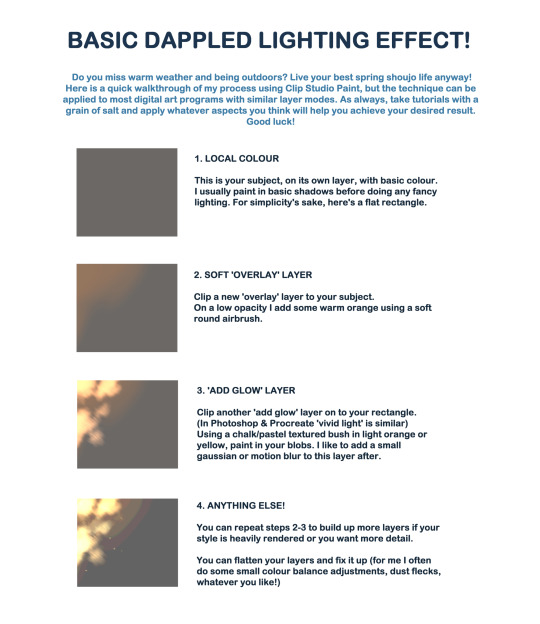
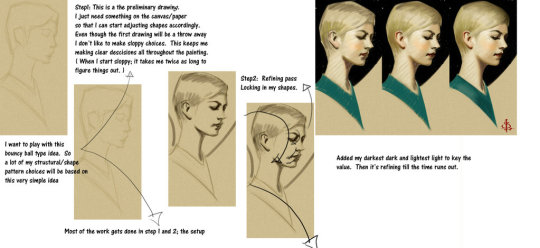
I created a quick walkthrough on my process! You can do the same with any digital art program and brushes you like. As always, learning comes with critical thinking and if you feel this does not apply to you, then no worries! There’s no correct way to do things as long as you achieve the results you want.
The technique can be customized with different brush types and colours, and can be as simple or heavily rendered as you so desire. I hope it helps a little! I like to do lighting like this in my own work for a sense of atmosphere.
Please ignore the fact I spelled complementary wrong, it’s been a long week ok lol
27K notes
·
View notes
Text
need refs/inspo for period clothing?
here you go:
Medieval (9th-15th century):
10th century and earlier
Romance (1000-1250)
11th century
12th century
13th century
more 13th century
14th century
more 14th
15th century
and more 15th century
Gothic (1150-1550)
Renaissance (1520-1650)
16th & 17th century
16th century
more 16th
Tudors (1500-1550)
more Tudors
Elizabethan Period (1558-1603)
Jacobean Era (1603-1625)
17th century
more 17th century
and again
and even more
this won’t stop
Baroque (1600-1750)
Georgian Period (1714-1830):
18th century
more 18th century
18th century women’s fashion
18th century men’s fashion
Rococo (1720-1770)
Classicism (1770-1790)
children 18th-19th century
Regency Preiod (1811-1820)/ Empire (1800-1820s):
1790-1820s
more stuff on regency and georgian era
even more
that’s not enough regency
and more
how is there so much
early 19th century men’s wear
early 19th century women’s wear
Victorian Period (1837-1901):
Romantic Era (1820-1840s)
Civil War Era/1850-1860s
1870-1890s
more victorian
Edwardian Period (1901-1910):
1900-1910s
Belle Epoque (1880-1910s)
more edwardian/belle époque
Modern:
1910s-1920s [Fashion between the World Wars]
1920s
more roaring 20s
so much 20s
1920s hairstyles
1930s
1930-1940s
1930-1950s
1950s
more 50s
1960s
1960-1970s
1980s
lots of periods in one spot/fashion through centuries:
here, here, and here is almost everything (and properly ordered)
also here with lots of historic fashion magazines
100 years of beauty (includes lots of other cultures too!)
historic fashion
costumes of antiquity
more historical clothing
history of fashion
more history of fashion
“vintage” clothing
historic costumes
children’s historical fashion/toys
details
historic wedding dresses
historic assecoires (hats, shoes…)
hats
masks
parasols
lots of embroidery/jewlery
Short disclaimer: Most pictures show clothes of royalty, aristocracy, and burgoisie as their clothes weren’t worn as much and especially not for labour, which is the issue with farmers/workers’ clothes, which also were reused quite often, whether to sew new clothes or have rags. So please keep this in mind!!
It really is very European-centric as I am European as well, and I apologise for it if you expected more from it. I definitely lack the knowledge to determine what are accurate portrayals of other cultures, and to find content for them is really difficult as well. This is why I would encourage you to submit any resources you have to my blog! If you have any book recs or know good pages, please let me know!
Another edit/note: Pinterest has changed a lot since I made the post, so you need to be signed in now to see more than the first row of the boards, I’m really sorry about that! (Also I tested all the links and on my original post they still work, if you’re having isues with that.)
156K notes
·
View notes


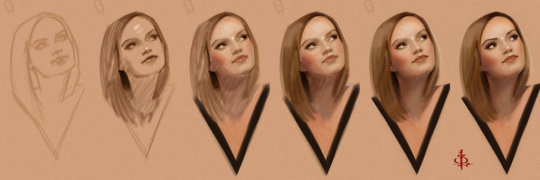


Photo
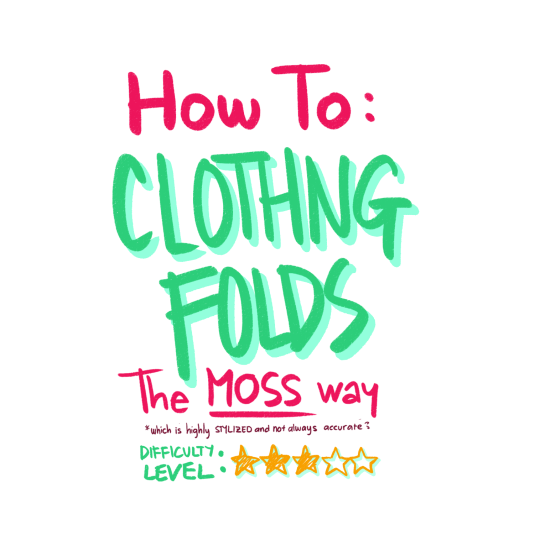
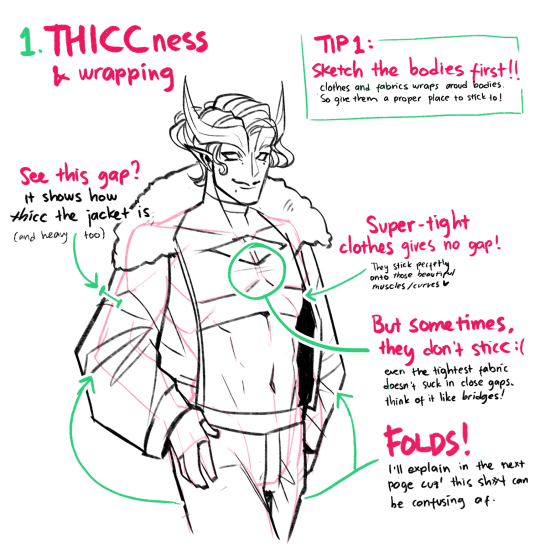
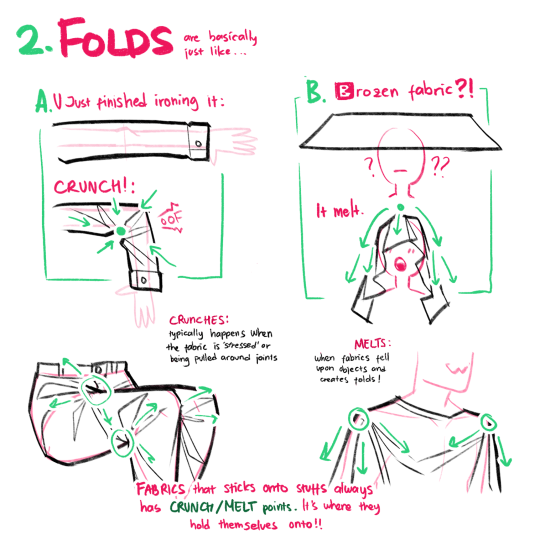
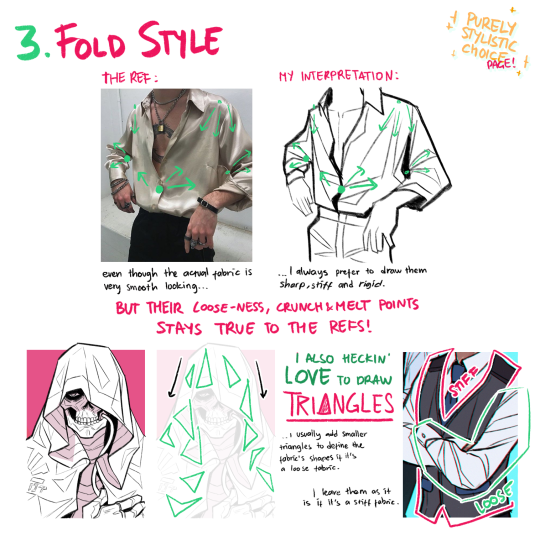
Tutorial: Clothing Folds
Im not that good of a teacher/instructor, but i hope this small tutorial on clothing folds helps ;o;
19K notes
·
View notes


Note
Hi! At work I often have a few minutes of downtime while the computer does it’s thing and I want to use some of that time to improve my drawing skills. Any little exercises you can recommend?
Absolutely!
What comes to mind first is something I did as a part of a ‘how to improve’ tutorial.

Post it notes are usually found around the office, so this is a great way to use company money to further yourself. I recommend trying to do this quickly, as well. The idea is to un-train your brain from throwing down incorrect details.
The steps are:
Think of one (1) thing you wanna learn to draw.
Draw that thing from memory on a post it.
Look for a picture of that thing on Google, or in a book. Think about what you got wrong in your first drawing.
Take another post-it and draw that thing again. (Without reference.)
Look at a reference again. Check for mistakes again.
Rinse and repeat.
This exercise was inspired by the How to Draw Anything tutorial by Xuu on DeviantArt. I recommend everyone give this a read. It’s an excellent approach to drawing as muscle memory instead of some unobtainable ‘talent’ that you have to magically happen upon.
- Mod Chekhov
3K notes
·
View notes
Photo

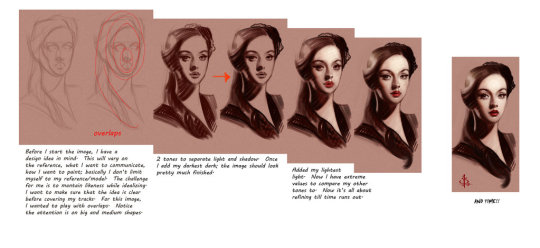
a page full of faces
watch the tutorial + painting process here
12K notes
·
View notes
Photo
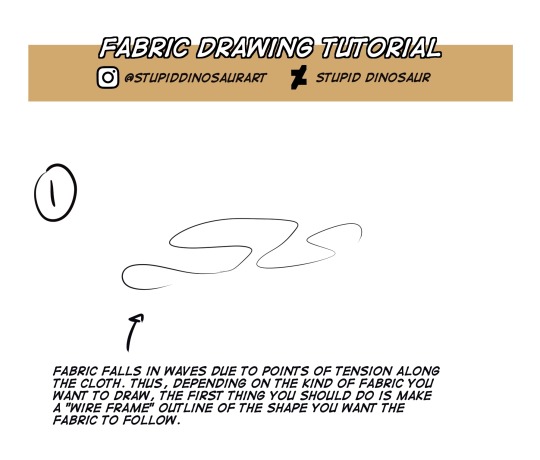
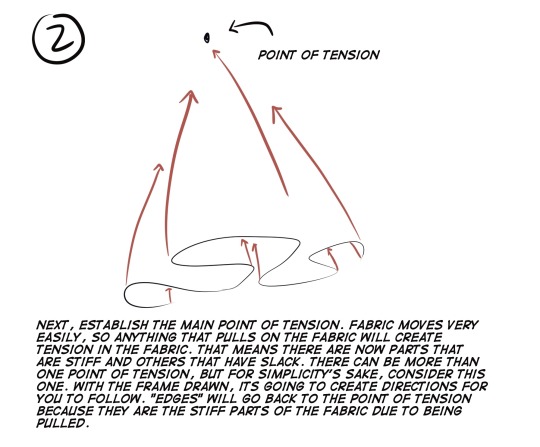

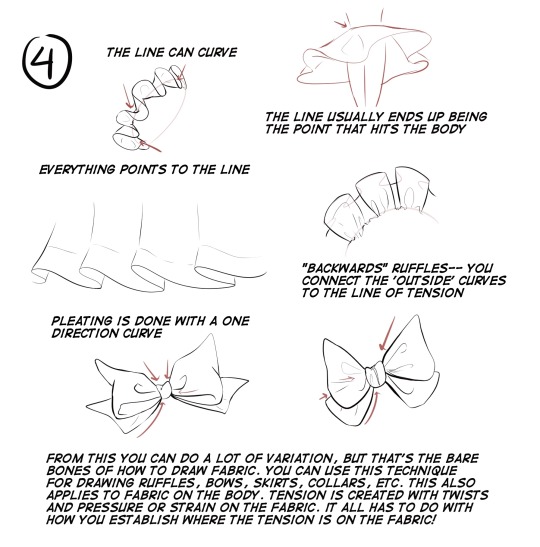

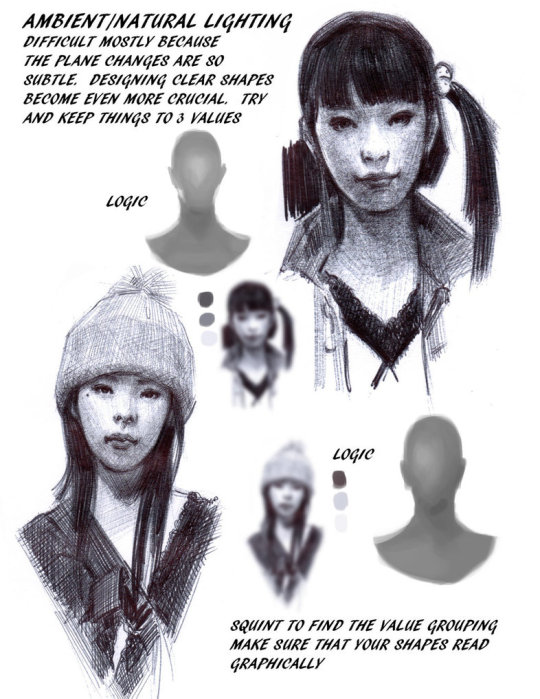
I’ve been getting some requests to make a tutorial on how to draw fabric. It’s really not that complicated when you break it down, but it’s still something people get stuck on and over complicate. Here’s my “bare bones” simple explanation as to how to draw fabric!
12K notes
·
View notes
Note
I've always loved drawing people and especially portraits. Your art is so inspiring! Do you have any advice on drawing portraits with accurate proportion? What aspects are the most important in portraits, do you think? And what are good exercises? I'm sorry for bombarding you with so many questions! :3
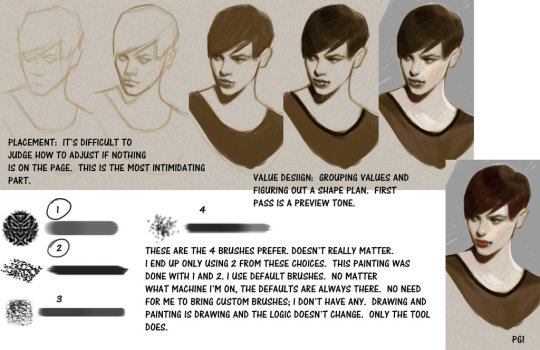
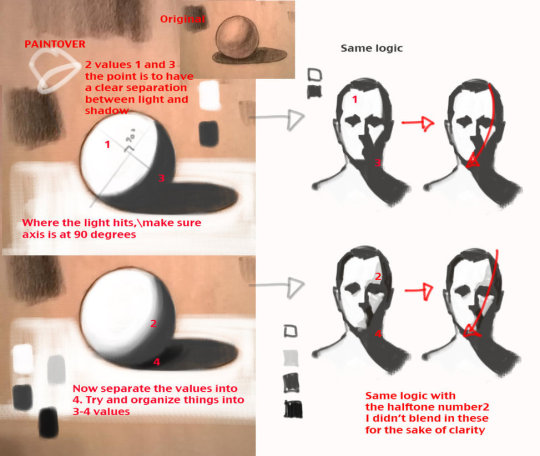
Thank you! There’s one thing about drawing portraits that I don’t think I’ve ever touched on, and it’s the technique of constraining features. Basically, it becomes easier and more intuitive to rotate the face in 3D space once your mind grasps exactly where the features are located and, furthermore, where they can’t be located.
I use a weird double trapezoid shape that I’ve depicted below in red to keep track of facial feature placement every single time I draw a face. It follows the top of the eyebrows, touches the corner of the eye, traces down to the corner of the lips, and finally ends at the bottom of the lips.
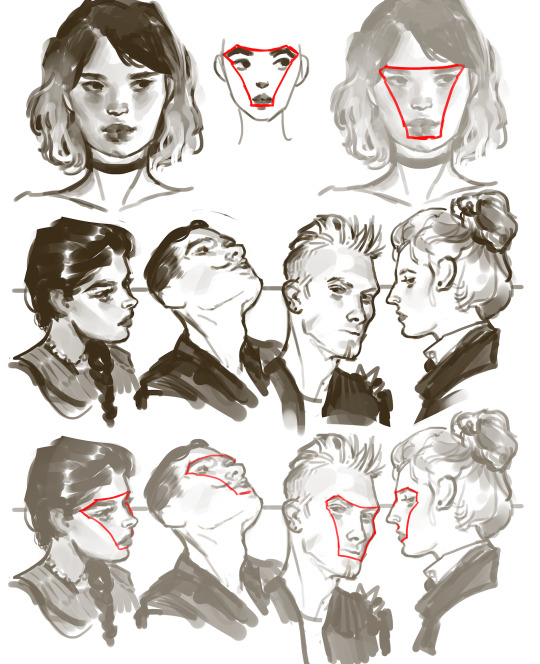
The shape of the constraint will change depending on the person’s features, and it works for every angle of the head. For me it really internalized where each part of the face was, as well as where it started and ended. It kinda helps moderate your drawings; i.e., you’ll stop drawing features that are wildly misplaced or off-sized. I don’t literally draw this shape out every time I draw a face, but I see it in my mind’s eye 100% of the time.
If you’re still learning proportions, a good exercise is to grab pictures of people and trace this shape over them (either digitally or with a marker or something) to get an idea of what realistic constraints looks like. Then go back to studying faces, and constantly check your drawing by tracing along the eyebrows and down to the bottom of the lips to make sure that things aren’t off (e.g., the constraint isn’t terribly asymmetric). It takes a while to get used to, but it might help you get a good feel for portraiture.
There’s one other unrelated thing I like to do with faces, and if you’ve seen a lot of my pics you’ve already picked up on it. If you kinda add some shading to the area on the cheek just below the eye and down to the nose, I think it adds a decent amount of depth to a face. Don’t go overboard of course but there’s another little tip that could be of use.
22K notes
·
View notes
Photo

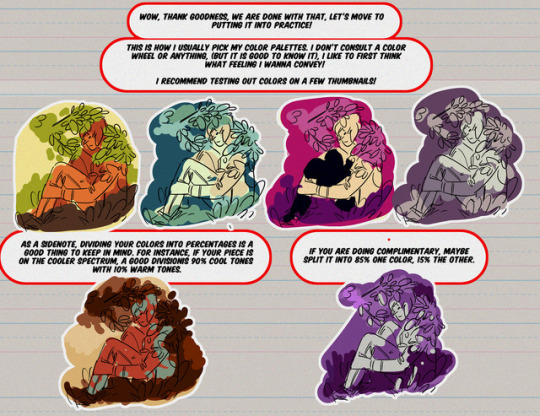
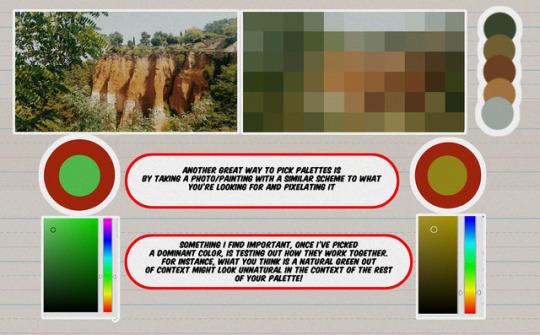
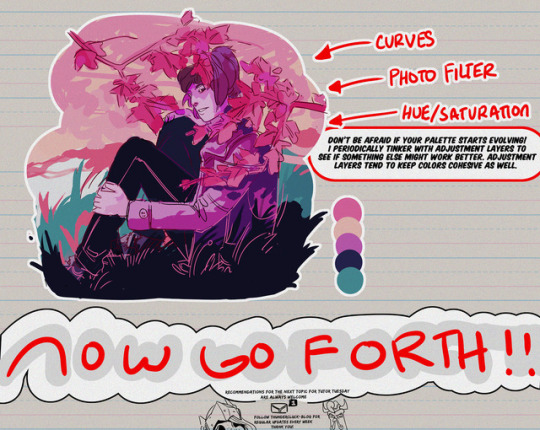
Hey friends!
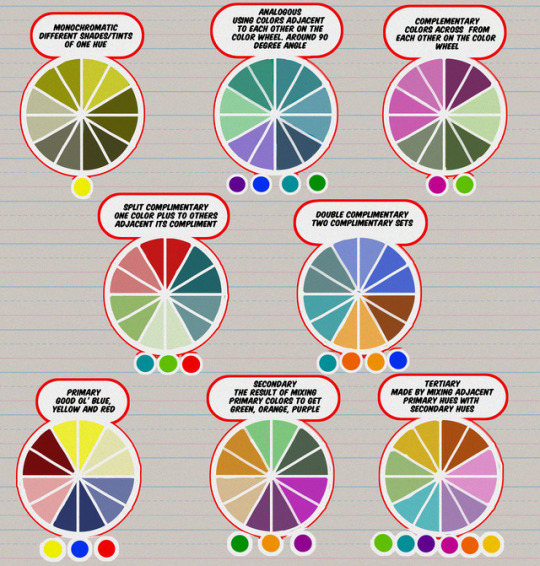
Meg here for TUTOR TUESDAY! Just a quick beginning look at colors and some color theory! I’ve had a few recommendation for color palette stuff, so I hope this is a start! Paul has done some on color as well! If you have any recommendations send ‘em in here or my personal! Keep practicing, have fun, and I’ll see you next week!
58K notes
·
View notes
Text
Things I wish I knew when I started drawing
My experiences with traditional art have been challenging to say the least, mostly because I didn’t really *get* some of the more obvious tips and tricks. Some of it was definitely jealousy of people with tablets, though. If someone had reminded me about a couple of these things, I wouldn’t have gotten frustrated enough to give up on art for a year. Hopefully they can help prevent others from doing the same.
It can take a painfully long time to learn new or unfamiliar techniques. If they don’t come naturally, your intuition isn’t going to help you.
The time it takes to draw something decreases drastically once you really start practicing it. Ever heard of ‘muscle memory’? It’s real. Your hands have it. Even after just a couple tries, you’ll be surprised at how much easier it gets.
Don’t force yourself to try and copy someone else’s style, or learn a bunch of complicated techniques. It’s time consuming and will end up costing you more in the long run.
Adding more lines isn’t going to make it look better. It’s good to trace the outline of what you have in mind before filling it in, but adding a bunch of dark lines in close proximity to each other just makes it look messier.
Avoid sketching and making lineart with a dark pencil. The easiest pencils to find in a school store are almost definitely HB pencils, which are a middle ground. You’ll have better luck erasing those extra lines if you use a(n) H pencil (2H, 4H, H).
WAIT UNTIL YOUR INK DRIES BEFORE YOU START TO COLOR OR ERASE ANYTHING. Inking is a delicate process and one wrong move can distort how your drawing looks overall. Wait a good 1-2 minutes before checking with a piece of paper or fingernail to see if it’s finished drying.
Unless it’s a really special marker, don’t color using a light marker over a dark marker. A mark will stay on the tip of your marker and stain everything you try to draw with it afterwards.
STOP COMPARING YOUR ART TO STUFF OTHER PEOPLE DRAW! When you look at some of the fantastic artwork online, it can feel intimidating. What you need to remember, is that you’re seeing the finished product of what was a long process of trials and errors leading up to a culmination of the artist’s strongest efforts.
And, last but not least, the tools don’t make the artist or the art. YOU, the artist, are the one with the vision to achieve a final result. Even if you don’t have that fancy white marker that shows up on top of black, you can still demonstrate good technique and a sense of style.
Thanks for coming to my TED talk! Now get out there and go make something beautiful!
7K notes
·
View notes
Text
tragedy as a genre asks us repeatedly “why did this have to happen?”. why did medea kill her children? why did lear reject the only daughter who truly loved him? why cant estragon and vladimir simply walk away? we can accept the idea that these are events made inevitable by some facet of the characters personalities. we can argue that circumstances forced their hand. but ultimately we dont have these answers and thats why i think tragedy. is a genre so given to retellings and repetition. the why is tantalizing — maybe if we play it again, we can figure out where it went wrong. so anyways as always we’re back at hadestown’s “its a sad song, but we sing it anyway. to know how it ends, and still begin to sing it again, as if it might turn out this time …”
26K notes
·
View notes
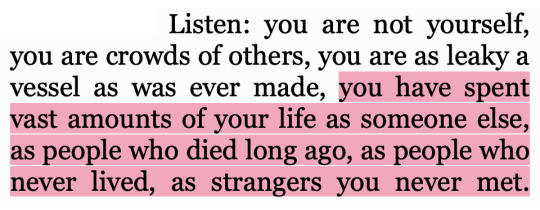
Photo

Heather Havrilesky, How to Be a Person in the World
7K notes
·
View notes