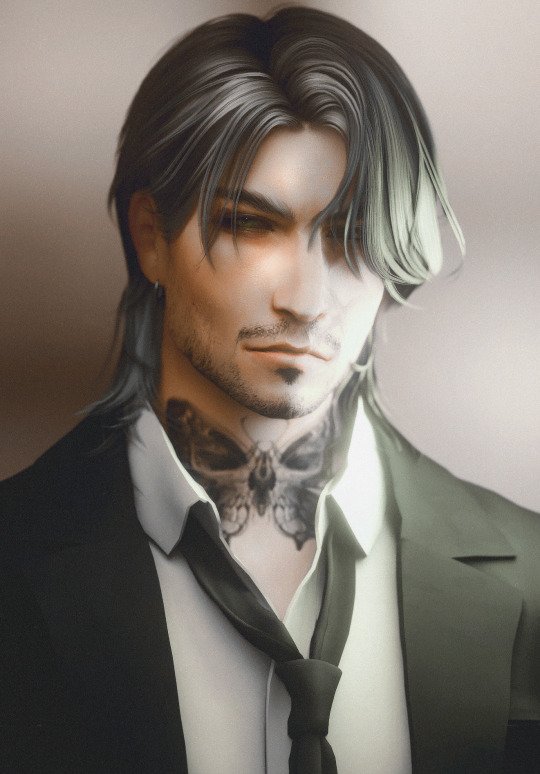
#from tha lighting tutorial
Text
one more medicated peaceful moment.
#ts4#the sims 4#simblr#ts4 render#show us your sims#deja senti b sides: edits#jay#from tha lighting tutorial#daddy merrik#god and his voice claim is linked.............i won't him 5ever im ngl#the vitiligo in his brow that i COMPLETELY FORGOT TO GIVE BOWIE HSKLHJHG#we're gonna pretend shes always had it
98 notes
·
View notes
Text
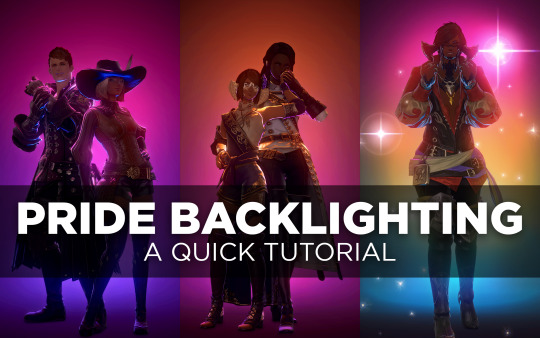
Pride Backlighting Tutorial
A few people have shown interest in replicating the pride backlighting I did, so hey, here’s a quick tutorial below the cut.
Enjoy, and happy Pride Month. 🏳️🌈
STEP 1 — SETUP
First thing you’ll want to do is find a suitably dark background to bounce the light off of. I use the White Screen housing item dyed Soot Black, available from the Housing Merchant or Apartment Merchant in any of the housing zones for 3000 gil.
I line up 2-3 of them for coverage, but one will do if you're trying to be frugal.

If you don’t have an apartment or an FC room to use, try asking friends, FC mates, or even folks you share a Discord server with. You might even find someone who already has a studio space set up and is willing to let you use it!
Lighting in your studio space should be 0 (though you might have success at 1 as well), so make sure to adjust that or ask the studio owner if they can make that change before you start posing.
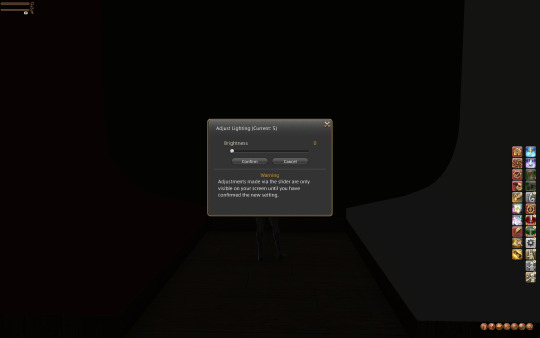
STEP 2 — GPOSE
Position your character(s) just a little ways back from the edge of the screen. You want some space between them and the screen so that the lighting can float there without casting a weird circle on the wall.
Hop into /gpose and bump up the “Manual brightness adjustment” to about 120 or whatever level allows you to see your character well enough to pose them. Pose to your heart's content.
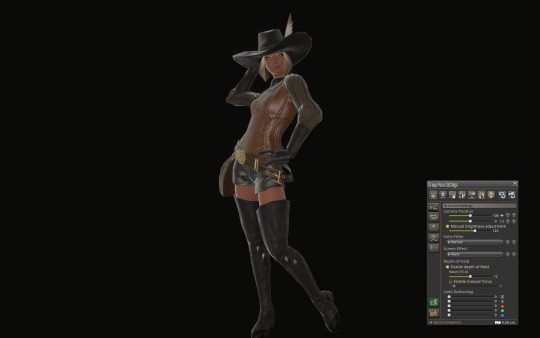
STEP 3 — LIGHTS
Here’s the fun part. In the Light tab of the Gpose menu, switch all of your Light sources to Type 1, which has the shortest falloff radius (meaning it doesn't reach as far as Type 2 or 3). I also set all of my lights to one strong color to differentiate them while I worked on lighting—red, green, and blue, all maxed out at 255 (for now).
Swing your camera (still on all default settings) around to your character’s back and up above their head a little ways. This is where Light 1 (red) will go.
Now pan your camera down at about mid-back height and set Light 2 (green) there.
Pan your camera down one last time until you have a nice shot of your character’s butt and set Light 3 (blue).
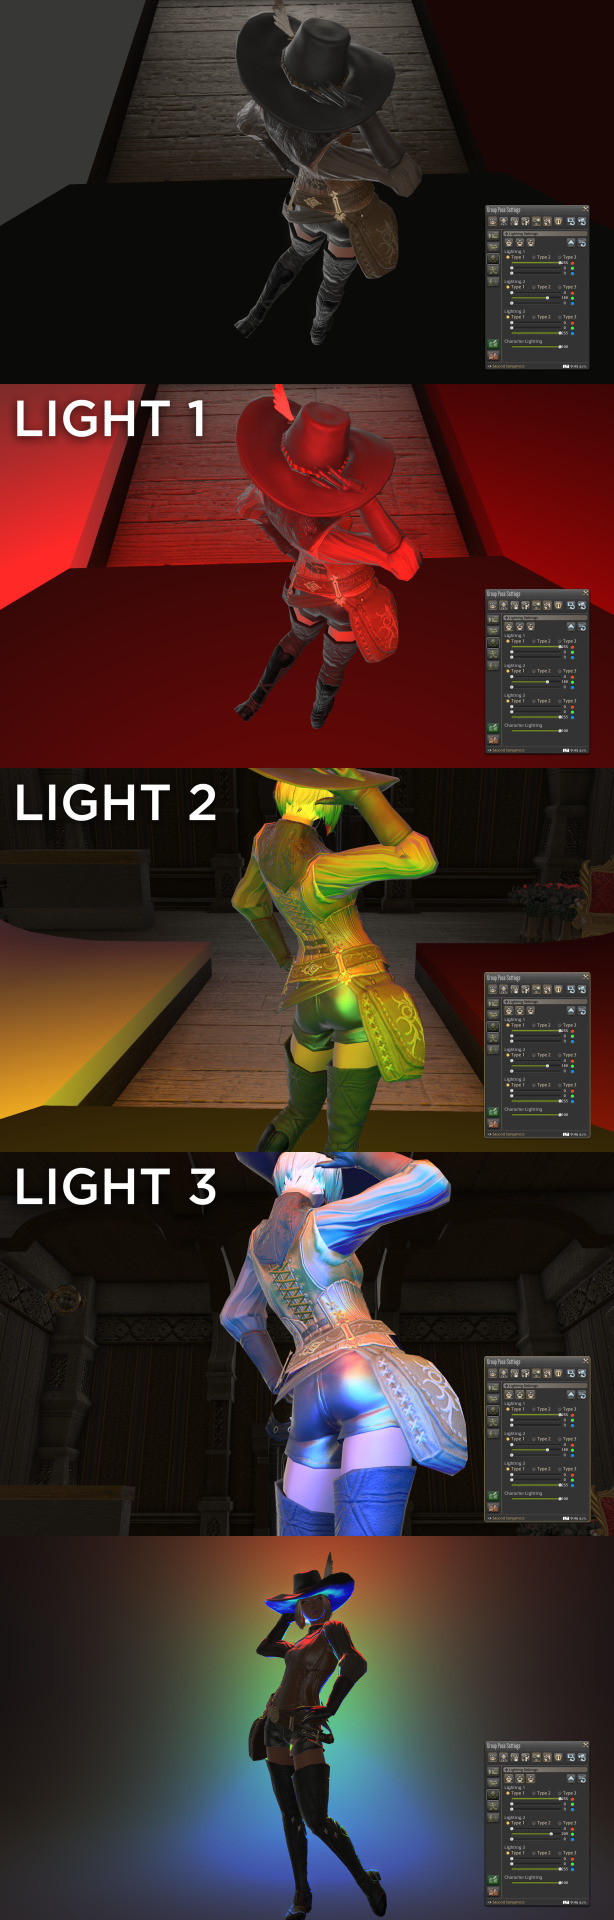
Spin your camera back around and enjoy this nice little macaw-colored gradient.
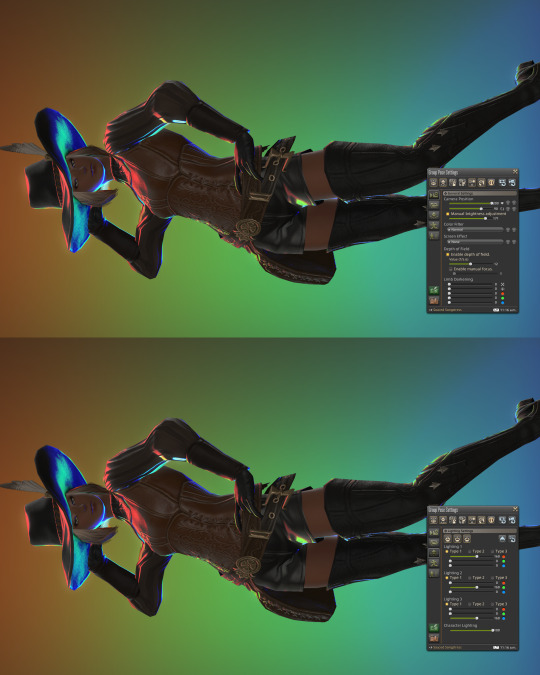
STEP 4 — CAMERA
Set your camera angle.
The way FFIXV’s lighting works is partially dependent on how much light is in a shot. It will adjust a lot like your eyes do when you’re entering a dark room from a bright room, or vice versa. Your zoom level and camera angle are going to directly affect the lighting, so set this before you start messing with light strength and color. Sometimes this means weaker lighting will actually light your character better.
I ended up bringing my lights down to around ~160 and boosted the "Manual brightness adjustment" up quite a bit to get lighting I was happier with.
For a straightforward vertical shot, I like to have my Field of View (FOV) at 200 and of course my rotation is set to 90. Zoom in or out as needed. Remember to save your camera angle if you plan to pan around and fix things!
STEP 5 — COLOR
Make it ~queer~.
Take your flag of choice and pick out 2-3 “main” hues. Generally these will be the strongest hues in the flag, if not the only ones. Some flags, like the Pride/Progress/Intersex-Inclusive flag itself, are difficult to replicate for the sheer number of colors that are in it. You can loosely represent a rainbow with some adjustment to the RGB colors, if you’re determined to have a whole rainbow in there.
Shader Note: I recommend picking a shader preset that doesn’t mess too much with color so that colors are represented correctly. You may need to adjust light strength and “Manual brightness adjustment” to be compatible with your preset of choice. Bloom will also heavily affect the way your colors are showing up, so you may need to tone down the bloom FX or toggle it off entirely. This all depends on your preset, however.
If you’re not into RGB math, here are some cheat sheets! Not every flag is represented here of course, but I tried to cover as many colors as I could so that you could grab a color from another flag as needed! Please note that colors will need some adjustment for your own screenshot, presets, and preferences.
And that’s it, y’all! 🏳️🌈
(Open this image up in a new tab for more detail.)
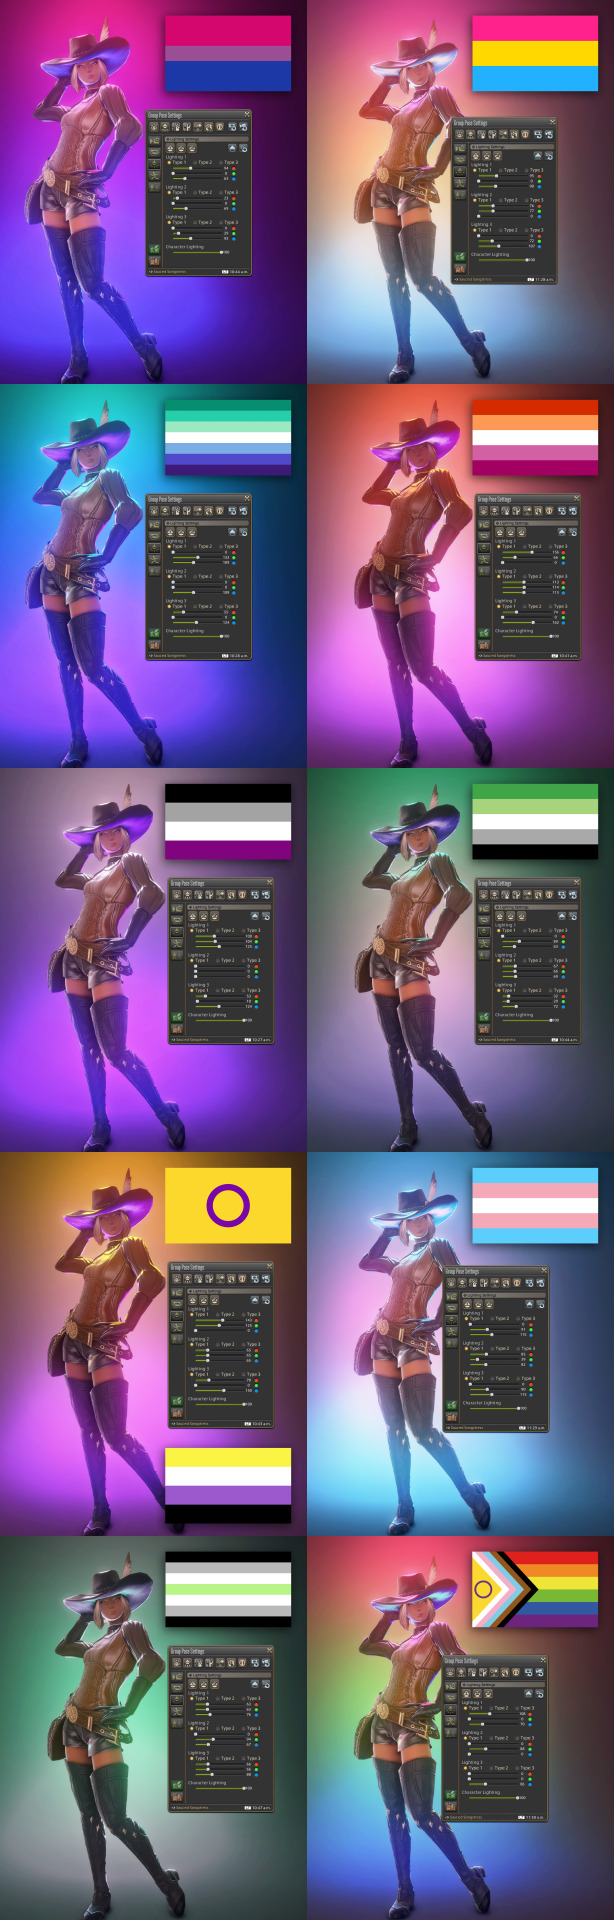
These were taken using a heavily customized shader for that nice glowy effect.
#ffxiv#ffxiv screenshots#[ ooc ]#[ tutorials ]#i didn't actually have a tutorial tag but#now i do#enjoy ❤️
1K notes
·
View notes
Text
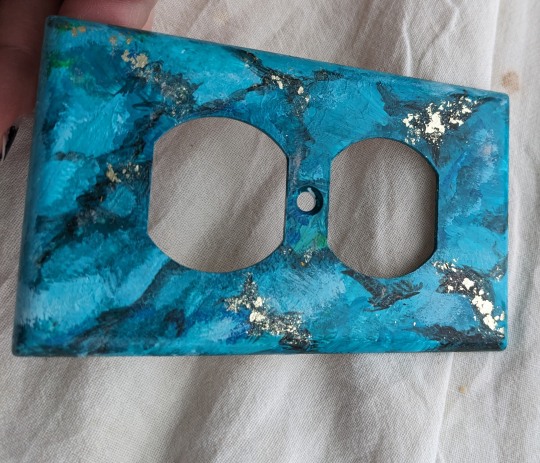
switchplate covers update/tutorial
So the thing to keep in mind with this is that we gotta see how well the wear. A switchplate cover is a pretty high-traffic thing, and subject to a lot of wear. If these get too dingy I'm absolutely going to have to go buy fancy ceramic ones or something.
But. That said. Here is my final result, and below the cut is how I did this, partly because I want to remember how it worked LOL.
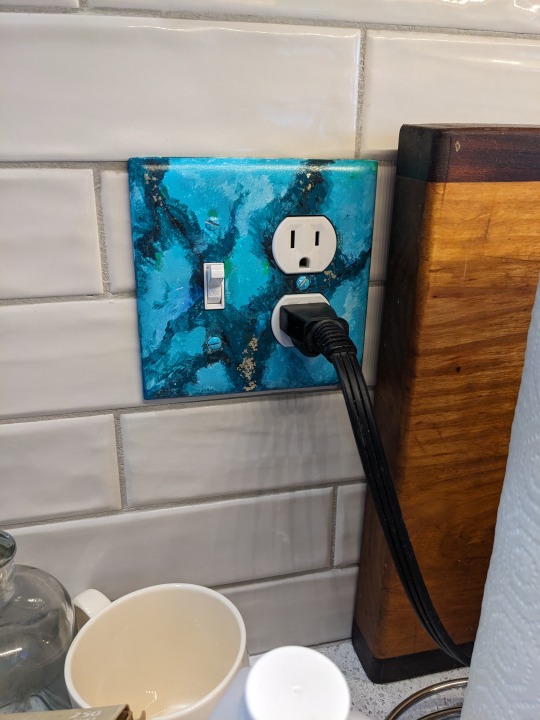
[Image description: A combo lightswitch/outlet with a black three-prong plug plugged into it, set into a white subway tile wall with a wooden breadboard leaned against it. The plate cover is painted with a mottled effect to look like a turquoise gemstone, complete with inset glitter to mimic the pyrite inclusions found in some raw turquoise.]
A better view of the glitter:
[Image description: Another turquoise-painted outlet faceplate on the background of a rumpled white dropcloth, my fingers visible tilting it toward the light so the flake glitter catches the light from the window.]
So I searched up for tutorials and found a few, each of which was like "can't believe nobody else has done this"; I'm sharing the most helpful one here. What was thee very most helpful thing, though, was the writer's pointing out that many different configurations of turquoise exist, so you can just pick a reference image and build off that. I did not in the end come very close to my reference, but decided instead to make it look sick as hell. LOL. I was just having too much fun doing whatever I wanted. So these are not super realistic! But then you wouldn't... make an outlet faceplate out of real turquoise, so I felt like I wasn't fooling anyone. Anyway--
How To Paint Faux Turquoise.
So the first thing I did was find some very fine-grit sandpaper (I think I got 320? I found a mostly used-up sheet of it in the basement and just used the unused edge from where it had been fastened around a block, LOL) and went over the whole front surface of each plate I was going to paint, and then I washed them with dishsoap and hot water and dried them with a dish towel, because I figured finger grease, hand dirt, and sanding dust would keep the paint from sticking. I started with white plastic ones, the kind you get for up to a dollar at the hardware store.
Then I got a plastic container lid, put dollops of various of my paint samples in it, dug out the craft paints I got cleaning out Auntie's basement and the sole tube of acrylics (Mars black) I could still find from the last time I did any painting, and went to town. The first couple, I did the pale shades and let them dry and came back to add the darker marbling. But then I was like, these are latex/acrylic, you don't have to build them in layers? So I just did the rest of them with all the shading in more or less one pass.
Acrylic art paint and latex housepaint are both water-based, so there's no conflict with using them intermingled. I've combined them before, I used to do a lot of sign painting and it works fine. Housepaint's runnier, idk. Don't mix oils and latex, is the thing to keep in mind; they just don't stick to each other real well.
I went to the art supply store to get some water-based varnish, because all i had was polyurethane and that's oil-based. It'd probably work as a topcoat but I was worried and the internet's advice conflicted. I wanted to go get better glitter anyway, so I did. I happen to live near Hyatt's All Things Creative, so I take every excuse I can get to go there.
I bought some sick-ass glitter (over in the resin pouring section, hell yes), and puzzled thru the various offerings. (@sassaffrassa's advice proved invaluable on this thank u.) I got just-- "Gloss varnish acrylic medium", the Hyatt's brand, for four dollars and sixty-nine (nice) cents, and then because I was feeling spendy, I also bought Krylon spray-on glossy varnish. Belt and suspenders, y'know? Also to make the brush strokes less obvious.
The critical thing, though, about the gloss varnish, is that it says right on the bottle that you can either incorporate it into the paint as a medium to enhance the sheen, OR brush it over the finished work as a protective coating. Dries absolutely clear. So I knew, THIS is how I'm attaching the glitter. I'd been thinking like, mod podge? elmer's glue? mix it into the paint? No.

[image description: the gloss varnish bottle. It is this product. The relevant text says "can be used either as a medium to enhance the sheen levels of acrylic paint or as an over-varnish on finished artwork to provide a non-tacky, protective gloss coating".]
So I carefully got open the little bottle of glitter (no sneezing! it was "white gold flake" style and cost eight bucks for like half a gram. to my knowledge it's not actually made of gold but it was priced like it was) and painted little fine patches of gloss varnish onto the spots I wanted glittered, and then used tweezers to apply glitter just in those spots, and mooshed them around with the little varnish-covered brush until they stuck where I wanted them. (I put them on the darkest bits of the veining, because that was what my source image looked like, mostly. I wanted to be really liberal but then I thought, no, a little pop of glitter is more exciting actually. Still not sure, but it does look good so. They say measure that shit with your heart but I went light because I figured I could add more later, and then I didn't.)
Then I came back at the end and painted more gloss varnish just over the glitter, just to make sure it was all really stuck down and wouldn't flake off with wear.
Let that dry for a couple hours, then used a larger brush to spread gloss varnish as evenly as possible over the entirety of each plate. It did leave visible brush strokes, which I didn't mind. The art shop guy suggested using a really soft brush to minimize that, and I was like "yah sure ok" but then, well, I didn't, I just used the brush I had.)
But then I let that dry overnight, and in the morning I put the plates all in my giant overspray cardboard box, and gave them each a liberal coating of the spray varnish. (Yes of course I have a giant cardboard box I keep in my basement to spray paint things in. I know it says use in a well-ventilated space but what I do, see, is I do that and then I leave the room, which is almost as good. LOL it's 24F and snowing I'm not doing it outside.)
That bottle says two hours until handling on it, so I left it two hours, and then I put up the plates that were in spots where the painting was done or wasn't happening, hence my example image being against a tiled wall.
The screwdriver immediately scratched the first one a little bit, but not super obviously. But I kind of would expect a screwdriver to scratch just about anything, so that doesn't mean much.
I won't guarantee how well these'll hold up but if you were interested in doing something like that, there's how it worked. (Hi, future me, you're welcome for writing it down lol.)
I'm sort of sorry for no more process pictures but honestly most of it was following whimsy and doing what I felt like and kind of drawing on what I hadn't realized was a lot lot lot of hours of past paint-handling in my life, so pictures wouldn't help anyone else recreate this. But it did remind me that I love to paint and should do that more. So, I'll try, I guess.
40 notes
·
View notes
Note
can you please make a tutorial for your santa gift graphics? i'm not totally new to photoshop but i could use some help <3
Ohh okay, this will be a bit long, so bear with me, dear Anon.
I'm going to use this one as an example:
You'll need three new documents: one for creating the watercolour portrait, one for the watercolour elements in the background, and a third one for the final edit.

Let's start with the portrait. I'm using a free photoshop action for the watercolour effect, which you can download here with a complete tutorial. After using the action, you'll need to make some adjustments, but it's still faster this way. Change the blend mode of the "watercolor artist" group to screen and slightly turn down the opacity if needed to make the details more visible

In the second document, use the watercolour action the same way again to create the red elements in the background. You can download the photo I used here. I highly recommend using Unsplash, they offer plenty of free high-resolution stock photos, and unlike on Pinterest, the photographers are actually credited.
Create the third document; mine is 540x750. I used an ivory paper as a background, but it should work with a canvas texture or even a simple white/light layer. Pick whatever you like.
After you're done with the watercolour actions, paste the portrait into your third document. Adjust the size and position, then change the blend mode to multiply. Name the layer "portrait."
Next, paste the background elements too, and also change the blend mode to multiply. I changed the saturation and vibrance to make the red pop more, but it's optional. Name the layer "background elements."
Now that you see everything together, you can play around with different adjustment layers, contrast, colouring, etc.
Now, open the video you'd like to use for the animation, in a separate document. I used this one, but there are other similar free videos on this website, pick what you like the most. If you want to make the process quicker, pick one that's already a high-contrast black and white.
After you've opened it, you can use the timeline to cut out the part you'd like to use, adjust the speed, etc. In this case, I just doubled the speed which you can do by clicking on that little triangle, and used the full video.

Create a video timeline in the third document. Go to Window -> Timeline -> Create Video Timeline. It's an important step, don't forget about it. Once it's done, copy and paste the video layer into the third document, and name the layer "video." Make sure the "video" layer is right above the "background elements" layer because you're going to need to create a clipping mask. You can do that by right-clicking on the "video" layer and choosing create clipping mask, or you can hold down the alt key and left-click between the two layers. When it's done, you can adjust the size of the "video" layer, rotate it, flip it, etc., depending on how you want your animation to look
After that, set the blend mode of the video layer to screen. If you've done everything correctly, you should have your animation now.
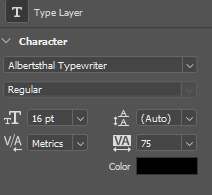
It's time to add the text. I used this font, size 16. I divided the text into 4 lines for easier adjustment of the position.
Once you're happy with the layout, create the white stripes, each on a different layer. This way, you can move them around separately if you'd like to change the position of the text. I like to make the text and stripe layers into a group so the layers are less chaotic, but you can skip this step.
The only thing left in the editing part is the invisible frame. Click on the "background elements" layer and add a layer mask. Select the brush tool, 50px, 100% hardness, and set the foreground color to black. Now, draw a line from corner to corner. Holding down the Shift key, click on one corner using the brush, then click on the next one, and repeat until you're done with all four sides. Your layers should look something like this now.

Before saving, make sure that all the layers on the timeline are the same length and start/finish at the same time.

If you're done, go to File -> Export -> Save for Web (Legacy). These are the settings I used for this particular edit, but feel free to experiment and use what you like the best.

I tried not to complicate it too much, but it's difficult to explain everything in writing, so if you have any questions, I'm always available :)
16 notes
·
View notes
Text
*momocore means Like Momo [me !!!!] if you r seeing this and Don't know me [what a funny idea !!! hiiiii] you r welcome to still vote and even look at my blog if you want... and if you want to ignore my poll that is okay too !!!!!
[i know Fundamentally the littles are more momocore but i only really looked at the main line !! this means no lala oopsies either... or ponies]
introductions to tha dolls and explanations under cut
🤍
Pillow Featherbed
Pillow is so sleepy !! me too girl i am always in bed… and i love wearing cute pyjamas and that is what Pillow is Always doing !! she is sewn from a baby’s blankie and i am a baby who loves blankies !!
🤍
Coral Sea Shells
Coral wants to be a mermaid Really Really bad and honestly me too… they were my special interest as a kid and i am still so fond of them 🤍 when i was little i would fantasise about being a mermaid and wish for it at every opportunity i got and i even followed YouTube tutorials that said i could do it if i drank a lot of salt water…
🤍
Holly Sleighbells

Christmas is Holly’s favourite and it’s mine as well !! she tries really hard to be good and to make people happy and i also do this… and she loves making lists and wrapping presents and i love doing both of these things as well !!!
🤍
Pix E Flutters
Pix E is a fairy and so am i a little !!! sometimes I use fae/faer pronouns… :o and !! Pix E is a wishful thinker like me and we both Specifically choose to be optimists 🤍 AND we both love glitter !!!
🤍
Ivory Ice Crystals
Ivory loves snow and so do i !!! And we are both very delicate and Also we both love doing little tedious activities… she makes icicle jewellery and i do things like making paper stars and diamond paintings and sometimes sewing ☆
🤍
Toasty Sweet Fluff
Toasty is very fluffy and a softy and i am too !!! we both love poofy dresses and baby animals and big squishy hugs :D and also her bunny is so incredibly momocore…
🤍
Toffee Cocoa Cuddles

Toffee is a sweetheart and she melts everyone’s hearts and people sometimes tell me this is true for me as well and i hope it is true… she is a cuddlebug !! she loves giving hugs and is always doing it and i also am like this :D both of us love chocolate !! and candy and ruffles and sending nice notes !!! but when we get nice notes Back we both get silly and embarrassed hehe… Toffee’s birthday is 11 June and that is MY birthday !!!!! and she has a chocolate lab and technically that is what my dog is… :O
🤍
Dollop Light N Fluffy
Dollop is the gentlest and softest and i think i am too… we both are super sensitive !! and we crumble when we even think someone is being mean hehe…
🤍
Sweater Snowstorm
Sweater is another snow lover and i still am one of those !!! she is also shy and quiet like me and sleepy like me and she loves soup which is very much like me !!!!!! Sweater practices shivering even when she is not cold and i also shiver when i am not cold most of the time it is when i am sleepy…
🤍
Tart Berry Basket
Tart is a strawberry which i am associated with Quite a bit !! and she loves dipping things in chocolate she is so right for that… i LOVE her pink bunny dressed as a strawberry SNIFFLE that is so momocore…
#this is my third try at making this post i hope no bitterness comes through#agere blog#lalaloopsy#kin assignment#<- ??? hehe
11 notes
·
View notes
Text
Much like the proverbial boomerang, my love of beautiful women who scare me has once again returned to the one being in this world that should have made even my asexual ass realize the gay thoughts weren't going to go away: Samus Aran.
And because I am the way I am, and am also thoroughly unmedicated, I have developed a game story three sections deep within the span of a few minutes. Full disclosure, it's been a hot second, like Metroid: Corruption era-ish and I have forgotten a lot, so don't come at me for canonical discrepancies.
I mean do, cause I want to know, but don't be an ass about it.
Anyway, onto the 'theory'?
Prologue:
Tutorial has player as classic fully upgraded Samus making tar out of a massive flood of enemies. Learn basic maneuvers, basic puzzle features, possible crafting, ect.
Tutorial ends with epic boss fight with some alien/robot that has ice/cold based attacks, because I remember that due to freaky alien DNA splicing, Samus doesn't handle cold very well. Samus technically wins but appears to be killed in the process as her suit is entangled in debris and flooded with coolant.
Some time jump later
Act 1
Cut scene opens to landing crew of a research ship docking at the remains of the 'final resting place' of the legendary Samus Aran. There are three people. They are talking to an admiral about the mission to research Arans power suit, as a way to combat the now growing issue of the alien/robot forces that she died fighting.
Admiral: just look for any remains of the suit, we can figure out funeral details once your back at the main ship.
Crew 1 (Doctor/Medic) : Understood. I will stay with the drop ship and coordinate while Lighter and Slip search the facility. Slip, take the upper floors, Lighter, bottom floors, move out.
Now the player controls Lighter, he is a thin man,5'6, and probably a little bit too excited to see the famous suit up close. His whole thing is fire and plasma weapons, but he is very weak compared to Tutorial! Samus, kind of to simulate Metroids whole, 'loose your gear and backtrack' thing.
Players go through a very destroyed facility, but are clearly taking a different path onto the building than in the tutorial, so there are still enemies to deal with.
Makes it into the boss chamber, and to his utter glee, the suit is more or less fully together, suspended in wires and debris. He has been lighting oil puddles on fire to provide light, and also warming up the room which is frigid from rampant coolant leaks. Very carefully cuts the chest plate and helmet in half, but halfway through the chest plate, he notices that the dead legend is staring at him, and not in the dead way.
Proceeds to nearly shit himself, as 6'3 Aran slowly shakes off dust and collapses out of the suit. Now in heavily damaged Zero suit, Samus growls at him and uses Lighter's torch to cut off the handcannon from her suit and it's power box.
While this is happening, Lighter is panic-calling Medic to help him.
Lighter: wholly shit, Medic, Shit shit shit shit....
Medic: is Aran functional? Does she recognize who she is?
Lighter: I don't know, I havent gotten to that just yet.
Medic: you didn't talk to the woman whose armor you cut to pieces?
Lighter: I did! But she doesnt seem to want to chat. She's hissed at me twice though. I told her we could get her off this planet.
Medic: So a giant genetically enhance soldier who is possibly incoherent and definitely feral now is alone with you and has your weapon? Brilliant, look just get her here, and I'll take over, I need to recall Slip. And call the admiral.
This part of the game is almost like a reverse escort mission. Since the objectives come from medic, they lead back the way Lighter came, but Samus has decided to ignore that entirely and starts limping back her way. Lighter tries unsuccessfully to get her to go towards the ship. Citing her extensive injuries and the prospect of a shower.
Samus does pause at that one, but then notices a waterfall nearby and stands under that instead.
They make it back to Samus's ship but set off alarms in the process. Samus throws on a back up suit prototype and glares at Lighter before tossing the upper body of a different one at him, as he does not exactly have the legs needed to wear the full thing.
Players now control Samus as the two fight their way back to the drop ship. Solving two-person puzzles and beating back the hoards of aliens/robots that have now woken up.
They teach the ship, Medic helps them aboard while Slip pilots.
Slip (turning around): soooo, what do we do with the demon nest we disturbed.
Samus looks at her armor, and presses a button, causing her ship in the facility to explode massively, taking the place with it.
Slip: I guess that works. Setting a course for Main ship.
#metroid samus#metroid#Samus Aran#Samus is feral#and doesnt give a shit bout this annoyance#shes got Alien/Robot army to kill#let Samus have friends damnit#also she gets a space rat as a pet because Samus&Pikachu was peak game choice is SSBB.
2 notes
·
View notes
Text
4 Easy Steps to be a Plus Size Lolita Beauty in 2023
Intro
Because the same query (I'm a plus-sized girl, where can I get Lolita clothes?) has just risen to the top of searches, Many adolescent girls are prone to low self-esteem or becoming easily dissatisfied with their supposedly minor flaws, but Lolita fashion is like the light that shines into life, the spiritual power and inner world that is strengthened by love, the magic that can help people become more self-assured and determined. We have made the decision to compile a brief tutorial and demonstrate how to buy and purchase plus size Lolita dresses. Just remember to follow these suggestions before making a decision!
Step1: Get Your Measurements
First and foremost, it's crucial to be aware of your measurements when shopping for big size Lolita in general, but especially for plus size Lolita. When it comes to "normal" clothing, being aware of your size "XL" or "18" may be helpful, but those designations are largely meaningless in Lolita. Additionally, there are differences between Chinese and American sizes.
The most crucial measurements for Lolita outfits are the bust and waist. The widest area of your chest should be measured (while wearing a bra) to determine your bust size, and the smallest part of your torso, located directly between the ribs and the belly button, is your waist. Knowing the distance from your waist to your knees is also helpful if you're tall so you can choose a Lolita dress that fits properly. Learn these distances in both centimeters and inches!
Step2: Discover Your Ideal Fit
Speaking of Lolita fashion, there are JSK, SK, OP, etc. How should we choose our fit? Here are some tips:
JSK
JSK can refer to a vest dress, a sleeveless dress, or a skirt with shoulder straps. JSK is the best option over salopette because the latter will make wearers appear heavyter. Large size Girls from Lolita should pick a plus size JSK dress with adjustable buttons. These buttons can be altered to fit your individual bust and waist, and it will also be more comfortable.
We advise trying a mid-length or long Lolita JSK if you are self-conscious about your thighs or have uneven leg lines. Long hemlines conceal the flesh on the legs while also making the legs appear longer than they actually are.
If you have a large bust, you should pick a JSK with a natural waist rather than one with a high or empire waist. When a dress has a high waist and is poorly fitted, it can occasionally make you look pregnant. In the real world, a high waist style will draw attention to your bust, which is unflattering to plus size Lolita girls. If you have a large bust, there are additional things you should take into account.
Avoid using bulky lace, ruffles around the bust, floral designs, and other intricate decorative elements on the upper portion of the dress as these will accentuate the breast. Just keep in mind to pick a Lolita outfit that will highlight your waistline!
SK/Skirt
One of the most popular Lolita versions is the SK, which has the advantages of being both functional and versatile to wear. The majority of Lolita skirts lack a waistline, making them great for hiding both meat and skinny people. However you wear it, everything looks beautiful!
A top shirt typically goes with a skirt. A SK may be created with or without shoulder straps. Normal-waisted skirts will make people look more slender than high-waisted ones. Another tip is to select skirts that end below the knee, so that if you're not happy with the length of your legs, they will only reveal a small portion of them.
OP
An OP specifically alludes to a dress with sleeves. Long sleeves or short sleeves may be OP. You are free to choose a skirt with any waistline. You can select a belt in the same shade as your plus size OP dress to go with it! To a certain extent, the waistband can highlight the slim waist and accentuate the waistline, giving the legs the appearance of being long and lean. The waistband gives the impression that the person is taller overall, making them appear thinner.
Puff sleeve OPs should also be avoided if your shoulder is wider than typical. However, this does not always imply that donning an OP with puffy sleeves will give you the appearance of a "rugby player." Puffed sleeves with a great shoulder line can totally cover the upper arm line, head-to-shoulder ratio, and actual shoulder width. A great shoulder line is a little deeper in than a standard Lolita dress, which most of the puffed sleeves OP would have on our website.
Step3: The Secret Weapons To Match Plus Size Lolita
Petticoat
One of the basics when you are wearing Lolita and want to have that perfect Lolita silhouette is a petticoat. It gives that nice poof that makes this fashion so recognizable. But it will also make you look heavier then you are. So to wear a petti or not?
When buying petticoats, you should also look for ones that provide plus sizes, or provide customized sizes. Wearing a plus size Lolita dress is inseparable from the skirt, but when choosing the skirt, you should also choose according to the size of the skirt. If a girl with a heavy body chooses it, she can wear a lo skirt with a larger skirt After putting on a relatively large pannier, using the "top wide and bottom narrow" wearing principle, the fluffy skirt can visually have the effect of thinning legs.
It is recommended to buy cotton lined skirt support, after all, plus size girls are prone to sweating, cotton lining will be very breathable and comfortable to wear. For example, the Aurora & Ariel makes all their petticoats with pure cotton lining, and also provide size customization.

Also, you can match Lolita coordinates with high heels. It can not only increase the height, but also lengthen the lines of the legs, making the proportion of the body more coordinated. If you feel that a solid color petticoat is too monotonous, you can also try a floral skirt support, such as the following flower petticoats.

Shirring
Shirring is your very best friend! In terms of plus size Lolita, shirring is arguably the best invention. The shirring section can expand and tighten as necessary since the fabric is collected using a unique method that makes use of elasticized threads. When a plus-sized beauty want to buy and use brand-name clothing without changing it, full shirring is the ideal choice.
Nearly all Lolita fashion brands have introduced shirred clothing at some point, albeit more recently for some. Recently released totally shirred pieces have been known to come from Metamorphose and Baby the stars shine bright. However, this does not guarantee that a dress with a full back shirring will expand to fit you. You should still consult the full size chart before making a purchase because it will typically provide you with a selection of sizes to choose from.
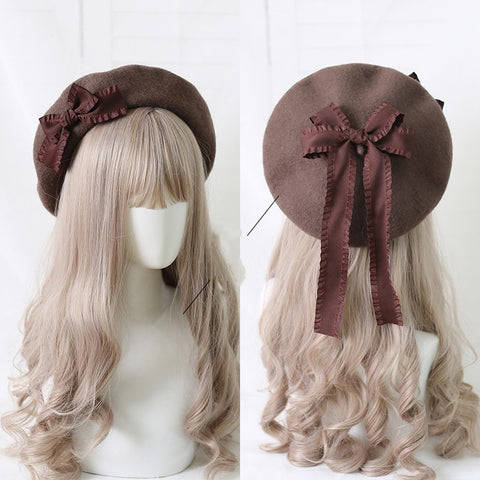
Beret
You can select accessories with eye-catching patterns and expansive spaces to fit a Lolita coordinates. Beautiful and high-end accessories can give the entire ensemble a more cohesive and layered appearance. Larger decorations, like a beret, will also draw attention and make you appear smaller in the face.
There are variation of hat styles. If the Lolita dress is beautiful and elegant, such as Cla Lolita dresses, you can choose a straw beret with a narrow brim and some delicate flowers laced along the top for decoration. Allow the characteristics of the clothing to stand out more, just as a large straw hat can be worn with an idyllic low skirt.

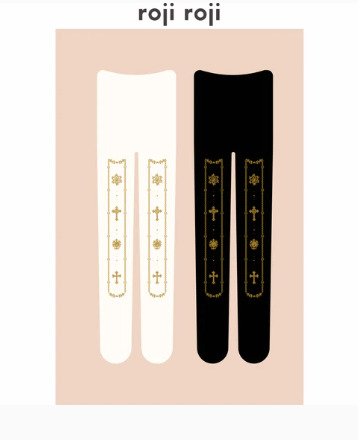
Tights
Buy some tights in a plain color. To make your legs look thinner, go for dark hues. Check out here for an incredible selection of colored plus-sized tights if you're considering wearing Lolita coordinates. Many companies sell socks that coordinate with their printed clothing. Despite the fact that some may advise you to avoid wearing socks since they will make your legs appear shorter I'd choose over-the-knee socks. When you are plus sized, those most likely won't cover your knee, but they look so much better than knee socks. You will only expose a tiny bit of leg if your skirt is the proper length.
Dark socks typically slim the legs more than light socks. Your Lolita ensembles will look more colorful with lace mesh pantyhose. You should pick dark, pattern-filled socks. Your leg line will get thinner. You can also choose darker socks with a small lace accent if you think black socks are too plain and monotonous.

Cardigan
A gorgeous cardigan is a girl's wardrobe need during the fall and winter. Lolita looks tiny and delicate when wearing a cardigan in addition to being elegant. Additionally, it is very body inclusive and is friendlier to ladies with larger arms. For a classier appearance, pair your skirt with a cardigan of the same hue. Another option is to simply invest a black and white cardigan—it's a chic combination! You can pair a black cardigan with Cla or Gothic Lolita coordinates and a white cardigan with a Sweet Lolita dress. You just wear a cardigan if you can't or haven't made the investment in a blouse. With a solid piece, you can even go over the top sweet since you may accessorize with bows or brooches. All depends on you!

Hime Sleeve Blouse
Many cute newcomers to the pit may have a hazy understanding of what hime sleeve shirt is. In fact, this sleeve type's design shares layers and a "fluffy" appearance with the little skirt.
As "Ji" is the Japanese word for princess, Lolita's inner sleeve is decorated with lace and numerous little details, giving it a stunning and elegant appearance. It is quite retro and not just has the taste of a dress. As a result, it is simple for us to locate the character "Ji Xiu" in some sweet and traditional Lolita.
The upper part's straight cuffs can help us visualize thin lines, while the lower part's sleeves can visually conceal the fleshy flesh. When you pair it with a JSK Lolita skirt, you won't have to worry about how it will look or effect your body. worth it
The upper arm, which is above the elbow and has a straight sleeve shape, is typically made up of two sections; suddenly, from the middle, a large cuff extends out, which can be useful for covering the skin on our arms.

Step 4: Brands Just For Plus Size Lolita
Here are some recommended indie Lolita brands that sell plus-size Lolita clothing. You can find these brands on 42 Lolita.
NanShengGe
NanShengGe is an indie Lolita brand that offers a lot of plus size Lolita clothing. Numerous dresses from this line are in the Cla Lolita collection style, which is known for its timeless elegance. It is good at conveying a sense of luxury with unique design. No matter if it has a handle design or not, the overall color matching is really exquisite, there won't be any color collisions, and the colors have a high saturation level.


Sakurada Fawn
Sakurada Fawn is a plus size Lolita brand that offers Sweet Lolita outfits. The main goal of Sakurada Fawn is to achieve a doll-like, adorable, and sweet shape while pursuing the "sweet girlish heart," which is typically used to express girls' innocent and romantic feelings as well as their inner dreamy consciousness.

The Conclusion
Having a large figure might be really discouraging. Avoid getting caught up in the "but I want it to fit since I love it sooooo much" stage. Buy brands for plus-sized beauty items like dresses, headbands, necklaces, and other accessories to complement your style to boost your spirits. No matter what people say, just remember that you are beautiful if you feel that way.
Lolita fashion should not be a tool to divide people, but a clothing that makes people happy. Whether you are heavy or thin, tall or short, or what skin color you are, you have the right to enjoy happiness. Wearing Lolita is just to make yourself happy, not to please others.
Lolita is accessible to anyone. Anyone can wear Lolita fashion, if there is one thing you learn from this post. No matter your age, race, height, or size, Lolita fashion can help you become the most attractive version of yourself. 42Lolita sincerely hope this information was helpful and wish you the best of luck on your Lolita journey!
5 notes
·
View notes
Text
12 Best free 3D Modelling Software for Beginners
Many professional-level 3D modelling programmes are outrageously costly, making them out of reach for most beginners. Furthermore, they are even less desirable because of the necessity of expensive monthly or annual subscriptions. Thankfully, some high-quality options for 3D modelling software may be had for no cost at all. That is the subject for today's conversation.

1. Tinker CAD
When it comes to free 3D modelling software, many beginners choose Tinker CAD because it is one of the better solutions available. It's completely free to use, and it has a robust online community. Complex 3D models are beyond the capabilities of Tinker CAD. Still, it gives newcomers simple yet effective tools for making simple 3D creations without breaking the bank.
As a starting point for your own free 3D models, you can download some pre-made ones from the website and import them into TinkerCAD. And if you want to learn how to use it to make 3D models for yourself, there are free tutorials for that as well. If you are looking for a CAD courses in Nagpur then CADD Centre Nagpur is the one stop solution for CADD Courses
2. Fusion 360
The capabilities of Fusion 360 extend well beyond those of traditional 3D modelling tools.
It's wonderful programme for novices who wish to experiment with basic 3D modelling and have fine-grained control over the final product's shape and size, despite the software's extensive feature set. With Fusion 360, you can create designs for production, 3D printing, and even machining.
Because the ribbon area is not overloaded with tools and commands, the user interface is clean and straightforward, making Fusion 360 a breeze to learn and use. Makers including 3D printing hobbyists, woodworkers, and even machinists use Fusion 360 as their primary design and drafting programme.
3. Daz 3D
Makers of the popular Daz Studio, Daz 3D are responsible for some of the most intriguing and user-friendly developments in the history of 3D modelling software. When it comes to animating, posing, setting up lighting, and rendering in 3D, Daz Studio simplifies many of the more technical aspects of the medium.
4. Free CAD
Despite still being in beta, FreeCAD, a free 3D modelling software with real skin in the game, has made great progress since its first release in 2002. It's made to streamline and simplify the process of generating 3D models of physical objects.
5. Vectary
Vectary, billed as the "easiest online 3D and AR design tool," is a browser-based mesh and parametric modelling programme. Its straightforward, user-friendly design conceals a wealth of useful functionality.
The software is aimed at professionals in the fields of graphic design, product design, and game design, with a particular emphasis on rendering, however it may be used for any type of 2D or 3D modelling.
6. Meshmixer
Autodesk's Meshmixer, a lightweight 3D modelling programme, is a necessary addition to every maker's arsenal. The software is a "Swiss Army Knife" for 3D objects, letting you easily modify, extend, splice, merge, and otherwise work with models, as described on the software's official website.
7. SketchUp
Google's SketchUp is a free, all-inclusive 3D modelling software suite. It is a visual tool for creating 3D models (unlike other 3D programmes, which need knowledge of code or the usage of complex tools). Users all over the Internet attest that SketchUp is a simple and efficient tool for drawing floor plans, furniture layouts, and other architectural and interior design-related 3D models.
8. Blender
Blender, one of the most widely used 3D modelling programmes, has a large and helpful online user community that freely distributes STL files, 3D models, and tutorials. If you do a fast search on Google or YouTube, you'll find millions of results from people who are happy to share their Blender 3D creations or instruct you in its use. This is because Blender is an open-source 3D modelling software application that doesn't cost a dime, allowing users to freely experiment with the software's vast set of features.
9. Z Brush Core Mini \ Z Brush
Core Mini is a streamlined variant of Pixologic's Z Brush, a sculpting application widely used by experts in the field. Still, that shouldn't put you off. Due to its design, Core Mini is accessible even to people with no prior knowledge with 3D modelling.
10. Dark Spark Mechanical
It's a free programme that may be used to create CAD environments. Even if the programme is simpler to work with, there are less job openings. In this way, engineers with no prior experience with 3D modelling software or conventional drawing equipment would be able to make their own customised models with ease. The 3D printing community has embraced Design Spark Mechanical with open arms. CADD Centre Nagpur also provides Mechanical CAD Courses
11. Archi CAD
This programme has a free 30-day trial period but costs money beyond that. Structures can be designed with the help of the ArchiCAD application. You can use it to make complicated 3D models and then analyse their constituent pieces in great detail.
Show the exterior of a multi-story building, the floor plans of individual units, and the design of inner spaces, for instance. The data can also be transferred to analytical programmes for speedy defect localization and correction. At last, ArchiCAD has automated document and visualisation tools.
12. Self CAD
By allowing users to create 3D files without the need for any further downloads, SelfCAD aims to be the finest free browser-based 3D modelling software for students throughout the world. Because of this, it is often used in American classrooms to teach pupils about 3D design. On the other hand, individuals who prefer a downloadable version can do so on both PCs and Macs.
For any queries or details Feel free to call us on- Nandanvan- 7507111164 I Sadar-7507111145, Or Visit our website- www.caddcentrenag.in/
3 notes
·
View notes
Text
youtube
In this video "PlayStation State Of Play REACTION By An Animator/Artist RE4, HORIZON, STRAY...AND MORE" We observe the latest exclusive games that the team at Sony Playstation and their partner game studios have in development and their respective trailers. Game reveals such as Resident Evil 4 (remame), Horizon VR, STRAY, and more are featured in PART 1 of this PlayStation State Of Play REACTION! We'll also do a light talk about some of the techniques and the games and out thoughts about them!
So put your feet up,
Relax and...
Enjoy!
Follow and Support for more Animation and Art Based Content and tutorials
-------------------------------------------
Subscribe -
FREE LEARNING Resources -
▶ GET 1 months Free Art Classes with me HERE 👇🏿-
(DRAWING HEAD TO TOE HUMAN ANATOMY)
▶ART TUTORIALS PLAYLIST👇🏿
▶"SHOW AND TELL" ART PLAYLIST:
▶"REACTIONS & FUN BREAKDOWNS (EDUCATIONAL)" PLAYLIST:
Thanks For Watching!
-------------------------------------------
▶ Subscribe -
#sony#playstation#sony playstation#sony playstation state of play#playstation state of play#state of play#state#of#play#game#games#gaming#gamer#resident evil 4#resident evil#lady demitrescu#lady#demitrescu#horizon#vr2#stray#Youtube
1 note
·
View note
Text
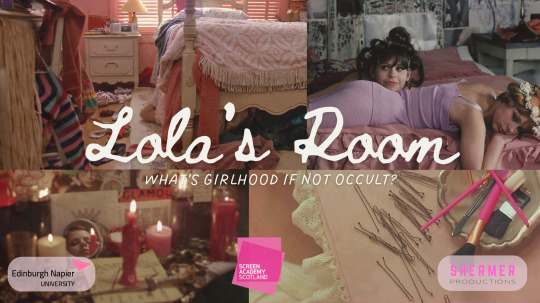
Week 6
THE PITCH
This way my director's statement:
Teenager girls are a collective that is constantly made fun of and belittled, causing young girls to grow up believing that being a girl is something to be ashamed of. With Lola’s Room, I want to move away from that perspective and portray teenage girlhood through a lens of acceptance and understanding, recognising that the things you care about as a teenager are essential to build your identity and shape your personality. Anyone who has ever been a 16 year old girl can relate to Lola and Jasmine, because the fear of not looking good enough is a rite of passage for women. The film takes place fully in Lola’s bedroom. As a teenage girl, your bedroom is your whole world, it is the one space where girls feel safe enough to express themselves freely. The same applies for Lola; her room is a reflection of her identity and interests. The themes of insecurity, self- awareness, and conformity that are explored in the film are heightened by the space where it is set, a space where only Lola and Jasmine exist and the fear of not looking good enough is fought back by the safety of a space for exploration free of judgement and expectations. Lola’s Room could not take place anywhere else other than in Lola’s room, because such intimate and vulnerable interactions between Lola and Jasmine would not happen anywhere other than a girl’s bedroom.
This is a coming of age story with its ups and downs, culminating in the realisation that it’s okay to feel comfortable being yourself and embrace your personality and identity. The tone of the film is of fun, excitement, and anticipation, with an aura of nostalgia and magic. The spell sequences will be integrated into the film with a shift in the style of the cinematography and sound design, turning surreal and dreamy, and playing with discontinuity in the edit. Lola’s Room is a film that feels like looking back at memories of teenage years and hours spent with friends, keeping girlhood and femininity at the core of its story. My intention with Lola’s Room is that it sheds a light on the reality of being a teenage girl and the importance of female friendship, but also to give viewers a glimpse into the fun and excitement of being a teenage girl.
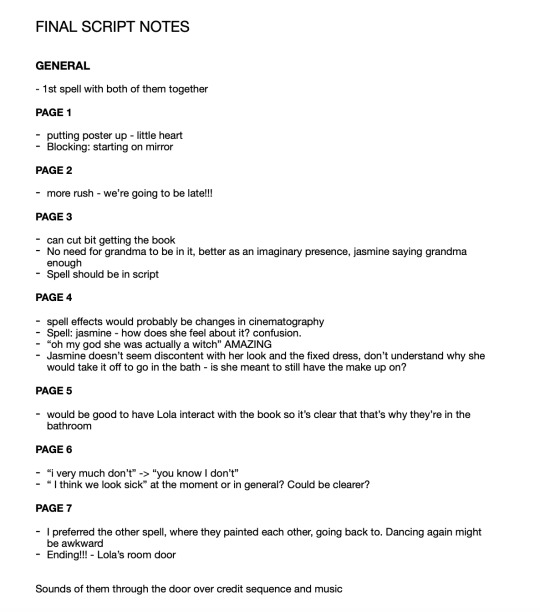
Pitch feedback
Kate:
We spent too much time going over the stylistic elements of the film and should have touched more on the witchcraft element and the general conflict
The actresses look older than 16
Good use of references, but we should have made it clearer how our film is innovating
Good presentation and design overall
Andrew:
Unsure about the character’s attitude towards the witchcraft elements: me and Gaby explained how the spells reflect the girls’ attitude towards the dance and how Jasmine is at first skeptical and then insistent about doing the spells because she really wants to go to the dance, but in the case of Lola it is the other way round
I was overall very happy with the feedback that we got for our pitch. We were clear enough about how we were incorporating the brief (sense of place) into Lola's Room and it did not cause any concerns, and we were able to answer questions confidently. We will make sure to keep the feedback in mind as we continue to develop the film and move onto production.
Meeting with Gaby
This week Gaby and I had another meeting to discuss the script once again. After a tutorial with Kate and Caio, there were some considerable changes made to the script, so the aim of this meeting was to decide what changes we wanted to keep and what elements we wanted to bring back from previous drafts. The lecturers' feedback helped Gaby greatly to increase the stakes in the story and justify the characters' motivations. However, some of the essence of the story was lost along the way, and some of the characters' interactions did not feel natural. We worked together to bring back the character's personalities and their friendship dynamic back to the story while respecting the elements that were improved with the new feedback.
0 notes
Text
Virtual city playground hack

#Virtual city playground hack for free#
#Virtual city playground hack how to#
#Virtual city playground hack generator#
#Virtual city playground hack for android#
Virtual City Playground Cheats is a really cool way to get In-App purchases for free. Ask a question or add answers, watch video tutorials & submit own opinion about this game/app. Avoid Virtual City Playground: Building Tycoon hack cheats for your own safety, choose our tips and advices confirmed by pro players, testers and users like you.
#Virtual city playground hack for android#
Virtual City Playground: Building Tycoon tricks hints guides reviews promo codes easter eggs and more for android application. You have to look at all the quests and see what the rewards are. Sorry I cannot seem to reply how do I unlock furniture factory. How u bild a steel mill in virtual city playground. Virtual City Playground HD Q&A: Unregistered. Powered by a brass mesh core, The Bunker Gym offers a completely unparalleled offering state-of-the-art equipment sourced across the globe, exceptionally skilled Personal Trainers, pumping aesthetics, disciplined signature gym classes, unique training zones and luxury. Descend beneath the city streets to enter a futuristic world of raw concrete, neon lights and brushed metal. Guide for Virtual City Playground (FREE) Application Features: - Virtual City Playground Strategy - Virtual City Playground Tips - Virtual City Playground Guide Legal Notice: This app is an unofficial guide only, it is not authorized or created by the creator of the game.
#Virtual city playground hack for free#
Thanks to our generator, you can get them for free and immediately.Įach game needs a different and particular resource to continue working, and we can generate all of them! In addition, we work with the main platforms on the market, such as PS3, PS4, Xbox360, Windows, Nintendo Switch, Apple, Android, etc.Link:Virtual City Playground: Building Tycoon, Video game.
#Virtual city playground hack how to#
All free! How to get free Coins Diamonds for Virtual City PlaygroundĪs you just saw, being able to get Coins Diamonds for Virtual City Playground is very simple. You select which resources you want and the quantity. So easy and fast! You can get unlimited Coins Diamonds to play Virtual City Playground totally free and without having to register anywhere. When everything is selected, the only thing you have to click is the START/INICIO button and our system will start working. We'll need your username and the platform you use to play Virtual City Playground and that's it!
Then, you must provide your information so that we can add Coins Diamonds to your account.
Each game has the resource that is needed to continue advancing, so select it and also indicate the amount you want to be credited to your account.
Once inside, you only have to choose the resource you want.
This is easy: in the search engine you must enter the name of the game and it will open for you. Once inside, you just have to go to the Virtual City Playground generator. Here we tell you step by step how to get free Coins Diamonds for Virtual City Playground, take note!
#Virtual city playground hack generator#
And it is a real torture to be in the middle of a game, wanting to continue playing and, suddenly, run out of resources, right? Precisely for this reason, we have created this automatic generator that will give you everything you need to continue enjoying Virtual City Playground. Getting Coins Diamonds from Virtual City Playground is now easier than ever! In our generator we offer you the possibility of being able to obtain these resources immediately and without having to pay anything. No problem! ) How to use the Coins Diamonds generator for Virtual City Playground Do you spend hours and hours with Virtual City Playground? It is one of the fashion games! If you are also a gamer and you don't like being left halfway due to lack of resources, you are in the right place! And the fact is that we offer you a generator of Coins Diamonds that is totally FREE and with which you will be able to continue getting addicted for hours and more hours.
1 note
·
View note
Note
harry x youtuber/influencer y/n ? pls idk but i am obsessed with like famous y/n😂love your work❤️
Hi!!! I ended up going with YouTuber y/n (specifically a beauty guru) because it's an area I'm slightly more familiar with!!! I don't wear makeup, though, so I'm not totally sure how well it turned out, but I had fun writing it either way!!! I hope you enjoy it!!!!
Warnings: none!! just fluff!!!
WC: 1.3k
Ever since your 7 million subscribers had discovered that Harry Styles was your boyfriend, they had been begging you to have him appear in a video. It wasn’t that easy, though; he was constantly busy, between tours, recording, promo, and filming movies, it was difficult for you to snag a moment where you could sit him down and slather makeup on his face. But your first makeup line had just come out, and, of course, you had to make a video to show it off. Harry took a little bit of time off to come to your release party the night before, and he agreed to appear in the video you were filming the following day before jetting off to tour rehearsals.
“I’m sure it’ll be fun, lovie. Jus don’ ruin this pretty face.”
You rolled your eyes, “Won’t be that tough to ruin.”
“Hey! What’s tha’ supposed t’ mean?” he exclaimed with a pout on his face.
You giggled as you prepped your filming space, making sure that the lighting was perfect, the cameras were in the right places, and the makeup was placed on the table in front of you.
He grabbed your wrist, making you stop in your tracks.
“What?”
“Nothin,” he said with a smile, “‘m just really proud of yeh. Got y’ own makeup line and everything. You’re amazin. ‘M sorry ‘m not around more to celebrate your achievements, but I am incredibly proud of yeh. Always.”
You felt your cheeks grow warm, “Thank you, Harry. You’re such a sweetheart.”
You pressed a soft kiss to his cheeks before walking over to the camera, “Ready, babe?”
He grinned, “Yeah. Can I make a dramatic entrance?”
You rolled your eyes again, “If you’d like.”
Harry settled himself under the table, giving you a thumbs up when he was ready. You turned on the camera and walked over to him, sitting in one of the empty chairs. When you saw the red light on your camera flicker on, it was go time.
“Hello, my lovelies! It’s time for another makeup tutorial, and today is gonna be a special one!”
You brandished your eyeshadow palette and gestured to the other products lying on the table, “I’m going to be using products from my first ever makeup line, Ice Queen!”
The palette in your hands was filled with cool blues, greens, and purples, as well as neutral colors and a bit of sparkle. The packaging was blue and silver on the foundation to the concealer to the lipsticks and everything in between!
“I’m so excited to finally release this! I’ve always wanted my own makeup brand, and now I have one, with products that are cruelty free, vegan, and just plain awesome! But for such a momentous occasion, I’m not going to be doing makeup on myself. Instead, I’ve brought in a special guest! Would you like to introduce yourself?”
It was then that Harry made his presence known. He popped up from behind the table with a cheesy grin and waved at the camera.
As he settled into his seat, he said, “Hi! ‘M Harry Styles, singer, actor, entrepreneur, and makeup model.”
You sighed, “And drama queen.”
“‘M a musician, darling. We always have a flair for the dramatics. Don’t you beauty Youtubers also have a lot of drama?” he quipped.
“We do, but I’ve always tried to stay out of it. They don’t call me ‘The Unproblematic Queen’ for nothing,” you replied.
“Tha’s true. Y’ literally the nicest person ‘ve ever met. Lucky I snatched yeh up, t’ be honest.”
Your cheeks grew warm at that, “You’re too sweet, babe.”
It was his turn to kiss you on the cheek, “So are yeh, m’ love.”
“Anyway, we should probably start with the meat of the video,” you said.
Harry clasped his hands together, “Yeah, baby, make me look pretty!”
“You don’t need much help with that,” you flirted.
He blushed a little, but still managed a reply, “And you say I’m the flirty one.”
“I have my moments,” you quipped, “anyway, first we’ve got to put on foundation. Since Harry’s whiter than a ghost-”
“Hey!”
“-we’ll be using one of the lightest shades, but there are 60 total to choose from! We’re all about inclusivity here, and everyone should have a foundation that matches their skin tone!” you explained as you opened the liquid foundation.
“It’s cold,” Harry whined as you began applying the foundation with a beauty sponge.
“Stop squirming,” you scolded, “this is why I only put makeup on myself.”
He pouted, “But I like when you put makeup on me.”
You couldn’t help but smile, “I like it, too, but only when you stay still.”
Harry willed himself to keep still throughout the use of the foundation, concealer, and blush painted across his features. You two threw in plenty of jokes and teasing that you knew your viewers would enjoy when the video came out. Sharing in this moment with Harry really was special to you; you loved bringing him into your world just as much as he loved bringing you into his when you went on tour with him.
“Okay, now for eyeshadow! I’m really excited to make looks with this palette because blue is by far my favorite color. Let’s see what we can do.”
You dusted silver in the corner of the lid, followed by blue more toward the center and black at the edges. You finished the eyes by sweeping black eyeliner at the bottom of the lid, highlight at the corner to accent the silver, and black mascara on Harry’s already annoying long lashes. You also added highlight to his nose and his cheeks, making him sparkle.
“So now all we need is a lip color. I feel like using this beautiful metallic blue.”
“Blue lips? Tha’ sounds kind of weird,” Harry questioned.
You shook your head as you uncapped the lip gloss, “Not weird at all! People wear ‘weird’ lipstick colors a lot now. I think you’ll look great.”
“Okay. I trust y’ judgement, Beauty Guru.”
You smiled as you applied the gloss to his pretty lips. Soon, they were coated in blue, and your work was done.
“And I think this look is complete! You wanna take a look, Har?”
He nodded, “Yeah! Wanna see if I look like an ice queen!”
You giggled as you pulled out the mirror, allowing him to take a look.
“Oh, this is really cool! I actually really like the blue lip! Y’ so talented, baby!”
You giggled again at the compliment, “Thank you, baby! I’m glad you like it! So, I think that’s it for today! Thanks to Harry for being a wonderful model, and thanks to all of you for making it possible for me to finally have my own makeup brand! Ice Queen will be out in beauty stores across the world, so make sure to keep an eye out for it! I’ll catch you all in the next one!”
You and Harry both waved goodbye to the camera before you got up and stopped recording.
“Now for the fun part: editing.”
He raised an eyebrow, “Don’ yeh get someone else t’ do it?”
“Usually,” you said, “but he’s got the flu, and I’m not about to put that on him. So, I’m going to do this one myself.”
“Can I help?” he asked.
You agreed, and the two of you sat down to edit. It was honestly really fun having Harry around to help, and he gave some good suggestions! You didn’t quite finish it that day, but you definitely made some good headway. Unfortunately, Harry had to leave for rehearsals.
He gave you a tight hug, “Today was so fun! Thank yeh f’ lettin me be a part of y’ video.”
You smiled, squeezing him back equally as tightly, “Thank you for being a part of it. I love you, Harry.”
“I love yeh too, baby. I’ll see you again soon.”
Harry pressed a quick, yet sweet, kiss to your lips before heading out the door. A few days later, the video was ready to post. It quickly became your most viewed video yet. Not only was the makeup look stunning, but your viewers loved the chemistry between you and Harry. You definitely needed to have him in another video.
#harry styles#harry styles x y/n#harry styles x you#harry styles x reader#harry styles fluff#harry styles blurb#harry styles imagine#harry styles fic#harry styles fanfiction#harry styles one shot#harry styles fan fiction#harry styles fandom#harry styles fanfic
188 notes
·
View notes
Text
Kissing Lessons pt7
Pairing: Katsuki Bakugou x Fem!Reader
Warnings: domestic violence, abuse, angst, fluff and more angst

I’m still in disbelief when I wake up the next morning. I look at my arm, it’s bruised, you can see the impression of his fingers. I put long sleeves on. When I look in the mirror I can see the bruises on my chin. I put concealer over that. No need to have anyone else worry.
Except Katsuki.
He saw the bruises. Does he know? I’m a terrible liar and I’m nervous to face him, but when Mei knocks on the door telling me breakfast is ready I take a deep breath and head out to face the music.
He doesn’t look at me, speak to me or acknowledge me in any way during breakfast. I try to act normally, but the tension radiating off of him is palpable.
“What crawled up your ass this morning?” Mei asks him, Katsuki shoots her a glare and says nothing. Nobody comments again after that.
I’m washing the dishes when he comes up beside me. He says nothing, just begins rinsing and drying them as I wash them. “What are you doing Y/N?” He asks me after his mother leaves the room.
“What?” I ask, unable to look him in the eye.
“You lied to me.” his voice is filled with hurt, I scrub the dish in my hand hard, trying to remain passive. “You said Ash wasn’t at that party...So what? You don’t trust me now?”
“I do.” he rolls his eyes, turning to face me, he places his hand on my wrist, and takes the plate from me, dropping it back into the soapy water.
“Then tell me the truth...Did Ash do this to you?” Before I can protest he rolls up my sleeve, his eyes widen in horror as he takes in the purple and blue markings around my elbow. I pull my arm away, rolling my sleeve back down.
“You already know the answer.”
“Yeah cuz you’re a terrible liar.” he lifts my chin gently, looking me in the eye. “Are you gonna see him again?” I pause, trying to think of what to say, but I take too long. He sighs, dropping his hand from my face. “Y/N….I know you don’t want me to tell you what to do-”
“Then don’t.” I turn around, flicking my hands as I march from the kitchen. I’m irritated. I just need to talk to Ash. Get his side of the story and everything will be okay.
“If you don’t slow down and think about this you’ll end up just like your mother!” That stops me immediately. His face is red, eyes troubled. He lowers his voice. “I don’t….fuck,...I don’t want you to get hurt.”
“Fuck you.” I say. That hits him and I instantly regret the words. He looks heartbroken, unsure of what to say now. “Ash cares about me. He won’t do it again.” Katsuki snorts crudely and rolls his eyes again.
“That’s what they all say.”
Monday rolls around all to quickly. I’m nervous about what’s going to happen when I see Ash. I don’t know what happened after the party, if he even remembers what he did. My elbow still hurts but the bruises on my chin are fading. I see him as soon as I step inside the building. He’s standing by my locker, a box of candy in his hands. I try to smile but my face feels tight.
“Hey,” he holds out the chocolate to me.
“Hey.” I take the chocolate and open my locker. He shoves his hands in his pockets and leans against the lockers.
“I just wanted to say I’m sorry….about the other night. I didn’t mean it….I really didn’t. I just….”
“It’s okay.” I pull out my history book, placing the chocolates carefully in the text book’s spot.
“No it’s not,” he shakes his head and lightly places his hands on my hips, I still at the contact. “I would never hurt you...I’m so sorry.” he kisses me, it’s mild and delicate, and not at all like the monster I met on saturday night. I decide to give him another shot. He pulls away and wraps his arm around me as we walk down the hall, kissing my hair as we go.
“Thank you for the chocolates,” I say as we get to my classroom. He releases me with a smile, kissing my hand. I love how affectionate he’s being.
“Meet me at my car after school. I’ll drive you home.” I give him a slight wave before entering the classroom.
The day passes quickly. I feel much better after talking with Ash, I knew I was overthinking things. Katsuki is waiting beside my locker. I look at him confused. I had already let Mei know I didn’t need a ride. Besides, Things have been awkward since the argument in the kitchen. I don’t really know what he wants at this point from me. I feel like he’s hot and cold.
“Ready to go home?” he asks.
“Ash’s bringing me.” Katsuki narrows his eyes.
“Absolutely not.” I scoff.
“You’re not my father.”
“Y/N.” he grabs my wrist as I turn away from him and pulls me close, his eyes are serious. “Y/N….He bruised you.” he whispers the last part. I pull my hand away, taking a couple steps back.
“Katsuki stop. We talked okay. It’s done. Let it go.” he opens his mouth to speak and I raise my hand. “Enough Katsuki. I’ll be home in a bit.” I leave him standing there at my locker, I don’t look back.
Ash’s car is parked at the far end of the parking lot. I hurry over to it, seeing that it’s running and he’s waiting for me. I open the passenger door quickly and got in, shutting it quickly behind me. He doesn’t say anything.
I turn to look at him, ready to apologize for making him wait on me. But I don’t even get the chance. He turns, an expression on his face that I have never seen before-distorted in anger- and backhands me across the face. The force sends my head slamming into the passenger window. He grabs the front of my shirt, bawling it in his fist and yanking me towards him.
“Where the fuck were you?” he snarls, his eyes are wild and I’m scared. I can taste blood in my mouth. He reminds me of my father.
“Katsuki-” I gasp. “He was-” he slaps me again, keeping his hold on me tightly.
“I am so sick of that dude I fucking swear,” he scream in my face. I am terrified. I stammer, trying to explain, he shoves me back, releasing me and putting the car in drive. He speeds off before I can even get my seatbelt on.
He rants, the whole way to my house. I cower against the door, hand pressed to my cheek. It stings.
“....And I don’t wanna see you talking to him again okay? I’m over it.” he slams on the breaks outside of my house. I jerk forward and slam back into the seat. My head is throbbing and I can feel tears burning against my eyes. He grabs my chin, very much in the same way he did Saturday night, forcing me to look at him. “If you just do what I say things will be easier for you.” he slams his lips against mine hard, I scream internally from the pain.
I quietly enter the house, listening for any hint of sound or movement. It doesn’t seem like anyone is home yet. I shut myself in the bathroom and flick on the light.
My cheek is pink, it may not bruise but my lip is swollen, blood trickling down my chin. The concealer I put on my chin has rubbed off, the bruise looks a bit darker. I lean forward in disbelief, touching my face and wincing as I do so.
“My god.” I mumble to myself. “My God….”
The cycle continues all week. Everytime I do something Ash doesn’t like, as soon as we are alone he hits me. He keeps telling me that things will be easier if I listen to him. I try to. I really do. But nothing I do seems to be good enough, satisfying enough for him. He brings me presents, apologizes, promises not to do it again, and then as soon as I do something.
The morning of homecoming, I wake up feeling anxious. I have a panic attack in the shower. I don’t tell anyone. I don’t really want to go at this point, even as I roll over and look at Mei sleeping away blissfully. I know I would have a good time if it were going to be just us….But it’s not.
I get out of bed and pad to the kitchen. Katsuki’s there, sitting at the kitchen table reading a book and eating cereal, he glances at me as I walk by but says nothing. I’ve caught him watching me quite a bit lately. It perks my curiosity, but I never ask him about it. I get my own bowl and pour my own cereal before sitting down beside him.
“So….”He says, trying to start conversation. “You excited for tonight?” I shrug my shoulders. I appreciate the effort, but I’m still angry with him for what he said about me being like my mother.
“Not really…”
“You wanna stay home?” I shake my head.
“Mei would kill me.” he smirks, nodding his head in agreement.
“Yeah. You’re probably right.” we the rest of our respective meals in silence. The awkward tension relaxing a bit.
By ten, Mei and I are huddled on the couch in the living room watching YouTube updo and makeup tutorials. Matsuki makes us lunch and we eat while we decide on our hairstyles. Everything moves quickly from there. Mei is blasting music so loudly it shakes the floorboards in her room. It’s a good thing their father is working today. We would have gotten into so much trouble.
Around four, we’re scrambling to finish, I try to put on my dress on in the bathroom, but Mei calls for help at the hair station, I open the door to sneak across the hall at the exact time Katsuki comes out of his bedroom too, and he gets an eyeful of me in a strapless black bra and matching underwear.
“Oh my god,” he says, and claps a hand over his eyes. “Will you put on some fucking clothes?” His cheeks flush bright red.
“You know not to come out when we are getting ready. What if I had been your sister.” he makes a disgusted noise.
“I need to go to the bathroom!”
I put my hands on my hips and wait until he lowers his hand, when he sees I’m still standing there he groans covering his eyes again, “Go away.”
“Why?” I smirk teasingly, taking a step toward him.”See something you like?” I feel bold, I know I’m crossing some line, but teasing him is too much fun to pass up.
He opens his eyes and stares me down, as if to say, Is that how you want to play this? And when I keep my stance, he accepts the challenge, his eyes wander all the way down my body and back up, resting for a moment on the fading bruise on my arm before finding it’s place on my face again. I suddenly feel very small, rooted to the spot as he steps closer to me.
He swipes my hair back from my face and whispers in my ear, “Thanks for the show.” I can feel him grinning against my cheek, like the little shit he is. It feels almost normal, like how we used to be. Before the kissing lesson. Before Ash. He steps around me, giving me one last look over before winking and going into the bathroom.
The boys will pick us up around seven. No one wanted to go to dinner first so we waited until it got close enough to just go to the dance. My dress is lavender colored, it looks like a ballgown. Mei wore it in a beauty pageant she was in a few years ago. It’s amazing it fits me, but I love it either way. I grab my wristlet off the bed in Mei’s room and head down the hallway, Katsuki sitting on the couch when I pass by the living room. He calls out to me.
“Hey.” I do a small spin, grinning at him. “What do you think?” he studies me, my hair and makeup, my dress. It feels like he’s staring at me forever before I finally get a response.
“You look….You look-”
“Hey!” I jump, turning to see Matsuki behind me. She’s grinning at me, it’s infectious. “Lookin’ good sister!” she pulls me into a quick hug. “Mei said the guys are here, they’re waiting for you.” I nod, throwing Katsuki a quick smile before hurrying to the front door.
I sit beside Ash in the back of Kai’s SUV. His hand squeezes my thigh hard. He’s angry I wasn’t waiting for him at the door with Mei. Katsuki had told him I was talking to Katsuki. He leaned over and whispered to me viciously, “When we get to this dance….” He doesn’t finish and I know what’s going to happen. It makes my blood boil. Katsuki’s words about my mother ring in my ears. He was right.
When we get to the dance I jump out of the car, slamming the door. Mei and Kai walk around the front of the car while Ash meets me behind it. He stands in front of me, towering over me. “I told you not to talk to that fucking guy. Why don’t you ever listen?” He pushes his forehead against mine. Hard. Fear rises like the tide,but I shove it down. I will not let him conquer me. I shove him away. He stumbles, caught off guard.
"I don't think I wanna do this anymore." I say to Ash. He looks surprised, taken aback. But I won't be my mother. I will be better than her.
"It's that guy isnt it? That Katsuki guy, Mei’s brother."
"No-"
"I've seen the way he looks at you. But you are mine. You belong to me." I grit my teeth, I have to be brave.
"I'm done Ash....I don't want to see you again."
"You want me to ask for forgiveness again? You're an ungrateful bitch you know that." He raises his hand and I close my eyes, waiting for the slap. Instead I hear the undeniable shriek of my best friend and the pound of heels against pavement.
"You don't touch her!" I look just in time to see Mei swing her purse at Ash, hitting him square in the face. He raises his arms to cover his face as she continues to hit him with it, screaming at him. “What the fuck is your problem?! Were you seriously bout to hit her?” Kai stands off to the side, clearly not willing to step into Mei’s path of rage.
“I wasn’t!” Ash shouted. “I wasn’t gonna-” she punches him, blood spurts from his fingers as he covers his nose with his hand. “Mother fucker!” he shouts angrily, stepping towards Mei.
“Hey man,” Kai does step in now, moving forward slightly. “I think you’d better go.” Ash glares at me for a moment, before turning around and walking towards the end of the parking lot. I’m shaking, my nerves on fire, I stood up. I actually stood up for myself.
Mei embraces me, wrapping her arms around me tightly. “Y/N. Are you okay?” she asks, pulling back to look at me. I nod and pull her in again, unwilling to let her go. I am so grateful to have her in my life. But I’m not much in the mood to dance and party now.
One of the teachers lets me use the office phone to call home. Katsuki agrees to pick me up and Mei sits outside waiting with me, sending Kai off to hang out with his friends. I tell Mei everything. She’s shocked and a little hurt that I kept it from her.
“You’ve been through so much shit Y/N,” she says in amazement. “I don’t know how you handle it.”
“I don’t really have a choice.” she smiles sadly, laying her head on my shoulder.
“I’m sorry you couldn’t tell me.” I rest my cheek on the top of her head.
“It’s not your fault Mei....Thank you”
“I would have killed him if I could have.” Katsuki pulls up a few minutes later. Mei hugs me once more before walking back into the auditorium. I watch her, to make sure she gets inside. The car is warm, no radio on as I climb in. Katsuki glances at me as we begin the ten minute drive home.
“That was quick.” he says finally. My forehead rests against the window, I watch the houses go by.
“Yeah.”
“What happened?’ He asks. I sigh.
“Ash was mad that I was talking to you when he came to pick me up. We got into a fight. He tried to hit me but Mei stopped him.” I explain how Mei hit Ash with her purse and finally socked him a good one. Katsuki smiles, proud of his sister. I feel a little better as we pull up in front of our house. He parks the car but neither of us gets out.
“I’m sorry Y/N….” I look at him, his eyes are distant, far off, he’s staring at the street in front of him. “But I’m glad you finally realize you deserve better.” He smiles, it’s small and beautiful. The adrenaline is still pumping through my veins. I lean over, placing my hand on his cheek, I tilt his face towards mine. His eyes hold a question, a curiosity. I answer it by pressing my mouth to his and kissing him as passionately as I can.
He’s breathless and wide eyed when I pull away. It’s a beautiful, satisfying expression.
“Yeah,” I trace his bottom lip with my fingers. He never takes his eyes off me. “I deserve someone like you.”
#bnha imagines#bnha scenarios#my hero academy fanfiction#my hero fanfic#my hero imagines#my hero x reader#bakugou comfort#bakugou katsuki#bakugou katuski x reader#bakugou x reader
67 notes
·
View notes
Note
alright so in fnae au how do the nights go?
Oh rad, this is exactly where I left off on that other ask??? Cool :0
Also this gets really long soooOOOO sorry y’all ‘^^
Ok, so, the nights... kiiiinda go like the ones in fn/af 1 and 2? The first game is the one I’m most familiar with, so its def the “base” of the au here, but there’s aspects of the second game that factor in as well. (And a tad of sister location but shhh thas night 5). Take this as u will.
Journ, our trusty player dude, starts off in his office every night with the doors/lights, camera tablet, and a flashlight. He must be mindful of his power (for doors/lights/cameras), but his flashlight runs on separate batteries.
Seraph is out on the main stage, Roo in a secondary closed stage (like pirate’s cove), and ruffy’s in one of the party rooms. Seraph and ruffy are the only two that move around the place. Roo stays put unless he’s not checked up on.
The animatronics are friendly, but complete darkness seems to send them all into a weird... frenzy. Might be related to the wacko sorceress who runs the place...
Keep all this in mind as I discuss our nights! Here goes!!!
Night 1: very much your standard tutorial night. We get a call from Aiden to talk about the place n what to expect, as well as talk about the newest animatronic (seraph). She’s a bit camera shy, but u can locate her via music playing in whatever room she’s in. She moves around a lil bit that night, but it’s nothin crazy. You jus gotta keep her outside the office cuz it’s known to be a dead zone for animatronics, and you wanna keep em operational. Night ends easily enough.
Night 2: Aiden talks to u about Roo this night! He advises u to keep checking up on the dude, and to tell him he says hi if he pays u a visit. Seraph is more active, and roo is too, albeit more slow/timid. Again, keep em out the office. Getting in is bad.
Night 3: Aiden introduces us to ruffy! Says he feels bad for the dude, and says he’s secretly been fixing him up. Ruffy is active, and, while he seems perfectly fine if he gets in your office, he puts a drain on ur power. Best to keep em out. Seraph and Roo also step up their active-ness; seraph becoming more aggressive about getting in (she says she has smth to tell u), and roo rlly wanting comfort, respectively.
Night 4: this night, Aiden confesses something weird is up with evangel. He says he’s gonna stay late the next night to try and see what she’s up to, since she’s being secretive and weird. All the animatronics have stepped it up tonight, and all seem on edge. You gotta work real hard to keep em out of the office.
Night 5*: this night is different than all the others!!!! Aiden’s stayed late, as promised, but he didn’t leave a message this time. He’s called you from inside the building. It appears he’s locked himself in the spare parts room, and is being kept from leaving by Roo. Panicking, he informs you that evangel has done something (aka used curses) to all the animatronics, and you need to get out/rescue him so it can be sorted out. This night, the main power is out. You have your flashlight and cameras (running on the same battery! Careful!) but you’ve gotta leave your office to go get Aiden. It’s a fun time of running away from seraph/ruffy, hiding, listening to audio cues, and making ur way to spare parts to get Aiden out. Roo gives u some trouble, but you’re able to stun him momentarily via flashlight (Funti/me foxy reference, aww yis) to get past, if u time it right. Have fun escaping the place after that!
Night 6*: Bc, c’mon. Who doesn’t love a bonus night. You’re back in the office, but this time, you’re guiding Aiden around to fix the animatronics via camera system. U gotta keep him safe/hidden on top of keeping everyone out of ur office. Good luck!!!
*Note that night 5 & 6 may have bonus corrupted evangel appearances! Kinda like gol/den Fred :0
Aaaand yeah!!! Thems the basics!!! Do with this what u will ᕕ( ᐛ )ᕗ
#this is;;; so friggin long;;;#ive put so much thought into this dumb crossover au hfkdjkd#a labor of love ;w;#hope y’all enjoy my ramblings!!!#theyre rlly fun aaa#arty asks#fnae#afw
4 notes
·
View notes
Text
Last Macos Version

The Coro Claw flute cutter video shows how easily the Coro Claw X is to use. Crop signs, pictures and shapes to suit your needs by taking off excess material. If you want single strips for a construction project, the Coro Claw X cuts straight through the corrugated plastic to give you widths of any size. Claw game for mac. The game features a rare glimpse of Dr. In March 2000, it was announced that Ubi Soft had teamed with Light & Shadow Production to release an Inspector Gadget game for the PlayStation. Tha game was revealed as Inspector Gadget: Gadget's Crazy Maze, with a Game Boy Color title Inspector Gadget: Operation Madkactus, following as well. The miner's claw swings back and forth and you will click once when the claw is pointed at the treasure you want to reel up. There is about 10 seconds wait time while the miner reels up bigger gold nuggets from the bottom of the screen, which are obviously worth more money, and smaller objects are reeled up quickly. 2021-01-10 2 points one of my childhood favorite games, if you download the RIP version, Captain Claw will run very slow and choppy, but there a way to fix this problem. You have to download 'dgVoodoo2' program, extract it from zip file then copy 'dgVoodooCpl.exe', the 'dgVooDoo.conf' and the 3 dll files that's inside the MS file to the main directory where you're claw file is, then open. Toreba is a fun game, but it isn’t without its fair share of flaws. There are many problems with the game, and some of these problems can make or break the player experience. In this section, we highlight all the problems that players have with Toreba. Delayed Shipping. As mentioned earlier, Toreba has free shipping once every seven days.
Node.js® is a JavaScript runtime built on Chrome's V8 JavaScript engine. #BlackLivesMatter New security releases now available for 15.x, 14.x, 12.x and 10.x release lines. If you can't get Node.Js to work on your computer, do the following to reset it: Open the installation folder. Find the 'nodejs' folder and delete it. Double-click the Node.Js installation file to restart the installation. Use the default settings to install Node.Js. Node js install mac tutorial. Node.js® is a JavaScript runtime built on Chrome's V8 JavaScript engine. Latest LTS Version: 14.16.0 (includes npm 6.14.11) Download the Node.js source code or a pre-built installer for your platform, and start developing today. Fortunately, for Windows users, the Node.js® installation process is a lot easier than how I recommend installing Node.js® on a Mac. Node isn’t a program that you simply launch like Word or Photoshop: you won’t find it pinned to the taskbar or in your list of Apps.
Mountain Lion, the last of the 'cat' versions of macOS launched in July 2012 and supported the following Macs: iMac (Mid-2007 or newer) MacBook (Late 2008 Aluminum, or Early 2009 or newer). MacOS Sierra (version 10.12) is the thirteenth major release of macOS (previously known as OS X and Mac OS X), Apple Inc.' S desktop and server operating system for Macintosh computers. The name 'macOS' stems from the intention to uniform the operating system's name with that of iOS, watchOS and tvOS.
Last Version Of Macos
Latest Macos Version Download
Reported by:Owned by: Component: guest additions Version: VirtualBox 6.0.14 Keywords: Cc: Guest type: OSX Server Host type: Mac OS X
Some system extensions aren't compatible with current versions of macOS or won't be compatible with a future version of macOS. Learn what to do if you see an alert about system extensions or kernel extensions. I am using a macOS 10.14 guest, with the latest development builds of VirtualBox Version 6.1.0BETA1 r134041 (Qt5.6.3), GuestEditions, and VB Extensions matching that version. This also occurs with the latest stable builds of all three installs Version 6.0.14 r133895 (Qt5.6.3) (different machine, also running macOS 10.14). When going to install. While it carries the macOS name, it is the first major version change in more than 15 years-officially dropping the 10.x and going by 11.x. The transition is projected to last two years. Windows 7 ultimate 32 bit download.
Description
Attachments
catalina-guest-install.log (5.8 KB) - added by Kalak17 months ago.
install.log from a guest additions install on macOS 10.15 Catalina
macOS10.15-2019-10-07-17-24-21.log (286.6 KB) - added by Kalak17 months ago.
machine log from macOS host
Change History
Changed 17 months ago by Kalak
attachmentcatalina-guest-install.log added
Changed 17 months ago by Kalak
attachmentmacOS10.15-2019-10-07-17-24-21.log added
comment:1 in reply to: ↑ description Changed 17 months ago by socratis
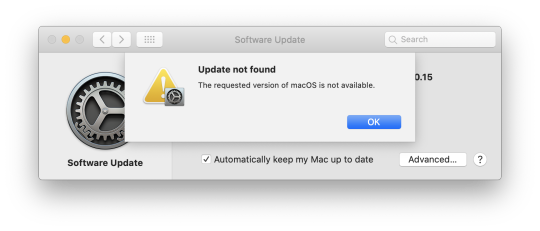
comment:3 Changed 13 months ago by aeichner
Status changed from new to closed
Resolution set to fixed
comment:4follow-up:↓ 5 Changed 13 months ago by GlebKh
Last Version Of Macos
comment:5 in reply to: ↑ 4 Changed 13 months ago by QA
comment:6follow-ups:↓ 7↓ 12 Changed 10 months ago by AKuehnel
Last edited 10 months ago by AKuehnel (previous) (diff)
comment:7 in reply to: ↑ 6 Changed 10 months ago by GammaG
Last edited 10 months ago by GammaG (previous) (diff)
comment:8 Changed 9 months ago by paulson
Status changed from closed to reopened
Resolutionfixed deleted
comment:9 Changed 9 months ago by paulson
Summary changed from Guest Additions not installing on macOS 10.15 Catalia guests to Guest Additions not installing on macOS 10.15 Catalina guests
comment:10follow-up:↓ 11 Changed 9 months ago by DGH
comment:11 in reply to: ↑ 10 Changed 6 months ago by kydar

Latest Macos Version Download
comment:12 in reply to: ↑ 6 Changed 3 months ago by atoolz
Last edited 3 months ago by atoolz (previous) (diff)
comment:14 Changed 3 weeks ago by pf5946
0 notes
Text
Proper Attribution of Photos/ Gifs in Social Media Posts by Fans
Right now there is a fan feud going on regarding attribution of photos made into a collage that Sam liked. I’m not going to rehash what happened. I think an innocent mistake was made and the party who made the mistake apologized. I also think that Sam handled the whole thing graciously, acknowledging both fans involved in the incident and that no one intended to do anything wrong.
However, this incident raises the issue of the proper attribution of images by fans on social media. I’ve noticed for a long time that many fans never seem to attribute any image they post to anyone. I believe they don’t make the attribution because they apparently don’t know they are supposed to do so.
This is a pet peeve of mine, so I figure I’ll do a short tutorial on proper attribution in social media.
The reality is you are ALWAYS supposed to attribute where you find the photos you use in your blog posts (unless they are your personal photos). Many bloggers get rightfully upset if you take a photo or gif they have made or modified and don’t attribute their work to them. (HERE’S an example of a neutral fan who was upset that another fan did not properly attribute one of her modified photos.)
Yes, the videos/ photos from a show or of celebrities belong to the channel/ studio (such as Starz, HBO) or the photographer/ agency that took them. Technically I suppose all fans are in violation of copyright laws all the time when they make gifs from their favorite shows or post photos of their favorite celebrities. However, most premium channels/ studios seem to allow fans leeway as long as they don’t go overboard, because they know that fandom helps promote shows. Still, if you are making an original gif or posting a screenshot from a TV show such as Outlander make sure you give them proper attribution.
However, if a fan takes a screenshot from a video of the show and modifies it (changing the lighting, contrast, colors, size, framing, adding captions, etc.) or makes a gif from a show, then the result should be attributed to the fan who made the screenshot or the gif when you repost them.
Because of the terms of service of social media sites like tumblr and pinterest bloggers can repost images on those sites as long as they are properly attributed. If photos and gifs aren’t propery attributed you are risking breaking the terms of service. This is why tumblr takes the extra step of automatically attributing gifs they have stored on tumblr and pinterest automatically provides attribution if you repost a photo to your pinterest board.
For instance, here is a gif from tumblr gifs:
Notice the attribution below the above gif:
”Originally posted by sam-heughan-daily.”
Tumblr knows the importance of proper attribution on social media.
Here’s a random pin I found on pinterest:
See how pinterest automatically attributes where the photo was originally posted as well as the pinterest board it was saved to?
But what if you find a photo on google? Well you have to be very careful if you find a photo that is not already on social media. If you do a search for a photo or gif on google, make sure that its license allows you to use it. Below is a screencap that can show you how you can find whether the license allows you to use the photo or not.

Once you find an image to use, click on the image and you will see this:
Click on “Visit page” and you will be able to find the URL of the photo. You can then insert a LINK for the photo into the post (as I just did for the above photo). There are different ways of inserting attribution links. For instance, sometimes I write things like “source” or “via source” under the photo, or (x) or I insert the link into the text describing the photo. Sometimes if it is a photo post format I just insert the link into the photo itself. You can do this by hovering over the bottom left of the photo until you see the link come up and then insert the URL there).


Anyway, I hope that this helps Outlander fans to figure out how to properly attribute images they post on their blogs.
Again, I think the lack of image attribution by many Outlander fans on their posts is due to their not understanding that they are supposed to make the attributions in the first place. Hopefully Outlander fans will find the above post helpful in ensuring that they make proper image attribution on their posts in the future.
73 notes
·
View notes
Last Seen Blogs
strunmah-suvulaan-jun
Strunmah Suvulaan Jun

mycircleofsenses
mycircleofsenses

svenvogler65-blog
Untitled

weekesweek
may fourth

sphinxara
Help! I've fallen for Sam Drake and I can't get up