#i wanna draw and practice my digital art but i need to rest my wrists
Text
been so fkn hyper fixated on video games this past month that my thumbs feel like they’re gonna fall off😗✌️ literally have to ban myself from gaming so i don’t end up getting carpal tunnel syndrome
#idk what i’m supposed to do during the days now tho#i wanna draw and practice my digital art but i need to rest my wrists#wanna draw fem crowley and aziraphale in funky clothes so baddd#cant write my fanfics cause typing hurts💀💀💀💀 i hate myself#would y’all like a WIP of the alec hardy one shot im writing atm????#allie shut up
1 note
·
View note
Note
Hello! I wanna start drawing again and I'm really fond of your style, I was wondering, do you have any drawing tips? ❤️
okay sorry this took a couple days to reply to because i wanted to think about it, but i think my main advice is to divide up your artistic time into practice and art. this drawfee video on how to practice effectively explains it really well (this section is at around 13 minutes, i haven’t watched the rest of it yet bc it’s a long vid but i bet there’s other good advice in there too): practice is input, drawing is output. practice is learning new information about things you don't know how to do – you're not making a final piece.
practice is things like:
experimenting with different ways of holding the pen/pencil. holding a pen/pencil for drawing is different than how you'd hold it for writing – you want to hold it higher up, and use looser arm movements. different angles will give different effects (see here). holding a pen for a tablet is different to both a traditional pencil and a writing grip. if you have a tablet that picks up on palm contact, try getting a drawing glove so that you don't have to hold your hand at an unnatural angle. draw different lines and shapes and get used to the different effects you can make.
experimenting with different ways of moving your hand. a general rule to follow here is the bigger the shape, the more of your arm you should use to draw it. a lot of people draw primarily with just their fingers or wrists moving because they feel more control there, which is great for fine detail work but doesn't translate well to bigger sweeping shapes, and thats where you end up with wobbly lines or having to draw several scratchy lines instead of one smooth curve. if you want more confident lines you need to draw from the elbow, or the shoulder. it takes some getting used to but it's definitely worth it for keeping your drawings lively instead of stiff, and your wrist will also feel less strain.
learning to draw basic 3 dimensional shapes. boxes, cylinders, spheres. just draw a whole lot of them from different angles.
learning how to break down a complex form into basic shapes. a good way to do this is tracing – tracing has a bad rap as being stealing, but as long as you're not uploading a traced image and passing it off as your own it's a great way to train your eye to understand how forms work together, particularly for something complex like anatomy. draw over an image and break it down into basic shapes. then try to copy those shapes onto your own paper without tracing. do it over and over until you're better at it. (this method of redrawing is called iterative drawing, it's a great practice technique).
theres broader practice and then narrow. having a mix of both is good: quick sketching a whole figure some days, other days really focusing in on like “this is how a nose work”. go with what feels right in the moment.
and then the output, the actual drawing, is when all this practice pays off - these are your pieces that you work on to show people, or the things that you want to make, this is where you chase your creativity and passion. keeping them separate really helps to stop your art feeling like a chore and keeps you from overworking your full pieces (incorporating too much practice into your creative art); it also stops you stagnating or becoming frustrated with your lack of improvement (not practicing enough).
you don't have to be super strict with yourself about when to do which thing; you'll probably go through phases of doing a lot of practice, and then phases of doing a lot of drawing. if you're really struggling with one thing, that's often a sign that you need to do more of the other to balance things out.
other advice:
learn to be bad at art. this is good during practice with things like timed figure drawing or whatever where you just don't have time to make it good, but it's also good in drawing/creating: just letting yourself make “bad” or silly or quick things for the fun of it or to get an idea out. nothing has to be perfect and the earlier you learn to be bad at art the quicker you'll get good at art, and the more you'll enjoy it too
to expand on that, while tablet drawing is great, i've found that i improve a lot more rapidly when i do at least some of my practice a) on paper but also b) in pen or marker or paint, anything non-erasable. the ability to undo and erase infinitely in digital art is great for full pieces but doing your practices in pen means you're forced to be lot less precious and so you learn quicker how to be more decisive and confident with your lines because whatever you put there, you’re stuck with it.
if you're stuck, try something completely out of your comfort zone. use different materials, restrict yourself to a specific colour palette, ask for prompts, set a timer. sometimes there's just too much choice about what to do and it can be paralysing: giving yourself a totally arbitrary restriction can actually push you to be more creative and to get out of a rut (recommending more drawfee here, their random shapes challenge videos are a really good example of this)
you don't have to find your style. it'll find you. it's good to observe what you like about other people's art and try to consciously think about it, it can be really good to ty and mimic those elements yourself during your practice, but for your actual drawings you don't need to think about your style because as your ability improves it will come out naturally.
this applies mostly to traditional, but try to have your paper tilted slightly rather than flat on the desk – i prop my hardback sketchbooks up on a book. if you have your paper flat then you're more likely to get a little bit of a perspective distortion from top to bottom, especially if you're working from a reference, because you're looking at the paper from a different angle than you're looking at the reference so it can look fine when you're drawing but then when you look at it head-on it's just a little off. it also makes it easier to not hunch up over it and get a backache.
FLIP THAT CANVAS. i don't know why this works but its a time-honoured artist technique for making sure that there's reasonable symmetry especially for drawing people: draw your picture out, then flip it. you'll be able to see a lot clearer where the proportions are off. make changes, flip it again, keep doing that. it's harder with traditional media to do this but if you have some tracing paper you can turn that over, or just take a photo of your work and flip that.
a little frustration can be good if it’s motivating you, but if it's so much that you're tearing up your drawings or wanting to quit, you either need to change up your approach for a while or you need to take a bit of a break. i know people say you have to draw every day and if that works for you then do that, but personally, i don’t: i go through phases of drawing all the time then not at all for a few weeks, and that works better for me than forcing myself to work on it every day and i often come back to it a lot better because i’ve given all the practice time to actually sink in. breaks are an important part of learning, whether its hour or a day or a week of just walking the fuck away from the sketchbook and doing something else.
stretch your arms and wrists often, especially if you're drawing for several hours. here's the routine i use, it’s only ten minutes but it makes a big difference. and if you've overdone it and your hand or wrist or back is hurting, don't push through it. drawing is surprisingly physical and i’ve fucked my hands up real bad several times not listening to a slight ache and having it turn into full on RSI
i hope some of that helps! there are a lot more specifics i could get into about a million different things but the overall gist of this is that you should be aware of all the different options you have and can dabble in, and try to find a balance of learning and creating that allows you to improve without sucking all the joy out of it.
15 notes
·
View notes
Text
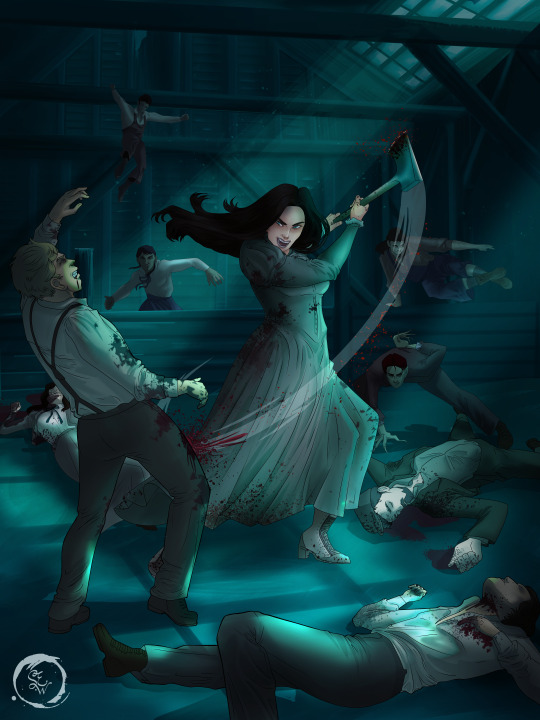
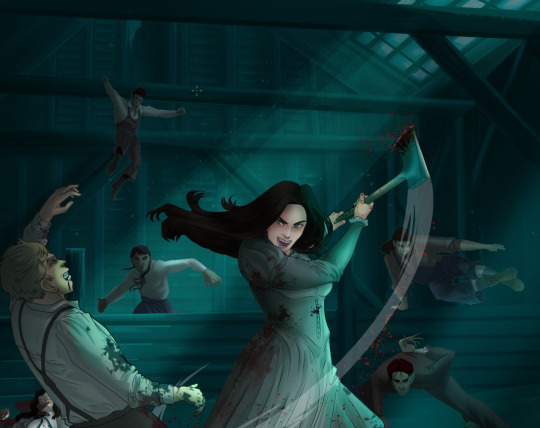
How I Digitally Paint like a Scenic Artist/Designer
Aka: how I did this and put my degree to good use.
LONG POST WARNING
Step 1: Research.
First off, get to your image search. If you are going to be using Google, you may want to type “-pinterest” in the search to eliminate the countless boards.
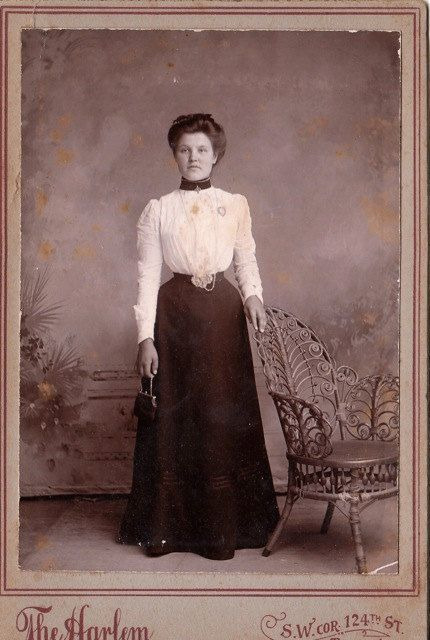
I had to figure out clothing that is vaguely late 1800s. I found a multitude of reference images that were fancier clothes- but I wanted to find images of clothing for kindred across all social classes. Photographs from the era and paintings are your friend. They will more accurately showcase what was worn.

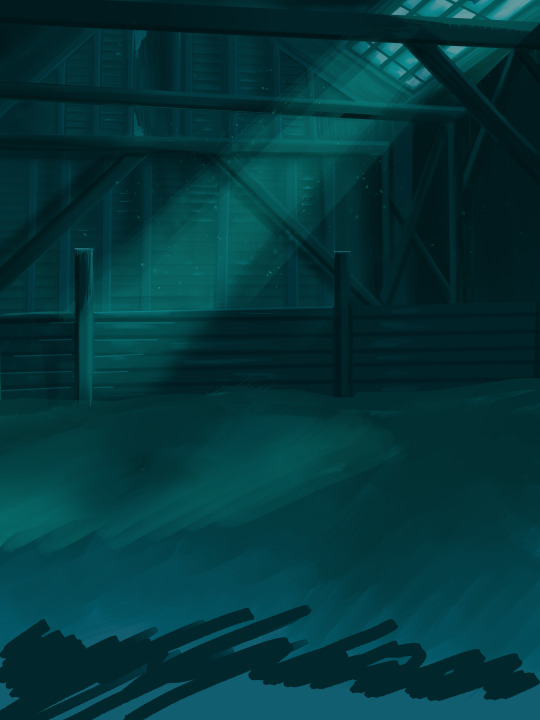
After Fashion research comes location research. The 1890s in America is known for the rapid industrialization. Factories were getting bigger and work days were getting longer. But, I wanted the moonlight to be cascading into the place, illuminating the scene. This means I needed to find a structure that had skylights or let sunlight in. And the best images I found? Slaughterhouses. Fitting, huh?
The same rule for fashion still stands- if you can find photographs or paintings from the era- they’re better. There are tons of places still standing today from the 1800s. But today, they look WAY different. Ya know, Abandoned! So just be sure to take this into consideration if you search “abandoned slaughterhouses” or go trespassing like I did.

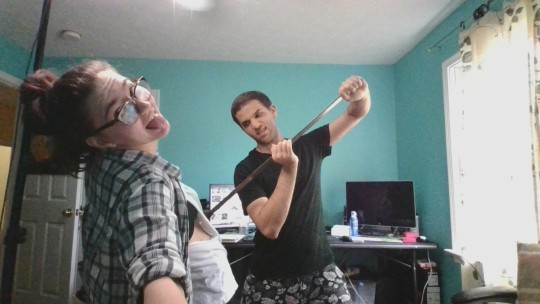
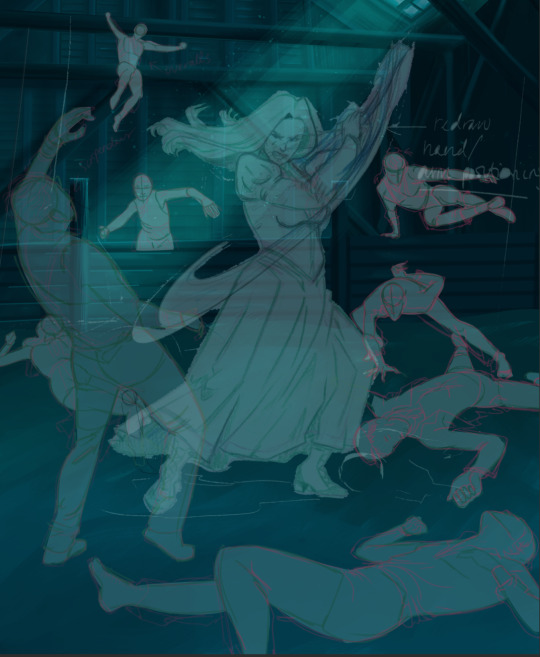
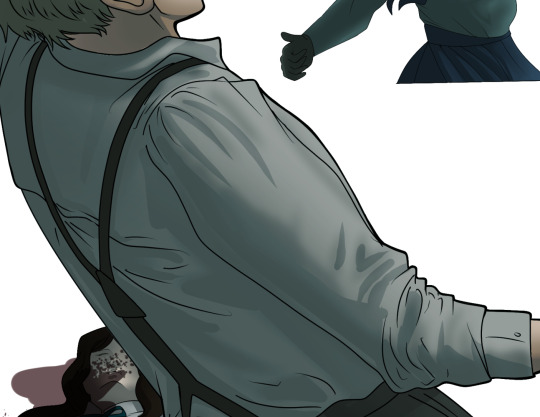
Lastly, pose research. Finding the poses for a fight scene can be tedious. So, I enlisted some help from a few fight choreographers and stunt men. You can record their fights and play them back at quarter or half speed. You can also get a mirror and flop on the floor a bunch. I did both. This lets you see the action/motion lines you are going to replicate in the drawing. Heres how we initially did fina’s pose:

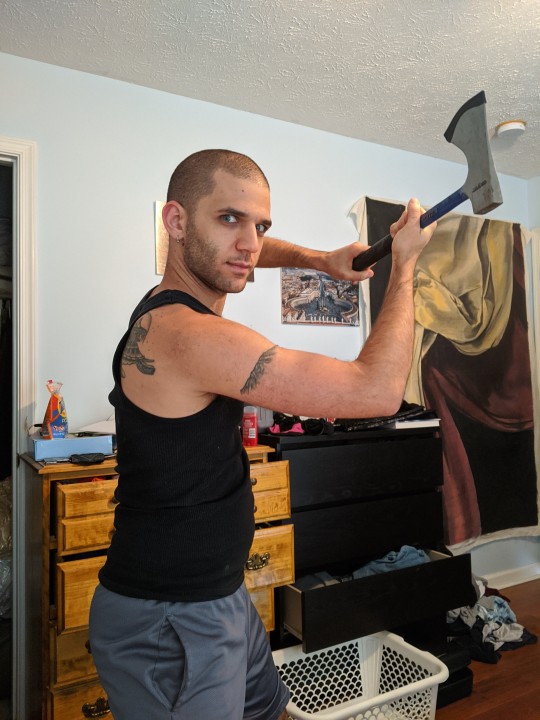
And sometimes you have to go back and get a clean shot. I ended up using this pose for the axe.
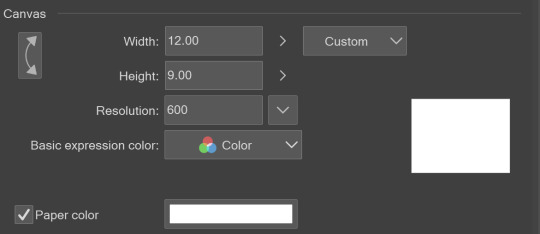
Step 2: Set up and Background!
When you open a new file, set it to the dimensions and resolution you want. I was working at 600. Usually, I’m working at 300-350. You can always reduce resolution. Its hard to prevent fuzzy lines if you increase it later.
I cannot stress the following enough:
You work background to foreground. Big Shapes and areas to little shapes. Work your way forward. What this means is you need to fill in as much space as possible first. Then build your details. I prefer working as follows: Big Solid tones, Soft shadows, Dark Shadows, Highlights, then final blend. Once you finish this, put an overlay on top. This knocks everything back and helps create the illusion of depth. See this at work with the video below or here
Step 3: Figure Drawings + Composition
Utilize that research and images you collected to pose your characters. I create subfolders for each set of figures. Organization is important here. This will help keep you on the right layer and prevent the eternal digital artist struggle of “Fuck that was on the wrong layer!”
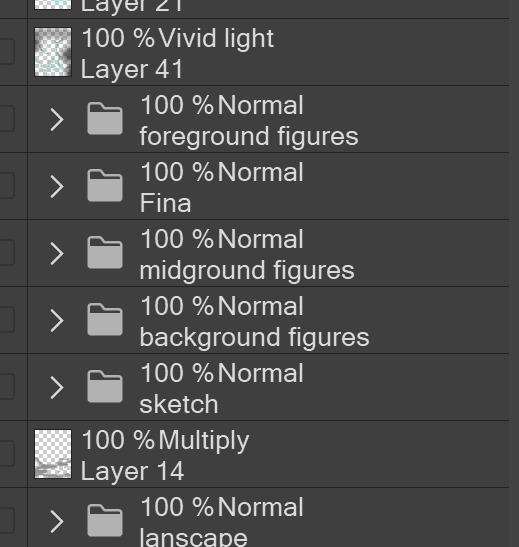
Even after you move on to lineart and shading, Keep the sketch layer as a reference. You may need to see what youre original notes/ figures looked like as you do the lineart and shade. Don’t be afraid to move them around and alter the composition rn. You want to be able to make changes. Make notes! Detail light sources!
I’m about to through out some art jargon:
You want to think about asymmetric balance. The easiest way to achieve this in an eye-pleasing manner is to use the Fibonacci spiral. Yeah. This boi:

Place your figures and actions in a similar sequence to the spiral and the viewer’s eye tends to naturally follow it. This is sometimes called the Golden Ratio in the art world.
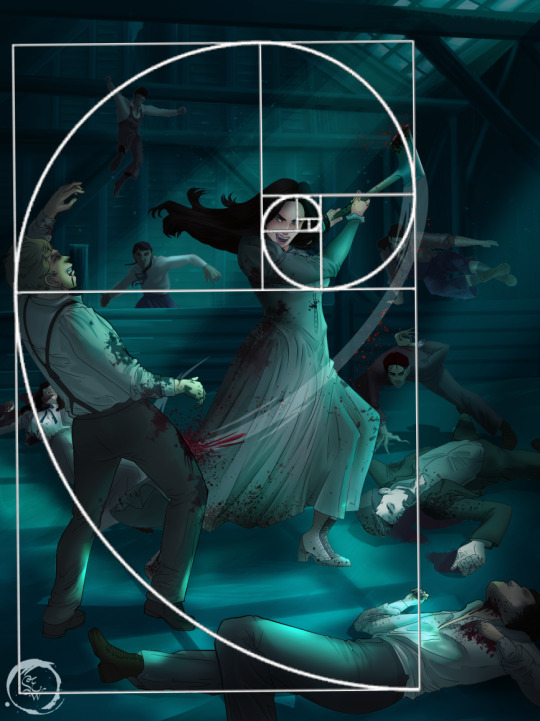
Doesn’t need to be perfectly on the spiral. You can break it- but its an excellent tool to plan how things move in the piece.
Step 4: Lineart
Once you got things sketched- its time to do the lineart. I’m using clip studio paint’s standard brushes. Nothing fancy. I often switch between the G-pen and the For Effect Liner. Mapping and Turnip are for thicker lines.

Usually I set these pens to a specific thickness depending on where I’m drawing.
My background figures are lined at 0.05 thickness, the midground is .1 to .2, Fina is .3 and the foreground is .4. I set my stabilization high to help keep my lines smooth. Stabilization 100 means there’s a significant delay between where the pen is and the cursor. I like the stabilization to be at 20 for freehanding and at 50 ish for outlining. Dont become completely reliant on the stabilization though. Good and smooth lineart is drawn from the arm not the wrist. Your range of motion is severely limited if you only move your wrist. Practice moving from your elbow and you’ll be surprised how much smoother your lines get.

Once I finish lining the figures, I usually go around it with an outline. This does three things:
1. Solidifies the figure and cleans lineart for paint bucket tool. More on that in the next step.
2. Its a stylistic choice. Helps give it that comic book feel with a heavy outline.
3. Pushes figures forward or back in the composition. Thicker outline helps denote that a figure is farther forward than another. My background figures have no outline to push them away
Step 5: Digitally coloring
For each figure you are going to select outside the lineart.
Create a new layer under the lineart
Invert the selection. Paint bucket. You should now have a solid shape of the figure under the lineart. Do not deselect.
Create a new layer above the one color. Title it solid colors. Paint in thick, solid tones. I like to use the mapping pen and turnip pen to color in my solid tones: skin, clothing, hair, etc.
After that, deselect. Create a multiply layer if you can. If your program does not have a multiplier function, Pick a tone you want to use for shadows and lower the opacity (usually 30-40% I like to use lavenders or blue tones). It will not be as vibrant, but you can edit it in post. Select off of the solid colors layer. I like to start with skin tones. Use the airbrush tool to create soft shadows. You don’t want to create harsh lines on this layer.
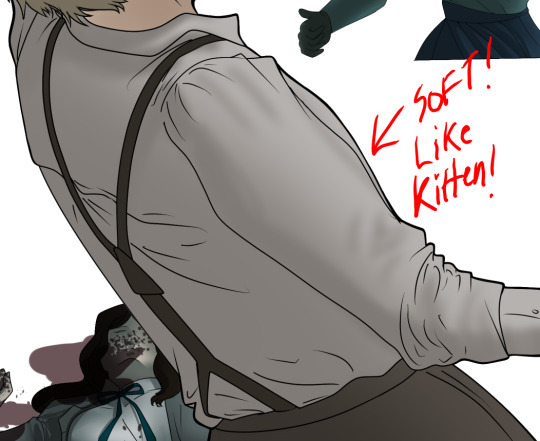
Then repeat this process with harsh lines.
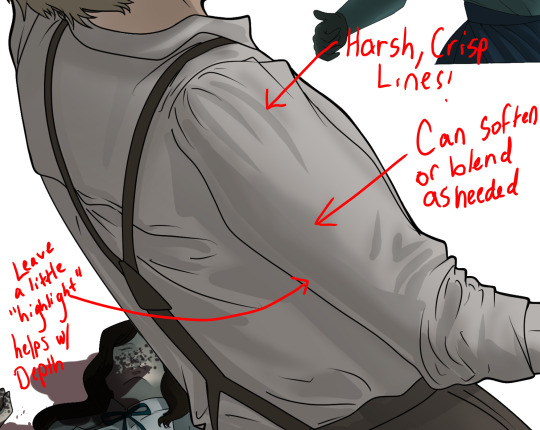
Then knock it all back with an overlay. If you dont have the ability to create an overlay, you can again drop a solid color and lower the opacity, but you’ll have to mess with the color balance/ brightness/contrast to let all the hard work come through.
You’re going to repeat this for every single figure. Here’s a few color theory tips though.
Your overlay colors should be darker (not more vibrant) in the foreground and lighter (avoid using pure white) in the background. This helps with the depth of the piece. Things closer tend to be darker (not always true, depends on lighting)
You can choose to use color theory to aid your shadows. Instead of choosing black or grey for shadows, choose a complimentary color. I used a lot of green for this piece, I used red for really dark shadows. Its not that black drains color- its just loses some depth if not used carefully.
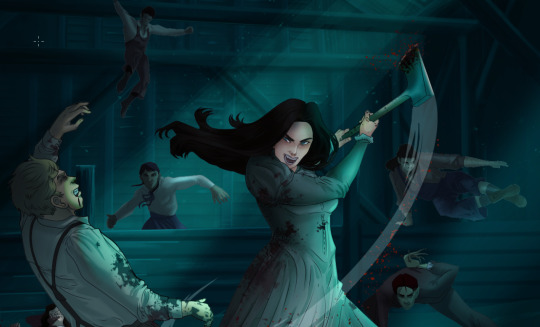
Keep your colors consistent. Helps unify the piece. You can strategically break the consistency to draw focus. For example, Fina is the only figure with a true blue overlay. This helps her stand out from the other figures who have reds and greens.
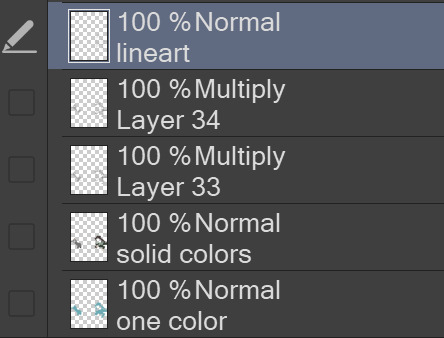
Step 6: Touch Ups and Final Renderings
Now comes the most tedious part. If you’re like me, your computer fans have been whirring for the last few hours trying to render this monster of a file. If you havent already, SAVE FOR THE LOVE OF ALL THINGS GOOD

These are the last four layers I have for the entire piece. Here, I am trying to create effective and believable lighting. This kind of work I have only been able to achieve in clip studio or photoshop. You can do it with normal layers, but choose your colors CAREFULLY. Stay away from pure white. Carefully utilize your knowledge of light and shadow to create soft highlights. Harsh lines tend to be a stylistic choice for me. The final layer, subtract, dulls out harsh red tones. I used this as a final overlay to help put everyone and everything in the scene. Without it, things are a little too green and skin tones are a little too blushed for vampires.
The challenge here is I want to tone down the red, but not lose the vibrancy of the blood. So, shift it to a blue. This also helped reinforce the “nighttime” effect. Its only a slight change.
Final thoughts:
Whenever you finish something, its important to reflect.
1. I am so FUCKING PROUD OF MYSELF. This is easily one of the most complicated pieces I’ve done in a while- and I’ve made 16′ tall faux stained glass. Brag. Let yourself feel awesome cuz you just made something awesome.
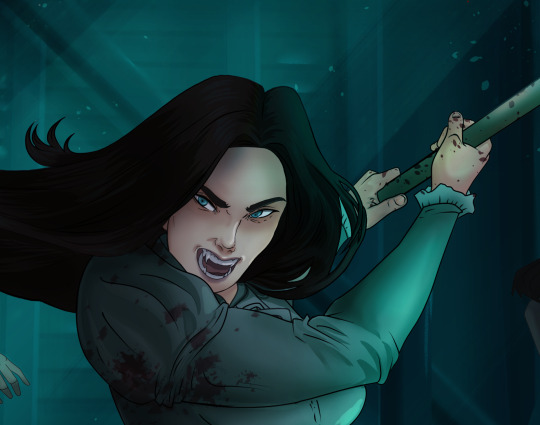
2. I timed myself on the piece. I could have easily spent another 7 hours on it. But its important to know when to stop messing with it. Partially for budget reasons but also when you get down to the details you can make yourself go insane. Theres also a ton of detail work I lost cuz of overlays or its just too small to notice. Fina’s face? hard to see cuz its not close enough.
3. I needed to take frequent breaks for this piece. That was good. Resting and stretching was very important. That is one of the reasons why I was able to work so fast.
4. I started doing more digital art in April 2020. I have to say, practice makes perfect. I practice drawing and digital painting for at least 3 hours a day.
That discipline has allowed me to improve so rapidly. So- I don’t wanna hear shit about I can’t possibly get this good! Or I couldn’t even draw a stick figure! BULLSHIT. You can. Get yourself some free software like Krita or Autodesk sketchbook and start playing!
And thats what I got! Thanks for coming with me on this long post!
27 notes
·
View notes
Text
Kacchako Secret Santa - College AU
Hey @novocaine-sea , I was your secret santa! You gave me a challenge not being able to write fluff and writing an AU, but I hope you like it.
That fucking fine art credit.
Katsuki wasn’t sure what sadist decided to make fine art a requirement for graduating with a business degree, but he was sure there was a special place in hell for that asshole.
His advisor suggested that he get the credit out of the way. Any fine art class he took would be an introductory level course, but he was warned that students had a nasty habit of putting it off until their last semester when they were buried in papers, internships, and projects. Though the course would be easy, the time he’d have to put into the course would be a nuisance later.
Any fine art course met for four hours once a week and required outside hours of work to complete.
Denki and Hanta signed up for Figure Drawing the moment they learned that the class came with live models for them to drool over.
Eijiro picked Creative Writing. The class ended the semester by hosting a coffee house where students in the class had to share a piece of original work they’d created during the class.
Katsuki decided he wasn’t interested in babysitting tweedledee and tweedledum while they giggled behind their drawing easels, and he wasn’t about to perform a piece of poetry in front of the theater kids and other random college students trawling for free snacks. So he’d chosen photography.
He figured all he had to do was take a couple of pictures on his phone, change the filters using one of the apps, and print them out for a grade.
The first day of class, Katsuki was hit with a startling realization when he was handed a massive supply list and an inch thick syllabus.
This wasn’t digital photography.
It was black and white film photography.
Katsuki couldn’t recall what happened in that first class, but he walked out with an assignment due for the next week. Their professor wanted them to photograph around campus to practice using the f-stop.
He wasn’t sure what an f-stop was, but he seemed to be dropping a choice “f” word every time he had to work that damn assignment.
Somehow he managed to load the camera and take the pictures.
“Do you want some help?”
Katsuki’s head popped up, teeth gnashed together in frustration as his fingernails dug into the metal top of the roll of film. “What?”
“Um,” the girl cringed. Slowly lowering the physics textbook in her hands, her chestnut eyes stared pointedly at the roll of film in his hand. “I think you need some help.”
He hadn’t noticed her sitting across the room, stool scooted next to the door and belongings scattered across the table. “I don’t need your damn help,” he growled, nails digging at the top of the film again. “I can print this shit on my own.”
“You mean process.”
“Same fucking thing.”
“Actually,” she started, folding her arms across her chest. “It’s not.” Brown eyes drifted back to the tube of the film in his hands as she frowned. “You need to process the film so you have negatives so you can then develop the film in the dark room.
Katsuki blinked, hands stilling as his brow wrinkled in confusion, “Fucking what?”
She shook her head, “Are you gonna let me help you or what?”
“It’s your time, not mine.”
“Um, yeah, I get paid whether I help you or watch you struggle-”
His eyes widened at her tone.
“So, answer me nicely or I’ll go back to my physics homework and let you ruin your film.” She rested an elbow on the table, shooting him an unapologetic stare. “Got it?”
“You don’t have to be such a bitc-”
Her eyes narrowed.
“Yeah,” he scoffed, tossing the roll of film on the counter. “I obviously don’t know what the fuck I’m doing so some help would be nice.”
“Okay then,” she nodded, closing her textbook and hopping off the stool. “I’m Uraraka Ochako by the way.” She walked over to the counter he’d been working at, pulling a box from one of the shelves above.
He stepped to the side, watching her. “Bakugo Katsuki.”
“Alright Bakugo,” Ochako placed a tube of film in front of each of them. “First thing, if you open your tube of film out here the lights are gonna ruin it and you’ll have to retake all your pictures.”
“What am I supposed to do then?”
“We have a room that is completely pitch black that allows you to safely open your roll of film and transfer it to the drum.” She picked up a black container, opening it up to reveal an empty reel for the film.
Katsuki looked from the unopened tube of film she’d set in front of him to the empty reel. “How the am I going to do that without being able to see?”
“Well,” she started, picking up her roll. “We’re going to practice it in the light with these rolls, and then we’re going to take your film into the dark room and place it on the roll.”
“This is fucking ridiculous.”
“Yeah, well,” she snorted, shoulders shrugging unsympathetically. “You signed up for the class under your own free will.”
“I needed the fine art credit!” Katsuki couldn’t help but wonder if it was too late to withdraw from the class and find something easier to stomach.
Writing poetry wouldn’t be so terrible...
“I’ll tell you this, it gets easier the more you do it.”
He snorted, “Says the photography major.”
“Astronomy with a minor in art actually-”
Katsuki’s brows furrowed trying to connect the dots between her interests.
“Okay, so your materials-” She placed several items in front of her. “In the dark room, there is a light in there that will be on when we get started. You wanna lay out your tools first, so that way in the dark you can just find everything. We have our scissors, can opener, developing tank-that should be open and taken apart so your reels are ready-and our film. So I want you to do everything I do, got it?”
“Yeah.”
“Alright, first we pop open the lid on the film,” she told him taking the can opener and opening the side of the film easily. “Your turn.”
Katsuki rolled his eyes, popping the lid off as she had done.
“Great!” Ochako smiled. “Remember it’s going to be the flat end-”
“I got it.”
“Okay next we take the film out, so you wanna feel for this curved edge and we wanna cut this part off cause it will be easier to put on the reel,” she instructed, running her fingers along the curved edge of the film.
“How the hell do I keep myself from cutting my damn pictures?”
“By feeling,” she repeated. “Feel the edge so you can get into practice.”
“This is so fucking stupid.” He obediently ran his finger along the edge of the curved piece of the film then cutting as she’d said.
“You picked it,” she cut the edge of her film. “Okay so now we have to place it on the reel. This is gonna be tricky. So you have to line up the film so it goes through the notches and then turn them back and forth. You’re gonna hear a shuffling sound, kinda a clicking too.” She wound her film, watching as he did the same. She looked over at him, smiling brightly.
Katsuki ignored the rosy tint of her cheeks.
“Next, we place this in the developer tank, and make sure that it’s locked tight! Because after it’s in the tank you have to come back out here to that workstation.” Her head tilted toward the sink across from them. “That’s where you add the chemicals to develop your negatives. They have all the steps with the chemistry on a poster. It’s not too bad.”
At the moment, Katsuki disagreed.
“Alright,” Ochako grinned up at him, setting her tank on the counter. “You ready?”
“No,” he told her sourly.
“Well, that’s too bad.”
His eyes narrowed.
“Come on let’s go,” she picked up an empty developer tank, a can opener, and a pair of scissors before walking to the black revolving door.
“Tch.” He snatched his film, shuffling toward her and stepping on the platform.
“I’d suggest you make a friend in class to do this with, but-”
Over his dead body.
“I don’t think that’s really your style,” she smirked, pulling on the sliding door. “Okay, the first opening in the developing room and that’s after you have your negatives and-” Ochako pulled again coming to a dark space. “This room is for you to load your film to the reel.” She reached into the room, tugging on a silver chain and causing the small room to flood with a dim red light. “This light is supposed to be less harmful, but it will still ruin your film.”
They stepped off of the platform and into the small room. It was no bigger than a closet and only contained a small table mounted against the short wall.
“Okay,” she dropped the things on the table. “Get yourself set up and let me know when you’re ready.” Her fingers hooked around the chain above him as she looked to him with a nod.
“Whatever, just turn out the damn light so I can get this over with,” Katsuki grumbled, throwing his back against the wall.
She frowned, eyes drifting to the scattered supplies on the table, “Alright then.” With a quick flick of her wrist, darkness surrounded them. “Let me know when you have your film secured in the reel and I’ll turn the lights back on.”
They weren’t kidding when they said dark room. “Is it going to be this damn dark when I develop the fucking pictures?” he grumbled, placing his hands in front of him as he felt for the table.
“No,” she chuckled.
He could hear the crinkle of discarded film beneath her tennis shoes as she shifted.
“It will be dark, but not pitch black like this.”
Grunting, he nodded as his hands fumbled for the bottle opener. Katsuki secured his roll of film and the bottle opener in each hand. His thumb traced the top of the film feeling for the smooth end as he’d watched her do in the light before removing the cap quickly. The film uncurled into his hand with a light clink.
“Good you got the film out!”
“How the fuck did you know?”
She laughed, “When you spend enough time in here you don’t need your eyes.”
“Yeah, well it would be nice to fucking see,” he grumbled, feeling the spirals of film fall between his fingers.
“You need to find and clip off the curve.”
Easier said than done. “I’m trying.” His fingers frantically moved between the now tangled mess of film as he fought to find the end. Katsuki was able to feel the end where the little roll was but the beginning eluded him. The film tangled around his forearms as his hands fumbled for the beginning. “Stupid piece of-the fuck!”
“Sorry!” Her hands released his wrists as she took a step away. “I didn’t want you to tear your film so I was going to help you untangle it.” Ochako gingerly placed her hands on his wrists to still him. The tips of her fingers slid down to his hands, coming to rest at his pulse points.
“Your fucking hands are rough,” he grunted, ignoring how nice it felt having her small hands around his. His eyes drifted closed as he lost himself in the feel of her hands over his skin, holding still as she slowly removed the film from his hold.
“When you do this,” her voice was low as she took a little step closer to him, the front of her shoes brushing against his toes. “You wanna be careful to catch your film before it spills out.”
He snorted as she removed the last piece of film. “Good to know.”
“It is.”
“Okay hold out your hands.”
“Why?”
“Just do it.”
Katsuki huffed, placing his palms out in front of him, staring into the blackness ahead. “Whatever.” His lips twisted and his stomach fluttered, feeling one of her hands grab the top of his hand.
“Alright,” she muttered softly. “Here is the the edge of the film.” Her other hand placed the curved edge at the center of his palm. A rough patch on her fingertips lingered as she pulled her hand away from him.
“How the hell did you find it so fast?” he mumbled, face heating from her touch.
“Practice,” she snickered, removing her hand at the bottom. “Now, I want you to pick up the scissors and cut the curved end off. I’m going to hold my fingers at where you’re going to cut.”
Katsuki’s hand fumbled along the table as he searched for the scissors she dropped earlier. “Got ‘em,” he announced.
“Alright.” She took his free hand, moving it to feel where she had two fingers sandwiching the film. “Cut there.”
He moved the scissors close to her fingers, feeling their knuckles bump, “Move your fingers.”
“No just place the blades next to my fingers.”
“Move your damn fingers.”
“Just make the cut.”
“I don’t need you bleeding all over my damn film.”
“I’m not gonna bleed all over your film,” she huffed, firmly taking the wrist holding the scissors. “You know where my fingers are, so you aren’t going to cut me.”
Katsuki growled.
“Plus those scissors aren’t sharp enough to cut through flesh, so….” Ochako grabbed his wrist, moving it to where she held the film. “Cut.”
He brought his hand to her arm that held the film, tugging her closer to him. The scent of her hair tickled his senses as his thumb crept over her hand, brushing over her fingers as he felt for the scissor blades. “Hold still,” he grunted.
“You’re not gonna cut me.” He didn’t need the light to see her rolling her eyes at him.
The side of the blade bumped the tips of his fingers. He cut the edge of the film.
“See.” Her voice tipped up in his direction.
“Don’t fucking look at me like that.” Katsuki hadn’t realized the error of his words until they spilled from his lips. Feeling something bump the front of his chest, he looked down at the blackness as he narrowed his eyes.
“Well, your new found sight will come in handy with this next step huh?”
Katsuki’s smirk was concealed by the darkness.
38 notes
·
View notes
Note
I really love your art! Do you by any chance have any tips for someone who is just starting to try their hand at drawing? Either digitally or traditionally?
Thanks! Glad you like it!Now, tips… tips tips… I’ll answer you as a reminder to myself too? Because there is a looot of stuff I know I should do more often in order to improve but because reasons, I always end up not following my own advice. Sooo here we go:1) Talent is just the 10%: You can have a natural ability, thats totally true. Some people are “naturally better” than others in all fields, and art is not an exception. But what matters here is your attitude. You can be incredibly “talented” but if you don’t practice and work and you just put all your confidence in your natural ability, you’re not going to get anywhere. What matters in the end is how much effort you put in improving.Also, as I said before, attitude is the real deal here. Don’t compare yourself to other artists unless it’s to study how they work and what you can apply to your own style. Don’t fall for the “ah, whatsherface is way better than me why bother drawing anything?”. If you have to compare your work with someone, compare it with yourself. Your previous works, what improved, what needs more work on. The best way to move forward is just compare your own work over time. Don’t get discouraged with what other artists can do, you don’t really know the ammount of time and effort each piece costs anyone else but yourself. Plus how many years of practice and study there are behind every incredible piece someone else uploads.This is a really hard point to get across and is an incredibly hard thing to avoid. I do know its hard for me, but I also know is the key to improve and not suffer.2) “It’s all in the wrist” : In order to get your lines more fluid and less shaky and stuff, you need to not worry about your pulse. Try to make loose movements constantly and draw lines fast. This can only improve by practice, over and over, but the results are always better than when you’re so focused on doing the perfect line that you end up with your arm locked like its made of stone. Nope. - How do you improve this? Doodle. Doodle all you can anywhere you can. And warm up. I used to draw loose circles and spheres for like 5 minutes before start drawing. That will make you feel more comfortable about your posture and lines.And when you actually start drawing, take into consideration that everything in the world can be simplified into basic shapes. Try to pick out the basic shapes that make up the over all shape. Usually these shapes are pretty easy to draw. Draw the shapes then draw the outlines until you get the result you want. As much as this can be applied to literally everything you wanna draw, is specially important to do this if you’re drawing people or “organic” characters. Anatomy can be a bitch, so if you get this previous step right, adding all the rest is going to be easier. 3) Look for information: Internet is an amazing place to learn. Watch tutorials, read books, follow other artists advice, ask people about their work and how they do what they do. Learn the basics then up, don’t try to draw superheroes with all the muscles and dynamic postures in one setting. Read a bit about anatomy, perspective and info in general that will help you understand how to work better and more accurate. No one was born with the ability to draw, we all learned from somewhere. And internet is an inexhaustible source of information. Use it to your advantage. It also depends in what you’re interested. I do try to draw as close as reality/source/classic as possible (i’m a canon bitch and i’m not sorry). What might help if what you wanna draw is relatively realistic, is take a look at Andrew Loomis’ books. It never fails.4) Don’t be ashamed of using references: Whoever says that artists that use references are not artists is absolutly wrong. Even the most famous painters used references. They are called references for a reason and now a days, is easy as fuck to just go to google, look for what you need and use it. Even use 3D programs to put the bases of what you’re going to paint. Look up for info in the industry of illustration or concept art, you will realize the ammount of “cheats” that are used is insane, but what matters is always speed and the visual result being what you want. Do not mistake “use reference” with “copy the same crap others did before me”. No go.5) Share your work: This is a good way of always getting feedback. If you’re not comfortable uploading it to the net (we all know there is always an asshole that will troll you, sadly is unavoidable) show it to a friend or family, ask them for opinions and what they like and dislike about your work, of course in terms of technique. But, always have faith in your style. There will be people that will not like the style in which you draw but it’s yours. Don’t let people change what you like to do.6) Know your tools: Its good to know the limitations of the software/tools you’re using, either digital or traditional have their own limitations. Which pencils are the best for sketching or for shading, if you’re going to use ink, make sure to find the propper pen for it, one that makes the lines as you want them to be and practice different thickness and weights in lines depending of the tool. I mean i could go on and on about this particular point. Speaking of digital (Since I’ve been working digitally for almost 3 years now so I feel more confident with it) a lot of people use one software for lines and other for color and render. It of course depends on how comfortable you are. For example, Photoshop doesn’t have a line stabilizer, so some lines can be a bit wonky. Paint tool SAI has this stabilizer so the lines look more steady and professional. But, if you are familiar with one software, knowing the other too can be a lot of time invested and its possible you don’t have the luxury of dedicating weeks to learn both softwares even if its a little portion of it. In my case, I use Photoshop and Lazy Nezumi Pro, that is actually a plug in that works as an stabilizer for the lines. Is a matter of trying several softwares and then decide which one makes you feel comfortable. Also, if you work with a tablet, it doesn’t really matter which one. Of course the more professional ones have a wider range of possibilities, but if you know how to work your way through them, it really doesn’t matter at least at first. Don’t go running and waste a bunch of money on a Cintiq 24′’, when you can easily achieve the same results with a Wacom Intuos Pro. What i’d suggest to take into consideration is the size of the tablet and the screen you’re using. The closer the size of the tablet is to the screen, the better, but its just cos perception of space since most tablets doesn’t have a screen on their own, like the Cintiq does. Its just a reccomendation, but is not necesarely something that could make things more complicated. I’ve drawn for months with a Bamboo medium size with good results. I just noticed when i changed my tablet for a bigger one that I felt way more comfy drawing on a bigger work area.7) Practice. Practice. Practice: The more you draw, the better you will be. Buy a sketch book and draw anytime, anywhere. You have ten minutes to spare? Doodle something. You don’t know what to draw? get prompts and get at it. Draw, draw, draw. Digitally, traditionally, using the PC, using the phone, pen, marker, ink, pencils. Just draw at least a bit every single day. Art is not talent, art is a Skill and as any skill you get better at it by repetition. Well, I hope this wall of text helps you a lil’ bit! Good luck with your art and always keep drawing!
12 notes
·
View notes
Last Seen Blogs

maruthamresdiency
Marutham Residency

warmeasternsoul
- warm eastern soul -

kafka54
All Aboard~!!

summerland-ag
Summerland_AG

arkhammaid
anne