#you'll find node wrangler as an option-- turn it on to enable it
Explore tagged Tumblr posts
Note
is it ok to ask how u edit ur lookbooks? i love your style sm
hiii!!!! omg thank you 🥹
first thing you need to know is that where my lookbooks are concerned i'm not doing a whole lot of editing. that's my secret, i think. i do as much as i can in blender. which is why this is exceedingly flattering for you to say because i do not consider myself very good at editing (mostly compared to those ppl that do shadows and hair strands, that's not my bag yanno!!!) i also try not to get too repetitive, so this is all just kind of general. if you got specific lookbooks in mind, i can dig into it.
also to preface this, i'm not going to link to any specific tutorials, because i don't know your particular learning style and there are soooo many tutorials out there that i could take hours just finding one. so i'm sorry but i'm going to have to leave the research with you, and point you in the right direction.
i've been using the same PSD, more or less, for well over 10 years now. i tweak it a little every time. learning how to make your own PSD can be a game changer-- you can learn how to manipulate the colors the way you wanna manipulate them, and if you use it long enough (like i have!) you'll create a signature. i'm such a sucker for the selective color adjustment layer, it's how i get my pinks so uniform. 💗
almost as important as a PSD is the action you use. i also made that, just a little sharpening, very tiny topaz effect, and more smart sharpen. in doing this (either taking the time to learn to make your own, or finding one you like) you'll free up a lot of time by quickly filtering your images and moving onto the fun parts.
layers layers layers!!!!
blending options for your layer open up (little mermaid voice) a whole new world! whether it's text you're bringing style to, cool outlines, soft glows, you can have a lot of fun just playing around.
fonts. just collect cool fonts you like. lost-type co-op is one of my favorites. play around with making some typography. there's no right answers!! but if you're working in a bigger canvas, make sure to zoom out so you know it's gonna be readable when tumblr scales it down to fit its format.
if you're going the blender route:
get in the habit of doing transparent background versions of every shot. even if i don't plan on using them, i just have them, and it makes editing a lot easier, a lot less painful. don't even have to crop out the backgrounds, it's just done.
learning how to use the compositor is another game changer. it's how i bring a little bit of a glow to my renders and make them pop without even having to open photoshop.
turn on node wrangler. this isn't relevant to anything in specific just look into how to enable node wrangler and thank me later.
also turn on the ratio aspects in your blender camera settings. this will allow you to see if things are centered, or juuuust the right amount of off-center if, if you're into that.
#i hope literally any of this is helpful#my brain is scrambled egg today i'm tired it's been long my head hurts#and i was about to work on this months lookbook when my mouse died :3#asks#anon#blender tips#photoshop tips
12 notes
·
View notes
Note
hey there, i was just wondering how did u do the windows and shadows on the post uploaded on the 6th of May on render please? Looks amazeballs
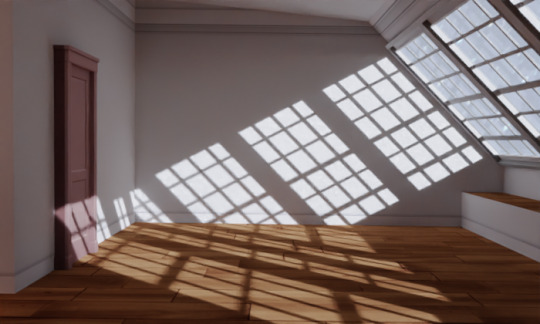
hello lovely anon! do you mean this render? i've gotten a lot of questions about it and people wondering how it was done, so this feels long overdo.
buckle up!
also, if this doesn't help, or just brings up more questions than you had to begin with, please feel free to message me off anon and i'll hop into your DMs to hold your hand and help you through it!
step one: the windows.
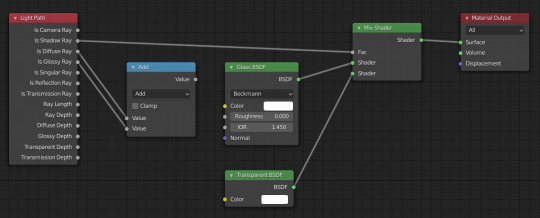
literally any windows will work, whether they're cc or from the game themselves. apply the material/texture as usual, but when it comes to the panes of glass, the most important thing is the glass shader. the glass shader you use has a lot, lot, lot to do with how the end result you're gonna get looks. you want your glass to reflect, be transparent, allow light through, and not create a lot of blur and caustics (as glass tends to do). this is my glass shader node set up, and i'm very proud of it, and anyone is welcome to use it. i don't need credit, just think of me and blow a kiss to the sky and i'll get the energy. 💕
in the instance of this render, the windows (and the wall they're on) are at a 45 degree angle, which in this case, creates a lot more light than most windows would because of the angle. it takes some fiddling to make it stick, but angling your windows are suuuper worth it for the effect it creates.

step two: the environment.
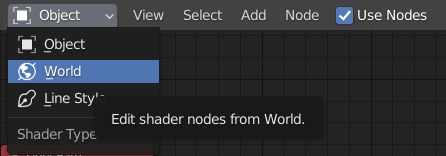
if you're not familiar with the world shader, you're about to meet her! you can find it in your shading panel, here. for a quick run down, i recommend this tutorial to get you started, because it's something that's good to have a basic understanding of, and this should give you a little foundation to start from!
you can find a buttload of HDRI here, too, from HDRI haven.

the environment your render is using has a lot to do with what lighting will happen. some HDRI create indoor light, or outdoor light, night time, or any number of things. this all sounds really complicated, but the node set up for it is actually much more simple than the youtube men will make it out to be. it's five nodes. (i've noticed that usually when you put one in, the entire scene will be flipped upside down, so that 180 value is in the X rotiation to flip the entire world rightside up!)
see also: the strength is normally set to 1, but i like to turn it up higher to really make it bright outside, but this depends on the HDRI you're going to be using. night time scenes should probably still be a 1.

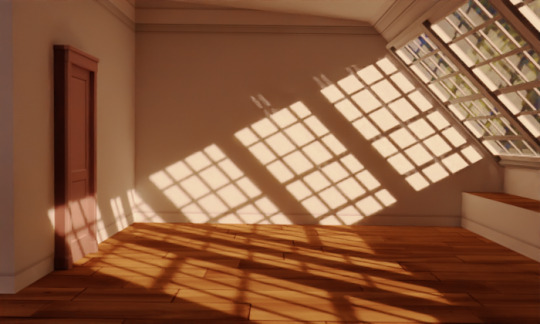
i've rendered out a few shots using the same set up, just changing out the HDRI every time to create a slightly different effect!
1. urban street 04

2. kloppenheim 02

3. blaubeuren night

#blender tutorial#blender help#asks#this is also important but i didn't know where to fit it#turn on node wrangler!!#edit > preferences > add ons#use the search function to search for 'node'#you'll find node wrangler as an option-- turn it on to enable it#now if you hit ctrl+t when you're working#it will create the image texture+the mapping node+and the texture coordinates in one go#it's a life saver#it allows you to group them too#node wrangler is something more people need to know about it because it's super helpful#there are a lot of other things going into the render like the compositor set up and blah blah blah#but one thing at a time!
28 notes
·
View notes