#those activity graphs are absolutely useless
Explore tagged Tumblr posts
Visit Tumblr Blog
Explore Tumblr blogs with no restrictions, modern design and the best experience.
Last Seen Tumblr Blogs


Fun Fact
Tumblr’s website traffic is steadily declining.
Text
Augmentation and Why You Should Give a Fff About It:
Edit: SoOoOoOo I completely forgot to actually post this and it was just sitting in my drafts and then instead of pressing post I pressed delete so here we are again.
So Iceborne is now 2 days away! YAY! Ah, Master Rank where we’ll all feel like absolute noobs as all these familiar monster we grew to love and appreciate will murder us to death in less hits. Fun!
So by now a lot of us have basically every armor piece and weapon we own augmented but there’s still a lot of new and newish players out there who still need to reach level 50 and do a lot of things and one of those very important things is augmenting your armor. What is it?
On armors augmentation allows you to unlock more upgrading which means you can make a jump from 74 to 92 in armor rating for each independent piece and since there are 5 pieces you can wear it’ll bring the total amount to 460 (if my math is correct). You’ll need to upgrade your armor completely before you can augment. So what do you need in order to do this?
Step 1: Beat the base game’s main storyline. Murder baby alien or as my boyfriend calls it glowstick. Step 2: Gather tempered monster clues to unlock investigations. Step 3: Fight some tempered monsters. Step 4: Leave an offering to RNGesus and pray. Pray like you’ve never prayed before in your life!
Wait, what???
...yeah...ya see, tempered monsters will have a strictly RNG based chance of dropping streamstones or gleaming streamstone for armors and warrior’s streamstone or hero’s streamstone for weapons. These are heavily coveted by everyone and that’s what you’ll mostly be doing in endgame. Farming the ever loving fuck out of tempered monsters in investigations.
Now the type of stone you get is based on what level the tempered monster falls under so here is a neat little graph that someone that was not me made to make this a lot easier.

As you can see we have three tiers (1, 2 and 3) and the exception list at the bottom. Yes, there is an Arch Tempered Xeno’jiiva and Arch Tempered Zorah Magdaros but they skipped tempered and went straight into AT so that’s why they’re an exception.
So which tier should you go for? Threat level 2 and 3. Here’s why: the rarity of your armor.
Rarity 1-4 requires 1x Streamstone Shard, 3x Fucium Ore, 3,000z
Rarity 5 requires 1x Streamstone Shard, 1x Dragonbone Relic, 5,000z
Rarity 6 requires 1x Streamstone, 1x Bird Wyvern Gem, 10,000z
Rarity 7 requires 1x Streamstone, 1x Wyvern Gem, 20,000z
Rarity 8 requires 1x Gleaming Streamstone, 2x Elder Dragon Bones, 30,000z
Honestly speaking you’ll be using rarities 6-8, maybe a rarity 5 may sneak in because of a hard to find skill and you haven’t found the decoration for it so you’re forced to use an armor piece for it. You definitely will not be using 1-4 so that’s a waste of time.
Another thing I wanna add is that augmenting armor is extremely expensive, however, it is worth every single penny!
Now moving on to the weapon items which just like the armors is divided in their rarity. Again, make sure your weapon is fully upgraded because you won’t be able to until you do so.
Rarity 6 requires 1x Warrior Streamstone
Rarity 7 requires 2x Warrior Streamstones
Rarity 8 requires 1 Hero Streamstone
Now weapons are handled differently than armors starting with the fact that there are different variations of the Hero and Warrior streamingstones.
Sword are for Great Swords and Long Swords
Blade are for Sword & Shield and Dual Blades
Hammer are for Hammers and Hunting Horns
Lance are for Lances and Gunlances
Axe are for Switch Axes and Charge Blades
Shaft are for Insect Glaives and Bows
Ranged are for Light Bowguns and Heavy Bowguns
With armors you just upgraded their defenses but with weapons you add things to them depending on how many slots there are. Rarity 6 has three slots, rarity 7 has two slots and rarity 8 has one slot.


You have a total of 5 improvements you can do to your weapons:
Attack Increase: raises base Attack Power by 5 with each application.
Affinity Increase: raises base Affinity by 10% the first time you augment and then 5% the second or third time you augment it.
Defense Increase: raises Defense by 10 with each application and applies a passive buff that randomly reduces damage taken. Chance to reduce damage increases with each application, and the buff activates independently from Divine Blessing.
Slot Upgrade: adds a Decoration Slot to the Weapon. Slot level increases with each application.
Health Regen: restores Health with each attack. How much you get back depends on the weapon type and how much damage was dealt. This stacks beautifully with Recovery Up!
So many choices, so many weapons, so much confusion! That’s ok. Listen, I ain’t gonna sit here and yell at you about following the meta or else you’ll die, you know how you play and what your needs are so I suggest you think it over and plan your strategy out and then augment how you believe it’ll best benefit you. However, I’ll gladly give my two cents on the matter.
I never touch defense, slot or attack because I just do not believe it is worth it. Defense is kind of useless unless you max it out and by then you’ll have broken any chance at a good build. Slot upgrade is also a waste because you can easily manage your decorations in the armor and charm sets. Attack can be raised through the use of items you take with you on hunts and through meals as well as through other skills so that’s a waste of resources and time.
Another guide you’ll see a lot is that melee weapons should only be augmented with Health Regen and all ranged weapons should be augmented with Affinity. This isn’t exactly true, I myself use a build with the Anja Arch III bow that has 2 Health Regen and 1 Affinity which is mixed in with the Recovery Up skill just to tackled AT Vaal Hazak and it works perfectly. However, there has been only one HBG I’ve put HR into but it was because it was an experiment and thankfully it worked out in my favor. Again, you do you and what you feel is best for you but also be warned that once you augment a weapon you cannot take it off. You’d need to make the weapon all over again.
So yeah, that’s all there is to augmentation. Not that hard aside from the stinking RNG. Expensive af but like I said it’s worth every cent.
“Um, I don’t have any augmentation options when I speak to the smithy at the workshop.”
That’s where step 4 comes in. You won’t have that option unlocked until you get your very first Streamstone or Gleaming Streamstone. A lot of people suggest hunting threat level 2 tempered monsters but again this is based on false rumors that those drop the items more frequently and again that’s wrong. So get out there and farm those tempered monsters and remember they are VERY, VERY STRICTLY BASED ON RNG!
39 notes
·
View notes
Text
How I made a habit stick and lost 3kg

Content warning: weight loss; calorie counting.
If you find this article interesting and decide to use a similar method to lose weight, please get proper advice from a doctor or dietitian. I can talk about habit forming, but I'm not qualified to say what is safe or healthy for you to eat.
This isn’t really a weight loss blog, because what could be more boring or unnecessary than a weight loss blog from someone only a few kilos overweight? It’s a blog about how I built some better habits, and found a system for sticking to them that worked for me. But in the first couple of months of lockdown I was moving about less than usual and probably eating a bit more, and the effect of those things was gaining weight (specifically, my jeans were getting tight). So the habits I needed to build were to move about more and eat less.
(For what it’s worth, I find it helpful to think about weight gain and loss as effects of different eating habits rather than problems or goals in themselves since I read Gillian Riley’s excellent book about food addiction Eating Less.)
The Problem
In my job, sometimes when we start a piece of work we use a set of questions something like this:
What problem are we solving, for whom?
How do we know it’s a problem?
How will we know if we’ve solved it?
My answers were:
I’m eating too much and moving about too little, which is bad for my health, which is a problem for me. Also, I want my clothes to still fit.
My jeans are getting tight (even my ‘comfy’ jeans which I wear on days when the others are too tight)
When I’ve adopted better habits that lead to me comfortably being able to fit into my favourite jeans
At this point I needed some science, which meant thinking about calories and weight for a while. I reckoned my jeans used to fit pretty well when I was about 3kg lighter so to achieve that, the energy I used (from moving about) needed to exceed the energy I consumed (from food) by about 22,500 calories in total. Whether it took me a few weeks or a year to create that difference didn’t matter.
The Science Bit
Caveat: I got a D at GCSE Science.
When I talk about calorie deficit, I’m not talking about someone else’s idea of what I should or shouldn’t be eating or how much I should be moving. I’m talking about physics: what goes in needs to be less than what comes out.
Side note: Did you know that when we lose weight, it leaves our body via our lungs? Yes, there’s wee and poo and sweat and stuff, but fundamentally when we ‘burn’ energy we turn oxygen into carbon dioxide. The air we breathe out is very slightly heavier than the air we breathe in, and that’s where the weight goes. I only found that out a few years ago and it’s still one of my favourite facts.
So for me, a 47-year-old woman, 5′3″ tall, weighing 69kg and working at a desk all day, on average*, I’d be burning about 1600 calories a day. (That number is different for everyone. And it makes me wonder where the 2000 calorie target for women on food packaging comes from, because I’m fairly average size for a woman.)
If I go for a 2 mile leisurely stroll, I’ll burn about 150 calories. (Click the link to work out your numbers because they’re probably different to mine.) So if that same day I get 1400 calories from food and drink, I’ll create about a 350 calorie deficit.
The System
I made up a card with 75 empty circles on it. Each circle represented a 300 calorie deficit. (75 x 300 = 22,500, my target from earlier.) When I’d filled in all the circles, I should be 3kg lighter.
To add some accountability, I decided to use different colours for different days of the week. That way I’d want to fill in circles most days, and it might help me spot patterns. You can see from the key at the top of the card, Monday is red, Tuesday is orange, and so on. So if on Monday I ate 1600 calories and used 1900, I could colour in one red circle. If on Tuesday I ate 1200 calories and used 1800, I’d colour in two orange circles. As you can see here, I started with a 600 calorie deficit on a Thursday. (I actually started this experiment on a Wednesday, but ended up eating about the same amount of energy as I used, so didn’t get to colour in any circles that day.)
If I ate 300 calories more than I used on any given day, I’d have to add an empty circle to the bottom of the card. (If you zoom in you might be able to see some very feint circles I printed out for this purpose.)

I've tried numerous ways to be better in control of my eating or exercise over the years and I’ve learnt a few things about what works for me and what doesn’t. This felt like it had a good chance of succeeding because:
I like having data, and I like data to be visible. Graphs, charts, etc. are all good.
I like to see progress. The bathroom scales are a bad measure day-to-day for me because on a traditional diet, what I gain or lose in hormonal and other random fluctuations can be more than I’d target to lose in a week. Colouring in circles should be a good measure because, even though my goal is better habits and not weight loss per se, as long as I don’t cheat, regardless of what the scales say on any specific day, every 300 calories of energy I use that I don’t replace with food will result in me being one step closer to my jeans fitting.
Things which rely on all-or-nothing thinking don’t motivate me very much. e.g. the Seinfeld Method where you have to avoid ‘breaking the chain’. I need to be able to have off-days and to be able to get back on track the next day. If I feel like I’ve failed at the whole task because of one slip-up, I’ll inevitably slip up and won’t continue.
I like stationery and have a lot of Sharpies.
If I had to draw in extra circles because I’d eaten more than I’d used in a given day, it would be a rough, hand-drawn circle and would stick out like a sore thumb from the neat printed circles. I like neatness, so I probably wouldn’t want to do that. (Please don’t look too closely at my colouring in.)
Measuring
Most fitness trackers will try give you some sort of estimate of how many calories you’re burning each day. I have a Garmin Vivosmart 4 which measures heart rate, so it should be fairly accurate. But most Fitbits and similar devices will do it, and if you don’t have one of those, MyFitnessPal and various other apps will give you an estimate which should be close enough to get you started. I’ve also included links to my own estimates from Wolfram Alpha in The Science Bit above, which are very close to what I get from my tracker.
Without a tracker, background activity level (walking around, physical effort involved in housework or childcare or whatever) you’d have to estimate based on whether you’ve had a ‘sedentary’ day, light activity, etc. Being anything other than as honest as you can gains you nothing. As for specific activities (going for a walk), there are tons of places online you can get estimates for walking, running, swimming etc. Any estimate which doesn’t take account of your approximate weight is close to useless, so bear that in mind. There’s no real need to weigh yourself frequently or accurately, but you do need a rough idea of what you weigh to know how many calories you’d burn by, say, walking two miles.
As for energy coming in, I kept a food diary using MyFitnessPal. The free plan does everything I needed for this exercise. Pre-packaged food comes with a calorie count, but especially in lockdown, where I was making more stuff from cupboard ingredients, I was using the meal and recipe functions and having to weigh things. It’s a hassle, but only a minor one.
What Happened? Did It Work?
Yes! Here I am, eight weeks later, sitting comfortably in jeans that haven’t fit me for a few years. I realise 3kg in eight weeks is hardly headline-grabbing stuff, but the point is it worked for me, where all the headline-grabbing weight loss plans just don’t.

Confession: for all I try not to think in terms of weight loss, I do weigh myself most days and I do collect data. Above is the chart from my Wifi bathroom scales, because of course I have Wifi bathroom scales.)
But more importantly, I’ve changed my habits:
I’m being more mindful in my food choices. Do I want a snack after lunch, or do I want to colour in another circle? If I’m genuinely hungry I haven’t been depriving myself, but a couple of times I’ve planned to eat something and then... just decided I wasn’t bothered.
In the first weeks of lockdown I’d developed a bit of a biscuit habit. But within the first few days of this experiment, I’d find myself in the kitchen, thinking about taking a chocolate chip cookie, and deciding not to because I didn’t want to sacrifice a circle for the day.
I’ve been walking absolutely loads. A long walk on a Sunday means I can have croissants and jam and an oat mocha for breakfast and still eat a decent sized dinner. And now a walk has become part of my weekend routine, I miss it if it doesn’t happen.
I’ve been getting up at 7am to walk 4km before I start work each day. I listen to podcasts when I walk so if I skip days then I feel like I’m missing out on my podcast time.
Chocolate raisins are my weakness. There have been a couple of times I’ve gone for a 40 minute walk just so I could ‘earn’ some chocolate raisins. This probably isn’t entirely healthy in terms of my eating addiction, but still healthier than just eating the raisins and not going for the walk.
I think what I’m saying is it’s taught me to make better choices. This is also a big theme in Eating Less - that putting all our focus on weight is unhelpful because anything I do today takes a long time to pay back in terms of a noticeable improvement in my weight. But hour by hour I can make better choices about what food I eat and how much I move about. This system lets me see the effects of those choices the same day. The circles don’t lie - if I create a 300 calorie deficit 75 times I will be about 3kg lighter, however long that takes. I’m holding myself much more accountable for those choices than I would be if I didn’t see the outcome for a few weeks.
Not Just For Calorie Counting
I’m telling you about my calorie deficit journey because that’s the change I needed to make and that’s why I built the system. But you could easily use the same system for any consistent change you want to create. These are the things that I think would apply to building any new habit:
It gave me near-instant feedback on the results of my choices.
It provided visible evidence of progress toward a goal, where progress might not otherwise be discernible immediately.
It doesn’t fix a timescale. It didn’t matter to me how many weeks I took to fill in the circles. Of course I wanted to get there sooner rather than later, but if I had a bad day or a bad week, there was no reason for it to derail me.
I wasn’t showing the card to anyone else, so I was accountable only to myself. There was no point in cheating or lying to myself because it wouldn’t gain me anything.
I found colouring in the circles surprisingly motivating. I’ve always been sceptical of ‘star chart’ type trackers because of the public element. But even though nobody else saw it, I was still disappointed on the days I couldn’t colour in a circle.
Other uses I can think of, off the top of my head:
Being more active: one circle for every two miles walked - if you change nothing else in your life this will make a difference
Decluttering: one circle for every shelf, cupboard or drawer cleared out
Study schedule: one circle for every half hour of study
Guitar practice: one circle for 20 minutes practice
You get the idea. If you try this, let me know how it works out for you.
0 notes
Text
Marker Man Misadventures 1
This is the start of a journey that is most definitely not worth doing. I'm going to not only attempt to beat one of the most obscure DS games of all time, but I am also going to map out the levels and be the first person to provide a complete walkthrough of this game. The game is called Marker Man Adventures.
Expect all of the following: - bad game - bad drawings of bad game (not like you're missing out on anything anyway) - pro tips and strategies - game analysis - general displeasure
Welcome to... Marker Man Misadventures
In case you needed some incentive to actually finish this game, Marker Man has you covered. A riveting story between a stick figure and his dog begins when you start a new game. Some may call it captivating, inspiring, and even spontaneous. I prefer "confusing". The stick figure person plays fetch with its dog and throws a ball to the right. The dog chases the ball. The dog doesn't come back. The stick figure goes to find the dog. That's the story. If the player has to go through over a hundred levels before probably finding the dog, that stick figure has a throwing arm that puts the best baseball pitchers to shame. Anyways, I hope that story was enough to make you want to sit through all of this, because here we goooooooooo!

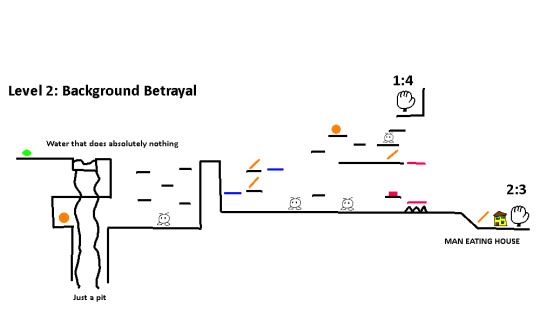
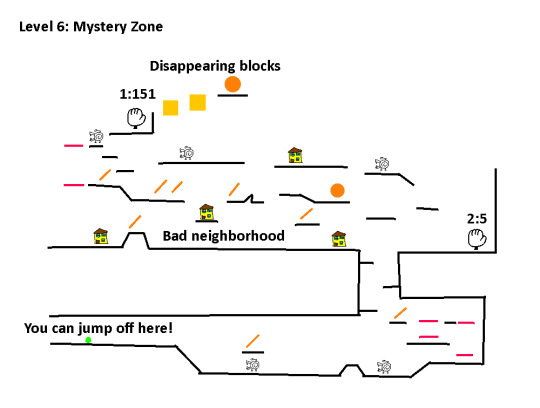
None of these levels have names, so I'll take the liberty of naming the level and labeling certain features of the map. Every level has these weird gloves that act as toll booths, where they will refuse to let you continue until you pick up a certain number of coins, indicated by the orange blobs on the map. The slanted orange lines indicate markers, which are essential to survival in this purgatory of a world. There are two colored platforms shown in this map. The pink platforms come in pairs but there's only one platform in the game. The reason why there's two is they indicate the position ranges that platform is allowed to move. They can only move up and down or left and right. The blue platforms also come in pairs but there are actually two of them in the game, and they act like a balance, where weight on one platform pushes that one down and the opposing one up.
It's a very simple level. You may learn some of the following during your first impression of the game: * rabbits bite * fall damage exists * platforming is extraordinarily glitchy * the game will draw a different shape than the one you wanted * buying this game is a mistake
In addition, there's this spike pit but with a platform over it so you can't actually kill yourself with the spikes. There is a Useless Button above the platform which you can draw a shape over to push it which forces the colored platform to move up, but there's literally no reason to do this. No extra items or platforms are available to you by doing this and you expose yourself to the spike trap so instead just walk past everything. Pay the hand the one coin you collected earlier and you beat level 1. I'm using a standardized syntax for describing what the hands do. The number on the left is how many coins they need before they let you pass the level. The number on the right is the level that the hand will take you. In this case, it's one coin to go to level 2.
This is our first enemy!
Rabbit

I swear I'm not exaggerating the drawing here; that's what it look like. Anyway, it's a rabbit and it is the weakest enemy in the game. Your Marker Man person has a life bar of 100, and this critter takes out 1 hit point every time you touch it. If even losing 1 HP is too much for you, there's a hilarious approach to neutralize this threat. In case you didn't realize by now, this game is all about drawing your way through each level. If you draw a circle around this rabbit, you put it into this bubble where it cannot do anything except be pushed around mercilessly. Doing this also doesn't spend your drawing power, so it is the only way to draw a shape for free.
Oh yeah, your drawing ability is tied to your health. This means that if your HP is low enough, whether from previous drawings or from taking damage, you won't be able to draw anymore shapes. That's where the marker pick up items come into play. They are useful for many reasons, but one of them is for replenishing your HP. The other way to restore your HP is to die and lose a life, but obviously that's not recommended.
I died to fall damage here because I forgot how brutal falling is. You only need to fall a few times your character's height before you take like 40 damage. This game uses a lot of vertical space so get used to learning how to cushion your fall.
In case you're actually playing this game and want to know the controls so far, it's A to jump and Y to use a marker to restore your health. You can use the stylus to draw lines to reach platforms, and other shapes with varying degrees of success.
There's actually two exits! This game loves branching paths. Each exit takes you to a different level, often skipping other levels. Cool, I guess. Not for me, since I NEED to play every level.
Shoe Boy

Basically the rabbit, only it kicks instead of bites. How rude. Bubble it and push it off a cliff or something so you don't have to worry about it.
Man Eating House

Of all the things I thought I would have to worry about in this game, I didn't think the background would be one of them. If you continue to the right exit that requires two coins, one of the houses in the background will come to life and eat you, killing you instantly. I don't think I've ever been so betrayed in my gaming career. There is NO indication or sprite difference between that particular house and all the other ones. However, no need to worry, because I have a solution. First of all, it's only the yellow houses that have a chance of eating you. Secondly, if you see a yellow house and want to check if it will eat you, draw a horizontal line over it. The houses that eat you have a hitbox on the left that collides with your shapes, so the line will hit some invisible block and end up slanted. You should be able to jump on the line and climb over the house this way. There is no way to kill the house.
The psychological damage this enemy has inflicted on me is astounding. Is there another background element that's going to kill me instantly too? Should I avoid that cloud with the smiley face over there? So many things have smiley faces in this game.
I understand that these level maps are not detailed and painful to look at, but if I put more effort into drawing them, they're going to start to look better than the actual game, and this game does not deserve that.
Also, it's only level 3 and the level already feels similar to the previous levels. There's hardly intent or theme behind so many of these levels; it just feels like the level creators haphazardly placed a bunch of platforms and enemies everywhere and called it good.
Oh yeah, also the exit I went to took me to level 5, so I had to start a new file so I could take the other exit to see level 4. I didn't realize that I may not be able to play every single level in a playthrough. Do you understand how frustrating that is for someone who's trying to play every level? I have to potentially play through the entire game multiple times before I find all the exits.
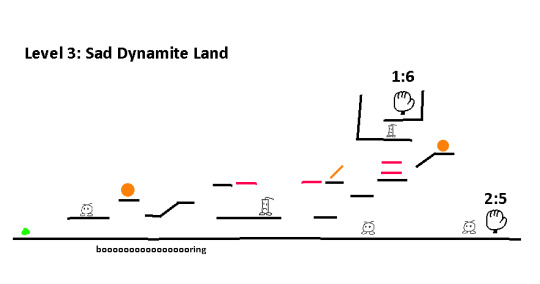
Dynamite

These things look so sad. Probably because they know that their pathetic lives will inevitably end in a violent explosion upon contact with anything. I touched one and it only did 5 damage, so I guess it wasn't that violent of an explosion. I touched another one and it did 10 damage. I guess the damage is randomized.
This level is so dangerous. I cannot believe this is level 4. There are spiky enemies everywhere, very deep chasms with spike pits, and bouncy blocks that prevent any structure from landing on it without being bounced off as well. In addition, bouncy blocks are an absolute pain in this game. There is no way to gain vertical height quickly with this. You just have to sit there while your maximum height increases by like 2 pixels on every bounce. But hey, at least you get a coin by going down there.
This is the level I learned that you can wall climb. It is probably a bug and not a feature but that's not important. If your character's head is over the top of a block you can just run into that block and mash the jump button to """""climb""""" up it. If you don't like that limitation you can draw a line parallel to the wall and place it right next to the wall. That line is climbable everywhere!
As if this level wasn't insulting enough, I took the ridiculous journey to get the second coin so that I can figure out what's in the two coin exit.... AND IT TAKES ME BACK TO LEVEL 3. WHY. There is no other thought process that makes sense as to why the developers did this except for: "The player sees a 2 coin exit with two very hard-to-obtain coins! They'll think this is a worthwhile journey, so we'll betray the player's trust in level exits just like we betrayed the player's trust with the background houses!"
However, I may have to take back the thought that it's impossible to get through every level in the game because previous levels can be revisited now. Imagine graphing out all those level connections...
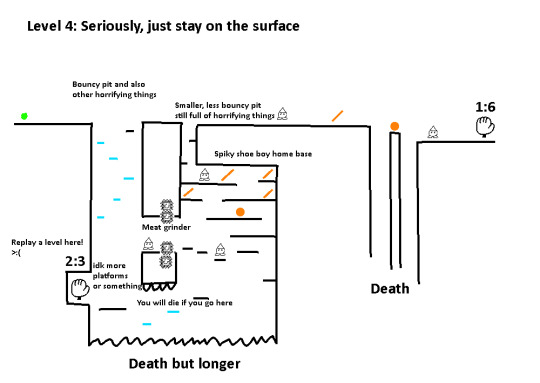
Spiky Shoe Boy

These things are so much more dangerous than regular shoe boy. Touching them will deal a giant amount of damage (10 per frame?) by continuing to touch them. You can lose 100 HP in less than a second because of spiky shoe boy. And they are not bubbleable. And you can find them in areas with low ceilings. Fantastic.
Spiky Wall

An invincible moving block that will gladly pass through any terrain to pulverize your character. It's basically instant kill. Just find another path around if you can.
There's a little path to the south that leads to a dead end and has an extra marker after activating a platform through a switch. Don't go there. There's a chance the shape pressing the button will despawn and you'll just be stuck up there. There's also a totally fun platforming segment where all the platforms are moving and the momentum makes it frustrating to land on the higher platforms. After that are those paired platforms that move together. Dropping there is guaranteed death, and staying on the first seesaw platform will put you in a spot where you will most likely not be able to get out of.
If you are like me you probably have died enough times to get a game over at this point. This means you have to start from Level 1 again. There is a trick you can do to sort of prevent that from happening. If you have exactly one life left and you die, you can shut off your console (In my case with the 3DS, press the Home button and close the software). This will save your last life if you do it immediately after you die. Strangely, it does not work if you have more than one life left. You can do this same trick for quickly seeing what level you'll be transported to when you give the hand the coins to beat the level!
Raccoon

One of the few enemies in this game that looks cute to me. They are just like the rabbits: 1 HP damage and bubbleable. What a waste of potential. There have been like 6 enemies so far and half of them are functionally the same. I thought my disappointment in this game could not have gotten any higher, but well here we are.
There's lots of houses that will eat you here, so tread carefully; one jump in particular, if missed, could land you right on top of a man-eating house. There's also these rainbow-outlined blocks that disappear once you touch them. They are indicated by the yellow squares. There's no reason to go to that area, but a cool trick is to draw a line on top of the block and then step on that line so the block doesn't go away. One exit takes you back to level 5, and the other to.... level 151? Well this is a sweet shortcut. Because the level takes you to candy land. You can't see it's candy land by looking at my maps, so I guess this joke doesn't work. Anyways, it's advertised as a bonus level, so I will break the level order here to explain this level soon.
Chomper

Finally, an interesting enemy. These guys are bubbleable, but they can deal out 1 damage every frame instead of the rabbit-like enemies where they do 1 damage every couple seconds. They're hardly more dangerous since you can bubble them, however.
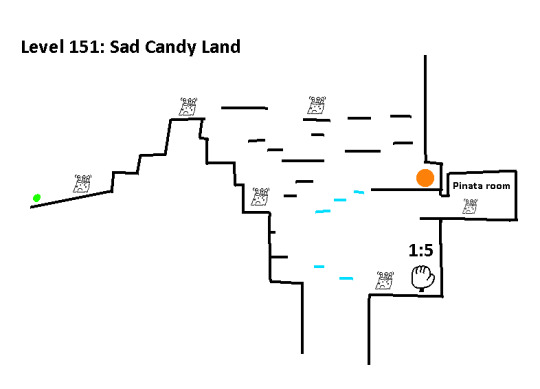
This place is just sad. It's decorated as a candy land level, but everything with a face is frowning. Also, the end of the level just takes you back to level 5, which means that the entirety of level 6 is a trap because every exit just sends you back to level 5. Great. This place is also really dangerous because there are no markers here. This means if you have 0 markers when you come here then you have to be extremely careful with how you use your life, because it will drain fast from all of the climbing.
On the plus side, the soundtrack has finally changed. I was starting to hate the background music because of how often it repeats. I even timed it to see how long the song takes before it loops, and it's about 16 seconds. It can drive anyone mad in a day. Too bad the soundtrack here is also extremely short (about 12 seconds).
There's also one spot in the level where it is almost impossible to get through. It looks like the end of the level, but you cannot actually reach this spot from the end of the level because it is way too high up to build. This is the spot underneath the coin. There is only one way to get to this spot that I know of. You must draw a really long line from the position of the coin underneath the character, and then support it with a rectangle to the right so the line doesn't tip over when you drop down. There is a cave entrance where the rectangle can be placed to lock the whole structure into place so you know it won't topple. Oh yeah, super pro tip: you can delete shapes by holding the left trigger and then clicking on them! You even get back some of your life when you do this.
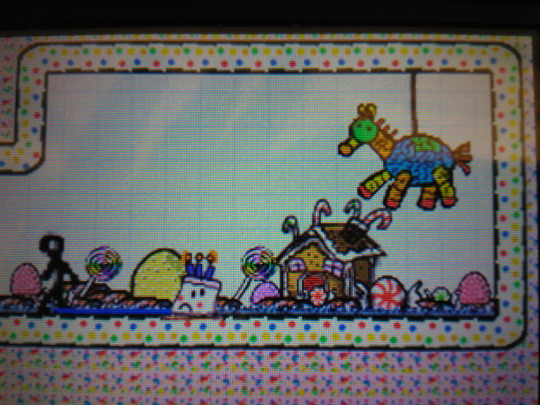
Aaaaand there's nothing here. There's a gingerbread house and a pinata in the background and that's it. So much for an easter egg. I guess the fact that there's actually a detailed background in this area constitutes as something rare enough to be an easter egg, so I'll take it. Fortunately you can drop straight down from the ledge and hit the exit back to level 5.
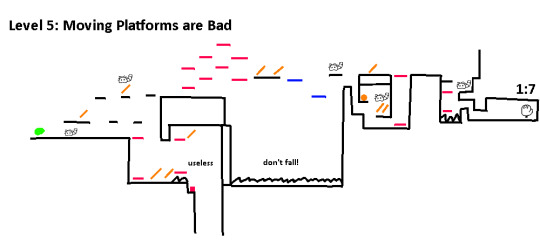
I forgot to mention that light blue platforms are bouncy platforms. Anyways, here's the super secret fun area
Sad Cake

Basically the spikes. They deal a lot of damage on contact. Climb over them using the line shapes.
I think that's enough ridiculousness for now. I need a break.
2 notes
·
View notes
Text
Spirit Working Cycles
[Disclaimer: This is my personal upg of your body’s natural cycle. Some people have reported either not having a hyperactivity period or having them so subdued that it isn’t an issue, so just use my post as a guideline for discovering your own needs. And natural fallow periods aren’t the cause for every downtime out there, some will be caused by blocks such as past trauma, energetic blockages, spirit influence, sickness and more. Some of those do require some sort of intervention and are good to get rid of!]
One of the biggest things I’ve seen you guys distressed over are the times where you are not working with your spirits! You’re not communicating (if you can communicate at all during this time), you aren’t really aware of their presence, you go ages without wearing their vessels, you just don’t have the strength to keep up with the work you want to do!
And then you grow frantic and anxious over what the spirits are thinking about you. You’re afraid of them hating you and leaving for how long you’ve been ignoring them. Or maybe they could be depressed by your sudden lack of interest, like you’re their best friend who suddenly cut contact and is ignoring their texts and calls. You may be worried about all this during your period of inactivity and can’t fix things despite being aware of them. Maybe the stress is even making it worse than before and now you can’t feel them no matter how hard you try!
So when you start to get in a better spirit working state, you’re afraid of speaking to them now, afraid of what they’ll say and if they hate you and if they’ll ever accept you back as a friend…
Guys, this is totally normal. This is a natural body cycle (well, psychic body cycle!) just like menstruation! I haven’t heard nearly as many people talking about it as I would expect, so let me break down your spiritual fallow periods!
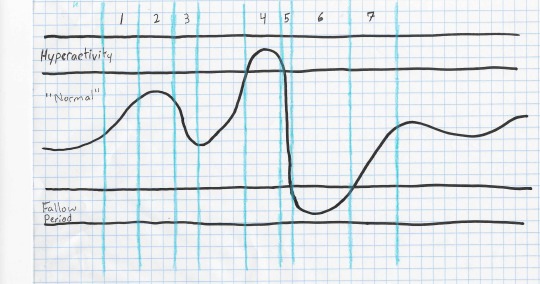
(yes, it’s a lazily drawn graph)
The graph is divided into three horizontal sections: Hyperactivity, Normal State, and Fallow Period. The colored vertical sections are parts I want to pay particular attention to. And finally the curving black line represents your spiritual state.
Area 1: Here, you’re in a state of growth. This is fantastic! You’re learning and improving!
Area 2: You are neither growing nor declining, but there is nothing wrong with this. Many people spend the majority of their time in stasis, their growth periods coming in sudden, sharp increases. Others will almost constantly be in a state of growth too gradual to see. Any way is okay as long as it is your way!
Area 3: This is your decline stage. It isn’t quite a fallow period, but you may notice that you are not quite as sharp as usual or have trouble concentrating on spirit activity. This is fine, it is your body preparing itself for a state of growth, recovering from large energy use, or just focusing on other things. You can also enter a period of stasis before your new growth period as your body recharges. If you feel you are in a stasis period after declining, take some time for both spiritual and mundane self care!
Area 4: Here you have peaked into a time of hyperactivity.. Your senses are better than ever before and your spirit working skills are on fire. This is not necessarily a good thing! Many people don’t know how to manage themselves during this time and end up burning out into area 5. When I was in high school and attended band camp (which wasn’t really camp as much as it was all day summer practices), most parents gave their kids twenty dollars for the entire week’s lunch. As one might expect, the kid spent the entire twenty dollars on day one and spent every other day either hungry or bringing whatever scraps they could find at home. This lack of saving is similar to what you might do during your hyperactivity stage! I’ll speak more later on how to manage this stage.
Area 5: This is a sharp decline after the hyperactivity stage due to burning out. It is possible to exit the hyperactivity stage without going into such a decline, but it cannot be avoided every time. This type of decline typically happens in a very short period of time, even overnight.
Area 6: Here is the moment you’ve been waiting for: your fallow period! This is not a bad thing! Essentially this is your body’s way of resting and recharging so that it can stabilize itself to go back into spiritual matters. Your senses may be distant or nonexistent, your communication may be difficult even with the use of tools, and you may feel a disconnect from spirit work in general. Do not panic and push yourself to do spirit work; you will only damage yourself and spend more time in this state! Strive for self care right and grounding right now. It is perfectly fine to separate from spirit work right now and even recommended for some people. Dive back into the mundane world!
Area 7: Finally, you’ve exited your fallow period! Many people go through growth after their fallow periods because their bodies are so fresh from recharging. Don’t burn yourself out, but feel free to have some celebratory communication with your spirit friends!
So you’re saying my fallow periods aren’t abnormal? They’re good?
ABSOLUTELY! Not only are they good, but they are necessary for you to maintain your abilities! Going without fallow periods would be like going without sleeping. You would eventually crash and burn from the lack of rest, and then your fallow period would be more akin to being knocked unconscious than a good night’s sleep. Don’t try to push them away.
And my spirits really don’t care?
Your spirits are more attuned to spiritual needs than humans. Not only are they going to be aware of this cycle, but they may go through it too. Almost everything goes through it. If you’ve been with a spirit for a long time, you may have noticed times where they don’t communicate much or fade into the background. They also go through periods where they have difficulty communicating with physical creatures. Some will hide this very well, while others will be very upfront on the subject.
How often should I be getting these? How long should they be?
This depends entirely on yourself. Everyone has a different natural cycle. Some people will have cycles of sharp increases and decreases, with every stage lasting in bursts. Others will have almost constant growth, but it is so gradual that they feel as if they are in permanent stasis. Your fallow periods are going to be whatever your body needs. If you need longer periods to recharge then it will be longer, and perhaps lessened in intensity. Others will have shorter periods, but they are more intense because your body has to dip so far down to recharge so quickly. It is not always even, either! Most people have fairly even patterns within their cycles, but it is possible to be everchanging. As for your hyperactivity, this is usually a sharp, albeit short-lived, spike.
Now onto how to manage your cycle!
Signs of entering a hyperactivity period:
Pressure, vibrations, buzzing, or other unusual sensations in your third eye and other energy centers
Psychic senses are suddenly intensified, possibly to the point of discomfort
Feeling as if you are not grounded
Difficulty grounding
Floating sensation
Headaches
Disconnection from reality; disassociation
More attuned to the astral and physical planes than your physical body
Others notice that your energy is bold and even chaotic, much louder than usual
You attract spirits more than in your normal energy state
Seemingly endless energy for spirit work and other related activities
Sudden motivation for spirit work, you may feel an exaggeration of your skill level
A disregard for discernment
How to manage a hyperactivity period:
Ground frequently! While it may feel useless, it will help to stabilize you in the long run
Discharge your energy into crystals and other storage units. It will give an outlet for excess energy and give you boosts when in need
Attempt meditations focused around peace, calm, and stability
Spend time in a garden or otherwise surrounded by nature, and ground by extending your energy like roots into the earth. Doing this will help to connect yourself to the energy system around you, the plants aiding in keeping you stable
This is a good time to look at the big pictures of vast energy systems. Try looking at the energetic connections within a forest, or between houses in a neighborhood.
Do not go overboard with spirit work, energy work, magic, etc! You will not start to feel the effects of burning out until it has happened. Work on grounding and stabilizing and try to not overwork yourself.
Consistency is the key! Instead of spending your energy all at once, try to use this time to be consistent with your spirit senses and communication. Consistency takes much more energy than you may realize!
Although you shouldn’t do everything all at once, that doesn’t mean you can’t get things done right now! Feel free to work on that big project, just pay extra attention to your spiritual health and go easy.
Don’t get arrogant or stupid! While confidence is good and important, don’t let your abundance of energy convince you to summon a nuclear doom spirit of death without protection. You will regret power trips.
Practice discernment! You may feel concrete in your senses right now but it is just as important as ever
PROTECTION!! Some people become larger beacons for spirits during this time, so up your protection and be wary of strange spirits. Even if you do not become more attractive than normal, energy siphoning spirits will still be drawn to the excess of food in you
Be extra polite to local spirits. Perhaps put up a ward to quiet your energy to others or if possible avoid going into particularly active locations. Even if they have no wish to snack on you, the loud energy can be obnoxious.
Signs of entering a fallow period:
Disinterest and lack of motivation for spirit work, energy work, and magic
Psychic senses are distant or nonexistent
Tools seem to fail or are difficult to understand
You do not naturally notice telepathic speech from spirits
Discernment is difficult, or you may feel that nothing is real
Attempting spirit work, energy work, or magic exhausts you
You are constantly distracted when attempting to meditate or astral travel
You think less of your spirits throughout the day
You are more drawn to mundane activities, such as watching tv, and feel the need to skip or pay less attention to daily exercises
If you feel guilt over ignoring your spirits, you are still unable to communicate well
Sudden frustration with your lack of ability and progress, feeling as if you have retrograded
Sadness or other negative emotions at the sudden sense of disconnect from your spirits, as if your bonds have disappeared
How to manage a fallow period:
Focus on the mundane world! Your body is not meant to be overworking itself on the nonphysical right now
Work on gentle physical self care
As you breathe in, visualize energy in your body like liquid streams of light collecting and brightening in your third eye and any other places you use as psychic energy organs. As you breathe out, it gently diffuses outwards back throughout your body, dimming as it is once again returned to its regular density. This helps to keep your psychic energy points in shape.
Visualize your energy like before, but when you breathe in it flows in a steady, circular cycle upwards from the tip of your toes through your chest. Let it pass through your third eye, and as you breathe out it completes the second half of the cycle by curving downwards, flowing through and cleansing that side’s energy centers as it does so. Rather than being in a single ball, the energy is in a constant, equal flow like the blood in your veins. This helps to keep your energy clean and flowing and cuts down the risk of stagnation during your fallow period.
If you must do any sort of spirit or energy work, make sure it is very slow and gentle like the two exercises above. It must not conflict with your body’s rest. If you wish to practice meditation, don’t do anything requiring long periods of focus or that demands energy. Try doing meditations for sleep or calm which do not involve any spirit contact, but only focus on relaxing your body.
Spiritual protection based in the physical plane is very good to have for when your fallow periods occur! These are things such as witch jars and large scale crystal grids. It is easier to keep these clean and working, since you may not be able to sense purely nonphysical protection like wards at all.
If you wish to remind your spirits that you have them in your thoughts, include them in a daily meal by offering its energy as you eat. Simply thinking this will most likely be enough for them to hear, but if you want to be certain, say it aloud or whisper it if with company!
Before you go to bed, invite your spirits to sit with you as you tell them about your day, no matter how mundane. Even if you can’t sense them around you, this will show them that you are still keeping them in your thoughts and taking the time to include them in your day!
However, it’s also okay to simply push spirit work to the back of your mind and focus on pressing mundane matters. They will understand.
Above all, remember that your spiritual self is resting and recharging. Do what your own body needs to encourage this rest. Don’t try to rush past it or forcibly stuff energy into yourself, most likely you’ll end up hurt and elongating this period.
So hopefully this guide will help on the stress everyone seems to get during their fallow periods! It’s always important for us to understand the natural workings of our bodies, whether physical or nonphysical. Start including your daily thoughts on your current location in your body’s cycle to start recognizing your patterns, and maybe to even predict when your natural downtimes will occur!
2K notes
·
View notes
Text
Making The Best Wedding Planning Binder
By Mark Clark
Your wedding will only happen once in your life. Therefore, treasure it as much as you can. Make it perfect. Of course, that is impossible. Along the way, for sure, you would meet a lot of troubles, problems, and unexpected changes. Despite these, though, learn to overcome the issue. It is not just ideal to create a perfect plan. Aside from that, as the host of this event, remember to take advantage of your resources. You could still host a grand wedding event, especially, without spending a fortune. You have resources, connections, and manpower. Therefore, use those qualities of yours, particularly, in making decisions. For your guide, have the wedding planning binder. You are obliged to create one. These reports would greatly serve as a blueprint for your project. Through this, you can monitor your progress. It would even help you future issues that might happen in the future. Being organized would really save you from various problems. Before writing your planner, think of making some drafts. Every owner has their own preferences, particularly, when it comes to their wedding plan. Of course, buying some templates from commercial companies would also help too. However, as the writer of this planner, you need to remember that your situations might be quite different from the others. Knowing how much the binder would matter to you, try to show your girly sides and prepare this binder. Do not just focus on the designs, though. It would be quite fun if you can organize things properly. That is the very purpose of this planner. It would serve as your guide. That is why be concrete when writing its content. There are various things that you got to reconsider and analyze, specifically, when writing these planners. As for now, take note of the budget. Be realistic. Regardless how good your plans can be, it is still useless, particularly, if those plans are not sustainable. You cannot just start a grand wedding celebration, especially, if you are financially unprepared. You got to be resourceful. This kind of event would surely affect your savings account. Therefore, be careful. Aside from your budget, prepare a checklist too. It matters, especially, to give you a summary of your actions. Instead of flipping the entire pages back and forth, this content would absolutely make your life easier. Do not check it, especially, if you failed to perform even one action from your plans. Speaking of plans, make sure to put them in a chronological order. Make a realistic time chart, if possible. Consider how long you are willing enough to spend for this event. You should be considerate of your schedule. Be considerate in checking your wedding location and reception. If you do not want to spend another more money on your transportation needs, you better perform them in one place. Before the big day, it is important to sort out your attire and dress. Remember to hire the best photographers too. On top of this, there are miscellaneous fees too. That is why consider of paying of them. For your guide, always remember to create a sustainable time chart for each activity. Create a graph. You can find some samples online for these charts. Aside from having a checklist, having a time chart would greatly help too.
About the Author:
When you are looking for information about a wedding planning binder, come to our web pages today. More details are available at http://ift.tt/2BWdHaL now.
Making The Best Wedding Planning Binder from NEXT GENERATION http://ift.tt/2ClaUfk
0 notes
Quote
Sometimes when you do a search, you’ll find that there’s a descriptive box at the top of Google’s results. We call this a “featured snippet.” In this post—the first in a new series going behind-the-scenes on how Google Search works—we’ll explore when, where and why we provide featured snippets.What is a featured snippet?Let’s start with a look at a featured snippet, in this case, one that appears for a search on “Why is the sky blue?”We call these featured snippets because unlike our regular web listings, the page’s description—what we call a “snippet”—comes first. With featured snippets, we reverse the usual format. We’re featuring the snippet, hence the “featured snippet” name. We also generate featured snippets in a different way from our regular snippets, so that they’re easier to read.We display featured snippets in search when we believe this format will help people more easily discover what they’re seeking, both from the description and when they click on the link to read the page itself. It’s especially helpful for those on mobile or searching by voice.Here are a few examples where featured snippets enhance the search experience by making it easier to access information from good sources, big and small:FeaturedSnippet1.png“can a bad spark plug damage my engine”FeaturedSnippet2.png"when did jimi hendrix burn his guitar"featured snippets how did mesopotamians write"how did mesopotamians write"FeaturedSnippet5.png"Cats that look like wildcats"Featured snippets aren’t just for written content. Our recently launched video featured snippets jump you directly to the right place in a video, such as for how to braid your own hair:Featured snippets help with mobile and voice searchMobile search traffic has surpassed desktop traffic worldwide. And with the growth in voice-activated digital assistants, more people are doing voice queries. In these cases, the traditional "10 blue links" format doesn't work as well, making featured snippets an especially useful format.Of course, we continue to show regular listings in response to searches along with featured snippets. That’s because featured snippets aren’t meant as a sole source of information. They’re part of an overall set of results we provide, giving people information from a wide range of sources.People click on featured snippets to learn moreWhen we introduced featured snippets in January 2014, there were some concerns that they might cause publishers to lose traffic. What if someone learns all they need to know from the snippet and doesn’t visit the source site?It quickly became clear that featured snippets do indeed drive traffic. That’s why publishers share tips on how to increase the chances of becoming one, because they recognize being featured in this way is a traffic driver.When it comes to spoken featured snippets, we cite the source page in the spoken result and provide a link to the page within the Google Home app, so people can click and learn more:We recognize that featured snippets have to work in a way that helps support the sources that ultimately makes them possible. That’s why we always take publishers into account when we make updates to this feature.Working to improve featured snippetsThe vast majority of featured snippets work well, as we can tell from usage stats and from what our search quality raters report to us, people paid to evaluate the quality of our results. A third-party test last year by Stone Temple found a 97.4 percent accuracy rate for featured snippets and related formats like Knowledge Graph information.Because featured snippets are so useful, especially with mobile and voice-only searches, we’re working hard to smooth out bumps with them as they continue to grow and evolve.Last year, we took deserved criticism for featured snippets that said things like “women are evil” or that former U.S. President Barack Obama was planning a coup. We failed in these cases because we didn’t weigh the authoritativeness of results strongly enough for such rare and fringe queries.To improve, we launched an effort that included updates to our Search Quality Rater Guidelines to provide more detailed examples of low-quality webpages for raters to appropriately flag, which can include misleading information, unexpected offensive results, hoaxes and unsupported conspiracy theories. This work has helped our systems better identify when results are prone to low-quality content. If detected, we may opt not to show a featured snippet.Even when a featured snippet has good content, we occasionally appear to goof because it might not seem the best response to a query. On the face of it, it might not appear to answer a query at all.For example, a search for “How did the Romans tell time at night” until recently suggested sundials, which would be useless in the dark:Left: Until recently, a search for “How did the Romans tell time at night” resulted in a featured snippet suggesting sundials. Right:We now provide a better response: water clocks.While the example above might give you a chuckle, we take issues like this seriously, as we do with any problems reported to us or that we spot internally. We study them and use those learnings to make improvements for featured snippets overall. In this case, it led to us providing a better response: water clocks.When near-matches can be helpfulAnother improvement we’re considering is to better communicate when we give you a featured snippet that’s not exactly what you searched for but close enough that it helps you get to the information you seek.For example, the original “sundial” featured snippet above was actually a response for “How did Romans tell time.” We displayed this near-match then because we didn’t have enough confidence to show a featured snippet specifically about how Romans told time at night. We knew sundials were used by Romans to tell time generally, because so many pages discussed this. How they told time at night was less discussed, so we had less data to make a firm connection.Showing a near-match may seem odd at first glance, but we know in such cases that people often explore the source of a featured snippet and discover what they’re looking for. In this case, the page that the featured snippet originally came from did explain that Romans used water clocks to tell time at night. We just didn't then have enough confidence then to display that information as a featured snippet.We’re considering increasing the use of a format we currently employ only in some limited situations, to make it clearer when we serve a near-match. For example, we might display "How did Romans tell time?" above the featured snippet, as illustrated in the mockup below:Our testing and experiments will guide what we ultimately do here. We might not expand use of the format, if our testing finds people often inherently understand a near-match is being presented without the need for an explicit label.Improving results by showing more than one featured snippetSometimes, a single featured snippet isn’t right for every question. For example, “how to setup call forwarding” varies by carrier. That’s where a recent feature we launched lets you interactively select a featured snippet specific to your situation. In the example below, you can see how it allows people to quickly locate solutions from various providers:Another format coming soon is designed to help people better locate information by showing more than one featured snippet that’s related to what they originally searched for:Showing more than one featured snippet may also eventually help in cases where you can get contradictory information when asking about the same thing but in different ways.For instance, people who search for “are reptiles good pets” should get the same featured snippet as “are reptiles bad pets” since they are seeking the same information: how do reptiles rate as pets? However, the featured snippets we serve contradict each other. This happens because sometimes our systems favor content that’s strongly aligned with what was asked. A page arguing that reptiles are good pets seems the best match for people who search about them being good. Similarly, a page arguing that reptiles are bad pets seems the best match for people who search about them being bad. We’re exploring solutions to this challenge, including showing multiple responses."There are often legitimate diverse perspectives offered by publishers, and we want to provide users visibility and access into those perspectives from multiple sources,” Matthew Gray, the software engineer who leads the featured snippets team, told me.Your feedback wantedFeatured snippets will never be absolutely perfect, just as search results overall will never be absolutely perfect. On a typical day, 15 percent of the queries we process have never been asked before. That’s just one of the challenges along with sifting through trillions of pages of information across the web to try and help people make sense of the world.Last year, we made it easier to send us feedback in cases where a featured snippet warrants review. Just use the “feedback” link at the bottom of a featured snippet box. Your feedback, along with our own internal testing and review, helps us keep improving the quality of featured snippets.We'll explore more about how Google Search works in future posts in this series. In the meantime, you can learn more on our Inside Google Search and How Search Works sites and follow @searchliaison on Twitter for ongoing updates.
http://feedproxy.google.com/~r/InsideSearch/~3/HYVhBQbklvU/
0 notes
Text
France Needs to Know the Numbers
The French contest for Président de la République is well underway. Central to debates on the stage and in the street is employment and, more generally, what the French economic model should be. Central to all of this is a number - 10.5 percent. A number which turns out to not even be true.
The French imaginary about their country, their place in the world, and their future is tied up with their unemployment rate. “What is the unemployment rate in the US?” I have been asked so many times. “About 5.5 percent.” “In France it is double that.” The graph below is burned into the French political imaginary as it is into every French university student who is convinced it is impossible to find a job. And, I know a number of instances where it has been used by employers like a bully club in thinking they have quite a bit of power.

But these figures are wrong. The simple truth, that I have stressed so often on this blog, is that the unemployment rate is absolutely useless and not informative today.
The technical definition of unemployment is someone without a job but looking for one. In France, where to be eligible for generous government benefits one must be looking for a job, many more report that they are looking for a job even if they gave up long ago than the US. In contrast, American unemployment insurance only lasts 6 months and there are few additional government transfers for jobseekers. Those who haven’t been employed for a long period and don’t receive any benefits that condition them to be looking for work, are more apt to say they have not been looking for work.
This is not simply armchair postulating. It can be seen in the employment rate - the figure (or figures) that should be considered. Below I have broken down the employment rate (i.e. the share of the population that is actively employed) down by age cohorts.
The first figure shows the employment rate for 25 to 54 year olds for an assortment of countries, with the respective figure for the US and France highlighted. As you can see, the French employment rate for the main working age cohort is actually higher than the US.

Where France does differ from the US most dramatically is in regards to youth and the old.
A mere 27.9 percent of 15 to 24 year olds worked in 2016, while that figure for the US was nearly double at 49.4 percent. But this should not be read as a sign of the sky-falling, but as evidence that European youth are living in the characteristically European way. They travel and take gap years and they are incentivized to study longer than their American counterparts and, with ample funding they are able to not work throughout their studies. If the French have any interest in raising employment on this front, all they likely have to do is charge for tuition.

The last front are those between the ages of 55 and 64. In the US, like other countries with retirement ages begins at 65, most of this cohort continues to work . In France, like other countries where retirement can begin at 60, the number of people working between 55 and 64 is markedly lower. But again, this is not a marker of the French economy going down the tubes. This is an outcome of a concerted policy choice that defends early retirement.

0 notes