#this episode. is so hard to make look nice. i usually use other people's psds but i had to go setting by setting adjusting this
Explore tagged Tumblr posts
Text


Maybe there is a lesson to be learned in all of this.
#'xmas was yesterday' it's not about xmas it's about dennis and his feelings!!!!!!!!!!!!!!!!!!!!!!!!!!!!!!!#*#my gifs#a very sunny christmas#dennis#iasip#it's always sunny in philadelphia#dennis reynolds#this episode. is so hard to make look nice. i usually use other people's psds but i had to go setting by setting adjusting this#i love sunny for how it looks but sometimes the lighting does not mesh well with making gifs
224 notes
·
View notes
Text
#showyourprocess
From planning to posting, share your process for making creative content!
To continue supporting content makers, this tag game is meant to show the entire process of making creative content: this can be for any creation.
RULES: When your work is tagged, show the process of its creation from planning to posting, then tag 5 people with a specific link to one of their creative works you’d like to see the process of. Use the tag #showyourprocess so we can find yours!
Thank you so much to @cloudylotus and @wendashanren for tagging me for this set ❤ (please check out their respective posts here and here as well 🥰) and to the members of mdzsnet who started this!
1. Planning
I try to alternate between gifsets based on quotes and gifsets based on a single scene for the cql edits I create! This is because the ones based on quotes require significantly more thinking for me to come up with scenes to fit, alongside getting all of them to adhere to one colour scheme and then inserting the typography, rather than just me focusing on a single scene 😅 This time it was time for me to pick a quote, which I usually do from my #words tag on my tumblr where I like to collect poetry I resonate with.
“Oh, let my chest split open, let my blood spill over, body be still! I’ve bled for you, and you won’t even show me your face.” - Yi Kwangsu (via skogenflicka)
For the quote used in this set, I had thought that it fit wangxian so I had already tagged it to find later 😄 I also searched it up to read a little more on the background of the story and author and was surprised to find that it was from a short story on gay, unrequited love, which made it somehow more appropriate as I wanted to fit lwj’s perspective during his mourning years.
To select the scenes, I split the quote up into four lines and wrote the summary of the the scenes that demonstrated them quite literally, as in the things lwj did for wwx out of love even when wwx was pushing him away, + ep number and timestamps for easier gif creation. I knew that I wanted to focus on text effects too so the 3rd gif was specially picked for the horizontal movement of lwj across the frame.
2. Creating
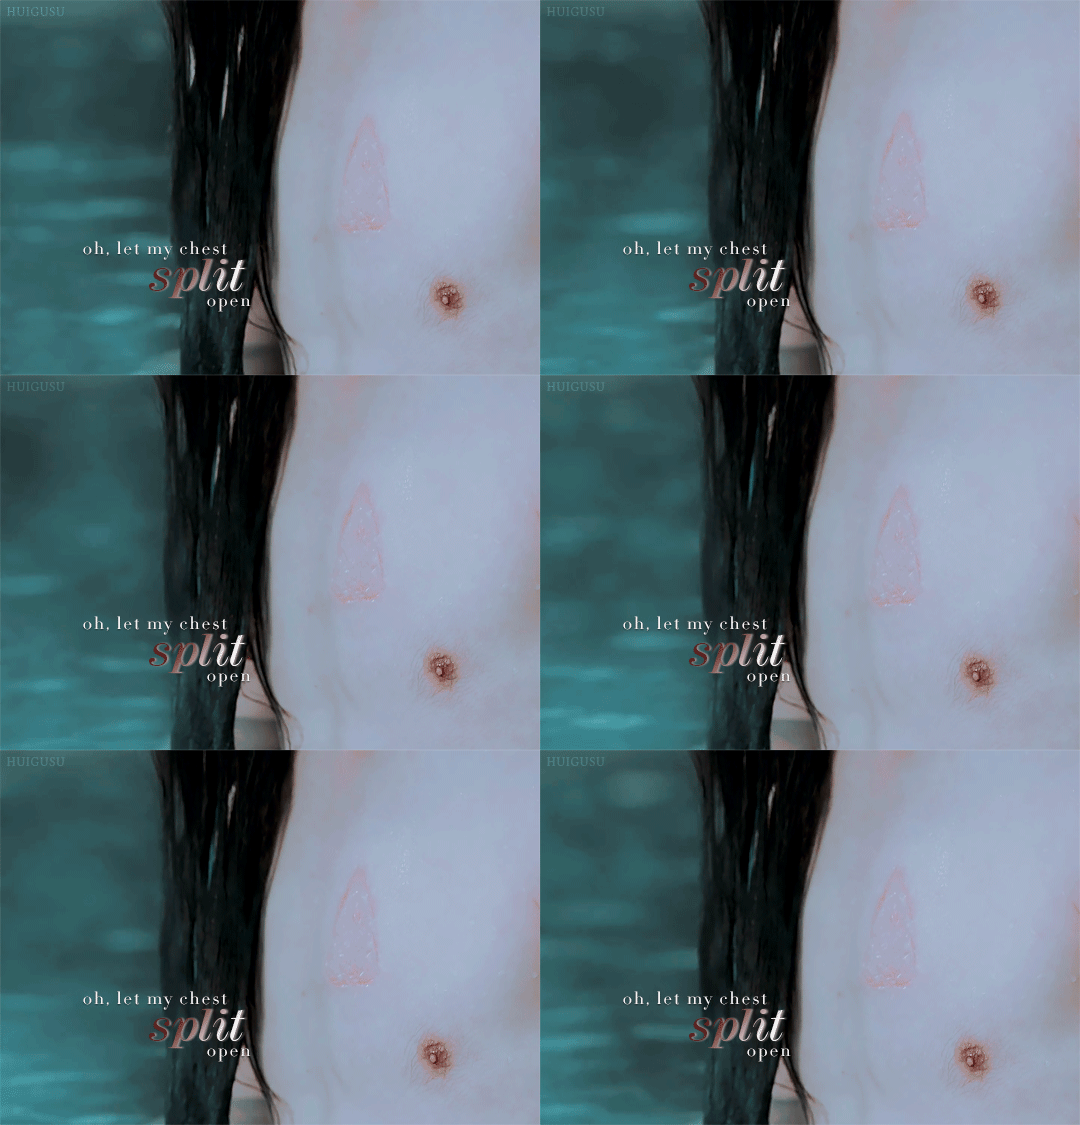
- oh, let my chest split open (wen brand at the cold springs)
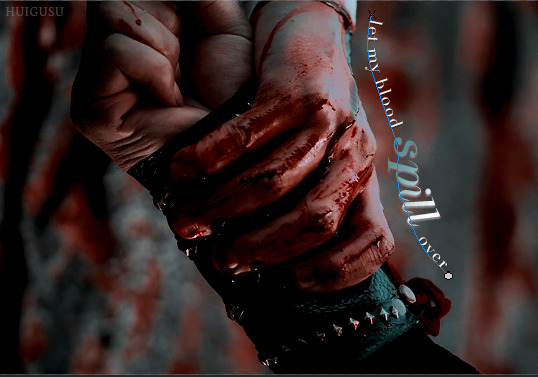
- let my blood spill over (blood running down his hand as he holds onto wwx)
- body be still! (lwj holding the rods as punishment for visiting burial mounds)
- i’ve bled for you, and you won’t even show me your face. (wwx pushing lwj’s hand off his and turning away)
I use Handbrake to isolate the scenes I want and then Photoshop to import and pare down the number of frames. I favour larger gifs, especially so that there’s room for the typography, so these were the usual 540px ratio across for cropping. For the first gif in this set, I didn’t have the special episodes downloaded so I used a screen recorder to get the needed frames of lwj’s chest brand! I remember not being happy enough with the length/framing of the brand from the regular episodes. I didn’t cut out his nipple and so many tags I see talk about it 😂
Colouring
Okay so! I knew I wanted to try out a darker colouring as the ones I do are more bright, so I went to look for tutorials and I found this psd that had a good effect for what I wanted after I modified/removed many of the layers. I wanted to work with existing colours already within the chosen scenes rather than modifying or emphasising them to go with the muted, anguished mood of the quote. The colour scheme thus became dark, maroon red (wwx) from the blood and wwx’s tassel, as well as turquoise (lwj) from the water and lwj’s robe. I then added a channel mixer layer and selective colouring layers to make the turquoise of the waters that the psd had removed stand out more, and then another vibrance layer and an additional selective colour so that I could match the blues/reds across gifs. Thankfully, I could copy this colouring over to the other gifs with a few alterations of hue/saturation, curves and levels 😊 After colouring, I resize, denoise, and sharpen the gifs.

Typography
I really wanted to work with some text effects and get out of my comfort zone in this one. In line with the three parts of the first line of exclamation in the quote (and the parallel structure for the first two parts which I found hit so hard 😭), I wanted to highlight the alliteration I found in them - the words ‘split’, ‘spill’, and ‘still’. For the first two gifs, I decided on linear gradient overlays at 45 degrees + taupe drop shadows with the colour from the colour scheme other than the colour already in the gif. In the second gif, I used the pen tool to draw a line (in blue below!) that followed the curvature of their hands, then pasted the text in. I realised that I had to draw a separate line for the word ‘spill’, which after a lot of trial and error turned out to be much simpler after turning off the first pen layer visibility (the new line kept connecting to the first 😓)
As for the third gif, I initially thought of masking each frame to make the words appear as lwj moved from left to right, then I remembered that using the ‘overlay’ blend mode on the text hides it when it is on top of the colour black! 😄 In this case, lwj’s hair is black so I just had to position the words properly so that the words ‘body be’ would reveal themselves while giving time for the word ‘still’ to also have a nice effect after. (If you look closely you can see them a little in lwj’s hair 😅) The word ‘still’ took a lot longer to figure out, but in the end using ‘difference’ for the overall text layer and ‘pin light’ for the dark maroon colour overlay gave the clearest dark red effect as the camera panned.

Finally, in the last gif, I wanted to have the effect of the word ‘face’ change from a dark maroon gradient to turquoise with wwx’s hand moving lwj’s away to have it be a bit symbolic I guess 😅 of wwx’s leaving lwj? The ‘linear burn’ setting for the overall text layer (solid turquoise) and ‘difference’ for the gradient overlay (maroon) ended up working best to make the red disappear the moment wwx’s hand ran over the word, unlike other settings where the colour looked mixed/too messy.
3. Posting
I usually save the gifs and look at them on tumblr to see if I need to adjust any colours to match better or make them more vibrant (and ask yan what she thinks HAHA). These were fine, so I wrote the caption to summarise the source of the quote, added links to research and the op of the quote on tumblr, and wrote my tags. If it’s a post with translations of what the characters are saying/from the novel I typically take more time to edit the translations/do my own translation. I check if it is loading fine on mobile and edit the saved draft if necessary, then I post! 💕
Tagging but no pressure please!! 💗
@lanwuxiann for this amazing wangxian wedding night edit 🤧🤧🤧 that had me yelling into my pillow
@inessencedevided for this heartbreaking nie brothers set (which included manhua scenes!!)
@lan-xichens for this really lovely wwx + lotus pier edit, the colouring of which i think about from time to time
@mylastbraincql for this gorgeous jyl set with soup set with such pretty blending
@still-snowing for this beautiful piece of wangxian art about lwj holding wwx’s hands through the years that i teared up over multiple times
#showyourprocess#phew thank you for reading the whole way if you did!!#and thank you jasmin and ali for the tag#❤❤❤#tag game#tw blood#tw scars#gifmaking
17 notes
·
View notes
Photo
Requested by anon here is a basic tutorial on how I make my gifs with pictures included.
1. Download the episode that has the scene you want to gif. For Inuyasha specifically I use this amazing link here that has both the original series and the Final Act along with the movies. Also to make things easier I would recommend having all your videos in one folder, as you can see I have downloaded a lot of episodes.

2. Have Photoshop. I use Photoshop Portable CS6, I know there are other programs you can use to make gifs but for me Photoshop is my weapon of choice. There are several links on tumblr that show you how to get photoshop or you can look it up on piratesbay if your feeling risky.
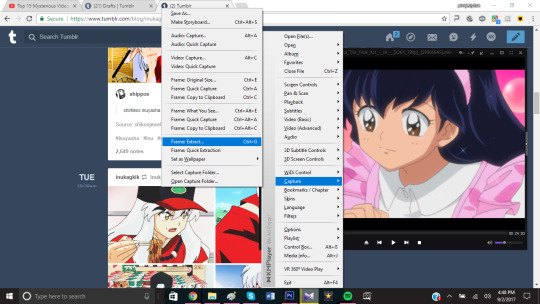
3. Capturing the frames. For this I use KMPlayer but there are several programs that can do the job. My version of Photoshop doesn’t let me open videos directly in the program so I have to import the scene I want as a folder of frames. I make a folder with a name I can remember to place the frames in, as you can see I have very creative naming methods (I also separate my caps by series so these are all sub-folders in my huge Inuyasha folder).

Now I open up the episode in KMPlayer and find the scene I want to gif and then right click > Capture> Extract which will open up the window I need to capture the frames.
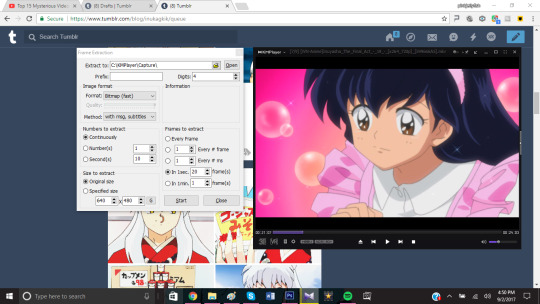
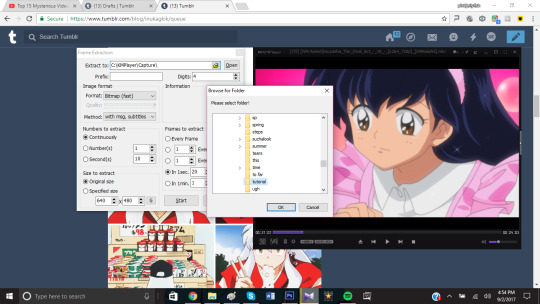
Then you go over to Extract to and find the folder you created for your frames, in this case my folder is called “tutorial”.
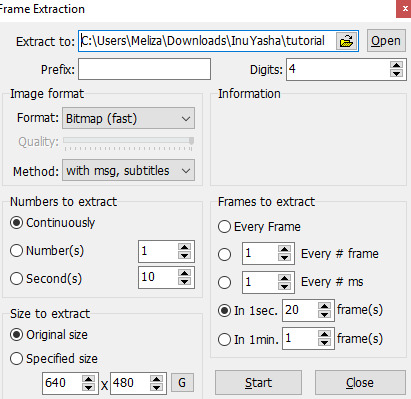
These are my personal settings for extracting the frames, I used to extract every frame but then I ended up with folders with over 200 frames which take a long time to load in photoshop and usually create gifs that excede the tumblrs limit.I keep them at their original size to not distort the quality. *You can have as many or as few frames per second as you want but keep in mind how many frames you have when giffing*
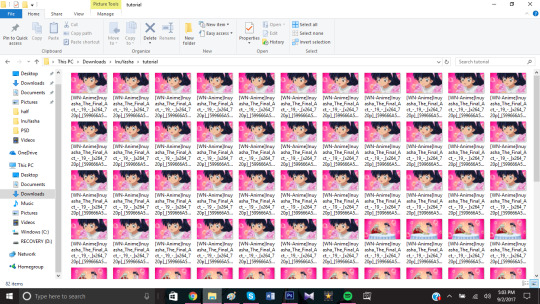
When your ready to go just press start and stop it once you have your scene. Your folder should look like this once your done, since no one is perfect you will most likely need to delete some frames you don’t want, this will make giffing easier.
4. Exporting the frames to Photoshop. Open and run photoshop and select File> Scripts> Load Multiple DICOM files. (I think some version of photoshop might have you select “Load Files into Stack” so if that doesn’t work try that)

A little screen should pop and and once again you find and select the folder that has your frames. Once you find it click okay and the frames will begin to load into photoshop.
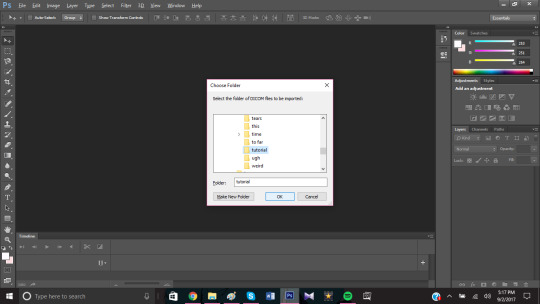
And now you wait, this could take a few seconds or a few minutes depending on how many frames your folder has ( usually I just go watch some youtube videos while i wait and forget I’m even making a gif lol)

3 minutes later the frames are loaded and its time to make the gif.
5. Creating the gif. Make sure you have your timeline turned one, mine is part of my default settings but I know a lot of versions don’t include it with their default view so you have to manually turn it on. Also make sure the timeline is set to frame animation and not video timeline, click on “Create Frame Animation” to start.


Click on the icon on the far right of the timeline that looks like an upside down triangle and 4 lines and then select “Make Frames from Layers”.

Click on the icon again and this time select “Select all Frames”, we’re going to input the frame delay.
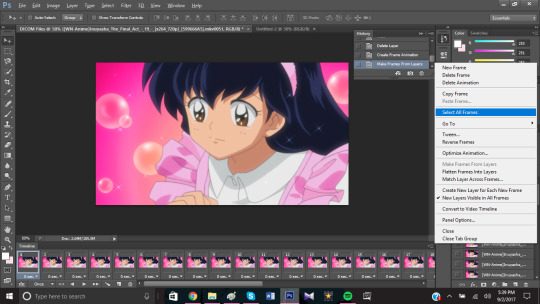
You select a random frame and go down to where it says 0 sec and click on the icon next to it and choose other. If you leave it at 0 seconds your gif will be too fast.
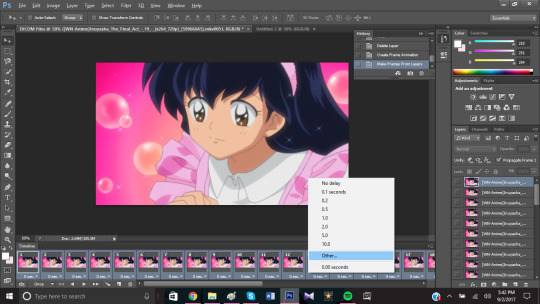
Because of the number of frames I have I’m going to use a 0.1 second frame delay. If your scene has a lot of frames you can decrease this number, if you have few you can increase it. Back when I used to use every frame I would use 0.03 seconds. Its really up to you how fast or slow you want the gif and if you don’t like it you can easily open up the gif again, change the time and re-save it.

Once you’ve decided your frame delay and have clicked okay click the icon on the far right of the timeline again and click on “Convert to Video Timeline”

Now select every frame in the window on the far right, you can do this by clicking on the first and last layer while holding down shift.
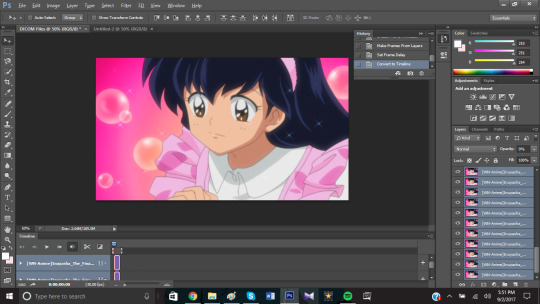
Click on the icon in the upper right hand corner of this window and select “Convert to Smart Object”.

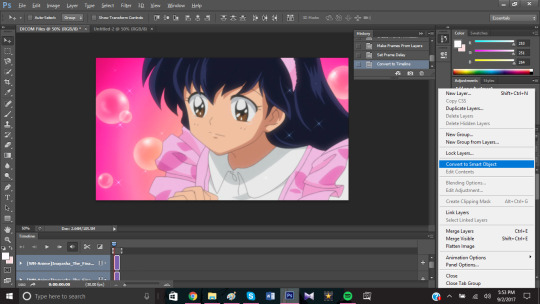
And now you have a gif, a really big gif, so its time to resize it. Tumblr uses 540px for big gifs and 268px for smaller gifs, I also cropped my gif a bit. Go to Image >Image size to resize your gif by changing the width size.

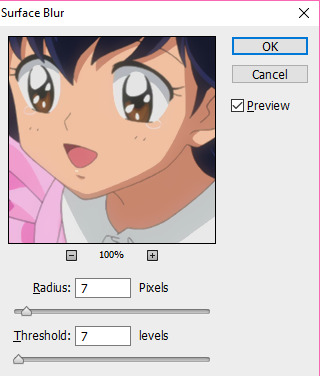
6. Surface Blur and Smart Sharpen. Now you could save your gif like this but it will most likely be grainy and will have lost some of its quality. To fix this go to Filter> Blur> Surface Blur to make the gif nice and smooth, for this scene I used a Radius of 7 and a Threshold of 7. For gifs I try not to exceed 10 on either one but I often go as high as 15 when editing grainy scans.
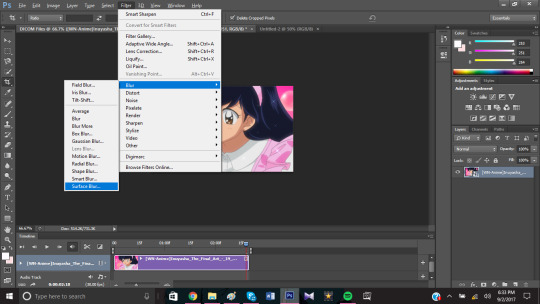
After that I like to Sharpen my gif so the lines stand out by going to Filter> Sharpen> Smart Sharpen.
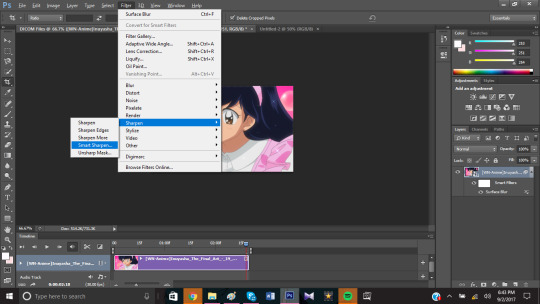
Usually for big gifs I only go up to 100% but with this scene I felt it looked best with 125%. Its best to tinker with these settings until you find what you think looks best, I like my gifs to be sharp so I tend to use a good amount of shapening. When I giffed the stage play I went up to 500%, live action is on another level. If you don’t like it you can edit this and the blur layer to fit your needs later on.

7. Saving. It’s time to save our gif, to save a gif you need to go to File> Save for Web. You can not save a gif the way you would save a png of jpg, it must be Save for Web.

Once you do that this screen will open up and it will have your settings for your gif. This is where you decide how you want your gif to be saved and get a view of how it will look like. Make sure your looping option is set to Forever!

I play around with these settings a lot because some scenes look smoother in different settings. I recommend trying a few combinations to see what produces the smoothest gif before saving. In this case it looked best with Selective and Diffusion.

Also make sure your gif does not exceed 3.00M, tumblr does not support gifs that big and all your work will be for nothing. You can make your gif smaller by changing the size or editing the colors.

Once you’ve check everything you can go ahead and click save and save your gif under an appropriate name.

And now you have a gif.

8. Coloring. Coloring is an important step when making gifs and I don’t think there is a wrong way to color, its just what you think looks best. When starting out I think its important to download PSDs to better understand how coloring works and what each of the little icons on photoshop do. I have an entire folder filled with PSDs, some made by me and some made by the wonderful people on here kind enough to share their PSDs with the world.
I’m going to show a couple of different coloring styles you could do with this gif.
Black and White

Achieved by putting a black and white gradient over a gif that was colored with this PSD.
Pale

This PSD over a gif with darker blacks and blue.
Pastel
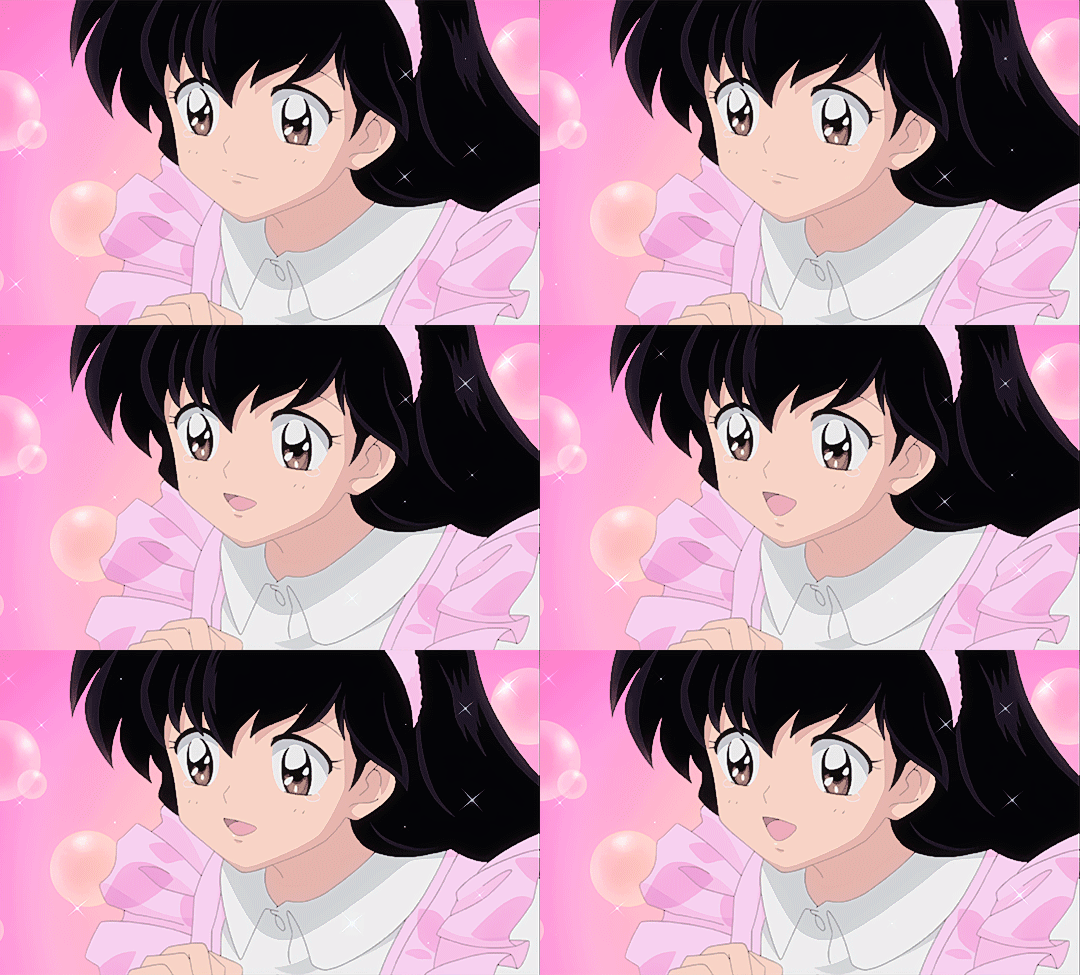
This PSD at 50% Opacity.
Vibrant

This PSD (this psd is actually one of my favorites I use it a lot)
This is how I would choose to color this gif.
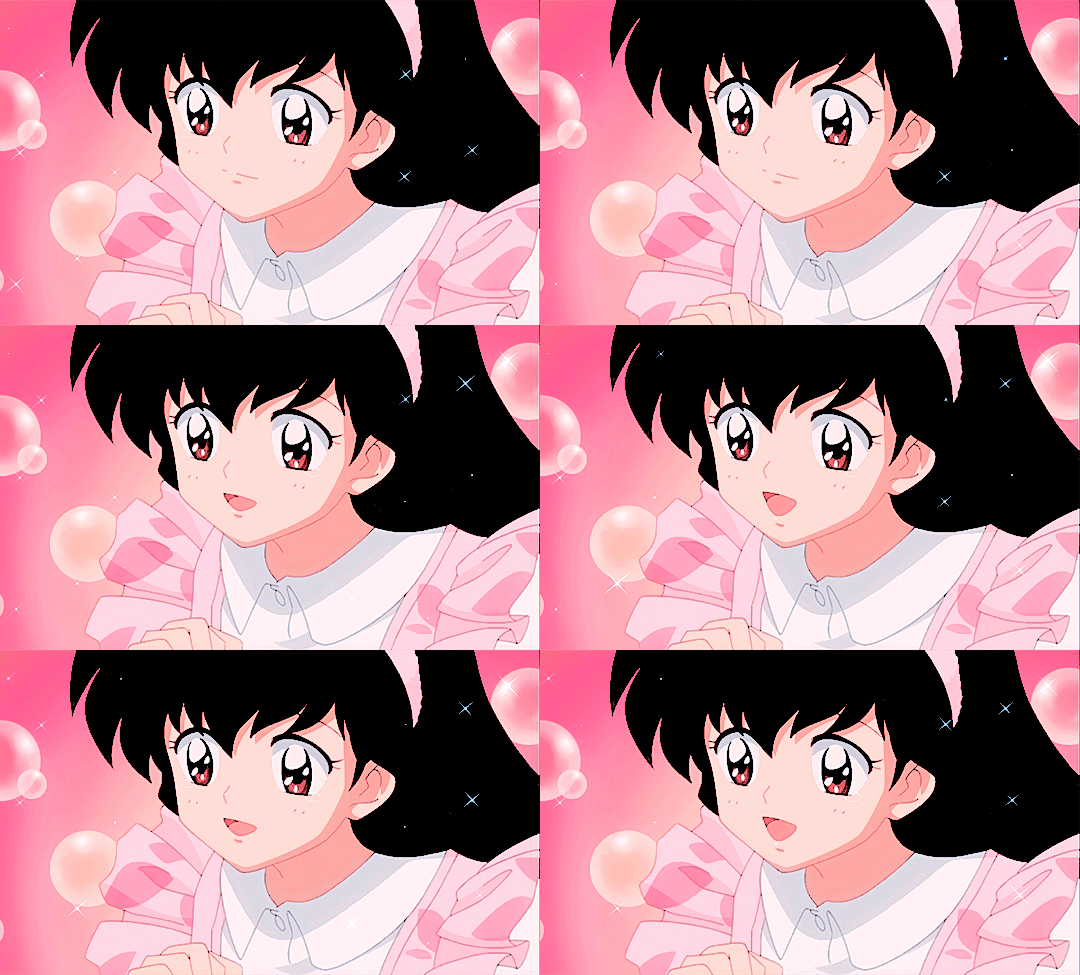
I would recommend following resource blogs, especially when your starting out because they have a lot of PSD you can download and use. PSD are also usef in making graphics and these blogs offer a lot of help too. Find a style you like or try something new every time. Coloring gifs can be hard so if your stuck you can ask them or look through their blog for tutorials that go more in depth on how to color certain types of scenes. Dark scenes, bright scenes, cartoons, live action, anime, music videos, pale, or color isolation its all there.
#im so sorry this took so long anon#my wifi is still out but hopefully it gets fixed today#requested#gif tutorial#not sure how to tag this lol#put under read more because it is kinda long especially with the screenshots#also included links to some nice psds i often use#and blog recommendations
49 notes
·
View notes