#so! If you're a beginner and have no need for a zig zag stitch
Explore tagged Tumblr posts
Visit Tumblr Blog
Explore Tumblr blogs with no restrictions, modern design and the best experience.
Last Seen Tumblr Blogs


redpatentleathercoachpurseo-blog
Red patent leather coach purse outlet - Coach outlet coupons 20%
2 posts


Fun Fact
Tumblr was attacked by a cross-site scripting worm deployed by the Internet troll group GNAA on Dec 3, 2012.
Text


after having used both these little machines on projects, i just have to say that all beginners should learn on a vibrating shuttle machine. Rotary machines will constantly give you tension issues, but vibrating shuttle machines do not give a flying fuck what your tension is, 80% of the time they figure it out. i will it be loud? yes. will it be slow? probably. will it create the most amazing straight stitch you've ever seen? always. honestly don't even want to bother with any other kind of straight stitch machine, tbh. i feel like we evolved backwards on this.
#they aren't particularly powerful so maybe on thick denims or whatever they aren't great#but man#all the time I've spent dicking around with tension problems on rotary machines and with these things you sit down and sew and they WORK#no questions no complaints#so! If you're a beginner and have no need for a zig zag stitch#get yourself one of these old baddies#they have no reverse but whatever#i just do 30 stitches per inch and it locks it just fine
2 notes
·
View notes
Text
Ooh I can add some!
Learn about the grain of your fabric ! The grain refers to which way the fibres are woven - cutting pattern pieces that are supposed to go along the length of the fabric along the width will give you different results! ESPECIALLY if you cut on the diagonal angle ! The diagonal angle is called the bias, and it results in a VERY stretchy pattern piece. Sometimes, this is necessary. Other times, it will completely ruin the integrity of a pattern piece by making it warp weirdly or stretch in odd ways. If you're using commercial patterns, there will usually be a diagram of how to lay out your pattern pieces on the fabric when you cut them out - follow this advice!
If you're making something that has a curved hem - like a circle skirt - the hem WILL drop unevenly. It's really annoying, but the best thing to do is be very patient, wait for it to drop (leave it on a hanger overnight), and even it out by cutting the dropped parts off before hemming it.
Iron your seams as you go!
If you're using a sewing machine and your fabric starts puckering when you sew, change your needle - it's probably blunt.
Most of the time, you can machine sew over pins if they are at a right angle to your needle - but NOT if they are vertical. Just take it slow when you go over them.
Stretchy fabric behaves very different to non-stretchy fabric. If you've only used one before, expect to have to change your methods when you use the other. Stretchy fabric tends to need a zig-zag stitch, whereas you can use a straight stitch on non-stretchy fabric.
Once you're a little bit more confident - learn how to make pockets. Once you know the basics, they're very easy to add into almost anything, and every garment is vastly improved by having pockets (especially dresses and skirts!)
Before you start machine sewing, test some stitches on a piece of the fabric you will be using. Try different lengths, tensions, and thread to find the best stitch for that project.
I have so so so many more tips, but I think these will be most helpful for beginners !
Things I wish I had read in "beginner" sewing tutorials/people had told me before I started getting into sewing
You have to hem *everything* eventually. Hemming isn't optional. (If you don't hem your cloth, it will start to fray. There are exceptions to this, like felt, but most cloth will.)
The type of cloth you choose for your project matters very much. Your clothing won't "fall right" if it's not the kind of stretchy/heavy/stiff as the one the tutorial assumes you will use.
Some types of cloth are very chill about fraying, some are very much not. Linen doesn't really give a fuck as long as you don't, like, throw it into the washing machine unhemmed (see below), whereas brocade yearns for entropy so, so much.
On that note: if you get new cloth: 1. hem its borders (or use a ripple stitch) 2. throw it in the washing machine on the setting that you plan to wash it going forward 3. iron it. You'll regret it, if you don't do it. If you don't hem, it'll thread. If you don't wash beforehand, the finished piece might warp in the first wash. If you don't iron it, it won't be nice and flat and all of your measuring and sewing will be off.
Sewing's first virtue is diligence, followed closely by patience. Measure three times before cutting. Check the symmetry every once in a while. If you can't concentrate anymore, stop. Yes, even if you're almost done.
The order in which you sew your garment's parts matters very much. Stick to the plan, but think ahead.
You'll probably be fine if you sew something on wrong - you can undo it with a seam ripper (get a seam ripper, they're cheap!)
You can use chalk to draw and write on the cloth.
Pick something made out of rectangles for your first project.
I recommend making something out of linen as a beginner project. It's nearly indestructible, barely threads and folds very neatly.
Collars are going to suck.
The sewing machine can't hurt you (probably). There is a guard for a reason and while the needle is very scary at first, if you do it right, your hands will be away from it at least 5 cm at any given time. Also the spoils of learning machine sewing are not to be underestimated. You will be SO fast.
I believe that's all - feel free to add unto it.
37K notes
·
View notes
Text
Unleash Your Inner Fashionista with the Singer Tailor Deluxe Manual Handheld Sewing Machine
Stitching up a storm has never been easier than with the Singer Tailor Deluxe manual handheld sewing machine. This lightweight, portable powerhouse is perfect for both beginners and seasoned sewers alike, offering a wealth of features and user-friendly functionality to help you tackle any project with confidence.
Stitch Your Way to Creativity:
Whether you're darning a delicate dress, crafting a cozy quilt, or whipping up a stylish tote bag, the Singer Tailor Deluxe has the stitch selection to bring your vision to life. From basic straight and zig-zag stitches to intricate decorative patterns, this versatile machine lets you personalize your creations with a touch of flair.
Effortless Sewing at Your Fingertips:
Threading needles and winding bobbins can be a tedious chore, but the Singer Tailor Deluxe takes the hassle out of sewing. The automatic bobbin winder makes filling the bobbin a breeze, while the easy-to-thread design keeps frustration at bay. And with its lightweight construction and convenient carrying handle, you can take your sewing anywhere – from your living room to a cozy coffee shop.
Built to Last:
Crafted with durable cast iron and metal components, the Singer Tailor Deluxe is built to withstand years of wear and tear. This sturdy machine is a reliable companion for all your sewing endeavors, ensuring smooth operation and precise stitching every time.
Simple to Use, Easy to Master:
Even if you're a sewing novice, the Singer Tailor Deluxe is designed with you in mind. The intuitive controls and clear markings make it easy to get started, while the comprehensive instruction manual provides all the guidance you need to master your sewing skills.
Invest in Your Creativity:
The Singer Tailor Deluxe is more than just a sewing machine; it's an investment in your creativity and self-expression. With this versatile tool at your side, you can bring your unique vision to life, one stitch at a time.
Buy Singer Tailor Deluxe Manual Handheld Sewing Machines at Murthy Sewing Machines Chennai
Visit Murthy Sewing Machines Chennai, your one-stop shop for all things sewing, and unlock the endless possibilities of the Singer Tailor Deluxe manual handheld sewing machine. Our friendly and knowledgeable staff will be happy to assist you in choosing the perfect machine for your needs, and our competitive prices ensure you get the best value for your money.
So why wait? Start stitching your way to a more fulfilling and creative life with the Singer Tailor Deluxe manual handheld sewing machine. Head down to Murthy Sewing Machines Chennai today and experience the joy of sewing firsthand!
Additional Tips and Tricks:
For even smoother stitching, use high-quality sewing thread and needles that are appropriate for the fabric you're working with.
Practice makes perfect! The more you sew, the more comfortable and confident you'll become.
Don't be afraid to experiment! There are endless possibilities when it comes to sewing, so have fun and let your creativity flow.
With the Singer Tailor Deluxe manual handheld sewing machine and a little practice, you'll be amazed at what you can create. So grab your machine, some fabric, and a dash of inspiration, and get ready to stitch your way to something truly special!
Call to Action:
Visit Murthy Sewing Machines Chennai today and let your sewing journey begin!
Note: I have included the keyword "Buy Singer tailor deluxe manual handheld Sewing machines at Murthy Sewing Machines chennai" once in the content, as requested.
0 notes
Text
How To Build Sewing Skills If You're A COMPLETE Beginner
This program shall cover understanding how to use a sewing machine, understanding and reading pattern catalogues, basic sewing skills, simple garment building and learning basic fixes and alterations to garments. This video shows you how to work with single fold bias tape and sew it equally and professionally how to sew clothes around curved edges. Looking for a simple way to figure out how to sew? Considering about his of the device is also very important and and yes it is important to consider the reliability and price of the sewing machine. I went home and immediately broke my new twin needle as my sewing machine was still occur zig zag mode after creating my t-shirt. We've lessons about how to sewing machine and the way to sew by hand. The next thing is to sew the inner knee seam(s). Hemming pants, darning tears and rips, reinforcing buttons & buttonholes, finishing up other textile projects how to sew like embroidery or knitting - they are all hands sewing techniques that are more useful the greater you know them, and don't depend on getting a machine at all. You are able to sew them into shapes (flowers or diamonds, for example) or you can sew them into long rows of hexagons, that are hand-sewn together then. Knowing what a pattern means by its instructions, along with why certain fabric explanations hand sewing stitches are important will help your sewing log off to an excellent start. Most good sewing machines have a quarter-inch patchwork foot now. Today this is one of the simplest types of the sewing machine found in the market. The stitch looks like the type of stitch produced by a serger and commercial sewing machines. Our 6 week Beginner and Improver courses how to sew clothes take place mid-week evenings and on Saturday mornings and cover extensive sewing techniques at both newbie and improver level. I started sewing because I wanted to sew clothes and so that's what I did so. Each individual in the class will be provided with a sewing machine to use but you are welcome to bring your own machine if you like. This begins the sewing machine sewing backwards. Like all creative endeavors, learning to sew such as a pro easy sewing projects for beginners takes dedication and time. Use money store plastic material or vinyl fabric tablecloths to transfer sewing or craft patterns onto. That being said, hands sewing is never heading to be as effortless or as strong as machine stitched. By popular demand Disposition U Sewing School is offering a free online sewing classes specific class in sewing with stretch knit materials now! Short needles such as "betweens" used for hand-quilting work less well for sewing on binding. This design is taken form our book 'Sewing your perfect Capsule Wardrobe' This is a great pattern to get you began on your capsule wardrobe journey. Then later I found these: This Lotta Jansdottor reserve is full of cute, modern projects that want only simple sewing. Heading fast has triggered the very best sewing thread to end up wound around itself - no idea how that happens how to sew beyond that it always happens when I'm racing down an extended seam. A treadle sewing machine was the building blocks of several homes and continues to be coveted by sewers who live in areas where the electrical grid is unpredictable. By the final end of this course, participants will employ a good knowledge of sewing and will have produced 2 or 3 3 garments (pyjama pants, skirt, pyjama top) depending on the individual pace of learning. In this specific how to sew article, I'm going to tell everything you need to learn about the sewing machine. It achieves almost the same effect as the essential stitch but instead of sewing on the inside of the plushie, you are sewing on the outside. Keeping scissors sharp isn't difficult and it generally does not take much time, but it is vital for sewing. If you've never sewn before or if you've not touched a sewing machine for a long time or if you would how to sew class yourself as a beginner, then all of this month's workshops are are ideal to get you were only available in making your own clothes. I am slow at hand-sewing extremely. Materials used for sewing also have come quite a distance since the start of leaves and skins. • Sewing machine familiarity, maintenance & protection. If you use a sewing free sewing classes machine often, mount a little bulletin table on the wall structure next to it. Fill up it with pushpins or right pins then. For example, there's an entire class dedicated to choosing the right sewing tools.
0 notes
Text


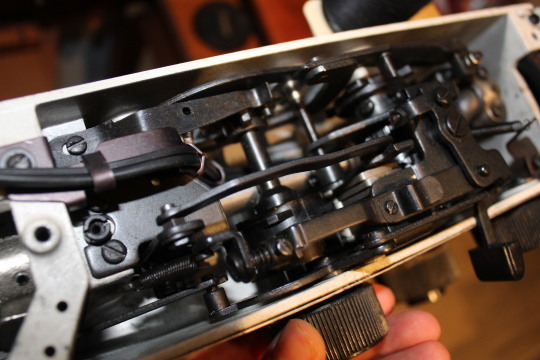
Thought I'd take some pics of my newly acquired machines. This is a Dressmaker of an unknown model (it only came with the front cover of the manual, so, uh, thanks for that I guess) but definitely made in the 1970s. This is when they started replacing metal parts with plastic, and you can see the gear I'm holding in the last pic has a plastic cam selector attached to it inside the machine. This is not ideal, but at first glance it seems the cam selector and the cams seem to be in working condition (I won't know until I run the machine). This is why people recommend Kenmores only if you're buying 1970s machines, but tbh this is still higher quality than anything under $300 you're buying new these days, as long as the plastic isn't broken. The rest of the machine is metal, including the exterior. I think she's fun and funky looking. This is the exact machine I'd recommend for a beginner, because it has the 5 stitches you actually use (buttonhole, blind stitch, zig zag, overlock) plus the free arm. People think having 100 computerized stitches is a plus, but you rarely use those, if ever.
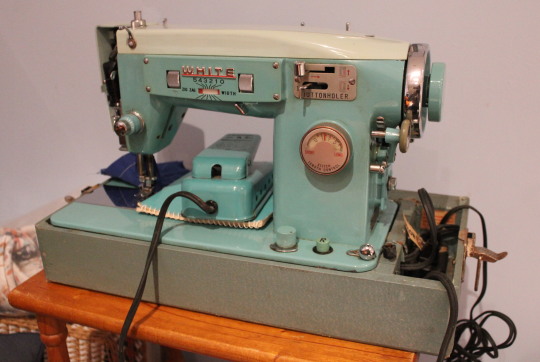
Next is the teal White Model 463 I bought for myself as a treat after Trump won lol. Like fuck it, I'm replacing my beautiful baby that broke a year ago, because I haven't seen a single one of these show up on ebay and when this one showed up for $80 I was like hell yeah. I don't need it, and I can't get the front closed, but I have my other one still, so I can figure out how to fix it. Feels good to have her back (in a sense). You get attached to these machines, I swear to god. She really was a fantastic machine.
Lastly, I finally took some nicer pics of my Kenmore, lol. When I was hanging out with my brother last weekend, he came with some work uniform pants that had holes in them, and the free arm really came in handy for sewing pockets high up on the pant leg. So she's in my rotation now. I still think they made these buttons overly complicated (especially compared to the Dressmaker), but maybe there was some mechanical reasons for it. This would be another great machine for a beginner (or anyone, really), and they're cheap because they're ugly as sin and only people in the know know how great they are. Some people prefer these things over Bernina, so that's how nice they are. I bought this for like $20 (plus shipping) lol. Hence why I get mad when people buy shitty machines for $80. You can get fantastic machines for CHEAP if you're willing to search on FB Marketplace and not just going straight to Amazon.

#this is a sewing machine blog now I guess#sorry :/#if anyone needs a machine I will sell you one cheap lol#i am a 1960s Japanese machine disciple#everyone should have one
2 notes
·
View notes
Text

The people have spoken.
You will need:
Underwear to be converted (I am using boxer briefs in this tutorial, but this should work on any "men's" underwear!)
Sacrificial underwear (these do not need to be "men's")
Scissors
Thread
Either a needle or a sewing machine
Pins or basting glue/some kind of temporary fabric glue
OPTIONAL: Seam ripper
My sewing skills are pretty beginner-level, but if you've never sewn before, this is a modified version of the idea from this video, which explains hand-sewing as well! imo this is simple enough (and similar enough) that you can probably attempt this tutorial after you watch that one.
What we're going for is a pouch in the front of the underwear, using the shape of the crotch they already have. This is a pair I made with fabric that matches it exactly (turned inside-out so you can see the pocket):


For this tutorial, I chose a sacrificial pair that contrasts a little bit, just so yall can see what I'm doing.

I'm converting the underwear on the left into packing underwear. I've chosen a sacrificial pair that I think I can match nicely to them, plus some thread that matches them both. You truly do not need to be this picky about it.
First, I'm going to deconstruct my sacrificial pair:

Cut along the yellow lines to separate out the crotch, elastic waistband, and the butt. (I cut on the outside of the seams here, so the seams were removed with the crotch.)

We're gonna get rid of the crotch, because it's cup-shaped & won't lie flat. The butt fabric will be perfect for that!
But first: the waistband.
This is the part that makes this design work so well! Let's remove some excess fabric from the waistband that my scissors couldn't get with the seam ripper (this is optional)


You want about 6'' of the waistband to form a strap, which will hold your packer in place inside the pouch.
My packer is a Mr. Limpy, which works well with these harnesses. This should also work with some packers that don't have balls- esp sock packers- but if you use the soft cup-shaped packers, I might be concerned about the strap compressing them. Whether you fiddle with the design, or just leave the strap out altogether, is up to you!
I played around with mine and found that it worked best to place the strap about 3'' up from the bottom of the crotch, but this may be different on your body & with your packer. Once you figure out placement, you're going to:
Turn your underwear inside-out

Measure & place your elastic strap (I like to go 3'' above the bottom seam of the crotch) (It's important that your elastic is longer than your crotch is wide!)

And pin.

(Make sure you do not pin your crotch to your ass.)
Now, you're going to place the butt fabric from your sacrificial underwear so that it covers the entire crotch, leaving maybe a quarter inch or so of room from the waistband. I also recommend placing one of the hemmed edges from the leg holes at the top here, so you don't need to hem it yourself.


(Blue lines are the crotch seams underneath, and the purple is the elastic, with yellow pins. I feel x-ray helps me understand what's going on.)
And pin! (With more x-ray so you can see where everything should be)

Turn the whole deal right-side-out again, and sew along the existing crotch seams:

This will hide your sewing, which I think is a nice touch.
When you're done, turn it inside-out again and cut off the excess fabric (you can cut pretty close to the seam here)


And viola!
I decided to do an overcast stitch around the inside hem, just to help prevent fraying and make things look more finished. If you're hand stitching, you probably do not want to do all that, but you can use a zig-zag stitch for a similar effect if you're particularly masochistic/determined.

Penis time.


And an inside peek:

I find the strap really helps keep things in place no matter what I'm doing, whereas the pair I made without one needed a lot more readjusting. I'm also a huge fan of how subtle the changes are! Even when I go to the bathroom, I'm not reminded of how Different And Strange my underwear are. Feels good.
If you come up with any tips or changes, or if you decide to make these and want to share/provide feedback, please add to this post & I will try to share!
i think i cracked the code on converting regular underwear into packing underwear:
easily
using only a pair of sacrificial underwear
looks good (inside and out!), AND
keeps ur packer firmly and comfortably in place
if there is interest I can be persuaded to share my secrets
10K notes
·
View notes