#nice lightroom presets
Explore tagged Tumblr posts
Visit Tumblr Blog
Explore Tumblr blogs with no restrictions, modern design and the best experience.
Last Seen Tumblr Blogs


Fun Fact
130K people were victims of a chain letter scam that affected Tumblr in May 2011.
Text
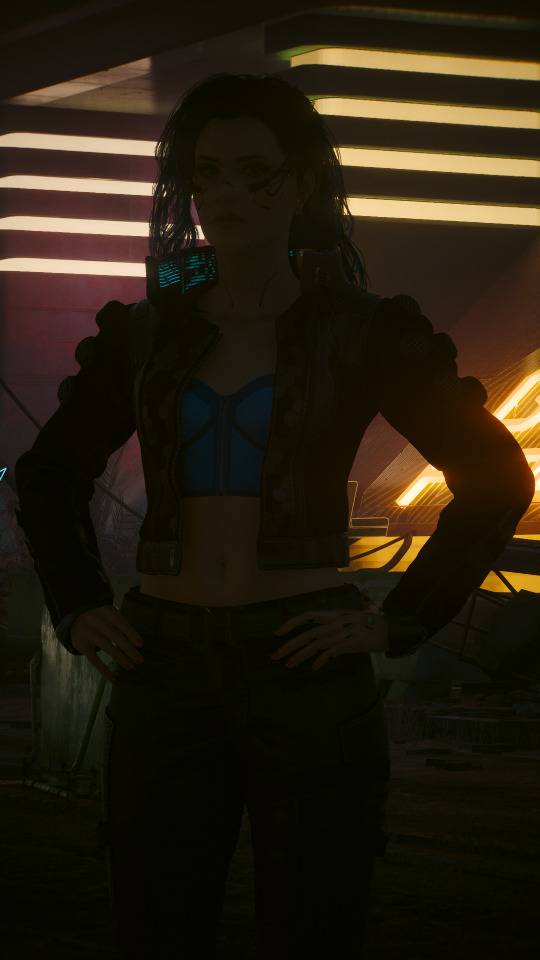


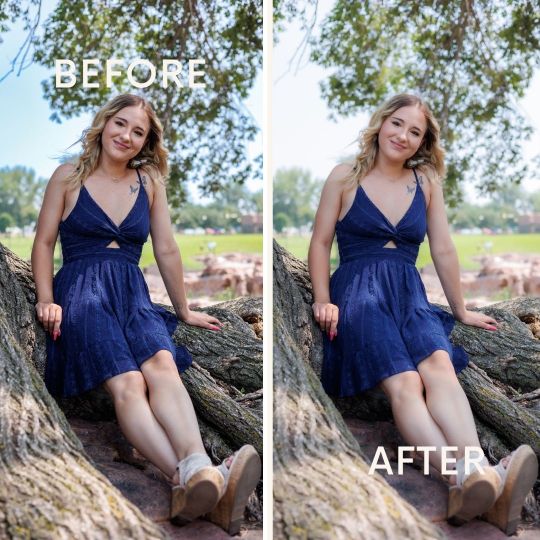
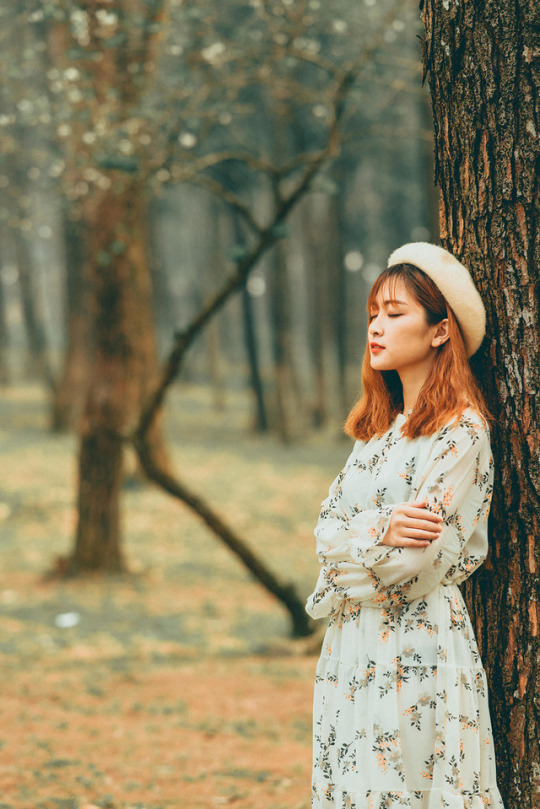
I saw someone recently ask why their shots weren't turning out how they wanted them to despite being able to support the highest graphical settings, so I thought I could share a little behind-the-scenes tidbit re: my approach to lighting and post-editing in VP in case it's useful.
And for my money, lighting is one of the most important factors in getting a shot that I'm happy with. Yes, a high-end graphics card can absolutely help, but that's just one tool of many that can make a difference.
(This info is probably most relevant to folks who can mod their game, but the overall principle can also be applied to vanilla photomode, too. You'll just have to find good in-game light sources since you won't be able to spawn your own, and it might require a little more finagling with the vanilla photomode exposure and contrast settings. Here are some 100% vanilla shots I took recently that I think turned out pretty decent even with those limitations, just to give you some ideas if that's what you're working with.)
Lighting & Exposure
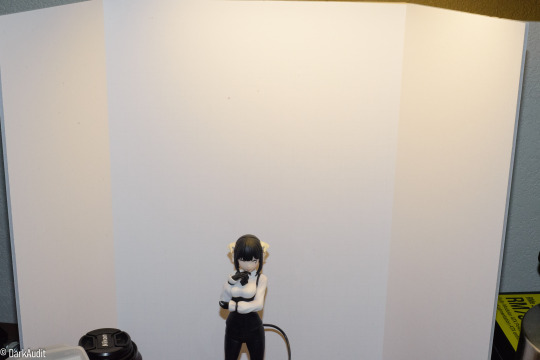
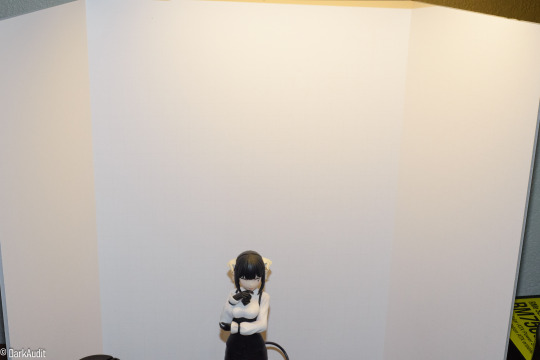
So referencing the photos above, from left to right:
A purely vanilla shot with ray-trace enabled but no lighting tools
The same shot with lighting tools on Valerie
The same shot with lighting tools + some Lightroom editing
Beefy graphics cards can certainly make a difference here since they'll be able to render more nuanced light and shadows, but as you can see in the purely vanilla shot, that ray tracing on its own ain't doing much when it comes to lighting Valerie. The neon lights in the background are pretty, but she's barely even visible in that dark ass street.
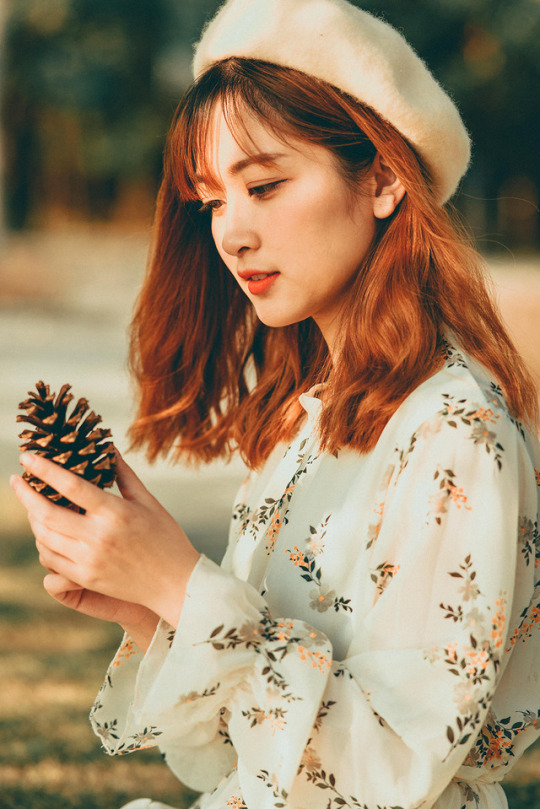
In the second shot, Valerie is in the exact same location but has multiple light sources on her. I mostly use CharLi lights these days, which is a free suite of lighting tools available on Nexus, and the customizable ambient lights in AMM, also free on Nexus.
I didn't think to screencap my exact lighting setup, but I'm pretty sure it was something like this:
CharLi spotlight on the left and right of Valerie, tinted pink/magenta
CharLi spotlight on the upper right, tinted teal
(I think I might have had an orange CharLi spotlight too, but it wasn't visible from this angle)
2 CharLi white spotlights directly on Valerie
Probably 1 or 2 AMM customizable point lights on her face (I like using the point lights at very low brightness to accentuate faces and give them a nice glow)
Now putting all these lights on a character could end up way too bright at the default vanilla exposure, especially if you aren't using any kind of major Reshade overhaul (which I do not).
Instead, I just use the vanilla photomode exposure settings to make a scene really dark and then light it back up with my own tools. (This is also a great way to shoot in areas that might have weird lighting effects, and it can be done indoors or outdoors and at all hours of the day.)
Just a simple example of that in these shots:

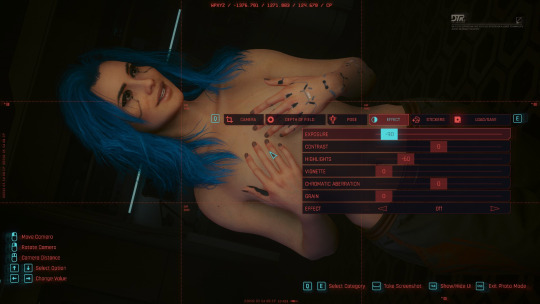
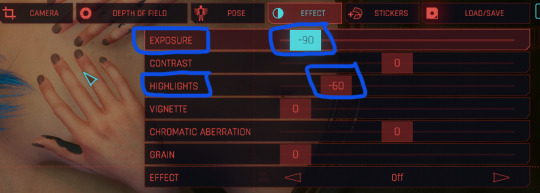
On the left, Valerie has a spotlight on her face and chest--It's pretty bright, too bright for my tastes. On the right, she has the same spotlight, but the overall exposure has been dropped down to -90 and the highlights have been dropped to -60 (now it's a little too dark for my taste--If this was gonna be a real shot, I'd build up more lights, but just wanted to show how much altering the exposure can affect a shot).
Post-Editing
As for making further adjustments to colors, shadow levels, sharpness, etc. of a shot, I know a lot of folks prefer to do that with Reshade presets, but... I don't, haha. I did make a basic shader to reduce the green tint of the game, and I use the Cinematic DOF and Real Long Exposure shaders to get a nice depth of field and reduce hair pixelating. Otherwise, all other adjustments I make are in Adobe Lightroom (or Photoshop if I need to make more precise adjustments).
And it's just a personal preference here. I just don't like having to mess with too many mods and menus in-game--I feel like it increases the chance of something freezing or crashing or me accidentally closing out of photomode. It also helps to give me a new perspective to see the shot outside of the game, especially if it's a portrait-oriented shot. Plus, I just like the process. Gives me one more reason to stare at the blorbos for a little while. :3
I adjust each Lightroom preset as needed depending on the color and exposure of the shots I'm working with, but these are some of the more common settings I modify:
I almost always finetune the exposure and shadows/highlights.
I like to do a global increase for saturation and vibrance.
A lot of my presets increase the saturation of reds and blues and decrease the saturation of yellows and greens, but this can vary; e.g. i like the greens to be vibrant if it's a nature shot.
I also usually make the white balance a little cooler.
I love tinkering with the global curves settings to "flatten" the shadow levels.
And I like really crispy shots, so I always increase the sharpness, and I'll usually bump the texture and add some noise, too.
These are all things that can be done in other similar programs/apps or even with Reshade. If you're just starting out, I think using pre-made presets and filters is a great way to go, and as you get more comfortable with the tools, you can start to make little tweaks and edits to personalize the style.
So anyway, there's some of my process! Everyone's got their own, and what works for me might not work for you--Don't feel like you have to take any of this as gospel or work exactly the way I do. But maybe this will... shed some light (ha ha, I'll see myself out) on how to get started with some VP tools. <3
44 notes
·
View notes
Note
Hey!!! Im a little shy (sorry for anon) but I was wondering how did you learn to take bg3 screenshots THAT LOOK SO AMAZING! I can’t seem to find anywhere on your blog if you already talked about it before. If it’s not too much trouble (and if it’s not your own creative secret) could you at least briefly describe your process? I get absolutely baffled and amazed when I see your posts. Like the angles, the lightning, the colors, the poses look absolutely stunning! I’m so glad I found your blog ❤️
Hi ! Thank you for the kind words :) . Technique depends on the photos - what kind of photo is it, what effect do I want to achieve. I have a tutorial on YouTube on how to take screenshots, but it is a bit outdated (I improved my skills) and it is in Polish. The topic is quite extensive, so it would probably be easier to explain how I achieved a specific effect in a specific photo. You can send me a DM - you don't have to be shy, I don't bite :D. I helped one person in taking screenshots, so I'll be happy to help you too :). From general information, the tools we use are important for taking screenshots. I use ReShade and Otis free camera mod. For editing Lightroom and Photoshop - I used to work as a photographer, so I know these programs. Sometimes I use ready-made presets from Nexus for ReShade, which I slightly modify, and then edit the screenshot in Lightroom and Photoshop. Lightroom and Photoshop is my main working tools.
A trick I can recommend to have nice, delicate light for portraits - talk to the character, make a quick save and do a quick load - then the light will be better for photos :) .
As for the rest, as I mentioned, the topic is extensive, so you can send me a DM and we will talk there, or you can send the questions about how I took a specific photo and how to achieve such an effect.
I hope everything is understandable - English is not my native language.
9 notes
·
View notes
Text
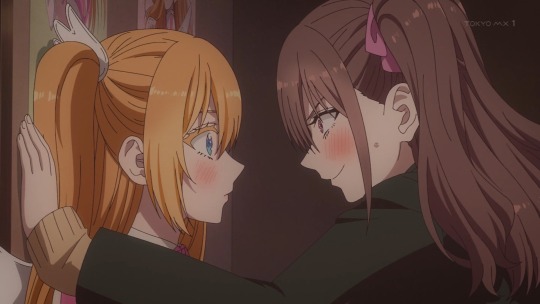
Best episode so far for sure. The love triangle is officially formed and I can’t express how jealous I am that the MC has his flat chested childhood best friend and a hot kouhai who’s into the exact same stuff as him and cosplays his waifu 😭 still a lot of censorship going on which I wish wasn’t the case, but the show is still good.
Mikari wanting to cosplay Lilliel and then realising her titties were too small made me crack up. But as Okumura said, real otaku like flat chests and nice asses. Flat is justice! She pulled off the Mirelia cosplay so well! fits her and her personality and I think she’s found a new hobby.
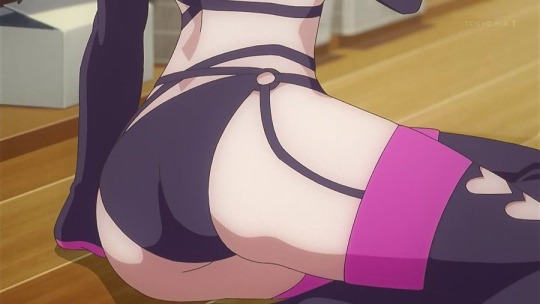
It’s totally plot relevant to have two hot girls groping each other and moaning for a mana transfer, trust me!


Good thing Mikari understands now that if you want to get closer to someone, you should probably try and understand the things they like. She was so desperate to make him like her, she skipped out on understanding what makes him him.
Both girls starting to get a little jealous over Okumura praising either one more than the other lol. Ririsa who was so focused on cosrom and otaku stuff is starting to see Okumura as a little more than just an otaku buddy that takes photos.. I know the face of a maiden in love when I see it!
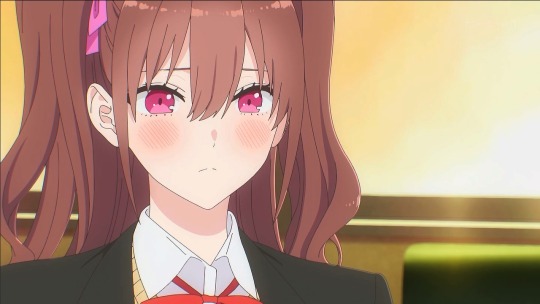
I hope Ririsa knows how to use presets in lightroom/photoshop otherwise that 500 photo editing session will be hell 😂

#2.5 dimensional seduction#2.5 jigen no ririsa#animangahive#animanga#animanga hive#summer anime 2024#anime#nigoriri
9 notes
·
View notes
Note
Hi! When using dof addon and camera mod (assuming you use it by the look on your screenshots) what are you’re go to settings for making the picture look so good and the dof shader settings etc? I know it varies depending on the pic but just curious!! SUCH pretty screenshots ^^
And also; do you turn off the game own’s dof or not? Thanks a lot!
Hi, Anon! Thank you so much :3
You're correct, I'm using the DOF addon with the camera mod :D
I'm using the reShade addons shown below along with the preset called Gleaming Sun which you can find here

Depending on the shot, I will toggle Lightroom and curves for adjustments and DepthDarkness for the dark vignette look. I try my best to let the game itself do most of the legwork for lighting/shadows because I want to showcase how beautiful the game is on its own.
That being said I also try to keep my shots as true to color as possible with some minor adjustments here and there. The preset I mentioned above is specifically used to remove some of the greenish tint that BG3 tends to have. It bothers me which leads me to have to adjust it for screenshots, so I figured why not use a preset that does most of the work for me. (the whole work smarter not harder thing ya know?)
I was using the in game DOF along with Otis's addon for it, but I realized that the in game DOF doesn't play nice with the addon so I turned it off. I turn it back on for gifs whenever I remember to though.
#hopefully this helps! i can do what astarionposting did and make a lil video tutorial about it if you guys would like :>#ask#anon
16 notes
·
View notes
Text
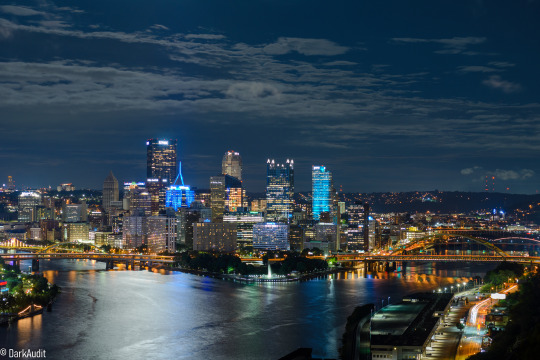
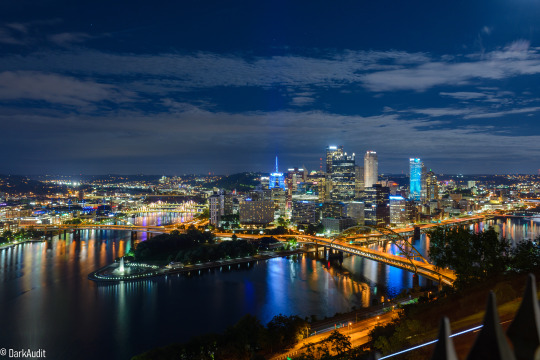
Full Moon
So as @sirfrogsworth pointed out yesterday, My D600 had a case of SENSOR DUST.
You can see the spots here. Shooting at a very high aperture, like f/22 seen here, will make them stand out like a sore thumb. The D600 had a reputation for being particularly bad at this, throwing oil on the sensor to the point where Nikon offered a free shutter replacement, and eventually scrapping the 600 all together in favor of the D610, which was essentially just the D600 with an upgraded shutter.
Learning the history of the D600 after I'd already placed the order, I quickly added a full-frame sensor cleaning kit to my toolkit. It's a pack of single use swabs and a bottle of cleaning solution you can dole out by the drop. Why the main cleaning kit came with just a spray bottle, I cannot explain.
Anyway, two drops of solution, one pass in the same direction with each side of the swab later, and...
Much better! Both shot with the 50mm f/1.8D @ f/22, btw.
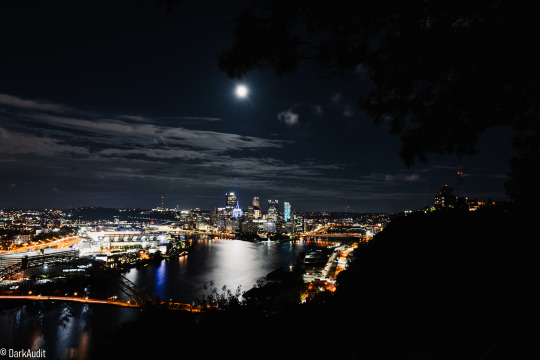
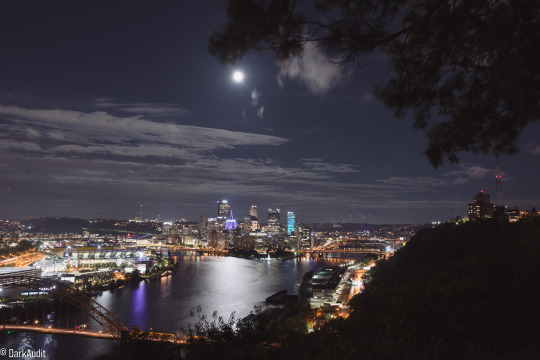
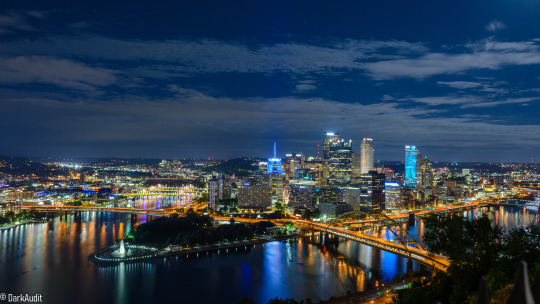
Fast forward to evening. I work nights, so it's just after breakfast, and I have the night off. It's about a 40 minute drive into the city and the West End Overlook. I go there a lot, because it's a good place to put any new knowledge into practice and compare it to previous visits. Plus, I spent good money on that Manfrotto tripod, and want to get use out of it.
Tonight was a full moon, which was both good and bad. You'll see in a moment.
For the most part, I'm shooting f/5.6 at ISO 200 aperture priority. Why? Because that's the combines result of assorted googling and photography book reading on night photography.
Once more with the moon in the shot.
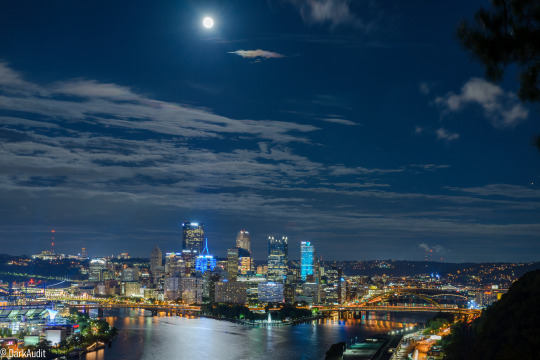
Thanks to the full moon, Lightroom is a little bit confused. The sky is way brighter than it actually is...
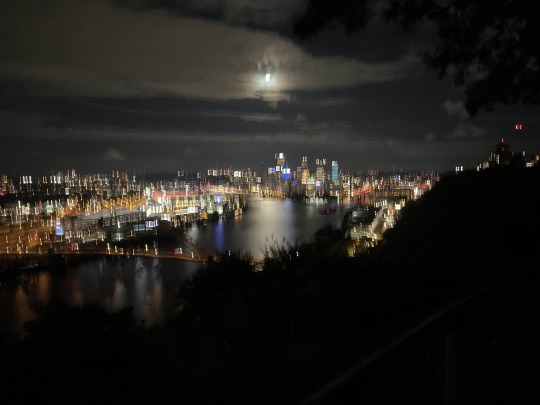
Never mind the shaking, that was just a phone pic to tell friends what I was doing at the time. But it shows what it looked like in real life.
I started looking through my presets, but nothing really came close to rendering an accurate version of the scene.
I think that second one comes close maybe? I usually just stick with Auto, but Auto isn't doing it tonight.
I moved on to the Duquesne Incline Overlook. Not seen here, but I'm starting to run into a little bit of gear trouble.

And one in 16:9.
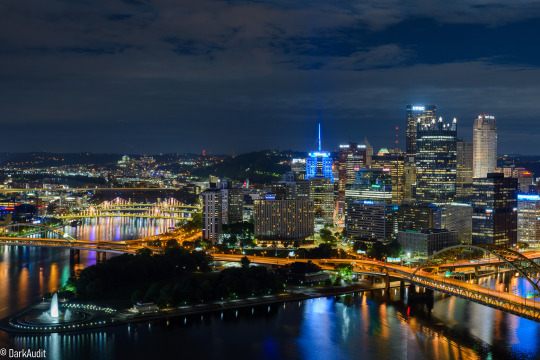
I moved on to Station Square, and here's where I ran into a problem. The 28-70mm lens did NOT want to autofocus on the buildings across the river. I fiddled with settings, turned the camera on and off, and even removed and reseated the lens. Could not get it to play nice.
So in order to salvage that stop, I broke out the 50mm f/1.8D that has mainly just been along for the ride when I go out. Tonight was it's chance to shine.
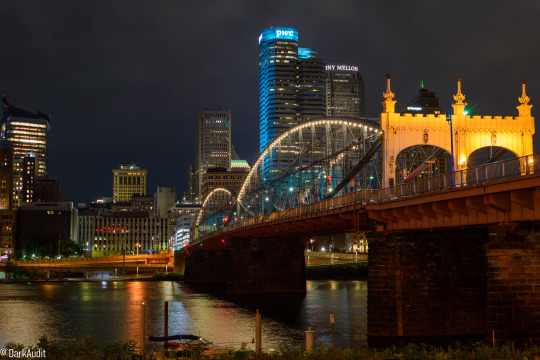
Oh, and that autofocus issue? Just out of shot here is a tall iron fence. Tall enough that I had to raise the center pole of the tripod a good foot to clear it. The camera STILL kept wanting to latch onto it for focusing. So it goes.
A few years ago I took a short course in Photoshop sponsored by WVU as part of Continuing Education. I should see if any of the local unis have anything similar for Lightroom.
#photography#pittsburgh#night photography#Nikon D600#D600#Nikon#nikon photography#digital photography#lightroom#adobe lightroom
2 notes
·
View notes
Note
hey! I want ask, how do you edit your pics? they are so nice, and which app?
I use Adobe lightroom! You can buy filter presets on etsy 😊
10 notes
·
View notes
Note
I know you were asked this already and I've saved the ask and response but now I can't find it😢. So I'll ask again because of my scatter brain, what program do you use to create your story header graphics?
Hiii lovey!! I use 3 apps but honestly you can do it all on one I’m just extra and have all 3 so might as well use them😂 they are:
-Picsart for actually creating the banners like blending the photos all together and making them look decent
-Typorama for titles because it has nice fonts (but Picsart also has nice fonts)
-Lightroom is where I add the adjustments to the coloring and the contrast and brightness I have presets saves (you can also adjust this on Picsart as well)
Hope this helps you!💖
6 notes
·
View notes
Text
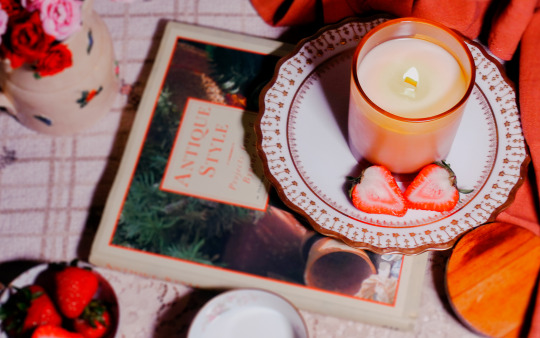
I always feel I don't have much interesting stuff to share, but I figured I should post what I have been up to lately. On the candle side, I'm still testing wooden wicks. I sadly had to give up on my dream of white wicks, as they were sooting far too much. I was able to find other wooden wicks that seem to work much better so fingers crossed. On the photography side, I recently found lightroom presents on creativemarket, so here's a preview of one said preset. Not sure if I like it, but it's nice not having to mess with all the setting haha
#candlemaking#candles#vintagecore#cottagecore#cozycore#aesthetics#I guess people weren't wrong when they call this a journey lol#I'm still trying to figure out how I want to set up the scene#it's really just an excuse to keep visiting antique malls for props#I may have a problem
2 notes
·
View notes
Text
Hazy Soft Light / Lightroom Preset
So, I was in the mood to edit some pictures today. In the process, I ended up making this preset.
I was aiming for a "fairytale-esque" style and I definitely think I got that spot on.
This preset has a very smooth light to it, it also skin softens.
I would not recommend using this on EVERY picture but it is definitely a nice preset to have for any soft outdoors pictures. I also tested it on some sports photography and concert photography and it looks really nice on those as well! It has a lot of different uses.

Where to download: patreon.com/NewGenrePhotography
2 notes
·
View notes
Text

From Snap to Story: The Art of Visual Storytelling
You’ve probably taken a photo that looked great in the moment—nice light, sharp focus, solid subject—then later felt empty. Just a picture. No story. It happens a lot, especially in a world overloaded with images. The ones that stick? They say something.
Visual storytelling isn’t just for pros or gallery walls. It’s in every choice you make—what you frame, what you leave out, color or black-and-white. A real story comes through when your images work together—like a road trip, a quiet morning, or a street scene abroad—pulling people in and making them feel like they were there.
The Story Is in the Sequence
Ten perfect shots can still fall flat. But ten that connect—with rhythm, contrast, and emotion—can tell a story that sticks.
Think of each image as a sentence. Some shout, some whisper. Some energize, others pause. Together, they build a mood.
That flow doesn’t happen by accident. Ask: what came before? What’s coming next? Where’s the quiet moment?
It’s not just what’s in the frame—it’s how shots play off one another. Wide to set the scene. Close to draw you in. When pacing and tone align, people stay with you.
Visual Language Is Real
Color, texture, tone - viewers may not name them, but they feel them.
Photographers with a strong voice often have a thread running through their work: a warmth, a framing style, a mood. It’s not about perfection—it’s about consistency.
It’s not a formula. It’s your fingerprint. And often, it comes together in the edit.
Why Consistent Presets Matter
Now here’s where things can go sideways—editing. You take ten photos in the same place, same time of day, same vibe… and then apply ten totally different looks to them. One’s moody and dark. Another is glowing and warm. One has punchy greens, the next is desaturated to grayscale. Suddenly, your story feels scattered. Like it was shot by five different people.
This is where Lightroom presets pull their weight.
Not in some magic, press-a-button-and-be-done kind of way. That’s not the point. But when you use consistent presets—ones that match the tone you’re trying to tell—your photos start speaking the same language. They look like they belong together, like pages in a photo book instead of random postcards.
Shot a quiet weekend camping trip? Soft colors and gentle light call for a clean, muted preset to hold that calm, natural vibe across the whole series.
Just came back from a classic car show under harsh midday sun? A punchy, contrast-heavy preset can match the bold, vibrant energy.
Either way, a solid preset helps keep your tone consistent—so the mood you captured stays clear from first frame to last.
And yeah, I’ve built a bunch of them myself for this exact reason. If you’re curious, I’ve got some over at Legendary Presets that can help with consistency without killing the natural character of your photos.
The Stories That Stick
Some of the most unforgettable photo stories I’ve come across didn’t come from pros. They weren’t flawless. But they felt real.
One was from a dad capturing the last summer before his daughter left for college. Just quiet, ordinary moments—pancake mornings, dog walks, old car rides with the windows down. But the sequence? That was the story.
Another was a series from a guy walking Tokyo’s rainy streets. Same lens, same tones, same slow shutter vibe. You could almost feel the air—thick, wet, electric.
They weren’t polished or loud. But they were consistent. They had intention. Honesty.
When you're flipping through your own photos:
Don’t just grab the sharpest or most dramatic ones.
Look for images that talk to each other.
Find the mood. Let the shots that share that mood stay in the same room.
And when you edit:
Don’t treat each image like a solo act.
Think of them as a setlist. One song leads into the next.
If a preset helps you keep that tone steady—use it. That’s not cheating. That’s storytelling.
Because in the end, it’s not about chasing one great photo. It’s about what they say together.
1 note
·
View note
Text
RNI's Latest Film Presets Updates Provide More Lightroom Support
Film aesthetics is one of the favorite presents that many photographers love and adore. While some can afford film today, plenty can’t shell out hundreds of dollars for purchase and processing. As a result, digital photographers heavily rely on editing software, with some unable to simulate a similar look for their images. One of the companies pushing boundaries in this area is Really Nice Images…
1 note
·
View note
Text
Brown & Aqua Lightroom Presets
Brown & Aqua color grade is used in photography with lovely warm tones with a cinematic look. Get various brown & Aqua Lightroom preset downloads of the brown and aqua preset to assist your editing workflow. Today I give away one of the best-crafted presets created by major photography artists. The aqua tones compliment the brown color which has a nice complementing look. Freely download these…
View On WordPress
0 notes
Text
Desktop presets:
Upgrade your photography game using Victoria Bee's desktop presets Lightroom Classic and Lightroom CC. These presets are also Adobe Camera Raw-friendly & they play nice with both Mac and PC. Get ready for seamless installation with Victoria Bee presets user-friendly instructions. Don't miss out! Enhance your photos effortlessly. Download now at victoriabeepresets.com and unleash your inner photographer.
1 note
·
View note
Photo
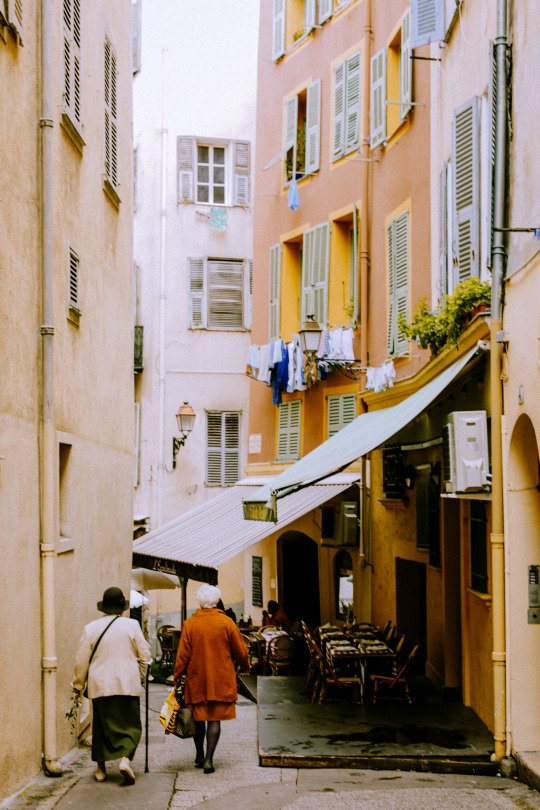
Nice, France
edited using Chez Anais preset for Lightroom desktop and mobile
3 notes
·
View notes
Photo

Retro Style preset. I love it, and you?
Link preset and stock : https://bit.ly/2LRrntA
#lightroom#free lightroom presets#presetsandmore#camera raw presets#nice picture#awesome presets#free presets#preset retro#retro style
10 notes
·
View notes
Photo
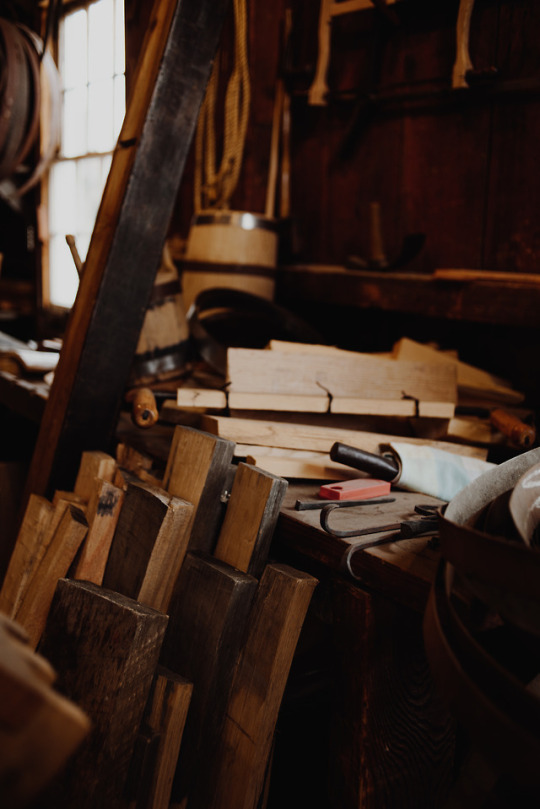
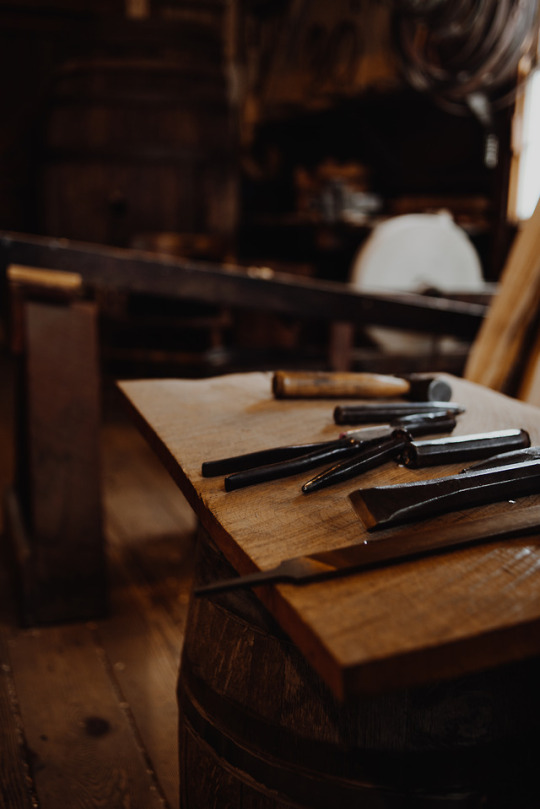
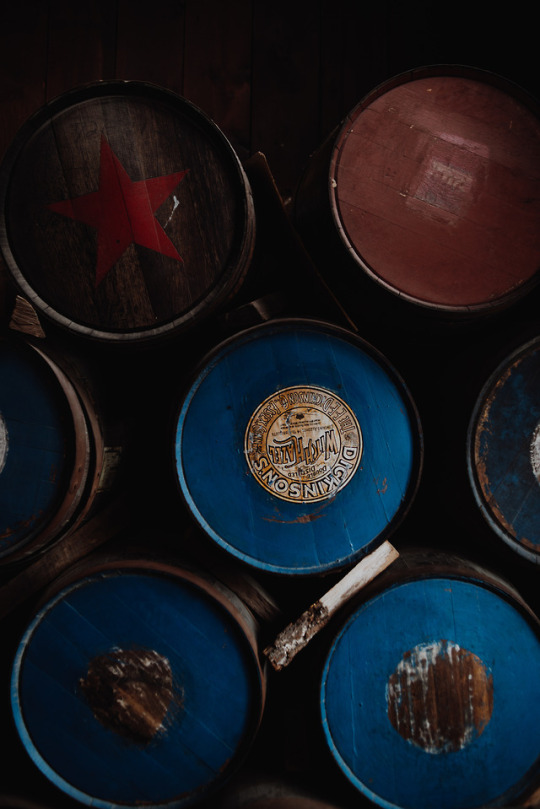
Barrel Craftsman, Mystic, Connecticut
#ships#ocean#exploring#nikon#vintage#cool#nice#vsc#vsco#preset#lightroom#nikonphotogrpahy#adventure#national#parks#beauty#fine#art#fineart#photogrpahy#fineartphotography#story#telling#storytelling
3 notes
·
View notes