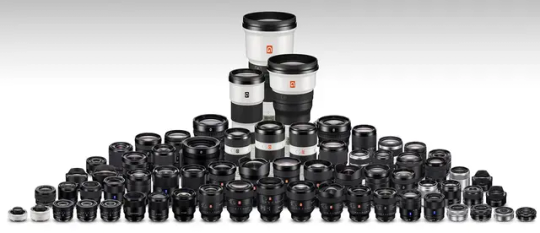
#mirrorless interchangeable lens camera
Explore tagged Tumblr posts
Visit Tumblr Blog
Explore Tumblr blogs with no restrictions, modern design and the best experience.
Last Seen Tumblr Blogs


Fun Fact
Forty percent of Tumblr users are between the ages of 18 to 25.
Text
The Camera Market Will Thrive. But There are Some Curious Trends
As the year begins on a relatively good note, questions about the camera market begin to circulate on the internet. Over the years, reports of a decline in the camera market have been persistent, with very few feeling the need to switch from a smartphone to a dedicated camera. However, with younger users bored with what companies like Samsung and iPhone offer, there appears to be some hope for…
0 notes
Text
Indian Digital Camera Market Size, Trends, Challenges and Future Outlook

In a world increasingly dominated by smartphones, the Digital Camera Market in India stands as a testament to the enduring passion for capturing life's moments in stunning detail. This market encompasses a diverse range of cameras, from point-and-shoots to high-end DSLRs, catering to photography enthusiasts and professionals alike. The Indian digital camera market is a significant contributor to the global market. The market size was valued at USD 1.8 billion in 2023. This figure is projected to grow at a CAGR of 4.2%, reaching an estimated USD 2.4 billion by 2028.
Digital Camera Market Analysis: A Multifaceted Landscape
A thorough Digital Camera Market Analysis reveals a market segmented based on various criteria: Camera Type:
Digital Still Camera Market: This segment comprises basic point-and-shoot cameras, offering user-friendly features and affordability. The digital still camera market is expected to witness a decline due to the increasing camera capabilities of smartphones.
DSLR Camera Market (Digital Single-Lens Reflex): DSLRs offer exceptional image quality and interchangeable lenses, catering to photography enthusiasts and professionals. The DSLR camera market is experiencing a shift towards mirrorless cameras due to their portability and advanced features.
Mirrorless Camera Market: Mirrorless cameras (MILCs) combine the image quality of DSLRs with a compact and lightweight design. The mirrorless camera market is witnessing significant growth due to their versatility and technological advancements.
Lens Type
Interchangeable Lens Camera (ILC) Market: This segment encompasses both DSLRs and mirrorless cameras, offering users the flexibility to swap lenses for different shooting scenarios. The ILC market is expected to witness the most significant growth due to the increasing popularity of mirrorless cameras.
Take a look : Forecasting the Camera Market Trends and Segmentation
Top Players: A Competitive Landscape
The Indian digital camera market is a competitive space with established international brands vying for market share. Some of the top players include:

Canon
Nikon
Sony
Fujifilm
Panasonic
These companies are constantly innovating and introducing new models with advanced features like high megapixel counts, faster autofocus, and improved low-light performance. However, the rise of smartphone photography has led to a decline in market share for some traditional camera brands like Olympus, which exited the camera business in 2020.
Digital Camera Market Trends: Shaping the Future of Photography
Several key trends are shaping the future of the Indian digital camera market:
Smartphone Integration: The increasing sophistication of smartphone cameras is impacting the digital camera market. However, smartphones are unlikely to completely replace dedicated cameras. Instead, we are likely to see a convergence where smartphones cater to casual photography, while digital cameras remain the preferred choice for serious photographers and enthusiasts.
Focus on Full-Frame Cameras: Full-frame cameras offer superior image quality and low-light performance compared to crop-sensor cameras. The full-frame camera market is expected to see steady growth in India, driven by the increasing affordability of these cameras and rising aspirations of amateur photographers.
Rise of Online Retail: The growing popularity of online shopping platforms is influencing consumer buying behavior. Online retailers offer a wider selection of cameras and lenses at competitive prices, making it easier for customers to compare and purchase products.
Focus on Content Creation: The rise of social media platforms and content creation has fueled the demand for vlogging and video recording capabilities in cameras. Manufacturers are responding to this trend by introducing models with improved video features and functionalities.
Challenges and Considerations for the Future
Despite the promising future, the digital camera market in India faces some challenges:
Competition from Smartphones: As smartphone camera technology continues to improve, it will remain a significant competitor to entry-level and point-and-shoot digital cameras. Manufacturers need to focus on innovation and highlighting the unique advantages of dedicated cameras over smartphones, such as superior image quality, interchangeable lenses, and better ergonomics.
Economic Factors: Fluctuations in exchange rates and rising inflation can impact the affordability of digital cameras, especially high-end models. Manufacturers may need to explore strategies such as localized production or offering financing options to make cameras more accessible to a wider audience.
Shifting Consumer Preferences: Consumer preferences in the camera market are constantly evolving. Manufacturers need to stay up-to-date with these trends and adapt their product offerings accordingly. For example, the growing interest in videography necessitates cameras with robust video recording capabilities.
Camera Market Future Outlook: A Focus on Innovation and Specialization
The Indian camera market future outlook is expected to witness moderate growth in the coming years, reaching an estimated USD 2.4 billion by 2028. We can anticipate a future where:
Artificial Intelligence (AI) Integration: AI features like scene recognition and object tracking are likely to be incorporated into future camera models, making photography more intuitive and user-friendly.
Focus on Specialization: Camera manufacturers are expected to focus on specialized cameras catering to specific photography niches like wildlife photography, astrophotography, and sports photography. This will cater to the evolving needs of professional and enthusiast photographers.
Increased Focus on After-Sales Services: With the growing complexity of cameras, manufacturers may prioritize providing comprehensive after-sales services like training workshops and technical support to enhance customer satisfaction and brand loyalty.
Conclusion: Capturing the Future of Photography
The digital camera market in India is a vibrant and evolving landscape. With increasing disposable income, rising internet penetration, and a growing passion for photography, the market is poised for continued growth. While smartphone photography poses a challenge, dedicated cameras will remain relevant for serious photographers and enthusiasts who value superior image quality, creative control, and specialized features. By embracing innovation, focusing on niche markets, and providing excellent customer service, camera manufacturers can navigate the changing landscape and ensure the future of photography in India remains bright.
You can also read more at: Camera Market Trends, Segmentation and Forecast (2023-2030)
#digital camera in india#Digital Camera Market#digital camera market analysis#digital camera market growth#digital camera market share#digital camera market size#digital camera market segmentation#digital still camera market#dslr camera market#interchangeable lens camera market#mirrorless camera market#digital camera market trends#Top Players#Camera Market Future Outlook
1 note
·
View note
Link
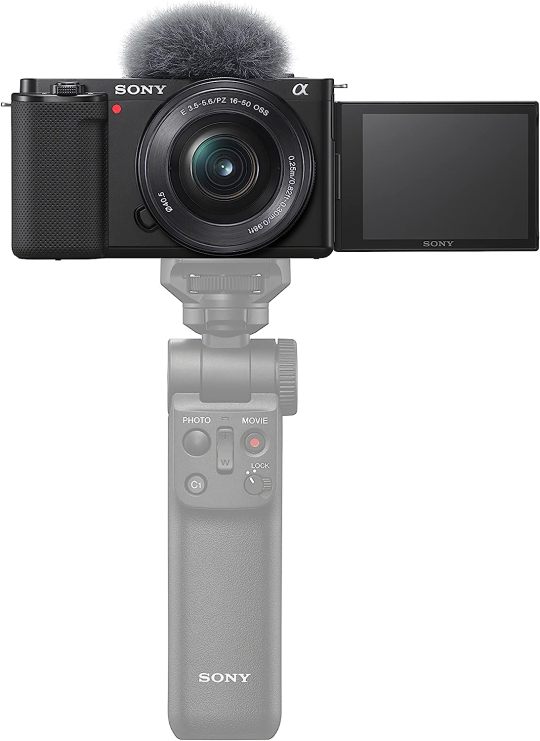
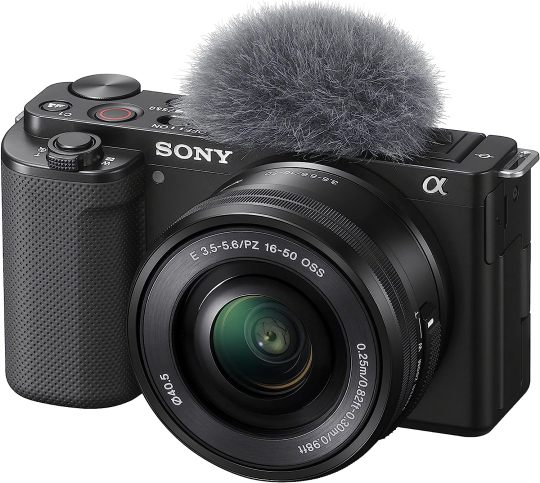
Sony Alpha ZV-E10 - APS-C Interchangeable Lens Mirrorless Vlog Camera Kit - Black - Classified Ad
Large 24.2MP APS-C Exmor CMOS Sensor and fast BIONZ X processor
4K Movie oversampled from 6k w/ full pixel readout, no pixel binning
Product Showcase Setting transitions focus from face to object
Background Defocus button instantly toggles between defocus effect on/off
Easy live streaming w/ single USB cable and no extra hardware/software


Buy at Amazon
#Sony#sony alpha#Sony Alpha ZV#sony alpha zv-e10#Sony Alpha ZV-E10 - APS-C#Vlog Camera Kit#Mirrorless Vlog Camera Kit#Lens Mirrorless Vlog Camera Kit#Interchangeable Lens Mirrorless Vlog Camera Kit#classfied ads
0 notes
Note
Hey! Sorry if you’ve been asked this before, but I didn’t see it anywhere.
I volunteer at an aquarium and often arrive before my shift, in which case I wander around and like to take photos. However, there’s been a problem of my phone focusing on imperfections in the glass rather than the animals, making the photos very blurry. I’m thinking about buying a small camera to fix the issue, is there a specific feature I need to look for or should just about any kind work? Your zoo and aquarium photography always turns out so clean so I was hoping you’d have advice. If not no worries!
What I’ve learned so far is that taking photos of fish in tanks is really dang hard, honestly. I’ve got a good idea of how to get the basics I want for the site now but they’re not like… what I would consider good photos.
You’ve got a couple problems with trying to shoot into tanks that have to be solved around: the acrylic/plexi is thick, and can warp or scratch or discolor; the water itself also creates light refraction and adds distortion to images; not all tanks are well lit, and many are lit with LEDs that have a flicker cycle; tanks are often very shallow, which requires a macro capability, or they’re super deep but anything farther back gets distorted by the water volume; fish are fast little buggers that require a really high shutter speed.
I think your phone is probably focusing too close to you - its software is telling it the salient point of the image is the surface of the tank, instead of the things in it. That’s more common now I think as phone cameras get better and better and the design improvements are focused on close up detail like a flower or a dog nose or a portrait from three feet away.
The current setup I’ve been using is a mirrorless camera with the autofocus software set to detect eyes, prioritize animals, and hold tracking without switching subjects. For fish I rented a macro lens with a big aperture so I could get close-up shots with lots of ability to take in light (35mm RF 1.8 if anyone is curious). That compensated for the fact that I had to use a shutter speed of like, 4000th-5000th of a second to catch moving fish without motion blur - for context I normally shoot birds in flight at around a 2000th of a second. Some tanks were well enough lit that worked with normal settings, but a lot required purposefully overexposing the shots massively and cranking the ISO up to absolutely ridiculous levels.
Point being like… yeah, you can get a nice camera with a good macro lens if it’s important to you to get fish photos. But tbh I don’t know if that’s the best way to do it, and it’s a pretty major investment. I don’t think a point and shoot (anything without interchangable lenses) would have the capacity for the settings I found I needed. I don’t want to discourage you, but I do want to be honest about what you might be looking at!
That said, if you want to play around with the idea, you can always rent cameras and lenses! That’s how I’ve figured out what my daily kit looks like and what I want to buy for different use cases. I will always recommend finding a local store, but if you don’t have one and are in the US, I’ve always had good experiences with the company Lensrentals.
Let me know if you end up trying some new gear, and any other professional photographers please chime in with additional advice!
43 notes
·
View notes
Text
Frogman's Camera Buying Guide
A few weeks ago someone asked if I could recommend an interchangeable lens camera (ILC) to supplement their smartphone photos and hopefully get better pictures of important things like vacations and pets.
I decided to go very extra with my response and due to that... I'm still not finished with it.
I'm worried I am letting this person down because they did not ask for a giant post explaining every detail about cameras in the history of forever.
So I am going to do a camera recommendation post without as much explanation and hopefully I can finish the giant post at some point in the near future.
If you want to take better pictures you are probably going to need a camera with a decent sized sensor, a fast lens, a tripod, and a flash.
The bigger sensor gives you more dynamic range so you can capture brighter and darker things in the photo.
A fast lens has a giant hole in the front that lets in a ton of light. That hole is called the aperture and the bigger it is, the better your photos in dark environments will be. So you will want something that does f/1.8 or f/1.4 (lower f-stop number = bigger hole = more light). This can also help you get a lot of cool background blur.
A tripod will help get you longer exposures without any blur from camera shake. Especially good for landscape photos.
And a flash is for taking photos of pets and other moving subjects when you are indoors and don't have a lot of light. A flash is an absolute game changer for indoor photos.
HOWEVER, never point it directly at your subject.
Point it at a large white ceiling or wall. The flash happens so fast that it freezes motion. It is how I got all of my indoor photos of Otis.
Here he was playing and being rambunctious and he is not blurry.

I used no special settings. I just stuck on a flash and pointed it at the ceiling and suddenly sheep are sticking to things.
Oh, and one other huge benefit of using a flash... you can take much better photos of pets with dark fur. So if you have a cute little void in your home, a flash can help you capture detail in their fur.

Just lift the shadow slider in your image editor and that beautiful fur will reveal itself.
If you get an ETTL or TTL flash, it will output the correct amount of light automatically. You can literally just put your camera in automatic mode, aim the flash at the ceiling, and press the shutter button.
Before I talk about recommendations I want to make one thing very clear.
GETTING A GIANT CAMERA WILL NOT AUTOMATICALLY GIVE YOU BETTER PHOTOS.
Aside from my flash aimed at the ceiling trick, a big boy camera is not a magic solution for better photos. In some cases, you might actually get *worse* photos than your smartphone. You need to learn the basic fundamentals of photography and you also need to learn some basic photo editing skills.
Smartphones employ powerful algorithms and computational processes to make every photo you take look as good as possible.
ILCs say, "Here is your RAW data, you figure out the rest."
You don't have to become an expert, but if you watch this free 6 hour photography course, that will ensure you have the knowledge needed to improve your photos.
youtube
Okay, let's get into the nitty gritty of buying a nice new old ILC.
If you are on a tight budget and cannot afford a fancy mirrorless camera, I would highly suggest a used DSLR. You can get them for very reasonable prices. And unlike just about every other modern technological gadget, cameras and lenses are built to last for decades. So I have no qualms about recommending used photography gear.
However, I do highly recommend using either KEH or MPB, as they have a long trial period and decent customer service. If something goes awry with your used gear, KEH has a 180 day warranty and MPB has a 6 month warranty. So there is much less of a risk than eBay or Facebook Marketplace. You pay a bit of overhead, but the piece of mind is worth it.
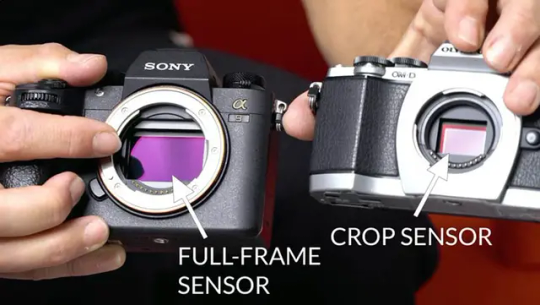
Before I start my recommendations I want to quickly explain the difference between APS-C and Full Frame camera bodies. (For brevity's sake I am going to omit Micro Four Thirds bodies as they are not typically geared toward beginner photography.)
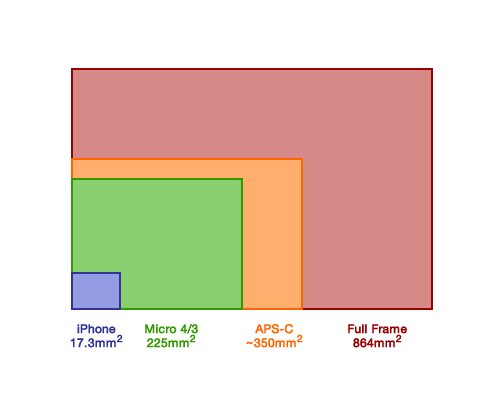
APS-C has a "crop" sensor. It is a bit smaller than full frame and does not perform as well in low light (more noise). However these bodies are cheaper and can still produce great photos. You can see above the sensor is still significantly larger than a smartphone. APS-C adds a 1.5x zoom to all lenses. This can be annoying in small spaces but advantageous for outdoor photography like wildlife and sports. You can use full frame lenses on a crop sensor body (within the same brand). APS-C lenses are usually cheaper but of lower quality.
Full frame has a larger sensor that will give you less noise in low light. It is also much easier to get background blur. Full frame also allows you to work in more cramped spaces. You *cannot* use APS-C lenses on a full frame body. However, the lenses meant for full frame cameras tend to be better quality in general.
If you can save up a little more and get a full frame body, I would recommend it. These bodies used to be geared more toward professional use, but since mirrorless cameras became popular, used full frame DSLRs have become much more accessible to those on a budget. Full frame cameras make it easier to get better results in challenging circumstances. And challenging conditions are really the main area where ILCs still kick a smartphone's ass.
For tight budgets I would recommend the following...
Canon or Nikon APS-C DSLR camera body
50mm f/1.8 lens (Nifty Fifty)
18-55mm APS-C lens (good for landscapes and portraits)
Yongnuo ETTL Flash
There are lenses called "superzooms" which can go from (as an example) 18-200mm or 70-300mm and other crazy focal lengths. That sounds fantastic and very versatile... but these are usually utter shite. You may be tempted to get one of these lenses hoping it can do everything you need, but there are no free lunches in lens land. Unless you are spending many thousands of dollars, the wider the focal range, the worse the lens will be.
When you stick to the 18-55mm range, you can be assured the images will be decent. And if you find yourself really needing a telephoto lens, you can save up and add it to your collection later on. The 18-55 will give you wide angle for landscapes all the way to slightly telephoto for portraits and moderately close wildlife. This lens cannot be used indoors or at night without a flash. Which is why I recommend the Nifty Fifty for that purpose. $100 for a moderately sharp low light lens is a no brainer.
Also, stick to Canon, Nikon, Sigma, or Tamron lenses. You can try exotic 3rd party lens brands when you know more what you are doing. And always make sure the lens has autofocus before buying.
It's hard to give you exact recommendations as used items are not reliably in stock. So I'm going to show you an example of the above, but I am not necessarily saying you should buy this *exact* combination. You might be able to get something similar with Nikon as well.
Canon 60D APS-C DSLR
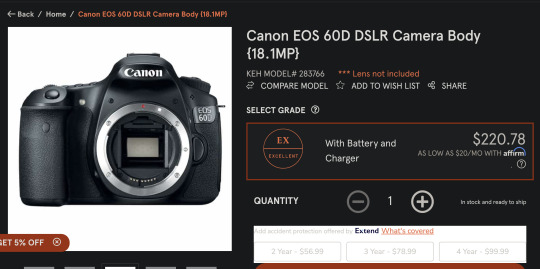
50mm f/1.8 lens

Canon 18-55mm APS-C lens (EF-S mount)

Yongnuo TTL Flash
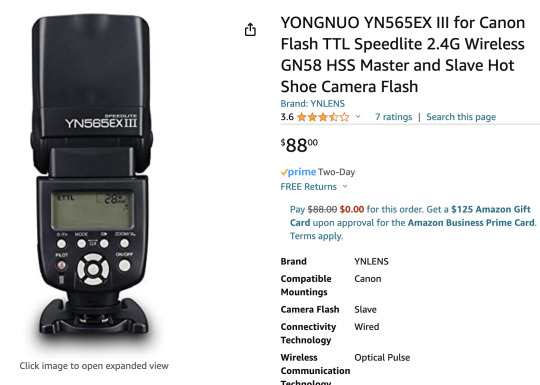
(I wouldn't recommend getting a used flash, as the Yongnuo is already a great price and you can't know if someone used the flash 100,000 times or 20 times.)
Altogether that is about $500. You can start with the 60D and the 50mm Nifty Fifty for $330 and add on the other two items later on.
My recommended full frame setup...
Full frame Canon or Nikon DSLR body
50mm f/1.8 lens (same as before)
24-70mm full frame zoom lens (full frame equivalent to 18-55mm)
ETTL Yongnuo flash (same as before)
And an example from KEH might be...
Canon 6D Full Frame DSLR


Canon 50mm f/1.8 Lens
Sigma 24-70mm Full Frame Zoom lens (EF mount)
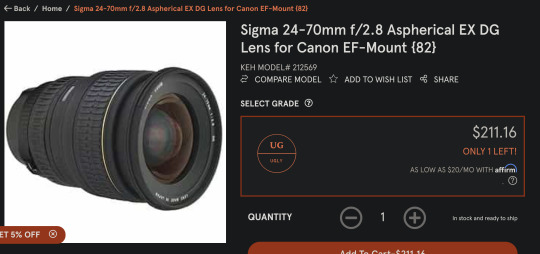
Yonguo ETTL Flash
And that would be about $800 total.
Again, you can start with just the camera and 50mm lens and add the other items later. So invest $500 initially and go from there.
And just to give a Nikon example as well...
Nikon D600 Full Frame DSLR
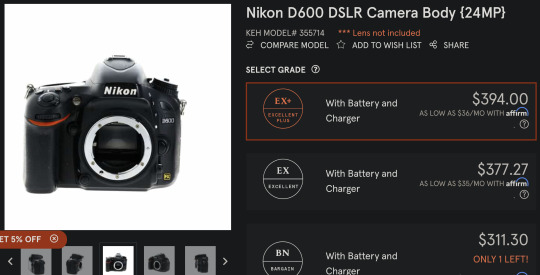
Nikon 50mm f/1.8 Lens
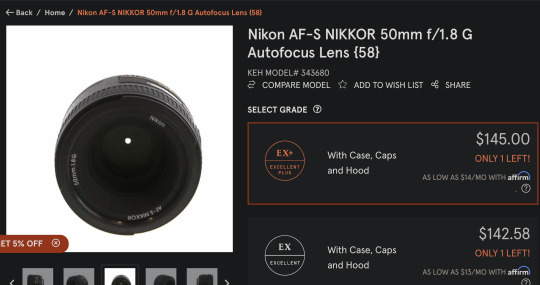
Tamron 24-70mm
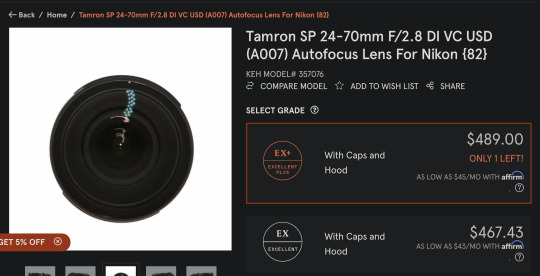

Yonguo ETTL Flash (Nikon version)

I highly recommend researching any camera body and lens before purchase. I can vouch for the items above, but you should definitely check out some YouTube videos before buying.
All of the stuff on KEH and MBP is marked down in price for aesthetic reasons. They do test everything to make sure it is functional. If you care if the camera or lens looks pristine, it will cost a little extra. But if you don't mind if it is beat to hell, you can save some money. Ugly or not, you will get the same photos out of the gear. As I said, photography stuff is built to last for a long time. Almost all repairs are due to user damage and not defects. And usually defects manifest when the product is brand new.
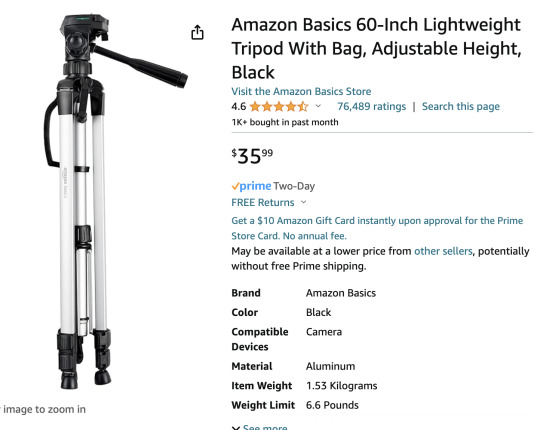
Oh, I forgot about the tripod!
Amazon's $35 tripod is surprisingly decent. It even got a good review on a very picky tripod review site. I recommend starting with this and then upgrading when you know more what you need out of a tripod.
Amazon 60 inch Tripod
I worry I'm leaving out a lot of important information, but hopefully I can expand in the other post I am working on.
That said, if anyone is thinking of buying a camera and you are not sure about the items you selected, please feel free to message me and I will help you assess your choices. Please make sure you include a budget range when asking for buying advice.
I hope that helps. I will try to finish the more in depth post soon. And it will include tips for how to get better photos from your smartphone if you cannot afford an ILC at the moment.
Further resources...
Recipe for Landscape Photos Froggie's Encyclopedia of Lens Terms
204 notes
·
View notes
Text


Website is in the tags!
#zoom in to see the specs#which item poll#pc#camera#photography#photographer#camera stuff#electronics#polls#poll game#random polls#poll blog#gimmick blog#amazon
21 notes
·
View notes
Note
I've been inspired (in no small part due to your photos) to get a camera and start doing some photography. Do you have any tips for a beginner? Good cameras to get, things you wish you had known, that kind of thing? Your photos look so good!
Heyo! Welcome to the photography world! I'd glad I could inspire you a bit.
A few tips I've learned recently:
For buying gear, the actual camera doesn't really matter for beginners. Any camera will take good photos, even old ones.
If you're feeling sociable, go to a local camera store and try out some used camera. Pick one that feels good and fits your budget. Brand doesn't matter.
Last, if you get a camera with interchangeable lenses, spend more on a lens than the body. High quality lenses will continue to be great on newer, better camera bodies & make cheap bodies take amazing photos.
I've got two posts for more tips, check 'em out!
Okay, we've made it to the bottom of the post. My starter camera recommendation has always been a Panasonic G or GX body (GX1, GX7, G7, GX85, or even a G9 or GX9 if you're feeling very spendy) + a Panasonic 25mm f/1.7 lens, which is still one of my favorite lenses of all time.
Prefer a mirrorless camera over a DSLR. DSLRs are cheaper, but harder to learn. You can adapt DSLR lenses to mirrorless if you like using cheaper DSLR lenses.
9 notes
·
View notes
Note
Hey Micheal what camera would you reccomend to some one starting out taking photos & what’s your set up?
Hey!
I'm a firm believer in buying an inexpensive DSLR or mirrorless setup with interchangeable lenses. You don't have to break the bank on a starter setup — just focus on buying a camera with a robust selection of first- and third-party lenses.
My usual advice is to start simple and only upgrade gear once you run into a physical or technical limitation that stops you from realizing your vision. For example, if you're not getting the shallow depth of field you want with your current lens and body, then maybe it's time to consider buying a lens with a larger maximum aperture (e.g., f/1.8 or f/1.4).
I started out with a Nikon D50 and a Nikkor 50mm f/1.8. That served me well for nearly five years, before I started running into technical limitations with the sensor that made shooting night photos difficult. That's when I switched to shooting medium format film for a spell, before ultimately settling on a full-frame Canon digital body. All-in-all, that experimentation period took about 17 years (I'm still not done).
That said, shop used for your first camera. Places like KEH or MPB have a great selection of tested and used gear. I personally shop from MPB. Here are a few great beginner full-frame camera bodies. I'll break out lenses later on in this post.
Why full frame? I think you get superior image quality, better depth of field, better image resolution for printing, and phenomenal dynamic range.
Canon EOS 5D Mark III ($714)
Nikon D750 ($774)
Canon 6D Mark II ($884)
Nikon D810 ($819)
Anyone of these are going to get the job done and then some.
The world of lenses is complicated and varied. You'll have “prime purists” that will tell you to eschew zoom lenses and only shoot prime (a lens with no zoom capabilities). You'll have people that say longer telephotos are all you need. The truth is, you'll find your niche the more you shoot. I prefer prime lenses for their simplicity (and the less I have to think about, the better).
I'll break these out by purpose.
Portraiture
Canon EF 85mm f/1.8 ($259)
Canon EF 50mm f/1.8 ($134)
Nikkor 85mm f/1.8 ($184)
Nikkor 50mm f/1.8 ($78)
Landscapes
Canon EF 24mm f/2.8 IS ($294)
Nikkor AF 24mm f/2.8 ($134)
Multipurpose
Canon EF-S 18-55mm f/3.5-f/5.6 IS STM ($54)
Nikon AF-P DX Nikkor 18-55mm f/3.5-5.6G ($73)
I could go on and on, but this is enough to get you a start in the right direction.
If I were to put together a beginner kit with the above options, I would snatch up the Canon 5D Mark III with the Canon 50mm f/1.8 and the Canon EF 24mm f/2.8 IS. Total cost before taxes and shipping would be $1,142. You would have an incredibly flexible kit that lends itself to portraiture, landscapes, and street work, all for the same price as a new “prosumer” kit with only one lens from Amazon or other big box stores. If you don't know which direction you want to go, or you want to save on cost, there's nothing wrong with swapping out the two primes and grabbing the 18-55mm kit lens for next to nothing. That will at least let you dabble with different focal lengths and see what suits you.
I'm happy to answer any other questions here!
P.S. I shoot with a Canon EOS 6D Mark I and usually have a Sigma 35mm f/1.4 lens mounted on it for street portrait/street landscape work. My other carry-around camera is a Ricoh GR III.
12 notes
·
View notes
Text
My 2023 in Review: Grants, Public Art, and Teaching
With 2024 right around the corner, now’s the perfect time to reflect on 2023 and share a bit more about what I’ve been up to. In terms of making pictures, 2023 is currently in my Top 3 worst years for creating photographic work. This doesn’t mean that everything else I was working on wasn’t photography related, it just wasn’t work for myself. Looking back, this year was all about strengthening my arts connections locally by sharing photography with the community. In no particular order, here’s what I’ve been up to for the past twelve months.
After-school Arts
Since the Fall Semester of 2022, my good friend Tariq Tarey and I have been working closely with a local charter school to develop an after-school photography program. For our first year, we were able to get interchangeable lens mirrorless cameras into the hands of fourteen eager 7th and 8th graders. Each week, we would take an hour to introduce the kids to a different aspect of photography. Throughout the year we managed to guide them out of Auto Mode on their cameras and start “seeing” their photos instead of simply “point and shoot”. By the end of year one students had: photographed a body of work, critiqued and edited their pictures, printed, framed, and entered their photographs into a local art show.
It’s been a long time since I’d worked with middle school aged kids, and to say I was nervous about working with younger students is an understatement. From years of teaching privately via Midwest Photo and One-on-One workshops, teenagers haven’t been my typical clientele. Many of them had no experience with a camera outside of a smartphone, and the idea of a dedicated device for picture taking was completely foreign. To the surprise of Tariq and myself, they picked up the basics at lightning pace. The mechanics took a bit more practice than anticipated, but their grasp of the language of photography was impressive and helped guide their vision. Overall I’m incredibly proud of what our students were able to accomplish in our short time together, and I’m looking forward to 2024 where we’ll be back for a new class of creatives!
Hilltop Cyanotype Day
Each year, the Greater Columbus Arts Council (GCAC) offers financial support to individual artists and arts organizations in the Columbus, OH area in the form of grants. These can range from one-time stipends for artist’s supplies to sustaining grants for arts nonprofits in the area. I’ve been participating in GCAC Individual Artist grants since 2015 and looking through the 2023 opportunities list, there was a new program that piqued my interest. The Neighborhood Arts Connection (NAC) grants are a way for artists residing in a particular Columbus neighborhood to receive funding to elevate and engage the community. And one of the two neighborhoods on the list for early 2023 was the Hilltop, where I’ve been for the last four years. There were two levels of the NAC grant available, $5k and $10k for a neighborhood based art program, so I decided to swing for the fences. I pitched a one-day public workshop where ANYONE would be able to attend free of charge to make a cyanotype print. To my complete surprise, the grant was approved; this was going to be my biggest undertaking of the year by far!
Even as I talk about it in past tense, $10k is a lot of money to spend on any one thing. I’m incredibly grateful that Columbus has an arts organization that’s able to support artists and their communities with grants like this. All of that being said, $10k for a public art event can be tough when accounting for everything that goes into the day. Breaking it down into three core categories, here’s what the budget looked like on my grant application versus what it actually came out to:
Material Resources - $4360 planned, $3878.81 actual
Includes art supplies, consumable goods, first aid supplies, and miscellaneous goods purchased for the event.
Human Resources - $4400 planned, $4682.50 actual
Includes pay for event host (me), eight assistants, and security all at a fair wage.
Event Planning - $1240 planned, $1693.11 actual
Includes space rental, permits, insurance, and event marketing.
So how far did that $10k go? I’m a little biased here, but I think it was enough to make an impact on my neighborhood. On Sunday October 1st, 2023 at Westgate Park, I along with eight other local artists hosted a hands-on workshop where all attendees were able to make their own cyanotype prints, free of charge. No photography experience? No problem! There were 200+ pieces of pre-coated light sensitive materials on-site, with dozens of different stencils and objects to make a unique photogram.
Throughout the course of the day, we had over 130 members of the public join us in making nearly 200 cyanotype prints on: watercolor paper, t-shirts, tote bags, napkins, and a few giant cotton murals! We had folks of all ages in attendance from age 4 - 72, many of which stayed to make extra prints. There were a few photographers that showed up, but a vast majority were Hilltop and Westgate locals that were interested in making something by hand. Any leftover arts and craft supplies that were used from the day made it into the hands of Hilltop art teachers, and two of the giant “snow angel” murals were donated to Hilltop local establishments. Most importantly, no attendees left the event empty handed, and everyone remained safe while having fun experiencing the joy of photography!
There were plenty of hurdles and a lot of lessons learned during the planning and execution of this event. Once I have that all of my thoughts and feelings compiled into an explainer video, I’ll be sure to append this blog post accordingly. For now, here are a couple of galleries of photographs taken on Cyanotype Day by photographers Shiann Banks (below) and Gracie Becker (above), thank you both SO MUCH for your help!
Research & Residency
Working as a freelance photographer is still not something I’m 100% used to yet, but in this second year of not having a 9-to-5 job I’ve started to look at opportunities that were previously out of reach. In previous years I’d see a handful of amazing location workshops and artist in residence (AiR) programs that I couldn’t participate in due to lack of paid time off days. One of my big goals for 2023 was to change this by applying to upcoming AiR programs and explore new grants. The Hilltop Cyanotype Day was one such opportunity afforded by a generous GCAC grant, but I’m happy to report there are a couple more.
Starting in January in 2024, I’ll be taking part in the Winter Residency program at the Penland School of Craft. Penland is an amazing craft school nestled into the Blue Ridge mountains of North Carolina. Each year they host over a thousand students in residencies and workshops of various lengths and disciplines. During those few Winter weeks I’ll be in charge of the photo studio and darkroom spaces at Penland in exchange for some much needed time and access to work on my alternative process photography.
Alongside the Winter Residency at Penland, I’m equally excited to announce that I’ve received a generous grant award from the Ohio Arts Council (OAC) to help fund additional materials and research related to alternative process photography. Combined with my upcoming time at Penland, my aim to is come back to Columbus and spend more time making fine prints throughout 2024. With any luck I’ll be attempting several new-to-me alt processes and be reporting back to you all here on the blog and the YouTube channel.
In retrospect, 2023 was another year defined by photography, just not my own. I wasn’t out making pictures with big sheets of film through an “old timey” as much as usual, but I still had a blast. Thanks to everyone that helped make this past year a meaningful one, and an especially big thanks to the Greater Columbus Arts Council and Ohio Arts Council for helping support my continued photographic projects. Have a safe and Happy New Year, and I hope to share more photography with you all very soon!
#mat marrash#non-profit#gcac#oac#ohio arts council#greater columbus arts council#cyanotype#alt process#alternative process#film photography#fine art#darkroom#artsohio#penland#penland school of craft
3 notes
·
View notes
Text
#I'm really considering dropping serious cash on a real camera @kelila
I can't stress enough, buy second hand. Literally any Interchangeable Lens (aka, dSLR or Mirrorless) Camera made in the last fifteen years is capable of producing excellent quality images.
I have a Nikon D50 (released June 2005), which with a lens, I could probably pick up for under £100, which is perfectly capable of producing images for the web (I've been uploading my photo archives, most of which were taken with that camera, and you wouldn't know it if I didn't list the camera used in each post), it can even do prints up to A4/Letter size with excellent quality, in spite of it being only 6 megapixels.
I recently bought a Nikon D300s (released July 2009, in itself basically the same as the D300 released in August 2007), for £100; adding a decent lens to that would probably make both around £200. Which would give you a 12 megapixel (semi)professional camera that is again perfect for the web and can produce A3/Tabloid size prints with excellent quality.
Again, you don't need to spend a lot to get a good camera. Newer cameras offer higher resolutions, or faster focus, or fancy video features, but if you don't need that then there's little reason to spend the money on them.
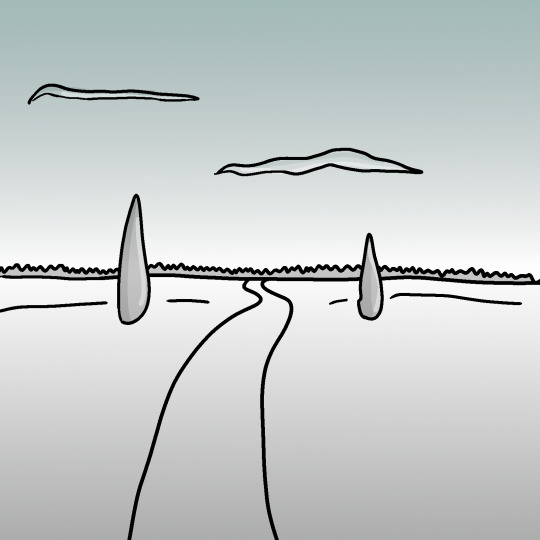
You know that thing where you see a gorgeous view (left) and try to take a picture of it, but your phone camera is a joyless fucking nihilist who refuses to see the beauty in anything and only sees this (right)

#cameras#used cameras#good cameras are cheap these days#of course depending on your local used market#and whether you're willing to buy used online#but yeah you don't need the newest cameras on the market#to get good images
83K notes
·
View notes
Text
Fujifilm's X-E5, New Bose Speakers, and Qualcomm's Smart Glasses Chip—Your Gear News of the Week
Fujifilm announced a new camera this week, the X-E5, the latest in its X-E rangefinder-style mirrorless camera series. Think of the X-E as an interchangeable lens version of the X100. The big news in the X-E5 is Fujifilm’s latest 40-megapixel APS-C sensor and 7-stop in-body image stabilization (IBIS). This is the first X-E series camera with IBIS, which Fujifilm says will gain you about 7 stops…
0 notes
Text
Sony Alpha ZV-E10L White Model now available on Amazon India comes with 16-50 mm Lens
Product Package: Sony Alpha ZV-E10L White 24.2 Mega Pixel Interchangeable-Lens Mirrorless vlog Camera with 16-50 mm Lens, Made for Creators | APS-C Sensor | Advanced Autofocus | Clear Audio & 4K Movie Recording Sony Alpha ZV-E10L has been available in India for a while now in Black. The current lowest price for this Best Seller product on Amazon.in is ₹58,489. Sony has now listed a White version…
0 notes
Text
Asahi Pentax 6x7 Camera
When I started photography, I used an older Univex Twin Lens Reflex-style camera that my uncle gave me when I was around 8-9 years old. From there, palling around with my buddies, that camera was too big and bulky to bring around with us. So, I opted for the smaller, more compact 35mm camera, which I could keep around my neck and under my coat when it was colder outside.
The Pentax 6x7 cameras have always held a special place in my heart, perhaps due to their unique blend of size and resemblance to a larger 35mm camera. While I still cherished the Twin Lens Reflex style, there was an undeniable elegance and familiarity about the Pentax 6x7 cameras. The interchangeable lenses and finders were reminiscent of the Nikon system I had grown to love in my later teen years.
I purchased my Pentax 6x7 camera a few years ago at an online auction. It appeared to be in good condition, and its camera is complete with the TTL finder, standard 105mm lens, wood handle, and Pentax-branded strap, all wrapped up in a wonderful cube-shaped case that it all fits nicely into. I noticed a pouch on the top portion of the case. There were a few accessories in it that the seller didn't show, so when I received the camera, an external battery holder, and covers for the finder, A focus grip was included in the kit. Now it's time to look at the Pentax 6x7 manual to double-check all the ins and outs of the camera.
The Company:
The history of Pentax cameras is deeply rooted in the evolution of photographic technology, with a legacy that spans over a century. Pentax began as Asahi Optical Joint Stock Co., founded in 1919 in Tokyo, Japan. Initially, the company produced lenses for eyeglasses and later expanded into camera lenses and optical equipment. Not until after World War II did Asahi make its mark in photography.
In 1952, Asahi released its first camera, the Asahiflex, the first Japanese 35mm single-lens reflex (SLR) camera. This launch marked a significant milestone for the company and Japan's emerging camera industry. Asahiflex featured innovative mirror-return mechanisms that set the stage for modern SLR design.
The turning point came in 1957 with the release of the Asahi Pentax, which gave birth to the Pentax brand name. The camera combined the best features of previous SLRs. It introduced a pentaprism viewfinder, allowing photographers to see their subject right-side up and laterally correct. It also standardized the use of the M42 screw mount, which would become a popular lens mount for decades. The success of the Asahi Pentax was so profound that the company eventually adopted "Pentax" as its corporate name.
Throughout the 1960s and 1970s, Pentax established itself as a leading manufacturer of SLR cameras, competing with brands like Nikon and Canon. They moved into the medium format by introducing the Pentax 6x7 camera. Iconic models like the Spotmatic series (launched in 1964) introduced TTL (through-the-lens) metering, significantly improving exposure accuracy. Pentax cameras became known for their durability, reliability, and affordability, making them popular among professionals and amateurs.
In 1980, Pentax expanded the medium format market with the Pentax 645, which offered larger film sizes for high-resolution photography. These systems were found to favor studio and landscape photographers.
Pentax transitioned to digital imaging in the early 2000s with models like the Pentax istD. It later gained attention for its weather-sealed DSLRs and in-body image stabilization. In 2011, Ricoh acquired the brand, becoming Pentax Ricoh Imaging Company.
Today, Pentax focuses on traditional photography experiences, emphasizing optical viewfinders and rugged build quality in an era dominated by mirrorless technology. Their commitment to DSLR development and legacy lens compatibility maintains a loyal following, preserving the Pentax name as a significant part of photographic history.
My Camera:
Researching the Pentax 6x7 camera for the article revealed three upgrades to the original Pentax 6x7 camera when it was introduced in 1969. The Pentax 6x7 camera was shown at the 1966 Photokina as a prototype camera, and it was called the Pentax 220 and had chrome and black bodies. The official introduction was in 1969, with the name Pentax 6x7, and only black bodies were available. The Honeywell Pentax 6x7 was available for the US market, but here in the US, I rarely see the Honeywell Pentax 6x7 around; the vast majority were Asahi Pentax 6x7.
In 1976, the Pentax 6x7 (MLU) camera added a mirror lock-up mechanism, and in 1990, with their third modification, they made a few minor cosmetic changes to the camera. Now, the camera is named Pentax 67. No more 6x7. The fourth change camera in 1999 was when Pentax launched the Pentax 67II camera, which offers a built-in right-hand grip, a brighter viewfinder with interchangeable focusing screens, a more advanced AE metering system with three different modes, a dedicated time mode switch, a self-timer, and multiple exposure capabilities.
I own the Asahi Pentax 6x7, so mine is the second-generation camera with the mirror lock-up capability. The camera weighs a whopping 5 lbs. 5 oz without the wood grip. The camera is 7.5" wide by 6" tall by 6.75" deep, measuring from the back of the camera to the front of my 105mm f2.4 lens. The Pentax 6x7 cameras have a dual bayonet lens mounting system, with lenses from 35mm to 300mm fitting inside the body, similar to many 35mm cameras and lenses from 400mm to 1000mm mounting on the outer bayonet. Even the front lens cap has a bayonet mount on my camera, so it's not a clip or press-on style of a lens cap.
The Pentax 6x7 camera is a fully electronic camera system. The entire camera is dependent on the PX28, 6v battery. The meter, or the shutter, won't work without the camera battery. After putting in the battery, I discovered the metered finder was working, which was good news. At first, I thought it wasn't working, but after reading the manual, I learned that you need to remount the lens once the meter is removed so the lens will couple with the meter. I didn't think it would work because there is a crack on the front running across the nameplate, but you never truly know until you try. With the fresh battery in the camera, I still wasn't sure the camera was working because there needed to be film in the camera for the shutter to fire.
Looking online, I did find a video showing a way to trick the camera into thinking there was film in the camera, which is by opening the back of the camera and, before closing the back, turning the frame counter to just past the first frame while holding the frame counter there and closing the back of the camera allows you to wind and fire the camera. The only issue is that there is no way to honestly tell if the shutter is opening or closing when you depress the shutter. You can tell at slower speeds by taking the lens off and looking into the mirror chamber to fire the camera. If you can see the film's pressure plate, you can tell if the shutter is opening and closing. What do you do to achieve faster shutter speeds?
Looking online, I did find a way to trick the camera into thinking there was film in the camera, which is by opening the back of the camera and, before closing the back, turning the frame counter to just past the first frame while holding the frame counter there and closing the back of the camera allows you to wind and fire the camera. The only issue is there is no way to honestly tell if the shutter is opening or closing when you depress the shutter. You can tell at slower speeds by taking the lens off and looking into the mirror chamber to fire the camera. If you can see the film's pressure plate, you can tell if the shutter is opening and closing. What do you do for the faster shutter speeds?
One thing I did was use my cell phone in video mode and use the "slow motion" setting. I started the video and then tripped the shutter. I could then go back to the video and look at a few of the frames of the video tell if I could see the slit from the shutter move across the film plane. It did, so I knew the shutter was working on all shutter speeds. That's fantastic, so now I was good to go. I prefer to use my Sekonic meter for all my metering needs as they are always more accurate than most camera meters.
Shutter speeds on the Pentax 67 camera range from 1/1000 to 1 sec. Along with "B" for timed exposures and "X" for flash sync, the shutter speed dial is on the far left side of the camera body and is turned with a large ring that is easy to grip and move. Just below the shutter speed dial is a battery check button, with a red light lighting up just to the right of the shutter speed dial if the battery is good.
Moving around the camera, on the front and the left side of the camera body are the flash sync terminals for both FP and X, and just below the flash terminals is the lens release knob, which needs to be pressed towards the camera's body to unmount the lens. To unmount the lens, press the lens release button and twist the lens counterclockwise. To mount the lens onto the camera body, line up the red dot on the lens to the red dot on the camera body and turn clockwise until the lens clicks into place.
The mirror lock-up switch is on the other side of the camera body, still on the front. Pressing this switch locks the mirror up to reduce vibration in the camera, which is good for longer exposures or using longer lenses that are more sensitive to camera movement. On the far right side of the camera body is a switch for using either 120 or 220 film.
The film advance lever is on the top, far right side of the camera, with the frame counter inside the center of the winding lever. There is a serrated dial that you can turn to change the frame counter if needed. This is also the knob that I turn to trick the camera, as mentioned previously. Right next to the film advance lever is the shutter release button, which can be locked by turning the outer ring from the white dot to the orange dot to "locked."
On top of the meter, a finder is an on/off switch used to turn the meter on. Two silver buttons must be pressed on either side of the camera body to remove the finder and put on a different finder. You can lift the finder off the camera body to replace it with a few different viewfinders available for the camera. The metered finder extends over the shutter speed dial, so when metering, you can change shutter speeds to adjust the meter settings.
To load film into the camera, pull down on the silver tab on the left side to open the back door. Two locking switches are on the bottom of the camera, just under where the film reels go. These need to be unlocked, allowing you to pull them down to load the take-up and fresh roll of film into the camera body. Once the film is in the camera, turn them to the locked position to keep them in place. Bring the leader to the take-up spool, thread it into the slot, and advance the film to start the film advance. Bring the arrow on the film leader to the arrow next to the 120 at the top of the shutter curtain, close the back, and wind until the camera stops. You're now at frame 1 and ready to take 10 photos on a roll of 120 film.
I wanted to put the wood handle on the camera before I took the camera out for a spin and tried it out. I always thought it was odd to have a grip on the camera's left side, as it's the left hand that I cradle under the lens for focus and setting the aperture. Let's give it a try because so many people think it's a great selling point for the camera. The wood handle also has a cold shoe for a flash attachment or other items you might want to put, like an external meter.
To put the handle on the camera, you need to unscrew the locking screw, which is located in the middle between the two areas that fit onto the camera lugs, which are on the top and bottom of the left side of the camera. Snap the handle into position and screw down the locking screw to lock the handle into position, which also presses a small knob on the camera in. To take it off, unscrew the knob and pull out the knob and slide the handle up to take the handle off. The handle won't fit on the right side.
The camera has four lugs located on the front and in each corner. These can be used for the camera strap to carry the camera vertically or horizontally or to put the wood handle on one side and the strap on the other. There are many ways to carry the camera comfortably while lugging 5 pounds around.
My Results:
This time, I walked through the neighborhood, taking a few photos. While I was taking my normal photos, I ran into a good neighbor who is an artist. He was showing me his studio, so I took a picture or two around his studio, then proceeded to take some of the regular photos I do when trying a new camera.
Here are the results of my walk through the neighborhood.
Conclusion:
I had a lot of fun shooting with this camera, considerably more than anticipated. I used the wood handle more as a tool to walk around with the camera than to shoot with it because it made transporting a 5-pound camera easy. I had the strap on the camera, but found the handle easier.
My lens is very sharp, and the camera felt comfortable in my hand. The focus was smooth and accurate, the transport was soft, and all the camera operations seemed effortless.
I'll need to look into other lenses for the camera and possibly a few other accessories, as this is a keeper camera for now.
Thank you for taking a few minutes from your day to read about a fun and extensive camera system to use.
Until next week, please be safe.
Here's a link to my other camera reviews if you want to see some of the other cameras in my collection.
If you're interested in some of the vintage cameras and accessory items I have for sale, please look at my online store:
#camera#camera collecting#Camera for fun#cameras from japan#japan#Japan#japanese camera#made in japan#camera from Japan#Pentax#Asahi Pentax#Pentax 67#Pentax 6x7#Asahi Pentax 67#Asahi Pentax 6x7#6x7 format#6x7 format camera#6x7 film format#film shooter#Film#film#fun with film#film camera#film camera collector#film camera collectors#film in camera#film photography#120#120 camera#120 film
0 notes
Note
Hi Froggy,
I hope you've been well! I wanted to reach out and first say that you inspired me many years ago to rescue a corgi! She was a grump, I think she may have taken her name (Elphaba) too literally. She recently crossed the rainbow bridge, but she was such fun and a joy. I hope our pups are playing together, somewhere peaceful.
I have a question unrelated to stumpy Corgis. I'm a veteran birth doula and an aspiring birth photographer! I've been trying to research cameras, lenses, and all sorts of technical stuff. I'm leaving towards purchasing the new Nikon ZF, because of the purported low-light capabilities.
Lenses are throwing me completely.
Do you have any guidance or resources to help a newbie like myself? Not really looking for an in-depth answer (I know how complicated things can get), but maybe a general push in the right direction?
If you don't want or can't answer, no hard feelings! I enjoy just seeing your posts on my dash and I hope the rest of your year is amazing and calm!-Steph
(continued...)
My budget is pretty flexible, since I am an independent contractor the expense would be tallied towards my taxes. But that being said, maybe $1-3k? I know it's important to invest more into lenses!
Usually, I am in a hospital, and lighting is extremely variable. I would be shooting mostly in low-light before baby is born. During delivery and after there is usually a spotlight or fluorescent lighting. The low lighting is exactly why I was looking at the new ZF, but if you have suggestions on that too I'm happy to hear them!
It's very cramped when the baby is born, most medical and support staff are clustered around the laboring person.
Warning! A lot of birth photos will have baby crowning or blood. It's a messy business, so I don't want to trigger you if you're sensitive to those sorts of images.
I will not be able to be directly next to the laboring parent, more than likely I'll be a few feet away, possibly behind the parents or standing on a stool.
After the baby is born, I'll be able to get closer to both parents and baby!
Here's a portfolio that is close to what I would like to provide (once again TW for blood and crowning):
https://www.sarahginderphotography.com/birth-photography-north-new-jersey
I cannot thank you enough for any help or advice, this whole endeavor is like learning a new language!
----------------------------
Note from Future Froggie...
I went way overboard on this response, as usual. I have decided I'm going to break it up into 3 parts.
First, an encyclopedia of lens terminology.
Second, a camera and lens buying guide.
Third, practical advice for shooting in cramped rooms with tricky lighting conditions.
While this will be geared towards the original ask, I think this could be helpful to a lot of people. So, let's learn about lenses!
--------------------------
Lenses throw everybody, just because there are so many options. It can be overwhelming to look at a picture like this and wonder what will suit you best.
It's a lot of pressure too, because lenses are more important than the camera in a lot of ways. Interchangeable lenses are probably the biggest advantage big cameras have over smartphones these days.
But I think I can help get you up to speed.
The following terms are photospeak you might hear in camera and lens reviews and if you aren't familiar with them, it can make it difficult to figure out what camera and lens to purchase.
I tried to put these in an order that makes sense, but some terms relate to other terms and you may have to read the list twice to make sure you understand how everything mushes together.
Froggie's Encyclopedia of Lens Terms
Lens Mount
Every camera has a specific lens mount. Sony calls theirs the E Mount. Nikon has the F Mount (older) and the Z Mount (mirrorless). So you need to make sure the lens you are looking at is compatible with the mount on your camera.
Mirrorless cameras all upgraded to a mount with a "short flange distance." Going without a mirror allows the lenses to be closer to the sensor.
Long story short... Short flange distance = easier lens design = sharper/lighter lenses.
However, if you want to use older DSLR lenses, there are adapters for Nikon and Canon that allow you to do that.
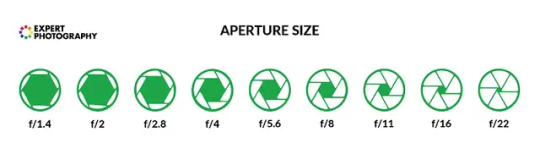
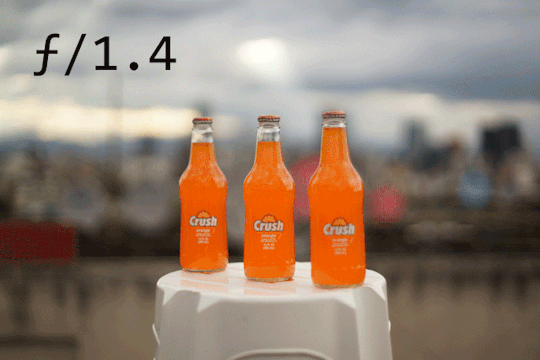
Aperture
"Aperture" is an opening at the front of the lens. It gets bigger to let in more light or smaller to restrict light.
Wider apertures have a shallower depth of field, causing blurry foregrounds and backgrounds outside the plane of focus. Smaller apertures expand the focus area to keep more stuff from being blurry, but they let in much less light and are difficult to use in dark environments.
Aperture can be a creative decision or it can be a technical decision or it can be a mix of both. If you need a blurry background, use a wider aperture. If you need everything in focus, use a smaller aperture. If you need more light in a dark scene, open it up.
F-stop
"F-stop" is a number representing how big the aperture is. A lower number is a bigger hole. Higher number is a smaller hole. It is helpful to memorize f-stops as they are not easily divisible. Cameras generally allow third stops, half stops, and full stops.
These are all a "full stop" apart.
Stop Down/Open Up
When someone says to "stop down" a lens, they are telling you to make the aperture smaller or use a higher f-stop number.
If they say to "open up" they are saying to make the hole bigger or lower the f-stop number.
Depth of Field (DoF)
Depth of field refers to how much of the photo is in focus. Things in front of the plane of focus will get blurrier and blurrier and things behind the plane of focus will get blurrier and blurrier. A shallow depth of field means only a tiny sliver of your image will be in focus. A deep depth of field means almost everything will be in focus.
The wider the aperture, the shallower the depth of field.
The smaller the aperture, the deeper the depth of field.
Focal Plane or Plane of Focus
The focal plane is the sharpest point within the depth of field. You can imagine an imaginary section of 3D space where things within the depth of field are sharp and things outside are blurry. The farther away from the focal plane, the blurrier they will get. But the focal plane is not always dead center of the depth of field.
Typically, at close distances, things will be sharp half in front of where you focused and half behind where you focused. As things get farther away, that changes to more 1/3 in front and 2/3 behind. The ratio changes even more at greater distances, but the 50-50 and 1/3-2/3 ratios are typically what photographers try to remember.

Shallow Depth of Field
The focal plane is something you need to be very aware of at close distances with a wide aperture—as the depth of field can end up as a tiny sliver.
Let's say you are only a few feet away from a baby and you have the aperture set at f/1.2. You focus on the nearest baby eye, and then you notice its ears and nose are out of focus.

The plane of focus and shallow depth of field are causing this issue. This might be a worthy compromise if you are in a dark room and your ISO is very high and you are worried about too much noise.
However, if you can use a flash or some kind of lighting, you can stop down your lens and increase that depth of field around the focal plane.

Bokeh
Bokeh is the quality of the blurriness. Some people are more obsessed with how good the blurry parts of the photo are more so than the in focus parts. Bokeh is typically judged by "bokeh balls" which are just out-of-focus lights in the background. While I like attractive bokeh balls as much as the next photographer, I will admit this is one of the sillier aspects of photography.
Field of View (FoV)/Angle of View
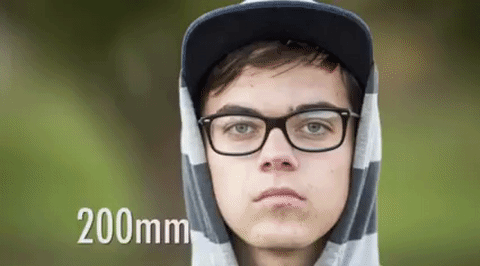
This is how much stuff you can fit in frame at a given distance. Wide angle lenses can fit more stuff in at a shorter distance and telephoto lenses can fill the frame with stuff that is farther away. The focal length of the lens determines the field of view. The focal length is designated by millimeters and the field of view by degrees.
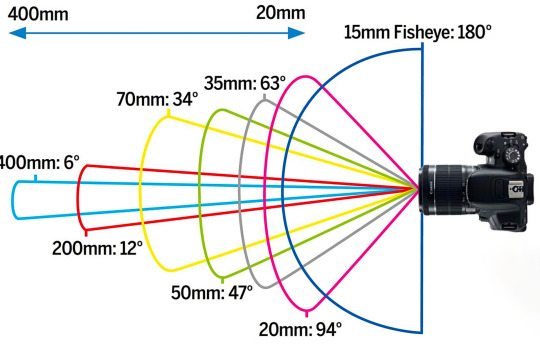
Focal Length
Technically, this is "the distance between the lens's optical center and the camera's sensor."
In simpler terms, this is how you determine the field of view of a given lens.
A short focal length, like 10mm, will have a wider field of view. You have to be very close to your subject to fill the frame with them.
And a longer focal length, like 500mm, will allow you to fill the frame with your subject from farther distances.
Typically all lenses are designated by their focal length. If someone says, "Hand me the 50" they mean a 50mm lens.
35mm Equivalent
Not every camera has the same sized sensor. So when we talk about lenses, we need a reference to help us understand how a given lens will behave. A 50mm f/2.8 lens does not have the same field of view or depth of field when placed on different sensors. So, we need a standard for comparison.
The standard that is used is the "full frame" sensor which is roughly the same size as a 35mm piece of film.
Anything smaller is considered a "cropped sensor."
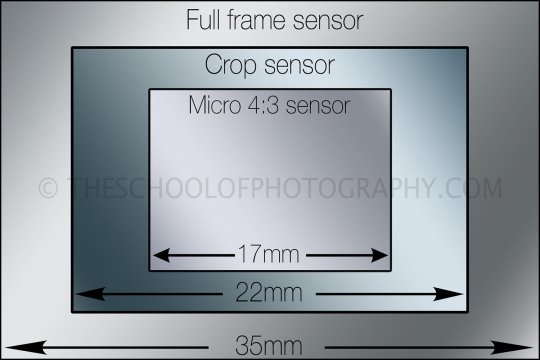
Those cropped sensor cameras have a "crop factor"—a simple multiplier that helps you understand how lenses compare. And when you use this multiplier it tells you the "35mm equivalent."
Confused yet? Yeah, sorry, it would be easier if camera manufacturers chose metrics that didn't change depending on the sensor, but this allows them to make their cameras and lenses seem more impressive in the marketing.
There are two main cropped sensors for ILCs. (Interchangeable lens cameras.) APS-C and Micro Four Thirds. They have a "crop factor" of 1.5x and 2x respectively. The Micro 4/3 sensor is half the size of Full Frame, therefore it has a 2x crop factor. And when you apply this crop factor to the aperture and focal length you can determine how a lens will behave.
For example, a 50mm f/2.8 lens on a micro 4/3 sensor would behave the same as a 100mm f/5.6 lens on a full frame—as 100mm is 2x 50mm and f/5.6 is 2 stops above f/2.8.
As you can see, the Micro 4/3 lens is not going to do as well in low light. The iPhone boasts an aperture of f/1.8 on its main lens, but when you figure out the 35mm equivalent, it's more like an f/8 lens.
I went to all the effort to explain this because it demonstrates that larger sensors allow you to work in cramped spaces with less light. If you want to use a 50mm in a hospital room, you probably can on a full frame. But on a Micro 4/3 you might need to be out in the hall because your lens is acting like it is 100mm. So the Zf would be a good choice in this regard.
Camera Shake
This is the bad kind of blurry. Humans are not tripods, so when you are handholding a lens, you need to make sure your shutter speed is fast enough to freeze the action of your image. Camera shake is very easy to control on wide angle lenses and very difficult to manage with telephoto lenses.
Reciprocal Rule
The reciprocal rule states that in order to get sharp photos without blurry camera shake, you must set your shutter speed to 1 over twice the focal length of your lens. So if you have a 100mm lens, you need to set your shutter speed at 1/200 to be safe.
This rule breaks down at a shutter speed of 1/50 if there is anything moving in your image. So if a dog is running or a car is driving by, it will have a motion trail, but at least it won't be due to your shaky hands.
Image Stabilization
This is a feature some lenses have that helps reduce camera shake. Image stabilization can counteract shaky hands and let you get sharp photos with a much slower shutter speed. Newer cameras have sensor stabilization which does the same thing. And if you pair up a stabilized sensor with a stabilized lens, it is almost as effective as using a tripod.
Stabilization is measured in stops. You might hear a lens has 4 stops of stabilization. That means you can handhold the lens and not get camera shake with a shutter speed 4 stops below the reciprocal rule. So for that 100mm lens, that 1/200 becomes roughly 1/12. And if your sensor has 4 stops, you could handhold a shot for nearly a second without any shake.
However, at shutter speeds that slow, if anything in the frame is moving, they will probably have motion blur. But for still life scenes, or maybe a sleeping baby, this can be very handy if you don't have a tripod with you.
If being able to handhold at lower shutter speeds seems important, then you might want to seek out a lens with stabilization and pair it to a camera with sensor stabilization for maximum stable-osity.
Lens Compression
Lens compression is kind of a myth, but I think we still call it compression because it is easier to explain to beginners than optical physics. The lens doesn't really compress anything, it's actually a matter of distance and the aforementioned physics. But I'm going to go with the easy explanation for now.
Lens compression is a phenomenon seen with different focal lengths. If you take a photo with a 500mm lens, the background will seem to compress with the foreground. Thus objects in the background will seem much larger in size.
This also happens with faces.
Wider lenses exaggerate distance. At 10mm, the lens would only be a few inches away from someone's face.
From the lens's point of view, the ears are several times farther away from the lens than the tip of the nose. So the lens is like, "Your ears are really far away! And far away things are really small, right?" So the lens gives us a big nose and small ears and makes us look a bit alien.
But at 100mm, the lens will be several yards away.

From this perspective, the lens feels like your ears and your nose are nearly the same distance away. And the lens is now like, "Things that are the same distance away do not get bigger or smaller." The lens seems to compress or flatten the face, causing a more flattering appearance in the image.
Minimum focus distance
This is sometimes called the working distance. This is how close you can get to your subject while maintaining focus. If you get too close, your camera will just hunt and freak out perpetually until you back up and it can lock on again. This isn't always advertised prominently for lenses, so you need to make sure the lens will be able to focus in the space you plan to use it.
Extension Tubes
Sometimes called "macro extension tubes." These are spacers you put between your camera and lens to decrease the minimum focus distance. In some cases you can even turn a normal lens into a macro lens. These tubes are able to stack and the more you put on, the more into the macro realm you can go. They come in smart and dumb versions. The dumb ones require you to manual focus whereas the smart ones can still use the autofocus system. I highly recommend the smart ones, as they are not too much more expensive.
Lens Imperfections
There are a few imperfections that can plague all lenses and their quality is sometimes judged by how well they mitigate those imperfections. Here are some of those attributes.
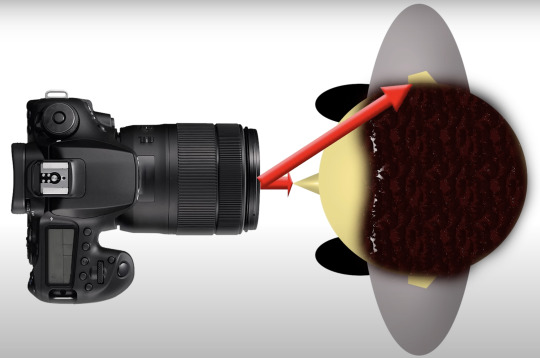
Lens Distortion
As lenses get wider, they allow a larger field of view by accepting light rays that are coming from the side of your lens. Let's look at this image again.
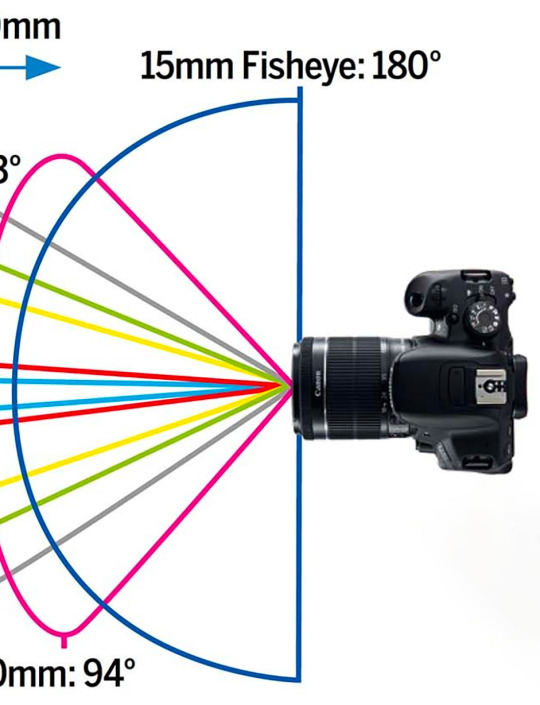
Your lens then has to correct those rays and send them to a square, flat sensor. If you look at the 180 degree fisheye, that entire arc has to be flattened and made square. And as good as optical engineering has become, the wider the lens, the harder it is to keep the image from distorting.
This is typically called "barrel distortion." Minor distortion can actually be corrected in editing software. Every lens has correction algorithms. Though sometimes it is best to embrace the distortion, like on a fisheye lens. Make the distortion a feature and not a bug.
Chromatic Aberration
This is the fancy name for color fringing. This is a defect in the lens that cause false colors to contaminate certain objects in a photo. Typically this happens around dark skinny things against a bright background, such as tree branches.

Modern lenses have nearly eliminated this, except for the super cheap models, but if you do end up with fringing, this can be easily corrected in Lightroom or Photoshop. And many lenses even have that correction built in and all you have to do is check a box.
Sharpness
You might not think of sharpness as an optical flaw, but no lens is perfectly sharp. And the quest to make a perfectly sharp lens involves engineering those optical flaws to a minimum.
A "sharp lens" is one with incredible fidelity. Even zoomed in beyond 100%, sharp lenses will show great detail. If you can't get close to the subject and need to crop your photo later, having a sharp lens can make up for the loss in resolution—as you can upscale without much loss in quality. If you plan to make large high quality prints, a sharp lens will help more than tons of megapixels.
That said, if you truly want to get the most out of a high megapixel camera, a sharp lens comes in handy here too. A smartphone may boast in the marketing as having 200 megapixels, but it has a tiny plastic lens. So even though it technically has 200 megapixels on the sensor, the lens will give it the equivalent of maybe 8-10 megapixels worth of detail. People forget, the lens has a resolution as well, and if the lens cannot resolve 200 megapixels, you aren't going to get a 200 megapixel image.
A sharp lens will allow for more detail than higher megapixels. In some cases you need to double or triple the number of pixels to see an increase in detail. Whereas you can put a super sharp lens on a 12 megapixel camera and blow any smartphone out of the water.
And if you put a sharp lens on a 50 megapixel camera, you can almost see into skin pores.
So... sharp = more detail. And more detail gives you greater cropping power for when you can't get close to babies.
Now, I am obligated to say that some photo nerds chase sharpness as if it is some holy grail. They need the sharpest lens so all of their pixels are perfect at 100% zoom even though no one ever looks at an image that close. There are amazing photos that have been blurry. There are amazing photos taken with 50 year old vintage glass. Sharpness is just another tool. If you need to crop. If you need to upscale. If you need to print large... it is a great help. But nearly every lens made for a modern mirrorless camera is "sharp" to some degree.
So, if you need extra sharpness for certain situations, do your research and find a lens that is sharp as can be. But sharpness should be like 8th on the list of priorities.
Soft Lens
A "soft" lens is how a non-sharp lens is referred to. Most modern optics for mirrorless cameras have some degree of sharposity.
Sharpitude.
Sharp...ness.
So you don't need to worry too much about getting a detrimentally soft lens unless you go super duper budget. This is why I usually recommend people skip the "kit lens" unless they absolutely can't afford anything better.
Though sometimes people purposely get vintage lenses because they don't like sharpness and prefer the "character" of older lenses. The imperfections can achieve a different artistic goal. Though this can also be achieved through lens filters... or Vaseline.
I'm looking at you, Barbara Walters.

Sharpness at the Corners
When I read that in my head just now I said it the same way I do "Panic! at the Disco."
Engineers will prioritize sharpness at the center of the lens since that is where most of the interesting stuff tends to be. But also, the light rays at the center tend to be the most parallel as they head to the sensor, so they don't need as much correction. The rays coming from the sides have to be bent and manipulated to correct for distortion, so keeping things sharp at the corners can be a challenge.
Now, knowing that, and knowing how the aperture works, you can infer that when you stop down your lens and make the hole smaller, all of the light rays are constricted to a smaller area. This makes them easier for your lens to deal with, so if a lens has problems with corner sharpness, you can usually stop down to improve this. So if a lens is soft at the corners at f/1.8, you might be able to go to f/2 or f/4 to get better results.
Vignetting
Vignetting is a circular area of darkness at the perimeter of your photo. This is another side effect caused by the same things as soft corners. When correcting those non-parallel light rays, it causes them to travel an ever so slightly farther distance getting to your sensor. And the inverse square law tells us that light becomes dimmer as it travels longer distances.
This is very easy to correct. Usually your camera has a setting to correct vignetting if you are outputting JPEG files. And if you are shooting RAW photos, your editing software should have a check box to fix the vignetting—usually the same one that fixes chromatic aberration. This is usually called "lens correction" in most menus.
Also, same as with corner sharpness, stopping down your lens will usually fix this optically rather than with software algorithms.
Contrast
Contrast is probably the most important attribute to determine lens quality. Good contrast can make a soft lens look good. But lens contrast is not always consistent. It can get better or worse depending on the lighting in your scene.
The best way to test the contrast of a lens is to take a picture of something that is backlit. A person with the sun behind them is a great indicator. If they have no light on them, the person should fall into inky darkness. But if a lens has poor contrast, they will seem like a faded gray.
Focus Breathing
Focus breathing is a phenomenon where your focal length changes depending on how far away your subject is. It's usually not a big deal and most people don't even notice it, but if you ever do video, it can cause a few headaches. Some people can get annoyed because they feel they aren't getting the advertised focal length on the lens they bought. Like, if you get a 300mm lens and it only goes to 250mm for things super far away, that can be annoying.
This video explains it in detail.
youtube
Lens Types
Prime Lens
A "prime lens" has a fixed focal length and cannot be zoomed. Typically prime lenses are "faster" (wider max aperture) and sharper. Weirdly they can be very inexpensive or the most expensive. They can be extremely lightweight or weigh a ton. And if you want the sharpest lens possible or the fastest lens possible or both, it will be expensive and heavy.
Having at least one fast prime is usually recommended for any professional photographer.
Zoom Lens
A "zoom lens" allows you to zoom. Obviously. But there are few that go below an aperture of f/2.8, so less light gathering and you sacrifice a bit of sharpness. However, if you don't know how much space you will have to work with, the flexibility of a zoom can be invaluable.
Be warned, while a cheap prime lens can still take fairly good photos, cheap zooms are usually pretty terrible. There are plenty of reasonably priced zoom lenses to choose from, but if the price seems too good to be true, I would trust that intinct.
Wide Angle Lens
A "wide angle lens" is any focal length below 35mm. Wider focal lengths allow you to get more stuff in the photo at shorter distances. A theme you might notice with photography is that every benefit has a compromise or consequence to go with it. Wide angle lenses are wonderful if you are in a cramped space. They also make it easy to keep everything in focus. But as you go wider, distances become exaggerated and barrel distortion becomes more pronounced and harder to correct.
Things that are close to the lens seem huge and things farther away seem tiny. One trick to remember is things in the center of the frame will be less affected by distortion. Something to take into account when taking those smartphone selfies.
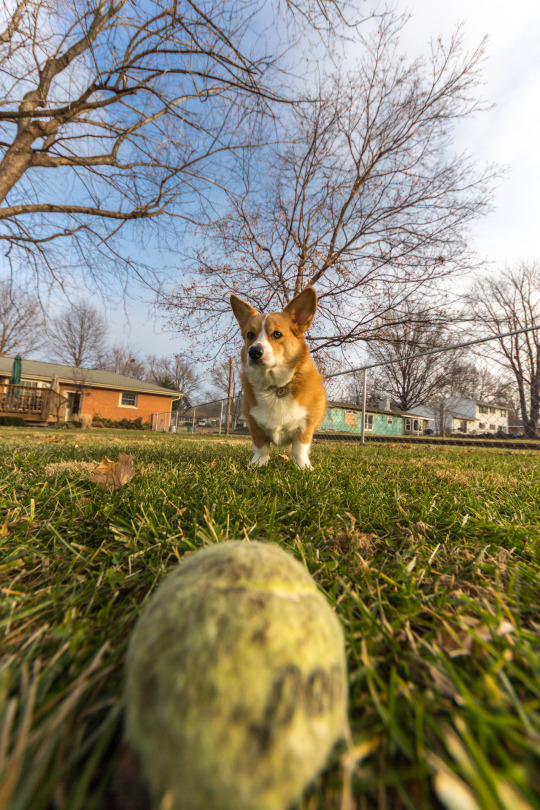
If you look, the ball looks huge in frame because it was only a few inches from the lens. Otis was literally smaller in frame than the ball despite only being about 2 feet away. However, he doesn't look all stretchy like the ball because he is centered.
Standard Lens
A "standard" or "normal lens" represents about the same field of view as the human eye. Generally around 40mm to 55mm on a full frame camera (there is some debate on this, but close enough). This is right about where you can take pictures of faces without the unflattering side effects of wide angle.
Telephoto Lens
A "telephoto lens" allows you to stand farther away and still fill the frame with your subject. Usually lenses 200mm and above are considered telephoto. These are often heavy and expensive.
Specialty Lenses
Ultrawide
This is just an extremely wide angle lens. At this point, you just except the massive amounts of distortion and embrace it. These lenses are extremely fun.
Medium Telephoto
These are sometimes called "portrait" lenses as well. They are a little more tele than standard and not quite tele enough for long distance photography. Usually in the 70-200mm range. This is the focal range that allows you to still be close to your subject but you are far enough away to get extra flattering lens compression on faces.
Superzoom Lens
A "superzoom" has an extremely large focal range. It can go from very wide to very telephoto. These are usually not wonderful lenses, although they have improved on mirrorless cameras in recent years. There are a few that could even be used professionally now. But most are just a huge mediocre compromise for vacation pix.
The cheap ones aren't fast, they aren't sharp, and every time you zoom people think your camera is having an erection.
If you are traveling and you have no idea what you might be photographing and carrying around a bunch of lenses is impractical, these have utility. But the larger the focal range, the more mediocre they get. Typically if the zoom range exceeds ~150mm you will start noticing that mediocrity. So a 70-200mm can be fantastic. But an 18-300mm will be very mid.
Macro
A macro lens is any lens that has 1x or more magnification. 1x magnification is a designation that relates the sensor size to how much of the subject fills the frame of your image. For 1x, that ratio should be 1:1.
So if you imagine a quarter lying on top of an image sensor, that's how big the quarter should be in your photo. 2x magnification would be like if a quarter doubled in size and you laid it on top of the image sensor. And so on.
Beware of lenses claiming to be macro and really only having a short working distance. 0.5x is not macro, but is sometimes advertised as so.
Tilt Shift Lens
This is a very niche lens. Most people know of it from the photos that make everyone look like they are in a miniature land.
For every other lens, the focal plane is perpendicular. If you move the camera at an angle, the focal plane will match that movement. So what the tilt shift lens allows you to do is angle the focal plane so your depth of field goes in bonkers directions.
Product photographers love this because you can take a photo of an array of products from a 45 degree angle and keep everything in focus.
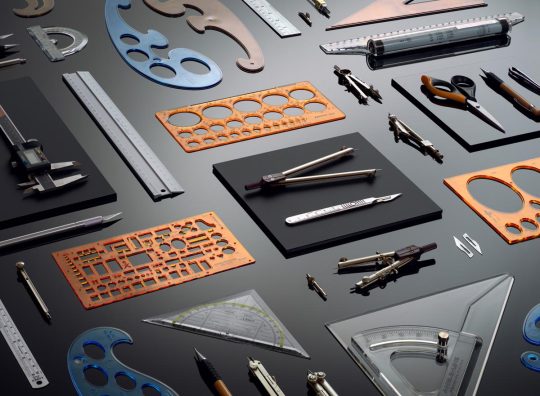
This image would be impossible to maintain complete focus of all the objects without a tilt shift lens.

In this example, without tilting the lens, the tip of the multitool is out of focus.

And now you can see the camera hasn't moved, but the lens is at a steeper angle. And you'll also notice the entire tool is in focus.
But wait, there's more! Did you forget about the shifting? Architectual photographers can use the shift function of the lens to correct perspective distortion and keep buildings looking straight.

Will this lens help in the photographing of infants?
Probably not.
But I bet you thought it was cool and are glad I included it.
Recommended Essential Lenses
I didn't know what to call this section. These are just the collection of lenses most photographers will try to acquire as they build out their kit.
Nifty Fifty
This is probably the first lens everyone should buy. Almost every brand has their own version. It is an inexpensive 50mm lens with a sub f/2 aperture. Canon's Nifty Fifty or "Plastic Fantastic" is probably the most famous example. It is only $125 and has an f/1.8 aperture.
This lens may not be the sharpest and it might have a lot of plastic-y, cheap feeling parts, but it is a wonderful way to get started with photography. You can use the wide aperture to experiment with bokeh and shallow depth of field. And the 50mm focal length is probably one of the most versatile. Not too wide, so people look normal, and not too tele, so you aren't a mile away from your subjects.
The Holy Trinity
The "Holy Trinity" is meant to describe the 3 lenses that can handle nearly every photographic task while maintaining professional quality results. Typically these lenses are all f/2.8 and are high quality zoom lenses. The 16-35mm, the 24-70mm, and the 70-200mm.
Most photographers can accomplish just about any task with these lenses in their bag.
Froggie's Holy Hexagon
That said, if I had an unlimited budget I would actually have 6 lenses to cover everything. Beyond the Holy Trinity, I would get a fast prime, an ultrawide, and a macro lens.
A fast prime can see in the dark and has more background blur. The nifty fifty would work great for this.
An ultrawide is one of the most fun lenses you will ever use, even if it distorts everything to a crazy degree and isn't useful very often. It is great for breaking you out of photographic ruts and can really get the creative juices flowing.
And a macro lens is not just useful for making tiny things big. It also allows you to focus at any distance. Sometimes you just need to get a tad bit closer than your other lenses will allow. Macro lenses are also pretty great portrait lenses and can serve multiple functions.
And if anyone is interested in sports or wildlife photos, a nice telephoto lens might be a seventh lens to consider.
I think that is the end of part 1.
I hope this was helpful. And I look forward to posting part 2 soon.
89 notes
·
View notes
Text
How to Choose the Best Travel Camera: Expert Photography Tips for Beginners

Best Travel Camera: Travel Photography Tips for Beginners
Travel photography is an exciting way to document new places, cultures, and experiences. However, choosing the best travel camera can be overwhelming, especially for beginners. With so many options available, selecting a camera that balances image quality, portability, and ease of use is essential.
In this guide, we’ll explore the best travel cameras, travel photography tips, and essential features to look for when choosing the right camera for your adventures.
1. Why Choosing the Best Travel Camera Matters
Travel photography involves a variety of shooting conditions — from capturing breathtaking landscapes to candid street portraits. Your travel camera should be:
Lightweight and portable — Easy to carry without adding bulk.
Versatile — Suitable for different lighting and environments.
Durable — Withstand travel conditions.
High-quality — Capture sharp and vibrant images.
Having the right camera enhances your ability to capture unforgettable moments with clarity and creativity.
2. Types of Travel Cameras: Which One is Right for You?
1. Compact Cameras (Point-and-Shoot)
Compact cameras are small, easy to use, and perfect for casual travelers. They offer decent image quality and automatic settings, making them ideal for beginners.
Pros:
Lightweight and pocket-friendly.
Simple to use with automatic settings.
Built-in lens eliminates the need to carry extra gear.
Cons:
Limited manual control.
Smaller sensors may reduce image quality.
Best for: Casual photographers who want an easy, travel-friendly camera.
Recommended Models:
Canon PowerShot G7 X Mark III
Sony Cyber-shot RX100 VII
Panasonic Lumix TZ90
2. Mirrorless Cameras
Mirrorless cameras offer professional-grade image quality in a more compact body than DSLRs. They allow for interchangeable lenses, making them more versatile for different photography styles.
Pros:
Compact and lightweight.
High-quality images with larger sensors.
Faster autofocus and better video capabilities.
Cons:
Shorter battery life compared to DSLRs.
Lenses may add extra weight.
Best for: Travel enthusiasts who want more control over their photography without the bulk of a DSLR.
Recommended Models:
Sony Alpha A6400
Canon EOS M50 Mark II
Fujifilm X-T4
3. DSLR Cameras
DSLRs provide the best image quality and full manual control but are bulkier than other travel cameras. They’re ideal for serious photographers who prioritize high-resolution images and lens flexibility.
Pros:
Superior image quality and low-light performance.
Wide selection of interchangeable lenses.
Long battery life.
Cons:
Heavy and bulky for travel.
Learning curve for beginners.
Best for: Professional and enthusiast photographers who need full control over their shots.
Recommended Models:
Canon EOS 90D
Nikon D7500
Canon EOS 5D Mark IV
3. Essential Features to Consider When Choosing a Travel Camera
1. Image Quality (Resolution)
Choose a camera with at least 20 megapixels to ensure sharp and detailed images. Larger sensors (APS-C or full-frame) perform better in low-light conditions.
2. Portability & Weight
For frequent travelers, a compact or mirrorless camera is ideal. If you prioritize quality over portability, a DSLR might be worth carrying.
3. Battery Life
Long battery life is essential for extended shooting sessions. Carry extra batteries or a power bank, especially for mirrorless cameras, which consume more power.
4. Lens Versatility
Wide-angle lenses (16–35mm): Best for landscapes and cityscapes.
Zoom lenses (24–200mm): Great for capturing distant subjects without carrying multiple lenses.
Prime lenses (50mm, 85mm): Perfect for portrait and low-light photography.
5. Video Capabilities
If you plan to vlog or record travel experiences, look for cameras with 4K video recording, good stabilization, and an external mic input.
6. Connectivity
Wi-Fi and Bluetooth-enabled cameras allow for easy sharing and backup of photos on the go.
4. Best Travel Cameras for Beginners
If you’re new to travel photography, these beginner-friendly cameras offer an excellent balance of performance and ease of use:
1. Sony Alpha A6000 (Mirrorless)
Why it’s great: Compact, fast autofocus, and excellent image quality.
2. Canon EOS Rebel T7i (DSLR)
Why it’s great: Affordable, beginner-friendly, and solid image quality.
3. Panasonic Lumix TZ200 (Compact)
Why it’s great: Pocket-sized with a powerful zoom and 4K video.
4. Fujifilm X-T30 (Mirrorless)
Why it’s great: Lightweight, stylish, and delivers professional-looking images.
5. Travel Photography Tips for Beginners
1. Plan Your Shots
Research destinations and lighting conditions beforehand. Sunrise and sunset provide the best natural lighting.
2. Use the Rule of Thirds
Compose shots using the rule of thirds for balanced and visually appealing images.
3. Experiment with Angles
Try different perspectives — low-angle shots, reflections, and framing techniques — for unique photos.
4. Keep Your Gear Safe
Invest in a weatherproof camera bag and always carry a lens cloth to keep your gear clean.
5. Capture the Details
While landscapes are stunning, don’t forget to capture the small details — local food, street signs, or textures.
6. Edit Your Photos
Use apps like Adobe Lightroom or Snapseed to enhance colors, contrast, and sharpness.
6. Conclusion: Finding the Best Travel Camera for Your Needs
Choosing the best travel camera depends on your travel style, budget, and photography goals. Compact cameras are perfect for casual photographers, mirrorless cameras offer versatility and quality, while DSLRs provide professional-grade performance.
No matter which camera you choose, the key is to capture your travel moments beautifully and effortlessly. If you’re still unsure about which camera to pick, The Lens India offers expert advice and top-rated travel cameras to help you make an informed decision.
Start your travel photography journey today with the best travel camera and capture stunning memories!
FAQs: Best Travel Camera & Travel Photography Tips
1. What is the best travel camera for beginners?
The best travel cameras for beginners include:
Sony Alpha A6000 — Compact and great autofocus.
Canon EOS Rebel T7i — User-friendly DSLR.
Panasonic Lumix TZ200 — Pocket-sized with a powerful zoom.
2. Should I choose a mirrorless or DSLR for travel?
Mirrorless cameras are lightweight and ideal for travel, while DSLRs offer longer battery life and superior lens choices.
3. What are the best travel photography tips for beginners?
Use the Rule of Thirds for balanced shots.
Shoot during Golden Hour for perfect lighting.
Carry a versatile zoom lens for different scenes.
Protect gear with a weatherproof camera bag.
4. What is the best budget travel camera?
Canon EOS M50 Mark II — Affordable and lightweight.
Sony RX100 VII — Compact yet powerful.
Nikon D3500 — Best budget DSLR.
5. Can I use my smartphone for travel photography?
Yes! Smartphones with multiple lenses and AI features can capture great shots, but a dedicated travel camera offers better zoom and manual controls.
Want expert guidance? Join Lens India’s Photography Tours in Japan’s cherry blossom season or India’s wildlife parks to learn from the best and capture breathtaking shots!
Stay Inspired and Informed! Follow The Lens India on social media for more captivating content, photography insights, and the latest updates:
Instagram: @thelensindia — Explore stunning visuals and behind-the-scenes stories!
Facebook: The Lens India — Join the conversation and never miss a post!
Let’s build a community of creators and storytellers together!
#TravelPhotography #CameraTips #PhotographyTips #TravelCamera #PhotoGearGuide #WanderlustPhotography #TravelWithCamera #ShootAndTravel #CameraLovers
#TravelBlogIndia #PhotographyBlog #LensIndiaTips #TheLensIndia #PhotographyForBeginners
0 notes
Text
How to Choose the Best Travel Camera: Expert Photography Tips for Beginners

Best Travel Camera: Travel Photography Tips for Beginners
Travel photography is an exciting way to document new places, cultures, and experiences. However, choosing the best travel camera can be overwhelming, especially for beginners. With so many options available, selecting a camera that balances image quality, portability, and ease of use is essential.
In this guide, we’ll explore the best travel cameras, travel photography tips, and essential features to look for when choosing the right camera for your adventures.
1. Why Choosing the Best Travel Camera Matters
Travel photography involves a variety of shooting conditions—from capturing breathtaking landscapes to candid street portraits. Your travel camera should be:
Lightweight and portable – Easy to carry without adding bulk.
Versatile – Suitable for different lighting and environments.
Durable – Withstand travel conditions.
High-quality – Capture sharp and vibrant images.
Having the right camera enhances your ability to capture unforgettable moments with clarity and creativity.
2. Types of Travel Cameras: Which One is Right for You?
1. Compact Cameras (Point-and-Shoot)
Compact cameras are small, easy to use, and perfect for casual travelers. They offer decent image quality and automatic settings, making them ideal for beginners.
Pros:
Lightweight and pocket-friendly.
Simple to use with automatic settings.
Built-in lens eliminates the need to carry extra gear.
Cons:
Limited manual control.
Smaller sensors may reduce image quality.
Best for: Casual photographers who want an easy, travel-friendly camera.
Recommended Models:
Canon PowerShot G7 X Mark III
Sony Cyber-shot RX100 VII
Panasonic Lumix TZ90
2. Mirrorless Cameras
Mirrorless cameras offer professional-grade image quality in a more compact body than DSLRs. They allow for interchangeable lenses, making them more versatile for different photography styles.
Pros:
Compact and lightweight.
High-quality images with larger sensors.
Faster autofocus and better video capabilities.
Cons:
Shorter battery life compared to DSLRs.
Lenses may add extra weight.
Best for: Travel enthusiasts who want more control over their photography without the bulk of a DSLR.
Recommended Models:
Sony Alpha A6400
Canon EOS M50 Mark II
Fujifilm X-T4
3. DSLR Cameras
DSLRs provide the best image quality and full manual control but are bulkier than other travel cameras. They’re ideal for serious photographers who prioritize high-resolution images and lens flexibility.
Pros:
Superior image quality and low-light performance.
Wide selection of interchangeable lenses.
Long battery life.
Cons:
Heavy and bulky for travel.
Learning curve for beginners.
Best for: Professional and enthusiast photographers who need full control over their shots.
Recommended Models:
Canon EOS 90D
Nikon D7500
Canon EOS 5D Mark IV
3. Essential Features to Consider When Choosing a Travel Camera
1. Image Quality (Resolution)
Choose a camera with at least 20 megapixels to ensure sharp and detailed images. Larger sensors (APS-C or full-frame) perform better in low-light conditions.
2. Portability & Weight
For frequent travelers, a compact or mirrorless camera is ideal. If you prioritize quality over portability, a DSLR might be worth carrying.
3. Battery Life
Long battery life is essential for extended shooting sessions. Carry extra batteries or a power bank, especially for mirrorless cameras, which consume more power.
4. Lens Versatility
Wide-angle lenses (16-35mm): Best for landscapes and cityscapes.
Zoom lenses (24-200mm): Great for capturing distant subjects without carrying multiple lenses.
Prime lenses (50mm, 85mm): Perfect for portrait and low-light photography.
5. Video Capabilities
If you plan to vlog or record travel experiences, look for cameras with 4K video recording, good stabilization, and an external mic input.
6. Connectivity
Wi-Fi and Bluetooth-enabled cameras allow for easy sharing and backup of photos on the go.
4. Best Travel Cameras for Beginners
If you’re new to travel photography, these beginner-friendly cameras offer an excellent balance of performance and ease of use:
1. Sony Alpha A6000 (Mirrorless)
2. Canon EOS Rebel T7i (DSLR)
3. Panasonic Lumix TZ200 (Compact)
4. Fujifilm X-T30 (Mirrorless)
5. Travel Photography Tips for Beginners
1. Plan Your Shots
Research destinations and lighting conditions beforehand. Sunrise and sunset provide the best natural lighting.
2. Use the Rule of Thirds
Compose shots using the rule of thirds for balanced and visually appealing images.
3. Experiment with Angles
Try different perspectives—low-angle shots, reflections, and framing techniques—for unique photos.
4. Keep Your Gear Safe
Invest in a weatherproof camera bag and always carry a lens cloth to keep your gear clean.
5. Capture the Details
While landscapes are stunning, don’t forget to capture the small details—local food, street signs, or textures.
6. Edit Your Photos
Use apps like Adobe Lightroom or Snapseed to enhance colors, contrast, and sharpness.
6. Conclusion: Finding the Best Travel Camera for Your Needs
Choosing the best travel camera depends on your travel style, budget, and photography goals. Compact cameras are perfect for casual photographers, mirrorless cameras offer versatility and quality, while DSLRs provide professional-grade performance.
No matter which camera you choose, the key is to capture your travel moments beautifully and effortlessly. If you’re still unsure about which camera to pick, The Lens India offers expert advice and top-rated travel cameras to help you make an informed decision.
FAQs: Best Travel Camera & Travel Photography Tips
1. What is the best travel camera for beginners?
The best travel cameras for beginners include:
Sony Alpha A6000 – Compact and great autofocus.
Canon EOS Rebel T7i – User-friendly DSLR.
Panasonic Lumix TZ200 – Pocket-sized with a powerful zoom.
2. Should I choose a mirrorless or DSLR for travel?
Mirrorless cameras are lightweight and ideal for travel, while DSLRs offer longer battery life and superior lens choices.
3. What are the best travel photography tips for beginners?
Use the Rule of Thirds for balanced shots.
Shoot during Golden Hour for perfect lighting.
Carry a versatile zoom lens for different scenes.
Protect gear with a weatherproof camera bag.
4. What is the best budget travel camera?
Canon EOS M50 Mark II – Affordable and lightweight.
Sony RX100 VII – Compact yet powerful.
Nikon D3500 – Best budget DSLR.
5. Can I use my smartphone for travel photography?
Yes! Smartphones with multiple lenses and AI features can capture great shots, but a dedicated travel camera offers better zoom and manual controls.
Stay Inspired and Informed! Follow The Lens India on social media for more captivating content, photography insights, and the latest updates:
Instagram: @thelensindia – Explore stunning visuals and behind-the-scenes stories!
Facebook: The Lens India – Join the conversation and never miss a post!
Let’s build a community of creators and storytellers together!
The Lens India
Tirupati Co-op Housing Society, Tirupati Campus, Phase – 2, Bldg – B8, F.no 402, Adarsh Colony Rd no -2,Tingre nagar,
Vishrantwadi Pune, Maharashtra 411015
Visit Us : https://thelensindia.com
Email Us : [email protected] Our Social Presence :
Facebook — https://www.instagram.com/thelensindiaInstagram — https://www.facebook.com/thelensindiaphotography/
#TravelPhotography
#WanderlustShots
#CaptureTheWorld
#ExploreWithCamera
#GlobetrotterShots
#WanderlustPhotographer
#TravelPhotography#WanderlustShots#CaptureTheWorld#ExploreWithCamera#GlobetrotterShots#WanderlustPhotographer#BestTravelCamera#TravelCameraGuide#MirrorlessCamera#DSLRPhotography#CompactCameraLife#BeginnerPhotographyGear#PhotographyTips#PhotographyForBeginners#LearnPhotography#BeginnerPhotographer#TravelPhotoTips#TravelPhotographyBasics#VisualStorytelling#FramingTheWorld#GoldenHourPhotography#StreetPhotographyVibes#LandscapeLovers#DetailsMatter#CameraGear#LensLove#4KVideo#LowLightPhotography#WiFiCamera#ShootLikeAPro
1 note
·
View note