#just a bump on this one for a bunch of new info and edits :D <3< /div>
Explore tagged Tumblr posts
Visit Tumblr Blog
Explore Tumblr blogs with no restrictions, modern design and the best experience.
Last Seen Tumblr Blogs


Fun Fact
There were a total of 171.5 billion posts on Tumblr in 2019.
Text
Making a Normal Map (from scratch) in GIMP - Part 1 of 2
So you're making a recolor, and when you try it out in the game it has weird outlines for pockets and whatnot. What gives?? The Normal Map (or sometimes the specular)! The bane of us noobie CC creators!
I had a rough time--and much Trial and Error--trying to figure it out so that I don't just have to "Make Blank" for all my CC. This guide gave some helpful pointers (https://sims4studio.com/thread/861/normal-maps-bump-editing-creating), but it left out a bunch of key info. So... here we go!
Side note-- What exactly IS a Normal Map? I don't 100% know. But it's purpose is to create a sort-of 3D effect on your 2D texture. It can help make your recolor look less "drawn on" to the mesh. I don't notice a difference in Sims 4 Studio, but there is a difference when you're in the actual game. When it comes to textures without a Normal Map, I think the grandpa from Derry Girls said it best: "It's just not as nice..."
You will need:
- Your completed Diffuse texture (your recolored .dds file)
- Sims 4 Studio aka S4S
- GIMP (free image editing software)
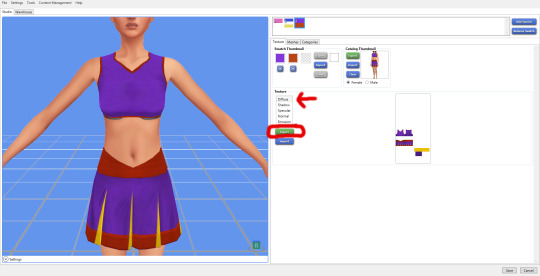
1.) I'm going to use my current WIP Kim Possible Cheerleader uniform as an example. Open up your .package in S4S. You can skip this step if you still have your Diffuse file laying around, but just to be thorough: Select your Diffuse and Export it.
2.) Open your Diffuse file in GIMP (or another Photoshop-type program, but I like GIMP and that's what I'm showing in this tutorial). When the options come up, make sure you de-select "Load Mipmaps". You don't want to load the mipmaps. You'll know you did this right because you'll only have 1 layer, as opposed to like 40.

Note here: if your clothes have a printed design or stripes or something on them, you want to get rid of them. They shouldn't be on the final Normal Map.
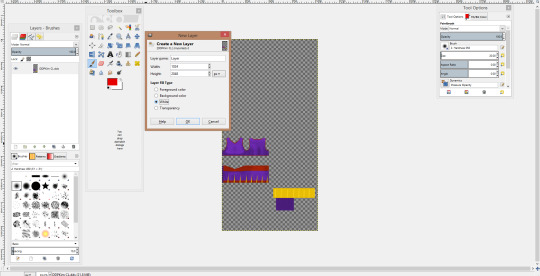
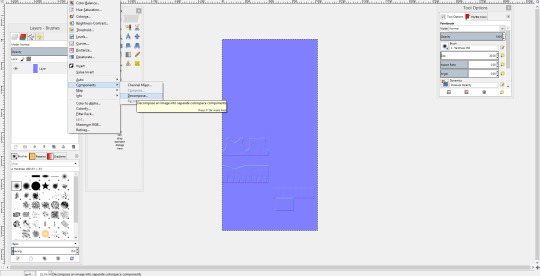
We need to make sure that your .dds has Transparency (an alpha channel). Mine already does, as you can see by that grey checker-pattern in the blank spaces. If yours doesn't OR you aren't sure, make sure you add one. In the Layers panel, click "New Layer". Keep the sizes the same, and select "Transparency". Move this layer to the bottom, then select your first layer and "Merge Down".
2.) We also need to add a "White" layer or else the Normal Map will be all kinds of messed-up. This is the same process as adding an alpha channel, btw. Right-click in the Layers panel, and add a New Layer. Instead of Transparency, we need to select White.
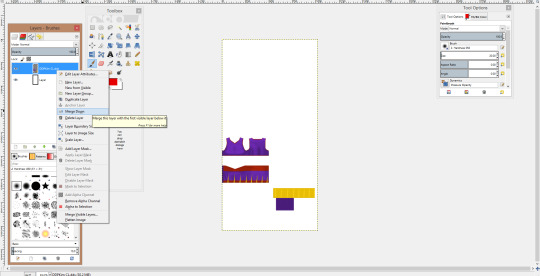
The White layer always gets put to the top for me, so we need to move it lower in the Layer panel.

The White layer will now appear below your Diffuse texture.
3.) I forgot to screenshot this, but we now need to de-saturate your Diffuse layer to make it black-and-white. Making sure that your Diffuse layer is selected in the Layers panel, click Colors>Desaturate... from the options bar at the top. Alternatively, press Alt+C, then Alt+D. I like to choose either "Lightness" or "Average", depending on how much of a contrast my Diffuse has/needs. Pick whichever you think looks better, then hit OK.
A.) If your Diffuse has white parts, skip to 3B! Do NOT follow this part or your Normal Map will be messed up! If yours doesn't have any white, then:
Select your Diffuse layer and "Merge Down" to combine it with the White Layer. Your Diffuse should be black-and-white, unlike mine. Oops! You now should have only 1 image.

From the top bar, we're now going to select Filters > Map > Normalmap... The below should show up:

Make the settings match that image. You should only have to change the Filter to Sobel 3x3, then go ahead and click Ok.
-------------------------------------------------------------------
B.) If you *DID* have white parts, we're going to do things a little differently. Make sure your Diffuse layer is selected, then select Filters > Map > Normalmap... (Alt+R should open the Filters, but I don't know the shortcut for Normalmap.)
Note that I forgot to desaturate when taking my screenshots. YOUR image should be black-and-white.
Make the settings match the follow image. You should only have to change the Filter to Sobel 3x3, then go ahead and click Ok.
Now, select your White Layer from the Layers panel. Repeat the steps to apply Filter > Map > Normalmap to your White Layer.
In the Layers panel, right-click your Diffuse layer and Merge Down. Your two layers are now combined into one.
---------------------------------------------------------------------
4.) Your image should now look something like this:
Mine looks a bit different because I forgot to desaturate, which will have repercussions later. But all blue besides the outline is good.
Continued in Part 2:
#sims 4 studio#Sims CC tutorial#ts4 tutorial#Normal map#bump map#recolor CC#create Normal Map#weird button outline#pocket outline
17 notes
·
View notes
Text

SOLAR REDUX - AN EYESET IN 72 COLOURS
A long time ago (but not particularly far, far away) I made a bunch of eyes (Solar Sailer and their recolours) and proceeded to use them for the next nine years or so. They didn’t animate as well as I’d like, so I decided to re-sclera them, then proceeded to get a bit carried away and ended up with a full re-make and a few extra colours on the side. A Solar Sailer redux. Solar Redux, if you will, and that’s what I’m sharing with you all today.
What you’re getting here is 72 eyes, 66 standard and 6 alien on an as-of-yet unnamed new edit I did of Pooklet’s old sclera that’s essentially this one but poked about in Photoshop some more.
Here’s a group shot of all the colours:

DOWNLOAD HERE or alternatively...
GET VERSION 2 HERE (they’re a bit nicer!)
Note: These do replace the old Solar Sailer eye packages (with a few exceptions) so you can’t have these and the old ones in-game at the same time because I’m a bit lazy. All files are compressorised.
More info and previews under the cut!
MORE ASSORTED PREVIEWS:

GENETICISATION + TOWNIFICATION
With the exception of the blind/albinism and alien eyes, these are townified (sorry there's not a non-townified version, I went ahead and townified 'em all before I realised I'd forgot to make a backup for non-townification)
Alien eyes aren't geneticised (custom), blind/albinism are geneticised at 4 (so there's only a tiny chance they'll be passed along) and the rest are geneticised at 1 (same as default brown/dark blue iirc). Feel free to re-geneticise as you like, since I know that's a bit unusual.
ANIMATION:
Probably not quite as animation-friendly as my previous Pooklet sclera edit but I like it more. Here's the lovely Phil pulling some faces to demonstrate (I think he has the dark brown eyes here):


SCLERA:
If anyone's interested I'll be posting the sclera resources (and probably an overlay mask) at some point in the future. I've just got to extract the iris texture from the eyeball since it's painted straight on first.
OTHER STUFF:
These by any means aren't perfect (compression artefacts, bumps and oddities ahoy!), there's tons of things I wanted to fix but couldn't so I barred myself from making any more substantial changes that'd involve re-importing all 72 dds files for the billionth time for the sake of my wrists. But I like them, so I hope you do too!
I tried to make an equivalent replacement of all the colours in the original sets. Some of my old choices were a bit less... useful? than I would've chosen now so they may have been altered/toned down a bit but aren't radically different. If you had the original sets, you shouldn't suddenly see any previously grey-eyed sims with orange eyes, is what I'm trying to say.
If I messed up anywhere (like importing the wrong image for the wrong file, big ol' blobs of neon green where they shouldn't be, etc), you need a non-compressorised version for some reason or if you really really want non-townified versions, as always gimme a shout I'll see what I can do :D
196 notes
·
View notes