#its not the first unboxing video I've done
Explore tagged Tumblr posts
Text
I miiiight have a really short video in the next couple days. I bought a couple plushes as a reward to myself because they were really cheap for black friday, so I was thinking it might be fun to open them in a unboxing video. Just something fun, that won't take a lot of effort while I wait until I can get a review video done
#youtube#my youtube channel#if anyone would be even the slightest bit interested in that?#its not the first unboxing video I've done#i did that avatar box unboxing earlier this year
7 notes
·
View notes
Text
youtube
I've filmed 2 videos back to back so I'm done until the new year. Hope everybody had a good Christmas.
My husband is still overseas but he got to go to Rome with a buddy for Christmas and it looks like they've seen some cool things so thats really nice. We called each other this morning and he wanted to watch me open gifts.
He sent me a University of Tennessee giant snuggy thing and an army hoody with his units symbols on it. I've worn both today already, especially while walking the dog because its cold outside. He also got me a cool Hakuna Matata Funko Pop figure which I've never seen before and a new smart watch. My smart watch is a first generation samsung and I've considered getting a new one several times but the first gen in still alive! it wont die! and it still does cool things and works efficiently. The new watch I've been charging it and linked it to my phone but mainly I've already screwed up putting the watch bands on T_T I still need to see how customizable it is.
Somehow, despite being alone this day has gone by faster than yesterday. I spent most of my morning filming this unboxing and then fighting my desktop computer to work.
I'm trying to cook shredded turkey and gravy to smother mashed potatoes but wish me luck because I dont know how to cook. We may be having microwave pizza for dinner instead.
and then I have to work the rest of the week and I already have a bad attitude about it, everyday I tell myself to quit but then the money comes in.
I guess I need to do a year in review. I've done some cool stuff this year amongst the stress.
The worst part of the year IMO is January, February when its cold and dreary. My husbands 40th is in January and I did send him birthday presents but still. I always look forward to spring when the seasonal depression kicks in after new years.
I do need to take my dog back to the vet probably next week on my next day off to see if she still has a bladder mass or a funky UTI. Unfortunately also, I need to rake my yard because this half of the country is a couple months behind on "fall" and all the leaves have just now fallen into my yard.
but anyway! Merry Christmas, Happy New year!
0 notes
Text
Some further additions:


@clarenecessities pulled the Instagram photos for She-ra vs. SDCC She-ra (why didn't I just reblog that version? Because I found errors in the original and I'm crazy. Thank you Clare). More photos if you want them are in her reblog through the link.
Also, something I didn't know at time of writing: every She-ra has different hair, it's just a lot less noticeable between Battle Armor She-ra and regular. Battle Armor She-ra's hair is about an inch shorter compared to regular She-ra and it might also be less voluminous (harder to measure).
(Battle Armor She-ra and) Swift Wind:


[Stock photos from Dollect and Amazon, and then finally the thumbnail for this unboxing Youtube video to show the back of the box.]
Some Swift Wind photos since I feel bad for not really including him in the original post, I just don't have many details on him. I'm also a little biased because I had a horse shockingly close to this as a kid and you couldn't really do anything with its size and immobility. I'm pretty sure it's "wing flap action" is literally just momentum that comes when bobbing it up and down and not mechanical. I found the instructional PDF on it on Mattel's website. It is one page.
Also, the picture you see in the bottom left is as close as She-ra's arms can get to her body (and the angle makes it look deceptively closer than it is) because the plastic armor under her arm blocks further movement. This is a problem on her regular armor as well.
Missed Catra details:
I thought this was an alteration the first time I saw it, but Catra actually has a tri-level haircut. She has "bangs" swept back over the top of her head that are cut to reach just the back of her head and then stop. I assume it was done to give her hair "body" so it looks fluffier, but it actually just turns out like a pompadour most of the time and only really works from the front. I've seen it lay correctly, so it can be given the proper effect with restyling techniques. There's also a few strands that are cut to stop at her shoulders, but that matches her uneven cut in the show at least. The real problem is that she just doesn't have enough hair rooted to really look like her hair in the show, so it seems like they used techniques to try to "fake" it that didn't pan out.
Her face mask is removable and kept on her head using "three" methods. 1) It has those little plastic ties shaped like an H anchored inside her head on one side and on the outside of the mask on the other through some small holes. These are kind of obvious up close. These ties are also used to affix the dolls' heads to the packaging in the back. 2) There are little clear rubberbands wrapped around her ears and the sides of her mask to hold it flat on the cheeks instead of flapping away from the plastic anchors at the top. 3) There are two plastic anchors that are molded onto the sides of the mask's actual design which hook over the top of her ears. They do keep her mask on when displayed but keeping the rubberbands is probably for the best for any play action.
Also, I continue to be impressed by her Force Captain badge: it's 3D! It has the Horde logo recessed from the main face, with the outer green edging also recessed. It's really amazing how much detail was crammed into that.
Bow addition:
His bow-and-arrow is a single piece accessory with no painting, but its mold is 3D and detailed. The fletching on the end of the arrow is in the traditional tri-shape and it's molded to appear as if it's "notched" on one side of the bow and bowstring. An arrow rest is the only thing missing from the molding really. Bow also looks like he's holding it "backwards" in-box (see previous reblog), but he is holding it correctly, just close to his chest. If he raised both arms so that it could turn to face out, it would be natural.


[Bow-and-arrow accessory photographed from the front and back to show off the notching from Ebay.]
Some packaging additions:


[She-ra logo embossed in the top of the core line packaging; Sword of Protection embossed on the sides of the packaging. Photos by me.]
Here's the best photos I could get of those blister details for the core five boxes I mentioned! All the core five boxes were the same except for the character information swapping out (you can see a bit of the backing in the right image, too).
The blister front doesn't just have the outline of the sword embossed in it: it's actually 3D, with the middle of the sword raised to give it the tapering effect towards the sides that a sword blade would have.


[Top of the SDCC exclusive display packaging; back of the packaging when unfolded. Left photo by me, right stock photo from Dollect.]
And here are some of the details I mentioned in the SDCC section. The left image shows the First Ones name labels on top of their sections in the display box (left is Shadow Weaver, right is She-ra). The hinge for the display halves is in the middle top of the photo.
The image on the right is the back of the box. She-ra's art and bio is the same as in the core line. In that line, the story on bottom was replaced with character photos for the rest of the lineup and legal disclaimers (squint at the bottom of the blister photos above to see what I mean). That trademark stuff is still present on the SDCC exclusive, just hidden on the bottom of the display box.
Some details on the design process can be found on toy designer Annalise Lao's portfolio. Photos of the unique sole print on Adora's shoes can also be found here.
She-ra (2018) Action Dolls: Design Details
In 2019, Mattel released a line of eight action dolls for the 2018 She-ra reboot. The line featured Adora, Glimmer, Bow, Catra, Shadow Weaver, and 3 versions of She-ra (there was also a Swift Wind model). There were more dolls planned that were canceled which I've covered in their own post.
For this post I've gathered official images and information about the dolls' design courtesy of the Instagrams of two of the designers: Darren Sander (known for work on Monster High, he designed this line's packaging and did work on She-ra and Swift Wind) and Annalise Lao (who worked on the BFS & Catra). It takes a lot of people to make even one doll for mass production (the SDCC exclusives were two years in the making, before the show even debuted!), but these are the only designers I've found talk about their personal involvement. I found a few more names to credit further in, though.
For data such as price and further stock/promotional shots (as well as the source of most of the ones in this post), see the line's page in the Dollect database.
Builds:
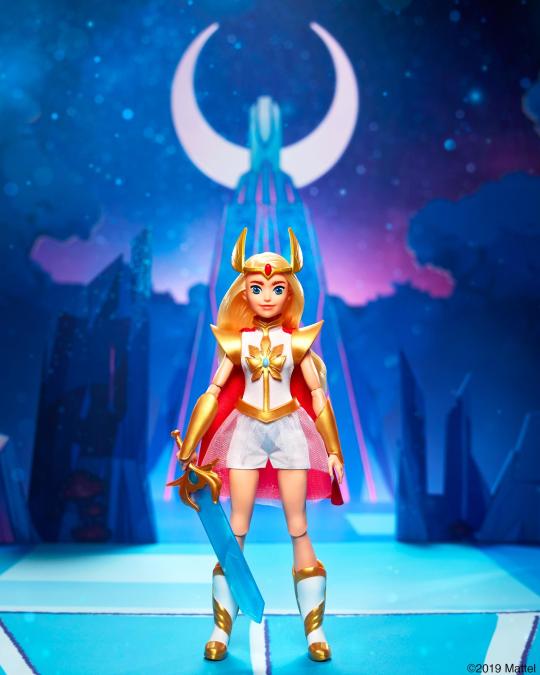
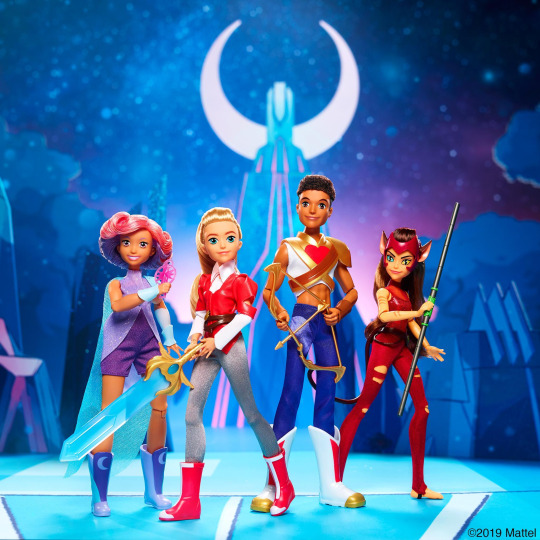

[Regular She-ra; Glimmer, Adora, Bow, & Catra; Battle Armor She-ra & Swift Wind. I'll cover the SDCC exclusives later in the post. Photos via Twitter.]
For the main four dolls (center image), the bodies are pre-existing sculpts, with the girls coming from the DC Super Hero Girls line and Bow coming from Monster High (generation 2). She-ra had a unique body sculpt. All of them had unique heads and clothing/accessories.
Glimmer's body is supposed to be a "curvier" sculpt compared to the other girls. Annalise says the foreshortening on the promotional pictures makes her look skinnier, but I can't comment on that without having seen the doll IRL. I can say that what counts as curvy when it comes to dolls is usually ridiculous, but they tried with the options they had, at least.
Swift Wind was designed by Darren Sander and his wing artwork was done by Kristen Kress. His wings are supposed to flap when you move him up and down, and he has a plastic clip on his back to keep She-ra in place.
She-ra(s):
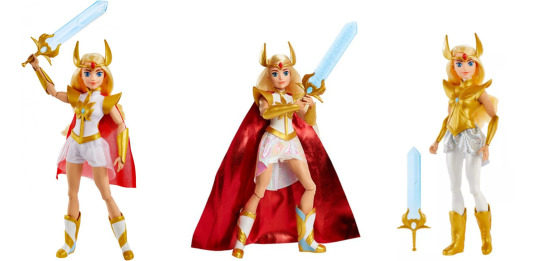
[Regular She-ra; SDCC-exclusive She-ra; Battle of Bright Moon She-ra - officially named "Battle Armor She-ra & Swift Wind." All stock photos.]
Regular She-ra: Her outfit is made of plain fabric with plastic accessories for the boots, gauntlets, chest emblem/pauldrons, and tiara (basically, anything gold). Her peplum skirt is unhemmed (on all her outfits) and is made from a sparkly tulle. Her cape is a one-sided fabric, but both sides look pretty much the same. The cape has no hemming either and is sewed directly onto her shoulders. It matches the shorter (more practical) length in the show. The plastic chest piece has overlapping straps and pegs in the back to hook it on.
SDCC Exclusive: The plain fabric of her uniform has been swapped out for a thin, rubbery pleather and her skirt "upgraded" to an iridescent fabric (the fabric feels stiff and way cheaper than the tulle, but was probably chosen for displaying well. It's one-sided). Her cape was redone, now much longer and made from a double-sided foil, still unhemmed. Her boots also have extra paint on their backs (details on that all the way down in the boots section). Otherwise her outfit is the same.
Battle Armor: Her torso and legs are cast in white to give the illusion of clothes. A plastic chest piece clips over the front of her, leaving her back exposed underneath her hair. She has no gauntlets, her forearms instead cast in gold to give the illusion that she is wearing some. Her boots are their usual cast, but they're solid gold with no painting. She has a one-sided reflective skirt, but its curving cut means it's shortest right in front and it often lets her articulation joints peek out. The chest piece was sculpted by Kittaya Wongchinda.
SDCC Exclusive:
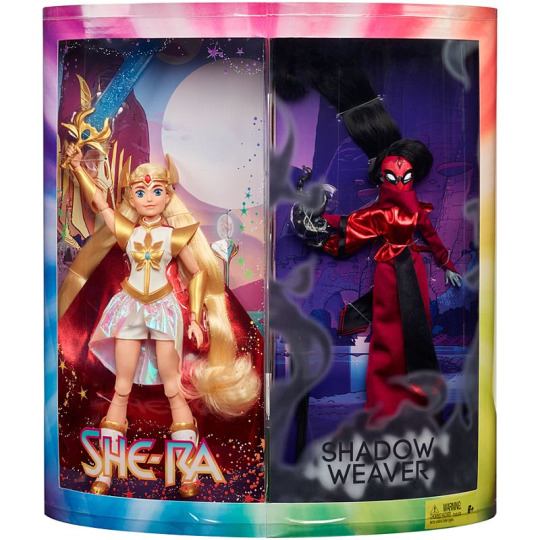
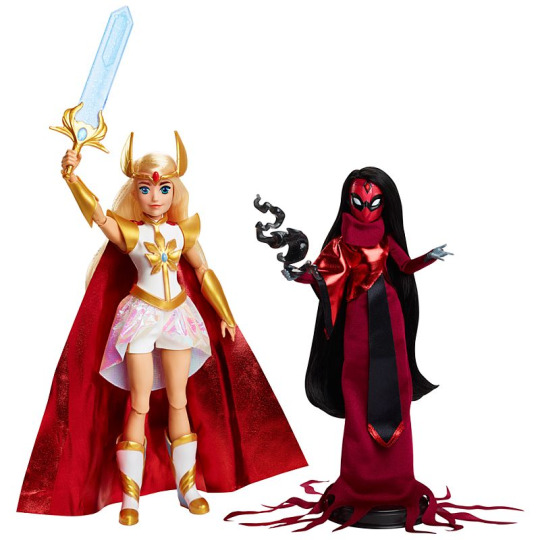
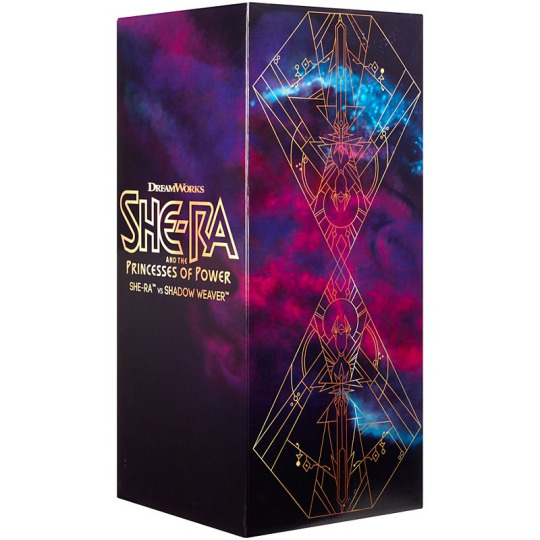
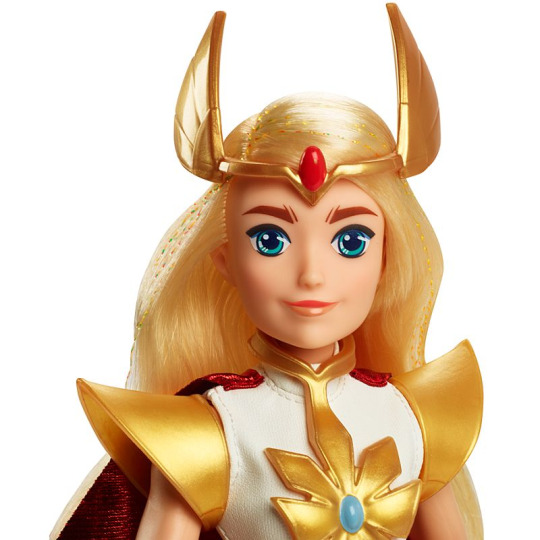
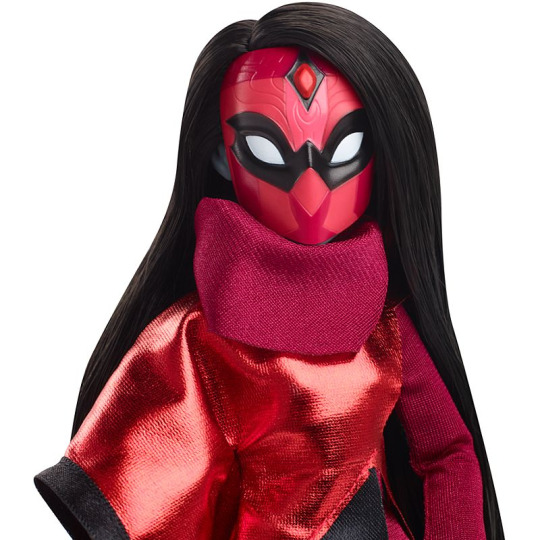

[Display packaging in the upper left; both dolls in middle; compact storage box in upper right; closeups on bottom. All stock photos.]
These two dolls were the first part of the line revealed. She-ra's unique sculpt in the regular line originates here. She-ra is capable of standing on her own while Shadow Weaver requires a stand. Shadow Weaver has the same body as core line Adora and Catra, but this is the only set that includes a stand since it's supposed to be more deluxe.
Shadow Weaver: Her outfit is two layers, made from a long red dress with a turtle neck and an unhemmed, tendril-cut bottom edge. Over the top of it she wears a monastic scapular made from red foil and black fabric. She does not have any shoes. She has a black shadow accessory to hold with glitter suspended through it.
Her mask does not come off, but is cast as a separate piece and then glued tightly to her head to create the appropriate silhouette and depth. Her head is likely smooth underneath and she has small elf ears. Her hair is Polypropylene.
Packaging: The display packaging on the upper left folds in half (with velcro on the insides to keep it together while unfolded) to fit into the storage box in the upper right. The tops of the displays feature the same backdrop as the storage box with Shadow Weaver and She-ra's names written in the First Ones script to label each of them. The storage box has the show logo on two sides with Shadow Weaver and She-ra art opposite each other on the other two sides.
Models & Designers: We know Darren & Garrett Sander (fraternal twins, the latter also being the creator of Monster High) worked on the SDCC dolls, in addition to more unnamed creators, but we have some modeler names!

[Shadow Weaver's model with her accessory; She-ra's plastic chest emblem model; She-ra's body model, via Instagram. There are three more photos showing She-ra's accessories and sword through the link but I've hit the image limit.]
The dolls and their accessories were sculpted by Arpine Keurjikian, Kittaya Wongchinda, Adam DeFelice, and Sean Olmos (this is gonna shock you but they all worked on Monster High).
Regular She-ra vs. SDCC:
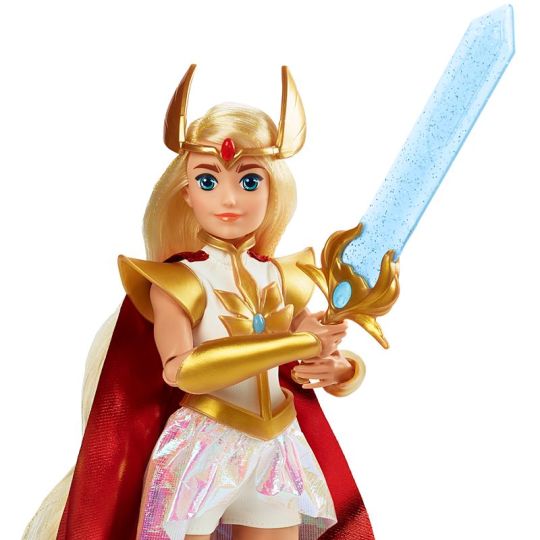
[SDCC exclusive on the left, regular on the right]
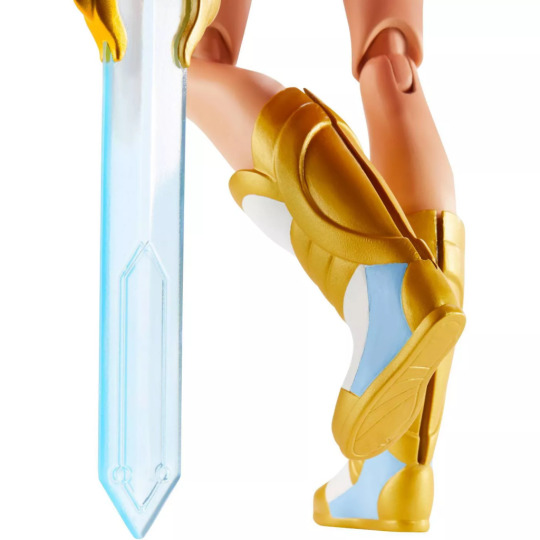
For the con exclusive, the Sword of Protection's blade has glitter suspended throughout it while the others are clear blue, but the cast is otherwise the same. I already compared outfits in the She-ra section, but the con version also has unique hair. Her hair is longer (10 inches vs. around 6 regularly) with some reflective strands (likely tinsel) threaded through it to make it shine. More side-by-side comparison photos of regular vs. con She-ra can be found on Darren Sander's Instagram.
Main Line:
Annalise and Garrett were both fans of the show (unknown for anyone else since I don't have their personal comments) and worked back and forth with Dreamworks on rounds of revisions for the dolls. The dolls had all major joints articulated (just missing ankles, and no torso/chest articulation). They have 11 joints, many of which can be moved in multiple directions. Some individual details:
Catra:
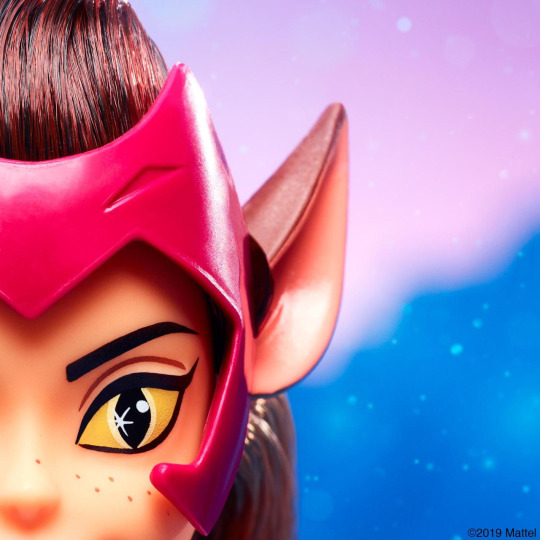
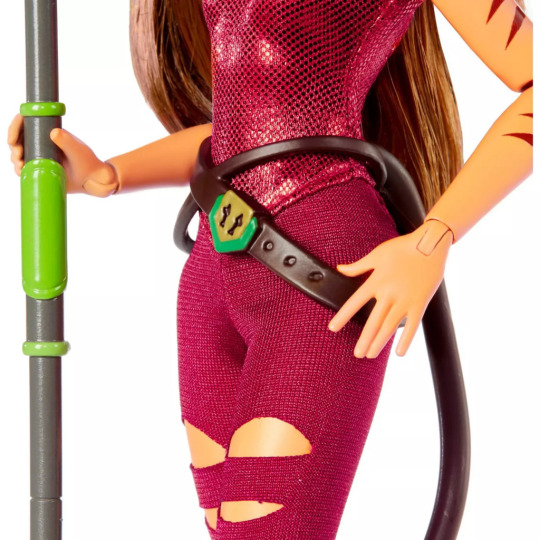
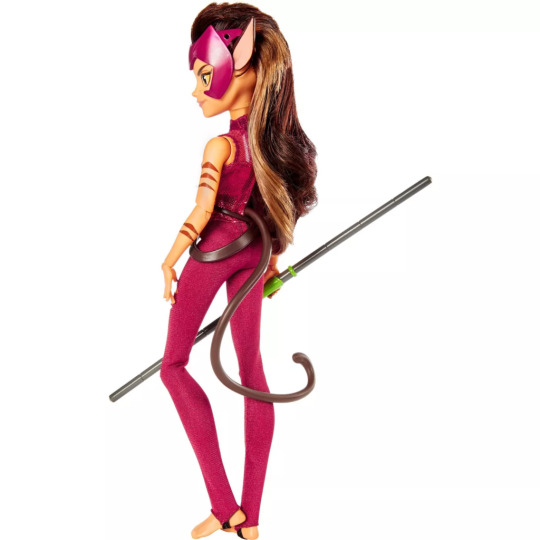
[Catra's screening; the rest are stock photos]
Catra's faceup is pretty much the first design Annalise tried, painting it directly onto the prototype early in the process. Her tail is rotatable, giving her an extra point for posing. She has all her stripes (and pant rips, Catra was Annalise's favorite) from the show. Her belt includes a tiny (and fully painted!) Force Captain badge. She came with a staff accessory. Catra uses Saran for her hair.
Glimmer:

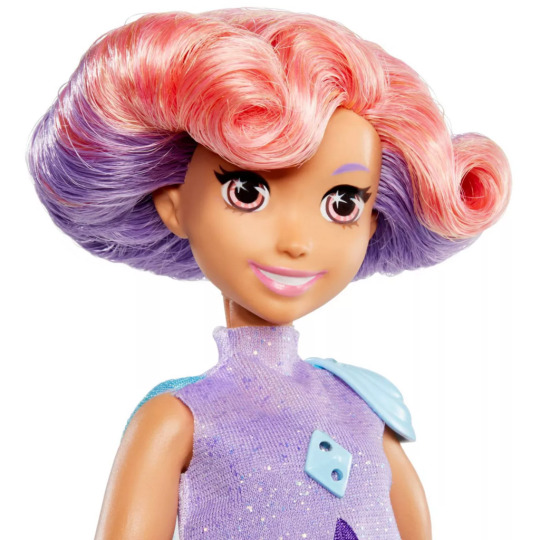
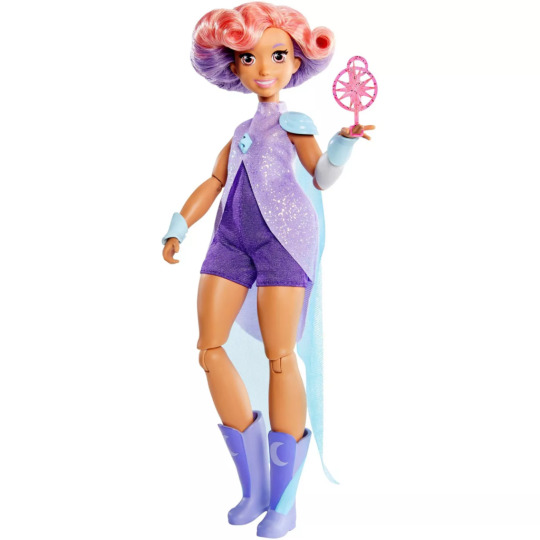
[Glimmer's boots; the rest are stock photos]
Glimmer's hair is also saran, but it has been heavily gelled to achieve its shape, which explains why it's often a mess (or at least deflated) in any dolls that have been played with. Glimmer's white glove is painted on to make the layering with her gauntlets work, but otherwise she has her accessories from the show and her jumpsuit is two layers. She has a unique star sparkle in her eye screening and uses the same skintone as the original DC Super Hero Girls Wonder Woman doll. She came with a "sparkle burst" accessory to hold.
Bow:
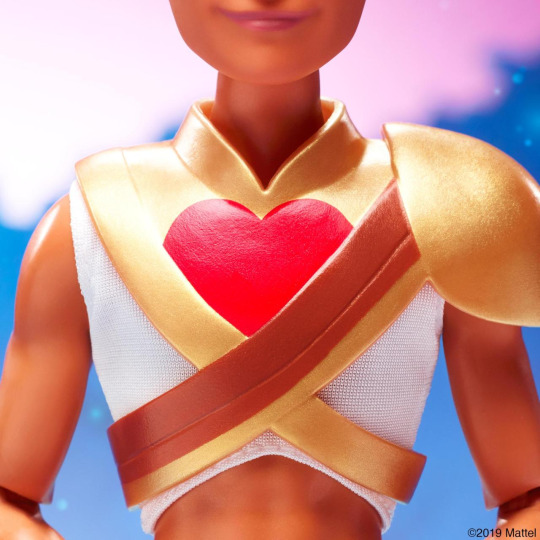
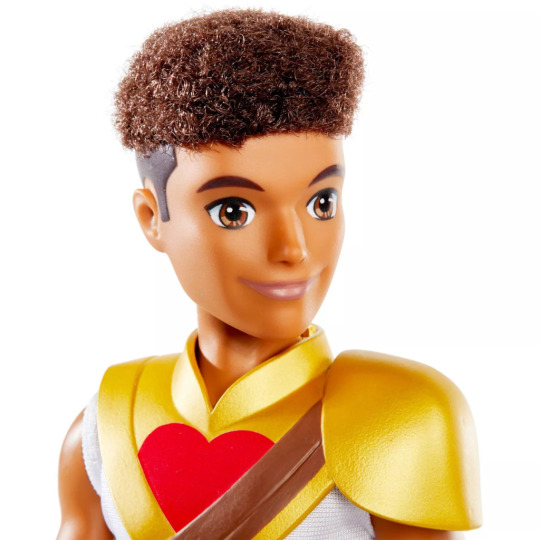
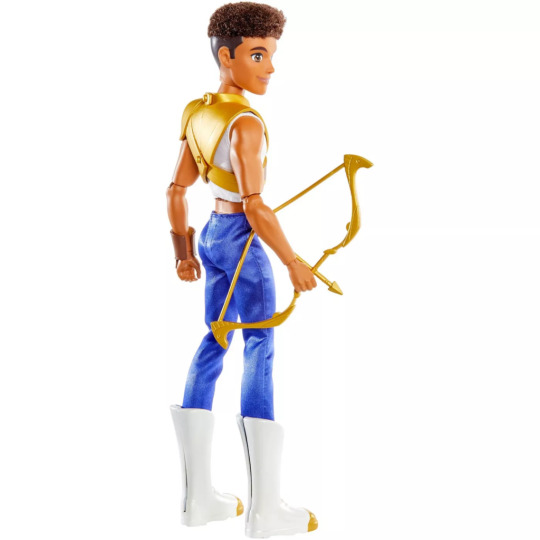
[Bow's chest; the rest are stock photos]
Bow has real textured hair up top with his short sides painted (the more expensive Monster High dolls also have their short sides painted on). His top is a white fabric shirt with a single plastic accessory layered over the top of it to represent his armor pieces. Funnily, the strap for his quiver is included despite him not having one. He came with a (single piece) bow-and-arrow accessory.
Adora:
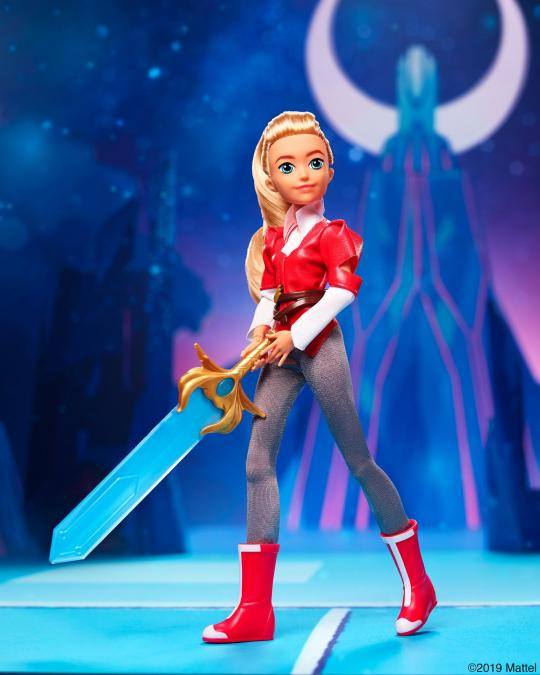
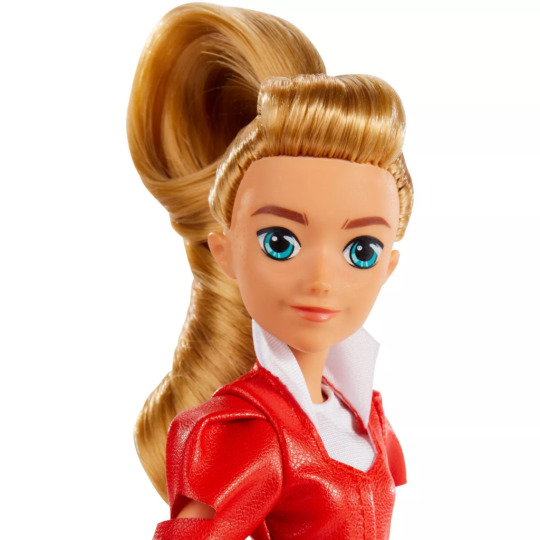
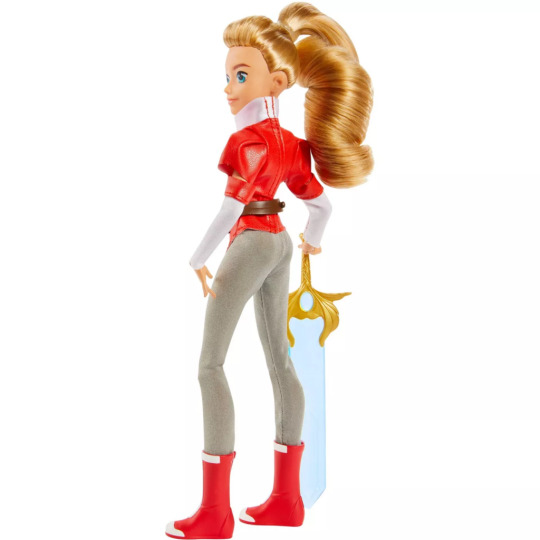
[Posed photo; the rest are stock photos]
I don't have many details on Adora's build, but here's her closeups. The white long-sleeves that are supposed to be from her shirt actually start at the hem of her jacket sleeves and are sewn directly to them. She has a white shirt front sewn on under the jacket collar to give the illusion of proper layering, but it's all one piece. She came with the same Sword of Protection that the two core She-ra dolls had.
Bootprints:
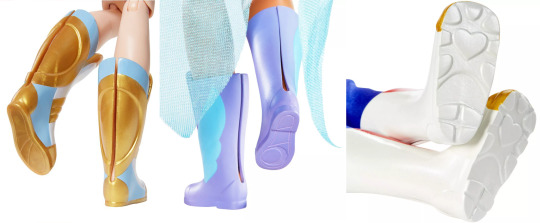
This was the only line they had at the time (and could still be) to have unique bootprints. I don't have a photo of it at the moment, but Adora's boots have four sparkles (the same shape as the emoji ✨) printed on the tread. She-ra's boots were fairly generic, but Glimmer's have a moon print on the bottom and Bow's featured hearts. Dreamworks shared the show designs with them ahead of time, since these dolls started production long before Bow's heart-soles were shown off in season two, and it was a detail they were excited to include for the fans.
It's mentioned up above, but the same cast was used for all of She-ra's boots. The pair pictured here is her con boots. Her regular boots didn't have the blue paint on the very top edge but were otherwise painted (they're up in the sword comparison photo in the SDCC section). The Battle Armor version was gold with no painting at all.
Packaging:
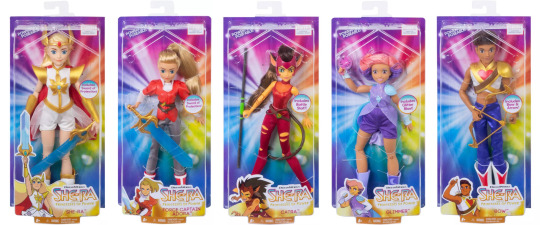
[A lineup of stock photos with the core five box fronts]
And finally, because it's really well-designed IMO, here's the packaging design that was used for the core five dolls. Darren Sander designed the packaging layout and blister with the artwork coming via Dreamworks. The front has the outlines from the Sword of Protection's blade embossed into it. The sides each have a little sword embossed into them and the top has the She-ra logo. They're difficult to see (much less photograph) in transparent plastic, and of course these are head-on photos, but the details really make it.
#merch#spop meta#she ra#words and things#i had to wait to be able to take photos of the packaging and I didn't want my own photos to go in the tags anyway#both because it looks more professional with posed photos and because i just don't like uploading photos#but also HEY i worked really hard on that original post so pay attention to it >:(#edit: i though i posted this like. two months ago. Oops
55 notes
·
View notes
Text
Hospital Visits
an:Hey y'all! This ones coming out a little late, I meant it to be out yesterday but here we are. Still super excited for this week even though we're nearing the end. Still have some content coming out in the next few days for the series as a whole. This is the second installment in the Happily Ever After series for Luke. As always, enjoy!
words:1.2 k
warnings:canon-typical injury, mentions of canon-typical violence, hospital setting
summary:"There's a difference in living and living well. You can't have it all, all by yourself. Something's always missing, 'til you share it with someone else."-George Strait
masterpost|taglist|have an idea
Over the next two months, you often found yourself in the company of Luke and Roxy, who had both become good friends during that time.
It had become a routine to walk through the park whenever you were on your way home in hopes of running into the two of them. In those two months, it had happened just over a handful of times, but when it did, the three of you would hang out until the sun went down. You hadn't seen him for a couple of days, so you assumed he was just busy. He hadn't shared what he did for work. All you knew was that he was a former US Army Ranger.
You had started today bright and early. You were up and 'ate before the sun was even fully up. Being self-employed meant doing tasks that you wouldn't do in a typical 9-5 job. Monday meant payday so, after a hard gym session and a soothing shower, you set to work. First was balancing the books and determining final costs. Next was making the list of people to be paid, and last was sending out the payments. After all, was said and done, you felt like you could relax a little bit. You ordered yourself breakfast from your favourite restaurant and just chilled for the morning, with the occasional Instagram shot, of course.
Around noon, you began to get ready to actually do some work. You were filming another unboxing video, with packages leftover and some new from your PO box, and reviewing some clothing brands that had been sent to you. You got ready quickly but precisely, remembering that you were going to be on camera for hours and under the lights for just as long. After getting prepared, you set to work.
You worked for hours until finally, you took a short break to recharge. With some water, a snack and a bathroom break, you were ready to work again. As you set up for your next video, your phone rang. Startling you out of your concentrated state. The blocked number on the screen was enough to encourage you not to answer the phone but, your curiosity got the better of you.
"Hello?" You said, answering your phone.
"Is this Y/N Y/L/N?" Asked a cheery voice on the other end of the phone.
"Yeah. Sorry, who is this?"
"Darling, my name is Penelope Garcia. I work for the FBI—"
"FBI? Did I do something wrong?" You asked, panicked, trying to rack your brain for any reason the FBI would be calling you.
"—No, not at all. I understand that you know Supervisory Special Agent Luke Alvez," She answered in a soothing tone, helping you to calm down a bit but still not entirely sure why the FBI would call you, even if it was for Luke.
"I met him a few months ago but, I just know him as Luke. We usually hang out at the park with his dog…."
"Okay well, darling, he's been shot." She said, getting straight to the point.
"What?!"
"He was shot in the arm, he had surgery but the doctors said he will make a full recovery and he kept mumbling your name as he was coming out of the sedation. I'll send you the address of the hospital."
"Thanks Penelope…" You said, kind of numbly. Mostly just trying to absorb the information you had just been given.
"Good luck Y/N!"
You quickly changed out of the sample clothes and into a comfy outfit. Slipping on shoes hurriedly, you grabbed your purse and rushed out the door. After locking the door behind you, you went down to your car. Clicking on the location pin Penelope had sent you, you started up the GPS and set on the way to the hospital. You quickly got frustrated trying to find parking in the parking lot and decided to park on the street instead. You all but jogged into the hospital, looking for anyone who could provide you with an update. The head nurse just pointed you to an official-looking woman who was in the waiting room. You walked up to her and took some deep breaths before introducing yourself.
"Excuse me?"
"Yes?"
Pointing to the nurse's station, you said, "They told me you could give me an update on Luke Alvez."
"Who are you?"
"I'm Y/N Y/L/N, a friend of Lukes. Who are you?"
You didn't even finish your sentence before a look you couldn't quite make out made its way onto her face.
"I'm supervisory special agent Emily Prentiss. I'm Lukes boss, I can take you to him."
The two of you set off walking through the never-ending corridors. In the silence, questions just kept swarming your head. In an attempt to keep them at bay, you asked, "What happened to him?"
She turned, briefly looking at you before she said, "Officially, I can't say too much. In the course of apprehending our UnSub, he got shot. The bullet knicked his subclavian artery, which is basically the shoulder area. He'll have to stay at the hospital 3 days but the doctor said he will make a full recovery."
You knew you were the one who asked, and she was just answering your question, but, at that moment, you had never wanted to yell at someone more. Where was his partner—assuming he has one? How did this happen? You only noticed you arrived at his room when Emily stopped walking. She opened the door and led you into the room before walking back out. Leaving you alone, with a sleeping Luke, to wait. After a couple hours in the hospital and you began to get hungry. You were reaching out for the Jell-O on his tray table when a hand grabbed your wrist.
"Don't take the jell-o please," a groggy voice startled you the same way the hand had.
You turned to see if the voice had come from Luke, and to your surprise, you found his warm brown eyes looking back at you. Jumping up to hug him, you shrieked, "Luke!"
A little confused, he asked, "Y/N, when did you get here?"
"You kept muttering my name to the doctors when you were coming off of the anesthesia."
"Well, I've been thinking about you while I'm working."
"What about me?"
He took a deep breath, and you noticed his heart sped up as the monitor beeped faster.
"Y/N Y/L/N, will you go on a date with me?"
A smile blossomed on your cheeks, and a warmth spread throughout your body, and you said jokingly, "well, with you on your deathbed, how could I say no?"
taglist:@multixfandomwriter @myescapefromthislife
68 notes
·
View notes
Text
My YCCTEAM'S Wireless Switch Pro Controller - Part 10 (Playtime through Super Mario 3D All-Stars game in Super Mario 64 #1)
Hi guys! Miss me of doing my continue YCCTEAM Controller topic reviewing? After using my controller of testing its buttons, batteries results, and doing gyro/motion controls in check, I decided to bring this for my YCCTEAM Controller topic to finished and give the results for how good was my controller is....almost. For my next one that I said from my April 22nd post, I've recording a video of using my controller during playtime with one of my games I choose. This video I did was back in April 18th; before 5 days later til showing my controller's gyro and motion through 👻Luigi's Mansion 3. Link Here
However though, I actually did 3 or 4 recording clips during the same day and I wanted to merge all 4 to make one video during this month of May 2021; instead of doing one at the time in clips. I can thank for my PicsArt app on my iPad Mini 2 to help me doing video edits and it really works! *thumbs up*
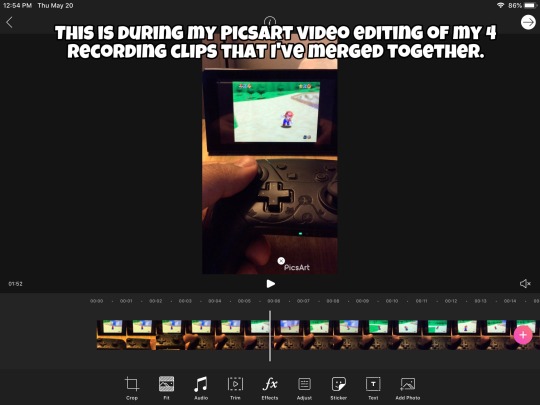

Those screenshots I took back in May 20th, by the way. ⬆️
However, it seems that I can't remove its tradmark on the right side bottom of the recording video. I'm sorry if I'll just leave it like that cause I don't have some money into my Apple account to purchased the PicsArts membership to help me remove its tradmark. At least knowing its small enough to not bother during this video of me playing games with my YCCTEAM Controller I've recorded. Nevertheless, let's get into my next topic part about using my pro switch controller through playtime I've been saving since April 18th. What better ways to show me playing with my controller with a game that I got from last year of Decemeber 2020 as my late Christmas gift: 🌟Super Mario 3D All-Stars! I've waiting for months to ever get started of my new progress through one of three gaming collection at first look. Just hoping that my buddy 🐰🖌Maxwell and his siblings will be ready to bring their reactions; mostly with Maxwell cause he's a big Mario fan and he'll be looking forward of me having fun with this game's progress I'll be bringing soon. Enough talking, let's-a-go for my latest topic part for today!
By the way, the original video's file size number was much larger so I use other video converter sites to turn down the file size smaller; that way I can uploaded through my tumblr blog just as easy.
0:00 to 0:37
Since now this recording video was actually the merge one with different shots I edited by using my PicsArt app, I'll begin saying the first one I did with my pro switch controller is doing Mario's moves through Super Mario 64. You know from my childhood that I happened to play the original Super Mario 64 since childhood. I remember when using my old N64 controller to play as Mario; jumping, running, and walking was a alright experience to begin my journey exercise to rescue Princess Peach from Bowser. Now years later that I got the 3D All-Stars collection version, I'm using my YCCTEAM Controller to get into Super Mario 64 once again. I still got it remember for the controls after learning from my original N64 game years ago, so here I am doing this to test my modern controller at hands. It looks good for starters when I use the left analog stick to move Mario and pressing the A button to perform jumping. I even do altogether while running and pressing the A button to perform a triple jump move.
0:37 to 0:53
Onto the next clip that I edited was pressing the Y button to perform his punching attack; like if I would be using it more often then doing jumping on enemies. At least knowing I've using it for the first boss battle which I'll get to that on my next video next month, by the way. I did five or more times of him throwing punches and the respond works fine. *thumbs up*
0:53 to 1:05
I quickly get into another part by performing Mario's ground pound move attack. I pressed the A button and ZR button while mid air. Just like my previous ones that it can do well when you gonna use for enemies/bosses and doing switching puzzles.
1:06 to 1:52
Finally now we're getting into the last part I've gotten of doing more of Mario's moveset I recorded. First was the jump kick attack after pressing the jump button then pressing X or Y button to kick in midair. Not bad, but barely if using it during my journey to rescue Princess Peach from Bowser sometimes. After that, I'm now doing the running long jump by moving the left analog stick to make Mario run faster a bit. Meanwhile pressing the Y button at the exact time can perform his long jump that I can feel the vibration on my YCCTEAM Controller; which is unexpected to say at least. I should've turned off the controller's vibration off during my recording, though....Just in case if It'll be little annoying when trying to have my gameplay through Super Mario game. Just saying, though. Anyways, I'm doing one more thing before ending this video and give some results about using my YCCTEAM Controller during playtime at first try. This is for the camera adjustment part as I use the right analog stick to move the camera; which Lakitu holding. It's little bit slow though when I'm trying to move the right analog stick quickly, but it was okay when using it for looking things; except looking into Mario's face cause reasons.
Looks like that's all I can bring you in this recording video of how far using my YCCTEAM Controller for Super Mario 64. Just wishing I could bring more of Mario's moves I haven't gone through it yet; such as crouching and doing backwards jumping. I did happened to perform those while not recording, but let's just say they're works fine as well; even could be useful during this game's progress. 🙂👍🏼
My Thoughts:
To my latest topic post for my YCCTEAM Controller review, it was a good start of using it during my playtime with Super Mario 3D All-Stars game and to the controlling respond as well. Testing with Mario's moves of jumping, ground pound attack, and so on was like taking me back when I'm playing with my original N64 controller, except differently since the N64 Controller had one analog stick in the middle bottom in weird design choice honestly. Nevertheless, it was still a good start.
Now if you we're thinking this will be my last topic review post for my YCCTEAM Controller, but I have other recording videos that I'll love to share for next month. So yeah, I'm still continuing this topic til I decided to finished. That being said, I did have good fun testing my controller; especially using through my first gaming progress of Super Mario 3D All-Stars that I promised to share for my upcoming posts soon.
Let's see how my mains reaction after showing my latest topic post for my YCCTEAM Controller.
🐰🖌Maxwell: It was the amazing thing I ever saw! At least during the begin though. ^^* While I give you applause for trying out Super Mario 64 on Switch in this recording, I'll can also give you a thumbs up about this latest topic post for using your YCCTEAM Controller in new test through playtime a bit. 😉👍🏼With this, I'm sure it can work well for your other games like 👻Luigi's Mansion 3 and 👊Super Smash Bros Ultimate. Though you already have.
🐰👊💥May: Indeed. Still our A-Pal will bringing more video recordings for another day soon. So his YCCTEAM Controller topic will continue, but hoping not to long eventually.
🦊⚽️Sam: Yeah. Besides, we like to see if he'll continue his gaming progress through Super Mario 3D All-Stars to share on his posts soon. That and he'll be doing his next items through upcoming topic reviews.
🐰🖌Maxwell and 🐰👊💥May: Huh?
You heard me right, guys. After I'll be done with my YCCTEAM Controller topic soon, I'll get into the next one for my other items that my family give me through stores or brought me online just in case we're still staying in houses til the pandemic can be over. It happens from months ago, by the way.
🐰🖌Maxwell: Guess you'll be doing your busyness through your upcoming topics, huh? Well at least hoping you'll have plenty of time to take it easy and organize your writing. For now though, you'll should keep going on your YCCTEAM Controller topic to continue; we can wait.
Thanks, Maxwell. Also hoping I'll remember when I can sharing one on my Super Mario 3D All-Stars gaming progress in screenshot pics to my Tumblr blog soon; by any chances I'll get. That's all for now. Hope you'll guys will giving a like to my lastest YCCTEAM Controller topic review post. See ya! 🙂👋
Pervious Posts for my YCCTEAM’s Pro Controller Topic:
Wireless Switch Pro Controller for Nintendo Switch/Switch Lite (Part 1) - Link Here #1
My YCCTEAM’s Wireless Switch Pro Controller for Nintendo Switch/Switch Lite Unboxing (Part 2) - Link Here #2
My YCCTEAM’s Wireless Switch Pro Controller for Nintendo Switch/Switch Lite Comparison with my Xbox One (Part 3) - Link Here #3
My YCCTEAM’s Wireless Switch Pro Controller for Nintendo Switch/Switch Lite Comparison with my Nintendo Switch’s Joy-Cons (Part 4) - Link Here #4
Testing Buttons (Part 5) - Link Here #5
Rumble Feature Testing (Part 6) - Link Here #6
Battery Charging Test (Part 7) - Link Here #7
Playtime Battery Life Results (Part 8) - Link Here #8
Gyro and Motion Controls 1st Half (Part 9) - Link Here #9
Gyro and Motion Controls 2nd Half (Part 9.5) - Link Here #10
#yccteam#yccteam controller#switch pro controller#video#video post#recording#super mario 64#super mario 3d all stars#3d collection game#3d game#testing#moves#doing moves#run#walk#jump#ground pound#etc#video edit#picsart#part 10#may 2021#may 24th 2021
7 notes
·
View notes
Text
✨Productive morning afternoon journal✨
I actually did pretty well with going to bed on time last night and getting out of the house this morning for it being a Thursday, plus I definitely learned something about my energy levels throughout the day!
Let's start with how yesterday went:
✨ I did get my lesson plan translated into a half-sheet to present from and I finished the problems for the warm-up and mini-assessment on when to use which cosine double angle formula; I did most of this from 8:30 am-9:50 am and then a smattering approximately around 1:00 pm-1:30 pm; I still need to come up with the wrap-up practice problems and ten test questions
✨ after my 10:00 am-11:10 am class, I felt pulled in different directions, and ended up cleaning the litter boxes, finally unboxing the litter delivery from last week and putting it into its storage bins, and breaking down all the cardboard boxes in the living room; the living room feels much nicer to come home to now!
✨ around 1:00 pm I was able to shift gears and start making lunch, which is when I realized my chicken was still frozen solid; fortunately, it was two small pieces, so the bowl-of-hot-water trick worked perfectly while I waited on the rice to be ready; I made sauteed chicken cubes with bok choy and an improvised sauce over jasmine rice, which worked out four portions as I had hoped, so I containerized three of those for later
✨ I watched a Minecraft video while I ate, and was ultimately done around 2:45 pm; I realized then that I was completely out of energy! seven hours of sleep translated to about eight hours of productivity, which is not great but it is my reality so I had better plan around it
✨I ended up mostly looking at social media despite knowing that I wanted to go ahead and get ready for bed; I ended up lying down around 7:30 pm and I think falling asleep by 9:30 pm
That left me quite well-rested for today!
✨ I initially woke up at 5:30 am and decided to delay my first alarm to 6:30 am to not wake up grumpy after only thirty minutes of "napping"
✨ then, all of my messages started coming in; AWA is this weekend, so my two hotel roommates wanted to talk plans while one was on their train to work, so I didn't get out of bed until 7:10 am
✨ it took me a bit of doing to use the restroom and get dressed with my hair brushed without falling into scrolling social media, and I did pretty good! I was ready to make breakfast by 7:20 am
✨ fortunately, the Braves stole a base during last night's game, so taco bell was giving out free tacos with every order, and one of my roommates was going anyways so they brought me back the free taco because it had meat in it and they are mostly vegan, so I had that ready to go for breakfast, plus a banana and my black tea with brown sugar and milk, which I finished at 8:00 am
✨ I sill wasn't pulling out of the driveway until 8:20 am, but traffic wasn't too bad despite the rain so I made it to campus in plenty of time to get things set up on the board
Class went great! My lead teacher loved how I intro'ed the class and even used what I had set up as part of her lesson!
✨ after class, I tried to get gas, but the card readers were all down; I'll have to get it on my way to the convention hotel tonight, although I do only need a quarter of a tank
✨ I got home by 11:00 am, and it took me a bit to transition into getting lunch; I had my prepped meal ready to eat by 11:30 am
✨ at noon I had my weekly meeting with my boss and my boss's boss to talk about the paper we are writing together; I finished my part last week and it was time for my boss's boss to write some connecting pieces and the conclusion, but since she's department chair she didn't have time to even look at it, so we just established that, wished her luck, and logged off
✨ it's just past 12:30 pm I'm feeling close to the same way I felt yesterday: tired and struggling to feel motivated to even do things that I want to do, like pack for the convention, so I've started a pot of coffee and I'm going to do a quick walk on the treadmill and see if those two combined change anything
0 notes
Text
Hands-On Review DIY Watch Club
Full disclosure: DIY Watch Club provided a kit for the purposes of featuring it here and on Instagram.
Today I've got the opportunity to review something unique - the DIY Watch Club Watchmaking tool kit from EONIQ! This is a brand new concept workshop where EONIQ provides all watchmaking tools and watch parts and users follow the instructions included on video step by step, to assemble their own watch!
Background
EONIQ is a custom watch brand based out of Hong Kong. Like Undone, they give you the ability to customize numerous watch styles. They describe themselves as “the first globally to bring customized mechanical watches that are designed by users on our website at the price point of a fashion watch.” Founded in 2014, they had a crowdfunding campaign in 2016 on Indiegogo. The $60,000 crowdfunding campaign on IndieGoGo hit its target in 1.5 hours and hit $200,000 within the first week. At the end of the campaign they raised $466,693 by 1551 backers.
Now with DIY Watch Club they've brought the watch assembly experience to hobbyists.
Personally, I've taken watches apart before, cleaned dials and crystals and of course changed batteries - so some of this was familiar, but there was still much that I was hoping to learn.

My watch kit arrived from Hong Kong it cardboard box with a nice quality zip-up case containing all the parts.
What's In The Box
The kit includes:
* A 38.5mm "Mosel" mechanical watch (with silver dial and Miyota 82S0 gun color movement)
* 316L stainless steel case
* Curved ACRYLITE ® 8N crystal
* See thru screw down caseback.
* A classic black leather strap
* A set of DIY Watch Watchmaking tools with teaching videos (there are three choices of Mandarin, Cantonese and English)

Tools:
tweezers
finger cots
hand pump
suede
Rodico
loupe
case opener
hand removal tools
protective film for hand removal
hand setting tool
screwdriver
peg wood
Overall the tools are solid - decent quality and will definitely come in handy for future maintenance on this and other watches.
The Process
You start off by scanning the QR code on the enclosed card, go through a quick sign up and you're in. Right away you get an introduction to what’s inside the package, and it shows you how to wear finger cots to protect the movement.
You then put the pins in the case back removal tool and remove the caseback from the movement. Then you view a quick tutorial on how to properly handle the movement so as to avoid damaging it.

Next you install the stem and crown, and the dial, movement holder, and movement. This is the part where I had the most difficulty. Fitting the dial into the movement took some effort. I was expecting putting the hands on to be the most difficult part of the assembly, but it was this step that took the longest as the dial was stubborn and would not stay attached. The dial is very nice looking though - mine was a silver sunburst dial that was not unlike a Seiko 5 dial in appearance. It's really sharp.

Hands
The hands were next - starting with the hour and the minute hand. I liked the emphasis on this section and it was good to find the kit came with a second set of hands because this part is tedious. I managed to succeed on the first try.

Aesthetically, the hands could be better. I would have preferred Timex Marlin style hands instead of polished hands with this dial to give it a cool vintage look - but that's just a personal design preference. You mileage may vary.
Once the hands are on and properly aligned you clean everything using the hand pump, rodico and peg wood. The the movement is installed in the case, the caseback screwed on and the leather strap (quick release spring bars) is affixed on the watch. At this point just over an hour and 30 minutes had passed from unboxing to a wearable watch!
Final Thoughts
What a fun activity! Being in lock down this was a great escape from the monotony of Covid-19 isolation. Did I end up with a luxury watch? No. Am I now a watchmaker? Not really. Did I have enjoy the experience? I actually really did.

The watch itself is nice. An automatic , open heart dial with a retro silver sunburst dial and a robust Miyota movement that hacks and handwinds. But really this is not something you've invested in to get a luxury watch when you're done assembling it.
Instead you get a really cool experience that can be a nice introduction to watch making or even watch modding and a watch that you assembled! I think that's what you're ultimately paying for here: a one of a kind horological experience in your own home. I highly recommend it for anyone who is curious about watch modding and even watchmaking or for someone looking for a gift for an aspiring watchmaker or WIS. I had a great time.
You can get your own kit at https://diywatch.club


0 notes
Text
My YCCTEAM's Wireless Switch Switch Pro Controller - Part 9.5 (Gyro and Motion Controls) (w/ Luigi's Mansion 3)
What's up, followers, friends, and Nintendo fans? It's been last month of March 2021 where I bring my past topic part for my YCCTEAM Controller back in the 30th day; just to trying out testing the gyro and motion control setting through Super Mario Odyssey. However, I promised that I'll be bringing the second half of testing the gyro and motion control setting again and here it is for using through my 👻Luigi's Mansion 3 game. (Although mostly with gyro control cause I've checked the game's details) I'm gladly saving this recorded video since March 26th like the same day after finished up my first test.
Much like from the first one though, I did the same thing trying to upload this video by dowsize its file smaller; of what the original iPad recorded video's file size was "100 MB" or more. Anyways, time to bring you my second half test of the YCCTEAM Controller's gyro and motion control setting. (Again mostly the gyro control part, sorry....)
By the way, I'm also like to announce that I've recorded other videos of using my YCCTEAM Controller during playtime for one of my games. Hoping I can save them as my conclusion to finished this topic soon, but just taking time. Sorry if I've said to confused I'm bringing my next YCCTEAM topic of me doing Super Mario 3D All-Stars today, though. ^^*
So for the next video of testing my YCCTEAM Controller again, I boosted up Luigi's Mansion 3 as you can see I'm at the elevator part. I haven't been talk about my progress since I got this game from last year, even I would like to do so more often or not. Nevertheless, my gaming progress through Luigi's Manison 3 was alright. I've been collecting ghosts, rescuing some Toads, encounter bosses, and gotten 11 elevator knobs so far. In fact back in March 14th, 2021 where I save my game file after I went to the Unnatural History Museum to battle out the caveman ghost. So why not taking a break by showing my second half testing with Luigi's Poltergust G-00 in action?
I happened to using it way back when, although mostly with analog sticks on left and right while controlling Luigi. It's a better option when trying to capture ghosts or solve puzzle when you need the right analog to turn directions. That being said, let's see if I using my controller to move around Luigi while he's "vacuuming."
At 0:05 to 0:13, I begin with using Luigi's Poltergust G-00 to suck things by pressing the ZR Button. While doing so, I'm using my controller's gyro setting to aim up and down to move. It funtion alright as I expected and even also work for blowing when pressing the ZL Button. Although you didn't seen it for this video cause I forget to add it in. Sorry. ^^*
At 0:14 to 0:26, I'm on the second part by switching Luigi's Poltergust G-00 with a Strobulb to be using to stun ghostly enemies. I simple go for pressing the A or R Button, but while doing so using my controller's gyro setting a second time. It still funtion just right when I'm trying to aim it up and down to move. *Thumbs up*
At 0:27 to 0:36, I'm now at switching to dark light aiming that it usually do helping to find hidden coins through paintings and rescue Toads being trapped there. I pressing the X Button to activate it while using my controller's gyro setting to aim just as fine.
At 0:38 to 0:51, Finally that I'm almost finished this second half test by doing one more switching into its Suction Shot; where it helpful to aim on flat surfaces then grab it by sucking to open up objects or break them. I usually hold the Y Button first before using my controller's gyro setting to aim down and up carefully; then releasing the Y Button to take a suction shot.
After using my controller's gyro setting through Luigi's Mansion 3, it was not bad how it funtions of trying to get aiming things; if I would use that during my continue gaming progress. Same goes for Super Mario Odyssey as I already tested its Gyro and Motion Control of tossing Cappy at enemies.
My Thoughts:
It was a👍🏼thumbs up results when using my controller's gyro setting through Luigi's Mansion 3, though not as much of what I did was aiming direction with Luigi's Poltergust G-00. At least knowing it can be useful of aiming things such as ghosts to capture them, but again still that the analog sticks are the better option.
I think that's all of trying to test the gyro and motion control for my YCCTEAM Controller I have. Besides, I have two games does support it; expect if checking to make sure my Super Mario 3D All-Stars game does have support of gyro and motion controls and then I'll have another recording next time. At least knowing I'll be bringing some Super Mario 3D All-Stars game during playtime with my controller; as my next part topic soon. Hoping my main rabbit OC 🐰🖌Maxwell can wait a little bit longer to look forward of what I'll showing. ☺👍🏼 Now if you excuse me, I'm still be doing some drafting art to be done such as Sam's new bio for example.
Pervious Posts for my YCCTEAM’s Pro Controller Topic:
Wireless Switch Pro Controller for Nintendo Switch/Switch Lite (Part 1) - Link Here #1
My YCCTEAM’s Wireless Switch Pro Controller for Nintendo Switch/Switch Lite Unboxing (Part 2) - Link Here #2
My YCCTEAM’s Wireless Switch Pro Controller for Nintendo Switch/Switch Lite Comparison with my Xbox One (Part 3) - Link Here #3
My YCCTEAM’s Wireless Switch Pro Controller for Nintendo Switch/Switch Lite Comparison with my Nintendo Switch’s Joy-Cons (Part 4) - Link Here #4
Testing Buttons (Part 5) - Link Here #5
Rumble Feature Testing (Part 6) - Link Here #6
Battery Charging Test (Part 7) - Link Here #7
Playtime Battery Life Results (Part 8) - Link Here #8
Gyro and Motion Controls 1st Half (Part 9) - Link Here #9
#yccteam#yccteam controller#switch pro controller#video#video post#gyro control#luigi mansion 3#luigi's mansion 3#test#testing#aiming#funtion#part 9.5#april 2021#april 22nd 2021#latest topic
9 notes
·
View notes