#it's likely the youtube to mp4 converter but i don't have a better one
Explore tagged Tumblr posts
Text


Ramon Tikaram in Mile High, s1 e8
part 1
#ramon tikaram#mile high#gif#2003#sadly the vid i found is downcoverted from 25fps to 24fps#so it does skip a little :/#it's likely the youtube to mp4 converter but i don't have a better one#i like to see beautiful men in dresses
12 notes
·
View notes
Note
Hello. Sorry to bother you but I wanted to ask about your gifing method. Do you use import video frames to layers function or you do screencaps in player and then upload them into ps? And does this affect quality?
tl;dr: i import mp4 files straight into photoshop and i do not believe that this affects the quality of the gif
you are not a bother at all anon and i wrote a suuupeeer looong answer for you. maybe too long actually. i never get the chance to talk about this insane hobby ever so i hope this pile of word vomit will be informative!
i feel like i'm the only weirdo who does this but what i usually do is i'll open mp4 files directly in photoshop and clip out the bits that i want then do frames to layers. it's somewhat time consuming but i feel like it takes the same amount of time as screencapping and i personally find it a lot more tolerable.
the time consuming problem is that most tv shows come in mkv formats so if you want to use this method you'll have to covert all mkv files to mp4 files (easy to do as long as you have vlc player, but again, time consuming). it totally depends on which method you can tolerate better. since 1 second = 30 frames, can you stand pressing the snapshot and next frame hotkeys 30 times for 30 frames for each second of each gif you make? or are you willing to wait for your computer to convert an hour's worth of video for every single episode you want to gif?
as for quality, i would say that there's no noticeable difference between screencapping or clipping from the video file itself.
example:


one gif was made by screencapping to frames to layers, the other by opening the converted mp4 file in photoshop. can you tell which one was made using which method? i don't think the quality differs enough for it to matter (to me).
so it really is up to your tolerance for amount of time consumed. the only important factor for quality is the resolution of your base file. 1080p is always going to look better than 720p or a screen recording. videos downloaded from youtube are fine, but 1080p still makes for clearer, sharper gifs.
example screen recorded gif (left) v.s. 1080p file (right):


i do not recommend screen recordings, because the gif quality will be equivalent to a 480p file even if the recorded source has a resolution of 1080p and your recording dimensions are large. gifs made from screen recordings can also be laggy. also sometimes with poorer quality videos, the more you tweak the gif and stack filters on it, the worse it will look.
+ for anybody reading who is interested in making gifs, well honestly i would advise you not to start, maybe just reblog and request if there's a specific gifset you want made. it is a super time consuming hobby that really does not enrich your life very much, but if you are not dissuaded by my 1 million warnings about time and still want to be a ~gifmaker~ i have made a couple of posts that might help if you're a beginner: [gifmaking resources masterpost] [curves tutorial (for brighter cleaner gifs)]
#if you're a gifmaker and you're reading this how long does it take for you to make a set? it usually takes me an hour per set#like maybe i'm doing something wrong and taking too long to make gifs so maybe don't listen to me? idk about other users though
8 notes
·
View notes
Note
Hi! I want to help with the Layton archiving, but have no idea how. Would it be bad to ask how to help with saving things?
Hi! I'm not really anyone who knows much about digital media preservation (there are plenty in this fandom who are!) but the basics I can offer are:
If there's a YouTube video or other resource you'd like to keep that you think would fall under the umbrella of non-transformative copyrighted work for LVL-5, download it! You can do this by looking up what format is appropriate for the file type you're looking to download - for instance, videos are usually saved as .mp4 or .mov, and audio is saved as .mp3 or .wav for the most part. Different file types have different pros and cons, but for these purposes pretty much anything will do. Then, look up how to convert from what you're looking at (e.g. a webpage, a video) to the appropriate filetype, and usually there will be some helpful links to do it for you. For instance: "youtube to mp4 converter" is a good google search for video saving.
Anything you download can be uploaded to the Google Drive. (Within reason; I have a 15GB cap on my account.)
If you can't think of anything you'd like to save, one great method for helping preserve things is by creating backups of this drive! To do that you'll need a flashdrive/USB stick or some other form of hard-drive outside of your computer. From there, you can download the whole Google Drive folder, move it to the flashdrive you've plugged in, and you're good to go! This is valuable because sometimes, if Google catches wind that people are saving copyrighted materials, they'll shut down a drive - I hope to God they don't do that since the folder is hosted on the same account as all my fanfiction (oops) - but if it DOES happen, it's really useful to have multiple backups of the folder kicking around, so that someone can restore the data and we can keep using it in the future!
Anyone involved in the Layton Lost Media project/more involved in media preservation feel free to add onto this - I'm barely computer-literate at the best of times and I'm sure there are other people who have much better recommendations than I do.
6 notes
·
View notes
Text
Gif tutorial by Alinelovelace
Alright, I'll be doing 3 things here today:
1.) Sharing the programs and websites I use
2.) Showing y'all a tutorial on how I make my gifs (this is my first tutorial, so if anything doesn't make sense, don't hesitate to message me, send me an ask, or comment on this post!!!!!)
3.) Sharing some resources by insanely talented gif makers (because I learned how to make gifs by following tutorials)
It's probably important(?) to mention that I use a Windows laptop
A.) Programs and websites:
ezgif: to make my gifs and do light editing
You can make gifs with video clips or screen caps. I'm not advanced enough to use screen caps, though they're supposed to make gorgeous gifs. I use ezgif to make the actual gif and edit the timing (which I end up having to tweak on Photoshop but...)
I also like ezgif because no watermarks!! I will do anything in my power to get rid of watermarks from websites and editing programs because they bother the hell out of me!
Photoshop: for the rest of my editing
This is where I recolor and add text.
A great alternative to Photoshop is Photopea, which I've used before I "obtained" Photoshop. It's FREE and online, so you don't have to download anything! I highly recommend it if you really want to get into gif coloring !!!!
Currently, I get my videos from torrents (bc I have a wide selection for my family to watch on our tv). But I used to use the Xbox game bar on Windows to record the clips I wanted on online streaming sites (unfortunately there's not a whole lot up and running anymore), then cropped and cut them. If anyone's interested in that, I could probably post a separate tutorial for that another time :)
There's also screen cap websites out there and YouTube. And probably dozens of other ways to get videos that I don't know about!
Video cutter
If you use full length episode videos and don't know how to crop them on your laptop (like me)
★★★★★★★★★★★★★★★★★★★★★
B.) Tutorial:
I'll be remaking the first gifset I ever made since I've learned A LOT since then! It should be pretty simple since there's only one set of subtitles.
Another time, I could do an edit tutorial like my That 70s Show ones. It's just taking the same concepts as this tutorial though, and playing around with colors, fonts, and font placement.
1.) Find your video/screen caps:
Since I no longer have the video from my first gifset, I just googled "Mulder throwing pencils season 10" on YouTube. After finding the video, I copied the link and pasted it into a YouTube to MP4 site ((this site has never given me popups or tried to get me to download something that isn't my video file)).
2.) If your downloaded video clip is short enough, you can just stick it into ezgif. If not, you may have to cut it using a website or a computer program.
Ezgif.com -> video to gif -> browse -> select your file -> upload video
3.) After clicking upload video, you should find yourself on this page:
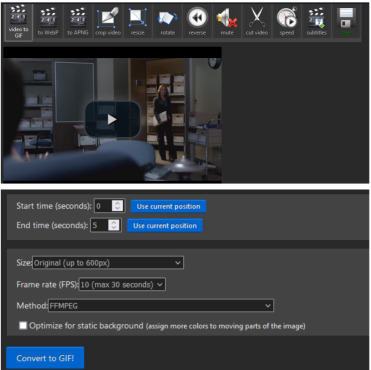
If you need to do any kind of video editing (cropping, rotating, resizing, etc) this is the place to do it! This is also where you make your gifs.
For the first gif, I don't need to change the start time, since I'm starting at the beginning of the video. 0 seconds is fine. But for the stop time, I'm going to play the video, pause where I want my first gif to end, then press "use current position" by end time.
I don't usually touch the settings for size, FPS, or method. If the gif doesn't have a lot of movement, I check "optimize for static background"
Then press convert to gif.
Here's the product I got. Since it's such a short clip, it moves a little fast for me.
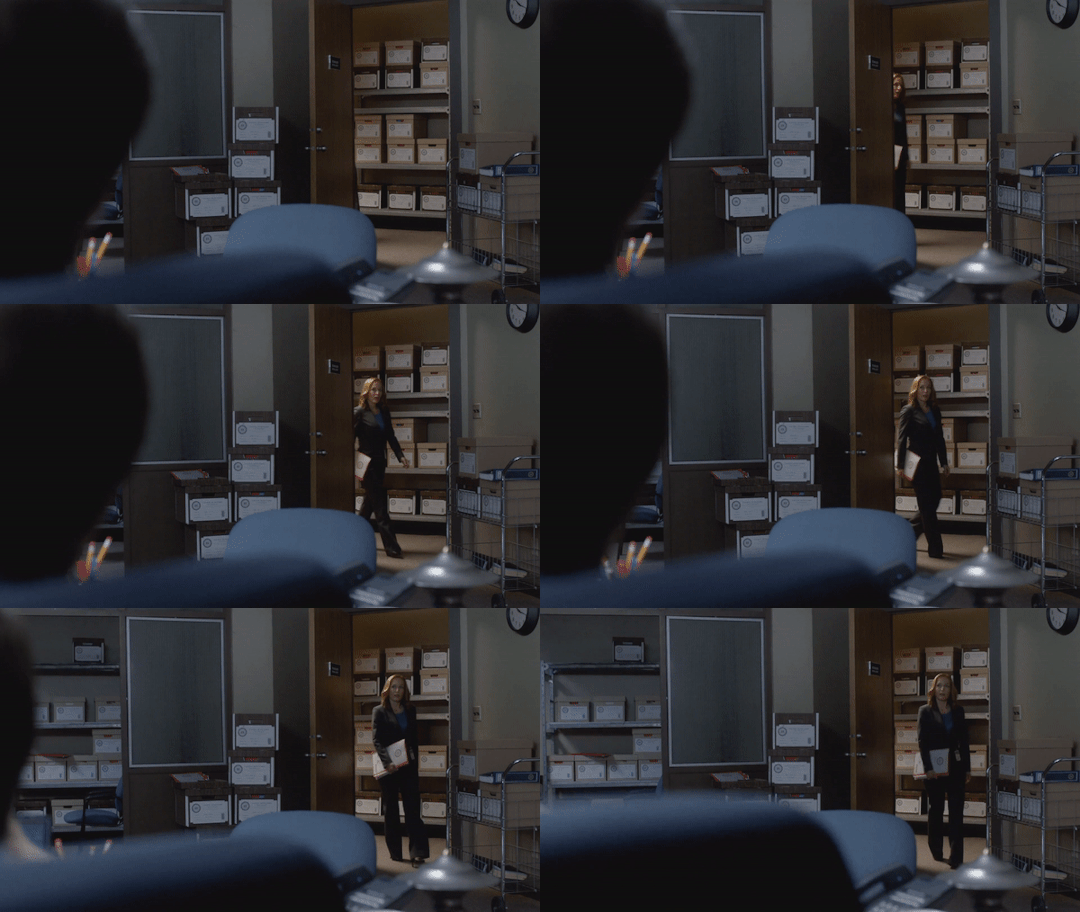
I'm going to click "speed" which is below the gif. You're brought to this page:
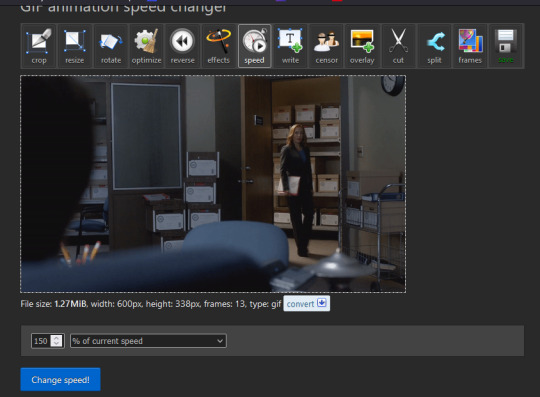
This is completely up to you for speed, but I find that between 60% and 85% end up looking good. If you don't like it, just change the number in the box and press "change speed". I ended up with mine at 65% of current speed.
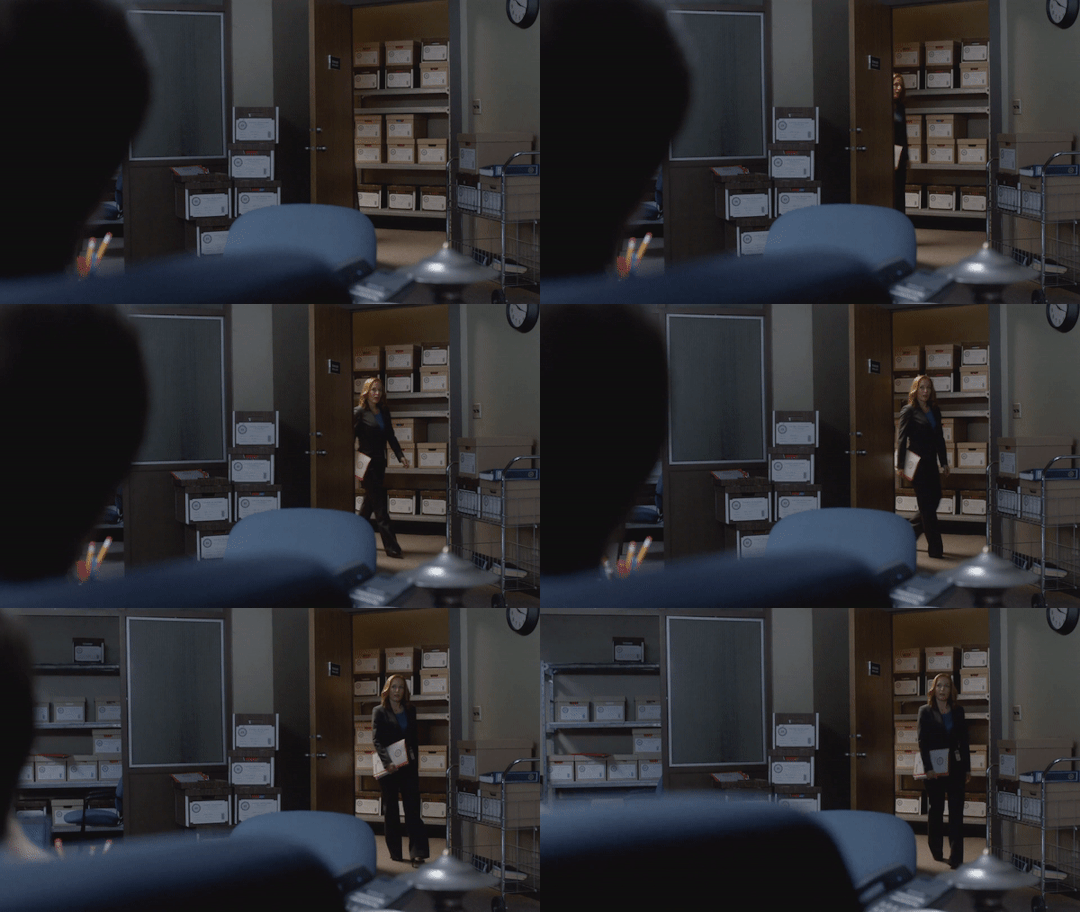
A little better, right? The gifs that turn out best are 3 seconds to 10 seconds in my experience. This one is 1.5 seconds, so it's a little fast.
After that, rinse and repeat for every gif you need to make.
4.) Editing time! This is for Photoshop (if you use Photopea, I very much recommend this tutorial. It's very well explained!)
Go ahead and open all of your gifs once Photoshop is booted up. Then click window -> timeline
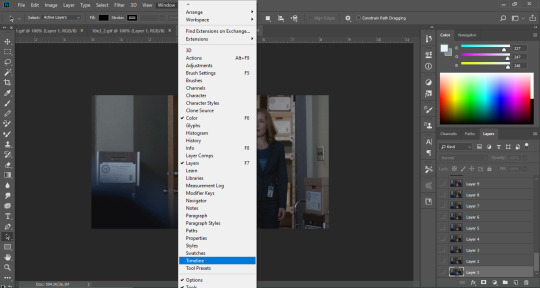
Now you have a handy dandy little timeline on the bottom.
The first thing you're going to do click play and decide whether or not your gifs are running at the speed you want. If yes, move on to next step.
If not: click on the three lines -> select all frames -> little drop down arrow. You should have a variety of times available to choose. Usually, I click other, then put somewhere between 0.04 and 0.08 seconds. Click play again. If you don't like it, try this step again.
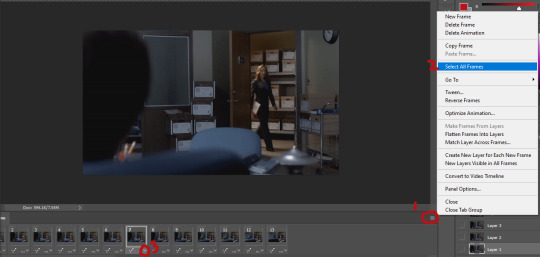
If you need to crop your gif, three lines -> select all frames. Press "c" on your keyboard and crop accordingly.
4a.) Color editing
This is where things get complicated. Just remember coloring is subjective and everyone does it differently. This is just an intro to the different tools most gif makers use to alter color.
You don't have to use all of these! I definitely pick and choose depending on how I want the coloring to look. When I'm making a gif set, my coloring isn't as adventurous as when I'm making an edit. It doesn't feel worth it to give away my settings for this gifset since it changes depending on the coloring and lighting of the scene.
All of these tools can be found under "create new filter adjustment layer"
• Brightness/Contrast
This one is the easiest in my opinion. It's pretty straightforward. The more you drag brightness the right, the brighter your gif gets. The more you drag contrast to the right, the higher the contrast is.
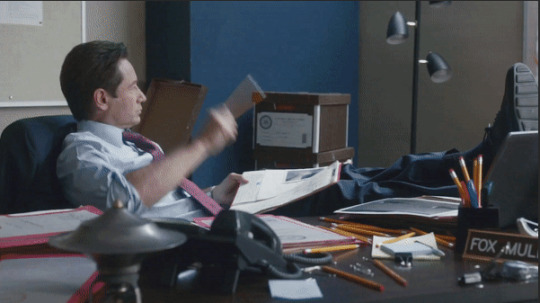
• Curves
This adjusts lighting with color values. It's another tool that's hard to explain. I just drag the little circles on the chart until it looks good

• Color Balance
Like every other setting, exactly what you do with this tool is up to you. Color Balance adjusts the overall tint of your gif. I recommend editing highlights, shadows, and midtones for the best results.
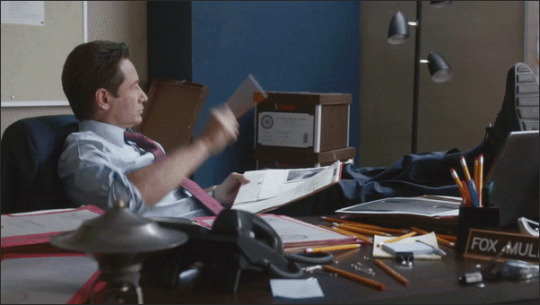
• Channel mixer
This one is one of the most complicated tools when making gifs in my opinion. It's best for getting rid of weird colored tints (think the blue coloring in Twilight). I'll just link a tutorial here for it. I don't make enough gifs to know how to explain it.
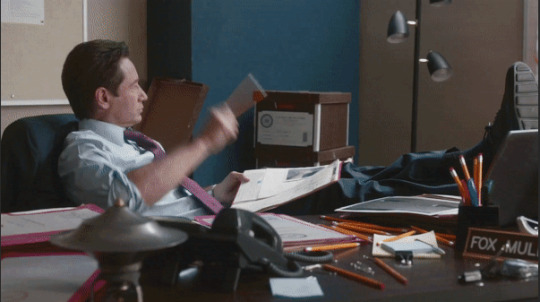
• Selective color
Hands down my favorite tool, though not only specifically for gif making. This tool allows you to select a color (reds, yellows, greens, cyans, blues, magentas, whites, neutrals, blacks) and edit each color group. For example: my skin in photos usually has a weird red tint. I can edit the reds in my photo using this tool to make it look less abrasive.
You just play around with the different colors and bars for each color until each color group looks good. I recommend hitting the highest value to see how the color changes/what parts of the gif are affected by the change.
In the instance below, I wanted to see how magenta affected the blue colors, so I dragged magenta to 100. Now, knowing what kind of color changes magenta will make to blue, I can adjust accordingly.
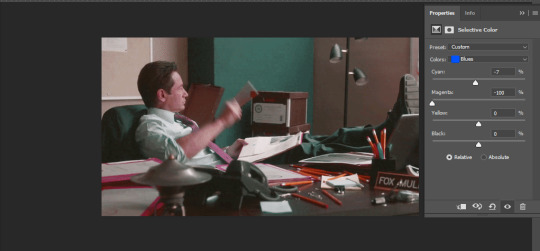
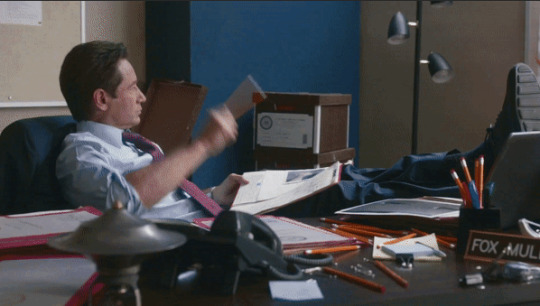
Messing around with the each color put me here:
• Vibrance
Another pretty self explanatory tool! Vibrance and saturation bars make the gif colors more colored and vibrant.
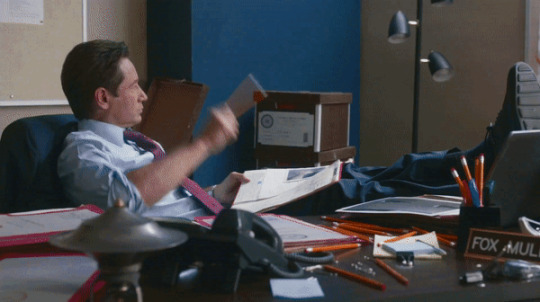
• Applying the filters to all frames
Shift click to select all the filters, and drag them above all the layers. They should now be applied to all the frames.
If not, select all frames with the three lines menu drop down like before -> click the little eye to turn off visibility, then click it again to turn it back on. You should be able to see everything now.
In order to carry the same colors from gif to gif, I take pictures of each setting and edit each filter adjustment layer accordingly. I side by side compare and make adjustments if the coloring doesn't match quite right. I'm sure there's a better way to do this, but I'm not experienced enough yet.


4b.) Subtitles
This part isn't too bad. For subtitle text, I use Calibri. Myriad pro bold italic and Arial are also really good options though!
• Text
Go to the sidebar and select text. Drag yourself out a box approximately where you want your subtitles. Type whatever you want. If you don't like where it is, click the move tool and drag it wherever you'd like.
Here are my text settings:

• Blending options
Right click your text layer and select "blending options" at the top. I edit stroke, which adds an outline. I also edit drop shadow, just because it adds a little depth to the text

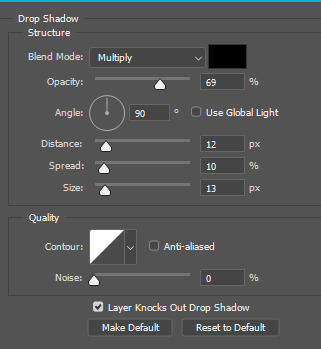
• Applying to all frames
Drag the text layer to the top, just like you did with the adjustment filter layers when coloring. The same troubleshooting applies.
5.) Exporting
I know there's other ways to do this, but this is the way that makes the most sense to me.
Select all frames on the timeline -> file -> export -> save for web (legacy) -> save
With everything together, you go from:


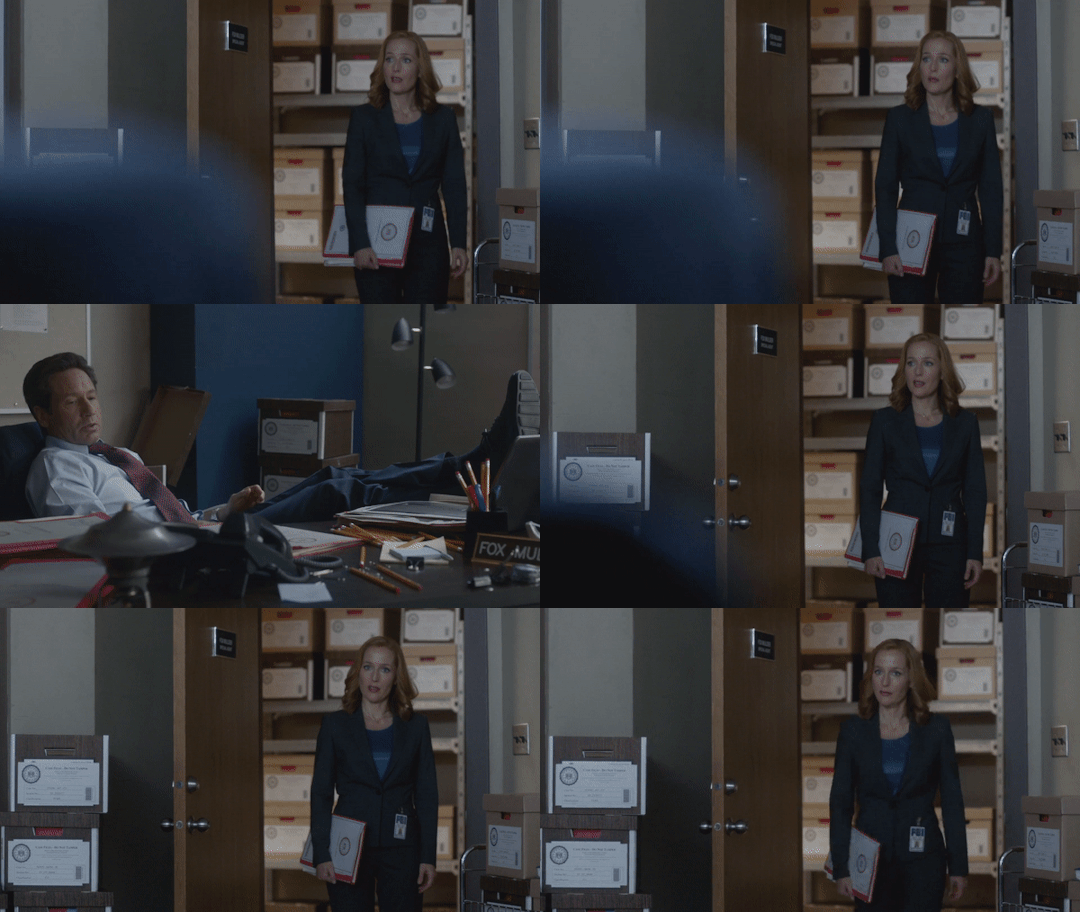
To:
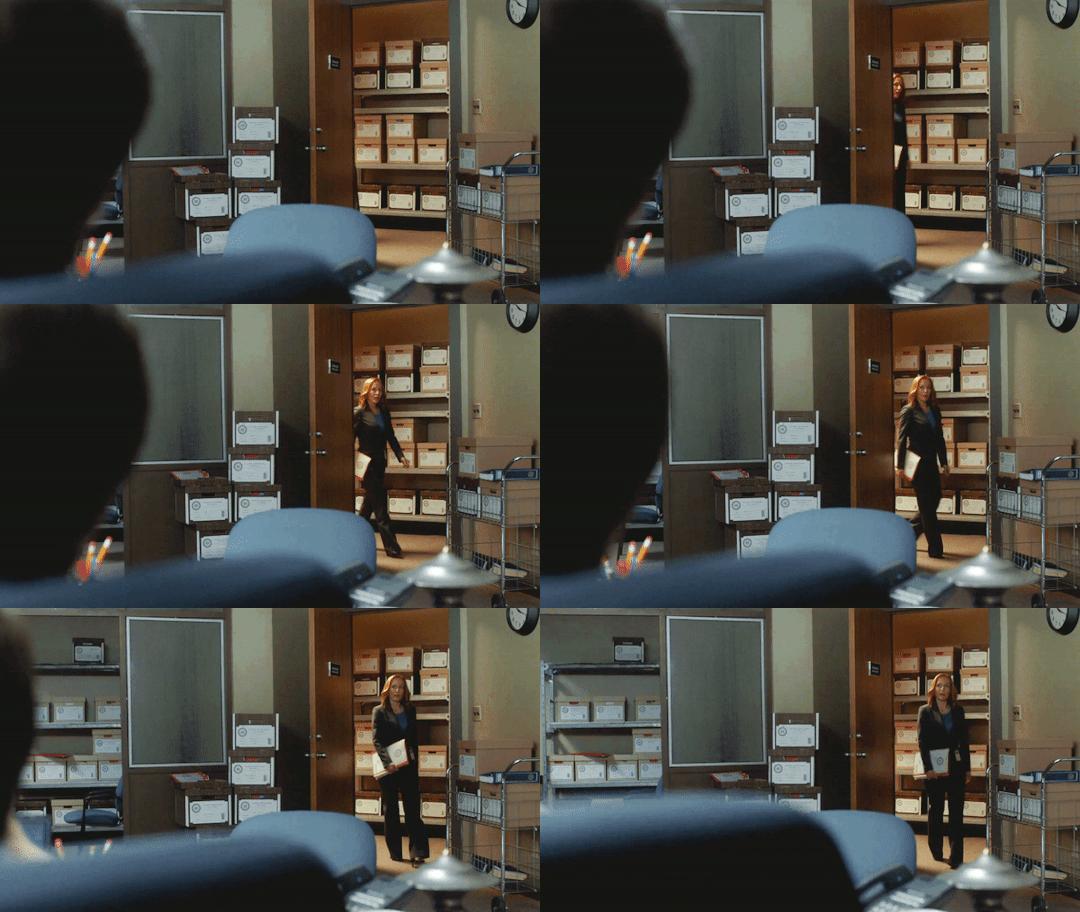


I had the subtitles in two parts because my first one had the subtitle in two parts (consistency).
Happy giffing!~~
★★★★★★★★★★★★★★★★★★★★★
C.) Resources:
This is a collection of resources both for Photopea and Photoshop
Photopea Resources:
Photopea giffing tutorial by @heroeddiemunson
Photopea gif coloring tutorial by @heroeddiemunson
Photopea removing yellow tint tutorial by @lacebird
Photopea gif making tutorial by @aragarna
Photopea gif making tutorial by @ashleyolsen
Photopea changing background color of gifs by @benoitblanc
Photoshop tutorials:
Giffing tutorial by @dqmeron
Subtitle tutorial by @itsphotoshop
Blurring gif backgrounds by @clubgif
Inverted colored text tutorial by @spaceslayer
Gradient text tutorial by @tawaifeddiediaz
Gif coloring tutorial by @logangarfield
Color consistency tutorial by @clubgif
Channel mixer tutorial by @zoyanazyalensky
11 notes
·
View notes
Text

hello! an anon asked me to do a tutorial on how i do my gifs, so here is my attempt to do that but i'm so bad at explaining so bear with me
this tutorial is screenshot and link heavy!
vapoursynth
vapoursynth is really useful for resizing, clipping and sharpening gifs. i've learned how to use vapoursynth from this tutorial, if you're intrested in using it (the tutorial also explains how to set it up). with time i've started using different sharpening settings than the ones that are mentioned in the tutorial (these are settings i used to use). also you can download vapoursynth from here
i use photoshop 2020 to make my gifs
handbrake
nowadays i use handbrake for clipping, it’s super easy to use and free. upon opening the program, make sure your summary, dimensions, filters and video settings are set to this:
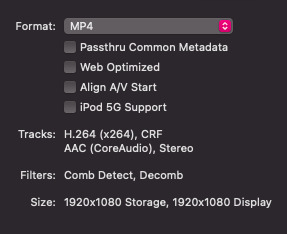
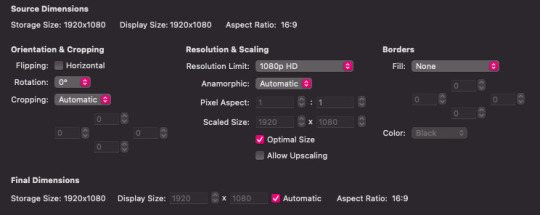
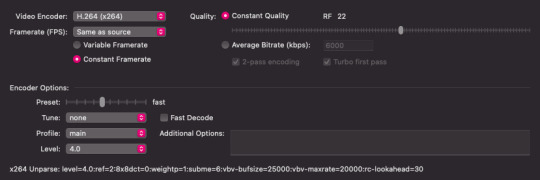
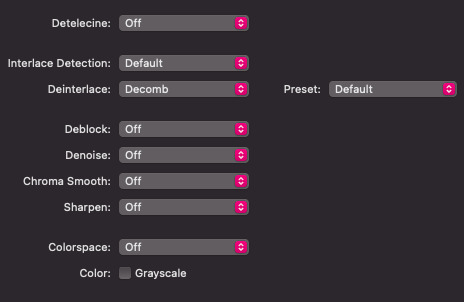
tbh the audio, subtitles and chapters don’t really matter. change the range from chapters to seconds, and find the time of your scene. type it into the boxes:

name your file at the bottom. make sure it ends with .mp4 then click the green start button. as soon as it’s finished, you can open it up in photoshop and start giffing!
i'll start with the very basics of my gif process, so if you know the basics of gif making, you can skip these few steps.
making the gif
first of all you go to file>import>video frames to layers
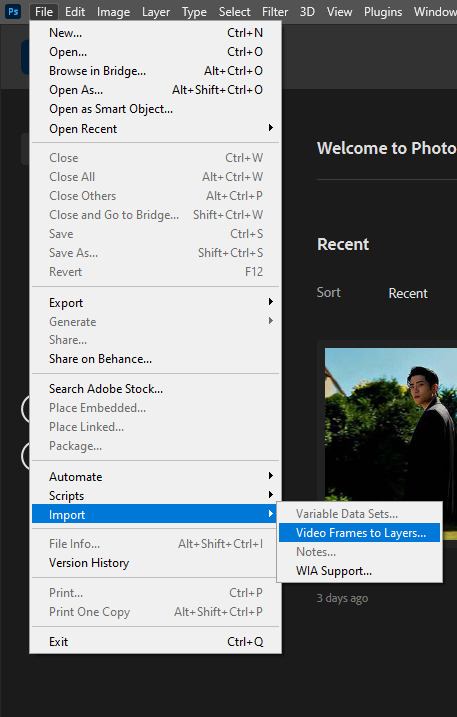
once you choose the video, a box will pop out (if you've chosen a video that has been encoded in vapoursynth or clipped in handbrake you can just click 'OK'. (if you're uploading a downloaded youtube video you'll have to trim the video with those two slides to your desired length)
i use the timeline to do my gifs (if you don't have it already opened go to window>timeline)
resizing
since I don't use vapour synth I crop and resize my gifs directly in photoshop. here you'll find a very helpful layout, made by @.dazzlingkai, with tumblr's dimensions for gifs and images. i usually do 540 x 450 for mvs. for cropping simply use the crop tool:

click on it and crop your gif. make sure you’ve set your dimensions at the top (this will help you with resizing):


after you’ve cropped it to your liking, click image at the very top then image size, and type in your dimensions:
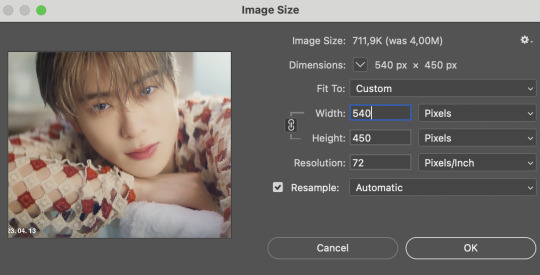
hit enter and your gif will be fully cropped and resized!
sharpening
before you should delete any frames that you don't want in your final gif. to do it choose the linear menu above your timeline and then delete frames
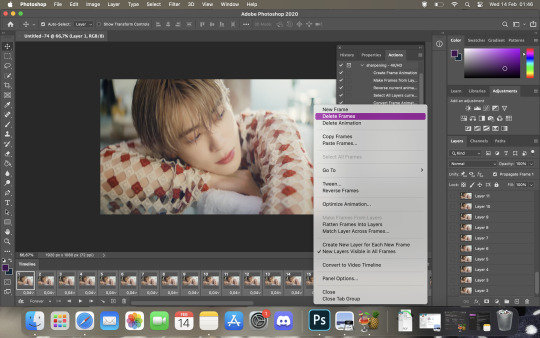
after deleting the unnecessary frames choose the same menu again and this time choose select all frames

once the layers are selected, click on the little chevron down to set the delay of the gifs. i choose other on the pop out menu and my delay setting is 0,05s (for vids resized in vapoursynth 0,04s might be better)
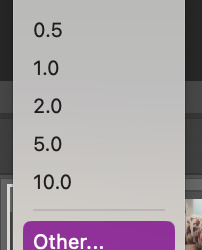
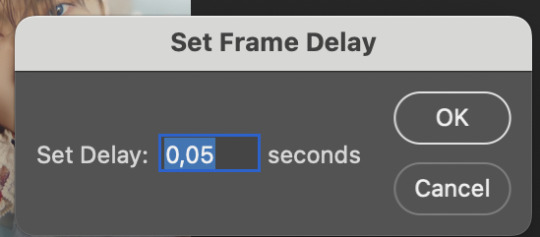
afterwards convert it to video timeline

now onto the sharpening itself.
the sharpening will depend on the quality of the file and/or how grainy it is if it happens to be.
select all your layers (hold shift and then scroll to the last layer that is visible, it has the little eye next to it, and the delete the ones you don't need)
then go to filter>convert to smart filters
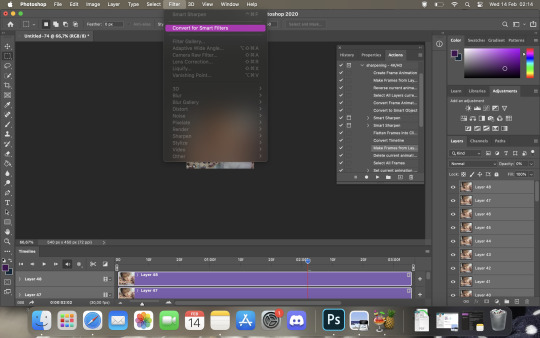
go to filter again, then select sharpen>smart sharpen
these are my first sharpening settings for 4k vids:

then i add another smart sharpen filter but with this settings to:
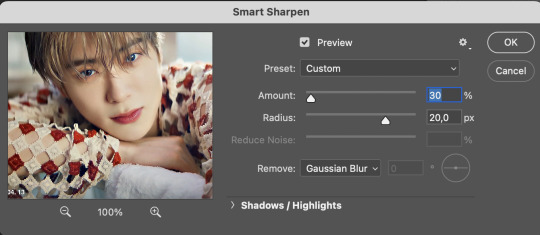
then I flatten the frames to clips.
click the linear menu>convert frames>flatten frames into clips

then convert it into timeline again and make frames from layers:
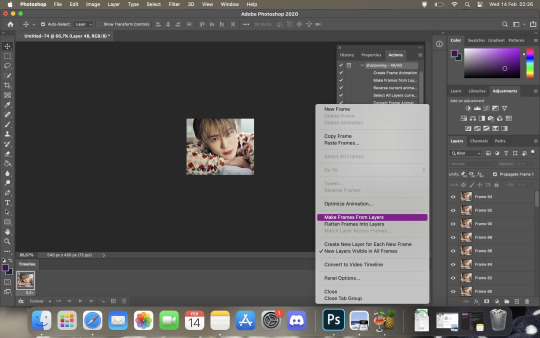
then delete the animation
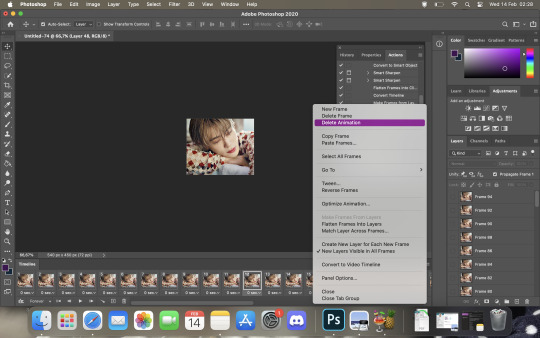
select all the layers again and set the delay to 0,05s as before
good news! to make the process of sharpening shorter you can use this action created by @.lildohnut
coloring
i adjust the colouring accordingly to the video, but i always include these adjustments:

in most cases:
i set exposure to +0,25
gradient map 1 is a white-black gradient with it's blend mode set to soft light and a 15% of opacity
gradient map 2 is basically a copy of the first one BUT reversed and the opacity set to 30% and fill to 70%
gradient map 3 is a rainbow gradient with blend mode set to saturation, 15% and fill to 50%
in selective color 2 under the blacks tab set the black +10
saving
to save your gif go to file>export>save for web (legacy)
this are my saving usual settings

hope you find this tutorial helpful! 💜
#allresources#itsphotoshop#userbru#usermich#useroptional#usersource#completeresources#resourcemarket#photoshop tutorial#gif tutorial
122 notes
·
View notes
Note
you do edits and gifs right? i am trying to find a good screen recorder (preferably free and without a watermark. kind of a tall order. i know) i just wondered if maybe you knew of one? also curious what programs/process you use to create your gifs and edits if you don't mind sharing ty
Hey! I've been making gifs for the last ten years and I got some tricks up my sleeve. It's going to be such a long post (as I'll discuss my process in detail and depth, explaining all the little things), so if anyone is interested, just read under the cut! (❁´◡`❁)
Step one: finding the video
To make an HQ gif, your video has to be HQ. The best choice is to go on YouTube and download the highest-quality video:
Example -> if there is as quality option 4K, download the video in 4K.
Remember that .mp4 videos have a lower quality, because it's a compressed file.
A better extension is .mkv, which I find preserves the quality better.
If you can't get the video from YouTube, you may still want to have a good quality video -> you can still record your screen and I suggest this open source program: OBS Studio (Win, Mac and Linux!)
Here you can play with the settings -> on the output menu, remember to select the .mkv output! (NOTE: you need to play around with the settings because depending on how powerful your PC is, some will be better than others!)
Now all you have to do is press start recording and once you recorded your video, press stop recording (it's pretty intuitive!!)
Step two: screencapping
It's the slowest way to make gifs, but it helps preserving the quality.
Once you have your video, you need to make the screencaps!
Download KMPlayer
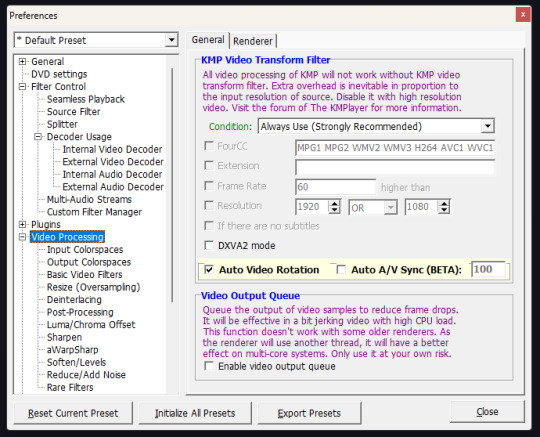
Right click on the middle of the screen > options > preferences

These are my settings:

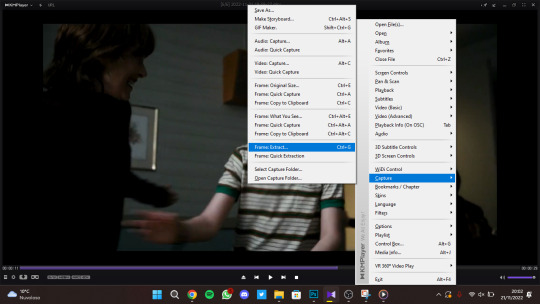
Open your file (you screen recorded in OBS studio) and put the cursor to the point the scene you want your gif starts
Then right click (on the screen) and select this
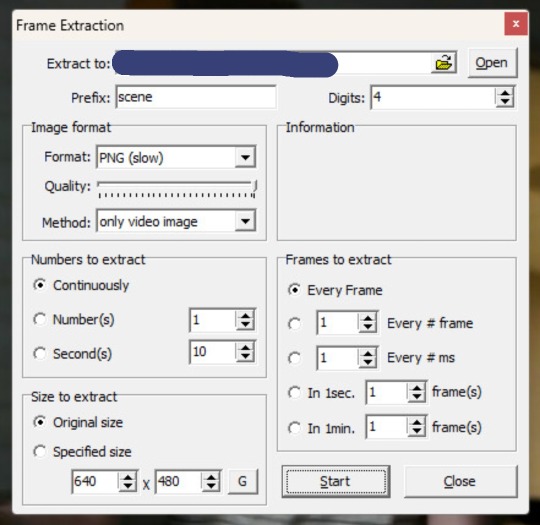
Make sure these are your options:
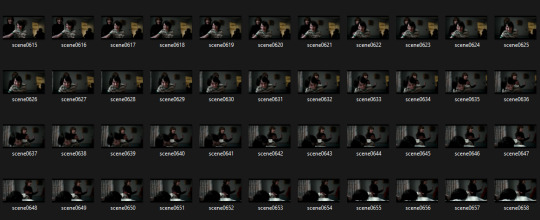
Press start and press play on the player -> now let it play until you finish your scene -> then press stop.
On the folder you chose as destination of the extraction, you should have something like this.
Step three: making the gif
Open Photoshop (I have Photoshop CC - 2018).
Go on File > Scripts > Load files into stack

Click on browse -> select all the screencaps you previously made -> once they're loaded, press on OK
Now, lean back, relax, grab some coffee because it's gonna take a while!
Turn on your timeline (Window > Timeline)

And press on Create frame Animation, there in the middle
Then press on the little burger menu on top right of the timeline and click on Make frames from layers
Click again on that menu and select Reverse frames
Now, select all the frames (the ones you see on the timeline) and right click where you see "0 sec" and choose Other ...

Put 0.04 as delay!
Step four: cropping and sharpening
Select the Crop Tool (shortcut: C) and you should have something like this
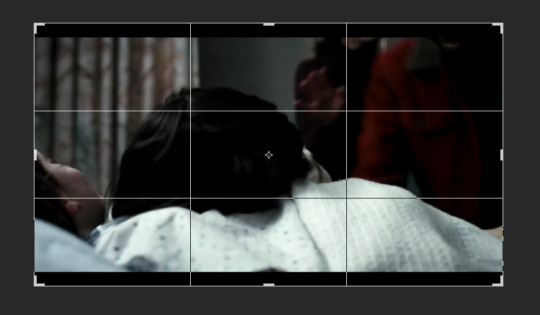
Move the handlers like this (don't reduce the image size!)
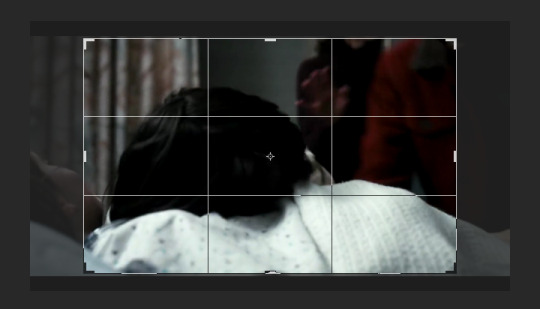
I just eliminated the black stripes on top and bottom and resized the width
Then confirm
Go to Image > Image Size and these are my settings:
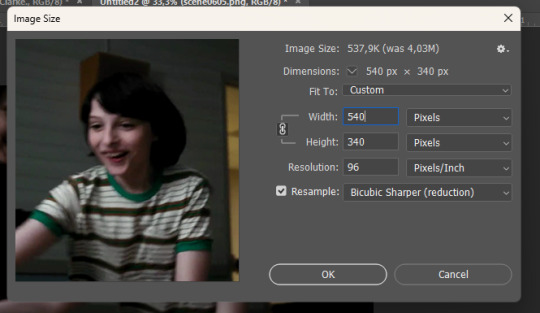
If you want to make a ONE COLUMN gifset -> width has to be 540 px
If you want to make a TWO COLUMN gifset -> width has to be 268 px
Height doesn't matter! Press OK.
Now, back to your Timeline, press that little icon on the bottom left

Now, this is what should happen:

On the layers panel, select all the layers and right click -> Convert to Smart Object

Now, you can use whatever sharpening option you want -> go on Filter > Sharpen > Smart Sharpen.
I usually do that twice:
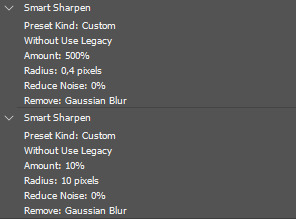
OPTIONAL -> duplicate the layer and set the opacity to 30% -> add Gaussian Blur (radius 1.5)
Step five: coloring
Now this is the fun part, and it's always different! So, just play around with the adjustments and find what suits the scene the best!
Step six: saving
File > Export > Save for Web

NOTE: .gif files must be under 10MB to be uploaded on Tumblr
REMEMBER TO SET LOOPING TO FOREVER!!!
And that is it!? If you have any questions please DM me, or send in another ask + there is a quicker way to do this, let me know if you are interested in that.
#ask#elz:explains#OMG I WAITED TEN YEARS TO RECEIVE THIS ASK!!!!#😭#sorry for typos#english is not my main language#gif tutorial#*resources
5 notes
·
View notes
Note
How do you make your gifs look so good and hq?? Any tips and tricks please 🙏🏼 ive been trying to make gifs for the longest time now (literal years) but i just cant do it im struggling so bad the ones i do look so shit lmaosjdj i also cant figure out how to do the right movement speed of them either 😭
Hellooo, i’m sorry the “i’m struggling so bad” took me out 😭 I’m sure it’s nothing you can’t fix. I’ll be honest, most of the time it’s about the quality of the video you’re giffing. Like that’s what makes a good gif. The quality of your video is your starting point and it determines about 80% of what your final gif will look like. I don’t exactly know what you’re doing, so I’m just going to link a couple things below:
I know you said you’re making gifs already but here are two very good tutorials: 1 & 2
Now there is also the ‘import video frames into layers’ option which looks like this:
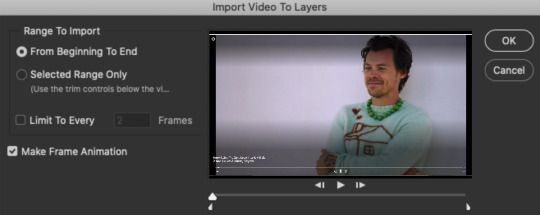
I do not recommend this method because 1, the video needs to be in mov or .mp4, which is not usually not how you get hd videos (you can convert but who wants to deal with this and secondly there is always loss of quality with this method. It's quicker but at what cost. (I'll leave a note below if you're insistent on using this/youtube videos) This gif I made was made with this method, which doesn't look too bad but it's from a screen recording of 660mb for like 40 seconds (meaning it's gigantic, which makes it easier to sharpen and make it look good). If I could download a good version l'd never do this. But if you’re insistent on using this method, make sure to not check limit to every two frames, because then it will skip frames and make your gif look very choppy.
I always use at least 1080p videos (the bigger the size, the better). If you're doing music videos and using youtube videos I'm sorry they almost always suck in quality and they will never look super HD, unless you have a good quality download from somewhere else. (If it's really concerts/music videos you want though, talk to me off anon and I can give you another source that sucks a bit less.) I also don't always make high quality gifs when I have to gif trailers that are only on youtube. As you can see the last gif in this set (which is from the youtube trailer) is so fucking bad sksikdfdfh. This is from a trailer. This is from a good 1080p movie and these two are a 2160p one. Not a huge difference with the 1080p and 2160p, but you can still tell. The youtube trailer one I won't even comment.
Again idk what you're giffing but most of the time when people say their gifs don't look high quality or crisp or something, I'll look and then they'll be giffing tiktok videos or a bad stream or something 😭 like that will just never look HD as 4k marvel movie someone is giffing. You need high definition videos, there is no way around that, no tips no tricks. OK moving on.
The sharpening might be a bit tricky because I think every gif maker does their own thing - this also depends on the quality of the video. Always use smart sharpen. If it's a good quality video, these are good settings, if it's not, I'd skip the second one. The better quality you have, the more you can sharpen - but I also wouldn't sharpen more than these settings, maybe if it's a 4k video (depending on the colours, the gif size etc) I could do 500 and 0.4, but nothing more than that because if you sharpen too much your gif starts looking cris-crossy.
The speed is almost always 0.05, (unless in extremely rare cases where the video you’re downloading has a different frame per second rate, but this is very rare.) unless you are skipping frames, which, please don’t because then the gif looks so choppy 😭 A lot of people don’t like this, and with the 10mb limit I think it’s quite okay to not skip any frames.
The colouring, I can’t really say a lot about because this also really depends on what you’re giffing and which scene, etc. Everyone has their preferences obviously, but I always go with less is more (since I don’t like overly coloured gifs myself, but again, personal preference!) Some people use base psds, they don’t really work for me so I don’t have them, but if you search around (look for gif tutorial on tumblr) you’ll find some. This is a good overall resource blog.
Anddd that’s it? Oh - if you want to do youtube videos, I’d say get 4k downloader and keep these as your maximum sharpening settings:
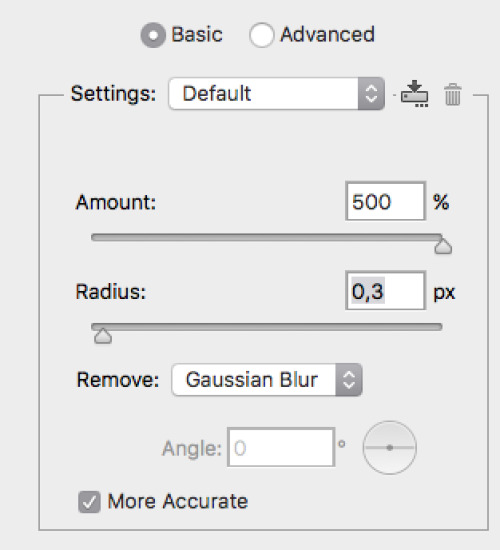
no matter what the quality is. Youtube just compresses stuff a lot. If you want to gif trailers, check apple trailers, they usually have higher quality trailers, but it will drop a bit later (you do not need itunes, just google apple trailers and it’ll be there). I hope this helps, I really am not great at explaining stuff, so please feel free to ask anything specific & happy gif making lol.
10 notes
·
View notes
Note
I have seen your GIFs and for the life of me I can't figure out how to get such clean GIFs myself. How do you do it (—_—) Are you magical? Are you a magical being??
Omg this means so much to me, thank you! ❤️😭❤️😭 I'm really glad you like my gifs.
My biggest advice is that a lot depends on the quality of the video itself you want to make the gifs of. For example i try to avoid converting them to the necessary format because there's a chance of quality downgrade during the process, but luckily most recording programs on consoles or PC record in mp4 so i don't even have to go near converters. If it's not from my videos then i try to look up the videos on youtube in the best quality, i like to work with 1440p ones because that quality helps a lot during gifmaking.
(Also just my opinion but instead of using pre-made coloring psd you can find on tumblr for example, it's better if you do the coloring yourself because besides making sure it will look like the way you want coloring is pretty much the most fun part of making gifs)
2 notes
·
View notes