#it's easy and a good way to practice drawing realistic shapes
Explore tagged Tumblr posts
Visit Tumblr Blog
Explore Tumblr blogs with no restrictions, modern design and the best experience.
Last Seen Tumblr Blogs


Fun Fact
The KCSC sent more than 20K requests to delete posts related to prostitution and porn to Tumblr from January to June 2017.
Text

A kitty :)

And a version with a blank background
I'm not very good at drawing cats, so i did this as a little study with tracing (as recommended from a random post on Pinterest)
Here's the original, because we don't trace without giving credits 😌

#art#my art#digital drawing#cat#cats#kitty#kitties#cute cats#cute animals#tracing#practice#art practice#i don't trace without credits!!!!#i just really like tracing#but the morally okay way i guess#it's easy and a good way to practice drawing realistic shapes
23 notes
·
View notes
Note
Hi!! I love your work!
Do you have any tips on how to stylize hands?
Thank you <3 I hope you’re feeling better!
I don't have a moodboard of hands I really like but I think it's a good idea to study what details you enjoy on your favorite styles. For example: I really like how in MHA they often don't draw the nailbeds, just the part of the nail where it starts separating from skin. I think it's really tasteful and simple, yet realistic, so sometimes I do this too:

My other example would be to pay attention to details and lack of details. Sometimes this can add to the funny factor too, like when a simplistic cartoony creature has an extremely realistic looking hand. But anyway here's my quick brainfart on the matter:

If you're gonna draw long nails, you better watch some nail videos to learn the ideal shape and weight etc. of them. It's so easy to make them look like dog claws or nasty old crone hands! Sorry, this turned into my personal nail drawing preference lol
I don't have any very smart advice on drawing stylized hands beyond "use real life / 3D reference still" and "practice until it looks ok" :') Pay attention to which way the individual shapes bend. If you don't study real hands and only copy other artists' hands, you might learn a few wrong things (but I guess this applies to most real life studies).
Oh and I'm feeling better now, thank you! ^^
#I have some bad habits like I really need to pay attention when I draw knuckles at some angles#because they get way more rounded than you'd think#I have a long way to go until I can draw hands in a way that I'm 100% happy#personal#art advice#hands
684 notes
·
View notes
Text
Allkindaideas - Platin
When it comes to dinner ideas, there are countless options to choose from. Whether you're looking for a quick and easy meal or something more elaborate, the possibilities are endless. One popular dinner idea is to create a themed meal, such as a taco night or a pasta bar. This allows for customization and variety, as each person can choose their own toppings and ingredients. Another option is to try out new recipes from different cuisines, such as Indian, Thai, or Mexican. This not only introduces new flavors and spices into your meals but also expands your culinary horizons. Additionally, incorporating seasonal ingredients into your dinner ideas can provide a fresh and vibrant twist to your meals. By using ingredients that are in season, you can take advantage of their peak flavor and nutritional value. Whether it's a hearty soup in the winter or a refreshing salad in the summer, seasonal ingredients can elevate your dinner ideas. When it comes to drawing ideas, the possibilities are truly endless. One popular option is to draw from nature, capturing the beauty of landscapes, flowers, or animals. This allows for creativity and exploration of different textures and colors. Another idea is to draw portraits, either of people or animals, focusing on capturing their unique features and expressions. This can be a great way to practice observation and improve your drawing skills. Additionally, abstract drawing can be a fun and expressive way to explore shapes, lines, and colors. It allows for freedom and experimentation, as there are no rules or limitations. Whether you prefer realistic drawings or more abstract and imaginative pieces, the world of drawing offers a wide range of possibilities for creative expression. Tattoo ideas are deeply personal and can hold significant meaning for individuals. When it comes to tattoo ideas, one popular category is food tattoos. From intricate designs of fruits and vegetables to tattoos of favorite dishes, food tattoos can symbolize a love for cooking, a connection to nature, or simply a passion for good food. Another popular tattoo ideas is chef tattoos. These tattoos often feature culinary tools, such as knives or utensils, and can represent a person's dedication to the art of cooking . Additionally, tattoo designs inspired by nature, such as flowers, animals, or landscapes, are timeless choices that can hold personal significance. Ultimately, the best tattoo ideas are the ones that resonate with you and reflect your unique personality and interests.
1K notes
·
View notes
Text
I dislike the vast, vast majority of fat anatomy tutorials that get passed around on social media because, while learning from other artists is great because it means you don't have to reinvent the wheel yourself, those posts usually end up being "use these 2-3 categories of shapes to draw these 3-4 body types" that functionally aren't that different from those "how to draw a cartoon dog" step-by-steps for children.
All you're learning is the approach that artist uses to draw the body types they typically draw in their style, which doesn't tell you what techniques and practice habits the artist used to arrive to their approaches and shortcuts. It's like being given 3 soup recipes that you can follow, but if you don't learn the basics of what makes a soup a soup, you might be able to riff off of what you know, but it's going to be really hard to make your own meals that reflect your self-expression and tastes.
This is an inherent problem for anatomy tutorials in general, but it's amplified even more for guides on how to draw fat and fat bodies. Any connoisseur of fat can tell you that there is no possible way to make a succinct guide to drawing what fat bodies look like. There is a whole range of hardness to softness, and within each incremental degree of softness there is a wide range of where fat gets distributed on the body, and within that, there are variations in what that distribution looks like proportionally given the person's height and the size of their frame. Where rolls and folds happen varies widely. Where stretch marks happen and to what degree varies widely. Whether there's cellulite in different areas or not.
This is so cool! There are so many options to mix and match and so much fun stuff to learn when drawing fat people. And so much room for expressive character design, too!
But the problem with the kinds of fat drawing tutorials in circulation isn't that fat people are just too varied or too complicated or difficult to learn outside of some specialized studio drawing class. It's because these tutorials talk about literally anything but actually looking at a fat body to learn how to draw one!
It's a hard pill to swallow perhaps, because we all want easy drawing shortcuts, but the way you learn how to draw realistic variation in body types is through real-life references! The tutorials you'll get the most out of are going to be life-drawing tutorials: how to train your eye to see what it's actually seeing and how to translate that to the page. The same exact *skills* that you use to learn how to draw thin and muscular body types are the ones that will get you to learn how to draw fat body types.
"How do I draw double chins?" Idk man, how did you learn how to draw sharp jawlines? Look at many examples of double chins and practice drawing them until you have a good idea of a lot of common shapes out there and adapt and recreate what you're seeing into your own personal artistic style, be that hyperrealism or simple cartoons.
"But where? Artist photo references are all of thin and muscular people, and there's no control over whether studio life drawing models are fat!"
Draw your fat friends with their permission!
Draw yourself if you're lucky enough to be your own fat photo or life reference!
It's a very common practice for artists to life sketch at places like parks and coffee shops, so as long as you are respectful and not oggling and leering at strangers, you may see a fat person in the wild if you go outside with a sketchbook for some people watching.
Live drawing is always going to be more valuable than drawing from a reference that's already 2D, but you can image search fat public figures, like musicians or actors, or redraw movie or music video stills with fat musicians or actors.
fatphotoref.com/
Ok now hear me out on this, but: a great place to find nude photo reference for fat men, (especially if you want practice drawing steamy gay fat sex and intimacy) is amateur porn videos using search terms like 'bear' and 'chub'. Many artists talk about having difficulty finding fat photo references where fat bodies are not portrayed with the themes and aesthetics common in fat fetish and feedism kinks, and I'm not trying to minimize that at all, but unlike the "BBW" category of porn, Bear and chub/chaser amateur porn is way more often just, like, some big guys making a sex tape together. And with amateur porn you often get a lot of footage of people walking around to change positions or camera angles, moving to a chair, reaching for the lube, taking clothes off, lying in bed - liminal space with naked fat bodies just existing and doing stuff, which makes it an underrated resource for figure drawing practice in my opinion.
Also, I have to add, there isn't anything wrong with using photos and videos by fat fetishists, even those with fat fetish aesthetics, for figure drawing practice. These are images fat people are creating of our own bodies, presenting themselves in a way that is gratifying or desirable for them. That is part of the fat experience too; that is a way for fat bodies to be represented, and just because something is a kinky way of portraying fat bodies doesn't mean the kinds of angles and movements and poses that are actively avoided outside of kink spaces have nothing of artistic value to contribute to creating vanilla art or learning figure drawing.
And lastly, there are also more and more videos and channels out there with some sort of niche related to fatness like fat fashion or fat yoga that can also make great photo references.
You learn to draw by looking at real life and drawing it. You learn how to draw fat people by looking at real fat people and drawing them. Look at actual fat people!
44 notes
·
View notes
Text
A Guide for Writing Ed's Top Surgery!
I'm getting my top surgery on July 3 (whoo!!!) and I'm using this as an opportunity to gather info for fic purposes. I love writing Ed as a trans man, and I love everyone else who writes and draws him as trans, so I wanted to share the notes I'm taking to help others who want to draw or write Ed's top surgery experiences! I'll update this as we go in sections (pre-op, the surgery itself, and initial recovery).
This is all just my experience with getting a double-incision with free nipple grafts surgery, and it's from a US perspective. Your mileage may vary and this definitely isn't meant as a medical guide. If you're having your own top surgery listen to your surgeon, not me.
Pre-op guide below the cut!
In the months before his surgery:
Getting insurance approval for top surgery in the US, depending on where you live, can be incredibly frustrating, dehumanizing, and painful. Ed will need at least one letter from a therapist or other mental health provider, and he'll probably feel very frustrated about being treated like a child who is unable to make his own medical decisions. I had several insurance denials, needed to switch insurance companies (currently having to settle for one that's more expensive in every other way but will at least approve this surgery), and needed three (fucking 3!!) letters from mental health professionals to get my approval. Hard to overstate how much it sucked and how much it makes you feel like the people writing state and insurance laws see you as a stupid child. Ed will very likely have Lingering Issues about this experience.
Ed will need an initial consultation to confirm he's a good candidate for surgery. Mine was quick and easy!
Once he gets his approval, or once he decides to pay out-of-pocket, he'll get his surgery date! Depending on his clinic, this could be years away or it could be as soon as a couple months out, so anything is realistic for your story. You could lean into the joy of a date that's sooner than he'd expected or he could be frustrated by the whole process grinding to a halt.
His pre-op appointment:
The pre-op appointment is when Ed will meet his surgeon and get the details for his surgery date. Mine was almost two weeks before my surgery. He'll also receive packets of information and his post-op check-up dates. If he smokes, he should be tobacco-free by this date.
This is when Ed and Stede will be able to ask any last-minute questions. Ed can ask here if the surgeon will be willing to give him heart-shaped nipples, but they'll probably say no
This appointment is also when Ed will be struck by the reality of having post-operative drains and not being able to shower for a week. This will be deeply upsetting for him
Ed will probably be very nervous for this appointment (what if something goes wrong and he can't get his surgery?) but he'll be relieved and comforted by the whole experience. The mood in the whole plastic surgery center, for me, was downright fucking jubilant, all the nurses who saw my name on the chart were congratulating me and telling me how happy they were for me! This WILL make Ed cry
The week before his surgery:
It begins to sink in that Ed is about to have major surgery. He's excited, of course, but he'll be a little nervous too! Stede will need to give him lots of cuddles and promise to take good care of him
They'll need to make lots of Ed's favorite comfort foods to freeze so he has something to eat when he can't raise his arms well enough to cook
Ed should practice doing things without lifting his arms above his shoulders. He'll have a great time stomping around and pretending to be a dinosaur
He'll want to prepare a selection of comfy clothes he can wear without raising his arms. Stede's robes will be perfect
The biggest struggle for Ed during his recovery will be the boredom. Stede should help him build up a stock of video games, books, Lego sets, sketchbooks, and model building kits to keep his hands and brain busy!
They should prepare Ed's sickbed. He might be more comfortable sleeping upright on the couch or in an armchair propped up by pillows. He'll have to see how he feels after surgery and what positions are most comfortable, so getting both the couch and their bed ready is a good idea!
At some hospitals, including mine, you won't know what time to arrive at the hospital for your surgery until the day before, when they'll call you to let you know (they do this based on surgery room flow to ensure you arrive at the right time). Ed will find this stressful; Stede will HATE it.
Ed may need to shower with a special antiseptic skin wash the night before and the morning of his surgery. He will not enjoy having to get up at the asscrack of dawn to shower
The night before Ed's surgery, he and Stede should pack bags, just in case. Top surgery is an outpatient procedure, but just in case anything goes wrong and Ed has to stay overnight, it's good to be prepared. A change of comfy clothes, a book, and Ed's Nintendo Switch are good things to pack. Ed will also love taking a stuffed animal to keep him company after Stede can't go any further with him (and he can use the plushie to cushion the seatbelt on the car ride home).
Ed's super excited and everything's set for him! Good luck, Ed! 🥳
53 notes
·
View notes
Text
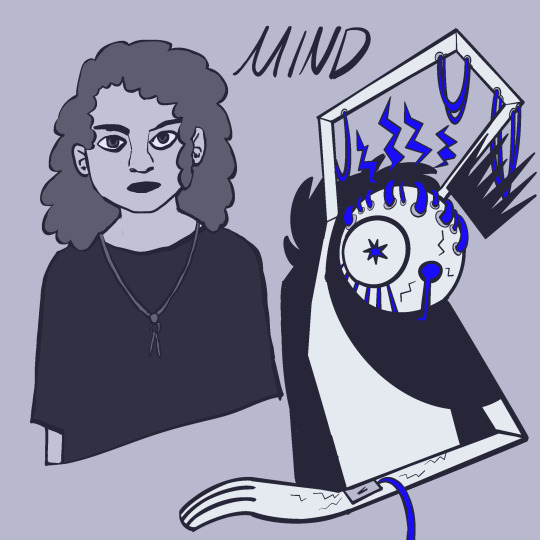
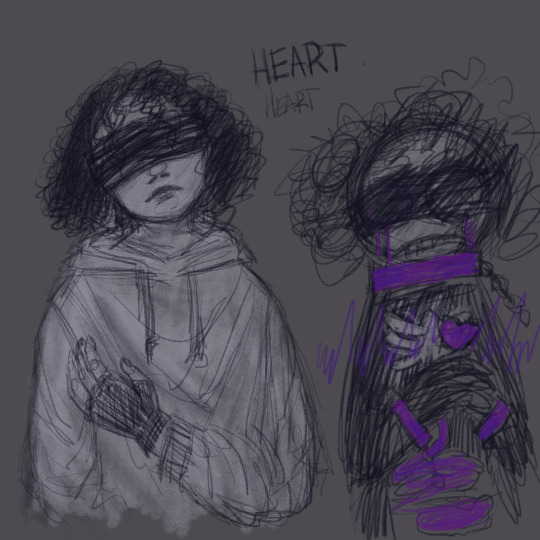
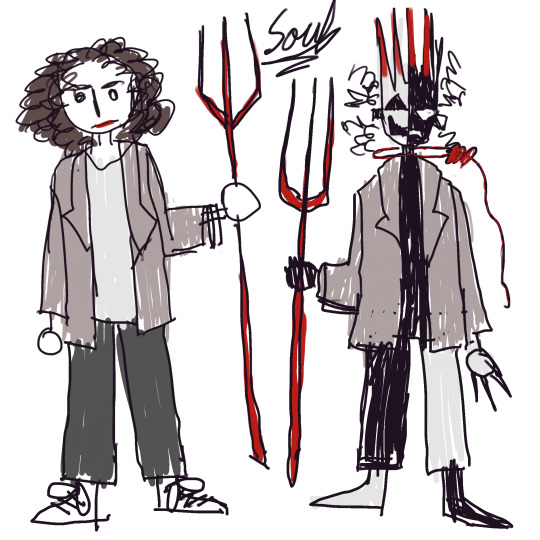
idea of the threes way of drawing themselves + handwriting. notes on each one;
thinking with mind he prioritizes clean lines and flat colors. in his abstracted form his joints are stiff, so he relies on vector-type lines, shape and line correction tools. his hand writing is i think print but has a tilt and a slight curve (almost cursive, but not quite...) and is primarily in all caps
for heart, if its digital i think he would draw on a dark background with dim colors due to high light sensitivity. lots of very sketchy lines because his vision is too fuzzy for clean ones to be easy and hes generally just a bit too shaky (also an avoidance of minds way of art.) but i like the idea that he is a good bit more practiced and it shows somewhat. probably followed some of those instagram tutorials at some point and a few things from those stuck. abstracted, he is far too jittery and shaky to even consider clean lines. his hand writing is usually either faint and a bit muddled (lower) or in block letters, going over every line a few times to make it as clear as possible.
for soul. he never really bothered with art past the mandatory middle school classes. he kept the cursive writing somewhat and he likes to add the little flourish under his name but unless its important his handwriting is mostly just whatever it ends up being. im imagining the only reason his would exist in-world is because he wanted to feel included. but he also couldnt really be bothered and then tried to get rid of it (a Little bit embarrassed) but mind stuck it to the metaphorical fridge bc he thinks its funny as shit
very much idealised in that realistically i think None of them would be able to draw. souls is probably the closest to reality lol
112 notes
·
View notes
Note
hello mara! i love how you draw people; the anatomy is so realistic, but your unique style always shines through as well. i was wondering how you got so good at drawing anatomy, and if you have any tips for how to improve? I'm an artist too, and i feel like I'm kind of stuck in a rut about that aspect of my art right now, so i wanted to see if you had any thoughts on the matter. have a nice day ^_^
hi anonymous;
i:m not so good at anatomy! thank you for the kind words, all the same -- i:ll take them! but there:s a few things that i think (accidentally) caused me to grow slightly as an artist, accidentally because i didn:t intend it to be practice.
i used to do a lot of drawings of "qlifot" and "torture chamber," which incidentally ended up being great shape drawing practice because the former is just sphere-practice, and the latter is just square practice; being able to draw basic primitive shapes from any direction goes a long way, + being able to render them convincingly (i:m not so great, here, because i don:t really ever bother rendering);
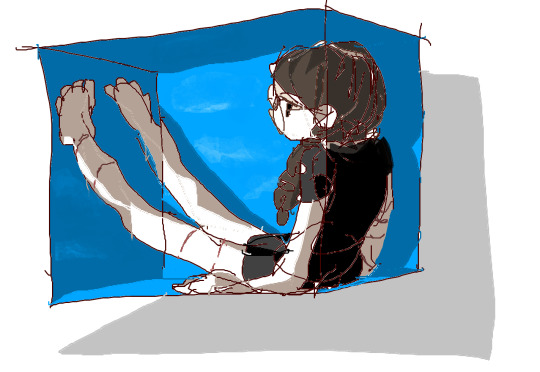
the other thing is i just figured i:d start drawing nudes of myself while i was setting up a studio-space for myself, because at some point last year i decided to make an art studio out of a storage room while thrifting for supplies + cleaning out some of our (my mom and me!) old unused things; then i:d usually force myself to do some morning drawings for awhile, trying to draw my body from imagination inside a torture chamber structure;
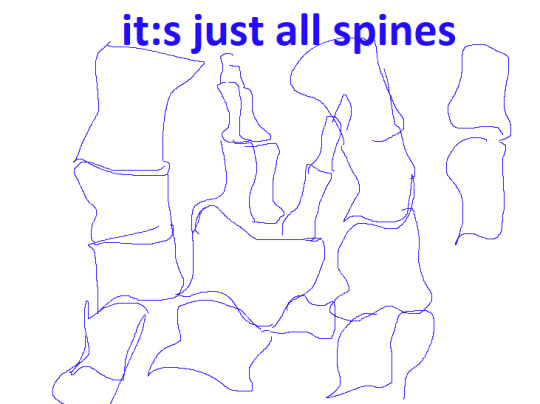
outside of that (and why i think me being good at anatomy is a little silly) is i just realized it were really easy for me to draw bodies if i just decided to structure the entire form out of a series of vertebrae -- which came to me while drawing fingers; "fingers look like spines -> what if i just make the ribs shaped like a spine -> and the waist -> and the hips -> i can get away with making the arms vertebrae, too," but i still struggle immensely being able to visualize how shoulders work, and how necks work, and usually need to look at a picture to remember how shoulders look.
if i:m in a rut i usually just stop drawing, personally, cause i don:t enjoy it very much! but sometimes it:s exactly what i want to do, so i:ll do it -- and then it:ll be enjoyable; but usually at minimum there are a few "well, minds as well draw" moments in my week: notably: church; i try at minimum to always do some drawings of my hands and some of the congregation before the hymnals start. otherwise, though, forcing myself to draw just makes me upset and frustrated. it:s a good habit to force yourself to do, though, if you can get over the frustration.
so build good habits, anonymous! take care
20 notes
·
View notes
Note
hey what should I draw, mr.s?
I'm always partial to people and adjacent things, so, maybe some anatomy practice? Shoes? Clothes with interesting textures/shine/folds? Expressions? I don't know! Or...
Don't try to draw anything.
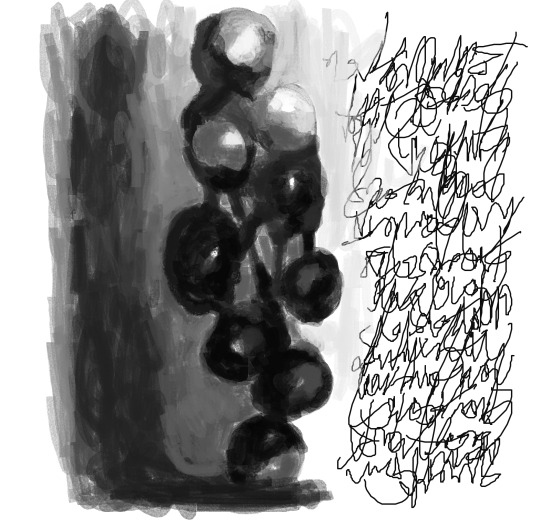
Listen, that sounds so fucking weird, but one of my friends encouraged me to try intuitive art where you just aimlessly do shit except for what you feel is right. Inuiting it. Scribble, make circles, dashes, lines, etc., whatever, there's no wrong way to do it. Just do it. Do what feels right. It doesn't have to be representative of anything, not an emotion or story, but it can be if you want to, too. Whatever. Use an art medium you're familiar with using or not. Use kids' crayons, use expensive, nice watercolors, either extreme or somewhere in between. There's no wrong way to do it.
I thought that sounded interesting when I was introduced to the concept first, and god knows I have enough sketchbooks unused lying around to experiement in. So I just picked up a sketchbook that someone distant in my family gave me who knows nothing about art, and nothing about the art I specifically make, so it's too small of a book for what I usually do and I don't particularly like the paper within it, so I was, like, whatever, okay, I'll "ruin" this book. And I just started scribbling.
I will say I don't love love love anything I've made yet, but I don't hate it the way I thought I would as a realistic artist that is very much a perfectionist. I've really only spent, like, 30 minutes of time (tops) on the intuitive drawings when I'm already spending 5+ hours to work on my actual pieces daily. So, it's low stakes. It's easy. But. It's still so interesting. It's been so good for me, even if I don't love the outcome, y'know? The process is fun or, at least, nice and flow-like. It's a good way to start or end a drawing session, I've found.
Shit, though, I made fucking magic this afternoon on complete accident! So, okay, maybe I do like that outcome of that scribble in particular. Even if it is a little embarrassing as a mess of smeared pink and red crayons in blurry squiggles and almost heart shapes. It's chaotic, and it happened because I got stuck thinking about my old best friend, whom I knew from 1st grade until high school. He, to say the least, was not a fucking good friend as it turned out. Yet, time puts rose colored glasses on you, and so sometimes I wonder about him. Sometimes, I even miss him, though I know it isn't real what I miss. (I also might have been in love with him? I don't know even know, and that's a whole can of worms.) That being said, I tore through a page with that intuitive art and... I was truly just scribbling, not trying to make anything representative. In the end, though, I made this lighter background with a very prominent, darker scribble in the abstract shape of the first letter of his name. I didn't do that. Not consciously. So, fuck, I was astounded when I looked down at it, feeling like I was finished, to see that letter. What the shit? I hate when art does these things to me 💀💀 Fine. I'm lying. It's very cool in an indescribable kind of way.
(Did I then immediately go on to start another page and make a vaguely disturbing scribble with lots of eyes and loose teeth and bloody looking smears that I also did not intend to make look like that? Yes. Is that besides the point? Yes.) ((Also, funnier, did I make something the day before yesterday that was undeniably vagina-shaped? Also, yes. It's an adventure out here, lmao.))
Whatever you do, get out there and do it, baby!! Draw! Be meticulous or chaotic! There's no rules!
7 notes
·
View notes
Note
Take your time, only if you want to <3
HI yeah i almost forgot about this thanks lmao
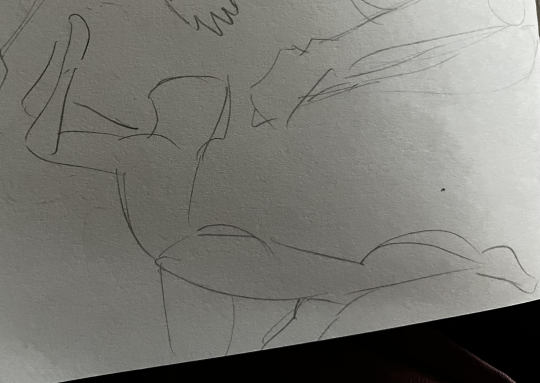
So I've been drawing for a LONG time and I've gone through a lotttt of different warm ups and practices and stuff but I'll give you the current one because I've noticed myself improving pretty quickly with it.
And before I get into this, I'm just going to point out that none of these are actual studies even though I should definitely be doing those too. All the exercises I've been doing are about learning the feeling of a body, not the structure of one. I'd definitely recommend not being lazy like me and doing some actual studies where you draw skeletons and try to make realistic replications of references and things like that.
So this site, SketchDaily Reference Site , is my favorite thing. I use it all the time, whether that be for getting inspiration by looking through all the pictures, doing the occasional actual study and trying to draw it realistically like I should do more often, and for the exercises I'm gonna show you. I encourage you to explore this and other reference sites, mess with the settings, find what works for you. Anyway, now onto what I do.
You're gonna want to get a sketchbook if you don't have one already, because these do take up a lot of space. Don't get an expensive fancy sketchbook because then you won't want to mess it up and you'll be scared of drawing bad. Drawing bad is important, let it happen.
Then I go to the full body tab. My favorite settings are gender: all, clothing: nude, pose: all, view: all, not class mode, and either 2 or 5 minutes for time depending on how focused I'm feeling that day. I put it on nude because I care more about improving how I draw figures than how I draw clothes, but if that makes you uncomfortable, obviously you don't need to do that. Just as a heads up, even if you choose the 'clothed' setting, you'll still get some images that reveal a lot, but there is a button you can hit to skip an image if that happens.
Then hit start and it'll give you an image. When you're doing this exercise, try not to worry too much. You have to let go of wanting to draw good and just focus on getting shapes on the page. My best tip would be to look for triangles in your pose. I'm a sucker for a triangle. They won't be in every pose but there are some where it's just. Perfect triangles and those are my favorite because it really helps you proportion the pose. Draw a triangle. Put a guy in it. Boom. Do this until you have a full page or two of poses. The point of this is to get them down quick and learn what shapes make a person look like a person. It's really good for developing your style because you'll learn what parts you like to exaggerate and stuff like that.
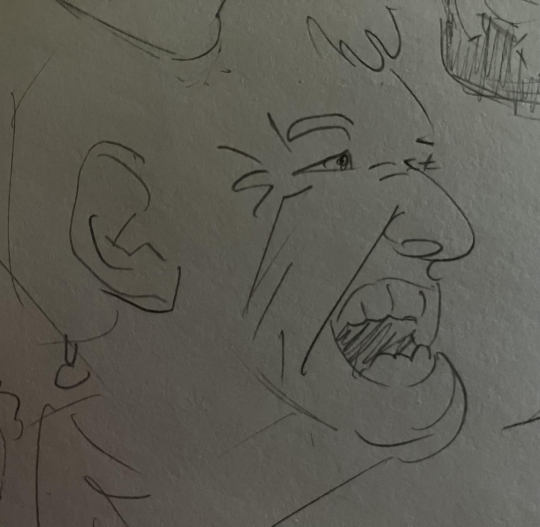
When you're done with that, end the session, and go to the body part tab. Select heads for the part, leave gender and view on all, and put this one on two minutes. Hit start and remind yourself that this is your sketchbook and nobody's gonna see this but you unless you decide. Then caricature the fuck outta those faces. Find the big shapes, the characteristics that stick out to you first, and exaggerate them as much as you can. Some of these are gonna look really bad. Some will probably make you think, 'this would get me cancelled on twitter.' That's fine, you learn from it either way. Sometimes you'll make a really good one and then the next one you make will look awful and you'll want to stop- no. Squash that little bug crawling around in your head and keeping drawing until the page is full of heads of varying qualities.
I do those two exercises 'every day,' and by that I mean i want to do them every day, but it ends up being a few times a week and that's fine. Consistency is good but not burning out is better. I'd say just do this whenever you have the time and motivation. They're quick and easy exercises that teach you about shape language, flow, and gesture. I'll put some examples of things I've drawn under the cut. There are some boobs in it, not with sexual intent but there are boobs so be warned.
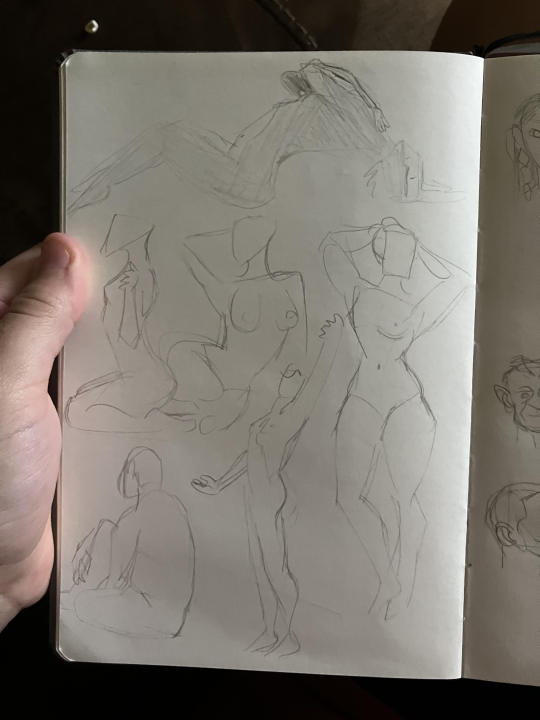
this was my first day doing this exercise. I think I was trying too hard to make it look like the reference.
After a week or so I started to relax and use broader strokes and bolder shapes.
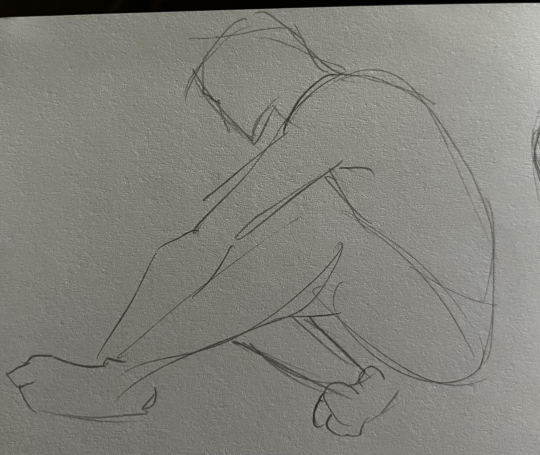
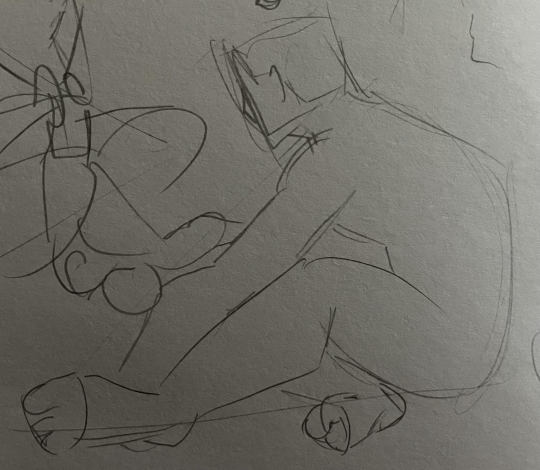
It turns out I got the same pose a few weeks apart. See how the one on the left looks stiff, while the one on the right has more relaxed shapes? Getting that nice shapely look and finding the way you like to exaggerate bodies is the point of this.
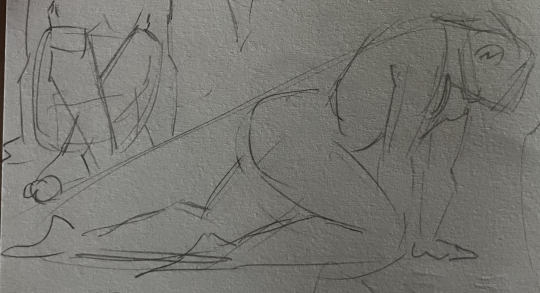
This is one from the last time I did this exercise. I really like the shapes in this one. See the triangle?

These two were from the first time I did the heads exercise. Not the best quality, but they get the message across, I think. It's just playing around with the different shapes of a person's head.
Made this one about a week ago and I'm really fond of it. This was the first one I drew this day and the rest of the page was trash but I did really like this. I think the shapes are really fun.
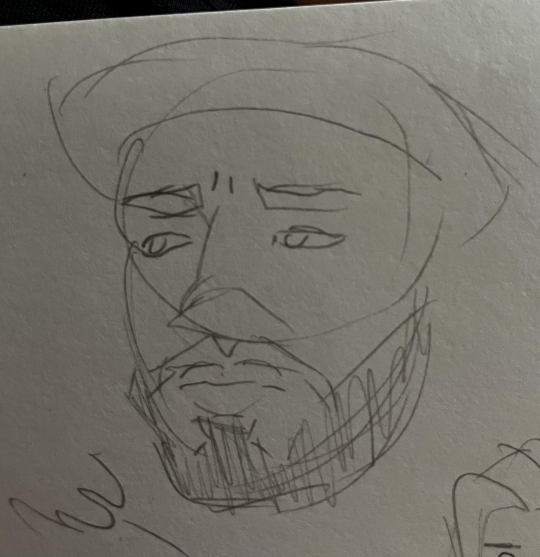
Here are three I did a few days ago. I'm gravitating towards a more realistic style here, idk why my hands felt like doing that that day, but whatever. Heads.
5 notes
·
View notes
Text
Some good things did come out of my large breakdowns I had a few weeks ago.
I've never had much faith in myself in regards to my goals, and I gave up on a lot of things that mattered to me. Music, art, social work. I struggled with impostor syndrome my entire life, and suffered from low self esteem due to the struggles that came with growing up with undiagnosed ADHD. I always felt like I tricked people into thinking I was smart because I could never do things consistently. And I pretended that I just didn't want to do those things anymore, when in reality I didn't think I deserved to do them, because I wasn't actually capable.
I realized that if I wanted to be happy, I needed to give myself more credit and be willing to make mistakes. I am allowing myself to realize I'm lovable, I'm likeable, and I didn't trick my friends or loved ones into caring for me. I'm worth having a job that makes me happy, and I'm worth pursuing my passions. I played my bass guitar for the first time in years the other day, and even though it wasn't much, it was... unbelievably cathartic.
For the first time in a long time, I'm making some new years resolutions and planning long term goals. They include:
- Starting therapy. I have been more stable the last couple weeks- I am trying to be kinder to myself and practicing grounding techniques for when work gets overwhelming, but I feel like I need to have an outlet to talk things out. I have reached out to a few therapists and am waiting to hear what their availability is like to schedule consultations.
- Get back into bass and art! I ideally would like to get an upright bass and join the local community orchestra, but I don't think that's going to be realistic for a while. That doesn't mean I can't play, though, even if it's for myself. I need to actually get my bass guitar and amp set up, but in my downtime I've been sight reading some music and practicing the rhythms. I also have been trying to draw more. Ideally, I would practice the basics, because I want to refine my style more, but as long as I'm creating I'm happy.
- Networking with the new marketing director at my current job. While the customer service aspect of my job sucks at times, I work with a supportive team and I know if I ask my boss, she'd support me trying to learn and grow, and who knows? Maybe I'd be able to shift gears from my current position.
- Finish taking this marketing course through Coursera, and maybe get a couple other certifications along the way. I'm on track to finish the Coursera course in six months, but I'd like to get it down to three, if possible. It's pretty easy to finish a week's worth of modules in a day as long as I have the spoons (and now that I'm back on my ADHD meds, it should be easier)
- Once I'm further along in the course and have more formal training, I want to reach out to the chorus my wife volunteers with and offer to do their social media. I know it's something they don't have a lot of time for (and it could use improvement), it would be good experience for me, and it would get me volunteer experience in two fields I'm passionate about: music and the LGBT community.
And as for my long term goals, they include:
- Getting a job in marketing, ideally for a company that specializes in music or audio
- Finding community in music. Be this getting an upright bass and joining an orchestra, or playing folk music with my wife and our friends, or whatever. Music used to mean so much to me, and while I don't want performing to be my full time job anymore, I want it to be a part of my life in some way, shape or form.
- Finding community in the arts again. I feel like I made some good headway last year, but my insecurities kept me from doing more. I also want to pursue more physical art. I enjoy doing digital art, but I'm definitely harder on myself than I am when I use a physical media. I place a lot of pressure on myself to make it perfect, which leads to my style being sanitized.
- Improve my executive functioning skills. I'm slowly getting better, but therapy will help
I haven't had a long term goal since I got married, bought our house and graduated college, which has lead to me just kind of floating around. I feel like these goals reflect what I've been missing and I'm excited to pursue them!
3 notes
·
View notes
Note
Hello! I was wondering if I could see how you do faces or just anatomy in general. I’m not that good at art but I’m trying my best to get better!
-🪲
AAAAAAA IM SO SORRY THAT IT TOOK ME SO LONG TO ANSWER!!!
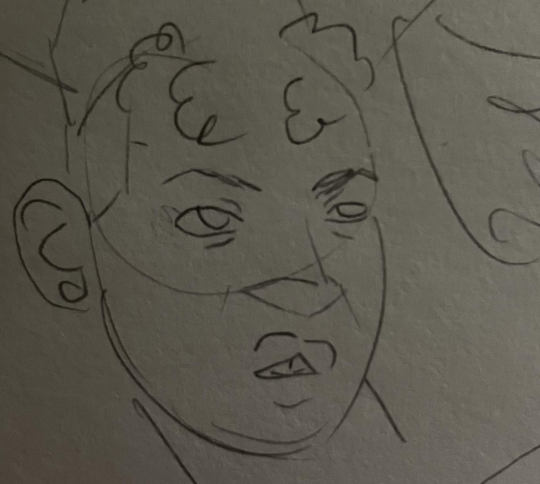
I hope this video can kind of help show how I go about drawing faces, but I’ll try to explain a little bit as well.
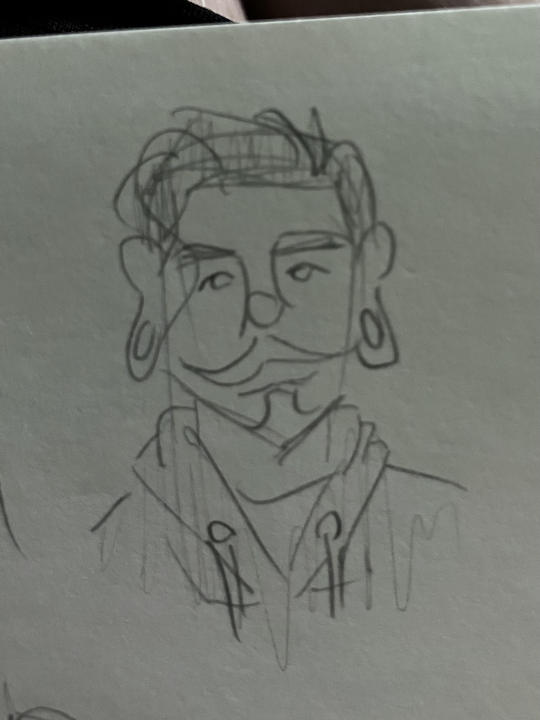
First of all, I draw best when I have a reference to go off of, and I learned to draw faces (even tho I’m still not the best at it lol) by doing a lot of little semi-realistic drawings based on people I just find on Pinterest. My reference for the above drawing:
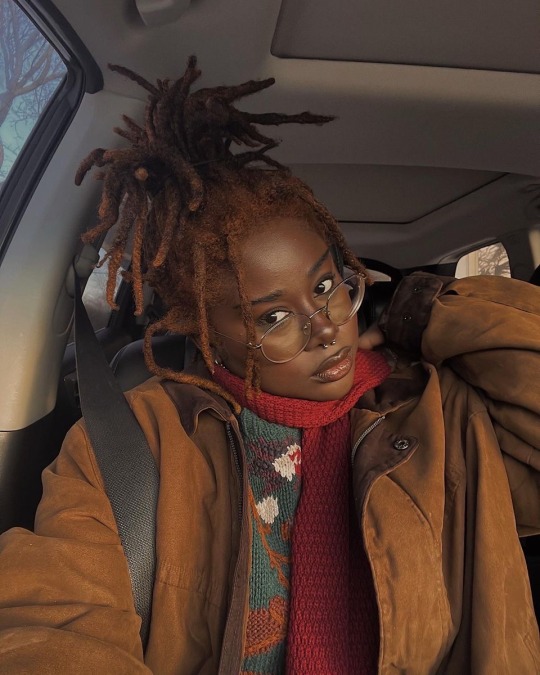
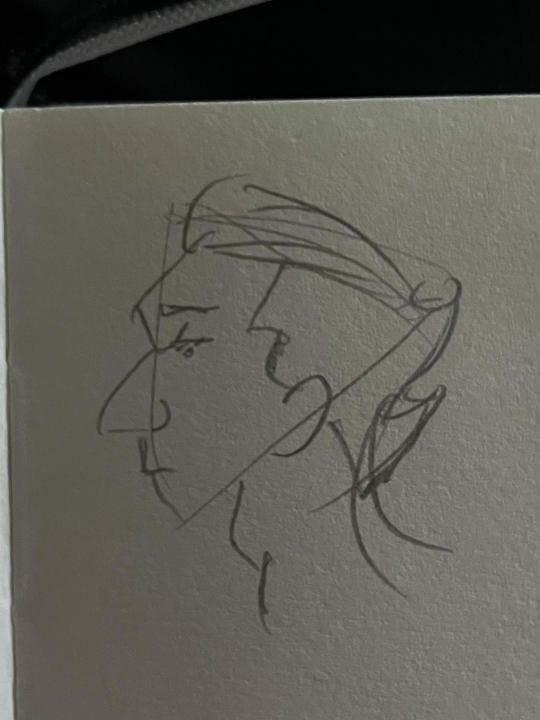
My first step in drawing a person is usually just to try and get the shape of their face out along with any other important parts of their silhouette (like hair, ears, hats, etc). After that I pretty much just have to feel out the shapes and positioning of the rest of their facial features. As you can see it took a LOT of sketching and erasing before I was happy with her eyes/lips.
For bodies, a lot of that is just trial and error for me as well. But doing action lines or weight lines (like a line going from head to the foot or area that’s holding the person up) is something I’ve found to be really helpful. It can help to work out a person’s proportions as well as making them look more naturally posed.
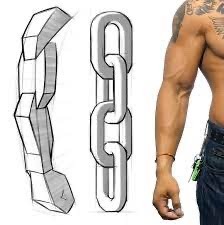
Thinking of the arms as chains is another good method for starting to understand how to draw arms (see below).
Overall, though, my art style/method of drawing is very inconsistent, so my advice might not be the most trustworthy 😭
Either way I wish you nothing but the best in your drawing escapades! Anything you create will be amazing, and practice will only make that amazingness more easy to accomplish!!
9 notes
·
View notes
Text
barely any art tip posts ever were useful to me mostly bc they are either made by people who are well meaning and talented but bad at being a teacher or professional artists (which can be an issue if you pick up art as only a hobby). A lot of the times these posts dont really point to the basics i think so many times the advice can be incomplete (like the infamous dont shade with black post or the million advice content abt how to draw men and women).
firstly i think its important to be in the correct mindspace:
- art is labor. even if you like it it requires mental and often physical effort. so not being able to make anything after an exhausting day or week is normal and expected.
- its good to always keep in mind why you are making art. if you do then later when you are feeling unsure or discouraged you can always thing back like “oh i started because i wanted to draw a cool beast” and then remember all the cool beasts you drew.
- its good to have a strong internal motivation to do art. i get the million posts abt how you should rb art or whatever instead of liking but (aside from the fact that those posts dont work bc guilt tripping others to do something is just not a good strategy on the long run) that kind of need for validation can make your relationship with what you make pretty unhealthy. Seeking validation and showing off what you make is fine but if thats the #1 reason then things are going to get difficult.
- get comfortable with being uncomfortable with your art. maybe you dont like the quality. maybe the idea you have is too hard so its a struggle. maybe you cant create at all and its frustrating. but its all part of making anything so its good to be patient.
the other issue is usually the tips only go for a specific art style or way of making art. But there are general pieces of advice on how to improve any type of art you make:
- get familiar with your tools. whatever they might be, spend time with messing around with them, trying out stuff, looking up guides on yt etc. you cant expect pencil to work the same way as pastels or drawing programs. each is unique
- you have to practice! maybe not at first but the only way to improve if you are unhappy is by practicing. an easy first step is simply practicing how to draw various lines and easy shapes, or making lines using a template and trying to replicate them as much as you can. These are for training your hands to actually do the things you want them to do.
- use references! not just when you are making studies (which are useful) but also if you are making anything. may it be pose references, face references or color references they are always useful and improve whatever you are making. even if you get inspired by somebody else’s work its ok to use that as a reference as long as you are not tracing it and then posting it online as your own ( thats a dick move and you are trying to pass off somebody else’s labor as your own)
- even if you have a more cartoony or stylized artstyle you should STILL use references and practice drawing things semi realistically to understand how things really look and work etc.
- even when coloring you should use references!! colors change depending on light so its easy to go wrong with how you color
art is fun but its also frustrating and takes a long time to master, just like anything else. so if you are patient with it, learn to make it for yourself and keep doing it one day you will be good and thats cool
#quenthel special#half of this advice is the same but whatever#last 3 esp abt refs bc if one more time some mf says they cant draw black people or any person of color bc of artstyle or bc they suck#i will do smthing drastic
3 notes
·
View notes
Note
This made me laugh so hard, because I feel it to my core.
Here’s the thing- my technical drawing skills? I can handle that. I have a background in art design and I went through a phase earlier this year where I wanted to learn how to draw hands, so I did an in depth anatomy study. By the end of that hyperfixation I had very realistic looking hands to show for it.
But learning how to develop an artistic style? That is humbling. I figured that learning how to draw hands anatomically correct would translate well when I drew in a line art style. And, it just, didn’t. And that’s not to say that the knowledge is useless, it certainly helped with things like shapes. But I had spent a lot of time learning how to develop something to look like it had dimension and wanted to create something that was 2-d with flavor and life.
So, I get frustrated a lot as I learn what my art style is. It’s easy to look at other people’s art and think “Man- they got it locked in.”
But, the thing is? We all go through the same period of frustration. I had no intention of making my SYNA comic. Originally I was going to write it as a one shot, throw it up on AO3 and call it good. But @somerandomdudelmao shared screen shots of their CAS series and compared a Casey Jr from the very beginning to a drawing months later and they were so different. Because Cass had been practicing over and over again. And even at the beginning of CAS their art skills were fantastically developed, but repetition still made new life. So, I took that to heart and decided to draw SYNA. Because in the end, it’s the story is for me anyway. If anyone else along the way enjoys it as I share, awesome. But at the end of the day it is for my own enjoyment and development as an artist.
And sometimes, I pick up my pencil and scream.
HOW DO YOU DRAW??
i pick up my tablet pen and scream
#drawing#my art#learning a new skill#tmnt#the same yet not at all#tmnt fan art#teenage mutant ninja turtles
48K notes
·
View notes
Text


↳ Exhibitions
David Ostrowski at Sprüth Magers
July 24, 2024
Artist: David Ostrowski
Exhibition title: Parliament
Venue: Sprüth Magers, New York, US
Date: June 4 – July 26, 2024
Photography: Images copyright and courtesy of the artist and Sprüth Magers
In David Ostrowski’s paintings, minimal gestures create maximum tension. His spray-painted lines break apart monochromatic backgrounds, both emphasizing and negating the painting’s flatness. Surfaces often built from plain house paint reveal underlayers of studio detritus that complicate the presumed emptiness of his abstract compositions. Monika Sprüth and Philomene Magers are pleased to present Parliament, Ostrowski’s first exhibition at the New York gallery, which furthers the artist’s relentless questioning of the medium of painting and its constitutive elements via the recurring figure of the owl.
Ostrowski’s first owl paintings date back to 2009, but he did not exhibit them until 2019. Now, five years later, Parliament combines early examples with several new works of varying scales and dispositions. Among backdrops of off-white and dusky blue, one, two, three or many owls appear, rendered in an array of visual styles from realistic to painterly to pictographic to cartoonish. Because of Ostrowski’s deft play with layering, overpainting and placement, they seem variously to be affixed to the work like a collage, or to emerge from the background, always bringing attention back to the painting’s surface. Certain canvases contain only a fragment of the animal, where others are nearly filled with them.
Owls are creatures endowed by humans with a long list of spiritual and symbolic attributes; they are said to be wise, melancholic, mystical, ominous. Yet, though owls are undeniably figurative, Ostrowski approaches them like he does his abstractions: as pure shape and form that coalesce through line, gesture and color. By continuously repeating them, often in humorous positions and attitudes, Ostrowski demystifies the owls, as he noted in Mousse in 2019: “The symbolism of the bird of wisdom, the allegory of good and evil—I want to dismantle these things.” His repetitions likewise empty the figurative form of its meaning, calling into question how images are conceived and understood.
The ambiguity between figuration and abstraction unfolds further in the eyes of the owls, which in most cases peer outward, watching the viewer in the gallery just as they did Ostrowski in the studio. At first, it was unsettling for the artist to paint owls while simultaneously being observed by the very creatures he was painting. Motionless, their eyes look stunned, dumbstruck, void of life and pathos—not unlike those of humans in our media-saturated world, where we are also being watched. Their gazes even evoke fear and anger, reflecting the anxieties of today’s world. Amid this uneasiness, something is activated; Ostrowski’s owls offer a view onto something new, albeit unknown.
Ostrowski’s titles have always played an important role in his work, adding an additional charge of meaning to each canvas and questioning it at the same time. The paintings of Parliament continue this practice, creating tension between image and text through wordplay and allusion. Drawing on one meaning of “parliament,” some titles relate to government activities, such as Einkommensteuer (“income tax”) and Denkmalgeschützt (“designated a landmark”); others ironically reference art, including The Grid Method (a way of reproducing pictures square by square) and Early American Painting. Each confounds any easy interpretation of the owls and their manifold stares.
With this body of work, David Ostrowski demonstrates his unique role within the history of abstract painting, which pulls both from minimalist painting traditions of the 1960s and 1970s, as well as the late-twentieth-century urge to dismantle the medium’s heroism and beauty. The owls in the Parliament Paintings don’t work to destroy painting, but rather to tip it—and us, as viewers—off-balance, making the medium dynamic, poetic and strange.
1 note
·
View note
Text
Embracing Fitness as a Way of Life A Methodology for Personal Wellness
Wisconsin teacher Disney
Embracing Fitness as a Way of Life: A Methodology for Personal Wellness
In today's fast-paced world, where the demands of daily life can be overwhelming, it is all too easy to overlook the significance of self-care and prioritizing one's health. However, taking the time to engage in regular exercise can have far-reaching benefits that extend beyond just maintaining a healthy weight.
Exercise not only helps to keep our bodies in shape, but it also plays a vital role in enhancing our overall well-being. When we exercise, our bodies release endorphins, which are known as the "feel-good" hormones. These endorphins help to alleviate stress, boost our mental and emotional health, and even promote better sleep. By making exercise a regular part of our self-care routine, we are giving ourselves the opportunity to improve our overall quality of life.
Nicholas Groth's personal experience serves as a powerful reminder of the importance of incorporating fitness activities into our self-care regimen. Through his own journey, he has come to understand firsthand how fitness can be a crucial factor in achieving a well-rounded approach to self-care. By sharing his story, Nicholas highlights the transformative impact that prioritizing our health can have on every aspect of our lives.
Nicholas Groth, a passionate advocate for health and wellness, firmly believes in the significance of incorporating these aspects into daily routines. With a deep understanding of the challenges faced by individuals, he has meticulously designed a lifestyle that not only promotes physical fitness but also ensures a holistic sense of balance.
By setting realistic and attainable goals, Nicholas exemplifies how ordinary individuals can seamlessly integrate fitness into their lives in a manageable and sustainable manner. His approach takes into account the unique needs and circumstances of each individual, providing tailored strategies and support to help them embark on their personal wellness journey. With Nicholas's guidance, individuals can experience the transformative power of a healthy lifestyle, unlocking their full potential and achieving long-lasting well-being.
His transformative journey began with a profound realization of the need for a healthier lifestyle. Motivated by this insight, he embarked on a quest to make positive changes to his daily routine. With unwavering determination, Nicholas Groth incorporated mindful practices, such as regular exercise, balanced nutrition, and prioritizing mental well-being.
Over time, the cumulative effects of these intentional choices manifested in remarkable improvements in both his mental and physical health. As he witnessed the positive transformations within himself, Nicholas became an embodiment of inspiration for others. His dedication to a life centered around wellness not only serves as a testament to the power of self-care but also encourages individuals to prioritize their personal well-being and embark on their own journeys of self-discovery and growth.
Drawing from Nicholas Groth's personally-created method, the following section provides a comprehensive guide on how to incorporate fitness into a daily routine:
Set Realistic Goals: Establishing achievable short-term and long-term goals provides motivation and helps maintain consistency in one's fitness journey. Consider incorporating SMART (Specific, Measurable, Attainable, Relevant, Time-bound) goal-setting strategies to ensure the right approach towards adopting a fitness lifestyle.
Find Activities You Enjoy: When it comes to maintaining long-term commitment to fitness, it is crucial to identify activities that genuinely interest and engage you. Take the time to experiment with a wide range of exercises and physical activities, such as yoga, dancing, swimming, and hiking, to discover which ones resonate with you the most. By exploring different options, you can find activities that not only provide physical benefits but also bring you joy and keep you motivated on your fitness journey.
Establish a Routine: To ensure consistency, it is important to incorporate fitness activities into your daily schedule and make them a non-negotiable part of your day. Taking inspiration from Nicholas Groth, a renowned fitness expert, consider setting aside specific days or times for exercise. By doing so, you can establish a routine that promotes healthy habits and allows you to prioritize your well-being. Embracing this approach will not only contribute to your physical fitness but also enhance your overall lifestyle.
Monitor Your Progress: Regularly tracking progress allows you to notice improvements in your fitness levels, acting as a motivating factor for continued dedication. Keep a journal, or utilize mobile applications to log your workouts and measure your progress.
Find a Support System: Engaging with like-minded individuals or seeking guidance from experts can greatly benefit your journey towards a fitness-oriented lifestyle. A supportive environment fosters motivation, encouragement, and accountability.
Listen to Your Body: Recognizing the importance of recovery and rest is essential for a sustainable fitness experience. Adequate sleep, proper nutrition, and listening to your body's signals for rest are essential factors in preventing burnout and maintaining overall well-being.
Celebrate Your Achievements: Acknowledging milestones and celebrating accomplishments are not just important, but they also serve as significant motivators in maintaining a consistent fitness routine. By recognizing and celebrating your progress, no matter how small, you not only stay motivated and positive, but you also build a strong foundation for long-term success. So, take a moment to reflect on your achievements, reward yourself for your dedication and hard work, and let it fuel your determination to reach even greater heights on your fitness journey.
Nicholas Groth's emphasis on incorporating fitness into daily routines serves as a valuable reminder of the importance of self-care and prioritizing one's health. By adopting a personalized approach and following simple guidelines for integrating fitness into daily life, individuals can embark on their journey towards a healthier, happier lifestyle. Remember, wellness is not a destination but a continuous journey that requires dedication and consistency.
0 notes
Text
Drawing a basketball hoop may seem like a daunting task, especially if you're not artistically inclined. However, with a little guidance and practice, anyone can do it. In this article, we'll break down the process into simple, easy-to-follow steps. Before we start, it's important to understand the structure of a basketball hoop. A standard hoop consists of a backboard, a rim, and a net. The backboard is usually rectangular, while the rim is a circle attached to the lower part of the backboard. The net is attached to the rim and hangs down. Now, let's get started with our step-by-step guide on how to draw a basketball hoop. Step 1: Draw the Backboard Start by drawing a large rectangle to represent the backboard. This is the part of the hoop that the ball bounces off of during a shot. The backboard is a crucial part of the game, as it can greatly affect the trajectory and success of a shot. "The backboard is a crucial part of the game, as it can greatly affect the trajectory and success of a shot." Step 2: Draw the Rim Next, draw a smaller rectangle at the bottom center of the backboard. This will serve as the base for the rim. Then, draw a circle extending from the lower edge of this rectangle. This circle represents the rim where the ball goes through to score points. "This circle represents the rim where the ball goes through to score points." Step 3: Draw the Net The next step is to draw the net. Start by drawing two curved lines extending down from the rim. These lines should be parallel and slightly curved towards each other at the bottom. Then, draw several curved lines across these two lines to create the appearance of a net. "These lines should be parallel and slightly curve in towards each other at the bottom." Step 4: Add Details Finally, add some details to make your drawing more realistic. You can add some lines on the backboard to represent the square box used for aiming shots. You can also add some shading or color to your drawing. "You can add some lines on the backboard to represent the square box used for aiming shots." And there you have it! You've just drawn a basketball hoop. Remember, practice makes perfect. So, don't worry if your first few attempts don't look perfect. Keep practicing, and you'll get better. Drawing a basketball hoop is a fun way to engage with the sport beyond playing or watching games. If you're interested in learning more about basketball, check out our articles on what is the New York basketball team, 10-year-old basketball drills, and are basketball shoes good for tennis. Step 5: Add the Pole A basketball hoop is typically attached to a pole, especially in outdoor courts. To draw the pole, start by drawing two long, parallel lines extending down from the center of the backboard. The width between these lines should be consistent all the way down to represent the pole's uniform thickness. "The pole is an integral part of the basketball hoop, providing the necessary support for the backboard and rim." Step 6: Draw the Shadow and Ground To give your drawing a sense of depth and realism, consider adding a shadow. Imagine your light source and draw a slightly skewed oval shape on the ground to represent the shadow of the hoop. Also, draw a horizontal line to indicate the ground. "Adding a shadow can give your drawing a sense of depth and realism." Step 7: Add Finishing Touches Now it's time to add some finishing touches. You can shade the pole and the inside of the rim to give them depth. Also, consider adding texture to the backboard and the net to make them look more realistic. "Adding texture and shading can make your drawing look more realistic and three-dimensional." And there you have it! With these steps, you can draw a detailed and realistic basketball hoop. Remember, the key to a great drawing is practice, so don't be discouraged if your first few attempts don't turn out as you'd like. Keep trying, and you'll improve over time.
Drawing a basketball hoop is just one way to appreciate the sport. If you're a basketball enthusiast, you might also be interested in learning about the 10-second rule in basketball, the 12-foot basketball hoop, or the 1952 Indiana State basketball championship. Step 8: Refine Your Drawing Now that you have the basic structure of your basketball hoop, it's time to refine your drawing. This could involve erasing any unnecessary lines, smoothing out any rough edges, or adding more detail to certain areas. For example, you might want to add some bolts or screws to the backboard or pole to make them look more realistic. "Refining your drawing is all about paying attention to the small details that can make a big difference in the overall appearance of your artwork." Step 9: Add Color Adding color to your drawing can make it more vibrant and appealing. You could color the backboard white, the rim orange, and the net white or gray. The pole can be colored gray or black. Remember to color lightly at first – you can always add more color later if needed. "Adding color to your drawing can bring it to life and make it more visually appealing." Step 10: Practice, Practice, Practice Like any other skill, drawing improves with practice. Don't be discouraged if your first few attempts don't turn out exactly as you'd like. Keep practicing, and over time, you'll see improvement. "Practice makes perfect. The more you draw, the better you'll get." Drawing a basketball hoop is a fun and rewarding activity that can help you appreciate the sport even more. If you're interested in learning more about basketball, check out our articles on the New York basketball team, basketball drills for 10-year-olds, or basketball shoes for lifting. Stay tuned to SportyConnect for more engaging and informative content about your favorite sports!
0 notes