#iPhone does that thing when you click the shutter button
Explore tagged Tumblr posts
Visit Tumblr Blog
Explore Tumblr blogs with no restrictions, modern design and the best experience.
Last Seen Tumblr Blogs


Fun Fact
Forty percent of Tumblr users are between the ages of 18 to 25.
Text
DJI Osmo Mobile 3 review
DJI is popularly known as a manufacturer of drones and handheld stabilizers for cameras. Even though it recently entered the field of action cameras with the Osmo Action, its strengths remain in the production of high-quality gimbals for smartphones and cameras. The most recent launch was Osmo Mobile 3, the handheld stabilizer for 3rd generation smartphones. This 3-axis gimbal is a great tool for content creation, especially if your phone doesn't have the best electronic or optical stabilization. The Osmo Mobile 3 gets some nice improvements over its predecessor. It is now foldable to improve mobility. has better ergonomics; and has new shortcuts and gestures. We've been using the DJI Osmo Mobile 3 for about a week now, and here's what we think of it.
DJI Osmo Mobile 3 design and features
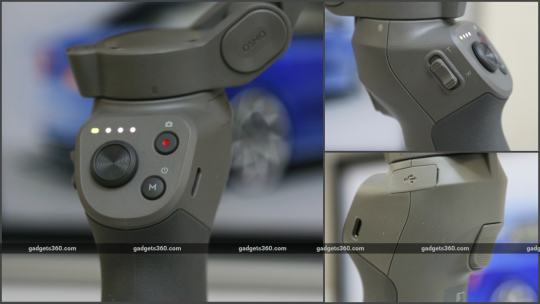
The Osmo Mobile 3 is available in India as a standalone device for Rs. 8,999 or as a "combo" for Rs. 10,999, which includes a hard carrying case and an Osmo Grip tripod. The latter does not add extra height to the gimbal, but has foldable feet so that when closed, it can be used as an extended handle or as a normal tripod. The Osmo Mobile 3 weighs only 405 g and is therefore quite light. The handle and most parts of the gimbal itself are made of plastic, but the quality is very good. The handle is covered with plenty of rubber to additionally support the sweaty palms. The arm of the gimbal can now be folded to make it easier to carry. You can even attach a phone to it when folded, which is convenient. With the 3-axis stabilization, you can perform tilting, rolling and swiveling movements while recording. The main buttons are located on the front of the handle. This includes a multi-directional joystick and buttons for recording and switching between the recording modes (& # 39; M & # 39;). There is a zoom control on the left and a USB Type-C port for charging on the right.
The DJI Osmo Mobile 3 has ergonomically placed buttons on the handle The Osmo Mobile 3 also has a full-size USB Type-A port on the handle in case you need to charge your phone while recording. Finally, we have an ergonomically placed release button on the back of the handle that can be used to reset the position of the phone. Depending on the number of clicks, the sport mode can also be activated and the tilt axis locked, and you can switch between the rear and front cameras of your phone. The Osmo Mobile 3 has a standard tripod mount on the bottom, so you can attach it to any tripod for time-lapse photography, or use the included tripod when you buy the combo package. The packaging contains a basic quick guide, a USB-C cable, a wrist strap and a soft storage bag. We received the combination package for review, which also contains the housing and the tripod. The hard shell case is of good quality and stiff enough to provide good protection. We only wish it was big enough to accommodate the tripod.
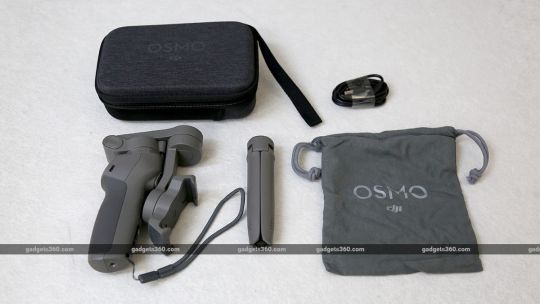
The DJI Osmo Mobile 3 combo bundle contains a carrying case and the Osmo Grip
DJI Osmo Mobile 3 performance
Before switching on this device, you have to open it, which is very easy thanks to the spring-loaded arm. Thanks to carefully placed grooves and latches, the arms of the gimbal snap into place when folded so that it does not accidentally unfold. The gimbal must be activated before you can insert your phone into the terminal. To do this, you need to download and log in to the DJI Mimo app, which is available in the Google Play Store and the Apple App Store. As soon as you have gone through the setup process, which also checks and downloads all available firmware updates for the gimbal, you can use Osmo Mobile 3. The gimbal automatically tries to center the installed phone. However, you can also manually adjust the position by holding the tilt motor. You can also calibrate the position and angle of the phone using an option in the Mimo app. The Osmo Mobile 3 is compatible with most of today's popular cell phones, but not all functions are available for all cell phones. For example, slow motion videos and 60fps videos in the Mimo app are currently only available on iPhones. 4K recording is not yet available on some Android phones like the Realme X2 Pro (review), but on others like the Samsung Galaxy Note 9 (review). Even if your phone is not in the list, you can still use all the basic functions of the app. Hopefully we should see better support in future releases. We tested the Osmo Mobile 3 with a variety of mobile phones such as the Redmi Note 8 (test), the Realme X2 Pro Master Edition, the Samsung Galaxy Note 9 and the Apple iPhone 11 Pro. The holder for the phone is also cleverly designed so that it does not come into contact with one of the buttons and you can really center it. We noticed that all of the phones we tested got quite warm after using the Mimo app for a long time and the batteries were quickly discharged as a result. If you are not taking pictures, turn off the screen or put the gimbal into standby to save power for both devices. With Osmo Mobile 3, you can record professional-looking, stabilized videos with little effort. This is particularly useful on phones that don't have electronic stabilization or don't do a good job. With the Redmi Note 8, for example, 4K videos are recorded in good quality without stabilization during the day. The Osmo Mobile 3 fixes this problem and makes an otherwise unusable video clip look like it was recorded with a much more expensive phone. We even tried recording a video while zooming in, which causes blurring even with tiny movements. The gimbal made a big difference even while walking. If you have a high-end phone with optical stabilization, taking photos in low light is still a challenge. A stabilizer for such situations is noticeable in the end result.
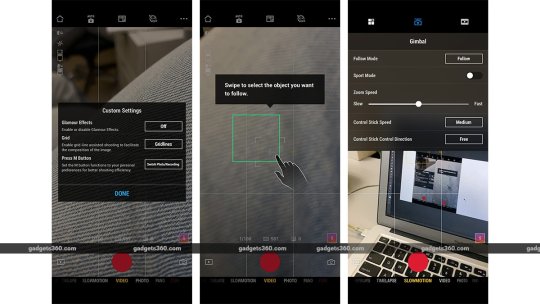
The DJI Mimo app offers good functions for recording and controlling the Osmo Mobile 3 In addition to standard photos and videos, the Mimo app also offers other recording modes and functions. You can use it to record professional-looking time-lapse videos in which you can set the path that the gimbal follows for the duration of the time-lapse. Hyperlapse videos are also possible, and we really liked the end results even with a cheap phone like the Redmi Note 8. In story mode, you can easily create short stories. All you have to do is select a template and follow the instructions to record short clips that are then automatically merged with transitions, on-screen text and music. You also have the option of instantly sharing these clips on social platforms. For panoramas, you can choose a 180-degree shot or a wider shot that captures a lot more angles. With the latter, however, the end result didn't always look good, and we occasionally noticed inconsistencies in sewing. In addition, the gimbal of the Osmo Mobile 3 can only be rotated to a limited extent so that you cannot take 360-degree photos or panoramas on it.

A 3x3 panorama that was combined with the Redmi Note 8 by the DJI Mimo app The Osmo Mobile 3 also has ActiveTrack 3.0, which is available via the Mimo app. You can select the object you want to follow through the viewfinder. The gimbal tracks it automatically to make sure it's always in the center of the frame. It worked very well with people, but not so much with fast moving objects. There is a sport mode that can be activated by pressing and holding the shutter button twice. This enables an active tracking of the object in the middle of the frame and increases the speed of the motors so that the gimbal can swivel and tilt faster. ActiveTrack 3.0 can also be activated by showing the camera a palm or a V-sign. However, this must be activated in the settings of the app. Other gestures include double tapping the mode button to rotate the phone horizontally or vertically. and triple-tap the shutter button to switch between the front and rear cameras. You can also activate the quick menu, which allows you to use the joystick to navigate through all shooting modes so that you never have to reach for your phone's screen. DJI specifies a battery life of up to 15 hours. We noticed that the battery life is actually around 10 hours in actual use, which is still not a bad thing. We believe that this should be more than enough runtime for everything you will be filming at the same time. The Osmo Mobile 3 can be used while charging, so you can use it for longer. It took approximately two and a half hours to fully charge when connected to a 10W adapter.
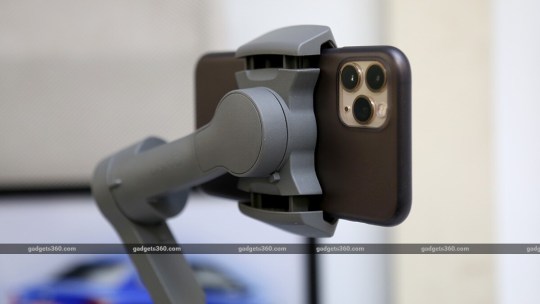
The DJI Osmo Mobile 3 works with almost any phone, but some features of the Mimo app are only available on some models judgment The DJI Osmo 3 is an incredibly entertaining device and a must for any serious content creator. Even for casual users, it is a very practical accessory when you are on vacation or just like to make home videos. The best part is that it is easy to use and even videos recorded with an inexpensive smartphone can look more professional. We love how compact it gets when folded up. The subject tracking function works well for people. and the Mimo app offers useful shooting modes. We hope that DJI updates the app to support more resolutions and frame rates on a wider range of Android phones. The starting price of Rs. 8,999 is very good considering the performance and functions that this device offers. We recommend putting a bit more money in the combo package, as the case is a must if you travel a lot and the tripod is very convenient for time-lapse photography. Price: Case 8,999 (base model); Case 10,999 (combo model) benefits Comfortable and portable Very good stabilization Easy to use Useful companion app Decent battery life disadvantage Object tracking could be better Read the full article
1 note
·
View note
Text
Top 6 New Accessories for iPhone 13
A whole new range of accessories for iPhone 13 has been created. Designers and creatives rushed to create a whole range of products. From a UFO-inspired charger to a car mount that doubles as an air freshener – there’s an accessory for all your needs. We have selected a selection of accessories for iPhone 13 that we believe are worth investing and buying. These Accessories for iPhone 13 will really enhance your Apple experience.
List of Accessories for iPhone 13
1. The G4 Charger
Why is this remarkable?
The iMac G4, with its debut in 2002, was truly a design icon in that it was unlike anything else around in its time. While the world was still struggling with square plastic computers, the G4 had this intensely beautiful organic design accented with chrome details. The adjustable stand made it stand out from all the rest, paving the way for future iMacs that will retain all the detail needed to keep the eyes level. Eponymously named the G4, this quirky little charger pays a shout-out to its 20-year-old predecessor.
It sports the same domed base and the same chrome stand that sits on the wireless charging element that allows you to clip your iPhone to it. Once the iPhone is nestled comfortably in place. This is best accessories for iPhone 13.
What we like
The dual-joint system on the back of the charger lets you tilt and position your phone however you like
A nifty light inside its domed front lights up when your phone starts charging
What we don’t like
It is not yet available in all countries!
2. The Fjord
YouTuber Marques Brownlee, who shoots all of his videos in 8K on ridiculously expensive RED cameras, hints that “the best camera is the one you have on you,” and that’s almost always your smartphone camera. Your smartphone camera’s image processing engine is arguably powerful enough to click photos as well as a DSLR, and the only thing really lacking is precision and that hands-on experience. This is where the Fjord comes in.
Why is this remarkable?
The Fjord turns your iPhone into an iPhone-based mirrorless DSLR. The Fjord attaches to the back of your iPhone and gives you analog controls such as a two-level shutter button, zoom wheel, speed wheel, and selection wheel. You can also use the additional multifunction button to trigger the flash.
What we like
Portable and stylish
Has its own camera app
What we don’t like
No complaints!
3. Snapods
Why is this remarkable?
The design of the case is directly inspired by the place where it is. Designed to rest against the back of your phone, the Snapods case features a flat, wedge-shaped profile, allowing you to easily slip your phone into your pocket. The slim case doesn’t just dock the headphones, it also charges them, giving you an impressive 45 hours of battery life.
The headphones match (and sometimes surpass) the AirPods in almost every category. Take them out of the case and they instantly power on and connect to your phone using Bluetooth 5.2. Powered by the latest flagship Qualcomm 3040 chipset, Snapods deliver a seamless and incredibly responsive audio experience, without lag, stutter or pauses. This is amazing accessories for iPhone 13.
What we like
Qualcomm cVc 8.0 noise reduction algorithm is capable of cutting up to 30 decibels of ambient noise
You can attach Snapods to phone cases, tablets or even your laptop
What we don’t like
No complaints!
4. The Chargepuck
The Chargepuck best accessories for iPhone 13 is what you get when you mix the words AirPower and PopSocket. This small device is about the size and shape of a hockey puck. It attaches to the back of your iPhone, providing wireless charging capabilities.
Why is this remarkable?
The Chargepuck is accessories for iPhone 13, replaces the wireless charging station or mat you probably have lying on your desk or somewhere by your bedside. The Chargepuck is not a static device that can be plugged into an outlet for hours. Instead, it attaches to your iPhone with a retractable cable. It is not a battery, because it does not contain its own battery. Instead, it’s a charger that attaches to your iPhone and lets you charge three other devices simultaneously.
What we like
Portable design
Fully functional 360 degree ring
What we don’t like
it may not appeal to everyone
5. The FLIP MagSafe external battery concept
Why is this remarkable?
In the tethered configuration, you can bend the power banks at any angle as needed. You can line it up upright to charge the iPhone 13 with one base and your headphones with the other. Yet another possibility is to have the accessory stand in a V position to clip onto the iPhone 13 in landscape orientation to watch media content. Or just keep them in a fully folded position to lay the accessories for iPhone 13 flat while charging overnight.
What we like
Triple the battery of your compatible iPhone with an intuitive design
What we don’t like
It’s still a concept!
6. The NUMBER ZERO
You might as well be a jack-of-all-trades when designing a product that faces fierce competition, right? Sure, your smartphone car holder can hold your phone, but can it also cool the air? That’s sort of the direction the NUMBER ZERO is heading. The NUMBER ZERO is a compatible car holder and popular accessories for iPhone 13. It can be universally mounted on any AC vent.
Why is this remarkable?
The design of NUMBER ZERO is clever and thoughtful and amazing accessories for iPhone 13. This detail is often overlooked by companies. The design of the stand was created to look good even if there is NO phone mounted on it. The NUMBER ZERO mount is equipped with neat kinetic animation powered by AC wind. There are a number of animated options for the mount. Each animation features a rotating element powered by the wind from the AC vent. Air from the vent pushes a series of gears which then gently spin the kinetic animation, allowing the NUMBER ZERO to be eye-catching accessories for iPhone 13 even when the phone isn’t mounted in place.
What we like
Its universal clip on the back mounts to any car’s AC vent without the need for special tools or know-how.
What we don’t like
No complaints!
0 notes
Photo
Passive Income: How I make $40,000/year doing nothing (software engineer edition) Passive Income: How I make $40,000/year doing nothing (software engineer edition) Video Transcript ▼ okay all right okay how's it going I think I'm getting all settled in here welcome back to another episode of the tech lead I am the tech lead and today I'll be the tech lead not to start off we actually have a sponsor today so let's go to that right now right now my name is the tech lead and I am the tech lead I hope you're enjoying the show but don't forget if you like the content we also have available for you tech weed season one complete HD for the low price of 1995 with this you get 28 additional episodes and nearly three hours of additional content check it out in the description link below everyone who has bother have left rave reviews saying that it has been well worth it for them they'll do it for me give it a like and subscribe and back to you tech lead thanks tech lead today I wanted to talk about passive income and about how I'm generating about $40,000 per year just on site income and this is income where I'm basically just not doing anything I'm just sitting around and each day I'm getting about low over $100 just for doing nothing now I wanted to talk about this video not actually because I think it's important for software engineers to build additional site income streams I would say that even $40,000 per year isn't really going to be that meaningful necessarily but but I would say it's a very fun happy to have it can help you get deeper into software engineering as you're building these side projects it can help build up your resume and what I hope to do is tell you about the ways that I generate aside the income and I'm not really sure if all of these are going to be completely useful for you because it may be difficult to replicate what I've done but it can help inspire you maybe give you some ideas so for me most of my side income comes from for projects that I'm doing now the first one is this photography software that I created it's called pan elapsed 360 comm check it out it is for time-lapse photographers and this project is a very niche project that I began when there was a big time-lapse boom like there were time lapses all over YouTube and I was into time lapses as well and people needed a way to add special effects to these time lapses to process the time lapses and there weren't many good time lapse software's so I looked into it there was one software that was retailing for over $200 and I thought you know that's really expensive and that I could build something better not the software I built did two things the first thing it would do was it would allow you to add motion to your time lapses using actually perspective correct math and this involved really understanding the math behind lenses like a 24 millimeter camera what does that actually mean in terms of field of view and what's like a hundred millimeter camera and this was very fun for me to learn and figure out and find the exact math behind it and I also applied some of my computer graphics skills to get this going I built the software using Adobe ActionScript which is like Flash technology now it's pretty funny because ActionScript is not a very popular language these days but the great thing about it was it was cross-platform across Windows and Apple and I wanted to make sure that the software I wrote could target both platforms and they needed to be desktop software because I didn't want users to have to upload their photos just together processed on like some web software so I've looked around for the appropriate technology for this and I could have chosen either Java or Adobe AIR ActionScript and I really wasn't keen on getting back into Java and it seemed to me that ActionScript and Flash technology could be something interesting it's something that I had already been doing a bit of and I was able to just build out the software pretty quickly it took like two weeks or so to build out I noticed at the time that a lot of time-lapse photographers were try to add motion to their time lapses using very expensive hardware rigs that would be based on timers and it was slowly like rotate the head and I realized that you didn't really need these Hardware timers and rotational motorized heads to do other stuff like you could do with or in software using perspective correction and just a bit of math and image distortion there was a very small niche messageboard community of time-lapse photographers I was part of it and I knew that if I built a software I could just go there announce it and everybody would see that message so that's exactly what I did and we then the first day or two of me launching the software I was already getting like five hundred dollars every day in sales over the years I continued to build up features into the software another big feature was allowing you to capture time lapses across sunset or sunrise when the scene exposure would change quickly and and for this I would use math to calculate the exposure of a scene based on the exposure triangle which is based on aperture ISO and shutter speed and using these three pieces you're able to calculate how bright a scene is and then interpret what Brenton is each frame should be as the cameras changing exposure quickly to try to capture the scene I also added some other interesting features like I had the support to do fish eye time lapses which is a very unique and strange effect and it literally took me like a month to work out the calculations for how to do a fisheye projection and then build like fisheye geometry into the program so I'm not sure if this was that well-received so I'm I don't know if it was a really good use of my time to spend the whole month building out this feature but it was really fun for me to do at least and I had to get into like GPU shaders to actually do it so I had to teach myself that stuff anyway the software something that I'm still maintaining these days I sell it for a pretty high price about $80 a piece and I think that's actually a very worthwhile price and also I just think that the economics is that for desktop software you can just charge more and I was pretty happy that I did not make this like an iPhone app where the standard is every app needs to be like $1 or $5 like like here's an app time selling for $80 but I still managed to make about one sell every day and it also helped when our managers to translate the whole web site into Japanese and the software became quite popular in Japan as well so that's one side project there's another side project that I've been running for the past 10 years or so it's called human pets comm it's kind of a social network and this was very popular back in the day like there were 2 million users and it was generating like $2,000 everyday or something for a while these days the website has lost a lot of popularity from its heyday it's still pushing out about say $100 per month and the way it generates money is generally through memberships take off these shoes so I feel like I probably should be charging more for membership I charge like 6 dollars for a monthly membership which is probably too low when you become a member you gain a bunch of additional features and another great thing about this that added was that you could buy or give to memberships to other people so a lot of people will be doing that because often people seem to treat others better than they may treat themselves I also run some Adsense on the site the ads don't really make much money it's like $60 a month but this site has been operational for the past ten years or so and it's just been spilling additional income for me the whole time so that's great the third project was a set of iPhone games web RPG apps really where people could just progress a character through a game and there would be levels a storyline to push the player through many items to collect monsters to fight and you just click buttons and kind of move your character through I think the key to this was there was a storyline that was just very engrossing for it to player and the other thing was I had high limits for purchases like you could buy items that were like $20 in the game there's a statistic that 90% of your income will come from the top 10% of players for in the game and those players are concerned with their whales they're basically people who have either a lot of money or don't mind spending a lot of money on gaming and so I think that was one mistake I made with my first website which was unlimited so that you can only pay a maximum of about 6 dollars per month for membership and after that it didn't matter how much you loved the app or game it was kept at that amount and what I wish I did was add higher thresholds for spending now the fourth project I did was very interesting and this was actually photography and you can sell stock photography or stock videos now stuff photography doesn't pay very well because it's so cheap like one photo the most you could get is like 25 cents or something like my best selling photo was a photo of the Brooklyn Bridge a New York just happens to sell very well because it's so iconic and this photo so about 1,500 copies and each copy was a dollar so me just standing there taking one shot with that was like a fifteen hundred dollar shot right there with video it's even better because each video you can sell for about $50 a piece or so and these days I think people are looking really for 4k video like they need to be extremely high quality my videos that I sold really well were videos of Japan there was actually the shrine called fushimi inari in kyoto with a bunch of red gates this was actually relatively unknown when I visited and there were very few people but it's funny that now if you go there's tons of people and I think it's because I helped popularize it you know I had this video and sold over a thousand copies of this video and usually it's travel agencies that buy these videos and then they use these to try to sell that that's a nation tours packages and they take tours there so it's kind of shame now that this place is now completely overrun with tours and I probably helped contribute to that mess and then I also did videos of Iceland the ice caves and Northern Lights and each of these videos generally brought in like $1,000 so in the end my photography work brought in about twenty thousand dollars over four or five years or so the other great thing about the photography work was I actually got sponsorships so I was able to work with a selling company and they offered us $10,000 catamarans and sailboats in exotic locations like the Bahamas or Phuket and we were able to just take these sailboats around and this was kind of unique because I knew how to sell and I'm a photographer so as I was able to take week-long sailing vacations in the exotic areas worthy lodging and that boat would be free so it was pretty great when you add it all together we're looking at about thirty six hundred dollars a month or forty K a year and the great thing about citing income like this business income is that you can actually deduct expenses on this so if you buy a laptop you can deduct against that anything i buy that may have some business purpose would be like about thirty percent off or something like that now one funny consequence of this is i don't actually do much github open source contributions because a lot of what I work on I sell like I wanted to be commercial software so I don't actually want to open source things so one time I had to recruit her asked me like hey what's your github and I was like I don't do open source you know I actually make money from her projects and they're just like that yeah that's I would say though that another way I generate a lot of site income so to say is I just live with my parents that's saving me like at least $3,000 per month on rent and the funny thing about this is you calculate that as post-tax income so it's equivalent to about 4 K per month in income you might earn at a job that's like 48 K savings right there's so I don't know what I'm gonna do with all this money I'm saving but maybe I'll give it to my kid or something like that so the last thing one says when I look for a project there's a few things I'm looking for so the first thing to look for is timing like why now and everything I've done that has succeeded I think there was a reason that timing made sense like like there were certain trends in user behavior or technology that signified that it was at that moment that it would be ripe for some project to succeed the other thing is I look for things that are scalable so running a restaurant I think is not very scalable it's I think what you're really looking for our scenarios were you can affect far more many people and that's usually done through the internet and that gets the last thing is using coding to automate these systems such that you don't have to do anything and then the system just automatically takes care itself that's when it becomes really passive but yeah that's pretty much how I've been looking at generally the inside income I think in the whole scheme of things it's not much compared to say the salary that a software engineer is able to generate but I think it's really fun sometimes you're actually able to strike gold in certain areas and make a lot but there than that I think it just makes the Hobby that much more interesting and overall just push your craft to a higher level no matter what you're doing so there you have it that'll do it for me if you liked the video please give it a like and subscribe it really helps grow the channel and that we'll see you next time bye
8 notes
·
View notes
Text
An Interview With Matt Bramhall
TELL US A LITTLE ABOUT YOURSELF!
I'm a fashion / lifestyle photographer from Stoke-on-Trent and if i'm not asleep or eating, I’m outside shooting with my friends.

HOW DID YOU FIRST GET INTO PHOTOGRAPHY?
I first got into photography taking pretty bad and also cringey shots of flowers on my iPhone 4s. I thought I was such a pro up until I received my first camera and hadn't the faintest clue how it worked.

DO YOU HAVE A PREFERRED MEDIUM TO WORK IN?
I work with digital because its easier and more cost effective, but preferred would have to be 120mm medium format film, as its one of the most intimate experiences you can get with photography. You can literally feel the camera working and clicking as you wind on the next shot, or when you click the shutter button, you gain such an appreciation for the actual art and technicalities of photography with medium format cameras. Plus the look the film stock makes is like no other medium of photography out there, it’s truly unique.

WHAT DO YOU FIND INSPIRES YOU THE MOST?
The most inspiring thing out there by far is instagram, it contains such an enormous library of photographic genres and techniques. Exploring how other photographers capture images and seeing what they chose to display is incredibly inspiring to me. I would credit most of my success to instagram because without it I never would have been able to find my own style.

HOW WOULD YOU DESCRIBE YOUR PHOTOGRAPHIC STYLE?
My style I would say is quite cold and moody, it’s quite rare you find me taking sunny happy portraits of a beautiful smiling model. I prefer much more of the opposite. Foggy or overcast days are much much more interesting to me than the sunny picturesque weather mostly associated with photography. My style has altered slightly in recent weeks in that I've been experimenting with light and luminescence. Don't get me wrong I do love a good sunset just as much as the next photographer, but I prefer cold and dreary weather with quite a serious expression upon the models face. I think if I had to attribute a word to my style I would describe it as mystical, as it’s quite hard to create a story from my images, you're never quite sure whats going on and I prefer my viewers to try and make something up on their own.

WHAT ADVISE WOULD YOU GIVE TO YOUNG PHOTOGRAPHERS TRYING
TO MAKE A NAME FOR THEMSELVES?
The single greatest bit of advice I could give to anyone starting out is work for free, don't charge unless you're working for a business or a company. If you start charging when you have a small portfolio no one is going to be interested, you need to build up a name for yourself first. Yes you might get fifty pounds from a model shoot, but what will you have achieved? As those jobs will only come once in a blue moon. If you work for free you'll get 10x as many jobs and the experience you'll get from all those jobs is invaluable, you might be doing it free, yes, but I see it more of a trade. They get some good photos, you get experience and get to do what you love. I personally think if you don't want to go out, take photos for someone and create great images just because you love to, then I don't think you can call yourself a photographer and I don’t think you’re ready to take the craft seriously.

WHAT HAVE YOU LEARNED SO FAR, BEING SO HEAVILY COMMITTED TO
PHOTOGRAPHY?
I've learned quite a lot over the past couple of years. One of the main things I've learned is to never turn a job down. No matter what it is (within reason of course) you should never, ever turn down a job because you have no idea where it might lead and no idea where it might take you. I remember being asked to take photos of a guys vespa scooter so he could display the images in his house, I didn't really want to, as it wasn't really my forté but I did it anyway and on the shoot the guys brother asked if i could take some photos of him sometime. I agreed and from those photos I entered the Next street style competition and came in the top 20 out of 400,000 entries, so you never really know where a job can take you.

IF YOU COULD COLLABORATE WITH ANY PHOTOGRAPHER, WHO
WOULD IT BE AND WHY?
It would definitely have to be with Andrew T kearns (instagram: @andrewtkearns ). His style has probably been the most influential on my work, I've been following his work for years and his lifestyle is just driving around the pacific northwest of america with some models in his land rover taking awesome pictures on these huge road trips he does. To be a part of that would be amazing.

DO YOU HAVE ANY PLANS FOR THE FUTURE?
My plans for the future are to go to Falmouth University in September of 2018 and do my degree in fashion photography. After that, if all goes to plan I want to move to the states, more specifically portland oregon and set up my own photography business in the city.
Follow Matt on his Instagram @matt_bramhall
1 note
·
View note
Text
Screen Mirroring In Lg Smart Tv

Desktop goose github tutorial. Welcome to ResourceHub, the unofficial website/repository for everything Desktop Goose. The launcher is an easier way to install and use mods. However, you can still manually download mods on this website! Hosted on GitHub Pages — Theme by orderedlist. A tool to customize your desktop goose. Contribute to lim10dev/desktop-goose-customizer development by creating an account on GitHub. A modding launcher for the Desktop Goose by the ResourceHub project desktop-goose resourcehub resourcelauncher resourcehub-launcher desktop-goose-modding C# GPL-3.0 9.
Screen Mirroring Lag Lg Smart Tv
Screen Mirroring In Lg Smart Tv Without
Two Workable Means for Screen Mirroring iPhone to LG TV
Get started to screen share Windows 10 to LG TV by following the simple steps below. On your web browser, get the application and install it on your Windows 10 and LG TV. Launch the app and click the Computer Screen Mirroring. Just enter the PIN code displayed on the interface of the app on your LG TV to connect. Note: Don’t forget to connect your Windows 10 computer and your LG TV to the same WiFi connection. Most smart TVs coming out these days have screen mirroring capabilities baked right into them. However, some of the older TVs do not have this feature. Thankfully, there are specific ways you can still make the old TVs work with screen mirroring, and that is by using an external device to connect with your smartphone.
ApowerMirror
Cross-platform screen mirroring has already been integrated into mobile operations. In order to get more enjoyment from a larger screen, including screen mirroring iPhone to LG TV, iPhone users also stream iPhone to PC or other Android devices. Another recommended app that you can use is called ApowerMirror. Which is by far one of the most trusted screen mirroring software for both iOS and Android devices. To use the app is very easy, here is the detailed way to mirror iPhone to LG TV. Fujifilm check shutter count.

You can install this program on your phone and PC.
Get a “HDMI” cable to connect your TV to your PC. Now set your TV source in “HDMI”.
This time start mirroring your phone to your PC by clicking the blue “M” button and tap “phone screen mirroring”.
This time, swipe up to your control panel and tap “Screen mirroring” and finally tap the name of your TV. From there your phone will be mirrored on your TV.
LetsView
Next up, we got LetsView. If you are looking for a simple and easy to use interface to mirror your LG phone to your TV, this is one good app that you can consider. It is one of the most recommended tools because not only it can mirror your phone, it can also screen record, screen capture and annotate. These features are genuinely free and do not require any registration nor premium purchase like other tools. There is no other tool that offers the same kind of service for free. Get LetsView on your phone now and follow the instruction to mirror iPhone to LG TV:
Use the download button below to download the app on your PC. On your phone, go to your Playstore and get the app from there.
Now connect your PC and your phone under the same Wi-Fi network. Also, prepare your HDMI cable to connect on your TV.
Now, launch the app on your phone and PC. Once the name of your PC appears on your phone, tap it and the mirroring will begin.
Finally set your TV source to HDMI 1 or 2 and plug the HDMI cable to your TV and PC. This way your phone will be mirrored on your LG TV.
Video TV Cast – Mirror iPhone to LG Smart TV
Video & TV Cast for LG Smart TV is an app specially designed for iPhone and iPad. You can use this software to browse the web and mirror any online video, web movies, live shows etc. from your iPhone to your LG TV. It supports different formats such as MP4, M3U8, HLS live streams. Now let’s take a good look at the following steps on how to mirror iPhone to LG TV.
Search Video & TV Cast for LG Smart TV on your iPhone and then, launch it.
Open your TV and launch “TV cast”. Ensure your iPhone and LG TV are under the same Wi-Fi network.
Use your TV’s remote control to open “LG Content Store” and you can find the same TV & Cast on the right side of the screen.
Configure the app on TV by filling the IP address shown on your iPhone.
Click “OK” to connect iPhone to LG.
Select a video you want to mirror on your LG TV, tap the link to cast and then you can simply cast your iPhone videos to LG TV. This app supports all major video websites and countless others.

You can stream high-quality video directly from your iPhone to a big TV screen via the above method. However, please remember that Video & TV Cast for LG Smart TV does not support iTunes movies, DRM protected videos or Flash videos. Also, this app only streams the video part of a website rather than the entire website content.
LG TV Plus – Screen Mirroring iPhone to LG TV
LG TV Plus is a must-have app that you can use to browse and play your smart TV with your iPhone. This app features TV controller, Touch pad, Launcher, Search and other useful functions. This app works with 14 webOS-enabled LG TVs. After setting your TV and mobile device to the same Wi-Fi network, you can use it to mirror iPhone to LG TV, control your TV with iPhone, enjoy photos, music, and videos from your iPhone on a large screen. For any iPhone with iOS 6.1 or later version, you can share iPhone contents on LG TV with this software.
Choose your favorite dress paintings from millions of available designs. All dress paintings ship within 48 hours and include a 30-day money-back guarantee. Painting dress online. Here are all the things you will find helpful when painting a dress (or any painted piece of furniture, for that matter). Don’t worry if you don’t have everything.Believe me, it takes time to build up your stash of DIY supplies and materials! Jan 30, 2015 - Explore DEB PAULSSON's board 'paintings of dresses' on Pinterest. See more ideas about art dress, ballet beautiful, ballet art. Back to School Dress, Girls Painting Party Dress, Painting Dress - 2 color choices, Long or Short Sleeved or Sleeveless, 3-6m to 8yrs ThreeWildGirls 5 out of 5 stars (2,028).
Conclusion
All tools mentioned above are helpful when it comes to mirroring your device to your LG TV. You just need to check which tool will give you more benefit. You can also try them all to make smart choices. If you have suggestions or questions about this article, please leave us a comment below, under the comment section.
Screen Mirroring Lag Lg Smart Tv
Screen Mirroring In Lg Smart Tv Without
Related posts:
0 notes
Text
I think you all know I love taking pictures, photography is one of my favourite things to do. Which means I always have a camera at hand whether that is my phone or my DSLR, I find it’s worth carrying something that I can take pictures with. But sometimes the pictures we take on our phones may seem to be lacking in depth or just look amateurish when compared to the more professional cameras or those from people who have mastered the art of great phone photographs. In this blog post, I wanted to touch on a few simple and easy steps to help you achieve wonderful photographs taken and edited from a phone.
My device of choice is an iPhone 6s, I have spent the last three years getting used to them and enjoying the simple yet functional layout of the app not to mention the great quality that is produced. Most of the time we have a smart phone in our pockets which have an amazing camera on them, taking pictures has never been so easy! But at the same time, it has become so much more important to take better photos as we all strive to get that ‘perfect shot’. So here are a few of my tips to achieve great images every time.
1| Lighting
This is the important one! Having a good source of lighting will always help in creating sharp images that are filled with loads of details as well as soft shadows.
Indoors: When you are shooting inside make sure you are near a window where there is plenty of natural light coming in. But make sure you are not standing between you and the light source and blocking anything that will help illuminate the picture. During the winter it does make things a little bit more difficult as the days get darker sooner and the weather is more overcast. Try to avoid direct sunlight as this can create harsh shadows and drastic lighting differences so this won’t look as good. Try to avoid using artificial lighting or flash as much as you can.
Outdoors: Since it’s getting closer to Winter there will be less sunny days so harsh shadows won’t be too much of an issue here. If it is going to be a bright, sunny day it might work out better if you head out in the morning or evening before the sun is at its highest point in order to get the best kind of photographs. Ones without any harsh lighting differences. If you find yourself taking pictures during midday then it might be good to look around see if you can find any shade to help block some of the light. But you won’t have to worry too much about this on an overcast day. The only problem is the colours will not be as vibrant and may take a bit of editing to fix.
Nightime: I tend to avoid taking photos at dusk or late in the evening, as the sun has set and it becomes more difficult to get crisp photos that have enough detail in them. There’s no real light source so unless you’re taking a picture of the city skyline or city lights, I’d stay away from night time pictures. It just creates a grainy and blurry photo.
2| Composition
It may take a while for you to find out a composition style that suits you. Play about for a bit and experiment with different angles, try crouching on the ground or get a shot that is upclose and in detail. For this, I would recommend a macro lens. I spoke about using them in a blog post which you may find interesting. You can find it > here <
Once you have found a style you like then it is always best to keep practising that until you get better at it and can instantly recognise what angle you would need for a particular type of photo. But I would still keep trying them in rotation and experimenting as you might just surprise yourself.
The next piece of advice Is the same rule as one that applies to DSLR photography. Whenever you frame a landscape or subject think about the ‘Rule of Thirds‘. This basically helps you to proportion pictures properly by lining up key points of a picture on the lines. If you didn’t know you can turn on a grid mode on your phone which displays a grid whenever you take a picture. You can access this function by going into settings > scroll down to photos and camera > scroll down > turn on grid mode. This is so good when you in need of a little help of how best to frame a picture and it’s a little function that I recommend you turn on. Just be sure you become familiar with the rule of thirds and how they work.
3| Equipment
I mentioned this in the point above but if you really want to step up your game without spending lots of money then I would suggest you invest in a decent clip on lens kit. You can find them as cheap as £6 on Amazon. I recommend the VicTsing 3 In 1 Clip-On Lens it has amazing reviews and you get three different type of lenses in this kit. It isn’t too much money to splash out on and can really improve your photography skills. I did talk more about it in > this < blogpost so if you’re interested in learning more then it might be worth a quick read.
This can really change the way you take pictures and can add so many interest perspective. I love using my macro and wide angle lens when I want a little extra from my device when I don’t have my bigger camera at hand. So if you have followed all of the other steps and cannot seem to improve your pictures then it might be worth giving it a shot.
4| Filters
Oh boy, I have seen countless pictures where people have gone to town using filters and it just looks awful! Use these sparingly! I understand filters make a picture look pretty and can help enhance an image but when I say less is more I mean it. If you took a bad picture adding filters won’t make the image look any better. I stay completely away from Instagram filters I don’t think they do much for an image instead I opt for minor adjustments in VSCO Cam. This wonderful creation has really helped me improve my editing skills and refine a certain style of photo. It is all about enhancing the image, bringing out the high points and the low without looking overly edited.
You can see part of my editing style above. I tend to start with the filters, I use A6-A10 the most. Those are some of my favourites and it ensures I keep a consistent style in my photos. This picture above was taken on my phone, like all of the other pictures in this blog post but this particular one was taken in a moving vehicle just to prove you can get really good pictures when you think about composition and timing. Once I have selected the filter, I move onto adjustments. In the app, I move along the options so I start with Exposure first followed by Contrast, Sharpen, Clarity and sometimes Saturation. If the image doesn’t seem right I tend to go back to Exposure to see what different brightnesses look like or adjust the Crop of the image to see which composition would work best.
So be sure to give VSCO a try and download all of the free filters that they have available and maybe even purchase a few filters that you can see yourself using quite a lot. It is a great investment and they tend to get used quite a lot, plus this app has worked wonders for me over the years, it is my go to app when I have a picture I want to edit whether I have taken it on my DSLR or just my phone. Other apps that I use for editing pictures includes Airbrush which is a free app and Enlight, a paid app, for more graphic style images.
5| Burst Mode
There isn’t really a fast shutter speed on the phone, so what you’re given is what you get. Instead of just tapping the button when you think the picture would look great to find out you took it at the wrong time or you blinked and ruined what would have been a great photo. A really quick and easy step to solving this issue is to continue pressing down on screen or on the volume button and keep on taking pictures until you think you have the photo. This works great if you are taking pictures of something that is moving fast and you want to try and get the best possible picture of it that you can. You never know when you might come across the perfect photo opportunity.
So there it is my top five tips on how I improved my photography and ways that you can help to improve yours. I hope you have found this useful and can go away and practise what I have suggested. What tips do you have for iPhone photography? Do you have any apps that you love to use? Do let me know and share this blog post, I would love to hear from you!
Adell x
Always wondered how you can improve your iPhone photography? Click the link to find out how! I think you all know I love taking pictures, photography is one of my favourite things to do.
#aesthetic#blogger#blogger lifestyle#blogger photography#edit pictures#flatlay#how I take pictures#how to#how to take iPhone pictures#Instagram#iphone#iPhone 6s#iphone photography#landscape#landscape photography#life improvement#life tips#Lifestyle#macro lens#ootd#phone pictures#Photography#photos#pictures on iphone#VSCO
1 note
·
View note
Text
Eldritch Librarians
Dark sat upside down on the living room’s couch, fiddling with a smart phone. He kicked his feet back and forth like a fidgeting child and scrunched his face in frustration. Beams of light came in through the windows and bits of dust floated in their rays. Anti walked into the living room, munching on a flaky croissant, flakes falling onto his black t-shirt. He dusted the flakes from his shirt and the bits of croissant joined the particles of dust.
“I made some croissants; want one?” Anti asked and took another bite. “I know they’re supposed to be flaky but I think I made ‘em too crumbly.” Dark didn’t reply and clicked away at his device. Anti looked at him and raised a brow. “When did you get a…you didn’t steal that, did you?”
Dark looked up and finally noticed Anti and slid down to the floor, legs still resting on the couch. “Nope. Bought it.”
Anti chuckled, and joined him in the floor, resting his feet on the couch. “Ah-huh. Did you steal the money?”
“No, I got this tiny computer with my own money and it does too much and I can’t figure out how to do any of it.” Dark tossed it towards a window but, using his glitch, Anti quickly teleported and caught it.
“Dark, you got an iPhone! If you look at this thing wrong, it’ll break. Let me see if I can help you with it, okay?” Anti sat on the couch next to Dark’s feet and Dark crossed his arms.
“I just want to do a few things!” Dark sat up and waved his arms around as he explained, “I want to call and text you but no matter how many times I type in ‘Anti’ it won’t do anything! I want to change my background to something besides some stupid water drops but when I type in ‘background’ it does nothing! I want to look up porn but I keep typing in ‘porn’ and I get nothing!”
Anti held in his laughter and looked at the iPhone in his hand. The “notebook” app was open and, written over and over again were the words Anti, background, change background, text Anti, call Anti, porn, people fucking, and lastly SOMETHING TO JACK OFF TOO I HATE THIS STUPID THING. Anti couldn’t help it and burst out laughing. Dark crossed his arms again, pouting.
“Laugh it up, I’m a real comedian.”
Anti coughed and subdued his laughter. “You can’t just start typing in random stuff, Dark. To text me you need to know my number. You have to change your background yourself and to look up websites you need to know their address. Here.” Anti put his phone number in Dark’s contacts. “Now when you need me just go to your contacts and click on my name! Now, what do you want your background to be?”
Dark jumped up and plopped down hard onto the couch. “Put that thing in ‘selfie’ mode!” Dark beamed.
Anti laughed and opened the camera, switching it to selfie mode. Dark took Anti’s hand, the one that held the phone, and held it up. “SMILE GREENIE!” They smiled and Dark clicked the shutter button. “Make that my background.”
Anti went to the phone’s settings and changed the background to the picture they just took. He couldn’t help but smile.
Dark marveled at his background. “Your hair’s getting’ a little long, man.”
“Eh, if it starts to bother me I’ll cut it.” Anti shrugged his shoulders. “Now about porn…well...it’s not safe to look that up on your phone, Dark. Wait ‘till we get a computer.”
Dark smirked and caressed Anti’s thigh. “Hm. Bummer.”
Anti’s face blushed bright red.
The doorbell rang and they both jumped, then looked at each other and laughed. Anti got off the couch and went to the foyer. He walked to the front door and peaked through the peep hole; standing straight at attention was a young man in a CDO jacket. On his forehead were tiny horns. Anti opened the door and waved.
The young man saluted. “Reporting for a Mr. Antisepticeye, sir!”
Anti pointed to himself, “Hello there. You’re looking at him, ahaha.”
Still saluting, the young man continued, “I am Knight-in-training Sukino, here to take you on your first mission, sir!”
“Oh.” Anti looked back to the living room and saw Dark taking several selfies. “Can he come?” He pointed back to Dark.
Sukino stood back to attention. “I…suppose so, sir! I’ll give you a moment to change.”
“Er, change?”
Sukino nodded, “It’s rather cold where we’re headed, sir.”
“Oh. Okay. Come on in.” Anti motioned for Sukino to enter and he did. “Make yourself comfortable; I’ll be back.” Anti left to the upstairs bedroom, not before saying, “Dark, be nice!”
Dark looked up from his phone to Sukino and giggled. “Hey, horny.”
Sukino blushed and made sure not to make eye contact with Dark.
It didn’t take very long for Anti to get changed (though, to Sukino, it felt like it took an eternity). Anti now adorned a black beanie and black hoodie that said, “wub a lubba dub dub!” in bright green writing. “Warm enough?”
Sukino nodded. “Grab onto my shoulders, please.” He didn’t even ask why Dark wasn’t getting into anything warmer.
Dark groaned and got up and grabbed Sukino’s right shoulder, Anti grabbed his left. Sukino pulled a metal tube from his pocket with a white jewel at the top and flicked it. The three were engulfed in a white light and, when the light disappeared, so did they.
--*--
Northern Canada
A bright flash of white light appeared and along with it, so did Dark, Anti, and Sukino. Anti and Sukino shivered, while the snow immediately around Dark melted. In front of them was a stories tall, massive, brick building, with “Clericus Daemon Ordinem Tabularium” carved above the doors.
Anti smiled and looked all around. “Yay! Snow!!!”
Sukino pulled a folded piece of paper from his pockets and handed it to Anti. “There are some documents we need you to pick up for your first mission. They’re here on this paper.” Sukino saluted and prepared the device he held in his hand.
“Wait, why are they sending me n’ Anti up here; why not you? Or another CDO kid?” Dark asked.
“Commander Padula wanted to start you off with something easy…and uh…we don’t really like coming up here. The people that work up here are…strange.” Sukino stuttered. Before Anti or Dark could ask anything else, Sukino flicked the jewel on his device and was gone in a flash. *~*~*~*~*~*~*~*~*~*~*~* Wow, I did not mean to make this that long. I didn’t want it to just be “we need to go here. Okay we’re here” but I also did mean for the this much build up ahaha. Whoopsie. Also...this is gonna be my first time RP-ing sooo, the lovely @brittany-san and @ari-trash , TAKE IT AWAY, YA’ BAMFS! (btw, those of you that have been making OC’s and what not, I’ve talked to some of you about RP-ing, some of you have chosen to opt out which is totes fine- like I said, this is just a realm of all sorts of possibilities- you do what you’re comfortable with and I freakin’ love you ALL! This is a place to have fun, bb, YEAH!)
#antisepticeye#darkiplier#clericus daemon ordinem#cdo#brittany-san#ari-trash#c-A#c-B#eldritch#are you excited?#cause I'm excited
44 notes
·
View notes
Text
Best To Do Apps For Mac

Purchasing a new MacBook is much similar to buying a ticket to a land of fabulous software & apps. In addition to all the free programs offered by Apple to all the fresh Mac owners, there are some extras essential Mac apps too that help to make the most out of your Machine.
Best To Do Apps For Iphone
Best Free Apps For Macbook
We’ve organized a list of the most useful Mac software and programs that are categorized into ten major categories, ranging from Best Mac Cleaning utility to Best Media Player & so on. Take a look at our best of bunch & let us know which of these suits the most for your needs!
Top 10 Best Mac Apps & Utilities for 2020
The mobile apps are also perfect. The UI is on par with Things 3 (but I think better). The only two minor gripes I would recommend would be for more app integrations and maybe more theme colors. Nonetheless, hands down best Todo list app out there. Feb 20, 2020 Comparing the best to do list apps for Mac. Honestly, there are too many to do list apps out in the world to count. To make your decision easier, many of those have been evaluated and narrowed down to just five — each with its own pros and cons that could sway your decision depending on your preferences. As a Mac user, you’ve probably heard. See full list on digitaltrends.com. Top 10 Best Mac Apps & Utilities for 2020. We’ve trawled the software market to find the most ideal Mac utilities & apps in every major category for better productivity and efficiency. Disk Clean Pro (Best Mac Cleaner & Optimizer) An all-in-one solution to keep your Mac machine clean & optimized for smooth performance.
We’ve trawled the software market to find the most ideal Mac utilities & apps in every major category for better productivity and efficiency. Try them now!
1. Disk Clean Pro (Best Mac Cleaner & Optimizer)
An all-in-one solution to keep your Mac machine clean & optimized for smooth performance.
Disk Clean Pro is an affordable tune-up utility to help users maintain their system for a longer time. It features dedicated modules to remove junk files along with hidden redundant files to improve response time & speed up Mac. It’s ‘One-Click Care’ works like magic to keep your machine run clutter-free.
Disk Clean Pro is an excellent Mac optimizer, packed with all the advanced features that several Mac Cleaning utilities miss. Packed with various tools like Junk Cleaner, Logs Cleaner, Crash Reports, Partial Downloads remover, Duplicate Finder, Large & Old Files Cleaner & more. Moreover, it offers a module, Internet Privacy Protector, that works efficiently to remove traces of your browsing history for best-in-class Mac security.
The best part? Disk Clean Pro is available at just $0.99, & it’s a limited time offer, so what are you waiting for? Optimize the storage space in a single scan & make the most of Mac’s disk space.
Several websites have reported Disk Clean Pro, as the #1 Mac Cleaning & Optimization Utility!
2. EaseUS Data Recovery Wizard (Best Data Recovery Tool for Mac)
An advanced data recovery tool to retrieve accidentally deleted files, documents, music, videos and much more.
Losing data & important files is the kind of nightmare no one would ever want to experience. But unfortunately, it has been known to happen for a variety of reasons such as, drive failure, human error & viruses. However, the “good thing” is the availability of a Data Recovery Software that makes restoring lost files effortless.
EaseUS Data Recovery Wizard is one such data recovery service that lives up to its name, by offering easy yet effective recovery solutions that makes users task super simple. The tool not only helps in locating recently deleted files from corrupted & critical file systems, but also helps in restoring data from external storage devices such as memory sticks, USB drives etc.
There are three different versions available with EaseUS Data Recovery Wizard: Free, Pro & Unlimited. Free edition allows you to recover data up to 200 MB. Get this Best Mac App for your system now!
3. Systweak Anti-Malware (Best Anti-Malware for Mac)
The 24/7 malware protection against your Mac.
Systweak Anti-Malware is a robust Mac security software that does a fantastic job of detecting any type of malicious content hiding in your system. Its smart algorithms understand which types of threats can put your Mac Machine at risk, and hence keep a close check that no suspicious program, malware, adware or spyware could bypass Mac’s defenses.
The antivirus software claims to have a 100% success rate for detecting dangerous malware and viruses. The lightweight application offers multiple scanning methods to make sure you have an ultimate protection against malware and other infections.
To keep your Mac safe, the antivirus software regularly updates its malware database, so that no latest suspicious threat can bypass you Mac’s security. It not only shields your Machine from online threats but also optimizes it for smooth-functioning, which probably makes it one of the best anti-virus programs in the market.
4. CyberGhost VPN Mac (Best VPN App for Mac)
A feature-rich, powerful VPN for PC with an easy-to-use interface, suitable for both novices & professionals.
The.Net Core is cross platform though it doesn't include winform (maybe it will in the future) or Wpf (definitely won't be cross platform in future). You can use Xamarin Studio and Mono to make a winform app for mac, though if you want to to use Visual Studio buy Xamarin business license for VS support or make a XNA or a web app. Winform macos. Visual Studio for Mac documentation. Learn how to use Visual Studio for Mac to develop apps and games for iOS, Android, and web using.NET.
CyberGhost is one of the most reliable VPN services for Mac. It boasts a really easy set-up process. In fact, all you have to do is download the VPN for your OS from the below button and launch it with one-click on your system. The VPN software boasts more than 3,700 servers across 60+ countries, including optimized servers for torrenting & other streaming services.
The VPN solution comes with a bundle of extra tools to block unnecessary ads, track malicious websites that attempts to make unauthorized access on your system and an automated HTTPS redirection that ensure most secure connection.
It’s one-month plan costs $12.99 which is a bit higher than other standard VPN services in the market. But that’s totally worthy as it supports connecting up to seven devices simultaneously.
5. Duplicate Files Fixer (Best Duplicate Files Cleaner for Mac)
An efficient, fast and easy-to-use duplicate file cleaner to get rid of identical documents, photos, videos, music and other digital media files.
Duplicate Files Fixer by Systweak Software is an awesome duplicate cleaner that helps you reclaim chunks of occupied hard drive space, clogged with unnecessary duplicates such as Documents, Videos, Music, Photos and other files. It’s one of the Best Mac Software for both professional and novice users for finding exact and similar-looking files.
This duplicate file finder comes with a robust set of functionalities for scanning different file types in just a few moments. The Mac utility has a sleek & intuitive interface for great navigation experience. It lets you create a backup of all your duplicate files before you delete them. The application is capable of scanning external devices as well for finding duplicates.
Is easy wifi radar real. Easy WiFi Radar by Makayama is a lightweight and free to use application that will help you scan your area for available wireless networks and connect to them. Easy WiFi Radar for Mac is not available for download, but be sure to check our list of alternative applications that will help you replace this software.
To use this Mac software all you have to do is download it > Add files or folders containing duplicates > click the Scan button to begin sorting > Remove to clean all the duplicate files at once! Enjoy deduplicate library in three-clicks. Duplicate Files Fixer is a must have mac application to fill your bucket of Best Mac Utilities 2020.
6. Stellar Drive Clone (Best Disk Cloning App for Mac)
A robust Mac utility to help you clone & restore all the files on your hard drive, so you can always have your peace of mind.
Stellar Drive Clone is a complete suite to create a Clone or Image of your Mac hard drive. The Cloned copy can be used as a ‘read-to-use’ copy of the original hard drive. And, the Image file can be used for ‘restoring purpose’ in case any data mishap happens.
The advanced Mac cloning tool supports various types of cloning including, HFS-to-HFS, FAT-to-FAT & NTFS-to-EXFAT. Stellar Drive Clone is a must-have Mac app if you wish to clone an encrypted Mac drive and volumes as well. You can also choose to ‘Schedule’ Periodic Backup’ to create timely backups.
This amazing disk cloning service stands out for two reasons, it’s ease-of-use and high compatibility. It supports all the commonly used OS X versions including the latest MacOS Mojave. Download this app for MacBook Pro now!
7. Photos Exif Editor (Best Exif Data & Editor For Mac)
Editing photo metadata or EXIF data was never this easy. Meet Photos Exif Editor, an ultimate batch photo editing tool for your Mac.
For people unaware what EXIF Data is, it’s basically a set of data attached to every image you capture. It includes basic parameters such as date, time, location, camera settings etc. This can be immensely useful info, when you might want to examine how a particular picture is taken, what are its shutter speed or ISO. Moreover, you can certainly edit and modify those set of info using an Exif data editor.
Presenting, Photos Exif Editor a fast and easy-to-use Mac software to read, write and modify metadata of single or thousands of images in one-go. You can manually manipulate the GPS coordinates of images to change its location. Rename multiple files at once, create EXIF Presets for repeated metadata editing to speed up the process.
It’s one of the best Mac apps to view, edit and modify EXIF, IPTC & XMP metadata. The Mac software supports various common photo formats including RAW image file format.
8. Cisdem Video Player for Mac (Best Media Player on Mac)
A universal video player with an impressive set of features to play up to 5K resolution videos without any jerks or tearing.
Best To Do Apps For Iphone
You saw that coming, right? Talking about the Best media player and not mentioning Cisdem’s Video Player is certainly not possible. It’s one of the most popular and utilized OS X apps that comes with interactive interface to play both audio and video. The video player is known for its smooth playback assistance offering crystal clear views.

With Cisdem Video Player, you don’t require to download any Codec pack, it lets you directly play WMV, FLV, MKV, AVCHD, AVI etc. videos on your Mac Machine. Best part? Unlike other media player for Mac, Cisdem allows you to automatically load subtitle files for the movie.
Looking to convert your video files for other Apple devices? Cisdem does that too for you with an optional in-app purchase. The video player is designed to support more than 50 audio and video formats. As soon as install the app, it’s ready to go!
9. Tweak Photos (Best Batch Photos Editor for Mac)
Most popular photo editing app that lets you brighten single or thousands of photos in a few clicks.
Tweak Photos is a brilliant package featuring an attractive interface, powerful filters, plethora of customization, adjustment tools and a lot more. This OS X app is available for just $4.99 on Mac app store.
From performing basic editing like renaming, resizing, cropping, simple color fixes, format conversions to advanced editing like applying complex photo filters, watermarking, multi-layer management, Tweak Photos does all for you.
You can download this amazing photo editor for Mac to de-noise bulk images, change texture/stylize, auto-correct orientations, blur multiple images, add frames and other artistic elements to batch photos at once. And just everything to create vivid and dazzling photo collection.
10. iSkysoft PDF Editor (Best PDF File Editor for Mac)
A super-smooth Mac software for editing PDF files easily & quickly.
iSkysoft’s PDF Editor is an ultimate solution to edit PDF documents without compromising file formatting. You can download this OS X app to get a complete suit of PDF editing tools to manipulate texts, images, links and other elements present in a PDF file.
Considered as one of the best alternatives to Adobe Acrobat, you can download this Mac software for easy editing, cropping, rotating, extracting, splitting, adding watermarks, altering background colours and a lot more.
Download this free PDF File Editor to quickly edit, convert, create, merge & convert scanned PDF files with ease. Not only this, iSkysoft enables you to protect your PDF files with passwords, you can set permissions for other users to perform specific functions like editing, commenting or printing. It’s one of the best Mac app available to share your PDFs to Email, Google Drive, Evernote and Dropbox in one-click.
Best Mac Apps You Need To Install On Your New Machine!
The MacOS app ecosystem is certainly packed with a lot of hidden gems. All the aforementioned Mac software & utilities are great to get you started. For the least frustration and better efficiency, download these handy extras now!
What Do You Think? 7 Responses
Let’s solve your to-dos
Get 2Do, a handy task manager that fits any schedule.
With life’s busy schedules and numerous distractions, staying on top of tasks can pose a challenge — that’s why every single productivity guide recommends you to keep track of everything in your mind with a to do list to achieve your goals.
While, historically, to do lists were handled by pen and paper, with the rise of mobile technology and modern software, it’s far more efficient to use a specialized to do list app to stay on top of your tasks.
That said, the beauty of pen and paper lies in the ability to format, write, and manage however you see fit, whereas apps force you into their predefined frameworks. And exactly because to do lists can be so personal, it’s worth exploring the differences between them before picking one for good.
Download Setapp to get things done
From note-taking to scheduling events, Setapp has a huge collection of apps for all your jobs. Solve tasks faster than ever on Mac.
Why Should I Use A To Do List?
From tasks at work to chores at home, to catching up with friends and family, and everything in between, it’s easy to get overwhelmed with things to do. The trouble is finding the time to do them, prioritizing them accordingly, then actually remembering to carry them out. That’s where even simple to do lists can be a powerful productivity tool, freeing up your time and mental space to focus on what you do best.
However, there are now so many different to do list on Mac options in the marketplace that getting around to selecting one is a chore in itself. That’s why this guide just saves you some time by picking some of the best ones for you to consider.
What are some tips for using to do lists?
There’s an art to using to do lists effectively, no matter the technology. You don’t need to be a project manager or have high attention to details to make a Mac task manager work for you. Simply follow a few of the most important tips:
Understand what should be on the to do list versus what should be a daily habit or calendar item. Brushing your teeth probably shouldn’t be on the to do list, as it would ideally be baked into your daily routine. Whereas your friend’s birthday should probably be put in your calendar. However, you might write “purchase gift for friend’s birthday” as a to do item.
Try to keep a manageable level of to do items at any time. Having a list of 300 probably won’t do much for your productivity, as it becomes difficult to quickly ascertain the correct priority and order. Make sure your to do list stays below 15 items to not get overwhelmed.
Focus on completing one item at a time. Multi-tasking is never as productive of a method of executing a task as you might think. So when it’s time to action your to do list, focus your energy on the task at hand.
With these tips in hand, you’re ready to get out and find the technology that works best for you.
What should a good to do list app for Mac do?
When it comes to selecting a to do list on Mac, there are a few aspects to consider. Some of the apps aim for total simplicity, whereas others come packed with useful features for more advanced users. Here are a few things to look for in your next to do list app:
Simplicity is most important. Adding new tasks and organizing them should be done in just a few clicks or taps.
The ability to categorize your to do list in such a way that it’s easy to find similar tasks. This might be done by grouping, tags, due dates, and more.
A notification system for reminding you of upcoming or late tasks. These hold you accountable and are something pen and paper can’t beat.
Syncing of your data across devices and operating systems can be useful for those who like to work on the go
At a more personal level, your to do list should look and feel easy to use, as friction points in the user experience might prevent you from making the most of it
Now that you know what a good to do list should be, let’s take a deeper dive into some of the best to do list apps for Mac on the market.
Comparing the best to do list apps for Mac
Honestly, there are too many to do list apps out in the world to count. To make your decision easier, many of those have been evaluated and narrowed down to just five — each with its own pros and cons that could sway your decision depending on your preferences.
As a Mac user, you’ve probably heard of Apple Reminders, which comes pre-installed in iPhones, iPads, and, of course, Macs. One of the main pros of using Apple Reminders is the fact that it’s ready to go — no additional tinkering required. It also has the benefit of looking and feeling like the rest of your Apple software, including Siri support, so it’s a familiar experience. Reminders works well with other Apple users by allowing you to share tasks in iCloud, but, unfortunately, you can’t assign tasks to people outside of that ecosystem, or to multiple people.
Key Features:
Smart location-based reminders which prompt depending on where you are
Task list sharing through iCloud
Simple, Apple-based interface that includes a quick calendar view
If you’re looking for the best task manager for Mac with more features, then you can’t pass Omnifocus. Made exclusively for Apple devices, Omnifocus takes everything one step further by allowing lists to be grouped into different projects, depending on the type of activity you’re doing, making it useful for work. Everything syncs, but only between Apple devices, of course. All in all, Omnifocus is definitely a strong candidate for any power user.
Key features:
Full-featured software designed exclusively for Apple
Multiple project types for any given workflow
Six handy views right out-of-the-box, including calendar, due date, projects, tags, and more
Another to do list on Mac that comes with a strong set of features is Wunderlist. Unlike Apple Reminders and Omnifocus, it can be used across all devices and operating systems, including Windows. While the app features a clean interface, it does have some complexity to it, so overall Wunderlist targets users who would like to collaborate on tasks together.
Key features:
Task reminders with notifications
Multiple assignees and collaborators on projects and tasks
Add hashtags to any descriptions to help search and organize task lists
If you care about speed and efficiency, you need 2Do — a perfect to do list app for people on the go. The quick-add feature makes creating new tasks a breeze, and you can even break your agenda up into a checklist format for subtasks.
A better version of Reminders
Get a top-notch app for busy folks. 2Do will help you organize any number of tasks into smart lists and break big jobs into subtasks.
While 2Do isn’t as full-featured as some of the alternatives, its upside is simplicity — essential for those who just need to get things done.
Key features:
Quick-add feature for maximum efficiency
Extra context for tasks via the tagging system
Smart lists let you view critical information at a glance, including due date, tags, and reminders — nothing more than what you need

One more of the best to do list apps is GoodTask. The beauty of GoodTask is its native ability to integrate with Apple Reminders and Apple Calendar, while adding some extra functionality on top to help you become more productive. The downsides are few and far between: for example, it doesn't have the extended functionality of something like Omnifocus.
Key features:
Automatic sync with your iCloud or Outlook calendar
Reminders (and repeat reminders) to help you stay on top of tasks
Smart sorting to organize your list by alphabet, due date, time created, or manually
With one of the best to do list on Mac options in hand, you’re ready to go out and become more productive than ever. Just remember to consider the difference between a task and a habit, keep your task list below 15, and pick an app that suits your preferences.
While you’re at it, give Be Focused a try. Be Focused is another task manager for Mac with a welcome twist — alongside the standard features, such as multi-device support and task list organization, Be Focused lets you set timers for each task. Now you can get to work knowing that you’re on track by the minute. Want to look further ahead? You can even breakdown your annual, quarterly, and monthly tasks into groups for a wider view of your life’s goals.
Best of all, 2Do, GoodTask, and Be Focused are available to you on a free 7-day trial via Setapp, a subscription service for Mac that grants you access to more than 150 indispensable apps across all categories imaginable. Now that’s a definite boost for your productivity!
Setapp lives on Mac and iOS. Please come back from another device.
Meantime, prepare for all the awesome things you can do with Setapp.
Read on
Sign Up
Setapp uses cookies to personalize your experience on our website. By continuing to use this site, you agree to our cookie policy.
Best Free Apps For Macbook
0 notes
Text
Dear Apple: don’t let a trackpad turn the iPad into a Mac
Good morning and congratulations on making it through another week. I had been planning on writing about some of the issues I had while writing my Samsung Galaxy S20 Ultra review — specifically my bafflement that Samsung is once again asking reviewers like me to be beta testers. It’s inconceivable that the company didn’t realize there were issues with the camera and also very strange that it didn’t so much as hint at a software update to me until the day before yesterday. I’ll say it again: never buy anything on the hope that future software updates will fix it. Wait. But we covered it pretty well in The Vergecast coming out later today, so please give it a listen. Instead, to the surprise of absolutely nobody given my obsession with how companies are trying to get big-screen computers beyond the UX paradigms of the 1980s and 90s, I’m interested in an iPad rumor about a keyboard. The news is simply that Apple is reportedly releasing an iPad keyboard with a trackpad later this year. It’s a good scoop from The Information. A good piece to read next is about something Jason Snell noticed in the iOS beta released earlier this month: better support for keyboard functions like modifier keys. A third thing to note is that Apple software boss Craig Federighi said, “If you like what you’ve seen us do with iPadOS, stay tuned, we’re going to keep working on it.” If you’re wondering when this might happen, the Apple-o-sphere has all been working on the belief that Apple will be holding a Spring hardware announcement. There are too many rumored products to fit into one event, but a new iPad Pro and a new keyboard for it would definitely make the cut. Given all the recent tech event cancellations due to the coronavirus, however, Apple might be rethinking its plans right now. In any case, I have many thoughts about the iPad — which you might have guessed since I’ve been writing about the iPad’s evolution as a computer so often over the past few years. I would love to speculate on the physical shape and design of the keyboard, but I think that’s better left until later, when we have a better idea of what it might look like. Instead, I just want to point out that the iPad is an OS that is currently hostile to mouse input. I don’t mean that as a criticism, but I do think it’s just stating facts. I know there are people who have enabled the “AssistiveTouch” mouse feature, but what it mainly does is let you emulate your finger taps with a mouse. That means it’s not actually all that helpful with two things that mice excel at: tapping tiny UI buttons and working with text. I’m on record as thinking that Apple’s recent attempts to improve text manipulation like selecting, copying, pasting, and even cursor placement are not very good. And since AssistiveTouch currently only supports acting like a finger, it doesn’t help. I bring this up because I have a radical idea: what if the only thing trackpad support brings to the iPad is better text manipulation? I actually think that is the right move for Apple, at least to start. With the new iPadOS last year, Apple was incredibly ambitious. It added all sorts of new ideas and interaction models to the UI, some of which were confusing. In my original review, I gave Apple credit for finally allowing the iPad to become complicated and I stand by that. But I also believe that it’s not intuitive because its features can’t be progressively learned over time — you basically have to watch or read tutorials, which is incredibly un-Apple-like. I bring all this up because right now the iPad has a lot going on with its overall user interface and I sort of feel that the last thing Apple should do is add yet another variable to the mix. Unless Apple is planning its second major re-think of how we interact with the iPad in two years, it’s just too much of a burden to put on users. Because, as I’ve said before, using a mouse is fundamentally a weird thing to do — it’s actually a level of abstraction beyond just touching the display. It only feels “intuitive” because so many of us learned to use one first, and because “desktop” operating systems do such a good job of progressively teaching you new skills as you use them. They’re consistent and learnable in a way the iPad’s more advanced features simply aren’t. I don’t want Apple to fall back on the crutch of just using desktop OS paradigms to solve the iPad’s user interface intuitiveness problem. The last thing we should want is for the iPad to turn into a Mac. It’s on a different path and it would be a shame to have those ideas tossed out the window just so we can have more traditional windows on the iPad. But I’m not anti-trackpad. I do think it would be a huge help for text selection and it would allow some app developers to create smaller touch targets on their apps. Plus, and this may be anathema to some, the iPad makes a lot of use of right-click style actions now (just long press to see them), and a trackpad could help with that too. If you haven’t done so in awhile, go on and watch Steve Jobs’ seminal iPhone introduction. Pay special attention to how he talks about styluses and fingers. It’s easy to forget now, but the iPhone was a radical reinvention of user interfaces compared to what most people had used. Only a tiny sliver of apps on smartphones were designed to be used with a finger — shout out to SnapperMail, my favorite email app for the Treo and the subject of a wonderful 2003 Walt Mossberg review. None of the smartphone operating systems before the iPhone were optimized for fingers, though. They all required a stylus or physical buttons to get around. The iPhone UI was revolutionary because it just had one button — the home button — and it was designed from the ground-up to be touched. The iPad continued that legacy, just on a big screen. Adding a trackpad to that seems like a good idea, but I dearly hope it doesn’t take away from all the benefits we get from a purely touchscreen interface. We already have the Mac, the iPad doesn’t need to turn into one too.
Coronavirus
┏ Facebook cancels F8 developer conference due to coronavirus concerns. ┏ Plague Inc. pulled from the App Store in China amid coronavirus outbreak. In late January, Plague Inc. saw a resurgence in downloads in China and became the country’s top paid iOS game. In response, Ndemic Creations released a statement reminding players that Plague Inc., while it was designed to be realistic and informative about how diseases spread, is just a game. It’s currently the top paid game in the US App Store. “We would always recommend that players get their information directly from local and global health authorities,” the company said in January. ┏ Tim Cook says Apple is reopening factories as China gets ‘coronavirus under control’. ┏ Health secretary Alex Azar won’t promise that a coronavirus vaccine would be affordable. ┏ Coronavirus merch is somehow worse than I expected.
More from The Verge
┏ Samsung Galaxy S20 Ultra review: shutter bug. Here’s my review. I hope Samsung bucks the trend of camera software updates usually not improving things. Samsung called this phone the S20 instead of the S11 to indicate that it is the first of a new generation, and that might be too revealing. As impressive as the overall phone is, the camera often acts like a first-gen tech product with first-gen tech problems. ┏ Robots aren’t taking our jobs — they’re becoming our bosses. Important, deep piece from Josh Dzieza. Well written and empathetic. Think of all the tiny moments of downtime you have during the day, the time where you’re just with yourself for a minute. AI tracking of workers is taking that away. An Amazon worker in the Midwest described a bleak vision of the future. “We could have algorithms connected to technology that’s directly on our bodies controlling how we work,” he said. “Right now, the algorithm is telling a manager to yell at us. In the future, the algorithm could be telling a shock collar—” I laughed, and he quickly said he was only partly joking. After all, Amazon has patented tracking wristbands that vibrate to direct workers, and Walmart is testing harnesses that monitor the motions of its warehouse staff ┏ It’s hard to care about other people’s feelings online. I love this essay from Bijan Stephen. Acting with empathy on platforms that reward snark is hard and you often end up looking painfully earnest. But do it anyway. ┏ Vivo’s Apex 2020 concept has breakthrough cameras and an ultra-curved screen. As Sam Byford notes, this phone was supposed to be shown at Mobile World Congress. Hopefully Vivo seeds it to some people to play around with even though it’s never going to get released, because I would love to see the results of some independent tests of a proper optical zoom lens on a phone: The Apex 2020’s telephoto lens, however, has actual moving lens elements that take it from 5x to 7.5x magnification. Vivo says the 16-megapixel module is just 6.2mm thick due to its periscope design, which allows it to fit inside the 8.8mm-thick phone. ┏ Uber tweaks its app to improve those pesky pickups. This is a very smart idea, though it does mean that drivers’ phones will have their microphones turned on. If I were Uber, I would get an independent auditor to go through the code every now and then to verify that the only thing the microphone is doing is listening for the ultrasound. Uber is also developing a new technology that uses ultrasound waves to automatically verify you’re in the right car, no PIN needed. The rider’s phone will send this ultrasonic signal to the driver’s phone to automatically verify the unique PIN. The company has said that technology should be ready to roll before the end of 2019. ┏ Clearview AI’s client list includes 2,200 organizations spanning law enforcement to universities. ┏ Peloton settles lawsuits over songs being used in fitness videos without permission. ┏ AT&T, Sprint, Verizon, and T-Mobile will be fined more than $200 million for selling customer locations, per report. Read More Read the full article
0 notes
Text
Samsung Galaxy S10+ review: the best big phone in 2019 so far
As Samsung’s heaviest hitter in the Canadian market in 2019, the Galaxy S10+ sees tremendous improvements in display quality, camera, and software. A new stunning Dynamic OLED display aces colors and brightness, setting a new bar for smartphone displays. Performance is driven by the blazing Qualcomm Snapdragon 855 chipset and up to 12GB of RAM, which translates to exceptional multitasking and gaming experiences. While camera quality is fantastic during the day, they falls short when things get dim. The biggest challenge, however, is pricing; even an entry model Galaxy S10+ costs CAD$1,419.99 – an ambitious pursuit for shallow wallets. Pros:
Eye-watering display
New ultra-wide angle camera
Fantastic battery life
Premium ceramic option
Punchhole camera>notch
Wireless charging and reverse charging
Improved software
Neat AI modes
Bixby button can now be remapped
Expandable storage
Still has the headphone jack
Cons:
Very expensive
Slow and inconsistent fingerprint sensor
Cluncky. Hard to take pictures with one hand
Ceramic option is distinctly heavier
Still carries some bloatware
Faster charger would be awesome
Bixby gets stumped by simple commands
Samsung Galaxy S10+ specifications
Galaxy S10e Galaxy S10 Galaxy S10+ Display size 5.8” FHD+ Dynamic AMOLED 2,280×1,080 6.1” QHD+ Dynamic AMOLED 3,040×1,440 6.1” QHD+ Dynamic AMOLED 3,040×1,440
Chipset
Qualcomm Snapdragon 855
RAM 6GB / 8GB 8GB 8GB/12GB Storage 128GB / 256GB 128GB / 512GB 128GB / 512GB / 1TB Camera Rear:
12MP Wide angle
16MP Ultra-wide angle
Front:
10MP selfie cam
Rear:
12MP Wide angle
12MP Telephoto
16MP Ultra-wide angle
Front:
10MP selfie cam
Rear:
12MP Wide angle
12MP Telephoto
16MP Ultra-wide angle
Front:
10MP selfie cam
Battery 3,100mAh 3,400mAh 4,100mAh Dimensions 142.2mm x 69.9mm x 7.9mm 149.9 x 70.4mm x 7.8mm 157.6mm x 74.1mm x 78.8mm Weight 150g 157g 175g (glass) / 198g (ceramic) Price Starting at $1,019.99 Starting at $1,259.99 Starting at $1,419.99
Design
The S10 series are encased in Gorilla Glass 6, Corning’s best glass yet. An unfortunate side effect is that the ultra-smooth surface and behemoth size makes it hard to grip without a case.
New year, new camera. The Galaxy S10 now has a 16MP ultra-wide angle camera in addition to the 12MP standard and 12MP telephoto cameras.
Ceramic color options are now available for those who prefer a less glossy finish. Our review unit is clad in Ceramic White, which is both less glossy and will more competently hide fingerprints. While many would undoubtedly appreciate the elegance in its simplicity, I personally feel like it’s a bit bland.
Whereas most phone manufacturers swiftly embraced the notch, Samsung vehemently defended the top bezel on their flagship devices. With the Galaxy S10+, it jumped from using a top bezel to a tiny pinhole front camera. Despite the mixed opinions on its design, there’s no doubt that it’s far less intrusive than notches.
The Galaxy S10+ has two front cameras: a 10MP dual-pixel image sensor and an 8MP depth sensor. Dual pixel just means that the phase detection autofocus (PDAF) sensing points have been integrated into the sensor.
A gentle curve extends from the edge of the display inwards, making swiping from the edge that much smoother. Colors distort slightly when pushed against the edge, but I didn’t find it glaring. An aluminum band encircles the device, occasionally interrupted by the antenna bands.
The volume rocker and the Bixby button are found on the phone’s right edge.
The Galaxy S10+ creates stereo sound by combining the bottom mono speaker with the earpiece. Audio quality is great, and volume is easily loud enough for a small room.
Our good friend, headphone jack, is still here! Hurray!
The SIM tray accepts a nano SIM card and a microSD card, supplying the already copious internal storage with ample room to grow.
I’ve never been bothered by a phone’s weight until I held the ceramic Galaxy S10+. At 198g, the Galaxy S10+ feels like an anchor in my pocket even without a case.
Display
One of the biggest improvements to the Galaxy S10 phones is its new Dynamic AMOLED display. The Galaxy S10+, the biggest of the bunch, carries one that’s 6.4” with a 3,040 x 1,440p resolution.
Samsung’s new Dynamic AMOLED display is set to be Samsung’s best display technology to date. It not only covers 100 per cent of the DCI-P3 color space popular in films, but also boasts an impressive 1,200 nit peak brightness. On the Galaxy S10, Display Mate measured its fullscreen brightness to be 804 nits, which is a 17 per cent increase over the Galaxy S9+. It compensates for the increased power draw of the brighter display by using a more power efficient OLED material.
Despite boasting 100 per cent color gamut coverage, Samsung claims that it manages to reduce harmful blue light by 42 per cent. But wait. How can it retain the same color accuracy while removing colors? In a statement to CNET, Samsung says that previous displays actually supported color spectrums beyond DCI-P3, and that it simply dialed back on the blue light output to more closely fit the DCI-P3 guidelines.
In addition, it’s the first smartphone display to ever to support HDR10+, an HDR format endorsed by major streaming services like Amazon Prime Video and Netflix. Even more impressive, Dynamic AMOLED features sub-pixel rendering and dynamic tone mapping.
Subpixel design hasn’t changed, however; Dynamic AMOLED still uses an RGGB pentile subpixel layout. A traditional white pixel contains a red, green, and blue subpixel. In a pentile display, there are two green subpixels for every one white pixel.
The color difference is immediately apparent upon turning on the screen. In a side-by-side comparison against the Google Pixel 3 XL with Adaptive colors enabled, which is also renowned for its excellent display, the Galaxy S10+ is noticeably warmer at its “Normal” setting, but not overly so, like the iPhone X. It strikes the perfect middle ground between vibrancy and eyestrain. Their colors are simliar, however, even when displaying HDR content on YouTube.
Something most would consider baffling, the Galaxy S10+ omits the pre-installed screen protector found on the smaller Galaxy S10. Thinking a little deeper produces several possible explanations. Corning’s Gorilla Glass 6 is literally on the entire phone and is a major part of the experience you’ve paid for. Therefore, it simply doesn’t make sense to cover up the front, especially considering most users will buy a case to cover the back. And let’s face it: no aftermarket screen protector can match the quality of Gorilla Glass 6.
Camera
With form factor and design becoming relatively stagnant over the past few years, smartphone cameras are now the main differentiating factor that affects buying decision. Manufacturers are placing paramount focus on developing innovative ways to make their cameras stand out.
This year’s Galaxy carries a new 16MP ultra-wide angle lens alongside the 12MP standard wide-angle lens and 12MP telephoto lens. The ultra-wide lens encompasses 123-degree vision and an f/ 2.2 aperture. The other two sensors don’t seem to have changed all that much; resolution, aperture, and pixel pitch all remain identical to the Galaxy S9’s.
Thought it recycles a few old – albeit still excellent – sensors, Samsung says it has made strides in AI post-processing features that take full advantage of the chipset’s NPU. One prime example is scene optimizer where the camera detects the scene and suggests an optimal angle for the shot. When it doesn’t recognize the scene, it can at least try to level the phone.
On the flip side, the selfie cam now uses a new 10MP sensor, as well as an 8MP RGB depth sensor for better bokeh effects.
Rear Camera
Standard wide-angle
Maybe Samsung is confident in the phone’s AI capabilities, but the camera seems to favor a fast shutter speed and then performs touch-up in post. Just as with the Galaxy S9 series, the main sensor boasts impressive sharpness and excellent colors in good lighting. Unfortunately, the camera has trouble capturing fine detail in darker scenes and has a haziness that generally comes with aggressive denoising.
Click on image for more full resolution samples
Telephoto
The telephoto lens features a 2x optical zoom and can extend all the way up to 5x digital zoom. Like the main sensor, it does a great job under good lighting. OIS keeps the phone rock steady during shooting.
Click on image for more full resolution samples
Ultra-wide
Be careful with the new ultra-wide angle lens. Because of its super wide field of view, it can sometimes capture your fingertips without you realizing. While there’s barrel distortion, it can be corrected via the distortion correction in the camera app once enabled.
Click on image for more full resolution samples
What can’t be corrected is the weird color “silhouettes” in certain scenes. In the darker images below, there’s a clear difference between the sky’s color in the background versus between the gaps of the tree branches. I suppose this is due to the AI unable to apply color corrections to finer areas.
RAW vs JPEG
Photographers tend to shoot in uncompressed RAW image format to provide higher flexibility in post-processing software like Adobe Lightroom. While the Galaxy S10+ supports RAW shooting, it can only be toggled in Pro mode. When enabled, the phone does not apply any inherent post-processing and only saves the image data as they were shot. It captures a ton more detail than normal JPEG at the expense of larger file size and needing manual post processing.
Front Camera
The new dual-sensor front camera does an excellent job at applying depth of field effects around strands of my hair and didn’t blur out my clothes and kept my face in focus.
Performance
All Galaxy S10 series phones are powered by Qualcomm’s Snapdragon 855 SoC. It’s the first Qualcomm consumer chipset built on the 7nm transistor node and is designed to compete against Huawei’s Kirin 980 and Apple’s A12. Our review unit has 8GB of RAM and 512GB of storage – enviable even by laptop standards – and can even be upgraded to 12GB and 1TB respectively.
Geekbench
In Geekbench, the Galaxy S10+ scored 3,474 in the single-core test and 10,890 in the multi-core test. While single-score sees only a marginal improvement over the Galaxy S9+, multi-core score is around 2,000 points higher. It also beats the Huawei Mate 20 Pro by 196 (5.9%) in single-core and 1,141 (11.7%) in multi-core.
PCMark Work 2.0
PCMark for Android is as real-world as synthetic benchmarks get. It runs the phone through a list of everyday business tasks includes writing, web browsing, video editing, and photo editing.
The Galaxy S10+ crushed it in PCMark Work benchmark, scoring an impressive 9,746 average. Compared to the Qualcomm Snapdragon 845 in the Google Pixel 3 XL, the biggest improvements were in the writing and web browsing categories, which saw a 1,482 (18%) and 1,655 (17%) jump respectively. The Galaxy S10+ also handily defeated the Huawei Mate 20 Pro’s Kirin 980, which scored a 7,709 average.
3DMark Slingshot Extreme
3DMark gauges the phone’s graphics processing ability and attempts to estimate how well it can handle 3D intensive workloads.
PCMark storage test
We’ve added a new benchmark to test for storage performance. It speaks to the phone’s ability to quickly restart, load apps, and retrieve files.
Software and Features
Whereas its hardware is excellent, Samsung’s software hasn’t been favored in the Android community. Many consider it to be way too bloated, and the plethora of default Samsung apps irks Android purists as well. In addition, Samsung phones are always the latecomers in receiving Android feature and security updates.
Since then, Samsung has been committed to solving its software’s reputation by launching its One UI initiative. One UI aims to improve UI flow, unifying app and icon aesthetics, and presenting the most important information first.
And the efforts have definitely paid off. App icons look more unified, and despite being inundated with features, the most important ones are clearly labeled and intuitive to find. Some advanced features like Secure Folder and Dual Apps are now more easily accessible and configurable.
Several other features are also refreshing and helpful. Download Booster, for example, couples Wi-Fi and mobile data together for faster download speeds in Google Play Store. MIrrorLink can mirror the phone’s screen onto your car’s display via a USB cable. Video Enhancer automatically increases color and brightness when watching videos.
Regrettably, One UI didn’t lose much bloat; it still comes bundled with a bunch of things many users won’t ever touch beyond the initial setup. The Galaxy Store, Theme Store, and Game Launcher are just a few of the unneeded extras. It even has McAfee antivirus built-in, which is (thankfully) disabled by default. With that said, Samsung Pay is the lone exception, as it’s incredibly handy if you have a compatible card like the Tangerine Cash Back rewards card.
One UI also incessantly tries to shove other Samsung services down your throat, and heavily insists that you sign up for a Samsung Account, which enables features like Samsung Cloud and Samsung pass, none of which are needed by most users. I was peppered with its notifications daily, forcing me to mute it manually.
Bixby, Samsung’s beloved voice assistant, is back, and it’s still mapped to a physical button. This time around, however, it lets users remap the button to perform other more useful tasks like launching the calculator or the camera app. You’ll need to keep Bixby enabled as a prerequisite to remapping, though.
Our third run-in with Bixby still leaves much to be desired. It couldn’t understand what I was trying to say when I asked it to show me restaurants in my area. Ask it to play music Spotify, and it will try its best to convince you that Samsung Music is what you need. Hilarious.
What happens when you ask Bixby to play music on Spotify.
Samsung is finally ending awkwardly placed fingerprint sensors by embedding it in the display. Samsung claims that instead of capturing a 2D image of your fingerprint, its ultrasonic fingerprint sensor builds a 3D map that accounts for your fingerprint’s valleys and peaks, and should therefore be nearly impossible to fake.
In my experience, the in-display fingerprint sensor is very inconsistent, often having trouble recognizing my thumb at an off-angle and requiring multiple attempts to register.
Battery Life
With a giant 4,100mAh battery, it’s unsurprising that the Galaxy S10+ produced 7 hours of screen-on time across nearly two days. My daily workload involves composing emails, editing Google Doc files, web browsing, managing social media, and streaming videos. Most apps I use are in dark mode, which helps save battery in OLED devices. Location services are enabled while NFC and Bluetooth are turned-on sporadically.
One thing that could improve the experience is a faster charger. Samsung’s adaptive charger can deliver up to 15W of power, 3W shy of Qualcomm’s QuickCharge 4.0. At this pace, it takes almost two hours to charge the phone from zero to 100 per cent. The silver lining is that thanks to its tremendous battery, you won’t have to plug it into the wall as frequently.
In addition to capping the processor clock speed in power saving mode, it also lowers the display’s resolution. Because One UI is based on Android 9, it also takes advantage of Google’s Adaptive Battery power saving feature.
Pricing and competition
All aspects of the Galaxy S10+ screams premium – including its price. For Canadian customers, an unlocked device runs for CAD$1,419.99 and comes with 8GB of RAM and 128GB of storage. Samsung charges CAD$1,749.99 for 512GB storage, and a whopping CAD$2,209.99 for 12GB of RAM and 1TB of storage.
The Galaxy S10 series is one of the first phones to feature the Qualcomm Snapdragon 855 SoC. As such, competition in the performance front is relatively thin, and most phones are either from China – which are hard to get or haven’t been released yet.
But competition is looming on the horizon. 2019 will see an impressive roster of big flagship phones like the LG V40, Huawei P30 Pro, Sony Xperia 1, and the OnePlus 7. A few Chinese manufacturers like Xiaomi have already released its version of Snapdragon 855 equipped devices, they’re just harder to get in North America.
Apple’s current flagship can also put up some fight against the Galaxy S10+. Despite its improved performance, the Galaxy S10+ still trails the iPhone XS Max’s A12 Bionic chipset. Familiarity wit the operating system makes a difference, too; some users rely on iOS apps to get through their workday. The Galaxy S10+ has a distinct edge in camera quality, AI capability, and a superior display.
The newly released Huawei P30 Pro is currently the closest matchup against the Galaxy S10+. While I’m not expecting its HiSilicon Kirin 980 processor to crush any benchmarks, its camera system is extremely impressive. The starting configuration comes with 8GB RAM and 128GB for $220 less. One area it does seem to underperform in is the display. I’m still going through the motions on evaluating the P30 Pro, but at the moment, it seems like an extremely strong contender to the Galaxy S10+.
Conclusion
Driven by a new gorgeous display, a new camera system, and Qualcomm’s new chip, the Samsung Galaxy S10+ is the best performing phone released in 2019 so far. It also creatively eliminates the top bezel by using an unobtrusive punch hole front cam. Internal software and AI improvements refine the overall usability, and new ceramic material and color options are welcoming, too, albeit at the cost of added weight.
A new ultra-wide camera finally lets users effortlessly capture stunning landscape photos. Although all three lenses produce fantastic images when lighting is good, they still trail behind the Pixel 3 XL in bad lighting conditions.
Starting at CAD$1,419, pricing is the biggest deterrent for the Galaxy S10+. It’s not short of new features, but I say hold off on upgrading if you got the previous year’s Galaxy S9+ lest you desperately need the beautiful display and the extra camera for some reason. With that said, for the first-time buyer who needs the phone that does it all and has the cash to burn, then the Galaxy S10+ is a no-brainer.
from Financial Post http://bit.ly/2IsRYNQ via IFTTT Blogger Mortgage Tumblr Mortgage Evernote Mortgage Wordpress Mortgage href="https://www.diigo.com/user/gelsi11">Diigo Mortgage
0 notes
Text
How to Take the Perfect Photo: Advanced Techniques
Updated: 12/09/2018 | December 9th, 2018
Today, professional photographer Laurence Norah of Finding the Universe, continues his five-part series on taking better travel photos. In this post, Laurence is taking it up a notch to give some advanced travel photography techniques such as long exposure shots, HDR, star shooting, and more!
One of the challenges we face as travelers is that so many of the places we visit have already been photographed extensively.
In today’s post, I want to share with you some advanced travel photography techniques that will help you get more creative with your travel photography. These more advanced concepts build upon the ideas in the first three posts in this series.
I’m going to cover four topics in this post on advanced travel photography techniques that will open up new creative possibilities for when you’re out and about:
Long-exposure Photography
Night Photography
High Dynamic Range (HDR) Photography
High Contrast Photography
Just click on the links above to jump direcly to that section.
Part 1: Long-Exposure Photography
Have you ever seen a photo of a waterfall where the water looks white and fluffy? Or a shot of a street at night where the cars have been replaced by streaks of light? Here’s an example of a waterfall to give you an idea of what I’m talking about:
This was shot in Glencoe, a stunning part of the Scottish highlands. As you can see, the water’s surface has a silky, flat look, and the waterfall itself looks more like cotton than water. Additionally, the clouds in the sky have a sense of motion.
Here’s another shot, of the Dubai Marina at night, where you can see the cars have been replaced by streaks of light:
Both of these shots were achieved using the same technique, long-exposure photography.
I talked a little about using shutter speed in post two of this series, and how too low a shutter speed can result in blurry images due your hand movement. Long-exposure photography is all about taking advantage of that blurry effect, but as a result of the objects in the scene instead.
You are going to need a tripod to make this work, as otherwise, your images will be blurry everywhere rather than just where you want them to be.
The secret to long-exposure photography is to put your camera in either shutter-priority or manual mode, which will allow you to set how long the camera’s shutter is open for. This will be marked as “S,” “Tv,” or “T” mode on the mode dial if your camera has one. If you’re shooting using a smartphone, many recent models, such as the LG G4, also let you manually set the shutter speed via the camera app.
For waterfall shots, you’re looking at any shutter speed slower than 1/15 of a second. For traffic, it will depend on the speed of the traffic, but you’ll need to shoot at speeds slower than one second. Both of the long exposure shots I’ve shared above were shot with a 30-second exposure.
If you are shooting in the daytime, you might need a neutral density filter in order to compensate for the amount of light available (see the travel photography gear post, the third in the series, for more information). If you’re shooting in manual mode, you’ll have to set the aperture to get the correct exposure. Try to avoid apertures higher than f/16 though, as they often result in lower-quality images.
Long-exposure photography will have you looking at the world and motion in new ways, and it opens up all sorts of creative possibilities. Have fun with it!
Part 2: Night Photography
When I travel, one of my favorite things is getting far away, to the middle of nowhere, and just looking up at the night sky. Away from the city lights, it’s is one of the most spectacular views available to us, and gazing up at it always helps me gain a sense of perspective.
Of course, once I’m done looking at it, I want to try and capture it as a photo. This isn’t as hard as you might think and, apart from a tripod, doesn’t need a great deal of expensive equipment to achieve. But shooting star trails does require more thinking than just pointing your camera at the sky and hitting the “expose” button.
There are two main types of star photography. First, you can do a long-exposure shot and turn the stars into streaks of light, like this:
This was a two-hour exposure I shot while camping in the Western Australian outback. Yes, two hours! (You need a lot of patience and a decent battery for long-exposure star photography.)
You can also do multiple long exposures lasting from 30 seconds to a minute and then stack the resulting photos together using specialist software like this. This reduces the “noise” that super-long exposures are known for, as well as the risk of your battery going flat mid-shoot, but it does require more work afterward.
However, most cameras won’t let you shoot for longer than 30 seconds in manual mode. You have to switch to “BULB” mode, whereby the shutter button will stay open for as long as you hold the shutter down. Some cameras have this in manual mode rather than a dedicated BULB setting — check your camera manual to find out how your model of camera works.
You are unlikely to want to stand with your finger on the shutter button for two hours, but don’t worry, you have some options. The easiest is to invest in a remote release cable, which will let you “lock” the shutter button down for as long as you want. Alternatively, if you have a more modern camera with Wi-Fi built in, you might find that there is an app that lets you control the length of the exposure beyond 30 seconds.
Finally, consider the movement of the stars. The earth rotates from west to east, so if you want circular star trails, you’ll need to point your camera north or south. If you’re in the northern hemisphere, composing around the North Star (which remains stationary) is a good place to start.
The other type of star photo is where you capture the night sky without motion. This will likely still require a long exposure, but one that is not so long as to result in the stars blurring from motion. Around a 30-second exposure is the maximum before the motion of the stars from the earth’s rotation becomes apparent. Here’s a 30-second exposure of Venus setting in the Galápagos as an example:
The setup is very similar to star trail photography, in that you will need a tripod and will have to consider your composition. However, with only a 30-second exposure, you are going to need to increase the ISO on your camera to get as much light in as possible.
Modern cameras are capable of shooting at ISOs of 3200 and 6400 without introducing too much noise into the image. In addition, you’ll want to open your aperture as wide as possible — depth of field isn’t really a consideration when shooting the infinite! Open it as wide as it’ll go, preferably in manual mode.
In some ways, these shots are easier because you’ll be able to see the results a lot more quickly. Here’s a shot of the stars over France:
The Milky Way is an excellent subject for static star photography — it’s a natural leading line, as you can see in the shot above. This was a 30-second exposure at ISO 6400 and f/4, shot on a Canon 6D in manual mode.
Once you’ve gotten the hang of basic star photography, you can start to be a little creative. At these exposures, even a little light can make a big difference, so you can try “painting” objects with light, by using a flashlight and shining it on objects near you.
Part 3: High Dynamic Range (HDR) Photography
Have you ever noticed that sometimes your camera fails spectacularly to capture an image as your eyes see it? For example, the sky is too bright, or the shadows areas are too dark?
This is because our eyes have a much greater “dynamic range” than a camera has. Dynamic range is the difference between the darkest and lightest part of a scene that can be observed, and our eyes are able to resolve a much wider range in darkness and brightness than a camera can.
This is why you might end up with a shot that looks like this:
Or like this:
…when in reality — to your eyes — the scene looked more like this:
The problem is that cameras struggle to capture the full range of the exposure, from the dark shadows through to the bright highlights. Either the sky will be a white washout, or the landscape will be dark and unrecognizable.
The solution is a technique known as high dynamic range photography or HDR. This simply requires you to take multiple photographs of the same scene at different exposures, and then put them together. This is also known as exposure blending.
If you have a relatively modern smartphone or camera, then it will probably have an HDR mode built in. The iPhone, in particular, has an excellent HDR mode. You can access this from the settings menu in your camera or smartphone menu. On a Canon camera for example, the menu is as follows:
Using your device in HDR mode is very simple, and it will do everything for you. Your device will take the necessary number of photos, align them if necessary, and then blend them together to give you a photo that looks more representative of the scene you saw.
The disadvantage of this is that you are leaving the camera to make all the decisions, and you won’t usually have the source images — you’ll just be presented with the final HDR image, and your camera will discard the interim files.
If you want more control over the final image, then you’ll need to set your camera to “bracket” the exposures for you. This will allow you to take a sequence of photos of different exposures just by holding the shutter down. To find this mode in your camera, look in the menu for auto exposure bracketing, or AEB.
Then you’ll have to use computer software to merge the images together into a single photo. There are a variety of software tools available to merge your images. I use Lightroom, Photoshop, and Photomatix Pro, but there are many others out there.
Shooting multiple photos at once does mean you need either a very steady hand or — you guessed it— a tripod. If your hand moves between the shots, then the images will likely need to be aligned, which doesn’t always work perfectly. In addition, be aware of moving objects, as these can create odd ghost effects as the software tries to combine images.
HDR works best in largely static, high-contrast scenes, particularly landscapes where there isn’t much movement and the difference in brightness between the darkest and lightest parts of the scene is pronounced.
Part 4: High Contrast Photography
Speaking of high-contrast scenes, don’t forget that you can use these to your advantage. You don’t have to use HDR; instead, you can use all that light to create wonderful silhouettes of your subjects.
This is a great way to get a different take on a subject, and used creatively can give you some standout images.
The shot above is the silhouette of a boat against two islands in the Seychelles. Shooting directly into the sun like this means that you are going to have to decide which area of the shot you want to correctly expose. If I had set up the shot so the boat was correctly exposed, the sky would have been a giant white mess as a result of the light from the sun.
I could, of course, have shot an HDR image, but in this case, a silhouette of the boat and two islands was a more attractive composition.
Other great subjects for silhouetting are people, trees…really, any object with a distinctive outline.
This sort of shooting will require a little practice, as the camera won’t know what sort of exposure you want. The joy of digital is that you can review a shot and try it again — particularly in a scene like this, where you have a bit of time to get the shot right before the sun sets. Be aware that your exposure meter might be indicating that you are over- or underexposing the scene.
The easiest way to get good results is to shoot in manual mode and set everything yourself. Keep the ISO rating as low as possible, and adjust your shutter speed and aperture according to the composition you want to achieve, considering the depth of field and any long-exposure effects you might be trying to achieve.
***
I use all the above travel photography techniques on a regular basis when I’m out and about in the world, looking to put a fresh perspective on a familiar scene. Admittedly, these are individually complex subjects to tackle, and it will take time to master each of them, but the rewards are very much worth it. Just start by picking one technique and work on it as often as you can. With regular practice, it will become second nature and you can move on to another. Travel photography is a slow process, but it’s a rewarding one if you’re willing to put in the work. If you aim for progress and not perfection, you’ll be taking better (and more advanced) travel photos in no time!
Laurence started his journey in June 2009 after quitting the corporate life and looking for a change of scenery. His blog, Finding the Universe, catalogs his experiences and is a wonderful resource for photography advice! You can also find him on Facebook, Instagram, and Twitter.
More Travel Photography Tips!
For more helpful travel photography tips, be sure to check out the rest of Laurence’s travel photography series:
Part 1 – How to Take Professional Travel Photos
Part 2 – How to Shoot the Perfect Travel Photograph
Part 3 – Camera Gear: How to Not End Up With the Wrong Equipment
Part 4 – How to Take the Perfect Photo: Advanced Techniques
Part 5 – 7 Post-Processing Tips to Improve Your Travel Photographs
LEARN TO GET OUT OF AUTO!
If you are looking to really get into photography and want to master your camera and take amazing photos when you travel, Laurence and I have developed a comprehensive photography course that will get you out of auto and have your friends go “Wow! That’s really breathtaking!” in no time. Click here to learn more about it!
Book Your Trip: Logistical Tips and Tricks
Book Your Flight Find a cheap flight by using Skyscanner or Momondo. They are my two favorite search engines because they search websites and airlines around the globe so you always know no stone is left unturned.
Book Your Accommodation You can book your hostel with Hostelworld. If you want to stay elsewhere, use Booking.com as they consistently return the cheapest rates for guesthouses and cheap hotels. I use them all the time.
Don’t Forget Travel Insurance Travel insurance will protect you against illness, injury, theft, and cancellations. It’s comprehensive protection in case anything goes wrong. I never go on a trip without it as I’ve had to use it many times in the past. I’ve been using World Nomads for ten years. My favorite companies that offer the best service and value are:
World Nomads (for everyone below 70)
Insure My Trip (for those over 70)
Looking for the best companies to save money with? Check out my resource page for the best companies to use when you travel! I list all the ones I use to save money when I travel – and I think will help you too!
The post How to Take the Perfect Photo: Advanced Techniques appeared first on Nomadic Matt's Travel Site.
from Traveling News https://www.nomadicmatt.com/travel-blogs/advanced-photography-techniques/
0 notes
Text
How to Take the Perfect Photo: Advanced Techniques
Updated: 12/09/2018 | December 9th, 2018
Today, professional photographer Laurence Norah of Finding the Universe, continues his five-part series on taking better travel photos. In this post, Laurence is taking it up a notch to give some advanced travel photography techniques such as long exposure shots, HDR, star shooting, and more!
One of the challenges we face as travelers is that so many of the places we visit have already been photographed extensively.
In today’s post, I want to share with you some advanced travel photography techniques that will help you get more creative with your travel photography. These more advanced concepts build upon the ideas in the first three posts in this series.
I’m going to cover four topics in this post on advanced travel photography techniques that will open up new creative possibilities for when you’re out and about:
Long-exposure Photography
Night Photography
High Dynamic Range (HDR) Photography
High Contrast Photography
Just click on the links above to jump direcly to that section.
Part 1: Long-Exposure Photography
Have you ever seen a photo of a waterfall where the water looks white and fluffy? Or a shot of a street at night where the cars have been replaced by streaks of light? Here’s an example of a waterfall to give you an idea of what I’m talking about:
This was shot in Glencoe, a stunning part of the Scottish highlands. As you can see, the water’s surface has a silky, flat look, and the waterfall itself looks more like cotton than water. Additionally, the clouds in the sky have a sense of motion.
Here’s another shot, of the Dubai Marina at night, where you can see the cars have been replaced by streaks of light:
Both of these shots were achieved using the same technique, long-exposure photography.
I talked a little about using shutter speed in post two of this series, and how too low a shutter speed can result in blurry images due your hand movement. Long-exposure photography is all about taking advantage of that blurry effect, but as a result of the objects in the scene instead.
You are going to need a tripod to make this work, as otherwise, your images will be blurry everywhere rather than just where you want them to be.
The secret to long-exposure photography is to put your camera in either shutter-priority or manual mode, which will allow you to set how long the camera’s shutter is open for. This will be marked as “S,” “Tv,” or “T” mode on the mode dial if your camera has one. If you’re shooting using a smartphone, many recent models, such as the LG G4, also let you manually set the shutter speed via the camera app.
For waterfall shots, you’re looking at any shutter speed slower than 1/15 of a second. For traffic, it will depend on the speed of the traffic, but you’ll need to shoot at speeds slower than one second. Both of the long exposure shots I’ve shared above were shot with a 30-second exposure.
If you are shooting in the daytime, you might need a neutral density filter in order to compensate for the amount of light available (see the travel photography gear post, the third in the series, for more information). If you’re shooting in manual mode, you’ll have to set the aperture to get the correct exposure. Try to avoid apertures higher than f/16 though, as they often result in lower-quality images.
Long-exposure photography will have you looking at the world and motion in new ways, and it opens up all sorts of creative possibilities. Have fun with it!
Part 2: Night Photography
When I travel, one of my favorite things is getting far away, to the middle of nowhere, and just looking up at the night sky. Away from the city lights, it’s is one of the most spectacular views available to us, and gazing up at it always helps me gain a sense of perspective.
Of course, once I’m done looking at it, I want to try and capture it as a photo. This isn’t as hard as you might think and, apart from a tripod, doesn’t need a great deal of expensive equipment to achieve. But shooting star trails does require more thinking than just pointing your camera at the sky and hitting the “expose” button.
There are two main types of star photography. First, you can do a long-exposure shot and turn the stars into streaks of light, like this:
This was a two-hour exposure I shot while camping in the Western Australian outback. Yes, two hours! (You need a lot of patience and a decent battery for long-exposure star photography.)
You can also do multiple long exposures lasting from 30 seconds to a minute and then stack the resulting photos together using specialist software like this. This reduces the “noise” that super-long exposures are known for, as well as the risk of your battery going flat mid-shoot, but it does require more work afterward.
However, most cameras won’t let you shoot for longer than 30 seconds in manual mode. You have to switch to “BULB” mode, whereby the shutter button will stay open for as long as you hold the shutter down. Some cameras have this in manual mode rather than a dedicated BULB setting — check your camera manual to find out how your model of camera works.
You are unlikely to want to stand with your finger on the shutter button for two hours, but don’t worry, you have some options. The easiest is to invest in a remote release cable, which will let you “lock” the shutter button down for as long as you want. Alternatively, if you have a more modern camera with Wi-Fi built in, you might find that there is an app that lets you control the length of the exposure beyond 30 seconds.
Finally, consider the movement of the stars. The earth rotates from west to east, so if you want circular star trails, you’ll need to point your camera north or south. If you’re in the northern hemisphere, composing around the North Star (which remains stationary) is a good place to start.
The other type of star photo is where you capture the night sky without motion. This will likely still require a long exposure, but one that is not so long as to result in the stars blurring from motion. Around a 30-second exposure is the maximum before the motion of the stars from the earth’s rotation becomes apparent. Here’s a 30-second exposure of Venus setting in the Galápagos as an example:
The setup is very similar to star trail photography, in that you will need a tripod and will have to consider your composition. However, with only a 30-second exposure, you are going to need to increase the ISO on your camera to get as much light in as possible.
Modern cameras are capable of shooting at ISOs of 3200 and 6400 without introducing too much noise into the image. In addition, you’ll want to open your aperture as wide as possible — depth of field isn’t really a consideration when shooting the infinite! Open it as wide as it’ll go, preferably in manual mode.
In some ways, these shots are easier because you’ll be able to see the results a lot more quickly. Here’s a shot of the stars over France:
The Milky Way is an excellent subject for static star photography — it’s a natural leading line, as you can see in the shot above. This was a 30-second exposure at ISO 6400 and f/4, shot on a Canon 6D in manual mode.
Once you’ve gotten the hang of basic star photography, you can start to be a little creative. At these exposures, even a little light can make a big difference, so you can try “painting” objects with light, by using a flashlight and shining it on objects near you.
Part 3: High Dynamic Range (HDR) Photography
Have you ever noticed that sometimes your camera fails spectacularly to capture an image as your eyes see it? For example, the sky is too bright, or the shadows areas are too dark?
This is because our eyes have a much greater “dynamic range” than a camera has. Dynamic range is the difference between the darkest and lightest part of a scene that can be observed, and our eyes are able to resolve a much wider range in darkness and brightness than a camera can.
This is why you might end up with a shot that looks like this:
Or like this:
…when in reality — to your eyes — the scene looked more like this:
The problem is that cameras struggle to capture the full range of the exposure, from the dark shadows through to the bright highlights. Either the sky will be a white washout, or the landscape will be dark and unrecognizable.
The solution is a technique known as high dynamic range photography or HDR. This simply requires you to take multiple photographs of the same scene at different exposures, and then put them together. This is also known as exposure blending.
If you have a relatively modern smartphone or camera, then it will probably have an HDR mode built in. The iPhone, in particular, has an excellent HDR mode. You can access this from the settings menu in your camera or smartphone menu. On a Canon camera for example, the menu is as follows:
Using your device in HDR mode is very simple, and it will do everything for you. Your device will take the necessary number of photos, align them if necessary, and then blend them together to give you a photo that looks more representative of the scene you saw.
The disadvantage of this is that you are leaving the camera to make all the decisions, and you won’t usually have the source images — you’ll just be presented with the final HDR image, and your camera will discard the interim files.
If you want more control over the final image, then you’ll need to set your camera to “bracket” the exposures for you. This will allow you to take a sequence of photos of different exposures just by holding the shutter down. To find this mode in your camera, look in the menu for auto exposure bracketing, or AEB.
Then you’ll have to use computer software to merge the images together into a single photo. There are a variety of software tools available to merge your images. I use Lightroom, Photoshop, and Photomatix Pro, but there are many others out there.
Shooting multiple photos at once does mean you need either a very steady hand or — you guessed it— a tripod. If your hand moves between the shots, then the images will likely need to be aligned, which doesn’t always work perfectly. In addition, be aware of moving objects, as these can create odd ghost effects as the software tries to combine images.
HDR works best in largely static, high-contrast scenes, particularly landscapes where there isn’t much movement and the difference in brightness between the darkest and lightest parts of the scene is pronounced.
Part 4: High Contrast Photography
Speaking of high-contrast scenes, don’t forget that you can use these to your advantage. You don’t have to use HDR; instead, you can use all that light to create wonderful silhouettes of your subjects.
This is a great way to get a different take on a subject, and used creatively can give you some standout images.
The shot above is the silhouette of a boat against two islands in the Seychelles. Shooting directly into the sun like this means that you are going to have to decide which area of the shot you want to correctly expose. If I had set up the shot so the boat was correctly exposed, the sky would have been a giant white mess as a result of the light from the sun.
I could, of course, have shot an HDR image, but in this case, a silhouette of the boat and two islands was a more attractive composition.
Other great subjects for silhouetting are people, trees…really, any object with a distinctive outline.
This sort of shooting will require a little practice, as the camera won’t know what sort of exposure you want. The joy of digital is that you can review a shot and try it again — particularly in a scene like this, where you have a bit of time to get the shot right before the sun sets. Be aware that your exposure meter might be indicating that you are over- or underexposing the scene.
The easiest way to get good results is to shoot in manual mode and set everything yourself. Keep the ISO rating as low as possible, and adjust your shutter speed and aperture according to the composition you want to achieve, considering the depth of field and any long-exposure effects you might be trying to achieve.
***
I use all the above travel photography techniques on a regular basis when I’m out and about in the world, looking to put a fresh perspective on a familiar scene. Admittedly, these are individually complex subjects to tackle, and it will take time to master each of them, but the rewards are very much worth it. Just start by picking one technique and work on it as often as you can. With regular practice, it will become second nature and you can move on to another. Travel photography is a slow process, but it’s a rewarding one if you’re willing to put in the work. If you aim for progress and not perfection, you’ll be taking better (and more advanced) travel photos in no time!
Laurence started his journey in June 2009 after quitting the corporate life and looking for a change of scenery. His blog, Finding the Universe, catalogs his experiences and is a wonderful resource for photography advice! You can also find him on Facebook, Instagram, and Twitter.
More Travel Photography Tips!
For more helpful travel photography tips, be sure to check out the rest of Laurence’s travel photography series:
Part 1 – How to Take Professional Travel Photos
Part 2 – How to Shoot the Perfect Travel Photograph
Part 3 – Camera Gear: How to Not End Up With the Wrong Equipment
Part 4 – How to Take the Perfect Photo: Advanced Techniques
Part 5 – 7 Post-Processing Tips to Improve Your Travel Photographs
LEARN TO GET OUT OF AUTO!
If you are looking to really get into photography and want to master your camera and take amazing photos when you travel, Laurence and I have developed a comprehensive photography course that will get you out of auto and have your friends go “Wow! That’s really breathtaking!” in no time. Click here to learn more about it!
Book Your Trip: Logistical Tips and Tricks
Book Your Flight Find a cheap flight by using Skyscanner or Momondo. They are my two favorite search engines because they search websites and airlines around the globe so you always know no stone is left unturned.
Book Your Accommodation You can book your hostel with Hostelworld. If you want to stay elsewhere, use Booking.com as they consistently return the cheapest rates for guesthouses and cheap hotels. I use them all the time.
Don’t Forget Travel Insurance Travel insurance will protect you against illness, injury, theft, and cancellations. It’s comprehensive protection in case anything goes wrong. I never go on a trip without it as I’ve had to use it many times in the past. I’ve been using World Nomads for ten years. My favorite companies that offer the best service and value are:
World Nomads (for everyone below 70)
Insure My Trip (for those over 70)
Looking for the best companies to save money with? Check out my resource page for the best companies to use when you travel! I list all the ones I use to save money when I travel – and I think will help you too!
The post How to Take the Perfect Photo: Advanced Techniques appeared first on Nomadic Matt's Travel Site.
from Nomadic Matt's Travel Site https://ift.tt/2zRFqL4 via IFTTT
0 notes
Text
The apple ipad tablet is taking over the leisure community, and many reasons exist why. Perhaps you haven't quite discovered how those motives relate to your lifestyle. Consequently, you must read on in order to greater understand a little more about tips on how to take advantage of the iPad to assist you to drive the straightforward option on existence.
Fed with getting inspired to join diverse Wi-Fi systems? There is an fantastic way to fix this matter from the Wi-Fi Options. Merely turn off the Check with to sign up for settings. You will still be capable to be a part of networking sites even so, you will have to visit Wi-Fi options and sign up for after that. Hold off until your battery power is reduced before starting to demand your ipad tablet. Power packs have something known as storage. When you fee the battery too soon, it's memory will record a smaller lifestyle, and also this can happen frequently, resulting in the device being forced to be on the charger to be utilized. A lot of people find it difficult to sort on tablets, but over time, it gets less difficult. There exists a button that lets you do presentation dictation. Press your own home key 2 times and just tap about the little microphone the truth is. If bandarq complete speaking, hit that icon once again and also the words will demonstrate up as text message. The apple ipad tablet does not include a end user guide, but it is sometimes beneficial to have 1. If you're figuring out how to establish a specific attribute on the apple ipad tablet, getting the guide handy will help. To get a version, simply go to the Apple company web site. There you will discover a Pdf model that may be easy to down load. If the electric battery in your ipad tablet is completely depleted, cost it immediately. Keeping the device for too long amounts of time using a dead electric battery can affect its capability to keep a demand down the road. When per month, let the electric battery to operate down fully before recharging it to 100 %. Create folders to higher arrange your iPad displays. Just obtain your monitor to jiggle function then put the icons on one another if you want them in the very same folder and recurring till you have every thing that you want to buy. This attribute is wonderful once you have 20 or higher icons. When checking out any new programs, don't forget about totally free possibilities. Frequently they are just as good since the paid out edition, even though they may include advertising. This is a wonderful way to have a kind of test well before buying the complete model that doesn't have any obtrusive ads upon it. By clicking on two times in your iPad's Property option you are able to easily view a list of the software which can be presently running. They will happen in a bar found at the end of the iPad's display screen. If you wish to modify to an alternative mobile app, just tap upon it once. You are able to take away this nightclub by swiping the screen downward. If you're having trouble learning your ipad tablet, seek out apple ipad message boards on the web. There are tons of excellent spots it is possible to go to so you can learn more regarding the ipad tablet. Join a community forum and check out the records to get some useful facts about different guidelines. Opening the 2nd scree of your keyboard each and every time you want a full cease can rapidly grow to be annoying. It will save you time and effort if you variety by demanding the area club twice when you really need to insert a whole cease with your text message or through a wireless network computer keyboard. You are able to import your own textbooks totally free making use of your apple ipad tablet. The iBook iphone app by apple inc permits you to search a free of charge part of publications. However, your apple ipad tablet permits you to read through textbooks acquired someplace else. It is possible to import these textbooks, but take into account that the sole file format an apple ipad can see is ePub. One of many nice options that come with the apple ipad is the Photo Booth. You can find a lot more pleasure out of this attribute if you use it on your friends and relatives. Tapping the "twirly digital camera" icon will allow you to take advantage of the video camera about the rear and acquire photographs by tapping the shutter button. Regardless of whether you have to get groundwork accomplished, speak with other people from around the world or enjoy some video games, the ipad tablet makes it happen. You will be more comfortable with your apple ipad tablet knowing about all its diverse functions. You can use the details you've figured out to higher get pleasure from your gadget.
0 notes
Text
Best Camera Apps to Shoot RAW Photos on the iPhone
New Post has been published on http://secondcovers.com/best-camera-apps-to-shoot-raw-photos-on-the-iphone/
Best Camera Apps to Shoot RAW Photos on the iPhone
(adsbygoogle = window.adsbygoogle || []).push();
Taking photos with your iPhone is great: it’s fast, it’s intuitive, and most importantly – it’s always with you. While we prefer taking a professional camera on a holiday, it’s our phones that get used the most. There are still camera things that an iPhone can’t do – you can’t swap in a 300mm zoom lens during a wildlife safari, for instance – but Apple has come closer and closer each year.
One of those improvements was the introduction of RAW support, giving iPhone owners more latitude to play with their photos after hitting the shutter button. And though the feature has been around for a while – RAW support has been available from the iPhone 6s onwards – not many know about it, or know how to use it. Part of that is Apple’s fault: the built-in Camera app doesn’t shoot RAW.
The only way to click RAW photos on iPhone involves third-party apps. We downloaded many apps that claimed to capture RAW photos, browsed suggestions provided by professional photographers, and then landed on a selection – both free and paid – that will have something for everyone. But before we get into the various apps and the features on offer, it’s worth diving into what RAW offers in the first place.
The Best Free Photo Editing Apps on Android
What is RAW photography? When you take a picture on an iPhone, here’s what happens: the sensor captures information, iOS processes that in the way Apple engineers wanted, and then the file is saved to your Photos app. But when you shoot RAW, the second step of processing, adjusting, and tuning never takes place, and the file is saved in DNG format, which grants greater control over editing to the user.
The reason Apple (and everyone else) doesn’t opt for RAW by default is because processing RAW files is taxing on the phone, and they take up a lot more space than standard photos, aka a JPEG, or HEIC on new iPhone models. That’s why RAW files also come with a low-resolution preview, so photo editors can display it quickly, without making you wait.
What iOS devices support RAW photography? RAW photo capture is supported on the following iPhone models: iPhone X, iPhone 8, iPhone 8 Plus, iPhone 7, iPhone 7 Plus, iPhone 6s, iPhone 6s Plus, and iPhone SE. Among iPad, RAW capture works on iPad Pro 9.7-inch, iPad Pro 10.5-inch, and iPad Pro 12.9-inch (2nd-gen) only.
Should you always use RAW? Since RAW offers more control, you’re probably wondering if RAW-only is the way to go. No, not always. For one, RAW takes a lot more space, as we said before. Two, Apple’s own calculations are quite helpful at times, especially when it comes to noise reduction. And three, you don’t need RAW if you’re just capturing for reference: a page, parking spot, a phone number, and things like that.
Plus, Apple doesn’t allow RAW capture in Portrait Mode for now. It’s likely a performance issue, since capturing depth map for Portrait Mode is CPU-intensive. If you like those depth-of-field shots, you’ll have to be content with normal photos for now.
Best RAW camera apps on the iPhone
ProCam 5 One of the most popular apps on App Store’s photos & videos section, and the most expensive option on our list at Rs. 499, ProCam 5 is also the only one here with an Apple Watch app. Whether it’s worth the price is up to you to decide, although we liked it a lot.
It offers all kinds of manual controls, including exposure, shutter speed, ISO, focus, and white balance. ProCam 5 also makes it really easy to switch between RAW, HDR, and AEB (auto exposure bracketing) for high-contrast pictures, and offers a ton of shooting modes: night, burst, slow shutter, Portrait Mode, and 3D Photos. The last of those only works on iPhones with dual rear cameras.
ProCam 5 provides live shutter speed, ISO, focus, and WB values, in addition to focus peaking, so you can easily gauge what you’re shooting is in focus or not.
Download ProCam 5 (Rs. 499)
VSCO On the other end of the price spectrum is the community-driven VSCO, which became known for its filter packs that provided various looks without the hassle of editing. The app has turned into a lot more than that over the years, including support for RAW capture and editing.
You can switch to RAW shooting with a single tap, and manual controls for exposure, shutter speed, ISO, focus, and white balance are included in the same row. Once you click a RAW picture, you can bring it into VSCO’s in-built editor, adjusting colour balance as you please, recovering lost highlights, and even making use of all the filters at your disposal.
Download VSCO (Free)
Shop On SecondCovers
Halide If you don’t mind forking over a few hundred rupees, Halide is another powerful camera app worth checking out. Chroma Noir, the team behind Halide, developed a new UI from scratch for the iPhone X, so it looks just right on your super-expensive device.
Halide’s manual controls work with gestures, changing exposure and focus with a swipe, while you can tweak the rest – ISO, white balance etc. – via menus. The app also offers focus peaking just as ProCam 5, plus live histogram to better judge exposure.
To ensure you can view your RAW photos in apps that don’t support it (including Apple’s own Photos), Halide saves a JPEG preview by default for those apps to fall back on. When it comes to exporting RAW from within Halide, you can choose TIFF, JPEG (‘Most Compatible’), or HEIC (‘Most Efficient’).
And to make for a faster launch, Halide has both lock-screen widget support and 3D Touch actions for dropping straight into manual/ automatic mode.
Download Halide (Rs. 399)
MuseCam Technically speaking, this is the only other ‘free’ app on this list. MuseCam does offer in-app purchases, one of which is needed to get the most out of RAW photos, but if you’ve another app for editing your RAW photos elsewhere, then you don’t need to bother paying for anything.
In addition to the repertoire of manual controls – shutter, ISO, white balance, and focus – MuseCam also offers custom film-inspired presets, tone curves that allow individual control of RGB channels, complete edit history, and a simulated depth of field tool. You can pair the last of those with RAW to achieve what Apple wouldn’t otherwise let you.
MuseCam brands itself as an app that lets you capture and edit in the same place, without having to think about importing, but if you do gown that road, you’ll have to pony up for curves, split toning, and HSL as a Rs. 299 in-app purchase.
Download MuseCam (Free)
Manual One of the first app to bring manual controls to the iPhone continues to be a good workhorse, providing full RAW capture in addition to the controls that have always been there: shutter, ISO, white balance, focus, and exposure.
Manual also has a live monitor for automatic exposure values, a live histogram, and a level tool to make sure your photos aren’t tilted. Plus, you can save photos directly to Camera Roll, unlike say MuseCam, which only saves JPEG by itself.
Other options include focus zoom, a delayed shutter for long exposures, fill flash mode, grid overlays (rule of thirds, or square), light and dark themes, and an EXIF viewer.
Download Manual (Rs. 299)
(adsbygoogle = window.adsbygoogle || []).push();
0 notes