#how to mix epoxy resin and hardener
Explore tagged Tumblr posts
Visit Tumblr Blog
Explore Tumblr blogs with no restrictions, modern design and the best experience.
Last Seen Tumblr Blogs


Fun Fact
Tumblr has been banned in Indonesia for providing people with access to pornographic content.
Text
Here are the steps and some tricks that I use to make water bases for my minis! (〃´▽`〃)
Thank you @lisuune for asking!~☆ I hope this will be of help!
1st step is to decide what the base "water" colour is!
For murky pounds you can use browns and beige, for a swamp, I use dark greens, olive, and sepia, for deep water the best would be shades of blue, depending of the depth that you want.
I'll use this mini as an example. I had some fun pouring cheap acrylics mixed with regular white/school glue (not obligatory, but I added a drop of silicone oil for the eye effects). I cut a plastic bag in two and let the acrylics dry. After acrylics dry, they turn to plastic, which is easy to cut and glued on the base.
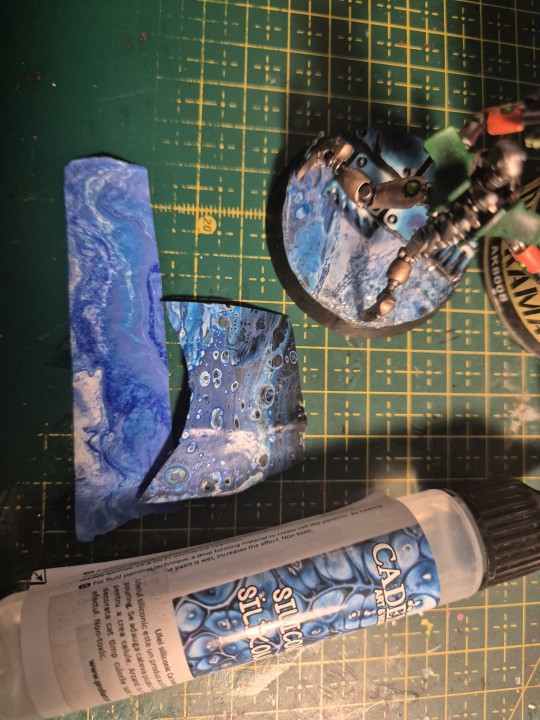
(I need to flip my cutting mate, sorry for the mess (ó﹏ò。))
Always let painrs dry in a well ventilated place.
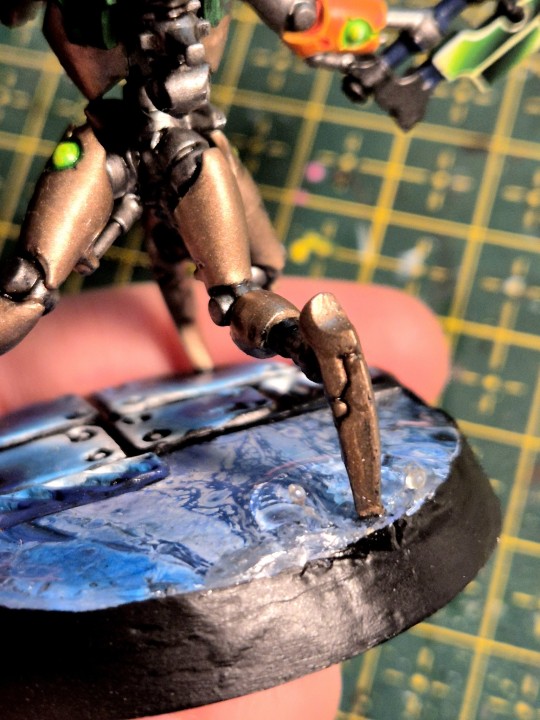
2nd step is to decide what sort of "water" you shall use.
I am mostly using two materials, but there are a few others as well. I never tried them, but I read that people use transparent glue, varnish medium, or medium gel. I personally have experience with resin (both UV and regular epoxy resin) and clear acrylic.
(! Always work in a well ventilated space with resin ! It is super important, the fumes are toxic! Wearing gloves with resin is a must!)

When pouring, you can use a silicone mold for the base, or as my silly ass did the first time, use a little tape to create a dam (this only works if you intend to pour just a little).
Depending on how much you need, you can use: acrylic and epoxy resin for projects where you need a lot. Those allow you to pour multiple layers that will merge marvellously!
The trick is to be patient to let it dry, and pour very slowly to avoid air bubbles. Usually, a spritz or spray of alcohol is enough to eliminate the surface bubbles!
While acrylic is way safer and friendly for beginners, resin allows you to do neat tricks.
Use UV resin when you don't have to use a lot, because it doesn't layer as nicely as the regular one that needs to dry to gel (harden).
You can leave the UV resin under sunlight, and it will harden, or you can use an UV lamp, or flashlight, which will cause it to harden in seconds!
I made here a watter ripping by using a compressed air can and curing as it was blown into place. (*sensible chuckle*).
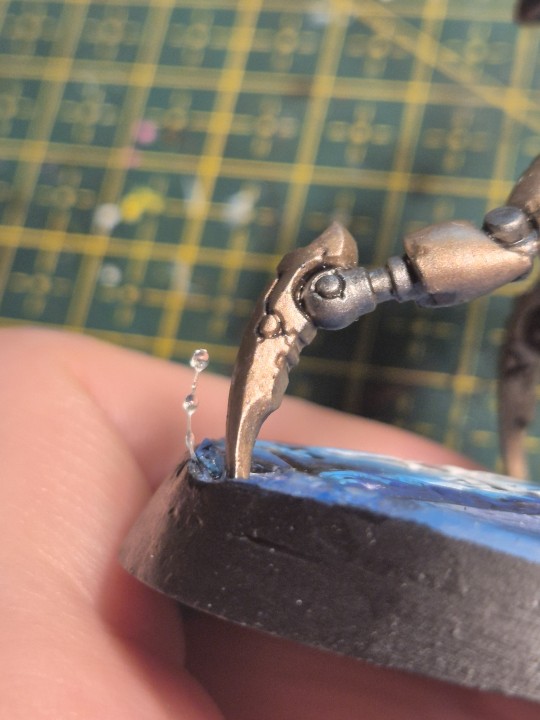
If you have fishing wire or transparent tread, you can pour a few drops on it and cure it for a cute splash effect!
As an extra, I use putty to make the "solid ground". I really like the Green Stuff world rolling pins, but a 3D printed one can work just as fine! (Don't forget to cover them with sculptor vaseline, or just water. For me, I prefer starch, that is why mine are so dusty)

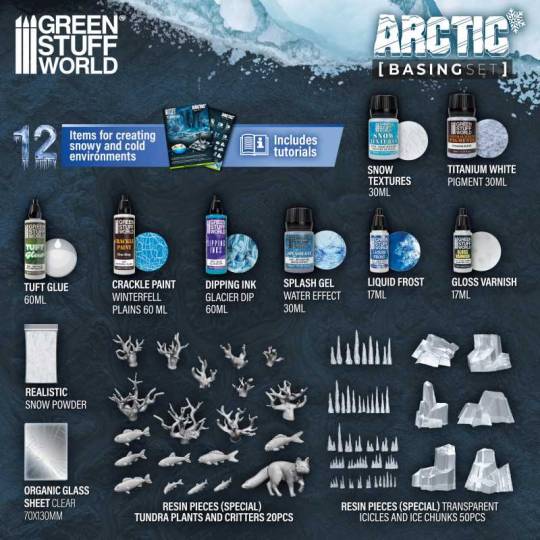
I saw some beautiful basing kits from GSW, that I will absolutely buy to try. They have them for all kinds of terrain, including water, swamps, lava etc.
Happy basing !~♡
(。・ω・。)ノ♡
15 notes
·
View notes
Text
From Concept to Reality: Epoxy Insulators Shaping the Future of Electrical Engineering
In the rapidly advancing field of electrical engineering, the demand for reliable and efficient insulation materials has never been greater. Epoxy insulators, known for their superior performance and durability, are becoming the cornerstone of modern electrical systems. As a leading transformer insulators manufacturer, Radiant Enterprises is at the forefront of this technological evolution. This blog explores how epoxy insulators are transforming the landscape of electrical engineering, from their conception to their real-world applications.

The Importance of Insulators in Electrical Engineering
Insulators play a critical role in electrical engineering by preventing unwanted flow of current and ensuring the safety and efficiency of electrical systems. They are essential components in transformers, cables, and various other electrical installations. The choice of material for these insulators significantly impacts their performance, durability, and overall effectiveness.
Why Epoxy Insulators?
Epoxy insulators offer numerous advantages over traditional materials such as porcelain and glass. These include:
High Dielectric Strength: Epoxy materials provide excellent electrical insulation properties, making them ideal for high-voltage applications.
Mechanical Strength: Epoxy insulators are highly durable and resistant to mechanical stress and environmental factors.
Thermal Stability: They can withstand extreme temperatures, ensuring consistent performance under varying conditions.
Moisture Resistance: Epoxy insulators have low water absorption rates, reducing the risk of degradation over time.
From Concept to Reality: The Manufacturing Process
Conceptualization and Design
The journey of creating an epoxy insulator begins with conceptualization and design. This involves understanding the specific requirements of the application, whether it is for transformers, cable terminations, or other electrical components. Engineers at Radiant Enterprises collaborate with clients to design insulators that meet their exact specifications.
Material Selection
Choosing the right epoxy resin is crucial. The selected resin must offer the necessary electrical and mechanical properties while being cost-effective. Our team of experts evaluates various epoxy formulations to find the best match for the intended application.
Prototyping and Testing
Once the design is finalized, a prototype is developed. This prototype undergoes rigorous testing to ensure it meets all performance criteria. Tests include:
Electrical Testing: Assessing dielectric strength and insulation resistance.
Mechanical Testing: Evaluating tensile strength, compressive strength, and impact resistance.
Thermal Testing: Measuring performance under high and low temperatures.
Environmental Testing: Ensuring resistance to moisture, chemicals, and UV exposure.
Manufacturing
Upon successful testing, the insulators move into the manufacturing phase. Radiant Enterprises employs state-of-the-art manufacturing techniques to produce high-quality epoxy insulators. This includes:
Mixing and Molding: Combining epoxy resin with hardeners and additives, then molding into the desired shape.
Curing: Allowing the molded epoxy to cure and harden, forming a solid insulator.
Finishing: Trimming, polishing, and coating the insulators to enhance their performance and appearance.
Applications of Epoxy Insulators
Epoxy insulators are versatile and used in a wide range of electrical engineering applications. Here are some key areas where they are making a significant impact:
Transformer Insulators
As a premier transformer insulators manufacturer, Radiant Enterprises provides epoxy insulators that ensure the safe and efficient operation of transformers. These insulators offer high dielectric strength and are resistant to thermal and mechanical stresses, making them ideal for both power and distribution transformers.
Cable Termination Insulators
Epoxy insulators are also crucial in cable terminations. They provide the necessary insulation and mechanical support to ensure reliable and safe connections. Radiant Enterprises, one of the leading cable termination insulator manufacturers in India, produces insulators that meet stringent industry standards and are designed for durability and performance.
Electrical Equipment
Beyond transformers and cables, epoxy insulators are used in various other electrical equipment such as switchgear, circuit breakers, and bushings. Their versatility and superior properties make them suitable for a wide range of applications in electrical engineering.
Why Choose Radiant Enterprises?
Radiant Enterprises stands out as the best transformer insulator manufacturer and a top player among electrical insulation manufacturers in India. Here is why:
Expertise and Experience
With years of experience in the industry, Radiant Enterprises has the expertise to design and manufacture high-quality epoxy insulators. Our team of engineers and technicians are skilled in developing solutions that meet the specific needs of our clients.
Commitment to Quality
Quality is at the core of everything we do. From selecting the finest raw materials to employing advanced manufacturing techniques, we ensure that every insulator we produce meets the highest standards of performance and reliability.
Innovation
We are committed to innovation and continuously invest in research and development to stay ahead of the curve. Our state-of-the-art facilities and cutting-edge technologies enable us to develop new and improved insulation solutions.
Customer-Centric Approach
At Radiant Enterprises, we believe in building long-term relationships with our clients. We work closely with them to understand their needs and provide customized solutions that exceed their expectations.
The Future of Epoxy Insulators
The future of epoxy insulators looks promising, with ongoing advancements in materials science and manufacturing technologies. Here are some trends to watch:
Smart Insulators
The integration of sensors and smart technologies into insulators is an exciting development. These smart insulators can monitor their own performance, detect faults, and provide real-time data to help manage electrical systems more efficiently.
Eco-Friendly Materials
As sustainability becomes increasingly important, there is a growing focus on developing eco-friendly epoxy formulations. These materials aim to reduce environmental impact while maintaining or even enhancing performance.
Enhanced Performance
Ongoing research is leading to the development of epoxy insulators with even higher dielectric strength, thermal stability, and mechanical durability. These advancements will further expand the applications and capabilities of epoxy insulators in electrical engineering.
Conclusion
From concept to reality, epoxy insulators are revolutionizing the field of electrical engineering. Their superior properties make them indispensable in ensuring the reliability and safety of electrical systems. As a leading transformer insulators manufacturer and a prominent name among electrical insulation manufacturers in India, Radiant Enterprises is dedicated to advancing this technology and providing our clients with the best possible solutions.
Whether you are looking for the best transformer insulator manufacturer or reliable cable termination insulator manufacturers in India, Radiant Enterprises has the expertise and products to meet your needs. Our commitment to quality, innovation, and customer satisfaction sets us apart in the industry.
Experience the future of electrical insulation with Radiant Enterprises. Let us help you turn your concepts into reality with our high-performance epoxy insulators.
#Electrical insulation manufacturers in India#Transformer insulators manufacturer#Best transformer insulators manufacturer#Cable termination insulator manufacturers in India
3 notes
·
View notes
Text
Avoid Being a Glass-assin: Use Epoxy to Fix Your Broken Treasures
Avoid Being a Glass-assin: Use Epoxy to Fix Your Broken Treasures
We have all experienced it: a favourite piece of jewellery breaks in two, a treasured mug tumbles, or a vase slips out of your hands. Although the initial shock and despair may be too much to handle, don't worry! Epoxy's strength can be used to restore these damaged treasures to stunning, useful pieces.epoxy for floor tiles
Epoxy's Magic
Epoxy is a multipurpose glue that can be used to join metal, glass, and ceramics. Its special qualities make it the ideal instrument for fixing damaged objects:
Unmatched Strength: Epoxy creates a long-lasting, robust bond that is resistant to normal wear and tear.
Crystal Clear Clarity: Because of its transparency, repairs can be made almost undetectable while maintaining the item's original appearance.
Simple to Use: Anyone may become proficient at epoxy repair with a little practice.
How to Repair Glass Using Epoxy
Clean the damaged Pieces: To get rid of any residue, oil, or grime, give the damaged surfaces a thorough cleaning.
Mix the Epoxy: Mix the epoxy resin and hardener according per the manufacturer's instructions.
Put the epoxy on: Apply a thin layer of epoxy to the fractured edges using a toothpick or a tiny brush.
Align the Pieces: Hold the fractured pieces in place until the epoxy hardens by carefully aligning them.
Cure Time: As directed by the manufacturer, let the epoxy cure completely.
Beyond Glass Repair
The uses of epoxy are not limited to glass repair. Here are a few more imaginative uses:
Jewellery Making: Use epoxy to insert flowers, leaves, or other things to create one-of-a-kind jewellery pieces.
Home décor: Fix broken figurines, pottery, or ceramics.
DIY Projects: Make personalised artwork, coasters, or other ornamental objects with epoxy.
Prioritising safety
Always wear gloves and eye protection when dealing with epoxy. Make sure there is enough ventilation and stay away from fumes. To guarantee safe and efficient use, strictly follow the manufacturer's instructions.
You may give your broken treasures new life by embracing epoxy's power. Therefore, don't give up the next time you come across a broken object. Rather, take out your epoxy and unleash your artistic side!
Epoxy tile joint filler
#epoxy tile joint filler#glass bond epoxy#glass epoxy#benefits of glass epoxy#epoxy for floor tiles#glass epoxy for tiles#what is glass epoxy
0 notes
Text
Epoxy Grout for Tile Joints: Application Tips for Bathrooms, Kitchens & More
Epoxy grout has transformed the way tile joints are finished, especially in areas that demand high durability and aesthetic appeal like bathrooms, kitchens, and other moisture-prone spaces. Unlike traditional grouts, epoxy grout offers long-lasting performance, stain resistance, and a polished look. This guide dives into essential tips for applying epoxy grout, ensuring tile joints maintain their appearance and functionality over time.
Why Choose Epoxy Grout for Tile Joints?
Epoxy grout is crafted to be water-resistant, stain-proof, and incredibly durable, making it the top choice for tile joints in areas like kitchens and bathrooms. Traditional cement-based grouts can discolor or crack over time, especially in high-traffic or moisture-heavy environments. Epoxy grout, on the other hand, maintains its integrity and appearance with minimal upkeep. For those seeking a grout that not only enhances tile joints but also withstands wear, epoxy grout is the ideal solution.
Benefits of Epoxy Grout for Tile Joints
Water Resistance- Perfect for wet areas like bathrooms and kitchens, epoxy grout prevents water from seeping into tile joints.
Stain Resistance- This grout does not absorb stains, keeping tile joints looking fresh even in high-traffic spaces.
Durability- Epoxy grout’s long-lasting performance means fewer repairs and lower maintenance costs over time.
Aesthetic Appeal- Available in a variety of colors, epoxy grout allows homeowners to add unique touches to tile joints.
Preparing for Epoxy Grout Application
Proper preparation is key to successful epoxy grout application. Here’s how to start:
Clean the Surface – Before you begin, ensure that all tiles and tile joints are clean and free from dust, grease, or residues. This helps the grout bond more effectively.
Use the Right Tools – A grout float, sponge, and bucket of water are essential. Also, wear gloves to protect your hands from the chemicals in the epoxy grout.
Mix Carefully – Follow manufacturer instructions precisely when mixing epoxy grout, such as Rainbowsil Hardener + Resin, to ensure a smooth, even application.
Step-by-Step Application of Epoxy Grout
Applying epoxy grout to tile joints is straightforward but requires attention to detail. Follow these steps for optimal results:
Apply the GroutUsing a grout float, apply the epoxy grout over the tile joints, pressing it in firmly to fill all gaps. For an even application, angle the float at 45 degrees and work in small sections.
Clean Excess GroutAfter filling the tile joints, use a damp sponge to wipe away excess grout on the tile surface. Ensure the sponge is just damp, not soaking, to avoid diluting the grout in the joints.
Allow to SetLet the grout set according to the manufacturer's recommendations. Rainbowsil, for instance, typically requires a short curing time before the next cleaning step.
Final CleaningOnce the grout is partially set, use a microfiber cloth to remove any remaining residue from the tile surface without disturbing the grout in the tile joints.
Recommended Epoxy Grout Products for Tile Joints
For the best results, consider using high-quality epoxy grout products. Rainbowsil - Epoxy Grout for Tile Joints (5 KG) is a premium option, featuring colored quartz sand with a high purity of quartz. It not only strengthens tile joints but also enhances their appearance with a range of color options. This product provides a smooth, seamless finish that’s perfect for any home or commercial space.
Additional Product Recommendations
Rainbowsil Hardener + Resin (1.31 KG)This two-component system combines with Rainbowsil color powder to create a lasting, vibrant finish for tile joints. It offers excellent stain resistance and prevents cracking, making it ideal for both residential and commercial settings.
Rainbowsil Separate Filler (3.69 KG)This epoxy filler, combined with hardener and resin, ensures flawless application, leaving tile joints smooth and free from stains. Its antibacterial properties make it ideal for kitchens and bathrooms where hygiene is essential.
Tips for Using Epoxy Grout in Specific Areas
Epoxy grout can be used throughout the home but requires slight adjustments depending on the space:
Bathrooms
Epoxy grout is ideal for bathroom tile joints as it prevents water damage and mold growth. For a luxurious finish, use Rainbowsil products that add a decorative touch to bathroom tile joints while maintaining their durability.

Kitchens
The kitchen is prone to spills and stains, making epoxy grout a great choice for tile joints. Choose a product that resists stains and maintains its color, such as Rainbowsil Hardener + Resin. This ensures your kitchen tile joints remain vibrant despite frequent cleaning.
Discover expert tips for applying epoxy grout on tile joints in bathrooms, kitchens, and high-traffic areas. Achieve a durable, stain-resistant finish with Rainbowsil epoxy grout for lasting quality and style.

High-Traffic Areas
For high-traffic areas like hallways or commercial spaces, opt for epoxy grout that withstands heavy use without discoloring. Rainbowsil’s high-durability properties make it suitable for spaces with a lot of foot traffic.
Frequently Asked Questions
Q1) What are tile joints?Tile joints are the small spaces or gaps between individual tiles. They help accommodate minor tile movements, prevent cracking, and are filled with grout to ensure a seamless look. Epoxy grout is an excellent choice for these joints, providing both aesthetic appeal and long-lasting durability.
Q2) What is a typical tile joint?A typical tile joint is usually 1/16 to 1/8 inch wide, though it can vary depending on tile type and installation requirements. These joints are filled with grout to prevent dirt, water, and debris from accumulating. Epoxy grout is particularly effective for filling tile joints due to its water-resistant and stain-resistant properties.
Q3) Is epoxy grout better than regular grout?Yes, epoxy grout is generally better than regular (cement-based) grout, especially for areas exposed to moisture or high traffic. Epoxy grout resists stains, cracks, and discoloration, making it ideal for bathrooms, kitchens, and other demanding spaces. Its longevity and low maintenance needs make it a preferred choice for homeowners and professionals alike
Maintenance Tips for Epoxy Grout
Epoxy grout requires minimal maintenance, but a few simple steps will keep your tile joints in excellent condition:
Regular Cleaning – Wipe down tile joints with a mild detergent to remove any surface grime.
Avoid Harsh Chemicals – Use non-abrasive cleaners to maintain the grout’s finish.
Inspect Regularly – Occasionally check tile joints for any signs of wear, particularly in high-traffic areas, and touch up as necessary.
Conclusion
Epoxy grout offers a superior solution for tile joints, blending functionality with aesthetic appeal. Whether you’re updating your kitchen, bathroom, or high-traffic areas, products like Rainbowsil Epoxy Grout for Tile Joints provide lasting quality and elegance. Choose epoxy grout for a seamless, stain-resistant finish that keeps your tile joints looking pristine. Transform your space today with Rainbowsil’s high-quality epoxy grouts, available at 20MCC.Contact us to explore our range of epoxy grout products and elevate your home’s design. Embrace a durable, beautiful finish for your tile joints that stands the test of time.
0 notes
Text
Flexible Epoxy Adhesive: The Key to Long-Lasting Repairs
When it comes to repairing or bonding materials with varying degrees of flexibility, Flexible Epoxy Adhesive is the ultimate solution. This versatile adhesive combines the superior bonding strength of epoxy with the flexibility needed to accommodate movement, making it ideal for both industrial and household applications. Among the standout products in this category is the Polyvance epoxy filler, renowned for its reliability and ease of use.
What is Flexible Epoxy Adhesive?
Flexible Epoxy Adhesive is a two-part system consisting of a resin and a hardener. When mixed, these components create a durable yet flexible bond capable of withstanding stress, vibration, and temperature fluctuations. Unlike traditional epoxy adhesives, which are rigid and prone to cracking under stress, flexible epoxy adhesives are designed to absorb impacts and maintain their integrity over time.
The Polyvance epoxy filler is a popular choice for repairing plastic and other materials where both strength and flexibility are required. Its unique formulation ensures a strong bond while accommodating slight movements, making it perfect for automotive, construction, and DIY projects.
Key Features of Flexible Epoxy Adhesive
1. Superior Bond Strength
Flexible Epoxy Adhesive offers excellent adhesion to a wide range of materials, including metal, plastic, glass, and wood. Its ability to bond dissimilar surfaces makes it a versatile solution for complex repairs.
2. Flexibility Under Stress
Unlike rigid adhesives, flexible epoxies can absorb vibrations, impacts, and thermal expansion without cracking or losing adhesion. This makes them ideal for dynamic environments, such as automotive and industrial applications.
3. Resistance to Environmental Factors
Flexible epoxy adhesives are designed to withstand harsh conditions, including UV exposure, moisture, and extreme temperatures. This durability ensures long-lasting performance in outdoor and demanding environments.
4. Versatile Applications
Whether you're fixing a cracked bumper with Polyvance epoxy filler or bonding flexible materials in a home repair project, these adhesives are suitable for a wide range of applications.
How to Use Flexible Epoxy Adhesive
Step 1: Surface Preparation
Clean the surfaces to be bonded to remove dust, grease, and contaminants. For best results, sand the bonding area lightly to create a rough texture that enhances adhesion.
Step 2: Mix the Adhesive
Follow the manufacturer’s instructions to mix the resin and hardener in the recommended ratio. Mix thoroughly to ensure a uniform consistency.
Step 3: Apply the Adhesive
Using an applicator or a spreader, apply the adhesive evenly to one or both surfaces. Align the parts carefully and press them together to ensure proper bonding.
Step 4: Allow Curing
Let the adhesive cure for the specified time. Flexible epoxies like Polyvance epoxy filler typically cure quickly but may require several hours for maximum strength.
Benefits of Polyvance Epoxy Filler
Polyvance epoxy filler is specially formulated for repairing flexible plastic components, such as automotive bumpers and trim. Key advantages include:
High Flexibility: Accommodates movement without cracking.
Fast Curing: Reduces downtime for repairs.
Durable Results: Resists environmental wear and tear.
Ease of Application: Simple mixing and application process suitable for both professionals and DIYers.
Applications of Flexible Epoxy Adhesive
Automotive Repairs: Ideal for fixing flexible parts like bumpers, moldings, and trim.
Industrial Use: Bonds materials in environments with constant vibration or stress.
Household Repairs: Perfect for projects involving flexible plastics, rubber, or glass.
Creative Projects: Frequently used in crafting and prototyping due to its versatility.
Why Choose Flexible Epoxy Adhesive?
For projects requiring a balance of strength and flexibility, Flexible Epoxy Adhesive outperforms traditional adhesives. Products like the Polyvance epoxy filler offer a unique combination of durability and adaptability, ensuring reliable performance in a variety of conditions. Whether you're tackling automotive repairs or crafting, this adhesive provides a dependable solution for long-lasting results.
0 notes
Text
How Do You Repair and Protect the Bottom of Your Boat?
The bottom of your boat is constantly exposed to harsh elements, from saltwater and marine life to debris and impacts. Over time, this exposure can cause wear and tear, leading to damage such as cracks, chips, and hull degradation. Repairing and protecting the bottom of your boat is essential not only for its longevity but also for its performance and safety on the water. Here’s a guide to help you understand how to repair and protect your boat’s hull to keep it in top condition.
1. Inspect the Hull Regularly
The first step in maintaining the bottom of your boat is regular inspection. A thorough check will help you catch small issues before they become major problems. Look for:
Scrapes, gouges, or deep scratches.
Cracks, especially around seams and joints.
Faded or peeling paint or gel coat.
Growth of marine life (barnacles, algae, etc.).
Any signs of corrosion (especially on metal parts like trim tabs or outdrives).
After inspecting, make a note of any areas that require attention and prioritize repairs based on severity.
2. Clean the Bottom of Your Boat
Before you can repair or protect the hull, it’s essential to clean it thoroughly. Regular cleaning will remove dirt, salt buildup, and marine growth that can damage the bottom over time. Use a marine-grade cleaner that is safe for your boat’s material (fiberglass, aluminum, or wood) to scrub the hull. If you notice barnacles or other hard growths, use a scraper to gently remove them. Be careful not to scratch or damage the surface.
For boats that are kept in saltwater, cleaning the hull after each outing will help prevent the buildup of corrosive salt deposits.
3. Repairing Damage to the Hull
If you find cracks, chips, or gouges in the hull, timely repair is crucial to prevent further damage. Here's how to handle common repairs:
Minor Scratches and Chips:
For small cosmetic damage, you can typically use a boat-specific gel coat repair kit. Clean the area first, then apply the gel coat according to the manufacturer’s instructions. Sand it smooth once it dries and buff it to restore the shine.
Cracks or Larger Gouges:
For deeper cracks or gouges that expose the fiberglass beneath the surface, you will need a more substantial repair. First, clean the damaged area and allow it to dry thoroughly. For fiberglass boats, mix a fiberglass resin and hardener, apply it to the crack or gouge, and then smooth it out with a putty knife. Once it has cured, sand the surface smooth and apply a layer of gel coat to match the surrounding hull. If you’re not familiar with fiberglass repair, it might be wise to hire a professional for larger damage.
Hull Leaks:
If the boat has developed a leak, it’s crucial to pinpoint its source and repair it immediately. Leaks in the bottom of the hull can be caused by damaged fiberglass, corroded seams, or failing seals. Small leaks can be patched with marine sealant or epoxy resin, but more severe damage may require professional repair or re-lamination.

4. Applying Bottom Paint for Protection
To protect the hull from future damage and deterioration, applying bottom paint is a key step. Bottom paint helps prevent the growth of marine organisms like algae and barnacles, which can damage the hull and reduce performance. It also creates a protective barrier against the harsh elements of the water.
Steps to Apply Bottom Paint:
Clean the hull thoroughly: Before applying bottom paint, ensure the hull is free of dirt, oil, or any old paint.
Sand the surface: Lightly sand the hull to create a rough surface for better paint adhesion.
Choose the right type of bottom paint: There are different types of bottom paint, including antifouling paints that prevent marine growth and hard paints for boats that are frequently in dry dock. Make sure to select the appropriate paint based on the type of boat, your location, and how often you use your boat.
Apply paint in layers: Use a roller or brush to apply the first coat of paint. Allow it to dry, and then apply a second coat. Follow the manufacturer’s instructions for drying times and the number of coats needed.
5. Protecting Against Corrosion
Corrosion, especially in metal components of the boat like the propeller, drive shaft, and trim tabs, is a common issue for boats in saltwater environments. Regularly inspect metal parts for signs of rust or corrosion and take steps to prevent it.
Use corrosion inhibitors: Apply marine corrosion inhibitors to metal parts, especially those below the waterline. These products help protect against saltwater exposure.
Consider sacrificial anodes: Install sacrificial anodes (zinc or aluminum) on the boat’s metal components. These anodes corrode instead of your boat’s more valuable metal parts, protecting them from rust and degradation.
Regular cleaning and maintenance: Rinse metal parts with fresh water after every use to remove salt deposits that can accelerate corrosion.
6. Maintain Your Boat’s Trailer and Lift
If you use a trailer or lift system to transport your boat, don’t forget to maintain the equipment that keeps your boat above water when it’s not in use. Check the trailer for any rust, wear on the rollers, or faulty brakes. Inspect the lift system for signs of wear or damage and make necessary repairs before putting the boat back in the water.
7. Consider Professional Help for Complex Issues
While many boat owners can handle basic cleaning, maintenance, and small repairs, some hull issues may require professional expertise. If you’re dealing with extensive damage, complex repairs, or if you simply want peace of mind, hiring a professional boat repair technician can ensure the job is done correctly.
Conclusion Proper care and maintenance of the bottom of your boat are essential to keeping it in good condition and maximizing its lifespan. Regular inspections, cleaning, and repairs will protect the hull from wear, marine growth, and environmental damage. By applying bottom paint, addressing minor repairs promptly, and taking steps to prevent corrosion, you can enjoy a safe and smooth ride for years to come. Whether you’re handling repairs yourself or enlisting the help of a professional, taking the time to care for your boat’s bottom is an investment in its long-term performance and durability.
0 notes
Text
Epoxy Consolidant: A Reliable Solution for Cold Weather Repairs
When the temperature drops, many common adhesives and repair materials lose their effectiveness, leaving you with weak bonds and incomplete projects. However, with the right product, you can ensure strong, long-lasting repairs even in freezing conditions. This is where epoxy consolidants like the Dura-Fix Cold Weather Formula come into play. Available from NXTGen Systems, this epoxy consolidant is specially designed to deliver powerful bonding and durability in cold environments.
What Is an Epoxy Consolidant?
An epoxy consolidant is a two-part adhesive composed of a resin and a hardener that, when mixed, form a durable, strong bond. This type of epoxy is particularly useful in construction, restoration, and industrial applications where standard adhesives or glues may not be sufficient. Epoxy consolidants are commonly used to stabilize and bond a variety of materials, including wood, concrete, metal, and masonry. Their superior strength and resistance to environmental factors make them ideal for repairs that require lasting durability.
Why Choose Epoxy Consolidants for Cold Weather?
In colder climates or during winter months, adhesives and epoxies can face a number of challenges. Many standard adhesives struggle to cure effectively in low temperatures, which can result in weak or failed bonds. Cold weather can also slow the curing process, leading to long wait times before a repair is ready to withstand use or further treatment. This makes it especially difficult for professionals and DIYers working in outdoor or unheated environments.
This is where Dura-Fix Cold Weather Epoxy Consolidant stands out. Designed specifically to cure and perform reliably in cold temperatures, this epoxy consolidant ensures that you can still carry out repairs, even when the temperature drops below freezing. It bonds strongly to materials and maintains its integrity, providing long-lasting results regardless of the weather.
Key Benefits of Using Dura-Fix Cold Weather Epoxy Consolidant
Cold Weather Performance: As the name suggests, Dura-Fix Cold Weather Epoxy Consolidant is specially formulated to bond effectively in low temperatures. It can cure and set even in sub-freezing conditions, making it the go-to solution for cold-weather repairs.
Superior Bonding Strength: Dura-Fix offers exceptional adhesion to a wide range of materials, including wood, metal, concrete, and stone. Whether you're repairing structural components or small fixtures, this epoxy consolidant ensures a strong, reliable bond that will withstand wear and tear.
Durability in Harsh Environments: Once cured, Dura-Fix creates a tough, durable surface that resists cracking, shrinking, and impact. It's ideal for repairs that need to stand up to weathering, moisture, and physical stress, whether you're working on outdoor structures, vehicles, or industrial equipment.
Versatility: This epoxy is designed for use in many different repair situations, making it a versatile addition to your toolkit. Whether you're restoring an old building, fixing outdoor equipment, or reinforcing structural elements, Dura-Fix Cold Weather Epoxy Consolidant can handle it all.
Easy to Apply: Using Dura-Fix is straightforward. Simply mix the resin and hardener in the recommended ratio, apply the mixture to the repair area, and let it cure. The epoxy is formulated to offer a smooth application that won’t drip or run, making it easier to work with in both large and small repairs.
How to Use Dura-Fix Cold Weather Epoxy Consolidant
Surface Preparation: Clean and prepare the surface to ensure there’s no dust, dirt, or grease. The better the surface preparation, the stronger the bond will be.
Mix the Epoxy: In a clean container, mix the resin and hardener according to the instructions. Be sure to stir thoroughly to ensure the components are fully combined.
Apply the Epoxy: Once mixed, apply the epoxy consolidant to the damaged area using a spatula, brush, or other tools. Spread it evenly and make sure the epoxy fills any cracks or gaps that need repair.
Curing Time: Allow the epoxy to cure for the recommended amount of time. Dura-Fix is formulated to cure even in colder conditions, but you should still allow it enough time to fully set and harden.
Check the Bond: Once the epoxy has fully cured, check the bond for strength. You’ll find that it has formed a tough, durable seal that will last for years.
When it comes to cold weather repairs, the Dura-Fix Cold Weather Epoxy Consolidant from NXTGen Systems is an essential tool in any repair toolkit. With its ability to bond effectively in low temperatures, its superior durability, and its versatility across various materials, it ensures that repairs are completed to the highest standard—no matter the weather. Don’t let the cold stop you from getting the job done. Trust Dura-Fix to provide the strength and reliability you need in your cold-weather projects.
0 notes
Text
How to Repair a Damaged Resin Tabletop at Home?

Beautiful resin table tops look very glamorous and are also very hard-wearing. However, over time it might develop some scratches or chips or even stain the table and the chairs. Even fixing them at home is simple and could rejuvenate your tabletop. Below is the step-by-step guide on how to repair a damaged resin table top.
1. Gather Your Supplies
Before you start with it, ensure that you have all the tools you are going to need. You will need:
Floor finish (400, 800 and 1200 abrasive paper)
- A soft cloth
- Highs rubbing alcohol, mild cleaner
- Epoxy resin repair kit
Mixing stick and a small container
- Protective gloves
2. Clean the Tabletop
First, clean the table. Wipe it with a very soft material using either diluted rubbing alcohol or a mild soap solution. Cleaning should now take place to remove dust, dirt or oil from the whole surface. Let it dry completely. The substrate surface has to be clean so that the repair materials will adhere well to the surface.
3. Sand the Damaged Area
When your table has scratches or scuffs for instance after a long use, sanding assists. When buffing your surface start with the 400-grit sandpaper. If you have a scratched surface, then use the ceramic-formed article and rotate it gently on the scratched area. Take caution that you do not sand too hard. Subsequently, replace the sandpaper with 800 grit for a smoother feel. Use 1200-grit to level off the work area.
4. Mix the Epoxy Resin
For any additional chippings or indentations, then epoxy resin repair kit should be used. Read the guidelines that come with the kit. In most cases, you will combine two parts to make the resin, and the most common types of systems use epoxy resins. Mix a small quantity of the resin and the hardener in a cup.
5. Apply the Resin
After that, mix it with resin, then with the stick spread the mixture on the affected place. Make sure you leave out the part that has been affected only. If you so overdo it, it may end up getting messy and creating a mess all over again. Level this off to be flat with the tabletop so no droppings of the resin are present.
6. Let It Cure
Now what you have to do is to let the resin set or dry up it is also referred to as curing. He stated most of the resin kits require about 24 hours to dry completely before other work can be done on them. Sit the table somewhere safe so it would not get tampered with. It is also important to ensure that there is no way dust or dirt can fall on the wet resin.
7. Use Sand again for a smooth finish
Once the resin is thoroughly cross-linked, the modified surface may feel slightly abrasive. To further smoothen the area you should follow by sanding it using 1200-grit sandpaper. It will allow it to fit properly within the rest of the tabletop and not look out of place.
8. Polish the Tabletop
Finish of a shiny look can be achieved by polishing the entire tabletop. The contact points should include using a resin-safe polish or a soft cloth in the progression. This will give your table a new look and also bring a layer of protection onto it.
Final Words
It is easy to repair resin table tops at home. It is easy to give it a new look depending on the extent of the damage done, by using a few simple tools. Follow the above mentioned steps to repair your resin table tops at home.
Also Read: Tips from Your Favorite Sydney Hospitality Furniture Pros: A Go-to Guide for Cleaning & Maintaining Your Pub or Club Furniture
0 notes
Text
How Epoxy Flooring Manufacturers Ensure Quality Standards
Epoxy flooring manufacturers prioritize strict quality standards to meet the demands of diverse applications in commercial, industrial, and residential settings. High-quality epoxy floors are valued for their durability, resistance to chemicals, seamless finish, and low maintenance, making quality assurance a critical focus for these manufacturers.
A primary way that epoxy flooring manufacturers ensure quality is through rigorous testing of raw materials. By selecting top-grade resins, hardeners, and additives, manufacturers maintain consistency in their products, providing customers with long-lasting and reliable flooring solutions. Many epoxy floor coating manufacturers adhere to ISO (International Organization for Standardization) certifications, which outline global standards for quality management. Adherence to these certifications ensures that products meet both national and international safety and quality benchmarks.
Additionally, manufacturers implement meticulous quality control processes during production. Advanced equipment monitors temperature, curing times, and mix ratios to maintain uniformity across batches. Many leading manufacturers use cutting-edge technology, such as automated mixing and dispensing systems, to reduce human error, enhance precision, and improve product consistency. This careful attention to production quality not only prevents defects but also ensures that the epoxy flooring performs as promised.
Leading epoxy resin manufacturers in India, a major hub for epoxy production, also integrate sustainability into their quality standards. For example, several Indian manufacturers source eco-friendly materials and use sustainable practices to minimize environmental impact. By choosing green-certified resins and low-VOC (volatile organic compound) formulas, they cater to a growing demand for environmentally responsible flooring options, all while ensuring product integrity and longevity.

Once products are manufactured, epoxy floor coating manufacturers conduct performance testing, including adhesion tests, chemical resistance tests, and abrasion resistance evaluations, to ensure that each coating meets required durability standards. Some manufacturers simulate real-world conditions to assess how the epoxy will perform under heavy machinery, high foot traffic, or exposure to chemicals and temperature fluctuations. This comprehensive testing process guarantees that the final product can withstand the intended environment and maintain its quality over time.
Finally, customer support and feedback loops play a key role in maintaining quality standards. Many manufacturers work closely with installers and end-users, gathering insights to improve their formulas and address any issues in real-time. This feedback loop allows manufacturers to refine their products and uphold consistent quality across every batch.
When it comes to quality assurance, MB Enterprises is one of the leading epoxy flooring manufacturers that provides industry standards, offering top-quality, durable epoxy floor coatings that meet the demands of diverse applications. With a strong commitment to quality and customer satisfaction, MB Enterprises is a reliable choice for all your epoxy flooring needs.
#resin manufacturers#epoxy flooring manufacturers#epoxy floor coating manufacturers#epoxy resin manufacturers
0 notes
Text
Revetement Sol Garage
Guide to Choosing the Best Revetement de Sol pour Garage in 2024

Why Choose a Revetement de Sol for Your Garage?
In many homes, the garage has evolved into a multipurpose area rather than just a place to keep cars. Whether you use it as a workshop, storage space, or even a gym, a high-quality garage floor covering can greatly improve both beauty and functionality. The proper flooring offers:
Protection against oil spills, chemical stains, and heavy impacts.
Improved aesthetics for a clean and modern look.
Enhanced durability for areas with heavy traffic and weight.
Easy maintenance, saving time and effort in cleaning.
Types of Garage Flooring Options
When selecting a Revetement de sol for your garage, the type of material you choose is crucial. Let’s take a look at some of the most popular options in 2024:
1. Epoxy Flooring
Epoxy flooring is a popular choice due to its durability and seamless look. It’s made by applying a mix of resin and hardener onto a concrete base, Revetement Sol Garage
forming a robust layer.
Pros: Highly resistant to stains, moisture, and chemicals; long-lasting; customizable with color options and finishes.
Cons: Requires precise installation; surface prep is essential for adhesion; can be slippery when wet.
Ideal for: Homeowners looking for a professional, polished appearance and minimal upkeep.
2. Polyurethane Coating
Polyurethane flooring offers similar benefits to epoxy but tends to be more flexible, which allows for minor movements in the concrete beneath it.
Pros: High resistance to UV rays; maintains color without yellowing; more impact-resistant than epoxy.
Cons: Higher cost than epoxy; needs to be reapplied over time.
Ideal for: Garages exposed to sunlight, as it retains its color well and withstands fading.
3. Garage Floor Tiles
A flexible and simple way to improve garage flooring is with garage floor tiles. These tiles can be installed as separate pieces or in interlocking forms like rubber or PVC.
Pros: Easy DIY installation; customizable patterns and colors; resistant to oils, stains, and moisture.
Cons: Slightly pricier for high-quality options; not as seamless as coatings; needs regular cleaning to avoid dirt buildup in seams.
Ideal for: Homeowners looking for a DIY-friendly flooring with customizable patterns.
4. Concrete Sealer
A concrete sealer is an inexpensive solution to preserve your garage floor without significantly altering its appearance. A protective layer is created by these coatings penetrating the concrete surface.
Pros: Affordable; enhances resistance to moisture and stains; relatively easy to apply.
Cons: Not as durable as epoxy or polyurethane; requires reapplication every few years.
Ideal for: Those who want basic protection without changing the appearance of their existing concrete floor.
5. Polished Concrete
Polished concrete is an increasingly popular choice for garage flooring because it gives a sleek, modern look while being durable.
Pros: Low-maintenance; highly durable; reflects light well, brightening the space.
Cons: Costly; requires professional installation; limited customization.
Ideal for: Those looking for a high-end, Revetement Sol Garage industrial look with minimal upkeep.
Key Considerations When Choosing a Garage Floor Coating
Before making your decision, Revetement Sol Garage here are some essential factors to consider:
Durability: Consider how much traffic your garage gets, as well as exposure to chemicals and heavy equipment.
Appearance: Color, gloss, and finish can significantly impact your garage’s appearance.
Installation: Compared to epoxy or polyurethane coatings, which may need expert assistance, some flooring solutions, such as interlocking tiles, are simpler to install.
Maintenance: If you prefer a low-maintenance solution, opt for polished concrete or epoxy.
Budget: Flooring costs vary widely, Revetement Sol Garage so decide on a budget that meets your requirements for durability and aesthetics.
Steps to Install Your Garage Flooring
Each type of Revetement de sol for a garage has different installation methods, but here’s a general overview:
Prepare the Surface: Start with a concrete surface that is clean and level. Sanding and acid washing are frequently required to guarantee adherence for coatings like epoxy.
Choose Your Flooring: Once the floor is ready, pick the product and color that best fits your needs.
Apply or Lay: For coatings, apply the product with a roller or squeegee. For tiles, interlock them piece by piece.
Curing Time: Allow adequate curing time, particularly for coatings, which may take up to 48 hours to fully set.
Final Touches: Apply any further touches, such anti-slip coatings, or check that the tiles are laid uniformly.
Maintenance Tips for Garage Flooring
Keeping your garage floor in top shape requires consistent care, regardless of the flooring type:
Regular Cleaning: Sweep and mop as needed to avoid dirt buildup.
Stain Removal: Clean oil or chemical spills immediately to prevent staining.
Inspect for Damage: Look for cracks, Revetement Sol Garage peeling, or loose tiles and address them promptly.
Reapply Coatings: For optimal protection, schedule reapplications of sealers or coatings every few years.
Popular Garage Flooring Trends in 2024
Eco-Friendly Materials: Many homeowners are choosing low-VOC and environmentally-friendly flooring products.
Decorative Epoxy: Decorative epoxy coatings with metallic or quartz finishes are becoming increasingly popular.
Textured Surfaces: Anti-slip coatings or textured tiles are ideal for preventing slips, especially in high-moisture environments.
LED Lighting Integration: Some garages are installing LED lighting around the flooring edge to improve the aesthetics and give them a sleek, contemporary look.
Conclusion: Choosing the Right Garage Flooring
Cost, durability, and Revetement Sol Garage aesthetics must all be considered when selecting the best Revetement de sol for garage. Tiles offer flexibility and convenience of installation, while epoxy and polyurethane finishes give smooth, long-lasting alternatives. Revetement Sol Garage will keep your floor looking brand new for many years with routine upkeep, including washing and reapplying sealers or coatings on a regular basis.
Investing in high-quality flooring will turn your garage into a useful, aesthetically pleasing, and long-lasting area, regardless of your preference for a polished concrete look or a more affordable sealant.
Article Source :- https://medium.com/@morefloor12/revetement-sol-garage-e98b43ed5fd5
0 notes
Text
Enhance Your Tile Surfaces with Epoxy Solutions from Durofill

With its cutting-edge epoxy materials, Durofill raises the standard for tile joint solutions. Durofill offers the ideal option whether you want to guarantee longevity and ease of maintenance or improve the visual attractiveness of your flooring. Let's examine Durofill epoxy's product line and how it might improve your tile work.
Durofill Glass Epoxy: An Innovative Approach Glass Epoxy: What is it? Glass epoxy is a resin-based substance that produces a smooth, glossy surface. With a transparent or tinted joint that blends in perfectly with the tiles, it offers a strong and water-resistant adhesive while improving the tile's beauty. This solution is regarded for being aesthetically pleasing, long-lasting, and low maintenance, which makes it appropriate for both residential and busy commercial spaces. Glass Epoxy's advantages Radiant Glossiness for Effortless Elegance: The high-gloss finish produces a vivid and sophisticated appearance by elegantly reflecting light. Stain-Free, brilliant Brilliance: Preserves a stain-free, brilliant finish that is as good as new for many years. Durable Sturdiness for Effortless Style: Offers durable stability, guaranteeing that your tile joints stay lovely and intact even in high-traffic areas. Dust-Defying Cleanliness: Your tiles will remain cleaner for longer because of the smooth, non-porous surface's ability to repel dust and grime. Easy-to-use Implementation in Just Twelve Hours: The application process is simple and fast, enabling you to get expert results in as little as 12 hours.
GL-250 Durofill Epoxy: A Combination of Durability and Shine Designed as an epoxy tile joint filler, Durofill Epoxy GL-250 offers a gorgeous high-gloss surface along with remarkable durability. Anyone may easily apply this product, which is ideal for creating floors that are glossy and long-lasting. Durofill Epoxy Gel: Unmatched Durability and Shine Presenting Durofill Epoxy Gel, the ideal way to give your tile walls and floors a glossy, glass-like appearance. Your place will be transformed into a faultless and sophisticated environment with this product's unmatched brilliance and durability.
How to Apply Durofill Epoxy Gel
Preparation: Gather all necessary materials, including the Durofill Epoxy Gel resin kit, which contains essential components such as resin, hardener, scraper blades, cutting blades, measuring spoons, gloves, stirring stick, and a wide range of pigments for customization.
Color Selection: Explore the variety of metallic and plain color pigments to find the perfect hue for your space.
Mix Resin and Hardener: Follow the recommended mixing ratio of 2:1 for resin and hardener. Combine two measuring spoons of resin with one measuring spoon of hardener and blend thoroughly.
Add Pigments: Add four to five drops of your chosen color pigment and mix vigorously for 2 to 3 minutes to ensure even distribution.
Application: Use a scraper blade to apply the Durofill Epoxy Gel onto the tile joints. Allow the gel to rest for 20 minutes, then wipe the joints using a stirring stick to prevent sagging and remove excess epoxy.
Drying Period: Allow the applied gel to dry for a minimum of 24 hours to cure and harden.
Final Touches: Use a cutting blade to carefully peel off any excess epoxy gel, revealing the gleaming, glass-like finish beneath. In conclusion A variety of advantages provided by Durofill epoxy solutions, such as Durofill Glass Epoxy, Durofill Epoxy GL-250, and Durofill Epoxy Gel, raise the level of sophistication and elegance of your tile surfaces. These products are essential for every tiling project because of their brilliant glossiness, stain-resistant brilliance, durability, dust-resistant cleanliness, and ease of application. With Durofill Epoxy Gel and Durofill Glass Bond Epoxy, you can transform your tile walls and floors and take advantage of its long-lasting beauty and low care requirements. To discover the revolutionary potential of Durofill, stop by the closest retail tile store in Kerala.
#epoxy tile joint filler#glass bond epoxy#glass epoxy#benefits of glass epoxy#epoxy for floor tiles#glass epoxy for tiles#what is glass epoxy
0 notes
Text
The Role of Table Top Epoxy in Furniture Restoration
Table Top Epoxy has emerged as a revolutionary material in the world of furniture restoration, offering an innovative solution for reviving worn-out or damaged pieces. This high-performance epoxy resin is not only durable but also provides a beautiful, glossy finish that can transform any furniture item into a stunning centerpiece.
One of the most significant advantages of using table top epoxy in furniture restoration is its versatility. Whether you’re working with wood, metal, or other materials, epoxy can effectively bond and seal surfaces, filling in cracks and imperfections to create a smooth, uniform finish. This capability is particularly beneficial for restoring antique or vintage furniture, where maintaining the piece's original charm while enhancing its functionality is crucial.

When selecting materials for restoration, it’s essential to choose the best table top epoxy available. High-quality epoxy resins are designed to withstand wear and tear, making them ideal for surfaces that will be used frequently, such as dining tables and coffee tables. The epoxy table top resin offers excellent adhesion, chemical resistance, and UV stability, ensuring that your restored furniture looks great and lasts for years.
The process of using table top epoxy for restoration typically involves cleaning the surface, preparing the epoxy mixture, and applying it to the furniture piece. After mixing the resin and hardener according to the manufacturer's instructions, the mixture is poured over the surface to fill gaps, cracks, or voids. The resulting layer creates a durable and water-resistant finish that enhances the aesthetic appeal of the furniture.
For those looking to dive into furniture restoration, understanding how to buy epoxy resin is crucial. Numerous suppliers offer high-quality epoxy resins specifically designed for table tops and restoration projects. Always read reviews and seek recommendations to ensure you choose a product that meets your needs.
Additionally, incorporating colors, dyes, or even embedded materials like wood or metallic elements can further personalize your restoration project. The end result is not just a functional piece of furniture but a work of art that reflects your style and creativity.
For all your furniture restoration needs, consider using MB Epoxy. With premium products designed for durability and beauty, MB Epoxy provides the perfect solution for restoring your furniture to its former glory. Explore their range today and start your restoration journey with confidence!
0 notes
Text
How to Choose the Best Glue for Marble Stone: A Comprehensive Guide
Marble stone is synonymous with elegance, luxury, and timeless beauty. It's a popular choice for countertops, flooring, wall cladding, sculptures, and decorative elements.
However, marble is also a delicate and porous material, prone to chipping, cracking, and breaking. When dealing with these issues or installing new marble pieces, it's crucial to use the right adhesive to ensure a strong, lasting bond without damaging the stone.
In this guide, we’ll explore the types of glue that work best for marble, how to choose the right one for your project, and essential tips for application.
Why You Need Special Glue for Marble Stone
Marble is a natural stone, and its physical properties require specific adhesives. Here are the reasons why you need specialized glue for marble stone:
Porosity: Marble is porous, which means it can absorb liquids, including adhesives. Using the wrong glue can lead to staining or weakening of the stone.
Sensitivity to Chemicals: Marble reacts negatively to acids and certain chemicals, causing discoloration or etching. The glue used must be chemically neutral and free from substances that could damage the stone.
Weight: Marble is often heavy, and the glue needs to offer significant bonding strength, especially for vertical applications like wall cladding.
Temperature Sensitivity: Marble expands and contracts with temperature changes. An adhesive that remains flexible and can accommodate these movements is ideal for long-term durability.
Aesthetic Considerations: Since marble is a decorative material, the glue should dry clear or be color-matched to blend in with the stone, ensuring a seamless finish.
Types of Glue for Marble Stone
There are several adhesives suitable for marble, each with different properties. The most common types include epoxy, polyester resin, construction adhesive, and silicone.
1. Epoxy Adhesives
Epoxy is one of the most reliable glues for marble stone. It consists of two components—resin and hardener—that are mixed before application. Once cured, epoxy forms a strong, durable, and water-resistant bond, making it ideal for both indoor and outdoor marble installations.
Pros:
Excellent bonding strength
Resistant to water, chemicals, and high temperatures
Can be color-matched to the marble
Suitable for large slabs and heavy pieces
Best Uses: Epoxy is ideal for countertops, flooring, and outdoor installations, where moisture and temperature changes are factors. It is also great for repairing cracks or chips in marble.
2. Polyester Resin Adhesives
Polyester resin is another popular adhesive for marble, especially for minor repairs or filling gaps between marble pieces. This adhesive dries quickly and can be sanded and polished to achieve a smooth finish. It’s often used in professional stone fabrication shops for seam filling or patching small cracks.
Pros:
Fast drying and easy to work with
Can be polished for a seamless appearance
Ideal for smaller repairs and gap filling
Best Uses: Polyester resin is great for minor repairs, such as filling small cracks, chips, or seams in marble countertops or floors.
3. Construction Adhesive
For large-scale marble installations, such as wall cladding or flooring, construction adhesive is a reliable option. It’s designed to bond heavy materials like marble and stone to a variety of surfaces, including concrete, drywall, and metal.
Pros:
Strong hold for heavy materials
Easy application with a caulking gun
Suitable for vertical installations
Best Uses: Construction adhesive is ideal for installing marble tiles, wall panels, and other large pieces where a strong bond is required to support the stone’s weight.
4. Silicone Adhesive
Silicone adhesives are flexible and water-resistant, making them an excellent choice for marble installations in wet areas like bathrooms or kitchens. Silicone is typically used for sealing edges or bonding in areas exposed to moisture.
Pros:
Flexible and accommodates temperature changes
Resistant to water and mold
Easy to apply and clean
Best Uses: Silicone adhesive is great for sealing around sinks, bathtubs, and backsplashes where marble is used. It’s also a good choice for exterior installations exposed to moisture.
How to Choose the Right Glue for Your Marble Project
Choosing the right adhesive depends on the nature of your project, the location, and the specific needs of the marble installation. Here are a few key factors to consider:
Type of Project: For large-scale installations like countertops, flooring, or wall panels, opt for a strong adhesive like epoxy or construction adhesive. For minor repairs, polyester resin or silicone is typically sufficient.
Location: If the marble will be installed in a wet or outdoor area, choose a water-resistant adhesive such as epoxy or silicone. For indoor installations in dry environments, polyester resin or construction adhesive may work well.
Aesthetic Considerations: If the adhesive will be visible, choose one that can be color-matched to the marble, such as epoxy or polyester resin. For hidden joints or seams, this may be less of a concern.
Temperature and Flexibility: If the marble will be exposed to temperature changes, opt for an adhesive that remains flexible, such as silicone, to accommodate expansion and contraction of the stone.
Best Practices for Applying Glue to Marble Stone
To ensure a strong bond and a successful installation, follow these best practices when working with marble and adhesive:
Clean the Surface: Before applying glue, clean the marble surface to remove dust, grease, or debris. A clean surface ensures better adhesion.
Use the Right Tools: For large applications, use a notched trowel to spread the adhesive evenly. For smaller repairs, a spatula or syringe may be more appropriate.
Apply Even Pressure: After placing the marble, apply even pressure to ensure the adhesive spreads evenly and bonds securely. You may need to clamp the pieces in place while the adhesive cures.
Follow the Manufacturer’s Instructions: Each adhesive type has specific instructions for mixing, application, and curing. Follow these instructions closely to achieve the best results.
Allow Adequate Curing Time: Don’t rush the curing process. Give the adhesive enough time to fully set before putting weight or pressure on the marble.
Conclusion
Choosing the right glue for marble stone is essential for ensuring a strong, long-lasting bond and preserving the stone’s natural beauty.
Whether you’re repairing a crack, filling a seam, or installing marble in your home, selecting the appropriate adhesive based on the project’s requirements will result in a durable and professional finish.
With the right glue and proper application techniques, your marble installations will remain beautiful and sturdy for years to come.
0 notes
Text
Epoxy Grouting Material

Epoxy grouting is a popular choice for tile work in wet areas like bathrooms, kitchens, swimming pools, and commercial spaces due to its water-proof properties, durability, and resistance to chemicals, making it a preferred choice for long-lasting tile installation.
Why Choose Epoxy Grout Over Cement-Based Grout?
Epoxy grout has several advantages over the cement-based conventional grout. Specifically, it finds its applications in places exposed to water, chemical environment, and also high traffic floors.
1. Waterproof Properties Epoxy grout, a non-absorbing mixture of epoxy resins and filler powder, provides a watertight seal, making it ideal for wet and damp areas like bathrooms and swimming pools, preventing mold and mildew growth.
2. Hardiness and Strength Epoxy grout is much stronger compared to cement grout. It resists cracking and shrinking much more, thus has a longer working life, even in high-traffic or moisture-rich locations. The material also resists cleaning chemicals and acids, hence versatile and commercially viable for application in commercial kitchens and other industrial uses.
3. Mold and Mildew Resisting Since epoxy grout is sealed and non-porous, it could never become a haven for mold and mildew growth, which often occurs when most places are wet and moist very frequently. This makes it even more sanitary while at the same time minimizing recurrent cleaning and upkeep by the homeowner and contractor.
How to Apply Epoxy Grouting Material?
Although epoxy grout offers the best possible benefits, applying it is very meticulous. It is much more unlike the traditional grout applied on a surface that requires good skills and responsibility in its application.
1. Preparing the Area Before applying epoxy grout, the installing correct tiles, clean the inter-tile gaps of debris. Water, dust, and dirt may reduce adhesion, alongside reducing the effect of epoxy grout.
2. Preparation of Epoxy Grout Epoxy grout is supplied with epoxy resin and a hardener. These have to be mixed in good condition only before these are applied. Mix the material with a slow speed drill attached with the paddle till the mixture becomes smooth. Be cautious with the working time of epoxy grout as it cures quite fast.
3. Application Procedure For filling the joint: mix the grout, then spread it at a 45-degree angle with a rubber float in the joints. Once all the gaps are full, then use a damp sponge to wipe off any excess grout off the tile's surface. Something to note about epoxy grout: they tend to haze on tiles if not cleaned soon after placing. Cleaning must be done within the first 15-30 minutes before it hardens.
4. Final Cleaning and Curing Post the first clean rinse, the final rinse will be done using clean water to flush out all the grout, if left behind. Epoxy grout usually cures in 24 to 48 hours, depending on temperature and humidity. Once cured, it becomes waterproof, extremely strong, and chemical resistant.
Applications of Epoxy Grout in Wet Rooms
1. Bathroom and Showers One of the best places to apply epoxy grout is in the bathroom. That is because it does not allow water penetration, and the effects of seepage into the wall or sub-flooring, thus preventing mold and structural damages.
This can also hold up very well in bathing areas with various exposures to soaps, shampoos, and cleaning agents.
2. Swimming pools and Spas Epoxy grout is very suitable for pools and spas because it exhibits moderate resistance to water, chlorine, and other chemical agents. Its surface will not encourage the presence of bacteria and other microorganisms that could infect such a structure yet keep its appearance constant in the long run.
3. Kitchen and Food Preparation Areas It resists heat, grease, and most chemical cleaners present in the kitchen. Its strength also means that it is not easily going to allow grout lines to break away in commercial kitchens, which have far stricter hygiene and safety standards.
Frequently Asked Questions
1. Is epoxy grout suitable for exterior application? Epoxy grout is highly resistant to adverse weather conditions as well as UV rays. For these reasons, it is an excellent choice for outdoor patios, pool decks, or any other type of exterior application.
2. How long does epoxy grout last? Grout epoxy has been marketed to be one of the most durable and long-lasting products with about 50 years of lifespan given proper care and maintenance, hence is an investment for a long while.
3. Can I apply epoxy grout with all types of tiles? Epoxy grouts are suitable for most tile material types, such as ceramic, porcelain, and natural stone. However, make sure to refer to the manufacturer's recommendations with respect to compatibility with certain tile types.
4. How do I care for epoxy grout? There isn't much maintenance required to keep epoxy grout looking fresh. General cleaning using mild detergents and water usually suffice. Avoid using abrasive cleaners though. They may destroy the tile surface, but the grout will be safe.
5. Is epoxy grout more expensive than cement grout? Yes, the epoxy grout is much costlier than the cement-based grout, however for better properties, in the long run, durability and low maintenance makes it payable.
Conclusion
Epoxy grouting material is a top choice for wet areas due to its waterproofing, service life, and resistance to chemical and mold. It is ideal for bathroom re-design, pool installation, and commercial kitchen design. Although more expertise is needed for installation, the ability to overcome difficulties makes it a wise investment for areas with high moisture content.
0 notes
Text
Top 5 Reasons to Hire a Professional Epoxy Flooring Contractor in Atlanta, GA
Epoxy flooring has become a popular choice for both residential and commercial properties in Atlanta, GA, due to its durability, aesthetic appeal, and ease of maintenance. Whether you’re looking to upgrade your garage, showroom, or industrial space, epoxy flooring can transform any area into a sleek, functional, and long-lasting surface. However, to fully enjoy the benefits of epoxy flooring, it’s crucial to hire a professional contractor. Here are the top five reasons why you should consider hiring a professional epoxy flooring contractor in Atlanta, GA.

1. Expertise and Experience
One of the most compelling reasons to hire a professional epoxy flooring contractor is their expertise and experience in the field. Epoxy flooring installation is a specialized process that requires in-depth knowledge of the materials, surface preparation, and application techniques. Professional contractors in Atlanta have the experience to handle a variety of flooring conditions and can anticipate potential challenges that may arise during the installation process.
A seasoned contractor will know how to properly prepare the surface, mix the epoxy resin and hardener in the correct proportions, and apply the coating evenly to achieve a smooth, durable finish. Their expertise ensures that the epoxy adheres properly to the substrate, preventing common issues like peeling, bubbling, or uneven surfaces. With a professional on the job, you can be confident that your flooring project will be completed to the highest standards.
2. Access to High-Quality Materials
Another significant advantage of hiring a professional epoxy flooring contractor is access to high-quality materials. While DIY epoxy kits are available, they often lack the durability and longevity of professional-grade products. Professional contractors in Atlanta source their materials from reputable suppliers, ensuring that the epoxy used for your flooring is of the highest quality.
High-quality epoxy materials offer better resistance to wear, chemicals, and moisture, making them ideal for high-traffic areas and industrial environments. Additionally, professional contractors can recommend the best products for your specific needs, whether you require a standard epoxy coating, a decorative finish with metallic pigments, or a slip-resistant surface. The result is a floor that not only looks great but also stands up to the demands of your space.
3. Proper Surface Preparation
Proper surface preparation is critical to the success of an epoxy flooring installation. Without adequate preparation, the epoxy may not bond correctly to the substrate, leading to premature failure. Professional epoxy flooring contractors understand the importance of this step and have the tools and skills necessary to prepare the surface thoroughly.
Surface preparation typically involves cleaning the existing floor to remove dirt, grease, and other contaminants, repairing any cracks or imperfections, and grinding or shot blasting the surface to create the ideal texture for epoxy adhesion. A professional contractor will ensure that every aspect of the preparation process is completed meticulously, providing a solid foundation for the epoxy coating. This attention to detail helps extend the life of your floor and ensures a flawless finish.
4. Time and Cost Efficiency
While it may seem cost-effective to tackle an epoxy flooring project on your own, the reality is that hiring a professional contractor can save you both time and money in the long run. Epoxy flooring installation requires a significant investment of time, especially if you’re unfamiliar with the process. Mistakes made during a DIY installation can lead to costly repairs or even the need to start over, negating any initial savings.
Professional contractors in Atlanta have the experience and equipment to complete the job efficiently, minimizing downtime and disruption to your home or business. They also have access to bulk purchasing discounts on materials, which can help offset the cost of their services. By hiring a professional, you can avoid the hassle and expense of potential mistakes and ensure that your epoxy flooring is installed correctly the first time.
5. Warranty and Peace of Mind
One of the most important benefits of hiring a professional epoxy flooring contractor is the warranty and peace of mind they provide. Reputable contractors in Atlanta stand behind their work and offer warranties on both the materials and labor. This means that if any issues arise after the installation, such as peeling, cracking, or bubbling, the contractor will address the problem at no additional cost to you.
A warranty offers protection and reassurance that your investment is safeguarded. Additionally, knowing that your flooring was installed by a professional gives you peace of mind, as you can trust that the job was done correctly and to the highest standards. This security is invaluable, particularly for commercial properties where flooring issues can lead to costly disruptions.
Conclusion
Hiring a professional epoxy flooring contractor in Atlanta, GA, is a wise decision that offers numerous benefits, including expertise, access to high-quality materials, proper surface preparation, time and cost efficiency, and the reassurance of a warranty. By choosing a professional, you can ensure that your epoxy flooring project is completed to the highest standards, resulting in a durable, attractive, and long-lasting surface that enhances your space. Whether you’re upgrading a residential garage or a commercial facility, a professional contractor will deliver the best results, providing value and peace of mind for years to come.
0 notes
Text
Epoxy Wood Crack Filler: The Ultimate Solution for Your Wood Repairs
When it comes to repairing damaged wood, finding the right product is crucial. Epoxy wood crack filler is an exceptional choice for homeowners and professionals alike. This type of filler is designed to penetrate and bond with the wood, effectively sealing cracks and gaps. Unlike traditional wood fillers, epoxy formulas provide enhanced durability and resistance against moisture, making them ideal for various applications.

Why Choose Epoxy Wood Crack Filler?
Using epoxy wood crack fillers offers several advantages over conventional fillers. Here’s why it should be your go-to option:
Strong Bonding: Epoxy adheres exceptionally well to wood surfaces, ensuring a solid repair that lasts. This strong bonding capability makes it perfect for structural repairs.
Moisture Resistance: Unlike many fillers, epoxy resists moisture, which helps prevent further damage. This property is especially beneficial in areas exposed to humidity or water, such as kitchens and bathrooms.
Versatile Application: Whether you’re working on furniture, flooring, or decorative wood pieces, the epoxy wood crack filler is versatile enough for various projects.
Key Features of Dura-Fix Cold Weather Formula
One standout product is the Dura-Fix Cold Weather Formula from Next Generation Systems. This epoxy wood crack filler is specifically designed for use in colder conditions, making it an excellent choice for those living in colder climates. Here are some of its key features:
Quick Cure Time: The Dura-Fix formula cures quickly, allowing you to complete your projects efficiently without long wait times.
Low Shrinkage: Unlike some fillers that shrink as they dry, this epoxy maintains its volume, ensuring a perfect finish.
Easy to Sand and Paint: After curing, the surface can be easily sanded smooth and painted over, providing a seamless look.
How to Use Epoxy Wood Crack Filler
Using epoxy wood crack filler is a straightforward process, but following the right steps will ensure the best results. Here’s a simple guide:
Prepare the Surface: Clean the area around the crack thoroughly. Remove any loose debris, dust, or old filler.
Mix the Epoxy: Follow the instructions provided with your epoxy product. Typically, you will need to mix the resin and hardener in equal parts.
Apply the Filler: Using a putty knife or similar tool, apply the mixed epoxy directly into the crack. Press firmly to ensure it fills the void.
Smooth the Surface: Once applied, smooth the surface with your tool to make it level with the surrounding wood.
Cure Time: Allow the epoxy to cure according to the manufacturer’s instructions. The Dura-Fix Cold Weather Formula from Next Generation Systems is designed to cure quickly, even in lower temperatures.
Finish Up: Once cured, sand the area to achieve a smooth finish, then paint or stain as desired.
Tips for Best Results
Work in a Well-Ventilated Area: Epoxy can emit fumes, so ensure proper ventilation during application.
Test Before Use: Always test the epoxy on a small area to ensure compatibility with your specific type of wood.
Store Properly: Keep your epoxy products in a cool, dry place to extend their shelf life.
Choosing the right repair method for your wood projects can significantly impact the final outcome. Epoxy wood crack filler stands out for its strength, moisture resistance, and versatility. With products like the Dura-Fix Cold Weather Formula from Next Generation Systems, you can tackle wood repairs with confidence, knowing you have a reliable solution at hand. Whether you're a DIY enthusiast or a seasoned professional, this epoxy filler will help you achieve high-quality, lasting repairs.
0 notes