#e.g. i'm choosing to cover and finish all my seams even though they probably left raw edges on the inside back then
Explore tagged Tumblr posts
Text
How to make a 210-year-old evening gown
Step 1: Find an inspiration gown with woefully few reference photos and no photos of the back.
Step 2: Decide that you want to be able to get in and out of this dress while living alone, and convert what’s definitely supposed to be a back-closing early 1810s gown into an apron front style. Rationalize your decision with the fact that apron front gowns definitely existed in the period, even though they were falling out of fashion. Better to be a few years late than early, right?
Step 3: Find the perfect fabric, or at least as close as you can get to the vibe even though the embroidery on the border is totally ahistorical, and only get 2 yards of it from a store that only sells deadstock fabric. Rationalize this decision with the fact that regency gowns don’t take up that much fabric and the bodices are tiny, so you can probably get away with it.
Step 4: Realize after the rest of the fabric sells out that you definitely didn’t get enough because puffed sleeves take up a lot of fabric, and you barely have enough to make it all the way around the skirt hem. Panic and trawl the internet for embroidered cotton gauze in the exact same shade of off-white as your intended fabric. Somehow manage to find the same fabric but in a different colorway on Etsy and order a yard for 4 times what you paid for the 2 yards of the original fabric. It’s fine because you only really need the off-white gauze part and not the blindingly hot pink border embroidery. Leave the fabric folded up in your stash for a year while you make the underpinnings.
Step 5: Make a regency shift and short stays out of anachronistic fabrics. Rationalize this decision with the fact that no one is going to see them anyway. Then remake the short stays so the cups aren’t as flat.

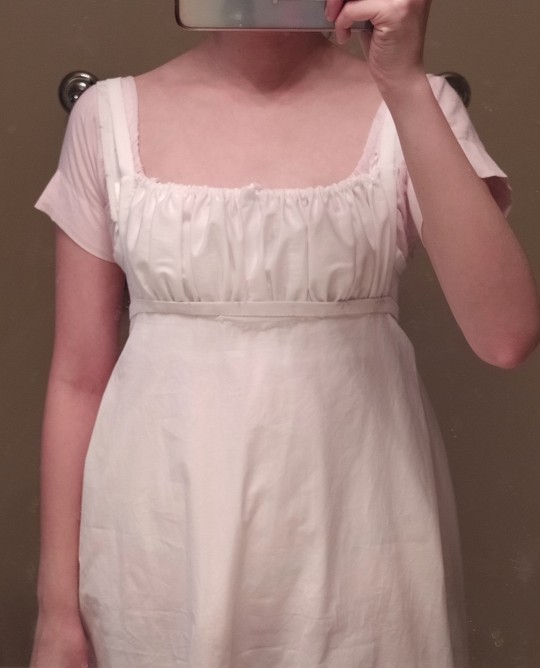
Step 6: Realize you made the top line of the short stays stick up too far so they show through anything worn over them. Make a gathered partially bodiced petticoat to hide your mistakes.

Step 7: Decide that the short stays give the wrong silhouette for the early 1810s because they position your bust too low. Do more research and find the Bernhardt stays pattern. Try it out, but don’t take into account that you have scoliosis so you scaled the pattern wrong, and use a bias tape for binding so the top edge of the stays stretches out.

Step 8: Hate the fit of your new stays. Spend the next 6 months doing some Victwardian historybounding wardrobe projects instead. But also find the time to draft a basic regency block pattern over the shitty stays.

Step 9: Suck it up and revisit the Bernhardt stays pattern. Realize that having scoliosis means the scaling up method just won’t work for you. Completely bastardize the pattern and do a gazillion handsewn mockups until you have an underbust design that you can’t post pictures of, because decency.

Step 10: Have a friend who bought an ugly shapeless sack of a dress and hated it and gave it to you. Take the dress apart and turn it into a new bodiced petticoat.

Step 11: Realize that your pink cotton voile chemise proportions are wrong for the higher bustline and make a new regency shift, this time out of linen and with way more room in the bust and shoulders and everything.

Step 12: Make the gown bodice using the bodice block you drafted months ago. Be completely shocked that it actually fits over the correct silhouette from the new stays. Then be less surprised when you realize it’s adjustable. Make a mental note that the front panels should probably slant down a little more in the future, in order to curve under the bust.

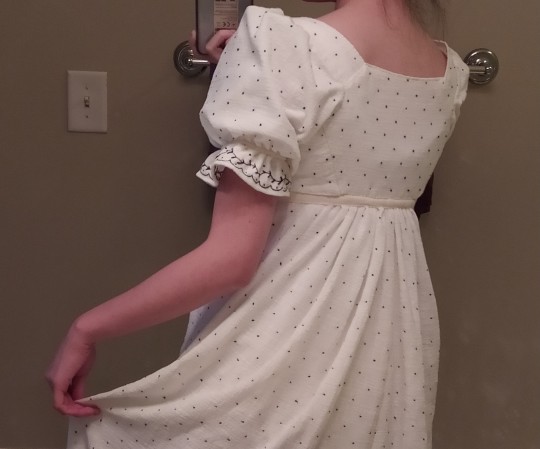
Step 13: Draft a sleeve pattern by completely winging it. Get it right on the first try. Add the sleeves to the bodice. Embroider the gown bodice, because you couldn’t find an appropriately embroidered fabric and resolved to hand-embroider it because who ever wanted to do things the easy way?

Step 14: Add drawstrings to the insides of the sleeves so you can adjust the height and puffiness of them. Cut out the skirt and line the front panel for extra structure. Have a decently good time doing colonial knots on the front skirt panel. Have a decidedly less good time trying to embroider tiny dots on the rest of the skirt, which does not have a lining backing it. Give up halfway through and sew the skirt and bodice to the cotton twill tape that will serve as the backing to the waistband.

Step 15: Take pictures because it looks pretty from the back, even though the bottom half of the skirt still needs embroidery, and you still haven’t finished the front skirt panel or the bodice front bib or the waistband.
To be continued...
#sewing#hand sewing#regency fashion#historical costuming#tricia sews (kind of)#disclaimer: there is probably nothing historically accurate about the way I constructed this gown#i only hand sew because i don't know how to use a machine#i'm not a dress historian; just a nerd#i chose to use a twill tape waistband because the extant gown doesn't look like the skirt is attached directly to the bodice#but i don't know how they constructed it because we don't get to see the back of the dress#so i'm just making things up by doing things in a way that i hope will improve the longevity of the garment#e.g. i'm choosing to cover and finish all my seams even though they probably left raw edges on the inside back then
12 notes
·
View notes