#don't like how the first one turned out but i've already redid it three times so eh
Explore tagged Tumblr posts
Text
I'll help you out! Idk what you made the original antlers with, but i'm gonna assume it was polymer clay.
The biggest thing i can suggest is to sculpt the antlers off of the Critter, with a sewing pin inside the clay. i'd suggest pins with a lil ball at the end, or ones with a little bend in them just so that they don't slip out of the clay. It gives you a base/armature for the antl3r, and also a way to attatch it without having to rely on only glue. When you're happy w your antlers, give them a test run on the position you're thinking of, make a teeny tiny lil mark where the needle sticks into the head, and then add a TINY bit of glue on them when you install them. Too much glue is gonna ruin the flocking, whicj i think you mention that you already redid (and nobody wants to have to reflock something three times)
As for the sizing, i say just try your best. Make sure that your Critter is somewhere near enough to compare the sizes to that, and also to both antlers.
As for anything polymer clay related, remember these few things (that took me too long tk learn):
• make sure you know your clay's baking temp. Not all brands have the same curing temp.
• make the base of your artpiece out of aluminum foil, at least. it cuts down on the weight and amount of clay that you use. For bigger pieces and figurines, i'd suggest also using armature wires (jewelry wire works fine, you don't need specifically "armature wire.")
• make sure that those aluminum bases are SMALLER than the size of the piece you intend to make. Even thin sheets of clay over top can add a lot to the size of your piece.
• bakable polymer clays can be softened with mineral oil. It can be added to help you knead the clay until it's workable, can help you blend uncured clays, and get rid of things like fingerprints if you find that to be an issue. I just recently learned that you can remove fingerprints w rubbing alcohol as well, but idk how it would affect those other things.
• you can cure many polymer clays several times! I use Sculpey clays, and i've made pieces that had me baking the same piece of clay over 10 times and it turned out completely fine! Just make sure that you don't burn your pieces.
• maybe test your brand on how well it handles that before commiting to using that method. i've only ever used Sculpey, so idk how Fimo or Cosclay handles that.
• you can always come back to a piece after it cures and sand it to be smooth. I've never been able to sculpt even sheres without it being lopsided, but sanding can help you get the exact shape that you need.
• combine the curing and sanding methods! If you're making cartoony/stylized pieces, building details on top of smooth surfaces makes the end look really neat.
• if you're having problems with clay pieces sticking to each other, and you don't want to blend the uncured clay, look into liquid polymer clays. Sculpey has something called "Bake and Bond," but i've used regular Liquid Sculpey to connect pieces and that works fine too.
• you can use SOME other materials alongside polymer clays to make a piece. I've seen wood and metal and glass used in pieces: ones that needed those bits baked along w the clay. just make sure that those materials can handle the temperature that your clay cures at before doing that.
• there are a lot of YT tutorials on how to get different effects for things. whatever you can't find for yourself, like say making joints for a doll or something, then try it yourself at a small scale so that you don't waste too much clay OR your main artpiece.
• don't put so much pressure on yourself to making your first clay pieces perfect. we all need practice to make things look good, and starting out means that you don't have that. just bc your first clay piece didn't come out the way you wanted doesn't mean that your tenth piece won't. Keep trying, and keep it easy as you start out with anything that you do.
i think i might have some more tips, but i can't remember them rn, so i'll come back and add if i need to. i hope any of this helped anyone. I'm trying to make art videos with some tips, my YT name is the same as here (Yo-Snap!)
Okay so the deer calico that ive gave antlers for didn't work as well as I thought so I've decided to remove them, It wasn't easy and I had to refur to just change the look completely. However this doesn't mean I haven't gave up on giving this guy antlers, it just mean that I gotta try again. I need to make sure I make the antlers too big nor too small if that makes sense. To the folks, Please feel free to give me ideas or at least tips on how I can do toy customs and restorations better. and while you add it maybe how to make better dolls in polymer clay as well? idk man, Its late at night and I feel like needing tips to get better at other stuff.
that and i felt a little guilty having to ruined the flocking.. poor thing.. i didn't mean harm..
13 notes
·
View notes
Photo
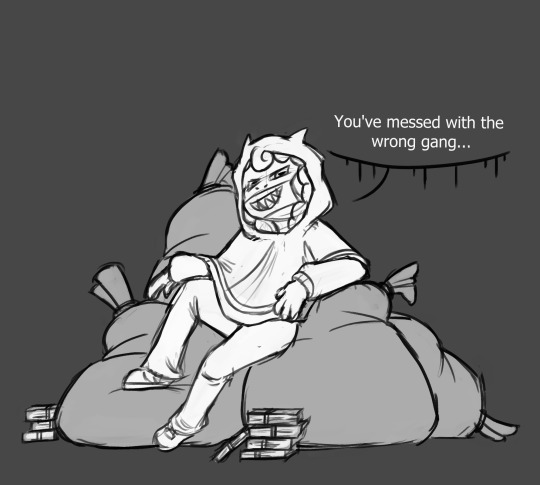
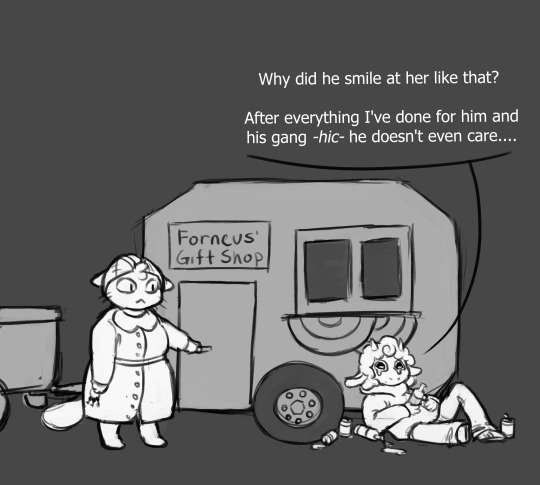
more of @cotl-flower-crown‘s g!lamb doodles because i enjoy how he’s simultaneously a feral gang leader and a pathetic wet paper towel
#cotl gang au#cotl au#cult of the lamb au#don't like how the first one turned out but i've already redid it three times so eh#tw alcohol#my shit#oh fuck wrong pronouns oops
282 notes
·
View notes
Text
#showyourprocess !
From planning to posting, share your process for making creative content!
To continue supporting content makers, this tag game is meant to show the entire process of making creative content: this can be for any creation.
RULES — When your work is tagged, show the process of its creation from planning to posting, then tag up to 5 people with a specific link to one of their creative works you’d like to see the process of. Use the tag #showyourprocess so we can find yours!
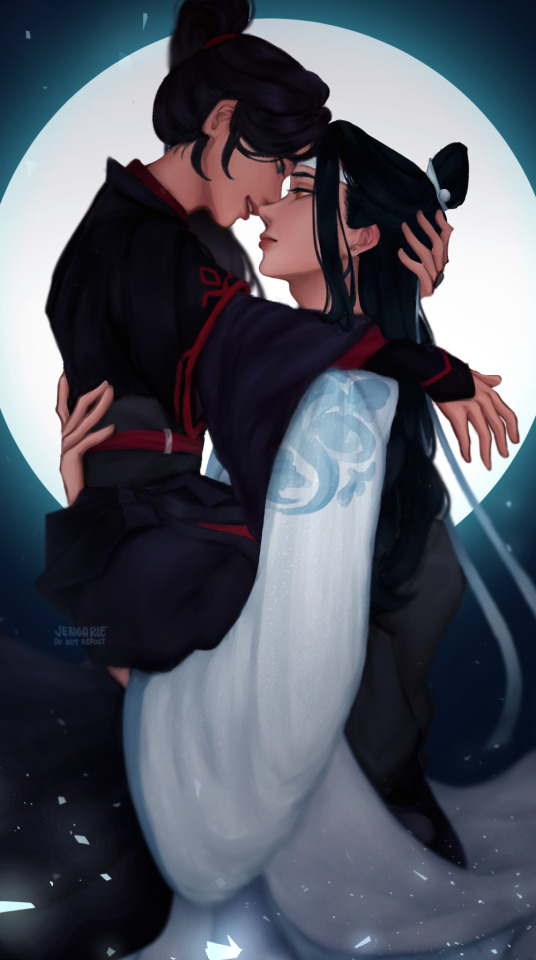
Thank you, @rinielle for tagging me! She chose the piece above (original post), and oh boy this one was a whole ass rollercoaster ride! Unfortunately, I hadn't turned on the timelapse feature for this but I'll try to go through each part of the process as best as I can!
The photos I'm gonna upload are gonna be a mix of screenshots and literal photos of my screen, because I'm taking some of them from my updates to friends, since a lot of the steps got lost in my painting process.
But before that, let me tag some other amazing creators!
@dragonji: this gif art!
@candicewright: this yibo painting!
@wendashanren: this gifset!
@mylastbraincql: this gif!
I haven't been able to keep track of who's been tagged so apologies if you've already done this! Also, no pressure to do it at all if you would rather not! <3
Planning
Sometimes, I get an idea first and find reference photos to go with that idea. But for this one, I sought out a reference photo first, and built an idea on top of it!
After that, I roughly sketch out the base pose. Usually, this looks very messy, but it doesn't really matter as long as I understand which part goes where!

The idea for the background didn't really come until the creation process because I don't think I really planned this to be a full piece.
Creation
Sketching
Honestly, from this point on, it's more of trial and error.
So, I redid the the initial base pose—made it cleaner and a little bit more detailed. See: the added definition in their arm muscles, the rearrangement of Wei Wuxian's legs, and Lan Wangji's hand on Wei Wuxian's back. If you look at the second photo, I also changed the pose a bit midway—I tend to edit as I go sometimes when I change my mind. (For this, I thought, given the Lan arm strength, it would be better to make Lan Wangji look more at ease carrying Wei Wuxian. This gets covered by the robes anyway though, so it didn't matter much in the end.)
I also started adding details to the base! I usually start with the face and then the hair! I usually go for the clothes next, but I dreaded the robes in this piece so I guess that's why I ended up with a basic idea of what I wanted for the background instead LOL I also figured out how I want the final crop to look like, so I blocked out all the other areas with an extra layer!
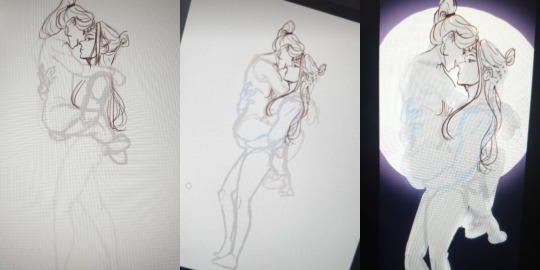
Okay, onto the part that killed me like ten times: the robes. There are a lot of interactions between their robes here given their pose, and not to mention they also have layers upon layers on each of them! So, to maintain my sanity and to keep track of which part is which, I color coded them into the most colorful sketch I've ever made.
Another reason why I filled in each layer of robe with a solid block of color, is so that all the lines underneath gets covered. Without all of the colors, the actual outline actually looks like the one on the right. What a nightmare!
I also ignored the crop again for this part, because it's always better to draw past your borders, in case you decide to rotate or tilt or whatever your piece later on. I didn't do the feet anymore though, because that I was sure wouldn't show in the final piece anymore.
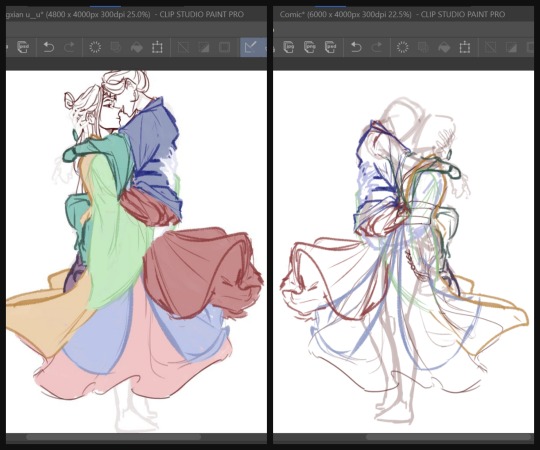
After that, I did the sketch one more time and then started adding the base colors. (I didn't have a screenshot of just the base colors, and the final CSP file is a nightmare so I copy pasted the layers into a new canvas to show you guys :') )
By the way, I drew their robes flowing this way, because I wanted it to frame the lower arch of the moon behind them for the composition. It was a little frustrating that I couldn't get Lan Wangji's robes a little higher because of Wei Wuxian's legs but I later filled in the empty space with his forehead ribbon anyway, so it all worked out in the end!
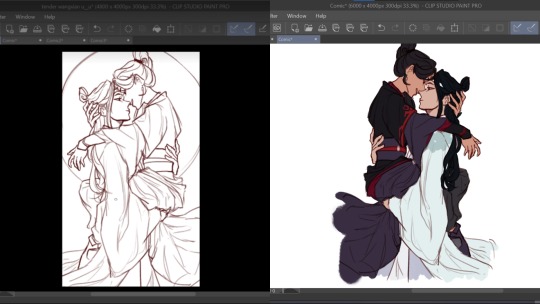
Painting
Because apparently, I was a masochist back then, I merged the base colors all into one layer and started adding shadows to the robes. (These days, I add shadows first and then, merge. It's much easier this way.)
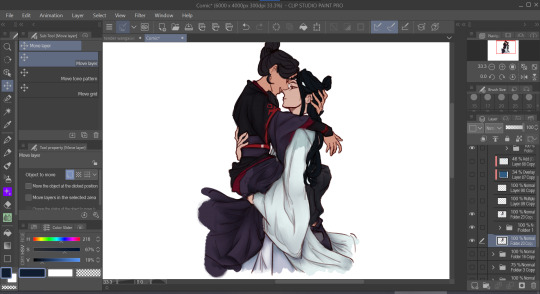
And then, I started painting! Again, I did the face first and then the hair, before finally the robes. This was my first time painting side profiles and honestly it was quite a pain to figure out LOL but !!! I think I did a good job and I'm proud of how it turned out. I again used reference photos for this one but I can't link any because they were just several random Pinterest photos that I didn't save.
Another thing to note is that I use the mesh transform tool a lot, especially on faces. That's largely why Lan Wangji's face looks so different in the latter two!
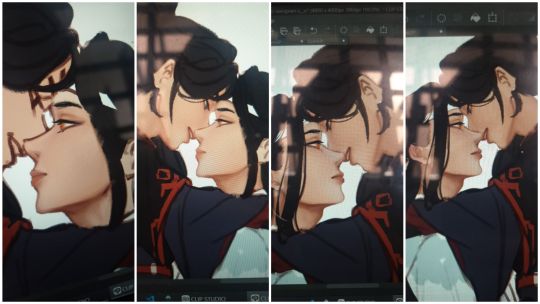
And then I went with the robes. Somewhere along the way, I realized I didn't like how I planned to do Lan Wangji's sleeves and the flowy part of Wei Wuxian's robes and I... decided, with much dread, to do them over. So I sketched on top of the painted layers and redid the robes, again.
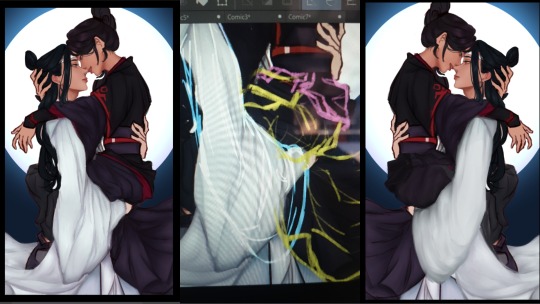
It was at this point that I decided to take a break from this piece because it was honestly very draining! I think it took about three weeks before I decided to open the file again and continue it.
When I did, I just finished painting the rest of the robes and their hands. The blue details on Lan Wangji's outer robes were painted on a separate layer that I put on Multiply. I probably did more adjustments to the face and hair and stuff, because my painting process is honestly a mess :')
Final Adjustments
I added some correction layers on certain areas to fix some of the colors. See: Lan Wangji's sleeve becoming much brighter and paler; Wei Wuxian's legs having less contrast. And then I merged all of the layers (excluding the background) and added a bit of blur. See: Wei Wuxian's ponytail; the entire lower part; the flowing forehead ribbon. My reasoning for this is so that most of the detail (and therefore the flow of the eye) goes to their faces and expressions!
And then, I put a blue Overlay layer on low opacity to make Wangxian blend better with the background, added a bit of shadow on the inside and the lower sections and added the glowing details for the added flair. I initially wanted sparkles and/or stars but they didn't turn out as well as this did. I also upped the contrast by a little for the entire piece!
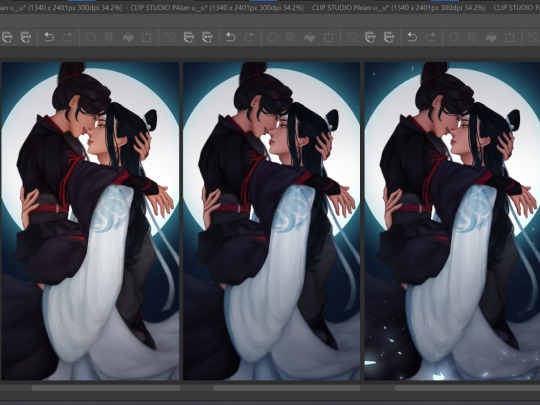
Aaaand, that's it! In truth, I did a bit more color adjustments to the whole piece, but I was a dummy who forgot to turn them back on before posting so ... oh well.
Posting
Before posting, I upload it either on my spare private Twitter account or on a drafted Tumblr post so I can check the colors on my phone. This is because the colors on different devices can look very different, and I would at the very least want all my pieces to look nice on both of my devices!
And then, once I deem it satisfactory, I just try to think of a caption and post! Some artists wait for a certain time where most of their followers are active, but I didn't have a lot of MDZS followers at this point so it didn't really matter to me.
It still doesn't really; I haven't actually been able to figure out when my MDZS followers are awake even now.
#showyourprocess#mine#whew this was so long oops#but this piece took like#maybe 1.5 weeks sans the break i had to take#so !!#LOL#tag game
46 notes
·
View notes
Note
Okay okay okay, wait, how do you draw such good hands? Like, I use references all the time for my drawings, but I can never get measurements or proper knuckle placing. They always come out like terribly illustrated blobs a 5 year old drew 😅😅 do you have any tips on how to do them, other than reference photos?
Also, your arts and that one fic you've done for tickltobrr this year? They are immaculate, and your fic, I cannot think about too hard or I will spontaneously combust
I don't know if this will help but I tried! Full disclosure, I went to art school but I haven't drawn much for over a decade. But also, art is something you figure out as you go, and there's no right/wrong way to work out how you like to do it! Even just in this past week, I've decided I liked and disliked certain parts of my process and how I'm using the tools I have, so there are already things I'm doing differently in today's art versus last week's art.
(Oh, and here's a link to the mentioned tickletober fic post in case anybody wants it! 😉)
Okay, onward we go! Hands! Tickly hands, to be precise.
(Tools used: 6th gen iPad, 1st gen Apple Pencil, Procreate app)
The art for day 8 called for a pair of hands, so I drafted them up separately in advance to use as an example. The video moves pretty fast, so I hope pausing and scrubbing through it will help. For some reason the right hand was giving me a hell of a time and I did it twice in this video, and then redid it again while I worked on the full art piece today because I wasn't happy with it. So I guess tip #1 is that things don't always work out the first time! Take a break, eat a snack, and come back to it later.
On my reference pic up in the corner, I first drew some lines over it to indicate the basic shapes and anatomy cues I'm looking at while drawing. (I don't normally do this, but I wanted to note the things I pay attention to so you can see how they translate.) This includes the trapezoidal shape of the palm, the angle of the thumb, and the lines of the metacarpals to guide where the fingers will go. I then sketched out these shapes as guidelines for myself, then worked on getting the lines down.
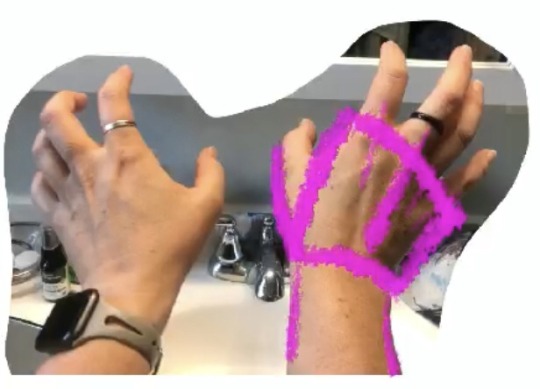


For fingers, I prefer to start by drawing the "spine," the bony back that has the most solid structure. I combat "blobby" tendencies by choosing to accent the knuckles, or anywhere a sharper angle can feasibly be put. Most times I'm actually using a slightly concave line where reality is convex. I rarely am trying to get lengths exactly correct; in the words of my figure drawing professor, "If it looks right, it is right." This is illustration, and the point is for it to feel like the right shapes and movement.
After I'm satisfied with the spine, I draw the flesh underneath, using curves more than angles. I pay particular attention to the shapes of the fingertips, as I feel like there's enough nuance in that small curve to impact how the whole finger is read. More pointed, and it's delicate. More squared, and it's beefy. I can create a nice suggestion of fingernails by allowing the spine and fingertip curve to meet at a right or slightly acute angle. (The middle finger of the right hand kind of turns out this way by the end, which wasn't my intention but I was fed up with it and not doing it again at that point.)
The thumb is one of my favorite fingers to draw, as it's so satisfying when it turns out right. It's only got two joints where the other fingers have three, so it's fun to play with the curves and angles to get just the right suggestion of what it's doing.
Pop a little bump of an ulnar wrist bone in there at the bottom and slap on some forearm lines. Ta-da, hand!
(Add some wiggly movement lines, and these hands are made for ticklin'.)
And of course, pay attention to your own hands! Notice what knuckles you can move independently and those you can't, what fingers tend to stay close to each other versus spreading out when doing certain movements. Take a picture and look at the negative spaces. And the tip that nobody wants: practice! 😊
13 notes
·
View notes