#chimney flashing sealant
Explore tagged Tumblr posts
Visit Tumblr Blog
Explore Tumblr blogs with no restrictions, modern design and the best experience.
Last Seen Tumblr Blogs


Fun Fact
Tumblr Inc. has $15.1M in annual revenue.
Text
How Do You Prevent Water Leaks in Residential Metal Roofing?
Metal roofs have gained a reputation for being durable, low-maintenance, and long-lasting, making them an excellent choice for many Omaha homeowners. However, even with these advantages, they are not immune to water leaks if not properly maintained or installed. Whether you're considering a metal roof for your home or you already have one, understanding how to prevent leaks is essential for safeguarding your investment and keeping your home dry and damage-free.
In this article, we'll explore the common causes of leaks in residential metal roofing, outline effective preventive measures, and provide actionable tips to help you maintain a watertight roof for years to come.
Understanding Common Causes of Metal Roof Leaks
Before diving into prevention strategies, it’s helpful to understand what causes metal roofs to leak in the first place. Knowing these culprits can help you identify issues early and take appropriate measures.
Improper Installation: Metal roofing is a precise craft. Misaligned panels, poorly placed screws, or inadequate sealing around roof penetrations such as chimneys, vents, and skylights are some of the common installation errors that lead to leaks. An improperly installed roof often results in gaps that allow water to seep in.
Loose or Damaged Fasteners: Metal roofs are secured using screws with rubber washers designed to create a watertight seal. Over time, due to thermal expansion and contraction, these fasteners can loosen, break, or fail, allowing water to penetrate through the gaps.
Worn or Deteriorated Sealants: Sealants are commonly used around penetrations and seams in metal roofing. While effective, these materials degrade over time due to exposure to UV rays, fluctuating temperatures, and weather conditions.
Flashing Failures: Flashing is used to protect roof edges and areas where the roof meets vertical surfaces like walls or chimneys. When flashing is improperly installed, damaged, or corroded, it can cause leaks.
Corrosion and Rust: Although metal roofs are designed to resist rust, poor maintenance or exposure to moisture over time can lead to corrosion. Rust creates weak spots in the roofing material, which can develop into holes and allow water to leak through.
Proven Methods to Prevent Water Leaks in Metal Roofing
Now that you understand the common causes of leaks let’s look at the practical steps you can take to prevent them. These strategies not only protect your roof but also enhance its lifespan and value.
1. Invest in Proper Installation
Hire Experienced Professionals: One of the best ways to prevent leaks is to start with a properly installed roof. Ensure you hire experienced contractors who specialize in metal roofing. Ask for references and verify their expertise before signing a contract.
Use High-Quality Materials: Ensure your roof is installed using premium-grade panels, fasteners, and sealants. Quality materials are more durable and less likely to fail over time.
2. Schedule Regular Inspections and Maintenance
Routine maintenance is critical for keeping your metal roof in excellent condition. Make it a habit to inspect your roof at least twice a year and after major storms. During inspections, focus on the following:
Tighten Loose Fasteners: Inspect all screws and fasteners for signs of loosening or damage. Tighten or replace them as needed to maintain a secure seal.
Monitor Seams and Sealants: Check all seams, edges, and penetrations for signs of worn or deteriorated sealant. If you notice cracking or peeling, replace the sealant immediately.
Check for Rust and Corrosion: Address any signs of rust early by sanding down affected areas and applying rust inhibitors or protective coatings.
3. Keep Your Roof Clean
A clean roof is less prone to leaks. Debris can trap moisture, causing corrosion and clogging drainage systems.
Remove Leaves and Branches: Regularly sweep away leaves, branches, and other debris that accumulate on the roof.
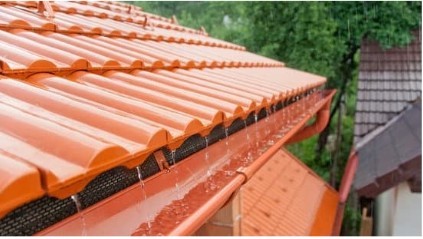
Maintain Gutters and Downspouts: Clean gutters and downspouts to ensure proper water flow. Clogged gutters can cause water to pool on the roof, increasing the risk of leaks.
4. Ensure Proper Ventilation and Insulation
Moisture buildup can occur inside your attic if ventilation or insulation is inadequate. This moisture can lead to condensation under the metal panels, which mimics the effects of a roof leak.
Install Adequate Ventilation: Proper airflow helps regulate attic temperatures and prevents condensation from forming.
Upgrade Insulation: Quality insulation reduces temperature fluctuations, minimizing the expansion and contraction of metal panels.
5. Use Durable Flashing and Sealants
Install Weather-Resistant Flashing: Flashing around chimneys, vents, and other roof features should be durable and properly sealed to prevent water intrusion.
Replace Sealants as Needed: Sealants are a key line of defense against leaks. Replace them as part of routine maintenance to ensure they remain effective.
6. Protect Against Rust and Corrosion
Apply Protective Coatings: Consider coating your metal roof with a water-resistant sealant or protective layer to guard against rust.
Address Rust Immediately: If you spot rust, sand it down and treat the area promptly to prevent further spread.
How a Metal Roof Protects Your Home When Properly Maintained
When properly installed and maintained, metal roofing is one of the most reliable roofing materials available. Its durability, resistance to extreme weather, and energy efficiency make it a popular choice for Omaha homeowners. By taking the steps outlined above, you can extend the lifespan of your roof, prevent costly repairs, and enjoy peace of mind.
Conclusion
Preventing water leaks in residential metal roofing comes down to proper installation, regular maintenance, and proactive care. By addressing potential issues early and following the best practices outlined here, you can ensure your metal roof remains strong, watertight, and visually appealing for years to come.
If you're ready to take the next step in maintaining your metal roof or considering a new installation, consult with local roofing professionals in Omaha for expert advice and services tailored to your needs. Don’t wait—protect your home and investment today!
8 notes
·
View notes
Text
How Do You Handle Roof Penetrations with Residential Metal Roofing?
When considering residential metal roofing for your home, you may have several questions, particularly about how to handle roof penetrations. Whether it's for vents, chimneys, or other fixtures, ensuring that these penetrations are done correctly is essential for the longevity and efficiency of your roof. In this article, we’ll guide you through the best practices for managing roof penetrations with residential metal roofing, making sure you’re well-prepared to tackle this important aspect of your roofing project.
Understanding Residential Metal Roofing
Residential metal roofing has gained popularity due to its energy efficiency, durability, and aesthetic appeal. Unlike traditional asphalt shingles, metal roofs can last significantly longer, providing better insulation and reducing energy costs. However, handling roof penetrations correctly is key to maximizing these benefits when it comes to installations or modifications.
Why Roof Penetrations Matter
Roof penetrations are any openings created in your roof for various installations, such as plumbing vents, exhaust fans, or skylights. Properly managing these areas is crucial for several reasons:
Water Leakage Prevention: If not sealed correctly, penetrations can become entry points for water, leading to leaks and damage to your home.
Energy Efficiency: Inefficient seals around penetrations can cause drafts, undermining the energy-saving benefits of your metal roof.
Structural Integrity: Properly managing penetrations ensures that your roof maintains its structural integrity and durability over time.
Sealing and Flashing Techniques for Residential Metal Roofing
Choosing the Right Materials
The materials you choose are critical when creating penetrations in your metal roof. Utilizing high-quality metals and sealants designed for roofing can help prevent corrosion and improve the longevity of the penetration points. Common materials include:
Metal Flashing: This is used to direct water away from the penetration. It's typically made of the same metal as your roofing material, ensuring a seamless fit.
Sealants: Use flexible and durable flexible and durable roofing-grade sealants to fill gaps around penetrations.
Installation Steps
Cutting the Penetration: Carefully measure and cut the vent or other fixture opening. Ensure that the edges are smooth to facilitate a better seal.
Installing Flashing: Place metal flashing around the penetration. The flashing should extend beyond the opening to effectively redirect water. Make sure to overlap any seams to prevent water from seeping underneath.
Applying Sealant: After positioning the flashing, generously apply sealant at the edges where it meets the roofing material. Ensure that it is evenly spread to create a watertight seal.
Securing the Fixture: If installing a vent or other fixture, secure it according to the manufacturer’s guidelines. Ensure it is tightly fitted against the flashing to prevent water intrusion.
Final Inspection: Once everything is installed, conduct a thorough inspection. Check for any gaps and ensure that all materials are securely in place.
Maintenance Tips for Roof Penetrations
Even with proper installation, it’s important to maintain your roof penetrations. Here are a few maintenance tips to keep in mind:
Regular Inspections: Periodically check the areas around your roof penetrations for signs of wear or damage. Look for cracks in the sealant or rust on the flashing.
Clean Debris: To prevent water from pooling around your roof penetrations, keep the area around them clean and debris-free.
Reapply Sealant: Depending on the weather conditions in your area, consider reapplying sealant every few years to ensure continued protection.
Common Types of Penetrations in Residential Metal Roofing
Vent Pipes
Vent pipes are necessary for plumbing systems and must be installed correctly to prevent leaks. To prevent leaks, use the appropriate flashing and sealant techniques described above.
Chimneys
Ensure that the flashing is installed correctly on chimneys. A chimney collar can provide additional protection against water intrusion.
Skylights
Skylights can enhance natural light in your home but require careful installation. Follow similar sealing and flashing methods to ensure that the area remains watertight.
Exhaust Fans
Exhaust fans, often found in kitchens and bathrooms, should be installed carefully to prevent moisture buildup. Proper flashing and sealing will help maintain efficiency.
The Importance of Professional Installation
While DIY projects can be rewarding, handling roof penetrations often requires expertise that can be challenging for the average homeowner. Hiring a professional roofer experienced in residential metal roofing ensures that all aspects of the installation are done correctly. Professionals can also spot potential issues before they become significant problems, saving you time and money in the long run.
Handling roof penetrations with residential metal roofing doesn’t have to be daunting. Understanding the importance of proper installation, choosing the right materials, and maintaining your roof ensures your home remains protected and energy-efficient.
If you’re considering a metal roof or need help with your current roofing system, why not contact the experts? Visit Lastime Exteriors to explore our services and learn more about energy-efficient roofing solutions tailored to your home’s needs. Your home deserves the best; we’re here to help you achieve it!
7 notes
·
View notes
Text
My Roof is Leaking – Causes and Solutions

Keep roof leaks from causing costly structural damage and leaving you with ruined possessions. Understanding what causes residential roof leaks will help you resolve them before becoming an issue.

New Image Roofing Atlanta gathered information about what causes residential roof leaks, how to fix or prevent them, how a maintenance program benefits you, and when to call your roofer.
Roof Leak Causes and Their Solutions

A leaky roof is a concerning issue for homeowners, as it can lead to structural damage, mold growth, and costly repairs if not addressed. Understanding common roof leak causes and their solutions is essential for maintaining your home’s integrity. Consider the following:
1. Missing Shingles
Shingles protect your roof by creating a water-resistant barrier. Strong winds, heavy rain, or age-related wear can cause shingles to come loose, warp, or fall off, exposing the underlying layers to water.
Solution – Replace missing or damaged shingles promptly. Ensure that new shingles match the existing material to maintain a uniform appearance and functionality. Regular inspections, especially after storms, can help identify missing shingles before significant damage occurs.
2. Bad Flashing
Flashing seals roof transitions, like where the roof meets a chimney or skylight. Over time, flashing can corrode, crack, or separate, leaving gaps that allow water to seep through.
Solution – Inspect and repair damaged flashing by applying a waterproof sealant or replacing it entirely. Proper installation during initial construction or repair is essential for long-lasting performance.
3. Faulty Penetration Boots
Penetration boots are rubber seals installed around roof penetrations, like vents and pipes, to prevent leaks. Over time, these boots can crack, degrade, or pull away from the pipe.
Solution – Replace worn or damaged penetration boots with new ones. Ensure they are sealed to prevent water infiltration. Adding a metal storm collar over the boot can provide additional protection.
4. Branch or Limb Damage
Falling branches or overhanging limbs can puncture or scrape the roof surface, leading to leaks. This damage commonly occurs during storms or high winds.
Solution – Trim trees regularly to keep branches away from the roof. If a branch damages your roof, assess the extent of the damage and repair or replace the affected area immediately. Install protective roofing materials that resist impact damage.
5. Mold and Algae Growth
Mold, moss, or algae can grow on roof surfaces, especially in damp or shaded areas. These organisms trap moisture against the roof and weaken the materials over time.
Solution – Clean the roof regularly using a gentle, non-abrasive cleaning solution. Install zinc or copper strips to inhibit future growth. Ensure your roof has adequate ventilation to minimize moisture accumulation.
6. Damaged Shingles

Shingles can crack, curl, or blister due to aging, UV exposure, or severe weather. Damaged shingles are less effective at repelling water, leading to potential leaks.
Solution – Replace damaged shingles promptly. Use high-quality materials designed for your climate to ensure durability. Regularly inspect the roof to identify early signs of wear and tear.
7. Debris Accumulation
Leaves, dirt, and other debris can collect on your roof, particularly in gutters and valleys. This buildup can trap moisture, causing water to pool and eventually seep through the roofing material.
Solution – Clean your roof and gutters regularly to prevent debris accumulation. Install gutter guards to reduce the frequency of cleaning. For hard-to-reach areas, hire a professional to handle debris removal safely.
Roof Maintenance Program Benefits

Regular roof maintenance is a proactive approach that helps prevent costly repairs and prolongs your roof’s lifespan. A comprehensive program includes periodic inspections, cleaning, and minor repairs. Here are the key benefits:
Early Problem Detection – Inspections identify issues like damaged shingles or clogged gutters before they lead to leaks.
Improved Durability – Routine maintenance keeps your roof in optimal condition, allowing it to withstand weather extremes.
Cost Savings – Preventative measures are more affordable than emergency repairs or roof replacement.
Enhanced Safety – Regular maintenance reduces the risk of structural damage or collapse due to water infiltration.
When to Call a Professional Roofer
While some minor repairs can be handled by homeowners, roof leaks require immediate attention from a professional roofer. Delaying repairs can worsen the damage and increase repair costs. Here’s why calling a professional is critical:
Accurate Diagnosis – Professionals have the expertise to identify a leak’s root cause and address it effectively.
Proper Repairs – A licensed roofer uses high-quality materials and techniques to ensure long-lasting repairs.
Safety – Climbing onto a roof can be dangerous without proper training and equipment. Professionals minimize injury risks.
Warranty Protection – Many roofing materials come with warranties that require professional installation or repair to remain valid.
If you detect a roof leak, like water stains on ceilings, dripping water, or mold growth, contact a reputable roofing contractor immediately. Quick action can prevent further damage and protect your home.
Roof Leaks and Solutions
In this article, you discovered crucial information about why residential roofing systems can leak, their solutions, how a maintenance program benefits you, and when to call a professional roofer to address the problem.
Your ability to quickly identify developing roofing issues will position you to get them resolved before they cause severe roof and material damage.
Ignoring roofing issues can lead to significant structural damage, costly cleanup, and potential displacement from your home.
Sources: hud.gov/sites/documents/HUDGB5C5GUID.PDF extension.uga.edu/publications/detail.html?number=C1082&title=home-maintenance-checklist blogs.oregonstate.edu/piperde/2023/06/20/roof-maintenance-tips-to-make-a-roof-last-longer
New Image Roofing Atlanta
2020 Howell Mill Rd NW Suite 232 Atlanta, GA30318 (404) 680-0041
To see the original version of this article, visit https://www.newimageroofingatlanta.com/my-roof-is-leaking-causes-and-solutions/
#residential roofer atlanta#residential roofing#asphalt shingle roofing#asphalt shingles#shingle roof#emergency roof repair#residential roof repair#leaking roof#roof leak
3 notes
·
View notes
Text
How to Install Metal Roofing on a Flat Roof: A Comprehensive Guide
Thinking about installing metal roofing on your flat roof? You're in the right place! In this comprehensive guide, we'll cover everything from the basics of metal roofing to the intricacies of installation on a flat surface. Whether you're considering solar panels or commercial applications, we've got you covered. Let's dive in!
Understanding Metal Roofing
Metal roofing has gained immense popularity due to its durability, energy efficiency, and aesthetic appeal. Unlike traditional roofing materials, such as asphalt shingles, metal roofs offer superior longevity and require minimal maintenance. Additionally, they are eco-friendly and recyclable, making them a sustainable choice for homeowners and businesses alike.
Benefits of Metal Roofing
Metal roofing offers numerous advantages:
Durability: Metal roofs can last 50 years or more, outlasting traditional roofing materials.
Energy Efficiency: Reflective metal roofs can reduce energy costs by keeping your home cooler in the summer.
Low Maintenance: Metal roofs require minimal upkeep, saving you time and money over the long term.
Weather Resistance: Metal roofs are highly resistant to wind, rain, snow, and hail, providing reliable protection for your property.
Aesthetic Appeal: With a wide range of colors and styles available, metal roofing enhances the curb appeal of any building.
How to Install Metal Roofing on a Flat Roof
Installing metal roofing on a flat roof requires careful planning and execution to ensure optimal performance and longevity. Here's a step-by-step guide to help you navigate the process:
Step 1: Prepare the Surface
Before installing metal roofing, ensure that the flat roof surface is clean, dry, and free of debris. Remove any existing roofing materials and repair any damaged areas. Proper preparation is essential for a successful installation.
Step 2: Install Underlayment
Apply a high-quality underlayment to the flat roof surface to provide an additional layer of protection against moisture and ensure a smooth, even surface for the metal roofing panels. The underlayment also helps to prevent water infiltration and improve thermal performance.
Step 3: Measure and Cut Metal Panels
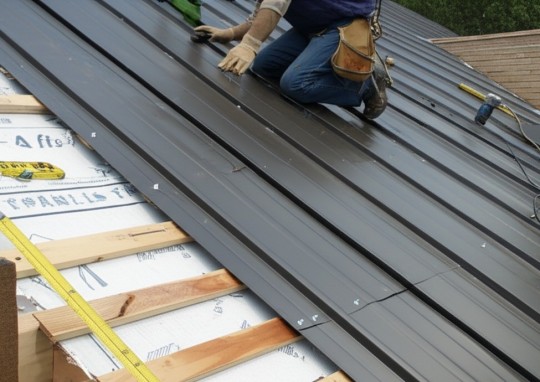
Measure the dimensions of the roof surface accurately and use a metal cutting tool to cut the roofing panels to the required size. Take care to ensure precise cuts to achieve a seamless installation.
Step 4: Install Flashing
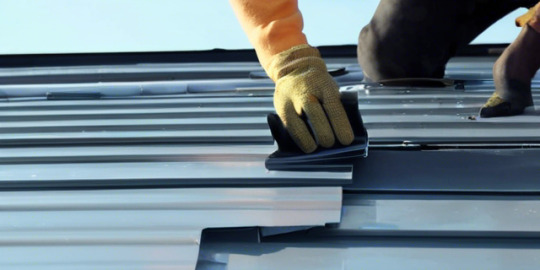
Install flashing around the edges of the roof and any penetrations, such as vents or chimneys, to prevent water intrusion and ensure a watertight seal. Flashing helps to direct water away from vulnerable areas and protect the integrity of the roof.
Step 5: Attach Metal Roofing Panels
Begin by attaching the metal roofing panels to one edge of the roof and work your way across, overlapping each panel to provide maximum protection against the elements. Use screws or nails designed for metal roofing to secure the panels in place.
Step 6: Seal Joints and Fasteners
Apply sealant to the joints between metal roofing panels and around fasteners to prevent water leakage and enhance the roof's weather resistance. Proper sealing is crucial for maintaining the integrity of the installation and prolonging the life of the roof.
Installing Solar Panels on Flat Roof
Interested in harnessing solar energy for your home or business? Installing solar panels on a flat roof offers numerous benefits, including:
Optimal Sun Exposure: Flat roofs provide an ideal platform for solar panels, allowing for maximum sun exposure throughout the day.
Space Efficiency: Solar panels can be installed flush with the roof surface, maximizing available space and minimizing visual impact.
Energy Savings: Solar panels generate clean, renewable energy, reducing your dependence on traditional power sources and lowering your utility bills.
Environmental Impact: By utilizing solar power, you can significantly reduce your carbon footprint and contribute to a more sustainable future.
FAQs
Q: Can I install solar panels on a flat roof?
A: Yes, flat roofs are well-suited for solar panel installation, offering ample space and optimal sun exposure. With the right mounting system, solar panels can be securely installed on a flat surface.
Q: How much does it cost to install solar panels on a flat roof? A: The cost of installing solar panels on a flat roof depends on various factors, including the size of the system, the type of panels, and any additional equipment or accessories required. It's best to consult with a solar installer to obtain an accurate quote based on your specific needs and circumstances.
Q: Are there any maintenance requirements for solar panels on a flat roof? A: Solar panels require minimal maintenance, typically limited to periodic cleaning to remove dirt, debris, and any accumulated snow or leaves. Additionally, it's essential to inspect the panels regularly for any signs of damage or wear and tear.
Q: How long do solar panels last on a flat roof?
A: Solar panels are designed to be durable and long-lasting, with an average lifespan of 25-30 years or more. With proper installation and maintenance, solar panels can continue to generate clean energy for decades, providing an excellent return on investment.
Q: Do I need to reinforce my flat roof to support solar panels?
A: In some cases, reinforcement may be necessary to ensure that the flat roof can support the additional weight of solar panels. A structural engineer or solar installer can assess your roof's load-bearing capacity and recommend any necessary reinforcements.
Q: Will installing solar panels on my flat roof increase the value of my property?
A: Yes, installing solar panels can increase the value of your property by reducing energy costs, increasing energy efficiency, and appealing to environmentally conscious buyers. Solar panels are considered a valuable investment that can enhance the overall marketability of your home or commercial building.
Conclusion
In conclusion, installing metal roofing on a flat roof offers numerous benefits, including durability, energy efficiency, and aesthetic appeal. Whether you're considering traditional metal roofing or incorporating solar panels, proper installation is essential for optimal performance and longevity. By following the steps outlined in this guide and consulting with a qualified professional, you can enjoy the many advantages of metal roofing for years to come.
2 notes
·
View notes
Text
Flat Roof Woes? We've Got Your Back!
Got a flat roof in Dallas, GA? 🏠 They're cool and modern, but they need some TLC!
We're Apex Roofing Solutions, and we're here to help you understand common flat roof problems and how to fix them! 👇
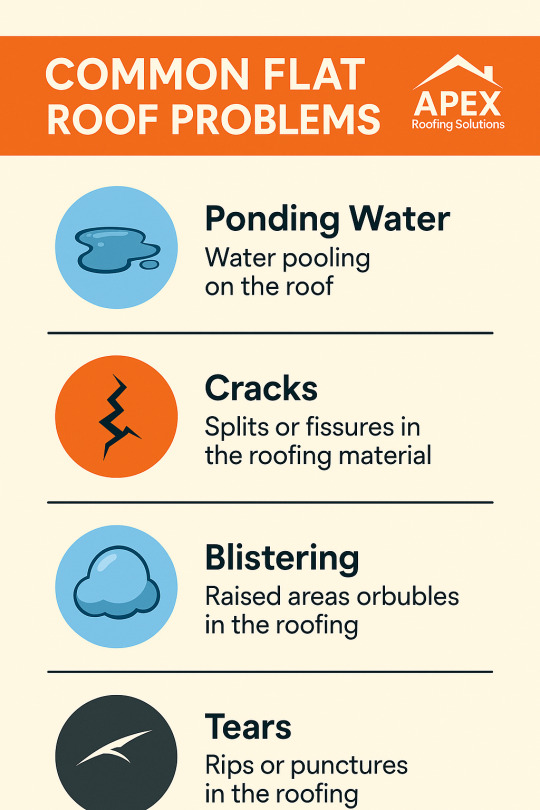
💧 Common Flat Roof Headaches & How We Solve 'Em:
Ponding Water: Ugh, standing water is a no-go! We fix drainage issues by adjusting slopes or adding new drains.
Blisters & Bubbles: Trapped moisture! We cut, dry, and reseal those bubbly spots to protect your roof.
Cracks & Splits: Weather changes can cause cracks. Our team uses special sealants and patches for a durable fix.
Seam Separation: Leaky seams? We re-weld or re-adhere them to keep water out!
Flashing Failures: Those spots around chimneys and vents are key. We replace and seal faulty flashing to prevent leaks.
Rotten Deck: If leaks go unnoticed, the roof deck can rot. We replace damaged sections to restore structural integrity.
🛠️ Why Professional Flat Roof Repair?
Flat roofs are tricky! They need pros who know EPDM, TPO, Modified Bitumen, and other materials. Don't DIY this one!
💡 Pro Tip: Preventative Maintenance is Your Best Friend!
Get inspections twice a year!
Clear debris and trim trees.
Keep an eye out for any puddles.
🤔 Repair or Replace?
REPAIR if: Damage is small (<25%), roof is under 10 years old, no structural issues.
REPLACE if: Roof is 15-20+ years old, widespread damage, persistent leaks, or poor energy efficiency.
We always do a free inspection to help you decide!
⚡️ Leaky Roof? High Energy Bills? Storm Damage?
A damaged flat roof isn't just about leaks; it can hike up your energy costs! And if a storm hit, your insurance might help cover it. We can assist with claims!
📞 Ready for a Strong, Watertight Roof?
Don't let minor issues become major headaches. If you spot trouble, call Apex Roofing Solutions in Dallas, GA! We offer:
Expertise in all flat roofing systems
Licensed & insured crews
Emergency service options
Honest assessments & fair pricing
Guaranteed workmanship
Protect your home. Get your free flat roof repair quote today!
#RoofingSolutions#DallasGARoofing#FlatRoofRepair#WaterDamage#LocalBusiness#QualityRoofing#ProtectYourHome#ApexRoofing#RoofingTips#HomeRepair#FlatRoofProblems
1 note
·
View note
Text
How to Install Metal Roofing ?
Installing metal roofing can be a great way to protect your home while improving its durability and appearance. Here’s a step-by-step guide that’s easy to understand:
1. Prepare the Roof
Start by removing old roofing materials (shingles, nails, flashing, etc.).
Inspect the roof deck for damage—replace any rotten wood or loose boards.
Make sure the surface is clean, flat, and dry.
2. Install Roofing Underlayment
Roll out a waterproof underlayment (like synthetic or felt) across the entire surface.
Overlap the rows by a few inches and secure them with cap nails or staples.
This layer protects against leaks and moisture buildup.
3. Optional: Install Furring Strips or Battens
For better ventilation or leveling, you can add horizontal wood strips spaced every 12–24 inches.
This step helps prevent condensation under the metal panels.
4. Install Drip Edge and Flashing
Attach a drip edge along the eaves and rake edges of the roof.
Use metal flashing around chimneys, skylights, and valleys to direct water away.
5. Lay the Metal Panels
Start at the bottom corner of the roof, usually on the side facing away from prevailing winds.
Lay your first metal panel and square it to the roofline.
Overlap each panel with the next, following manufacturer guidelines.
6. Secure the Panels
Use metal roofing screws with rubber washers to avoid leaks.
Drive screws into the flat part of the panel (not the raised ribs) every 12–24 inches.
Be consistent and avoid overtightening.
7. Install Ridge Cap
Once all panels are in place, finish by installing a ridge cap along the roof peak.
Use foam closure strips underneath to seal out rain and pests.
8. Seal and Inspect
Check for gaps, missed screws, or misaligned panels.
Apply a quality metal roofing sealant if needed.
Pro Tip: Always follow manufacturer instructions for your specific type of metal roofing (standing seam, corrugated, etc.), and don’t skip safety equipment—especially on steep roofs!
When in Doubt: If you're not confident on ladders or working with sharp panels, it's smart to hire a licensed roofer. A poorly installed metal roof can lead to leaks, rust, or even structural damage.
#roof replacement#roofing services#roof repair#roof installation#roofing company#roofing#roofing contractor
0 notes
Text
How a Roof Whirlybird Helps Lower Indoor Temperatures in Summer
On a hot afternoon, stepping into a building that feels just as warm inside can be frustrating. Air conditioners run longer. Fans spin faster. Yet the heat lingers. A roof whirlybird offers a simple fix. It spins on the roof and pulls hot air out. Below are key tips on roof types, placement and common errors to avoid.

The Quiet Problem on Every Roof
Tile roof whirlybird installations often start because roof cavities trap heat. Solar radiation heats roofing materials. Tiles and metal both absorb sun energy. This creates a layer of hot air under the roof. Without an exit path, the heat moves down through ceilings. Indoor temperatures can rise by several degrees. Insulation alone cannot clear this hot air. The trapped heat makes rooms feel stuffy. Cooling devices then use more power to reach set temperatures. Over time, energy costs rise. Buildings with large roof cavities and poor cross‑ventilation face the worst impact. Multi‑bedroom homes, duplexes and older commercial spaces often lack proper airflow.
What Makes a Roof Ventilator Effective?
Not all roof turbines deliver the same airflow. A metal roof whirlybird can resist harsh weather and spin freely. The principle is simple. Hot air rises into the roof cavity. The spinning turbine pulls it out. Cooler air flows in from eave vents or soffit vents. This constant cycle brings down temperatures without using electricity. A hidden benefit is reduced moisture. Humid air from kitchens and bathrooms meets a cooler roof surface. Condensation can cause mould or rot. Whirlybirds cut down on humidity and protect the structure. These turbines work quietly and continuously. Their impact grows over time as they clear heat day after day.
Simple Ways to Boost Cooling with a Roof Whirlybird
Match Vent Size to Roof Area
Large roofs need multiple turbines. An average home gains from two or three units. More space calls for more vents.
Place on Hottest Roof Slopes
North‑facing and west‑facing slopes get the most afternoon sun. Install turbines there first. Correct placement maximises airflow.
Add Passive Intake Vents
A turbine must have an inlet. Install eave vents or wall grills. This creates a clear path for fresh air to enter.
Avoid Obstructed Roof Zones
Trees, chimneys or antennas can block the wind. An obstructed turbine cannot spin well. It is like trying to cool a room with a blocked window.
Consider Roofing Material
Metal heats up fast but cools quickly. Tiles hold heat longer. A tile roof whirlybird may need extra units to match the cooling effect on metal roofs.
The Most Overlooked Mistakes with a Metal Roof Whirlybird
Hole Size Too Small
A small hole limits airflow. It is like breathing through a straw with a tiny opening. The turbine cannot pull out enough hot air.
Missing Sealant and Flashing
A tight seal at the base prevents leaks. Metal roofs expand and contract. Without proper flashing, gaps form and rainwater seeps in.
Units Too Close Together
Turbines that sit side by side compete for the same hot air. Spacing them out ensures each draws air from a different zone.
Ignoring Roof Insulation
Ventilation helps but it works best with good insulation. An uninsulated ceiling still loses cool air. Both measures should work together.
Why Some Homes Feel Cooler—And Others Don’t
A common thought is “Why does the whirlybird not make a difference?” The cause is often subtle. It may be a shaded roof area that stops the wind from spinning the turbine. It could be eaves without vents. Or the building orientation might trap late‑day sun on one side. When the roof layout and vent placement match, the result is noticeable. Indoor spaces feel fresher. The air flows without noise. Cooling systems run less. The reward is simple. After a long hot day, stepping into a cooler room feels natural. It is not a blast of cold air. It is a gentle relief created by constant airflow up on the roof.
Cooling Efficiency
A roof whirlybird provides a low‑maintenance way to cut indoor heat. It removes trapped hot air. It lowers humidity. It eases the load on air conditioners and fans. For large homes, commercial sites or DIY roof projects, it is a cost‑effective upgrade. Every roof has its challenges. The correct choice of vent type, precise placement and proper sealing make the difference. With these steps, the whirlybird becomes a silent partner in keeping spaces cooler all summer long.
0 notes
Text
The Importance of Proper Chimney Construction and Maintenance
A chimney plays a vital role in any home with a fireplace or heating appliance. Beyond simply venting smoke, it ensures safe operation, preserves indoor air quality, and adds architectural charm. However, to function properly and last for years, chimneys require expert construction and ongoing maintenance. If you're in the GTA, working with an experienced Toronto masonry company can make all the difference in chimney performance and safety.
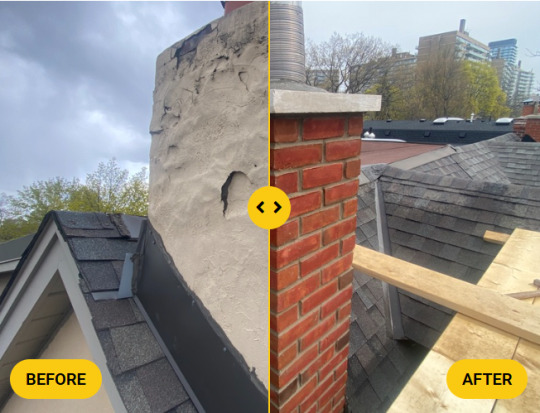
Why Proper Chimney Construction Matters
A well-built chimney isn’t just a stack of bricks—it’s a complex structure that must meet strict building codes and safety standards. Proper construction includes:
A solid foundation to support weight and resist shifting
Correct flue sizing for efficient smoke ventilation
High-quality brick and mortar that withstands heat and weather
Appropriate lining to protect masonry from corrosive byproducts
A cap and crown to keep out moisture, debris, and animals
Poor construction or shortcuts during installation can lead to early deterioration, smoke backflow, fire hazards, and expensive repairs down the line.
Dangers of Neglected Chimney Maintenance
Even a perfectly built chimney won’t last forever without proper care. In Toronto’s freeze-thaw climate, chimneys face intense weather that can cause:
Cracked or spalling bricks
Deteriorated mortar joints
Water infiltration
Rusting or broken chimney caps
Creosote buildup, increasing fire risk
Ignoring maintenance can put your home and family at risk. Moisture intrusion, for example, is one of the biggest threats to chimney structure—and it often goes unnoticed until costly damage occurs.
Benefits of Routine Chimney Maintenance
Partnering with a reliable Toronto masonry company for chimney maintenance provides long-term benefits, including:
Increased Safety – Prevents fire and carbon monoxide risks
Structural Integrity – Stops small issues from turning into major damage
Improved Efficiency – Ensures your fireplace or stove vents properly
Extended Lifespan – Protects your investment for decades
Enhanced Curb Appeal – Keeps your chimney looking sharp and in harmony with your home's design
What Does Chimney Maintenance Involve?
Professional chimney maintenance typically includes:
Annual Inspection – Identify early signs of wear, moisture, or blockages
Chimney Cleaning – Remove soot, creosote, and debris
Tuckpointing – Replace deteriorating mortar to reinforce structure
Flashing Repair – Fix leaks where the chimney meets the roof
Waterproofing – Apply protective coatings to resist moisture
Crown and Cap Repair/Replacement – Seal off the chimney top from rain and pests
Why Hire a Local Toronto Masonry Company?
Toronto’s unique climate and building styles require skilled professionals familiar with local materials, codes, and challenges. A reputable Toronto masonry company will:
Understand seasonal weather impacts
Use climate-appropriate sealants and bricks
Comply with Ontario Building Code regulations
Provide reliable service and long-term warranties
Whether you need a new chimney, repairs to an existing one, or regular upkeep, hiring a local expert ensures safe, code-compliant, and lasting results.
Conclusion
Your chimney is more than just a vent—it’s a critical system for heating, safety, and design. Proper chimney construction and maintenance are essential for preventing hazards, protecting your property, and maintaining comfort during Toronto’s long winters. If you’re seeing signs of damage or simply want peace of mind, connect with a trusted Toronto masonry company today for a thorough inspection and expert service.
0 notes
Text
What services do roofing contractors NJ provide?
Whether you’re dealing with storm damage, planning a roof upgrade, or just need an inspection, professional roofing contractors in New Jersey offer a wide range of services to keep your home safe and secure.
If you’re specifically looking for roof repair in Clifton NJ, it’s important to understand what local contractors can offer — and how to choose the right one.
1. Roof Inspections
Regular roof inspections are crucial for identifying minor issues before they turn into major (and expensive) problems. Roofing contractors offer:
Seasonal checkups (especially before/after winter)
Pre-sale inspections for homebuyers
Storm damage assessments
Tip: Schedule at least one professional inspection per year — twice if your home is near waterfront or wooded areas in Clifton.
2. Roof Repair (Clifton NJ and Beyond)
One of the most requested services, especially in areas like Clifton, is roof repair. Whether it’s a small leak or damaged shingles, fast action is key.
Common repairs include:
Fixing leaks and water stains
Replacing broken or missing shingles
Flashing and chimney repairs
Gutter and downspout issues
Emergency storm damage repairs
A reliable contractor offering roof repair in Clifton NJ will also provide emergency service after severe weather events.
3. Full Roof Replacement
When repairs aren’t enough, contractors offer complete roof replacements. You’ll get help selecting the right materials based on your home’s style, budget, and local climate conditions.
Popular materials:
Asphalt shingles (affordable, durable)
Metal roofing (energy-efficient, long-lasting)
Flat roof membranes (for commercial or modern homes)
Slate or tile (premium durability and aesthetics)
4. Roof Maintenance Services
Preventative maintenance is essential to extend the life of your roof and reduce future repair costs. Contractors often offer packages that include:
Gutter cleaning
Moss and debris removal
Sealant checks
Ventilation and insulation review
Small fixes and resealing
If you’re in Clifton or nearby areas, look for a contractor who offers seasonal maintenance plans — especially before winter.
5. Gutter and Downspout Services
Gutters play a major role in protecting your roof and foundation. Roofing contractors often provide:
Gutter cleaning and unclogging
Gutter guard installation
Downspout repair or rerouting
New gutter system installation
This is particularly important in hilly areas of Clifton where drainage is critical.
6. Commercial Roofing Services
In addition to residential work, many NJ contractors specialize in commercial roofing. These services often include:
Flat roof repair and coatings
TPO, EPDM, or modified bitumen installation
Skylight and HVAC curb sealing
Waterproofing and routine inspections
If you own a business in Clifton, be sure to ask if the company handles both residential and commercial projects.
7. Emergency Roofing Services
Storms, fallen trees, and high winds can lead to immediate roof damage. Professional roofers offer 24/7 emergency services to:
Patch leaks temporarily
Secure exposed areas with tarps
Schedule follow-up repairs or replacements
If you need emergency roof repair in Clifton NJ, look for companies with fast response times and strong local reputations.
Final Thoughts
From small repairs to major replacements, NJ roofing contractors offer comprehensive services to protect your property. If you’re a homeowner searching for roof repair in Clifton NJ, make sure to choose a licensed, insured, and highly-rated local company that understands the unique needs of your neighborhood.
0 notes
Text
Tectum Roofing – How to Prepare Your Roof for Hurricane/Storm Season
When hurricane or storm season approaches, homeowners and commercial property owners must make storm preparedness a top priority—and your roof is one of the most critical areas to protect. At Tectum Roofing, we know that proactive preparation can prevent thousands of dollars in damage and ensure your home or business stays safe during even the most severe weather events.
In this guide, we’ll walk you through everything you need to know about preparing your roof for hurricane or storm season, including inspection tips, common issues to look out for, and how Tectum Roofing can help.
🌀 Why Roof Prep Is Crucial Before a Storm
Your roof is your first line of defense during a storm. High winds, flying debris, heavy rain, and hail can cause serious damage—or even complete roof failure—if your roof isn't in top condition. A damaged or unprepared roof can lead to:
Water leaks and flooding
Mold and mildew growth
Structural issues
Expensive emergency repairs
Insurance claim headaches
The best time to prepare your roof is before storm season begins—not when a hurricane is already on the radar.
✅ Step-by-Step: How to Prepare Your Roof for Storm Season
1. Schedule a Professional Roof Inspection Before anything else, have a licensed roofing expert—like Tectum Roofing—conduct a thorough inspection of your roof. We’ll assess the condition of:
Shingles or roofing membrane
Flashing and sealants
Vents, skylights, and chimneys
Gutters and downspouts
Roof decking (if accessible)
A professional eye can spot hidden vulnerabilities that homeowners often miss—especially in hard-to-reach areas. 💡 Tectum Tip: Book your inspection early in the season. As soon as storms hit the forecast, roofing companies can become booked out for weeks.
2. Repair Damaged or Loose Shingles Even a single missing or curled shingle can let in water or give wind a place to get underneath your roofing system. Common problems include:
Cracked, curled, or loose shingles
Exposed nails
Missing granules
Lifting or flapping underlayment
Tectum Roofing can quickly replace damaged shingles and re-seal weak areas so your roof is ready to withstand high winds and heavy rain.
Explore Tectum Roofing Reviews for more details!
3. Secure Flashing and Seal Roof Penetrations Roof penetrations—like vents, pipes, chimneys, and skylights—are especially vulnerable during storms. Flashing (the metal or rubber material that seals these areas) must be tight and watertight. Storm-force winds can peel up flashing, and heavy rain can seep into even small gaps. We inspect and re-seal these spots to prevent leaks. ⚠️ Pro tip: Flashing issues are one of the leading causes of roof leaks during storms.
4. Clean and Reinforce Gutters Your gutters and downspouts play a vital role in directing water away from your roof and foundation. Before storm season:
Remove leaves, debris, and nests
Check for sagging or loose brackets
Make sure water flows freely through downspouts
Extend downspouts to move water away from the house
Tectum Roofing offers full gutter inspection and maintenance as part of our storm prep services.
5. Trim Nearby Trees and Remove Debris Tree branches hanging over your roof can snap off and cause significant damage in high winds. Do this:
Trim back limbs that hang over the roof
Remove dead or weak branches
Clean leaves and twigs off the roof surface
Flying debris is one of the top causes of punctures and broken shingles during a storm. Keeping your roof clear helps reduce that risk.
6. Check Your Attic for Signs of Leaks or Weakness A quick attic inspection can help you catch hidden issues before a storm exposes them. Look for:
Water stains or mold
Daylight shining through the roof boards
Wet insulation
Sagging or rotted beams
If you see any of these signs, call Tectum Roofing right away for an evaluation.
7. Consider Storm-Resistant Roofing Upgrades If your roof is nearing the end of its life or has been patched multiple times, you may want to consider investing in storm-rated roofing materials, such as:
Impact-resistant shingles (Class 4)
Metal roofing, which performs exceptionally well in high winds
Hurricane straps and clips for better structural integrity
Sealed roof decks to prevent water intrusion
We’ll work with you to find the right solution for your home or business, including insurance assistance and financing options if needed.
🧰 What Makes Tectum Roofing the Right Partner?
At Tectum Roofing, we’re not just roofers—we’re storm-prep specialists. With years of experience helping homeowners and business owners weather hurricanes, hailstorms, and more, we offer:
Free roof inspections
Licensed and insured service
Emergency repair availability
Expertise in insurance claim assistance
Warrantied work with top-grade materials
Our team works quickly, efficiently, and professionally to ensure your roof is storm-ready—before it's too late.
Explore Tectum Roofing Reddit Reviews as well.
📋 Bonus: Storm Prep Roof Checklist
Here’s a quick summary you can print or save for later: ✔️ Book a professional inspection ✔️ Fix missing/damaged shingles ✔️ Seal roof penetrations (vents, pipes, chimneys) ✔️ Clean and secure gutters ✔️ Trim nearby trees ✔️ Check attic for leaks ✔️ Ask about storm-resistant upgrades
💬 Final Thoughts
Storms are unpredictable, but the damage they cause doesn’t have to be. With proper roof maintenance and storm preparation from Tectum Roofing, you can protect your property, reduce risk, and enjoy peace of mind—even during the most intense hurricane season.
Don’t wait until the forecast turns grim. Call Tectum Roofing today to schedule your free storm season inspection and take the first step toward protecting your home or business.
📞 Contact Us Tectum Roofing Commercial & Residential Roofing Services 📍 [Colorado Springs, Colorado] 📞 +1 719-455-7663 🌐 https://weroof.com
0 notes
Text
Rainy Season Coming? Make Sure Your Gutters and Roof Are Ready
The rainy season is on its way, and with it comes the potential for roof leaks, water damage, clogged gutters, and costly home repairs. If you’ve ever dealt with overflowing gutters or dripping ceilings during a storm, you know how important it is to be prepared.
But don't worry, it’s not too late. In this guide, we’ll show you exactly how to get your roof and gutters ready for the rainy season, step by step. With a little preparation now, you can avoid big headaches later.
Why Preparing for Rain Matters More Than You Think
Heavy rains can quickly expose weaknesses in your roofing and gutter systems. A small leak or clog today can lead to flooded interiors, damaged insulation, rotting wood, or even mold growth tomorrow.
Taking the time to inspect, clean, and reinforce these systems means:
Peace of mind during storms
No surprise leaks or repairs
Prolonged roof and gutter lifespan
Protection for your home’s foundation and walls
Think of it as your home’s rain armor—you want it watertight and strong.
1. Clean Your Gutters Thoroughly
One of the most important tasks before the rains hit? Cleaning out your gutters. Over time, leaves, dirt, and twigs collect inside and block water flow.
Why it matters:
Prevents water from backing up onto your roof
Stops fascia boards from rotting
Keeps water away from your foundation
Reduces the risk of mold and mildew
Use a gutter scoop or trowel to remove debris, then rinse the system using a garden hose to ensure proper drainage.
2. Check and Clear the Downspouts
Even clean gutters won’t help if your downspouts are clogged. These pipes are responsible for directing water away from your home.
Check for:
Visible blockages like nests or leaves
Water that pools near the downspout base
Spouts that are disconnected or crushed
Flush each downspout with water to confirm flow. If it's blocked, use a plumbing snake or pressure nozzle to clear it.
3. Inspect for Gutter Damage
Once your gutters are clean, take time to inspect them for damage.
Look for:
Sagging or loose sections
Rust spots or holes
Separated joints
Signs of overflow from previous storms
If you find any damage, make repairs now—before the next big downpour. Use gutter sealant, replace broken brackets, and consider installing new sections if necessary.
4. Examine the Roof for Potential Trouble
Now it’s time to turn your attention to your roof. A quick inspection can help you catch issues early and avoid bigger problems later.
What to look for:
Missing, loose, or curling shingles
Cracked or worn flashing around vents or chimneys
Pooling water or sagging areas
Debris buildup in roof valleys
Use binoculars or a drone if you’re not comfortable climbing up. Better yet, hire a professional roofer for a full inspection.
5. Trim Trees Around Your Roof and Gutters
Overhanging branches can drop leaves, seeds, and twigs directly onto your roof and gutters, quickly causing blockages. In storms, branches can even snap and damage your shingles or siding.
Trim back any tree limbs that are:
Hanging directly over your home
Touching or scraping your roof
Close to power lines (hire a pro for these)
This small step can save you from a big cleanup job or costly damage.
6. Check the Attic for Hidden Leaks or Mold
You might not see the problem from outside—but your attic tells the truth. Head up there on a dry day and inspect for:
Dark water stains on wood or insulation
Mold or mildew smells
Signs of animal nests (which can damage insulation)
Sunlight peeking through roof decking
Any of these could signal a leak waiting to get worse. Fix it now while it's manageable.
7. Install Gutter Guards (Optional but Helpful)
If you’re tired of constant gutter cleaning, gutter guards might be worth it. These mesh or screen covers go over your gutters to block out large debris while allowing water to flow.
Benefits:
Reduces cleaning frequency
Prevents clogs from forming
Keeps pests and birds out
Extends the life of your gutter system
There are several types—foam inserts, mesh screens, and surface tension guards. Choose the best fit for your budget and roof type.
8. Ensure Proper Drainage Away From the Home
All that rainwater has to go somewhere. Once it leaves your gutters, it should be channeled away from your foundation to prevent basement leaks, erosion, or flooding.
Make sure:
Downspouts extend at least 4–6 feet away
Water doesn’t pool near the base of your home
Drainage slopes away from the house
If needed, use splash blocks or drainage extensions to guide water further out.
9. Repair Flashing and Sealant Around Roof Features
Flashing is the thin metal or rubber barrier installed around roof features like vents, chimneys, and skylights. It helps direct water away and keeps vulnerable spots dry.
Over time, flashing can:
Crack or peel
Come loose in storms
Deteriorate from sun and weather exposure
Reapply roofing sealant or have damaged flashing professionally replaced to stop leaks before they start.
10. Schedule a Professional Roof Inspection
If you’re unsure about the condition of your roof or gutters, it’s smart to bring in the pros. A qualified roofer can:
Spot signs of hidden damage
Check for proper gutter alignment
Evaluate roof age and wear
Recommend needed repairs
Peace of mind during the rainy season is worth every penny.
Conclusion: A Dry Home Starts With Smart Prep
With heavy rain on the horizon, now is the time to get your roof and gutters in top shape. Taking proactive steps today can save you from expensive repairs, water damage, and stressful emergencies tomorrow.
Here’s your quick rainy season checklist:
✅ Clean your gutters and downspouts ✅ Inspect for roof and gutter damage ✅ Trim trees and improve drainage ✅ Repair flashing and check your attic ✅ Call a professional if needed
When the skies open up, your home will be ready to weather the storm. For expert help with roof and gutter maintenance, visit Rip City Roof Cleaning and prepare your home for whatever comes next.
1 note
·
View note
Text
What are the methods of fixing roof coverings?
If you've noticed some wear and tear on your roof, you're probably asking yourself, "What are my options for fixing this?" You might feel unsure whether you need a simple patch-up job or a full roof replacement. Either way, it’s great that you’re looking into the best ways to address the issue. You don’t have to go through the process alone—working with a professional roofing contractor like Lastime Exteriors will make things easier.
In this article, we'll explain the various methods of fixing roof coverings so you’ll know what to expect and feel more confident when making decisions about your home’s roof. Whether you're dealing with shingles needing replacing, leaks requiring quick attention, or general wear, this guide will help explain the process.
Types of Roofing Materials and Their Common Problems
Before we discuss methods for fixing roof coverings, it’s helpful to understand the different types of roofing materials and the issues they typically face. The most common types are asphalt shingles, metal roofing, tile, and flat roofs. Each material has its own maintenance needs, so knowing what’s on your roof is a good first step.
Asphalt Shingles: Asphalt shingles are widely used for their affordability and ease of installation. Common problems include curling, cracking, and losing granules over time.
Metal Roofing: Metal roofs are known for their durability, but they can suffer from rusting, loose fasteners, or dents from hail and debris.
Tile Roofing: Tile roofs are long-lasting but can crack or break due to heavy impacts.
Flat Roofing: Flat roofs often experience leaks due to pooling water or cracks in the membrane.
Now that you know what to look for, let's move on to the actual methods of fixing roof coverings with the help of a trusted roofing contractor.
How a Roofing Contractor Replaces Damaged Shingles
One of the most common repairs involves replacing damaged shingles. You may notice curling or missing shingles if you have an asphalt shingle roof. A roofing contractor will remove the damaged or missing shingles and replace them with new ones to ensure your roof continues to protect your home effectively.
The process starts with the contractor lifting the shingles above the damaged area. They’ll carefully pry out the nails holding the damaged shingles in place, slide in a new one, and nail it down securely. While this may seem simple, it’s always best to let an experienced professional handle it to avoid causing further damage.
Working with a professional like Lastime Exteriors means you won’t have to worry about accidentally causing a leak or weakening the structure of your roof during the repair.
Patching Leaks: The Role of a Roofing Contractor
If you’ve noticed water stains on your ceiling or heard the dreaded drip of a leak, you’ll need to address it as soon as possible. Leaks can occur for many reasons—damaged flashing, broken shingles, or cracks in the roof surface.
The first step in fixing a leak is identifying the source. This can be tricky, as water doesn’t always travel straight down from the leak; it may run along beams and walls before pooling. Once the source is found, your roofing contractor will likely use a sealant or roof patch to close the hole or crack.
For larger leaks, your contractor may need to replace part of the roof, especially if water has caused rot in the underlying structure. With Lastime Exteriors, you’ll get a thorough inspection to identify and fix the problem.
Fixing Flashing Issues with the Help of a Roofing Contractor
Flashing is the material (usually metal) placed around vents, chimneys, and skylights to prevent water from seeping into your home. If flashing becomes loose or damaged, it can be a major source of leaks. The good news is that fixing flashing is straightforward.
Your roofing contractor will start by removing the old, damaged flashing. They’ll clean the area to ensure a proper seal, then install new flashing that fits securely in place. Flashing repairs might sound minor, but they're crucial to maintaining the integrity of your roof and preventing future water damage.
When you work with Lastime Exteriors, you’ll have peace of mind knowing that all the details, including flashing repairs, are handled with care.
Re-Sealing a Flat Roof with a Roofing Contractor
Flat roofs, while more common on commercial buildings, are also found in some homes. If you have a flat roof, you may notice issues like water pooling or cracking in the membrane. These types of roofs often require re-sealing to maintain their protective qualities.
A professional roofing contractor will inspect the roof's surface for cracks or worn areas. They’ll clean the roof and apply a fresh layer of roofing sealant to ensure the surface is watertight. Depending on the roof's condition, they may add a new protective coating layer to extend its lifespan.
Flat roof maintenance can seem intimidating, but when you trust a professional like Lastime Exteriors, you know your roof is in good hands.
Repairing Roof Ventilation Issues with a Roofing Contractor
Proper ventilation is key to the longevity of your roof. Without it, heat and moisture can build up in your attic, leading to problems like mold, rot, and premature aging of your roofing materials. If your roof isn’t ventilating properly, a roofing contractor can help inspect the system and make necessary adjustments.
Roof vents may need to be repaired or replaced, or your contractor may suggest adding more vents to improve airflow. Ventilation issues aren’t always obvious, so it’s a good idea to have a professional like Lastime Exteriors inspect your roof regularly.
Handling Roof Decking Damage with a Roofing Contractor
Roof decking is the wood or plywood layer forming your roof's foundation. If water leaks through your roof covering, it can lead to rot or damage to the decking. Unfortunately, this problem often goes unnoticed until a major issue arises.
If a roofing contractor detects damage to your decking, they must remove and replace the affected areas with new materials. This type of repair is more invasive, as it involves removing part of the roof to get to the decking, but it’s necessary to ensure your roof remains structurally sound.
At Lastime Exteriors, your roofing contractor will walk you through the process and explain the best action to restore your roof’s strength.
Replacing Roof Valleys with a Roofing Contractor
Roof valleys are where two roof planes meet, creating a natural pathway for rainwater flow. Because valleys collect so much water, they’re prone to wear and leaks over time. If you notice issues like water pooling or damaged shingles in the valley, it may be time for a replacement.
A roofing contractor will remove the shingles from the valley, inspect the underlying materials, and install new shingles or flashing as needed. Since valleys are a key part of your roof’s drainage system, keeping them in good condition is essential to prevent leaks and water damage.
When you call Lastime Exteriors, you can trust that your roof valleys will be repaired or replaced with care to ensure long-lasting protection.
When to Call a Roofing Contractor for a Full Roof Replacement
Repairs may sometimes be insufficient, and a full roof replacement becomes necessary. This usually happens when the roof has extensive damage, is past its expected lifespan, or is more costly than a replacement.
A roofing contractor will assess the condition of your roof and help you decide whether it’s time for a new one. At the same time, it may seem like a big investment, but a new roof offers better protection and energy efficiency and can increase the value of your home.
At Lastime Exteriors, we work closely with you to choose the right materials and create a plan that fits your budget. We ensure the process is as smooth as possible, giving you peace of mind that your home is protected for years.
Maintaining Your Roof with the Help of a Roofing Contractor
Regular maintenance is the key to avoiding costly repairs or replacements. Having a roofing contractor inspect your roof once a year can catch small issues before they become big problems. Maintenance, from cleaning gutters to checking for missing shingles, helps your roof last longer and perform better.
At Lastime Exteriors, we offer comprehensive maintenance services to keep your roof in shape. By partnering with a professional, you can ensure your home stays protected from the elements all year.
There are many methods for fixing roof coverings, and knowing what to expect can help you make the best decisions for your home. Whether you need to replace a few shingles, patch a leak, or consider a full roof replacement, having a skilled roofing contractor by your side makes all the difference.
If you need repairs or want to maintain your roof, Lastime Exteriors is here to help. Our experienced team will assess your roof, recommend the best solutions, and ensure your home is well-protected.
Your roof is an important part of your home—let’s keep it in the best shape possible together.
2 notes
·
View notes
Text
Chimney Repairs: How to Spot Problems Before They Worsen
Chimneys are a vital yet often overlooked part of many UK homes, enduring harsh weather conditions and constant exposure to the elements. Whether you use your chimney for an open fire, a wood burner, or as a decorative feature, regular maintenance is essential to prevent minor issues from escalating into costly repairs. Neglecting chimney problems can lead to structural damage, water leaks, or even safety hazards like chimney fires or carbon monoxide leaks. This comprehensive guide will help you identify common chimney issues early, understand their causes, and take proactive steps to address them, ensuring your chimney remains safe and functional.
Why Chimney Maintenance Matters
Chimneys are exposed to wind, rain, snow, and temperature fluctuations year-round, making them prone to wear and tear. In older UK properties, particularly Victorian or Edwardian homes, chimneys are often constructed with materials like lime mortar, which can degrade over time. Without regular inspections and maintenance, small problems can worsen, leading to expensive repairs or even the need for a complete chimney rebuild. According to industry standards, chimneys should be inspected at least once a year, ideally before winter, to ensure they’re in good working order. Early detection of issues can save homeowners hundreds, if not thousands, of pounds in repair costs.
Common Chimney Problems and How to Spot Them
1. Cracked or Eroded Mortar Joints
Mortar joints hold the bricks or stonework of your chimney together, providing structural integrity and a watertight seal. Over time, exposure to weather can cause mortar to crack, flake, or erode—a process known as spalling. This is particularly common in older UK homes where lime-based mortar was used, as it’s less durable than modern cement-based alternatives.
How to Spot It:
Look for visible cracks or gaps between bricks or stones from the ground using binoculars.
Check for black voids where mortar has receded.
Inspect nearby interior walls for signs of damp or peeling paint, indicating water ingress through damaged joints.
What to Do:If caught early, repointing—renewing the mortar joints—can restore stability and prevent water penetration. This process involves removing damaged mortar and replacing it with a durable mix, often costing around £400–£1,200 depending on the chimney’s size and location. Delaying repairs can lead to water damage or structural instability, potentially requiring a partial or full rebuild.
2. Damaged or Missing Flashing
Flashing is the metal (often lead) seal between the chimney and the roof, designed to prevent water from leaking into your home. Over time, flashing can crack, rust, or pull away due to weathering or poor installation.
How to Spot It:
Look for rusted, cracked, or loose flashing around the base of the chimney stack.
Check for water stains or damp patches on ceilings or walls near the chimney, especially after heavy rain.
Inspect the roofline for gaps where flashing has separated from the chimney or roof tiles.
What to Do:Minor flashing damage can often be repaired with sealant or by re-securing loose sections, costing around £200–£300. More extensive damage may require replacing the flashing entirely, with costs ranging from £400–£800 for a full replacement. Avoid using caulk as a primary fix, as it’s not a long-term solution for masonry or roofing materials.
3. Cracked or Crumbling Chimney Crown
The chimney crown, or flaunching, is the mortar or concrete layer at the top of the chimney that secures chimney pots and prevents water ingress. It’s often overlooked due to its position but is critical for protecting the chimney structure.
How to Spot It:
Use binoculars to check for cracks, chips, or loose mortar around the chimney pots.
Look for signs of water damage inside the home, such as damp spots in the attic or near the chimney breast.
Notice if chimney pots are leaning or misaligned, indicating degraded flaunching.
What to Do:If the crown is cracked but intact, a brush-applied, flexible sealant can prevent further water damage. For more severe damage, the flaunching may need to be removed and replaced with a new mortar mix, costing around £80–£130. Waterproofing the crown after repairs can extend its lifespan.
4. Damaged Flue Liner
The flue liner channels smoke and gases out of your home while protecting the chimney’s interior from heat and corrosion. Older chimneys may have clay or concrete liners that crack over time due to heat expansion or chimney fires, while newer ones often use stainless steel.
How to Spot It:
Look for pieces of clay or concrete in the fireplace, indicating shaling (tile degradation).
Notice reduced draft or excessive soot buildup in the fireplace.
Be alert for signs of carbon monoxide in the home, such as headaches or nausea, which could indicate a compromised flue.
What to Do:Stop using the fireplace immediately if you suspect flue damage, as it poses a fire or carbon monoxide risk. A professional inspection, often using a CCTV camera, can confirm the extent of the damage. Replacing a flue liner typically costs £800–£1,200, depending on the chimney’s size and the liner’s material. Stainless steel liners are a durable, long-term solution.
5. Creosote Buildup
Creosote is a flammable residue produced when burning wood, especially unseasoned or green wood. It accumulates inside the flue, increasing the risk of chimney fires if not cleaned regularly.
How to Spot It:
Notice black soot or shiny, tar-like deposits in the fireplace.
Observe reduced draft or excessive smoke when using the fire.
Check for a strong, smoky smell near the chimney.
What to Do:Hire a certified chimney sweep for an annual cleaning, costing around £50–£100. Regular sweeping removes creosote and other debris, reducing fire risks. The National Fire Protection Association recommends annual inspections to ensure safety.
6. Spalling Bricks
Spalling occurs when moisture penetrates porous bricks, freezes, and expands, causing the brick surface to crack or flake. This is common in older UK chimneys exposed to freeze-thaw cycles.
How to Spot It:
Look for chipped, cracked, or flaking bricks on the chimney stack.
Check for white stains (efflorescence) on the brickwork, indicating moisture infiltration.
Inspect for loose or crumbling bricks, especially after cold weather.
What to Do: Minor spalling can be addressed by replacing individual bricks and sealing the chimney with a breathable water repellent, costing around £500 for small repairs. Extensive damage may require a partial rebuild, ranging from £600–£3,000. Applying a masonry sealant can help prevent future spalling.
7. Leaning Chimney Stack
A leaning chimney is a serious structural issue, often caused by sulphate attack (where sulphates in wet bricks cause expansion) or poorly supported chimney breasts after renovations.
How to Spot It:
Use binoculars to check if the chimney stack leans to one side, often away from the prevailing wind.
Look for vertical cracks or loose bricks in the stack.
Notice if chimney pots are misaligned or at an angle.
What to Do: Consult a structural engineer to assess the chimney’s stability. Minor leaning may be stabilised with a steel tie bar, but significant leaning often requires a partial or full rebuild, costing £1,000–£15,000 depending on the extent of the work. Act quickly to prevent collapse.
Preventative Maintenance Tips
To keep your chimney in good condition and avoid costly repairs, follow these practical steps:
Schedule Annual Inspections: Hire a certified chimney sweep or roofing professional to inspect your chimney annually, ideally before winter. A thorough inspection, including a video survey, can identify hidden issues.
Clean Regularly: Have your chimney swept at least twice a year if you use it frequently, or once a year for occasional use. This removes creosote, debris, and blockages.
Install a Chimney Cap or Cowl: A cap or cowl prevents rain, debris, and animals from entering the flue, reducing the risk of water damage and blockages. Costs range from £50–£150.
Apply a Breathable Sealant: Use a high-quality, breathable water repellent on the chimney stack to protect against moisture ingress while allowing trapped water to escape.
Check After Storms: Inspect your chimney for damage after heavy wind or rain, as these can exacerbate existing issues like loose flashing or cracked mortar.
Avoid DIY Repairs: Chimney work often involves working at height, requiring scaffolding or specialised equipment. Always hire professionals to ensure safety and quality.
When to Call a Professional
While some issues, like loose chimney pots or minor creosote buildup, can be spotted from the ground, most chimney problems require professional expertise. Internal damage, such as a cracked flue liner or leaning stack, is difficult to diagnose without specialised tools like CCTV cameras. The National Fire Protection Association recommends annual inspections by certified professionals to ensure safety. If you notice signs of water damage, structural issues, or reduced fireplace performance, contact a qualified chimney sweep or roofer immediately.
Cost Considerations
Chimney repair costs in the UK vary based on the type of repair, chimney size, location, and access requirements. Here are average costs for common repairs:
Repointing: £400–£1,200
Flashing Repair/Replacement: £200–£800
Flaunching Repair: £80–£130
Flue Liner Replacement: £800–£1,200
Partial Chimney Rebuild: £600–£3,000
Full Chimney Rebuild: £4,000–£15,000
Scaffolding, often necessary for safe access, adds £200–£1,200 to the total cost, depending on the chimney’s location and height. Costs are typically higher in London and the South of England compared to the North or Midlands.
Conclusion
Regular chimney maintenance is crucial for keeping your home safe, warm, and free from costly damage. By learning to spot common problems like cracked mortar, damaged flashing, or creosote buildup, you can address issues early and avoid expensive repairs. Schedule annual inspections, clean your chimney regularly, and act quickly when you notice signs of trouble. With proper care, your chimney can remain a functional and attractive feature of your home for decades.
Learn more : Spray Foam Insulation Removal: Health Risks You Should Know
#roof installation#roofing contractor#roofing company#roofing services#roofing#roof repair#roof replacement#roofing installation
0 notes
Text
Residential Roof Leak Prevention - Flashing and Seals

Is your leaking roof causing unsightly water damage and stains on your ceiling and walls? Understanding how your roof’s flashing and seals work in tandem with your roofing system helps you keep roof maintenance current and prevent nuisance leaks.

newimageroofingatlanta.com gathered essential information on how roof flashing, sealants, and boots prevent leaks. And how a maintenance program extends your roof’s lifespan.
Roof Flashing Types in Residential Roofing
Flashing acts as a directional barrier, guiding water safely off the roof and away from joints and intersections. It is most commonly made from aluminum, galvanized steel, or copper and installed where the roof surface meets vertical walls, chimneys, and roof valleys.
Step Flashing

Use: Applied where roofing meets vertical walls (around dormers and chimneys). Each piece overlaps the next, like steps, ensuring water flows downward.
Benefits:
Effective water redirection
Easily replaceable in sections
Drawbacks:
Requires careful installation
Misaligned pieces can cause leaks
Continuous (Apron) Flashing

Use: Sections of metal where the roof meets walls or chimneys.
Benefits:
Quick installation
Fewer pieces mean fewer potential weak points
Drawbacks:
Less flexible than step flashing
Prone to warping over time due to thermal movement
Valley Flashing

Use: Installed in valleys where two roof slopes meet, where water flow is most concentrated.
Benefits:
Provides durable protection in high-flow zones
Reduces buildup of debris and ice
Drawbacks:
Requires regular cleaning
Improper sizing may restrict water flow
Drip Edge Flashing
Use: Installed along eaves and rakes to protect the edges and guide water into gutters.
Benefits:
Prevents water from seeping under shingles
Protects fascia boards from rot
Drawbacks:
Often omitted on older roofs
Loosens when not securely nailed
Chimney and Skylight Flashing

Use: Custom-fit flashing designed to wrap around the base and sides of chimneys or skylights.
Benefits:
Critical for leak-prone features
Designed to adapt to unique shapes
Drawbacks:
Labor-intensive to install
Must be inspected regularly for separation or cracking
Roof Sealant Types

Sealants are flexible, weather-resistant compounds applied to fill joints, cracks, and gaps around flashing and other roofing features. They serve as a watertight backup system.
Silicone Sealants
Benefits:
Excellent UV resistance
Remains flexible in hot or cold climates
Drawbacks:
Not paintable
May be more expensive than other options
Urethane Sealants
Benefits:
Strong adhesion to various materials
Paintable and highly durable
Drawbacks:
Shorter lifespan under UV exposure
Requires a clean, dry surface for proper bonding
Acrylic Sealants
Benefits:
Cost-effective and easy to apply
Suitable for most climates
Drawbacks:
Shorter lifespan
May dry out and crack in extreme temperatures
Sealants complement flashing by sealing fine gaps, imperfections, or joints where water might infiltrate. Their flexible nature ensures that minor structural shifts or temperature changes don’t break the seal.
Residential Roof Penetration Boots

Penetration boots, also called pipe boots or flashing boots, surround vent pipes and plumbing penetrations.
Construction: Usually rubber or silicone collars fitted over pipes and sealed into the roof using metal flashing and adhesive.
Benefits:
Provide a waterproof seal around vent stacks
Flexible collar expands and contracts with weather
Drawbacks:
Rubber boots degrade under UV exposure
Should be inspected every 3–5 years
Boots fill a critical gap in roof protection. Without them, every vent pipe becomes a leak hazard.
How Flashing, Sealants, and Boots Prevent Leaks
Flashing redirects water away from weak points. Sealants fill gaps and cracks. Penetration boots seal around protrusions. Together, they create a watertight system designed to defend every vulnerable inch of a roof.
Flashing is placed to overlap shingles and other roofing materials, creating a seamless path for water to flow away from walls, chimneys, and valleys.
Sealants are applied where flashing meets surfaces (forming a continuous water barrier).
Boots wrap around pipes and are tightly sealed into roofing layers, eliminating gaps where water could enter.
New Image Roofing Atlanta Maintenance Program

A professionally managed roof maintenance program ensures that flashing, sealants, and boots are inspected and maintained. At New Image Roofing Atlanta, our maintenance program is designed to extend the life of residential roofs by identifying potential failures before they result in leaks.
Here’s what homeowners can expect:
Bi-annual inspections to assess roof condition and document wear
Sealant touch-ups where weather or time has degraded existing materials
Flashing and boot replacement when rust, separation, or UV damage is found
Gutter and valley cleaning to maintain proper water flow
Many leaks develop slowly. Tiny cracks or separations in flashing and boots can go unnoticed until significant water damage occurs. We help homeowners avoid costly repairs and maximize roof lifespan. With regular maintenance, roofs that would fail after 15 years can often last 25 or more.
Key Considerations for Residential Roof Flashing, Boots, and Seals
Choosing flashing and sealant materials is only half the equation. Proper installation and inspections are essential to leak prevention.
1. Climate and UV Exposure:
Roofs in hot, sunny climates need materials that can resist intense UV rays. Silicone sealants and aluminum flashing perform well in these conditions, while rubber boots may degrade more quickly without UV protection.
2. Roof Slope and Drainage:
Low-slope roofs require robust flashing in valleys and seams as water moves slowly, increasing chances for seepage. Drip edges and fully sealed flashing should always be included in these systems.
3. Material Compatibility:
Mixing metals like copper and galvanized steel can result in galvanic corrosion. Installers must ensure all components are compatible and properly bonded.
4. Building Movement:
Temperature, soil conditions, and settling cause a home to shift. Sealants and boots must be flexible with these shifts. Silicone-based products provide superior elasticity.
5. Maintenance Intervals:
Flashing may last decades, but sealants and boots require attention every few years. Inspect roofs biannually (spring and fall are ideal).
6. Contractor Experience:

Improperly installed flashing can do more harm than good. Always hire qualified contractors with experience in your specific roofing.
Flashing, Seals, and Boots
In this article, you discovered essential information about how roof flashing, sealants, and penetration boots prevent leaks (and why a maintenance program can extend your roof’s lifespan).
A watertight roof is protected at every seam, slope, and pipe. Flashing, sealants, and boots are essential components in residential roofing. With thoughtful material selection, professional installation, and regular maintenance from trusted providers like New Image Roofing Atlanta, your roof can withstand a significantly longer lifespan.
Failure to maintain your roof’s flashing, sealants, and penetration boots can result in pesky leaks, unsightly water damage, and costly repairs.
Sources: fema.gov/node/618044 basc.pnnl.gov/resource-guides/flashing-penetrations-existing-roofs extension.umn.edu/protecting-home-rain-and-ice/sealing-roofs-walls-windows-and-doors-keep-water-out
New Image Roofing Atlanta
2020 Howell Mill Rd NW Suite 232 Atlanta, GA30318 (404) 680-0041
To see the original version of this article, visit https://www.newimageroofingatlanta.com/residential-roof-leak-prevention-flashing-and-seals/
#emergency roof repair#residential roofing#residential roofer atlanta#Roof Flashing#Roof Seals#Penetration Boots#Chimney Flashing#Skylight Flashing
1 note
·
View note
Text
How Can the Top Roofers in Erie Help Extend the Life of Your Roof with Preventive Maintenance?
A roof is one of the most important components of any building—it protects your home or business from the elements, insulates against extreme temperatures, and enhances property value. In a city like Erie, PA, where seasonal shifts bring snow, rain, and strong winds, proper roof maintenance is critical. Preventive maintenance by professional roofers in Erie can significantly extend your roof’s lifespan, saving you money and stress in the long run.
In this blog, we’ll explore how top roofers in Erie help homeowners and business owners maintain their roofing systems, prevent damage, and prolong the life of their roofs through proven strategies.

Understanding Preventive Roof Maintenance
Preventive maintenance involves scheduled inspections, small repairs, and routine upkeep designed to catch minor issues before they turn into expensive problems. For Erie residents, where weather conditions can accelerate roof wear and tear, preventive care is more than just an option—it’s a necessity.
Roofing companies Erie PA offer services that help detect leaks, remove debris, address flashing issues, and inspect the integrity of shingles, tiles, or metal panels.
Why Preventive Maintenance Matters
Many property owners wait until a leak appears or significant damage occurs before calling professionals. However, this reactive approach can be costly. Preventive maintenance offers several advantages:
Extended Roof Life: Regular inspections allow early identification of wear and tear.
Cost Savings: Fixing a small issue today prevents a large-scale repair tomorrow.
Improved Energy Efficiency: Sealing leaks and fixing insulation gaps reduce heating and cooling costs.
Peace of Mind: Knowing your roof is in good condition provides year-round confidence.
Top roofers in Erie follow a systematic process that includes assessments, reporting, and necessary repairs—all tailored to the specific roofing material.
Services Offered by Erie Roofing Experts
Erie Roofing offers tailored maintenance packages for both residential and commercial clients. Their highly trained team ensures that every part of your roof functions correctly, whether you have a traditional shingle system or modern metal roofing.
Here are the preventive maintenance services typically provided:
1. Routine Inspections
Scheduled inspections help spot early signs of damage like cracked shingles, missing flashing, or rusted metal panels. Experienced Erie PA roofers will examine your entire roof structure, including gutters and ventilation points.
2. Debris Removal
Leaves, twigs, and snow buildup can clog drainage systems, leading to water damage. Removing these elements helps maintain roof drainage and avoids pooling, which is common in Erie winters.
3. Gutter Maintenance
Clean gutters play a major role in water drainage. Roofing Erie PA professionals ensure your gutters are clear and functioning, reducing the chance of roof leaks and water damage.
4. Flashing and Sealant Repair
Flashing seals joints around chimneys, skylights, and vents. Over time, these areas may crack or degrade. Erie roofing companies reseal and reinforce flashing during maintenance visits.
5. Minor Repairs
If the inspection reveals small issues like loose shingles or sealant cracks, roofers address them immediately, preventing more costly problems down the line.
Material-Specific Preventive Care
Every roof material has different needs. Whether you own a residential home with shingles or a commercial facility with metal roofing, Erie Roofing offers targeted maintenance solutions.
Shingle Roofs
Shingle roofs, while popular, are prone to granule loss, curling, and cracking. A shingle roofing company in Erie focuses on checking the overall shingle condition, replacing damaged pieces, and maintaining protective layers.
Metal Roofs
Metal roofing is known for its longevity, but it still requires attention. Metal roofing installation in Erie areas often involves checking for rust, seam separation, or fastener loosening. Preventive care includes sealing and cleaning to extend performance.
Commercial vs. Residential Maintenance Needs
While both commercial and residential roofs benefit from preventive maintenance, the approach differs slightly:
Erie Residential Roofing: Focuses more on weather resistance, shingle integrity, and attic ventilation.
Erie Commercial Roofers: Often deal with flat roofs, membrane systems, and HVAC system interactions. Maintenance involves checking drainage, sealing joints, and addressing foot traffic damage.
Seasonal Maintenance Tips for Erie Homeowners
With Erie’s changing seasons, each time of year brings different maintenance priorities. Here’s what to keep in mind:
Spring: Inspect for winter damage, clear gutters, check flashing.
Summer: Schedule inspections, repair UV damage, ensure ventilation.
Fall: Remove debris, prepare for snow, clean gutters again.
Winter: Monitor snow loads, prevent ice dams, schedule emergency services if needed.
Following this seasonal checklist with the help of roofing services from Erie Roofing helps prevent major issues year-round.
The Role of Professional Roofers in Long-Term Roof Health
Professionals bring knowledge, tools, and experience that the average property owner doesn’t have. The best roofing contractors near you will use drone inspections, thermal imaging, and leak detection systems to uncover hidden problems.
Top roofers in Erie are licensed, insured, and up to date with roofing codes and safety regulations. Their proactive approach means fewer surprises and more value for your investment.
Roof Replacement vs. Maintenance
While maintenance can delay roof replacement in Erie PA, it can't prevent it forever. However, professional preventive care can often extend your roof's lifespan by 5–10 years or more.
When roof replacement is necessary, roofing companies in Erie help you choose the best option for your structure and budget—be it shingle, tile, or metal roofing.
Signs That You Need Preventive Maintenance
You don’t have to wait until your ceiling leaks. Contact Erie PA roofers for maintenance if you notice:
Shingles missing or curling
Gutter overflow or blockage
Mold on the roof or attic
Unusual indoor temperature changes
Discoloration on ceilings or walls
Rust stains on metal roofs
If you're Googling "roof repair near me" or roof repair that’s already a strong sign you should book an inspection.
Why Choose Us – Erie Roofing
At Erie Roofing, we believe in proactive care over reactive repairs. Our skilled team of Erie roofing experts brings years of experience, certified training, and customer-focused solutions to every project.
Here’s why Erie homeowners and business owners trust us:
Fully licensed and insured team
Personalized maintenance plans
High-quality materials and modern tools
Quick response times and emergency support
Transparent pricing with no hidden fees
From roof repair to metal roofing installation, our goal is to keep your roof strong, safe, and energy-efficient for years to come.
Frequently Asked Questions (FAQs)
Q1. How often should I schedule roof maintenance in Erie, PA? A: It’s recommended to schedule a professional inspection at least twice a year—once in spring and once in fall. However, after major storms, it’s wise to schedule an additional check.
Q2. What does preventive maintenance include? A: It includes inspections, debris removal, flashing checks, minor repairs, gutter cleaning, and sealing. The exact services may vary based on the roof type.
Q3. Is preventive maintenance worth it for metal roofing? A: Absolutely. Metal roofing may last longer than other materials, but without regular maintenance, rust, loosening seams, and fastener issues can occur.
Q4. Can preventive maintenance really prevent roof replacement? A: While it won’t prevent the need entirely, it can delay replacement significantly by catching and fixing problems early.
Q5. Do you offer both residential and commercial roofing maintenance? A: Yes, Erie Roofing provides comprehensive preventive services for both homes and businesses in the Erie area.
Conclusion
Your roof is a vital part of your home or commercial property. By partnering with top roofers in Erie, you invest in long-term value, safety, and comfort. Preventive maintenance is not just a service—it’s a strategy that helps you avoid bigger expenses and enjoy peace of mind.
Whether you’re looking for roofing services, roof repair, or simply want to understand how to extend your roof’s life, Erie Roofing is your trusted partner. Don’t wait for a leak—act today and schedule your preventive maintenance inspection.
Erie Roofing 1924 Keystone Dr, Erie, PA 16509, United States (814) 840-8149 https://www.erieroofingpa.com/ https://www.google.com/maps?cid=18213750102428623295
0 notes
Text
The Truth about DIY Roofing Repairs
DIY Appeal
Homeowners often tackle small leaks or loose shingles to save money. A few YouTube tutorials and basic tools give a false sense of confidence. It’s true you can fix minor issues yourself, but pinpointing damage, matching materials, and sealing properly are trickier than videos make it look. Before climbing that ladder, weigh real effort against potential mistakes.
Tools and Skill Requirements
Effective repairs require more than a hammer and nails. You need a reliable ladder, harness, roofing sealant, replacement shingles or flashing, and possibly power equipment. Matching shingle profiles and securing underlayment takes practice. Even skilled DIYers usually stop at caulking or replacing one tile. For anything beyond patchwork, you risk improper installation that leads to leaks, rot, or structural damage exactly what Tyler TX roofing professionals guard against.
Timing and Weather Considerations
Roof work demands dry, mild conditions. Rain ruins sealants, wind upends materials, and extreme heat can deform shingles or burn installers. In the Tyler climate, summer storms and scorching sun create tight windows for safe, effective repairs. Misjudging timing means wasted work, damaged products, and risk of injury. Professionals monitor forecasts and schedule work when conditions align perfectly.
Safety First
Falls are the leading cause of home-improvement injuries. Roof slopes, hidden weak spots, and weather hazards multiply danger. Without proper fall protection, you risk serious harm. Professionals train on safe techniques, use harness systems, and carry liability insurance. If you’re not 100% comfortable at heights and with safety gear, DIY roofing isn’t worth the risk.
Quality and Longevity
Even if you patch a leak, will it last? Roofing pros ensure each element—underlayment, flashing, shingles, sealant—works together as a system. Improper nail patterns, undercut seams, or mismatched materials lead to accelerated wear, voided warranties, and repeat visits to your roof. Investing in professional installation means cohesive workmanship and manufacturer-backed guarantees that outlast a quick DIY fix.
When to Hire a Pro
Small sealant jobs or gutter clearing are fair game for handy homeowners. Anything involving multiple shingles, flashing around chimneys, or complex roof lines is best left to professionals. If you spot missing shingles over a large area, visible rot, or suspect structural damage, stop DIY immediately. A certified roofing contractor has the know-how, crew, and equipment to correct issues swiftly and permanently.
Making the Right Call
DIY roofing repairs promise quick savings but carry hidden costs, safety hazards, and potential warranty issues. For minor sealant touch-ups on a calm weekend, you can handle things yourself. For anything more complex, tap into professional roofing services. Their expertise safeguards your home, wallet, and well-being, ensuring the job gets done right the first time.
0 notes