#camtasia 8
Explore tagged Tumblr posts
Visit Tumblr Blog
Explore Tumblr blogs with no restrictions, modern design and the best experience.
Last Seen Tumblr Blogs


Fun Fact
US Tumblr user growth rate is estimated to slow down to 4.1%.
Note
Would you be able to share some of your gif making process/programs you use to make them? They look great! 💕
Omg thank you,,, 🥺💕💖💕 And yes ofc! I'm going to write down everything I can think of about my gif making process but if I forget anything/you have questions about something specific let me know! ✨
(Long post ahead)
Emulators & Recording
I use different emulators and recording programs, depending on the game I want to play/record:
DesMuMe: This is the one I use for DS games, and it comes with a neat “Record AVI” feature under the “File” tab. Just click it, choose a location for the file and click OK (make sure the Compressor is set to “Full frames (No compression)”). Recordings have a limit of 2 minutes/2GB, but when it reaches it, the program will automatically create a new file and keep recording until it reaches 2 minutes, and the process will repeat (the next recordings will have “part_X” in the name file). When you’re done recording, just lick on File > Stop AVI. Also! The recordings will always have the original resolution. My DesMuMe is set to be 2x its size with a gap between the screens, but all recordings are 256x384 pixels with no gap.
VisualBoyAdvance: Like DesMuMe but for GBA games. Also has a recording feature in Tools > Record > Start AVI recording. The resolution of the video will be that of the original game but I think there’s no limit on how long the recording can be. I’d still recommend stopping and restarting the recording every 5 minutes or so.
Other games & OBS Studio: For 3DS games I use Citra, and Dolphin for Wii ones. They both have Recording features but I don’t use them because they create weird files. Instead, I record them with OBS Studio. Open the program, click on "Start Recording" and then on "Stop Recording" when you’re done. Pretty simple, just remember OBS records your screen so obviously if your emulator window is minimized it won’t record it. You can change your OBS settings to only record the emulator window but I’m too lazy to tinker with OBS so I just record the whole screen lol. There’s always a slight loss of quality with OBS. If you’re recording games with 3DS models then it won’t be too noticeable, but I do not recommend using OBS for pixel/pixelated games like Nintendo DS and Game Boy ones.
Misc: Before OBS, I used to use Camtasia Studio 8. Also does the trick, but instead of saving a .mp4 file it creates its own type of file and it requires you to manually export it as a .mp4 (it's a hassle). It has some editing features too, which OBS does not as far as I can tell. Also, besides DesMuMe I have MelonDS. Highly recommend it if you need to use the multiplayer option (to trade pokemons between games for example) and most importantly for the better mic feature (you WON’T get past the Nintendogs tutorial on DesMuMe). Also the 3D model graphics are of higher quality, but it doesn’t have a recording feature so you will have to rely on OBS and as I said it lowers the quality.
As for video file types, both .avi and .mp4 are allowed in Photoshop. However, .mkv (mostly used for TV shows and movie files) is not, so if you want to edit, say, an anime episode in that format you’ll need to convert it to .mp4. I use Format Factory for that, although I think here’s a slight quality loss.
Here's a comparison of a pixel game recorded with OBS vs with DesMuMe. It's tiny but it will have you shaking the screen violently when you notice it.
OBS recording vs. DesMuMe recording
Do not delete or move the video file until you’re done making gifs of it. Even if you save the file as a .psd, you will get an error message if the video file is gone from its original location and you'll have to start over again.
Editing (I)
I exclusively use Photoshop 2020. If you use CSP, GIMP or other editing program you’ll have to find the equivalent features or look at other tutorials, because I’m only familiar with Photoshop. Other PS versions should have either the same or similar features. Here are the steps I usually follow (names might be wrong because my PS is in Spanish “OTL):
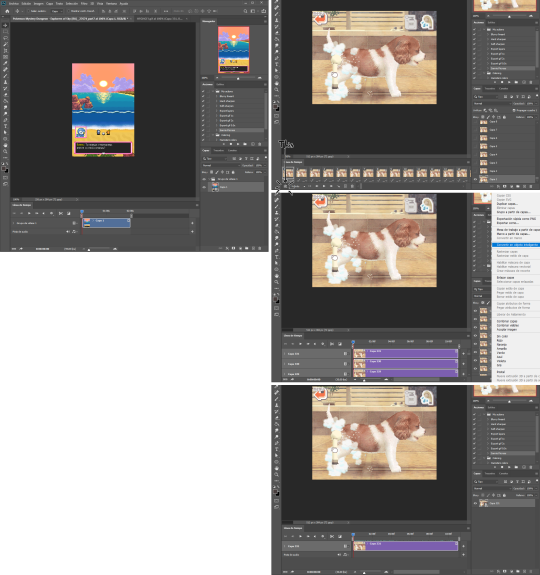
Importing: Drag and drop your file into PS. You should have your Timeline window on the bottom part. If you import a .mp4 or .avi file you should get the Video Timeline, which is what we will work with. If you export a .gif you will get the Frame Animation Timeline; in that case you need to convert it to a single timeline. Click on “Convert to Timeline Video”, then select all the layers (click on Layer 1 and then hold Shift+Click on the last layer) and then right-click on the last layer > “Convert to Intelligent Object”. This is what your PS window should look like for both cases:
avi/mp4 file (has a Video Timeline) vs. gif file (has a Frame Animation Timeline)
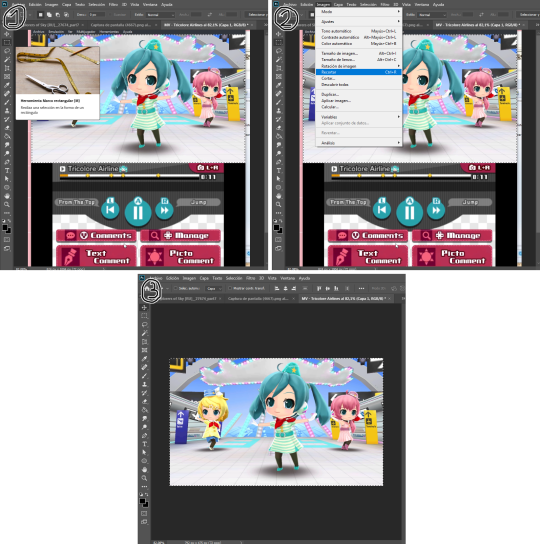
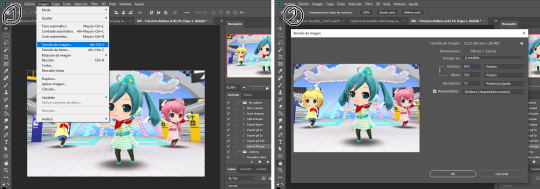
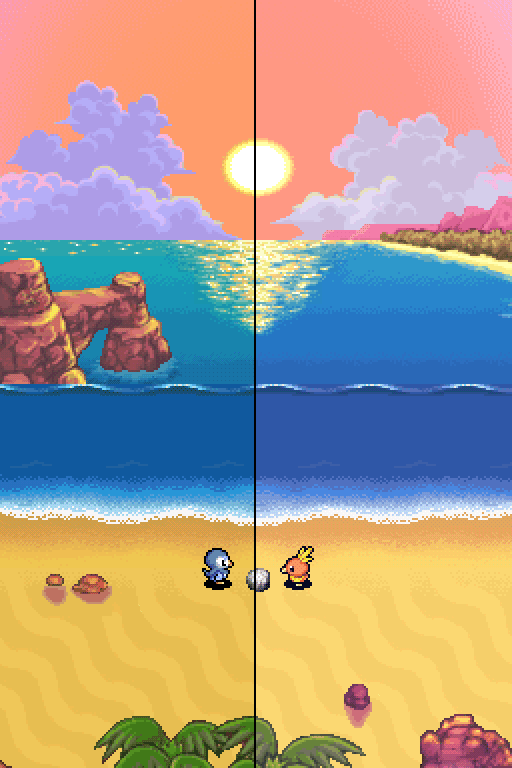
Cutting and resizing: Often your file will either be the wrong size or have unnecessary parts. To resize your video, go to Image > Image Size (NOT Canvas size) and change the resolution. For good gif quality, the image resolution should always be 540 pixels wide (Tumblr’s image size), height doesn’t really matter. PS will change the height proportionally if you change the width. So, for example, a 1440x1080 video will be 540x405 after the conversion. Similarly, you can crop out parts with the Selection tool + Image > Crop. Making pixel games bigger requires a different method (more on this later).
Cropping vs. Resizing
Cutting the timeline: Your gif will likely be too long, or you might need to stitch two parts together. In the Timeline window, move the vertical red line to the part where you want to make the cut. You can precisely move frame by frame with the arrows next to the play button. You can also zoom in and out the timeline with the slider at the bottom. Once you’ve placed the red line on the part where you want to make a cut, click on the scissors. You’ll get two layers – delete the one you don’t need and repeat until your gif is the right length. Similarly, you can click on either end of the timeline and drag it left and right to extend/reduce the length, but it’s less precise. I recommend moving the gif layer out of the video group in the Layer window, especially if you’re going to stitch parts together or add new layers that aren’t Color adjustment layers (like your watermark). If you do so, you’ll notice that each layer occupies a different line in the timeline, while if it’s in a group, it will all be in the same line (this means that all layers will be one after the other, you won’t be able to overlay them).

Cutting the timeline (1-3) + Moving the gif layer out of the video group (4)
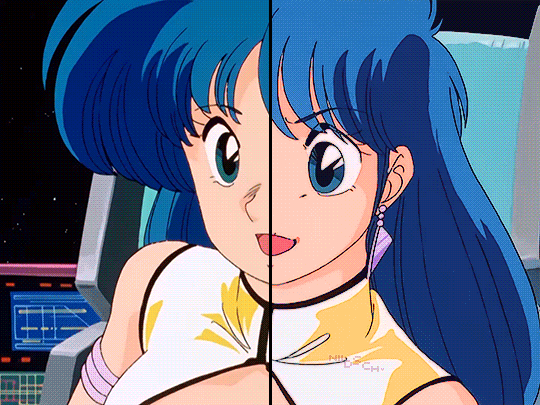
Color adjustments: The fun part! You can get hella crazy with this one. If you want to go for really fancy stuff, I recommend checking out @/usergif, they have lots of tutorials and gifsets you can use as inspiration. I am however a simple man and will mostly use the same tools: Sharpen, Hue/Saturation, Gradient Map and Curves.

Soft sharpen in the Filters tab + Curves, Hue/Saturation and Gradient Map in the Layer window
Editing (II)
Can't make a bullet list of a bullet list so here's each adjustment layer explained. Note that this part is very personal so feel free to tinker with the settings for each tool until you get what you like:
Sharpen: Used only with non pixel media, aka for 3D models and series/movies. It makes the image look sharper. You'll notice that the video layer can have two icons: a movie film or a folded paper (in the "Import" section, the Pokémon gif has a movie film icon, while the converted Nintendogs gif has a folded paper icon). If your layer has the former, the sharpen tool will only be applied to one frame. To avoid that, right-click on the layer > Convert to intelligent object. Resizing the image will also do the trick. Filters are always applied to the layer, they don't create a new one (this is what the rest of the following adjustments will do). As for settings, this is what I usually have:
Two types of Sharpen settings (original on the left)
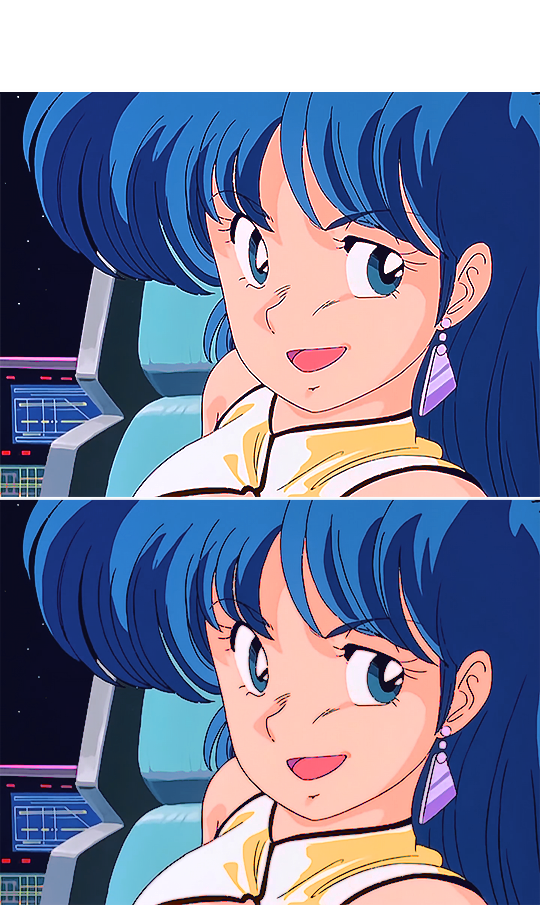
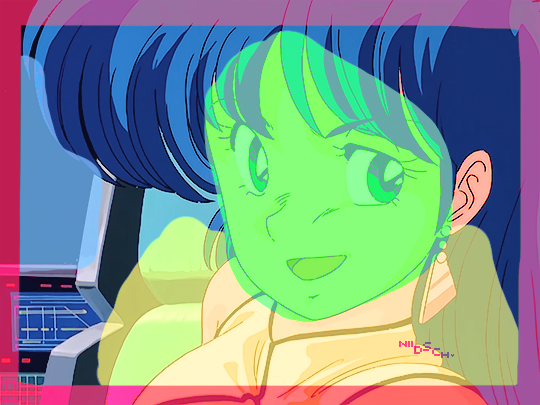
Hue/Saturation: Changes both the global colors and specific hues. To do the latter, open the menu right above all three sliders (by default it's set to "All") and then choose the color you want to change. Be careful! Sometimes you might accidentally edit the wrong hue, for ex a bluish green if you are editing blue hues. If you want to see what parts of the gif you're targeting, set the saturation to the max. Colors play a heavy role on gif size: the more diverse and brighter the color palette, the bigger the file. Gif size will be the ruin of your gif making process, so don't go too overboard with this. More on gif size later, but for now, I recommend "unifying" the color palette (aka making some hues similar).
Two examples of Hue/Saturation adjustments (Original above)
Gradient map: Adds a gradient overlay to the image. When you open the Gradient Map window, click on the gradient and you'll be able to edit it or create a new one. To do so, click on the tiny boxes with colors (only the lower ones, the upper ones won't work), then on the slightly bigger box to change the hue. To add a color, click anywhere below the gradient; to move the colors around, drag the tiny boxes and move them, and to edit the limit between each hue, drag the tiny diamond. The way gradient maps work is by editing the colors from lighter (right) to darker (left). So if you have blue on the right of the gradient, light hues will be blue, and if you have pink on the left of the gradient, dark hues will be pink, with mid tones being a mix of pink and blue (either purple, or bluish purple or pinkish purple). The image will look weird when you add a gradient map, but don't mind that for now. Just create the gradient you want and click OK. Now, select the new layer that has been created and play with the blending modes and the opacity of the layer until you get something you like. For blending modes, I usually go for the ones in the second and third sections. To edit either the Hue/Saturation layer or the Gradient Map one, click on the black and white icons (left to the mask, aka the white box) in the Layer window.
Video showing how Gradient map works

Two examples of Gradient maps, with a readjustment of the Hue/Saturation layer (Original above)
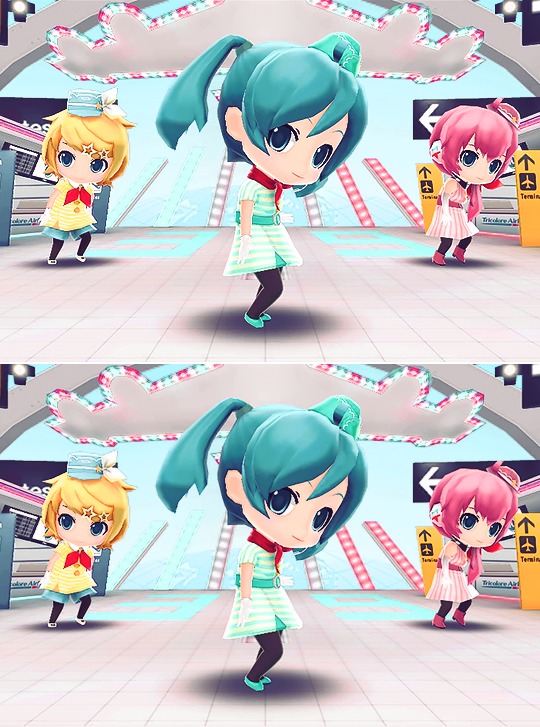
Curves: Edits the light, dark and mid tones. Click any point in the curve/line and then drag it around to see what it does. You can make more than one point in the curve. Afterwards, change the blending mode and the opacity.
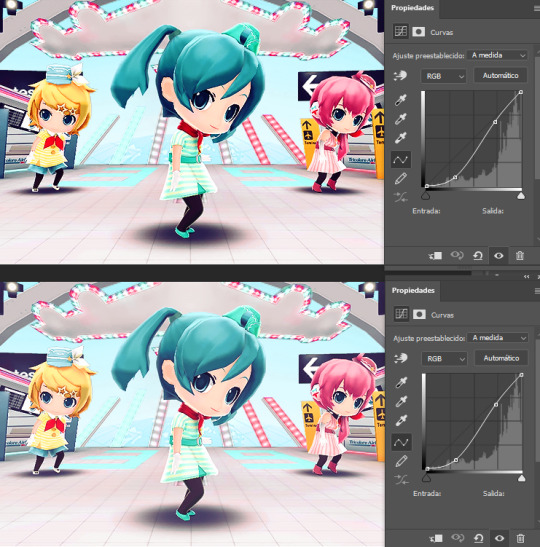
An example of a Curve and the same example with the Curves layer at 40%
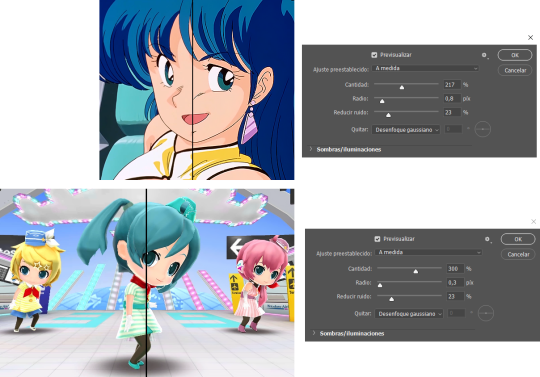
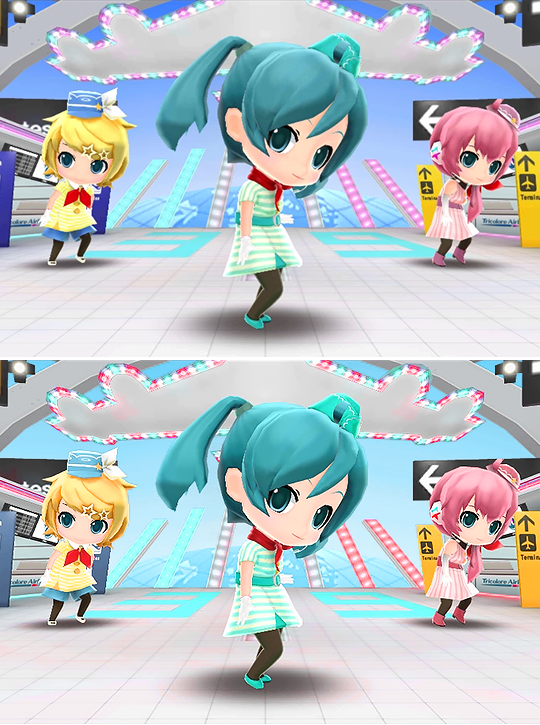
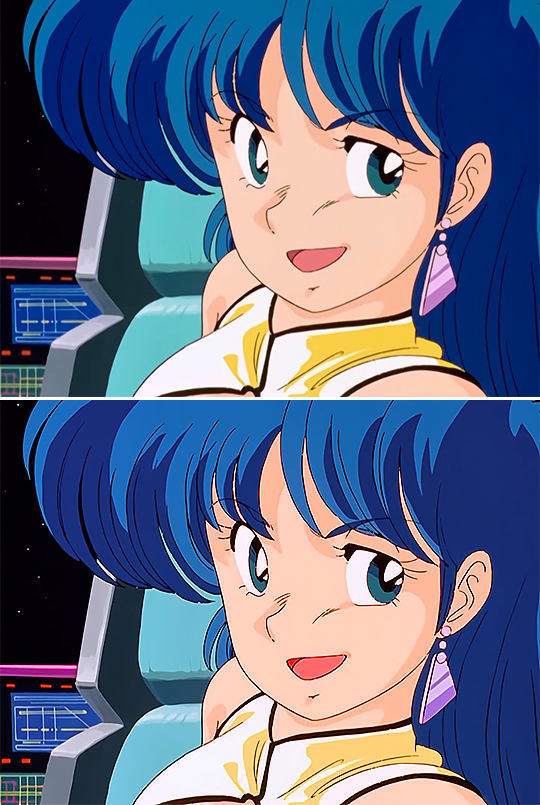
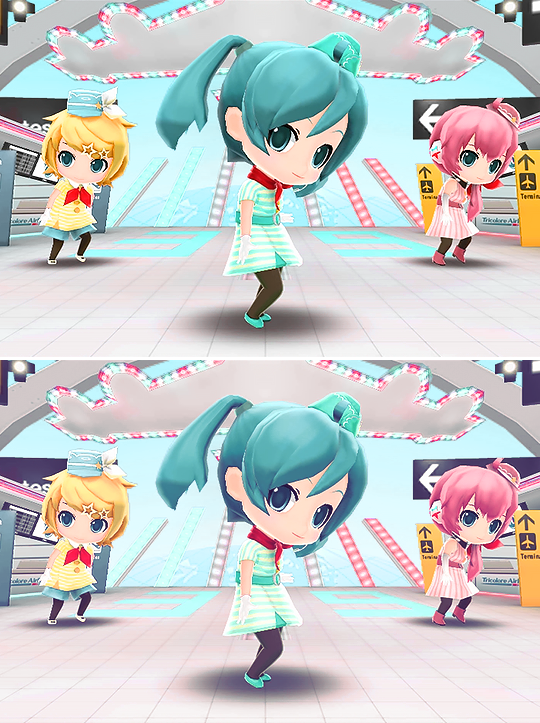
Gaussian blur: Sometimes I add a blurry/fuzzy effect to certain gifs. To do so, duplicate the gif layer (right-click > Duplicate layer), then, while selecting the new layer, go to Filters > Gaussian blur and pick a small numer (0,4-1). Click OK, set the blending mode of the new layer to Darken and lower the opacity.
Two examples of images with Gaussian blur applied (Original above)
Watermark: Add a watermark to your image. Click on the Text tool, create a text box, pick the font, the size, the color and the placement, and then click the ✔ button. Change the blending mode and opacity of the text layer. Personally, I have a .png image of my watermark that I just import to the gif and then edit, instead of creating a text box everytime. Regarding watermarks, I get that they are annoying but it's going to be far more annoying when someone reposts your gif without credit or crops the watermark out. Tumblr sucks when it comes to reporting this kind of stuff and you deserve to have your work respected (you've spent time and effort on this!!), so I highly recommend putting a watermark on your gifs. If you want to avoid having someone crop it, put it towards the middle of the image and not in a place that can be edited easily. Also, I usually save gifs without a watermark and add it afterwards.
Red: Danger zone, can get cropped easily. Blue: Also Danger zone, can be edited out. Green: Too obtrusive. Yellow: Perfect place, can't be edited out and it's not on the main focus of the image
Exporting
This is the "hell on earth" part. To export a gif, go to File > Export > Save for Web (Legacy), then once it loads (may take some time), play the gif a couple of times to make sure it looks good and save it. These are my settings:
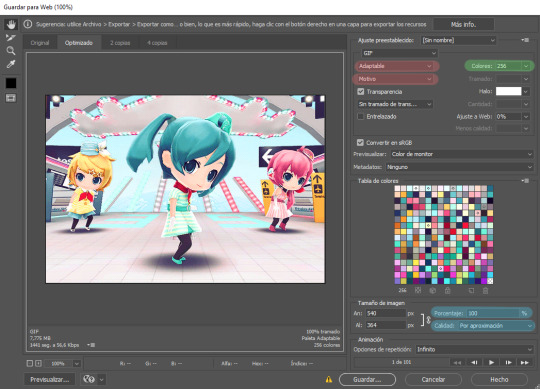
Settings for the Save for Web (Legacy). You'll only need to tinker with the settings on the right.
However, there's one thing to keep in mind: Tumblr has a size limit of 10MB per gif, meaning your gif won't be uploaded if it's larger than that, and you'll be surprised how easily you can surpass that limit. Also, gifs can't be longer than 500 frames, aka 8 seconds (to check the duration of your gif, zoom in in the Timeline Window, you can see the seconds at the top). Here are some pointers regarding gif size:
Pixel games and anime have a smaller size than life-action and 3D models: This is because the former have limited color palettes and the latter has way more colors. For example, Pokémon Mystery Dungeon or Sailor Moon will rarely pose problems, but Arcane, Breaking Bad, Nintendogs or Baldur's Gate 3 will.
The more complex the animation/motion, the bigger the size: This is because complex animations/motions, like a fight, have more unique frames than, say, someone moving their head up and down and nothing else, and that means there's more information to store.
The longer the gif/the bigger the resolution, the bigger the size: Kind of self-explanatory, longer gifs or gifs with big resolutions means more information stored in the file.
Bright and diverse color palettes increase the gif size: As explained in the first point, more colors means more information and thus a bigger file size.
The more it exceeds the limit, the bigger the changes you'll have to make: If it's 10.5MB you can get that number down easily. If it's like 20MB, you might need to cut the gif in half.
How do you solve this? There are a couple of methods:
Make the gif shorter: In the Timeline window, cut parts of your gif until it's short enough. If you don't want to delete certain parts, you can divide your gif in two separate ones.
Make the colors less bright/unify the color palette with an Hue/Saturation layer: If you haven't done this in the editing process and your gif exceeds 10MB, it's time to edit the gif colors.
Reduce the color palette: In the Save for Web (Legacy), you'll see that there's "Colors: 256" on the left (marked in green in the screenshot). 256 is the max amount of colors you can have, but you can reduce it. PS will automatically get rid of colors that have a smaller presence first (for example, in the anime gif above, if I reduced the colors it would get rid of the reds and magentas before the yellows or the blues).
Change the settings in the Save for Web (Legacy) window: Besides the color palette, there's a setting on the right side, marked in red in the screenshot above (the first one). I have it set to "Adaptable", which is the highest setting, but you can change it to "Perceptual", "Selective" or "Restrictive". This will lower the quality and thus the size, but sometimes it might mess up the gif. Similarly, you can change the setting below that one (set to "Motive" in the screenshot) to "Noise", "Difusion" or none at all to change the quality and size.
Optimize the gif: I use ezgif.com for this. Click on "Optimizer", upload your gif, make the Compression level smaller, click on "Optimize" and then save your gif. This will inevitably lower the quality, so I usually don't go lower than 35. Also, try to get your gif right below the 10MB limit, so if a compression level of 20 gets your gif to 9.5MB but a 15 gets it down to 9.9MB, choose 15. ezgif also has other cool features like one to slow down your gif's speed, so check it out!
Don't make gifs of media that causes problems: If you regularly find yourself being frustrated with gifs of X media exceeding the size limit, you might need to find something else. It sucks to think that you might not be able to make gifs of your favourite piece of media, but gif making should be fun, not ruin your day. Of course, it's up to you to decide how much effort you're willing to put on a gif, but don't overexert yourself either.
The Save for Web (Legacy) window is also where you can make your gif bigger in the case of pixel/pixelated games like Pokémon Mystery Dungeon or Nintendogs. In the "Image Size" section, set the quality to "Nearest Neighbor" and the percentage to 200% to double its size (it will be somewhat close to 540 pixels wide). You can make the gif three, four or even more times its size wih this method.
Closing thoughts and results
Managing a gif blog would require a whole new post with some advice so I'll leave that out for now. There are other things I've also left out like actions (highly recommend learning about them) but these are the basics methinks. Again, if you have any questions, my ask box is open ✨
And here are the gifs with a comparison to the original 🎉
Sharpen, Hue/Saturation, Gradient map and Gaussian blur

Sharpen, Hue/Saturation, Gradient map, Curves and Gaussian blur
Hue/Saturation and Gradient Map
#ysiposting#whew this took a while#now if you'll excuse me I'm going back to studying for exams. regrettably
23 notes
·
View notes
Text
Super Shadow, 3rd annivesary!!
The professor Gerald Robotnik may be my creator, but I take my own decisions!

Old one:
Made in FireAlpaca with Wacom Bamboo CTH-470
Animation made with Camtasia Studio 8
36 notes
·
View notes
Text
youtube
Motion and Camera By: iNsaNiTy
Song: Indila - Dernière Danse
Model: Robin Spheros (PMATGA OC) by Me and made in Koikatsu.
Programs used: Koikatsu Chara Studio and Camtasia 8.
Is it me or the quality video in tumblr is superior than Youtube Quality?
Anyway i hope you loved this video with Robin, oc at this point i have some favoritism and affection at her coff coff sorry brad uxu.
#pmatga oc#pmatga#pacman and the ghostly adventures#koikatsu#mmd#indila#deer deer deer girl!#Youtube
8 notes
·
View notes
Text
Nosso artigo de hoje é sobre o Camtasia 8 além de acesso a um curso completo, leia mais..
0 notes
Text
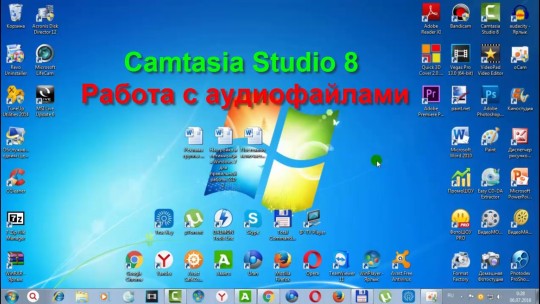
Здравствуйте, мои уважаемые друзья и подписчики!
Сегодня мы рассмотрим с Вами, как работать с аудиофайлами в программе Camtasia Studio 8. Мы рассмотрим, как поставить для обработки аудио на монтажную дорожку, как ее обрезать, улучшать качество звучания и многие другие вопросы.
Желаю Вам и членам Ваших семей здоровья, добра и всех благ!
Данное видео можно увидеть на других видеоканалах:
YouTube - https://www.youtube.com/watch?v=uYeTziyzggk&t=26s
ОК - https://ok.ru/video/9622527412757
ВК - https://vkvideo.ru/video230530462_456240608
Дзэн - https://dzen.ru/video/watch/677e26ed7b326f44079eaf72
Телеграм - https://t.me/+rbqQfr_DnpY3ZGQy
0 notes
Note
how do your make your vids? not just software I was wondering about like creative process I guess
i use camtasia studio 8 for editing but i promise its not worth the money pleassseee buy better software if u can afford it (camtasia studio 8 is like?300 USD ? but i used the free trial a million times before they added the gay ass watermark to ur shit. sigh) ive just been using it for around 10 yrs now so its all i know. & i guess it depends on the type of video i usually put things together in a couple hours & i really Really like matching things up with music & sounds its good but i HATE DRAWING when i have an actual idea in my head because it looks wrong. as it does for everybody i suppose. artist tingz
i dont remember the process of making anything honestly i just know i have fun & i want to do animation but only for the video editing experience To Be Honest
0 notes
Text
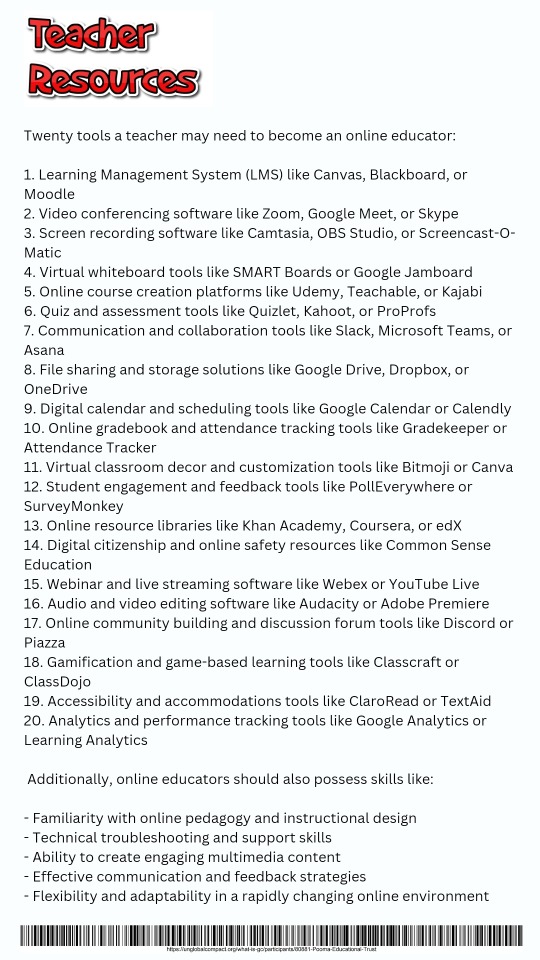
Twenty tools a teacher may need to become an online educator:
1. Learning Management System (LMS) like Canvas, Blackboard, or Moodle
2. Video conferencing software like Zoom, Google Meet, or Skype
3. Screen recording software like Camtasia, OBS Studio, or Screencast-O-Matic
4. Virtual whiteboard tools like SMART Boards or Google Jamboard
5. Online course creation platforms like Udemy, Teachable, or Kajabi
6. Quiz and assessment tools like Quizlet, Kahoot, or ProProfs
7. Communication and collaboration tools like Slack, Microsoft Teams, or Asana
8. File sharing and storage solutions like Google Drive, Dropbox, or OneDrive
9. Digital calendar and scheduling tools like Google Calendar or Calendly
10. Online gradebook and attendance tracking tools like Gradekeeper or Attendance Tracker
11. Virtual classroom decor and customization tools like Bitmoji or Canva
12. Student engagement and feedback tools like PollEverywhere or SurveyMonkey
13. Online resource libraries like Khan Academy, Coursera, or edX
14. Digital citizenship and online safety resources like Common Sense Education
15. Webinar and live streaming software like Webex or YouTube Live
16. Audio and video editing software like Audacity or Adobe Premiere
17. Online community building and discussion forum tools like Discord or Piazza
18. Gamification and game-based learning tools like Classcraft or ClassDojo
19. Accessibility and accommodations tools like ClaroRead or TextAid
20. Analytics and performance tracking tools like Google Analytics or Learning Analytics
Additionally, online educators should also possess skills like:
- Familiarity with online pedagogy and instructional design
- Technical troubleshooting and support skills
- Ability to create engaging multimedia content
- Effective communication and feedback strategies
- Flexibility and adaptability in a rapidly changing online environment
0 notes
Text

Hi Everyone! I'm Mr.Cool. 😎 (Projects Are Gone)
Just kidding lol, im still twenty :) anyways, "why are the projects gone?" well. yeah one thing, Stress gets me hard. and has been replaced by our psalm of ours :) i will be liking shit and always will be im always a human, WE BOTH ARE. im still active on one specific platform called X. @TwentiethCen in this photo, you can see everything i had imagined and wanted to make, both funny and genius :) from now on, have this photo i made in camtasia studio 8 along with Paint.NET. :) I hope i can make cool shit though, and make what i say projects! before i made this post, i wrote my personal information on my profile for purpose reasons, just for you to understand. :)
-Twenty
1 note
·
View note
Text
Speechelo Pro 2024 Crack Free Download Torrent [Mod APK]
Speechelo Pro 2024 Crack is a important textbook-to- speech creator tool that allows you to convert any written textbook into voiceover. It supports further than 24 languages and can convert them to over 70 mortal voices with just a many clicks. This software is available for download for PC, Apple, and smartphones. It’s especially designed for videotape artists who want to produce professional- quality vids for their YouTube channel and numerous other purposes. The discussion process is veritably simple; anyone can do what they want.
Speechelo Torrent is a cutting-edge text-to-speech software that allows users to generate high-quality voiceovers for their videos, podcasts, and other multimedia content. With a wide range of natural-sounding voices and customization options, Speechelo Pro makes it easy to create professional-grade voiceovers that engage and captivate audiences.
Speechelo Pro Crack + Mod APK Free Download [Torrent-2024]
Speechelo Pro is also incredibly easy to use, with a simple and intuitive interface that makes it accessible even for those without technical expertise. Users can simply type or paste their text into the software, choose their preferred voice and customization options, and generate their voiceover with a single click.
Another key benefit of Speechelo Pro is its customization options. Users can adjust the speed, tone, and emphasis of their voiceovers, as well as add breathing sounds and pauses for a more natural-sounding result. Additionally, the software offers advanced options such as the ability to control the volume of each word, which can be particularly useful for creating dynamic and engaging voiceovers.
Overall, Speechelo Pro is an impressive tool for anyone looking to create high-quality voiceovers quickly and easily. With its extensive selection of voices and customization options, as well as its user-friendly interface, it’s a valuable asset for content creators, marketers, and anyone else who wants to elevate their multimedia content with engaging and professional-grade voiceovers.
Main Features:
Allows fluently convert textbooks into vids with a mortal voice.
Also allows vids to captions.
Allows work with other software like Premiere Pro, Camtasia, Audacity, and numerous further.
Compatible with PC, Apple, and smartphones.
Speechelo Torrent also offers 40 background music tracks with you can produce a brand new voiceover.
Provides 100 real mortal voiceover with dupe– paste textbook.
The online editor is pall– grounded, which is fully safe.
It allows druggies complete control over the content they produce.
Offers multitudinous voice tones similar as serious, happy, or normal.
What’s New in Speechelo Crack 2024?
Election Encourage: when users want to work efficiently, users should keep organization. With each business or business users take forward, users might create brand-new advertisement inside full game.
Audio commentaries in the form of a conversation. This application has recently been demonstrated which using additional or much more characters in their movies will improve audience participation.
If users enable the “Overlapped” feature inside Premium upgrade, only one monologue can be utilized.
We’ll show users how else to advertise acting work so which clients find users rather than other way around.
This enables anyone to sell narration and preserve entire money earned.
System Requirements:
500 MB Hard disk
At least 1 GB RAM
Processor: Intel Pentium 4
Windows: 11/7/8/8.1/10/XP/Vista
How to Crack?
Speechelo Full Crack's new version can be downloaded for free from this link.
Extract the downloaded file into a folder of your choice.
Disable Windows Defender and any other security software.
Install the cracked setup by giving it two taps.
Run the most recent version after installation.
Simply install and enjoy the preactivated cracked version.
#SpeecheloPro2024Crack#SpeecheloTorrent#SpeecheloModAPK#SpeecheloFreeDownloadCrack#SpeecheloFullCrackgoogle
0 notes
Text
How to Screen Record on HP Laptop: Mastering 12 Step-by-Step Methods
In the fast-paced digital era, the ability to screen record on your HP laptop is a valuable skill. Whether you're a content creator, educator, or business professional, having a comprehensive understanding of various screen recording methods can significantly enhance your productivity and communication. In this guide, we'll walk you through 12 detailed and foolproof ways to screen record on your HP laptop, empowering you to choose the method that best suits your needs.
1. Using Built-in Tools: HP QuickPlay
One of the easiest ways to screen record on your HP laptop is by utilizing the built-in tool - HP QuickPlay. This user-friendly application allows you to capture your screen effortlessly. Follow our step-by-step guide to harness the full potential of QuickPlay for your screen recording needs.
2. Windows Game Bar: Your Hidden Screen Recorder
Many HP laptops come equipped with Windows Game Bar, a feature-rich tool that extends beyond gaming. Discover how to leverage this hidden gem for seamless screen recording, complete with audio narration and annotation options.
3. Camtasia: Professional-Grade Screen Recording
For those seeking a more advanced screen recording experience, Camtasia stands out as a professional-grade solution. Uncover the intricate details of setting up Camtasia on your HP laptop, ensuring high-quality recordings for your projects.
4. OBS Studio: Open-Source Excellence
If you're a fan of open-source software, OBS Studio is your go-to option. Explore the world of OBS Studio screen recording with our comprehensive guide, covering everything from setup to customization.
5. Snagit: Effortless Screen Captures
Snagit is renowned for its simplicity and efficiency in capturing screenshots and screen recordings. Dive into the nuances of Snagit, and learn how to harness its powerful features for your HP laptop screen recording endeavors.
6. Microsoft PowerPoint: Beyond Presentations
Unleash the potential of Microsoft PowerPoint as a versatile screen recording tool. Follow our detailed instructions to transform this widely-used presentation software into a handy screen recorder on your HP laptop.
7. Online Screen Recorders: Anytime, Anywhere
Discover the convenience of online screen recorders that eliminate the need for installations. We'll guide you through the selection process and provide tips for optimizing your online screen recording experience.
8. Using VLC Media Player: More Than Just Playback
VLC Media Player, known for its robust media playback capabilities, also offers screen recording features. Explore the lesser-known functionalitiesHow to Screen Record on HP Laptop (12 Ways) Step-by-Step of VLC and turn it into a reliable screen recording tool with our expert guidance.
9. ShareX: Customizable and Feature-Packed
Unlock the full potential of ShareX, a feature-packed screen recording tool with extensive customization options. Follow our step-by-step instructions to set up ShareX on your HP laptop for personalized and high-quality screen recordings.
10. Icecream Screen Recorder: Simplicity Redefined
If simplicity is your priority, Icecream Screen Recorder is an excellent choice. Learn how to navigate its user-friendly interface and make the most of its essential features for hassle-free screen recording.
11. Xbox Game Bar: Not Just for Gamers
Explore the multifaceted capabilities of Xbox Game Bar beyond gaming scenarios. Discover how to utilize this Windows tool for efficient and high-quality screen recordings on your HP laptop.
12. Filmora: Video Editing and Screen Recording Combined
Delve into the world of Filmora, a video editing software that seamlessly integrates screen recording capabilities. Uncover the steps to create polished screen recordings with Filmora, elevating the quality of your content.
0 notes
Text
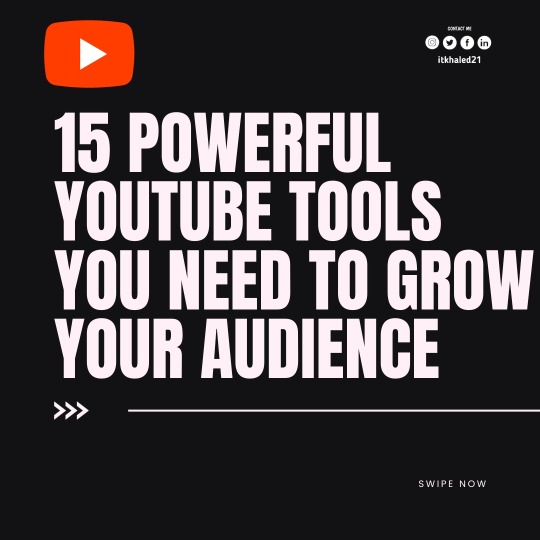
15 Powerful YouTube Tools You Need to Grow Your Audience
1. YouTube Studio 2. YouTube Creator Academy 3. Tubebuddy 4. VidIQ 5. Vidooly 6. Tubics 7. OBS Studio 8. Streamyard 9. Adobe Express 10. Canva 11. YouTube Search Autosuggest 12. Keyword Tool 13. Camtasia 14. Movavi Video Suite 15. Wondershare Filmora . . . . Follow @itkhaled21 for daily Youtube growth tips and tricks , content related to Instagram 🚀. Turn on post notification🔊. JOIN ME NOW for your Instagram Growth💯 . . COMMENT below and SAVE this post! for later!📲 👥 Tag a friend who would like to know this ---------------------------------------- 👈🏼
. --------------------------------------- 🔥FOLLOW- @itkhaled21 🔥FOLLOW- @mrskhaled22 -------------------------------------- • • • • •
#khaledbdj #music #artist #artistsoninstagram #artistoninstagram #youtubeartist #content #contentcreator #contentmarketing #artistcontent #videoartist #artistunion #usaartist #musica #musicartist #musicartists #food #foodblogger #foodbloggers #channelside #asmr #asmryoutube
0 notes
Text

GO, TAILS!
GIVE IT ALL YOU'VE GOT, YOU CAN DO THIS!!
Assets made in FireAlpaca with Wacom Bamboo CTH-470; animated in Camtasia Studio 8
#sonic fanart#sonic the hedgehog#sonic#drawing#sonic art#digital drawing#miles tails prower#super sonic#super tails#sonic animation#2d animation#animated#animation
22 notes
·
View notes
Text
AI Lead Hunter Review 2023 + Bonuses ($2984 Value)
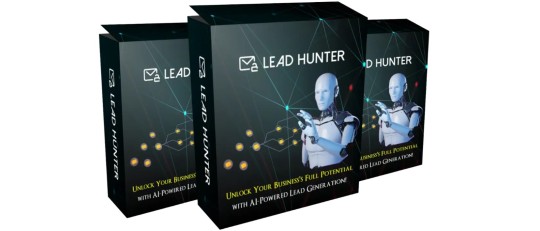
AI Lead Hunter Review: Welcome to my friends. This software was made by Nishant Sharma.
Do you desire a lead from your intended market? The best AI-powered laser lead generation app in the world is for you and helps you produce leads using precise keywords, links, and usernames. From every website or social media account (including Instagram, Facebook, Linkedin, Threads, and Twitter/”X”), this innovative AI program retrieves leads. Even if it makes lead creation simpler, you still need a strong pitch. However, AI Lead Hunter is a strong place to start.
Make the important choice after reading the complete assessment of the AI tool.
Overview of AI Lead Hunter
Product Name: AI Lead Hunter
Author/vendor: Nishant Sharma et al
Official Website: VISIT HERE
Launch Date: 2023-Sep-16
Front-End-Price: $17
Bonuses: Yes, Huge Bonuses Included
Refund: 30-Day Money-Back Guarantee
Support: Effective Response
Recommend: Highly Recommended!
Rating: 8.5/10
Skill: All Level

What is AI Lead Hunter?
Artificial intelligence (AI) is a technology that is used to find and gather possible business leads from a variety of sources, including websites, social media, and databases. First off, AI Lead Hunter streamlines your sales efforts by making lead generating simpler. By reaching potential customers more successfully, it automates the process of looking for and gathering contact information, assisting businesses in improving their sales and marketing operations. You’ll have a steady supply of possible leads using AI Lead Hunter. As a result, you can see an increase in sales or business growth.
What are the Features Of AI Lead Hunter
Features
Brand new Alibaba AI technology.
Extract email IDs from any Website or URL.
Target specific keywords, niches and links with URLs.
Extract email IDs from multiple social media accounts.
Extract email IDs from any Instagram account.
Extract email IDs from any Facebook account.
Extract Email IDs from Any LinkedIn Account.
Extract Email IDs from Any Threads Account.
Extract Email IDs from Any Twitter or ‘X’ Account.
One-Click Export in CSV Format.
Commercial License Included for High Profits.
Low One-Time Price During Launch Period.
Newbie-Friendly, Easy-to-Use Dashboard.
Cloud-App, No Downloads.
Award-Winning Support.
200% Money Back Guarantee.
Furthermore, AI Lead Hunter integrates seamlessly with your existing CRM software.
How does AI Lead Hunter work?
To sum up, it’s user-friendly and can be a game-changer in your lead generation efforts.
Works in 3 Easy Steps.
Step-1: Login to your AI LeadHunter Account.
Step-2: Enter the Website URL or Select Desire Social Media Account and Enter your Username.
Step-3: Then press Enter I’m done now. Start making enormous profits by downloading your CSV file.
It also provides sophisticated filters to help you focus your search for top-notch leads.

What is a Bonuses of AI Lead Hunter
You will also have access to 10 Premium Bonuses that are not available anywhere else in addition to AI LeadHunter:
Bonus: Built-in Autoresponder & Specially Designed AI Custom ChatBot
Bonus: Affiliate Marketplaces Integration inside the app (JVZoo, Warriorplus & Clickbank)
Bonus: Stunning & Beautiful DFY Website
Bonus: Super Premium App – Videoo
Bonus: Get Traffic from 8 Social Sites on Complete Autopilot with Auto Social Traffic
Bonus: Build Google-friendly blogs with only a few clicks using AutoBlogger
Bonus: Add timers and scarcity to your website or mail to increase purchases by 400% with Epic Countdown.
Bonus: Animate Everything – Boost Action Sales by 300% by Animating Any Element on Your Website
Bonus: Camtasia Like VIDEO EDITOR
Bonus: VIP Access to Premium Facebook Group
What Are The Benefits Of AI Lead Hunter?
Instantly access a goldmine of targeted buyer leads from websites and social media platforms.
Effortlessly extract contact details, saving you hours of manual data entry.
Send unlimited emails and text messages to your leads without any extra costs.
Forge authentic connections and nurture prospects with personalized outreach.
Seamlessly engage with leads across multiple platforms without hassle.
The AI-powered content writer crafts compelling emails and messages in a flash.
Precision targeting ensures you focus on leads with the highest conversion potential.
Streamline your lead generation process, saving time and boosting efficiency.
Elevate your business growth with a tool designed to drive conversions and connections.
Gain a competitive edge by leveraging AI for smart, strategic outreach.
How You Can Make Huge Profits With AI Lead Hunter?
In contrast to manual searches, this technology is much more efficient.
Close More Clients with Precision Targeting.
Personalized Outreach.
Time Efficiency.
Reduced Marketing Costs.
Laser Targeted Ad Campaigns.
Sell Buyer Leads to Local Businesses.
Specific Niche Targteting.
Unlimited Custom & Lookalikes Audiences.
Grow Exponentially with a Commercial License.
Sell High-Quality Leads to Struggling Startups and Big Brands.
Who Is AI Lead Hunter For?
Sales and Marketing Teams.
Affiliate marketer.
Cpa marketer.
Business Owners.
HR professionals.
Real estate agents.
On the other hand, relying solely on AI Lead Hunter may not work for complex, high-touch sales processes.
How To Make Money With AI Lead Hunter?
Use AI Lead Hunter to find possible clients, business partners, or employment prospects to generate income. Then, turn those leads into sales by making a sale, concluding a deal, developing a partnership, or finding employment. You can find and take advantage of opportunities to raise your earning potential with the aid of AI Lead Hunter. The technology not only identifies possible customers but also provides contact details. Additionally, it might assist you in starting outreach.
Frequently Asked Questions:
Q – What is AI LeadHunter?
Our front-end solution, AI LeadHunter, has the potent capacity to pull millions of email IDs from any website or social network account. It’s made to boost your lead-generation efforts and make it easier for you to communicate with potential clients.
Q – How does AI LeadHunter work?
In order to extract email IDs from websites and social media accounts, AI LeadHunter uses cutting-edge AI technology. Just enter the URL or account information, and AI LeadHunter will take care of the rest. A list of targeted email IDs is swiftly compiled for your outreach.
Q – How is it different from other Lead Finder tools?
In contrast to other lead discovery tools, AI LeadHunter uses cutting-edge Alibaba AI technology to extract email IDs from websites and social media accounts together with keywords, links, and user names. This allows for extremely precise and laser-focused targeting.
making it the best AI-driven lead finder app in the world.
Q – What can I use the extracted email IDs for?
In addition to email marketing campaigns, lead nurturing, sales prospecting, networking, market research, client outreach, and many more uses, the extracted email IDs can also be put to use for other purposes. There are countless options for growing your business.
Q – Is AI LeadHunter easy to use?
Absolutely! AI LeadHunter has a simple user interface that doesn’t call for any specialized knowledge. Within minutes, you may begin extracting email IDs, making them available to users of all skill levels.
Q – Is there a monthly subscription fee for AI LeadHunter?
Absolutely! AI LeadHunter has a simple user interface that doesn’t call for any specialized knowledge. Within minutes, you may begin extracting email IDs, making them available to users of all skill levels.
More FAQ
Q – Is it difficult to set up?
Just a 3 Step process.
Consider discovering your next significant client with just a few clicks as an example.
Q – Do I need to download ANYTHING to my Computer/Hard drive?
You don’t need to download anything other than a CSV file to your computer or hard drive. It is a web application that is solely cloud-based.
Q – Do I need to have any kind of Technical Skills to use AI LeadHunter?
No, not at all.
Q – Is customer support available for AI LeadHunter users?
Yes, we provide blazing-fast customer service to help you with any queries or problems you could have with AI LeadHunter. Our passionate support staff is available to assist you in succeeding.
Q – Can I use AI LeadHunter for multiple niches or industries?
Absolutely! AI LeadHunter is adaptable and can be used in a variety of markets and sectors. It adjusts to your unique demands for lead generation, making it a useful tool for many different types of enterprises.
Q – Is there a money-back guarantee with AI LeadHunter?
Yes, there is a 30-day money-back guarantee for AI LeadHunter. Although we’re sure you’ll find it beneficial, you have 30 days from the date of purchase to ask for a refund if it doesn’t live up to your expectations.
Q – What is the Delivery method of AI LeadHunter?
As soon as you purchase AI LeadHunter, you’ll have immediate access to your own login page. All you have to do is register to use AI LeadHunter. All you have to do is that.
Q – How do I get started with AI LeadHunter Special?
Simply click the “Get Started Now” button below to begin, and AI LeadHunter will be available to you right now. Enhance your lead creation and client outreach strategies right now by starting to extract email IDs.
Final Opinion
Al Lead Hunter is the future of lead generation, to sum up. By replacing them with a methodical and effective strategy, it does away with the hassle of manual lead generation and generic outreach techniques. Regardless of your stage of development—startup, small business, or existing brand—Al Lead Hunter presents a priceless chance to quicken your customer acquisition processes and promote growth.
Don’t pass up this fantastic opportunity to change the way you find clients. Get access to Al Lead Hunter right away to transform your company.

Read More My Blog: AIFlipBook Review
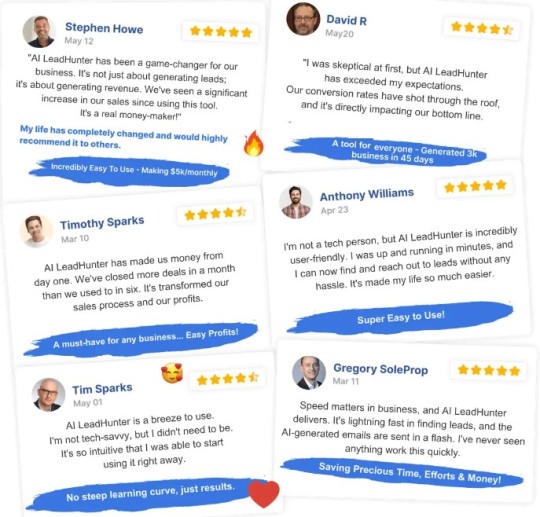
Other Users Opinion
#AILeadHunter#NishantSharma#AILeadHunterReview#AILeadHunterReviewandBonus#AILeadHunterLegit#AILeadHunterDownload#AILeadHunterBonuses#AILeadHunterVendorNishantSharma#HowDoesAILeadHunterWork#HowtoMakeMoneywithAILeadHunter#MakeMoneywithAILeadHunter#AILeadHunterScamorLegit
1 note
·
View note
Link
0 notes
Text
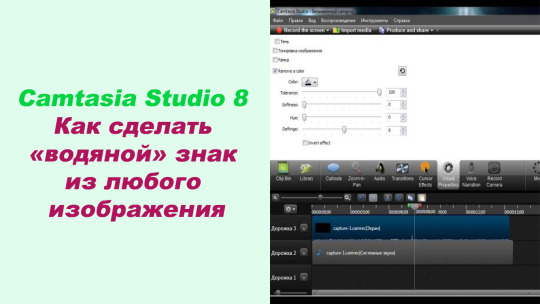
Здравствуйте, мои уважаемые друзья и подписчики!
Сегодня мы продолжим тему по работе с известным медиаредактором Camtasia Studio 8. Мы разберем то, как из любого изображения, которое Вы загрузите для обработки в редакторе сделать водяной знак. В видеоуроке Вы узнаете, как просто это сделать Camtasia Studio 8.
Желаю Вам и членам Ваших семей здоровья, добра и всех благ!
Данное видео можно увидеть на других видеоканалах:
YouTube - https://www.youtube.com/watch?v=OSV63P7SPL4
ОК - https://ok.ru/video/8499734514197
ВК - https://vk.com/video/@id230530462?z=video230530462_456240568%2Fpl_230530462_-2
Дзэн - https://dzen.ru/video/watch/672598d1edab5921b06959ba
Телеграм - https://t.me/+rbqQfr_DnpY3ZGQy
0 notes