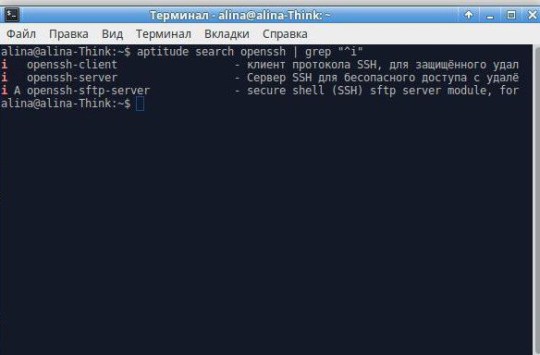
#but this is a risk i take with my choice of os. and open source software /is/ that important to me <3< /div>
Explore tagged Tumblr posts
Visit Tumblr Blog
Explore Tumblr blogs with no restrictions, modern design and the best experience.
Last Seen Tumblr Blogs


Fun Fact
Premium Tumblr themes are available from anywhere between $9 to $49.
Text
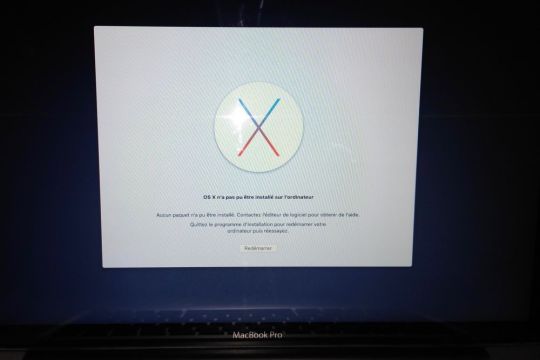
El Capitan Installation
Multibeast 8 is simple ultimate post installation utility.Thanks to TonyMac for making this great tool.Download from here: http://www.tonymacx86.com/download. Follow the onscreen instructions, which will guide you through the steps necessary to install. Begin installation. After installation of the installer is complete, open the Applications folder on your Mac, then double-click the file named Install OS X El Capitan. Click Continue and follow the onscreen instructions.
Warning: Please follow these instructions at your own risk. I am not responsible for any damage or information loss that could result from following this guide. Also, note that installing OS X on PC is illegal. Please buy a real Mac if you're satisfied with your Hackintosh. This guide is for evaluation purposes only.
Requirements
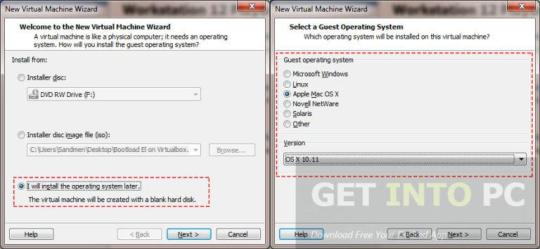
An Intel-based PC with UEFI bios
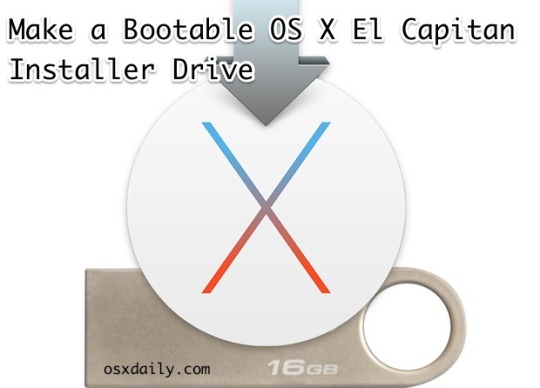
A USB flash drive with at least 16GB capacity
A dedicated hard drive (SSD highly recommended)
A computer running OS X (10.9 or later) for preparing the installation USB flash drive
I chose to avoid the UniBeast installer (by Tonymacx86) because of its commercialized nature, as described here. Here is a vanilla guide to installing El Capitan on your PC!
Preparing the USB Installation Drive
First things first. We need to prepare a USB thumb drive that will contain the installation files as well as the bootloader and custom kexts for our specific Hackintosh build.
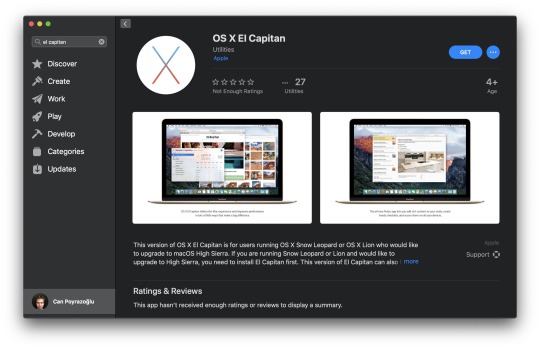
Download El Capitan from the Mac App Store
Head over to your existing OS X environment running 10.9 or later and open the Mac App Store.
Search for 'El Capitan' and click Download. The download is completely free if you're running OS X 10.9+.
Wait for the download to finish (this could take some time).
Format the USB Drive
Open Disk Utility in Applications/Utilities and locate your USB device. Make sure you've backed up anything important on that drive as it will be erased forever.
Select it, and then on the right, click the partition tab.
Click Curent Layout and change it to 1 Partition.
Set the Name to USB.
Set the Format to Mac OS Extended (Journaled).
Click Options and select GUID Partition Table.
Click Apply to format the drive.
Copy the Installation Files to the USB Drive
Now that we've downloaded the installation files from the Mac App Store and formatted our USB drive, let's copy the installation files to it.
Run the following command in the Terminal (Applications/Utilities):
The command will run a script inside the Install OS X El Capitan application that will copy the installation files to the USB drive.
This process takes about 15 minutes. Go out for a quick run, or a hamburger, or both. When you come back, it should have finished.
Installing a Bootloader
If you tried to boot from the USB drive as is after the previous step on a PC, it wouldn't work. We need a bootloader that makes it possible to boot OS X on x86 and x86_64 PCs.
There are 3 popular bootloaders to choose from.
Clover
Chameleon
Chimera
I went with Clover as it seems to be the most popular choice among other El Capitan installers, mostly for the following reasons:
Clover is an open-source EFI-based bootloader created on Apr 4, 2011. It has a totally different approach from Chameleon and Chimera. It can emulate the EFI portion present on real Macs and boot the OS from there instead of using the regular legacy BIOS approach used by Chameleon and Chimera. For many, Clover is considered the next-gen bootloader and soon it will become the only choice since BIOS in being replaced by UEFI in every new motherboard. One big feature of Clover is that iMessage, iCloud, the Mac App Store works along with Find My Mac, Back To My Mac and FileVault since Clover can use the EFI partition. (Read more)
Install Clover on Your USB Drive
Installing Clover on your USB drive is relatively easy. It involves running an installation wizard and selecting some options.
Download the latest Clover installer from here.
Run the installer.
Click Continue twice.
Click Change Install Location and set it to your formatted USB drive.
Click Customize and check the following options:
(x) Install for UEFI booting only
(x) Install Clover in the ESP
( ) Drivers64UEFI
(x) OsxAptioFixDrv-64 - fixes memory map created by AMI Aptio EFI. Booting OS X is impossible otherwise.
Mac Os El Capitan Install
Click Install and wait for the installation to finish. It shouldn't take more than a minute.
Copy Essential Kexts to the USB Drive
Next, we'll need to copy some kexts (kernal extensions, similar to drivers on Windows) to the USB drive.
FakeSMC.kext - open source SMC device driver/emulator developed by netkas. Tricks OS X into thinking it's installed on Apple hardware. Absolutely required for Hackintosh installation.
NullCPUPowerManagement.kext - disables AppleIntelCPUPowerManagement.kext which may cause kernel panics when you try to boot from the USB drive. It's optional, copy it only if you get an AppleIntelCPUPowerManagement-related kernel panic.
ApplePS2Controller.kext and AppleACPIPS2Nub.kext - adds support for PS2 devices (such as PS2 keyboard/mouse). They're optional, copy them only if you still use PS2 devices.
Download these files from here and copy them to the EFI mounted volume at /EFI/Clover/kexts/10.11/.
Now that the installation USB drive is ready, let's install OS X El Capitan!
Boot from the USB Drive
Restart your computer and boot from the USB drive (Press Esc/F8/Del to access the boot selection menu).
Use the arrow keys to select Boot OS X Install from Install OS X El Capitan (It should be selected by default). Press the spacebar and select Boot Mac OS X in verbose mode. Verbose mode means that you'll be able to see exactly what's going on under the hood as OS X attempts to boot up its installer. You'll be able to see the exact error message if booting fails.
Press Enter and cross your fingers. Clover will now boot the installer from your USB drive. This could take some time, in my case, it takes around 5 minutes (Don't worry -- the startup time is around 5 seconds after installing on an SSD).
Did it fail?
It's more than likely that the boot will fail. Don't panic (ha-ha), as kernel panics usually mean that you forgot to copy an essential kext to the EFI partition. Look up the exact error you're getting before the boot log comes to an end and search Google for a solution.
Once you find an additional kext that your system needs, you'd attempt to copy it to the EFI volume, only to discover that it's gone! Not to worry, it's just unmounted and hidden. Follow this guide to mount the hidden partition, and then, follow the Copy Essential Kexts section above to copy it to the USB drive's EFI partition.
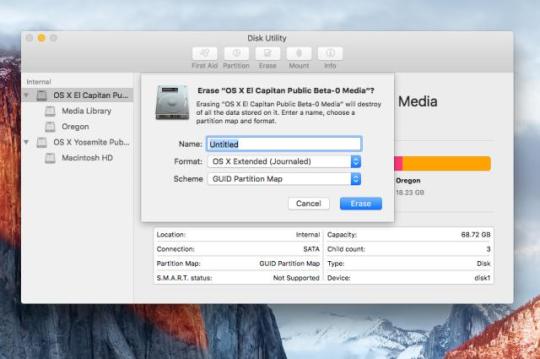
Format the Target Hard Drive
Once the installation wizard boots, the next step is to prepare the hard drive that you want to install OS X on.
Click Continue, followed by Disk Utility.
Select the target drive to install to (not the USB drive!) and click the Erase button. Make sure to back up anything important on that drive, as it will be deleted forever.
Set the Name to El Capitan.
Set the Format to OS X Extended (Journaled).
Set the Scheme to GUID Partition Map.
Click Erase to format the drive.
Install OS X to the Target Drive
Exit the Disk Utility and click Install OS X.
Click Show All Disks and select the drive you just formatted to install OS X on it. Finally, click Install.
The process takes about 25 minutes. Be patient. For me, it hung at the end ('1 second remaining') for around 5 minutes. Don't be tempted to reset or cancel the installation.
When that's done, the system will reboot. Make sure to boot from the USB device again, and select Boot OS X Install from Install OS X El Capitan once again, in verbose mode. The installation is a two-part process that continues once you re-boot into the USB drive.
Finally, after about 25 more minutes, OS X El Capitan should be successfully installed on the target drive.
Boot into El Capitan via the USB Device
After the second reboot, boot from the USB device once again, but this time, select Boot OS X from El Capitan, and select verbose mode.
Press Enter and cross your fingers again. If all goes well, you'll be presented with the setup wizard:
Take a minute to set up your new Hackintosh. Once you're done, there are a few things you need to do to finish off the installation.
Reinstall Clover on the Hackintosh Drive
In the previous step, we used Clover on our USB drive to boot our Hackintosh. This is fine, but most of us aren't going to keep that USB drive plugged in forever. Let's make it possible to boot El Capitan independently by reinstalling Clover on it.
Go back up to the Install Clover on Your USB Drive section and follow the steps again, but this time, select your El Capitan volume instead of the USB drive.
Once again, copy the essential kexts to the EFI partition that shows up after installing Clover.
Finally, make sure to add Clover EFI boot options which is possible by pressing Clover Boot Options in the Clover boot window (if there are 2 boot options -- find the one for your SATA drive). I literally spent 3 hours figuring out why Clover would not boot when I disconnected the USB drive before I figured out that I need to manually add the EFI boot options.
Now you'll be able to boot directly from the El Capitan hard drive, as it should be!
Audio and Networking
If you're lucky, audio and networking will work right out of the box. If not, you're on your own from here. You'll need to research your exact hardware (by using System Information in Applications/Utilities) and searching Google to find the right kext or installer to make it work on El Capitan.
Clover Themes
The default Clover theme is pretty ugly (no offense). Check out this theme database to improve Clover's appearance.
This is YosemiteLogin by xenatt:
El Capitan Installation Disk
Enjoy!
That's it! Enjoy your new Hackintosh, and if you absolutely love it, consider buying a Mac!
OS X El Capitan remains available for Mac computers that can't upgrade to macOS Catalina, Mojave, High Sierra, or Sierra, or that need to upgrade to El Capitan first.
Check compatibility
You can upgrade to OS X El Capitan from OS X Snow Leopard or later on any of the following Mac models. Your Mac also needs at least 2GB of memory and 8.8GB of available storage space.
MacBook introduced in 2009 or later, plus MacBook (13-inch, Aluminum, Late 2008) MacBook Air introduced in late 2008 or later MacBook Pro introduced in mid 2007 or later Mac mini introduced in early 2009 or later iMac introduced in mid 2007 or later Mac Pro introduced in early 2008 or later Xserve models introduced in early 2009
To find your Mac model, memory, storage space, and macOS version, choose About This Mac from the Apple menu . If your Mac isn't compatible with OS X El Capitan, the installer will let you know.
Make a backup
Can't Reinstall El Capitan
Before installing any upgrade, it’s a good idea to back up your Mac. Time Machine makes it simple, and other backup methods are also available. Learn how to back up your Mac.
Get connected
It takes time to download and install OS X, so make sure that you have a reliable Internet connection. If you're using a Mac notebook computer, plug it into AC power.
Download OS X El Capitan
For the strongest security and latest features, find out whether you can upgrade to macOS Catalina, the latest version of macOS.
If you still need OS X El Capitan, use this link: Download OS X El Capitan. A file named InstallMacOSX.dmg will download to your Mac.
Install the macOS installer
Double-click the downloaded file to open a window showing its contents. Then double-click the file within, named InstallMacOSX.pkg.
Follow the onscreen instructions, which will guide you through the steps necessary to install.
Begin installation
After installation of the installer is complete, open the Applications folder on your Mac, then double-click the file named Install OS X El Capitan.
Click Continue and follow the onscreen instructions. You might find it easiest to begin installation in the evening so that it can complete overnight, if needed.
Allow installation to complete
Please allow installation to complete without putting your Mac to sleep or closing its lid. Your Mac might restart, show a progress bar, or show a blank screen several times as it installs both OS X and related updates to your Mac firmware.
Learn more
OS X El Capitan won't install on top of a later version of macOS, but you can erase your disk first or install on another disk.
You can use macOS Recovery to reinstall macOS.
1 note
·
View note
Text
Cda To Mp3 Converter Home windows 10
Download crack for Alt CDA to MP3 Converter 7.2 or keygen : Tool for CD ripping - convert CDA recordsdata from audio CD`s to mp3 recordsdata. Many software program purposes create play listing information that act as tips that could audio recordsdata in your pc (and sometimes specify a enjoying order). Playlist file varieties will range between purposes, but the most typical file extensions used arewpl (utilized by Windows Media Participant) andm3u (used by a variety of open supply functions and WinAmp). Additionally, Zamzar's conversion time is slow when compared to other online audio converter providers. In case your CD is an audiobook, you possibly can remodel it into M4B audiobooks format that is compatible with iPod and iTunes. CDA to MP3 Converter is suitable with DVD. Convert any unsupported audio format to any audio player, audio gadget supported one. fre:ac's user interface is designed to be intuitive so you will be able to make use of the essential features without any bother. It still affords advanced choices if you need them so it is possible for you to to go beyond easy ripping and format conversion using fre:ac. Step 2: Click the Import Settings button, choose the MP3 Encoder as well as the standard degree within the drop-down list of Import Using. Click OKAY to return to the principle interface. Step 2Choose the tracks you to want convert to MP3. MP3 to CDA Converter allows users to simply modify customary MP3 audio information into a cda audio to mp3 ripper free download format. That is often helpful when dealing with Audio CD s and other subroutines within widespread Windows audio information. Additionally, many will choose to make use of this program if they're unable to take heed to a selected audio observe on a certain system. A free trial is offered. CDA to MP3 Converter là một chương trình cho phép người dùng đổi đuôi của các audio cda sang mp3 một cách dễ dàng, nhanh chóng nhất trên hệ điều hành windows. Người dùng có thể chỉnh các file đầu vào, thực hiện kéo thả các file cda vào giao diện và thực hiện chuyển đổi tất cả các file này sang dạng mp3 một cách chính xác. You can't play CDA information copied to your hard disk simply because they aren't audio information. CDA is a CD version of WAV format. You need to convert, or "rip" the CDs tomp3 or one other readable format. You possibly can't simply straight copy the CDs to the player. It's also possible to use MP3 CD Burner or DJ Twist & Burn to rip CDs. Leawo Music Recorder couldn't only document and convert CDA audio to MP3, but additionally other audio sources like built-in microphone sound, online audio, radios, native audio information, streaming audios, and so on. It has a recorder function, which is not out there within the different 2 methods.
Step 2: Import yourcda recordsdata into the converter. I not too long ago purchased a CD however not have it my possession - someone else does. I've the tracks on a memory stick. They were wonderful on the pc that I used to put them onto it, but on my laptop computer - which has NO CD PORT - it has changed the information to ".cda". This has additionally happened on my reminiscence stick. When I plugged them again into the original laptop computer, they had been stillcda files. Step 1: Run Windows Media Player, and click on Instruments within the toolbar on the highest. One frequent query I get from mates and colleagues is recommendations on how one can take a day by day audio CD and convert the tracks into MP3 data. The times of carrying spherical a CD participant are lengthy gone, because of smartphones! Nonetheless, why pay ninety nine cents on iTunes or the Google Play Retailer for music you may already personal!? Instead, it is best to dig out all these old CDs and rip them to your laptop computer, which you will then import into your iTunes music library and sync over to your telephone.
The CDA file extension is an information format generally known as CD Audio Monitor Shortcut. CDA information are small (44 bytes) digital file created by Microsoft Windows CD driver for each observe on an audio CD. They contain indexing information comparable to monitor instances plus a special Home windows shortcut that allows users to entry the particular audio tracks. They don't comprise music, as a substitute level to where the music is situated on the CD. These files instruct the pc which audio track to play on a CD. CDA information won't play when separated from the CD they characterize. Changing CDA files is named ripping, which is copying music from a CD onto a computer. These files can be converted to WAV, MP3, WMA, OGG, and FLAC. Information in CDA format can be opened with Apple iTunes, VideoLAN VLC media participant and different audio participant in Mac Os, Microsoft Home windows based and Linux platforms. Finally, it's best to decide on the output format and online cda to mp3 audio high quality. Within the MP3 dialog discipline, select the format settings for the final MP3 info. Relying on prime quality you want, select the bitrate of the file, sample price and the number of channels. You may most likely lose some audio content material in the event you occur to decide on the mono risk. You'll be able to choose what pattern fee you want to use. forty four.1 kHz (or 44100 Hz) is the pattern worth utilized by audio CDs. Decrease than that and it's possible you'll begin to hear the loss in top quality. It's possible you'll select the bit price you need to use. 128kbps is often used for MP3s on the internet.

Sure! The CDA to MP3 Converter obtain for PC works on most present Home windows working techniques. Click on "Add Recordsdata" to choose CDA tracks and add them to conversion record. CD Audio (.cda) tracks are audio info which may be stored on CD media. Thecda recordsdata are representations of CD audio tracks and do not include the precise pulse code modulation (PCM) information might be performed solely from a CD-ROM. Copied from the CD-ROM to the onerous disc it could't be played. That is format used for encoding music on all industrial compact discs. For individuals who buy a CD from a retailer, the music on that CD is saved in CDA format.

In the record of formats you possibly can select the output file format, corresponding to MP3, AAC, OGG, WMA or WAV (lossless audio). FileZigZag is an online audio converter service that can convert most typical audio codecs, so long as they don't exceed a hundred and eighty MB. To make Home home windows Media Participant create songs with the more versatile MP3 format instead of WMA, click on on the Set up button within the high-left nook, choose Choices, and click on on the Rip Music tab. Select MP3 as a substitute of WMA from the Format drop-down menu and nudge the audio prime quality over a tad from 128 to 256 or even 320 for higher sound.
1 note
·
View note
Text
Create Usb El Capitan

Create Usb Installer El Capitan
El Capitan Os X Download
El Capitan Usb Boot
Warning: Please follow these instructions at your own risk. I am not responsible for any damage or information loss that could result from following this guide. Also, note that installing OS X on PC is illegal. Please buy a real Mac if you're satisfied with your Hackintosh. This guide is for evaluation purposes only.
Rename the USB Flash Drive to Become the OS X El Capitan Bootable Installer: The. The following steps can be used to create a USB installer for El Capitan. Use instructions on the Apple website How to get old versions of macOS to download InstallMacOSX.dmg. Use the Disk Utility to erase a 16 GB or larger flash drive. If the Disk Utility window has a View pulldown menu, make sure Show All Devices is selected.
Requirements
An Intel-based PC with UEFI bios
A USB flash drive with at least 16GB capacity
A dedicated hard drive (SSD highly recommended)
A computer running OS X (10.9 or later) for preparing the installation USB flash drive
I chose to avoid the UniBeast installer (by Tonymacx86) because of its commercialized nature, as described here. Here is a vanilla guide to installing El Capitan on your PC!
Preparing the USB Installation Drive
First things first. We need to prepare a USB thumb drive that will contain the installation files as well as the bootloader and custom kexts for our specific Hackintosh build.
Download El Capitan from the Mac App Store
Head over to your existing OS X environment running 10.9 or later and open the Mac App Store.
Search for 'El Capitan' and click Download. The download is completely free if you're running OS X 10.9+.
Wait for the download to finish (this could take some time).
Format the USB Drive
Open Disk Utility in Applications/Utilities and locate your USB device. Make sure you've backed up anything important on that drive as it will be erased forever.
Select it, and then on the right, click the partition tab.
Click Curent Layout and change it to 1 Partition.
Set the Name to USB.
Set the Format to Mac OS Extended (Journaled).
Click Options and select GUID Partition Table.
Click Apply to format the drive.
Copy the Installation Files to the USB Drive
Now that we've downloaded the installation files from the Mac App Store and formatted our USB drive, let's copy the installation files to it.
Run the following command in the Terminal (Applications/Utilities):
The command will run a script inside the Install OS X El Capitan application that will copy the installation files to the USB drive.
This process takes about 15 minutes. Go out for a quick run, or a hamburger, or both. When you come back, it should have finished.

Installing a Bootloader
If you tried to boot from the USB drive as is after the previous step on a PC, it wouldn't work. We need a bootloader that makes it possible to boot OS X on x86 and x86_64 PCs.
There are 3 popular bootloaders to choose from.
Clover
Chameleon
Chimera
I went with Clover as it seems to be the most popular choice among other El Capitan installers, mostly for the following reasons:
Clover is an open-source EFI-based bootloader created on Apr 4, 2011. It has a totally different approach from Chameleon and Chimera. It can emulate the EFI portion present on real Macs and boot the OS from there instead of using the regular legacy BIOS approach used by Chameleon and Chimera. For many, Clover is considered the next-gen bootloader and soon it will become the only choice since BIOS in being replaced by UEFI in every new motherboard. One big feature of Clover is that iMessage, iCloud, the Mac App Store works along with Find My Mac, Back To My Mac and FileVault since Clover can use the EFI partition. (Read more)
Install Clover on Your USB Drive
Installing Clover on your USB drive is relatively easy. It involves running an installation wizard and selecting some options.
Download the latest Clover installer from here.
Run the installer.
Click Continue twice.
Click Change Install Location and set it to your formatted USB drive.
Click Customize and check the following options:
(x) Install for UEFI booting only
(x) Install Clover in the ESP
( ) Drivers64UEFI
(x) OsxAptioFixDrv-64 - fixes memory map created by AMI Aptio EFI. Booting OS X is impossible otherwise.
Click Install and wait for the installation to finish. It shouldn't take more than a minute.
Copy Essential Kexts to the USB Drive
Next, we'll need to copy some kexts (kernal extensions, similar to drivers on Windows) to the USB drive.
FakeSMC.kext - open source SMC device driver/emulator developed by netkas. Tricks OS X into thinking it's installed on Apple hardware. Absolutely required for Hackintosh installation.
NullCPUPowerManagement.kext - disables AppleIntelCPUPowerManagement.kext which may cause kernel panics when you try to boot from the USB drive. It's optional, copy it only if you get an AppleIntelCPUPowerManagement-related kernel panic.
ApplePS2Controller.kext and AppleACPIPS2Nub.kext - adds support for PS2 devices (such as PS2 keyboard/mouse). They're optional, copy them only if you still use PS2 devices.
Download these files from here and copy them to the EFI mounted volume at /EFI/Clover/kexts/10.11/.
Now that the installation USB drive is ready, let's install OS X El Capitan!
Boot from the USB Drive
Restart your computer and boot from the USB drive (Press Esc/F8/Del to access the boot selection menu).
Use the arrow keys to select Boot OS X Install from Install OS X El Capitan (It should be selected by default). Press the spacebar and select Boot Mac OS X in verbose mode. Verbose mode means that you'll be able to see exactly what's going on under the hood as OS X attempts to boot up its installer. You'll be able to see the exact error message if booting fails.
Press Enter and cross your fingers. Clover will now boot the installer from your USB drive. This could take some time, in my case, it takes around 5 minutes (Don't worry -- the startup time is around 5 seconds after installing on an SSD).
Did it fail?
It's more than likely that the boot will fail. Don't panic (ha-ha), as kernel panics usually mean that you forgot to copy an essential kext to the EFI partition. Look up the exact error you're getting before the boot log comes to an end and search Google for a solution.
Once you find an additional kext that your system needs, you'd attempt to copy it to the EFI volume, only to discover that it's gone! Not to worry, it's just unmounted and hidden. Follow this guide to mount the hidden partition, and then, follow the Copy Essential Kexts section above to copy it to the USB drive's EFI partition.
Format the Target Hard Drive
Once the installation wizard boots, the next step is to prepare the hard drive that you want to install OS X on.
Click Continue, followed by Disk Utility.
Create Usb Installer El Capitan
Select the target drive to install to (not the USB drive!) and click the Erase button. Make sure to back up anything important on that drive, as it will be deleted forever.
Set the Name to El Capitan.
Set the Format to OS X Extended (Journaled).
Set the Scheme to GUID Partition Map.
Click Erase to format the drive.
El Capitan Os X Download
Install OS X to the Target Drive
Exit the Disk Utility and click Install OS X.
Click Show All Disks and select the drive you just formatted to install OS X on it. Finally, click Install.
The process takes about 25 minutes. Be patient. For me, it hung at the end ('1 second remaining') for around 5 minutes. Don't be tempted to reset or cancel the installation.
When that's done, the system will reboot. Make sure to boot from the USB device again, and select Boot OS X Install from Install OS X El Capitan once again, in verbose mode. The installation is a two-part process that continues once you re-boot into the USB drive.
Finally, after about 25 more minutes, OS X El Capitan should be successfully installed on the target drive.
Boot into El Capitan via the USB Device
After the second reboot, boot from the USB device once again, but this time, select Boot OS X from El Capitan, and select verbose mode.
Press Enter and cross your fingers again. If all goes well, you'll be presented with the setup wizard:
Take a minute to set up your new Hackintosh. Once you're done, there are a few things you need to do to finish off the installation.
Reinstall Clover on the Hackintosh Drive
In the previous step, we used Clover on our USB drive to boot our Hackintosh. This is fine, but most of us aren't going to keep that USB drive plugged in forever. Let's make it possible to boot El Capitan independently by reinstalling Clover on it.
Go back up to the Install Clover on Your USB Drive section and follow the steps again, but this time, select your El Capitan volume instead of the USB drive.
Once again, copy the essential kexts to the EFI partition that shows up after installing Clover.
Finally, make sure to add Clover EFI boot options which is possible by pressing Clover Boot Options in the Clover boot window (if there are 2 boot options -- find the one for your SATA drive). I literally spent 3 hours figuring out why Clover would not boot when I disconnected the USB drive before I figured out that I need to manually add the EFI boot options.
Now you'll be able to boot directly from the El Capitan hard drive, as it should be!
Audio and Networking
If you're lucky, audio and networking will work right out of the box. If not, you're on your own from here. You'll need to research your exact hardware (by using System Information in Applications/Utilities) and searching Google to find the right kext or installer to make it work on El Capitan.
Clover Themes
The default Clover theme is pretty ugly (no offense). Check out this theme database to improve Clover's appearance.
This is YosemiteLogin by xenatt:
Enjoy!
That's it! Enjoy your new Hackintosh, and if you absolutely love it, consider buying a Mac!
In this article, I will show you How to create Bootable USB for Mac OS El Capitan on Windows using Transmac. Therefore, you can create bootable USB for your Mac using Transmac on windows 10/7/8/8.1 here you will learn the easiest method of creating bootable USB. As you know that Mac OS EL Capitan is the newest version among Mac. In here just follow my steps to create a bootable USB installer for your Mac. is the twelfth major of the Mac operating system. Therefore, it has outstanding features that the previous version of Mac doesn’t have that. It is better now that we should create a bootable USB installer drive to install Mac OS.
You all have the information about “Transmac” software about its function that how it works, or how to download “TransMac” and how to install that on your Windows PC? However, you need the following requirements to create a great bootable USB installer for Mac OS El Capitan.
Why we use TransMac to Create bootable USB for mac os el Capitan?
TransMac is a simple application to open hard drives disk, Flash drives, CD/DVD high-density floppy disk on Windows 10/7/8/8.1 or lower version of other Windows. to use this application you just need to insert the drive you need, and one of the great function is this that it will automatically read the drives, TransMac is a great tool that you can access the Mac file on Windows operating system using TransMac.
TransMac Features
You are allowed to use the TransMac for 15 days trial, and after that, if you want to use that more then 15 days then you need to purchase that. All the features are the same for Mac.
The system requirements are you need Windows 10/7/8/8.1 or Windows Vista and XP.
The users can buy TransMac for $59.00 with the license.
Apple files system (APFS) are only supported.
Open Mac APFS/HFS/HFS+ format disk drives, flash drives, CD/DVD/Blu-ray media, HD floppies, dmg, dmg part, sparse bundle, and sparseimage files.
Copy files to Mac and image file
Format HFS to Mac
Save and restore image files to disk and USB flash.
Create, compress image files for Mac
Burn your ISO file and dmg file directly to CD/DVD Blu-ray.
View the partition layout
Now Create bootable USB for Mac OS El Capitan on Windows
Now it is the time to create a bootable USB installer using TransMac, To install Mac OS El Capitan on VirtualBox on Windows 10 you need a Bootable USB here you will learn the steps of creating a bootable USB installer for Mac OS El Capitan on Windows.
Step #1. Before going to create a bootable USB for Mac OS El Capitan you need to download TransMac. Therefore, you can download TransMac from the given link. After that, you are download TransMac now install that on your computer, the installation process is too much easy everyone can install that on their PC/Computer with a simple procedure. Just click on the setup file and with some click, the installation will finish. After that, Launch TransMac when TransMac is launched you will see the list of Flash drives or local disk. Then Right-click on that flash you want to create bootable USB for Mac OS El Capitan then select Restore with Disk Image.
Restore with the Disk image
Step #2. Now a warning message will pop-up after you select Restore with Disk Image, and in this step, select Yes.
Step #3. After that, you clicked on yes now a dialogue box will come just click on that and browse for VMDK file and select the file and click Open.
select Mac OS EL Capitan VMDK file
Step #4. After that, you clicked on Open in here your file will be ready to copy on USB drive click on “OK”.
Copying your File VMDK file to USB
Step #5. After that, you clicked OK now in this step, your Mac OS EL Capitan VMDK file will copy to your USB drive. Have patience and wait for some minutes that should copy your file.
Copying Mac OS EL Capitan File to USB
Conclusion
El Capitan Usb Boot
That’s all about it,Now you are totally done with creating the USB drive. Therefore, if you faced any problem regarding this you can comment on below comment box and share your ideas. Furthermore, we will discuss that and don’t forget to subscribe our website with your email address and have a notification about our latest post.
0 notes
Text
Usb Installer El Capitan
Step 3: Now the USB Drive is ready for OS X El Capitan installation. Make sure the copy of “Install OS X El Capitan” is there on /Applications folder. Bootable USB Installers for OS X Mavericks, Yosemite, El Capitan, and Sierra First, review this introductory article: Create a bootable installer for macOS. To create a bootable El Capitan installer drive, you need the El Capitan installer from the Mac App Store and a Mac-formatted drive that’s big enough to hold the installer and all its data. My Patreon Link: USB installers for older versions of Mac OS X can be tricky, so I decided to put together a more deta.
Warning: Please follow these instructions at your own risk. I am not responsible for any damage or information loss that could result from following this guide. Also, note that installing OS X on PC is illegal. Please buy a real Mac if you're satisfied with your Hackintosh. This guide is for evaluation purposes only.
Requirements
An Intel-based PC with UEFI bios
A USB flash drive with at least 16GB capacity
A dedicated hard drive (SSD highly recommended)
A computer running OS X (10.9 or later) for preparing the installation USB flash drive
I chose to avoid the UniBeast installer (by Tonymacx86) because of its commercialized nature, as described here. Here is a vanilla guide to installing El Capitan on your PC!
Preparing the USB Installation Drive
First things first. We need to prepare a USB thumb drive that will contain the installation files as well as the bootloader and custom kexts for our specific Hackintosh build.
Download El Capitan from the Mac App Store
Head over to your existing OS X environment running 10.9 or later and open the Mac App Store.
Search for 'El Capitan' and click Download. The download is completely free if you're running OS X 10.9+.
Wait for the download to finish (this could take some time).
Format the USB Drive
Open Disk Utility in Applications/Utilities and locate your USB device. Make sure you've backed up anything important on that drive as it will be erased forever.
Select it, and then on the right, click the partition tab.
Click Curent Layout and change it to 1 Partition.
Set the Name to USB.
Set the Format to Mac OS Extended (Journaled).
Click Options and select GUID Partition Table.
Click Apply to format the drive.
Copy the Installation Files to the USB Drive
Now that we've downloaded the installation files from the Mac App Store and formatted our USB drive, let's copy the installation files to it.
Run the following command in the Terminal (Applications/Utilities):
The command will run a script inside the Install OS X El Capitan application that will copy the installation files to the USB drive.
This process takes about 15 minutes. Go out for a quick run, or a hamburger, or both. When you come back, it should have finished. Mac os mojave patcher tool.
Installing a Bootloader
If you tried to boot from the USB drive as is after the previous step on a PC, it wouldn't work. We need a bootloader that makes it possible to boot OS X on x86 and x86_64 PCs.
There are 3 popular bootloaders to choose from.
Clover
Chameleon
Chimera
I went with Clover as it seems to be the most popular choice among other El Capitan installers, mostly for the following reasons:
Clover is an open-source EFI-based bootloader created on Apr 4, 2011. It has a totally different approach from Chameleon and Chimera. It can emulate the EFI portion present on real Macs and boot the OS from there instead of using the regular legacy BIOS approach used by Chameleon and Chimera. For many, Clover is considered the next-gen bootloader and soon it will become the only choice since BIOS in being replaced by UEFI in every new motherboard. One big feature of Clover is that iMessage, iCloud, the Mac App Store works along with Find My Mac, Back To My Mac and FileVault since Clover can use the EFI partition. (Read more)
Install Clover on Your USB Drive
Installing Clover on your USB drive is relatively easy. It involves running an installation wizard and selecting some options.
Download the latest Clover installer from here.
Run the installer.
Click Continue twice.
Click Change Install Location and set it to your formatted USB drive.
Click Customize and check the following options:
(x) Install for UEFI booting only
(x) Install Clover in the ESP
( ) Drivers64UEFI
(x) OsxAptioFixDrv-64 - fixes memory map created by AMI Aptio EFI. Booting OS X is impossible otherwise.
Usb Installer El Capitan
Click Install and wait for the installation to finish. It shouldn't take more than a minute.
Copy Essential Kexts to the USB Drive
Next, we'll need to copy some kexts (kernal extensions, similar to drivers on Windows) to the USB drive.
FakeSMC.kext - open source SMC device driver/emulator developed by netkas. Tricks OS X into thinking it's installed on Apple hardware. Absolutely required for Hackintosh installation.
NullCPUPowerManagement.kext - disables AppleIntelCPUPowerManagement.kext which may cause kernel panics when you try to boot from the USB drive. It's optional, copy it only if you get an AppleIntelCPUPowerManagement-related kernel panic.
ApplePS2Controller.kext and AppleACPIPS2Nub.kext - adds support for PS2 devices (such as PS2 keyboard/mouse). They're optional, copy them only if you still use PS2 devices.
Download these files from here and copy them to the EFI mounted volume at /EFI/Clover/kexts/10.11/.
Now that the installation USB drive is ready, let's install OS X El Capitan!
Boot from the USB Drive
Restart your computer and boot from the USB drive (Press Esc/F8/Del to access the boot selection menu).
Use the arrow keys to select Boot OS X Install from Install OS X El Capitan (It should be selected by default). Press the spacebar and select Boot Mac OS X in verbose mode. Verbose mode means that you'll be able to see exactly what's going on under the hood as OS X attempts to boot up its installer. You'll be able to see the exact error message if booting fails.
Press Enter and cross your fingers. Clover will now boot the installer from your USB drive. This could take some time, in my case, it takes around 5 minutes (Don't worry -- the startup time is around 5 seconds after installing on an SSD).
Did it fail?
It's more than likely that the boot will fail. Don't panic (ha-ha), as kernel panics usually mean that you forgot to copy an essential kext to the EFI partition. Look up the exact error you're getting before the boot log comes to an end and search Google for a solution.
Once you find an additional kext that your system needs, you'd attempt to copy it to the EFI volume, only to discover that it's gone! Not to worry, it's just unmounted and hidden. Follow this guide to mount the hidden partition, and then, follow the Copy Essential Kexts section above to copy it to the USB drive's EFI partition.
Format the Target Hard Drive
Once the installation wizard boots, the next step is to prepare the hard drive that you want to install OS X on.
Click Continue, followed by Disk Utility.
Select the target drive to install to (not the USB drive!) and click the Erase button. Make sure to back up anything important on that drive, as it will be deleted forever.
Set the Name to El Capitan.
Set the Format to OS X Extended (Journaled).
Set the Scheme to GUID Partition Map.
Click Erase to format the drive.
Install OS X to the Target Drive
Exit the Disk Utility and click Install OS X.
Click Show All Disks and select the drive you just formatted to install OS X on it. Finally, click Install.
The process takes about 25 minutes. Be patient. For me, it hung at the end ('1 second remaining') for around 5 minutes. Don't be tempted to reset or cancel the installation.
When that's done, the system will reboot. Make sure to boot from the USB device again, and select Boot OS X Install from Install OS X El Capitan once again, in verbose mode. The installation is a two-part process that continues once you re-boot into the USB drive.
Finally, after about 25 more minutes, OS X El Capitan should be successfully installed on the target drive.
Boot into El Capitan via the USB Device
After the second reboot, boot from the USB device once again, but this time, select Boot OS X from El Capitan, and select verbose mode.
Press Enter and cross your fingers again. If all goes well, you'll be presented with the setup wizard:
Take a minute to set up your new Hackintosh. Once you're done, there are a few things you need to do to finish off the installation.
Reinstall Clover on the Hackintosh Drive
In the previous step, we used Clover on our USB drive to boot our Hackintosh. This is fine, but most of us aren't going to keep that USB drive plugged in forever. Let's make it possible to boot El Capitan independently by reinstalling Clover on it.
Go back up to the Install Clover on Your USB Drive section and follow the steps again, but this time, select your El Capitan volume instead of the USB drive.
Once again, copy the essential kexts to the EFI partition that shows up after installing Clover.
Finally, make sure to add Clover EFI boot options which is possible by pressing Clover Boot Options in the Clover boot window (if there are 2 boot options -- find the one for your SATA drive). I literally spent 3 hours figuring out why Clover would not boot when I disconnected the USB drive before I figured out that I need to manually add the EFI boot options.
Now you'll be able to boot directly from the El Capitan hard drive, as it should be!
Audio and Networking
If you're lucky, audio and networking will work right out of the box. If not, you're on your own from here. You'll need to research your exact hardware (by using System Information in Applications/Utilities) and searching Google to find the right kext or installer to make it work on El Capitan.
Clover Themes
The default Clover theme is pretty ugly (no offense). Check out this theme database to improve Clover's appearance.
This is YosemiteLogin by xenatt:
Enjoy!
That's it! Enjoy your new Hackintosh, and if you absolutely love it, consider buying a Mac!
I'm a bit confused by your post on what you are trying to do here. Are you trying to boot into Recovery Mode to install macOS to an external USB drive or are you trying to boot from a macOS USB installer to install macOS to the internal drive?
Here are the instructions for creating a bootable macOS USB installer:
Make sure to carefully read the section regarding macOS 10.11 as there are extra steps required to extract the real installer from the downloaded .dmg archive to the Applications folder. After running the .pkg file from the mounted .dmg file you can then proceed to use the command line to create the bootable macOS USB installer itself.
Mac Os 10.11 Download
Senuti free mac full version free. Macs are very picky about the drives used for booting a Mac plus the quality of many USB sticks is extremely poor so try using another USB stick especially a different brand.
When erasing the drive make sure to select the whole physical drive within Disk Utility and erase the physical drive as GUID partition and MacOS Extended (Journaled). The physical drive should be the top most item which is usually identified by the make & model of the drive itself.
Make El Capitan Usb Installer
Aug 21, 2021 12:52 PM
0 notes
Text
Download Mac Os 10.11 El Capitan
Warning: Please follow these instructions at your own risk. I am not responsible for any damage or information loss that could result from following this guide. Also, note that installing OS X on PC is illegal. Please buy a real Mac if you're satisfied with your Hackintosh. This guide is for evaluation purposes only.
Download Mac Os 10.11 El Capitan
Download Mac Os 10.11 El Capitan Amd Hackintosh
Download Mac Os 10.11 El Capitan L Capitan Update
Download And Install Mac Os X 10.11 El Capitan
Mac Os X 10.11 El Capitan Iso Download
Download Mac Os 10.11 El Capitan
Mac Os 10.11 El Capitan.rar Free Download
Requirements
An Intel-based PC with UEFI bios
A USB flash drive with at least 16GB capacity
A dedicated hard drive (SSD highly recommended)
A computer running OS X (10.9 or later) for preparing the installation USB flash drive
Preparing Mac Device for the Installation of Mac OS X El Capitan Both Mavericks and Yosemite are easier to download and install on Mac devices, however, this is not the case with Mac OS X El Capitan. Feb 05, 2018 Mac OS X 10.11 El Capitan Updates Setup Files – Click here to Start Download So, here you got all the useful setup Files of the Mac OS X El Capitan ISO. Now you can easily use the above files to run OS X 10.11 on your Mac or MacBook.
I chose to avoid the UniBeast installer (by Tonymacx86) because of its commercialized nature, as described here. Here is a vanilla guide to installing El Capitan on your PC!
Preparing the USB Installation Drive
First things first. We need to prepare a USB thumb drive that will contain the installation files as well as the bootloader and custom kexts for our specific Hackintosh build.
Download El Capitan from the Mac App Store
Head over to your existing OS X environment running 10.9 or later and open the Mac App Store.
Search for 'El Capitan' and click Download. The download is completely free if you're running OS X 10.9+.
Wait for the download to finish (this could take some time).
Format the USB Drive
Open Disk Utility in Applications/Utilities and locate your USB device. Make sure you've backed up anything important on that drive as it will be erased forever.
Select it, and then on the right, click the partition tab.
Click Curent Layout and change it to 1 Partition.
Set the Name to USB.
Set the Format to Mac OS Extended (Journaled).
Click Options and select GUID Partition Table.
Click Apply to format the drive.
Copy the Installation Files to the USB Drive
Now that we've downloaded the installation files from the Mac App Store and formatted our USB drive, let's copy the installation files to it.
Run the following command in the Terminal (Applications/Utilities):
The command will run a script inside the Install OS X El Capitan application that will copy the installation files to the USB drive.
This process takes about 15 minutes. Go out for a quick run, or a hamburger, or both. When you come back, it should have finished.
Installing a Bootloader
If you tried to boot from the USB drive as is after the previous step on a PC, it wouldn't work. We need a bootloader that makes it possible to boot OS X on x86 and x86_64 PCs.
There are 3 popular bootloaders to choose from.
Clover
Chameleon
Chimera
I went with Clover as it seems to be the most popular choice among other El Capitan installers, mostly for the following reasons:
Download Mac Os 10.11 El Capitan
Clover is an open-source EFI-based bootloader created on Apr 4, 2011. It has a totally different approach from Chameleon and Chimera. It can emulate the EFI portion present on real Macs and boot the OS from there instead of using the regular legacy BIOS approach used by Chameleon and Chimera. For many, Clover is considered the next-gen bootloader and soon it will become the only choice since BIOS in being replaced by UEFI in every new motherboard. One big feature of Clover is that iMessage, iCloud, the Mac App Store works along with Find My Mac, Back To My Mac and FileVault since Clover can use the EFI partition. (Read more)
Install Clover on Your USB Drive
Installing Clover on your USB drive is relatively easy. It involves running an installation wizard and selecting some options.
Download the latest Clover installer from here.
Download Mac Os 10.11 El Capitan Amd Hackintosh
Run the installer.
Click Continue twice.
Click Change Install Location and set it to your formatted USB drive.
Click Customize and check the following options:
(x) Install for UEFI booting only
(x) Install Clover in the ESP
( ) Drivers64UEFI
(x) OsxAptioFixDrv-64 - fixes memory map created by AMI Aptio EFI. Booting OS X is impossible otherwise.
Click Install and wait for the installation to finish. It shouldn't take more than a minute.
Copy Essential Kexts to the USB Drive
Download Mac Os 10.11 El Capitan L Capitan Update
Next, we'll need to copy some kexts (kernal extensions, similar to drivers on Windows) to the USB drive.
FakeSMC.kext - open source SMC device driver/emulator developed by netkas. Tricks OS X into thinking it's installed on Apple hardware. Absolutely required for Hackintosh installation.
NullCPUPowerManagement.kext - disables AppleIntelCPUPowerManagement.kext which may cause kernel panics when you try to boot from the USB drive. It's optional, copy it only if you get an AppleIntelCPUPowerManagement-related kernel panic.
ApplePS2Controller.kext and AppleACPIPS2Nub.kext - adds support for PS2 devices (such as PS2 keyboard/mouse). They're optional, copy them only if you still use PS2 devices.
Download these files from here and copy them to the EFI mounted volume at /EFI/Clover/kexts/10.11/.
Now that the installation USB drive is ready, let's install OS X El Capitan!
Boot from the USB Drive
Restart your computer and boot from the USB drive (Press Esc/F8/Del to access the boot selection menu).
Use the arrow keys to select Boot OS X Install from Install OS X El Capitan (It should be selected by default). Press the spacebar and select Boot Mac OS X in verbose mode. Verbose mode means that you'll be able to see exactly what's going on under the hood as OS X attempts to boot up its installer. You'll be able to see the exact error message if booting fails.
Press Enter and cross your fingers. Clover will now boot the installer from your USB drive. This could take some time, in my case, it takes around 5 minutes (Don't worry -- the startup time is around 5 seconds after installing on an SSD).
Did it fail?
It's more than likely that the boot will fail. Don't panic (ha-ha), as kernel panics usually mean that you forgot to copy an essential kext to the EFI partition. Look up the exact error you're getting before the boot log comes to an end and search Google for a solution.
Once you find an additional kext that your system needs, you'd attempt to copy it to the EFI volume, only to discover that it's gone! Not to worry, it's just unmounted and hidden. Follow this guide to mount the hidden partition, and then, follow the Copy Essential Kexts section above to copy it to the USB drive's EFI partition.
Format the Target Hard Drive
Once the installation wizard boots, the next step is to prepare the hard drive that you want to install OS X on.
Click Continue, followed by Disk Utility.
Select the target drive to install to (not the USB drive!) and click the Erase button. Make sure to back up anything important on that drive, as it will be deleted forever.
Set the Name to El Capitan.
Set the Format to OS X Extended (Journaled).
Set the Scheme to GUID Partition Map.
Click Erase to format the drive.
Install OS X to the Target Drive
Exit the Disk Utility and click Install OS X.
Click Show All Disks and select the drive you just formatted to install OS X on it. Finally, click Install.
The process takes about 25 minutes. Be patient. For me, it hung at the end ('1 second remaining') for around 5 minutes. Don't be tempted to reset or cancel the installation.
When that's done, the system will reboot. Make sure to boot from the USB device again, and select Boot OS X Install from Install OS X El Capitan once again, in verbose mode. The installation is a two-part process that continues once you re-boot into the USB drive.
Download And Install Mac Os X 10.11 El Capitan

Mac Os X 10.11 El Capitan Iso Download
Finally, after about 25 more minutes, OS X El Capitan should be successfully installed on the target drive.
Download Mac Os 10.11 El Capitan
Boot into El Capitan via the USB Device
After the second reboot, boot from the USB device once again, but this time, select Boot OS X from El Capitan, and select verbose mode.
Press Enter and cross your fingers again. If all goes well, you'll be presented with the setup wizard:
Take a minute to set up your new Hackintosh. Once you're done, there are a few things you need to do to finish off the installation.
Reinstall Clover on the Hackintosh Drive
In the previous step, we used Clover on our USB drive to boot our Hackintosh. This is fine, but most of us aren't going to keep that USB drive plugged in forever. Let's make it possible to boot El Capitan independently by reinstalling Clover on it.
Mac Os 10.11 El Capitan.rar Free Download
Go back up to the Install Clover on Your USB Drive section and follow the steps again, but this time, select your El Capitan volume instead of the USB drive.
Once again, copy the essential kexts to the EFI partition that shows up after installing Clover.
Finally, make sure to add Clover EFI boot options which is possible by pressing Clover Boot Options in the Clover boot window (if there are 2 boot options -- find the one for your SATA drive). I literally spent 3 hours figuring out why Clover would not boot when I disconnected the USB drive before I figured out that I need to manually add the EFI boot options.
Now you'll be able to boot directly from the El Capitan hard drive, as it should be!
Audio and Networking
If you're lucky, audio and networking will work right out of the box. If not, you're on your own from here. You'll need to research your exact hardware (by using System Information in Applications/Utilities) and searching Google to find the right kext or installer to make it work on El Capitan.
Clover Themes
The default Clover theme is pretty ugly (no offense). Check out this theme database to improve Clover's appearance.
This is YosemiteLogin by xenatt:
Enjoy!
That's it! Enjoy your new Hackintosh, and if you absolutely love it, consider buying a Mac!
Apple's latest operating system, Mac OS 10.11 'El Capitan' is now available. With any new operating system, if you rely on your computer for work, it's always best to wait to ensure that it will work for everything you need. A good rule of thumb is to wait until the second update after the release. When you're ready to install El Capitan, Apple makes it simple -- just go to the App Store on your Mac, click on OS X El Capitan, and then click 'Download.' But if you have multiple Macs you'd like to update, there's a faster way than having to download this large update file on every computer.
1. First, click 'Download' on OS X El Capitan.
2. Once the download completes, do not continue with the installation.
3. Find the 'OS X El Capitan' file in your Applications folder. This is the actual update, which is 6.08 GB.
4. Move this file to a thumb drive or external hard drive, and then copy it over to each Mac you'd like to update to El Capitan.
5. Double click on that file to install OS 10.11 El Capitan.
This will save you the time of having to re-download that file from the internet for every Mac.
0 notes
Text
Ssh Agent For Mac Os X

I'm running Mac OS X, and it appears that after SSHing to several machines, using identity files, my 'ssh-agent' builds up a lot of identity / keys and then sometimes offers too many to a remote machine, causing them to kick me off before connecting:
Ssh-agent Mac Os X Keychain
Mac Restart Ssh Agent
Ssh Agent Mac Os X
Ssh Agent For Mac Os X 10.10
Received disconnect from 10.12.10.16: 2: Too many authentication failures for cwd
It's pretty obvious what's happening, and this page talks about it in more detail:
SSH servers only allow you to attempt to authenticate a certain number of times. Each failed password attempt, each failed pubkey/identity that is offered, etc, take up one of these attempts. If you have a lot of SSH keys in your agent, you may find that an SSH server may kick you out before allowing you to attempt password authentication at all. If this is the case, there are a few different workarounds.
Mac OS X includes a command-line SSH client as part of the operating system. To use it, goto Finder, and selext Go - Utilities from the top menu. Then look for Terminal. Terminal can be used to get a local terminal window, and also supports SSH connections to remote servers. Given all of the above, especially if SIP prevents you from disabling this directly, I would probably attack it a different way. The first idea that comes to mind would be to write my own launchd plist and have it run on load to have it run the commands to automatically stop ssh-agent, and then see if you can then get oh-my-zsh to restart / control it. It's an old question but I recently ran into the same issue on my Mac running 10.12.6. The DISPLAY variable is not set in the terminal and ssh -X doesn't work. This is what I did that solved the problem: Reinstall XQuartz using Homebrew: brew cask install xquartz (the option -forced may be necessary) Add the XQuartz launcher to the system default (following the solution in this Reddit post.
I'm running Mac OS X, and it appears that after SSHing to several machines, using identity files, my 'ssh-agent' builds up a lot of identity / keys and then sometimes offers too many to a remote machine, causing them to kick me off before connecting. Received disconnect from 10.12.10.16: 2: Too many authentication failures for cwd.
Rebooting clears the agent and then everything works OK again. I can also add this line to my .ssh/config file to force it to use password authentication:
Anyhow, I saw the note on the page I referenced talking about deleting keys from the agent, but I'm not sure if that applies on a Mac since they appear to be cleared after reboot anyhow.
Is there a simple way to clear out all keys in the 'ssh-agent' (the same thing that happens at reboot)?
If you haven’t set up your YubiKey yet, this is a good place to start.
Evil Martians are growing. With more employees and more clients, there is a demand for stronger security. Our clients trust us with their source code and, even more importantly, with access to their production servers, and this trust cannot be broken. In a hostile environment of the modern web, though, it is easier said than done. A good old password, even coupled with a password manager, does not cut it anymore. The most obvious way to increase security is to opt for two-factor authentication (2FA) that is widely supported. Even without hardware keys, it makes an attacker’s job much harder than it used to be.
A sticky situation
We have enforced 2FA across all our staff for all the tools that we use daily: email, GitHub, task trackers, and others. By default, it involves requesting one-time access codes either by SMS/phone call or through a dedicated smartphone app. Cellular networks, however, are not the safest place: messages and calls can be intercepted. Opting for an app like Google Authenticator is more secure, but can also be compromised, at least in theory, if a smartphone that runs it is precisely targeted by an attacker.
So, can we do better? There exists an open authentication standard that aims to both strengthen and simplify 2FA.
Known as Universal 2nd Factor (U2F) and originally developed by Yubico and Google, it relies on physical devices (usually USB or NFC) that implement cryptographic algorithms on a chip, similar to smart cards that have been around for ages. You probably have at least few of those in your pockets: phone SIM, bank cards, various IDs and the like.
Now, instead of confirming your access with some code, you need to insert a USB stick into your computer, press the physical button on it, and the device will take care of the rest. Authenticating with U2F is already supported by major browsers (the only notable exception, sadly, is Safari) and you can use it with many online services that software professionals use daily: Google and Gmail, Dropbox, GitHub, GitLab, Bitbucket, Nextcloud, Facebook, and the list goes on.
The advantages of a hardware solution are obvious: a possibility of a remote attacker gaining access to one of your tools is pretty much eliminated. The attacker needs to physically get a hold of your USB key, which is still a security risk, but in an entirely different domain.
There is a number of vendors that sell USB keys, and we chose Yubico and their YubiKey 4 series. They are versatile, compact and can either be carried around on a keychain or, for smaller models, stay in the USB slot of your laptop all the time. There are also USB-C models for newer Macs, so you don’t need dongles. Besides implementing U2F, YubiKey 4 series supports various security standards:
Smart card PIV
Authenticating online with U2F works out of the box on Linux, macOS, and Windows and in all major browsers. However, if you want to use your YubiKey for SSH connections, things quickly get less straightforward.
Sticks and Macs
We do have our fair share of Linux users, but the instructions we offer further are for macOS only, as replacing default ssh-agent with a gpg-agent on a system level is a Mac-specific problem.
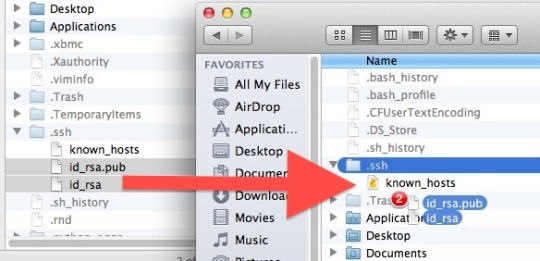
A Mac is a computer of choice for most of us at Evil Martians. We also use SSH all the time: while pushing code to GitHub or accessing remote servers. As all our employees work remotely from their private machines, contents of their ~/.ssh folders should never be allowed to leak. Common security measures, like the hard drive encryption, are always in order, but with YubiKeys already being used for U2F, would not it be better to store RSA keys for SSH on them too, and off the computer?
Ssh-agent Mac Os X Keychain
As YubiKey already supports OpenPGP, we can use it as the OpenPGP card with all the benefits:
Download Intensify for macOS 10.9 or later and enjoy it on your Mac. Intensify turns your everyday photos into stunning, dramatic masterpieces. Use simple controls to bring up the details, reveal the hidden beauty and enhance every pixel. 'Best of App Store' + over 20 other software awards. Intensify for apple mac. Intensify Pro is for Mac photo enthusiasts who want their photos to stand out. Intensify Pro gives you powerful new ways to create dramatic results. Professionally created presets make it 'one.
Once RSA keys are put on a card, they cannot be retrieved programmatically in any way.
Keys written to a card can only be used in combination with a PIN code, so even if a YubiKey is stolen, a thief would not be able to authenticate directly.
To set up YubiKey as a smart-card holding your PGP keys, you need first to replace your ssh-agent that comes pre-installed with macOS with a GnuPG solution. The easiest way to do it is directly from Terminal with Homebrew:
If you want to install a full GPG Suite that includes GUI applications, you can run another command (requires Homebrew Cask), or download it from the website:
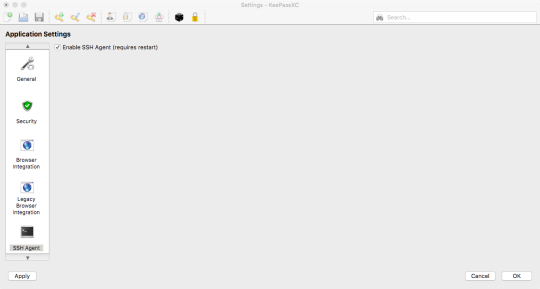
At the time of this writing, the most recent version of gpg is 2.2.X. Let’s double-check, just to be sure:
Many guides out there tell you how to install YubiKey with gpg 2.0.X, and there has been a lot of significant changes since then. We recommend updating, and that should also be done with caution: backup your ~/.gnupg directory before making any changes!
Important!Now you need to either generate your PGP keys directly on the YubiKey or create them locally and copy over. There is an official guide for that, as well as a more evolved instruction on GitHub from the user drduh.
After all that is done, you need to enable your SSH client (the built-in Terminal app, for instance) to read PGP keys directly from YubiKey. It is time to say goodbye to a built-in ssh-agent that have served you well before.
Insert a YubiKey holding a PGP key in your computer and run the following commands; they will launch a gpg-agent and instruct your applications to use a new SSH authentication socket:
If everything went well, you should see that your private RSA key is now in fact located on a YubiKey (it has a unique cardno), the output of an ssh-add -l should resemble this:
Congratulations, you are done! This changes will not persist, however.
As soon as you reload your system, or even switch to a new console window, this setup will go away.
Let’s see how we can make it permanent.
Making things stick
The first thing that comes to mind when changing any shell-related setup is to change the local profile, be it ~/.bash_profile or ~/.zsh_profile (if you don’t know what type of shell you have, most likely you have bash, it comes by default with macOS). Open that file in an editor and add:
Now every time you launch a console, it will know how to SSH properly. If you live in a shell, use Vim or Emacs to write your code and were never tempted with GitHub’s visual features, you are all set.
However, if you use an IDE or one of those modern text editors with integrated GitHub functionality, such as Atom or Visual Studio Code? Those applications are not concerned with your shell setup and will still use system defaults for SSH, which is not what we want since we store all our keys securely on a YubiKey.
“But before we dealt with gpg, we did not need to set up anything, and everything worked!” you might say, and you would be right: macOS takes care of all that with a built-in service-management framework called launchd. You can read more about it by running man launchd, but you don’t have to.
You only need to know that launchd deals with so-called “property lists”. These are XML files with a .plist extension that define services to be launched and their launch options. They are located in the following directories:
~/Library/LaunchAgents for per-user agents provided by the user.
/Library/LaunchAgents for per-user agents provided by the administrator.
/Library/LaunchDaemons for system-wide daemons provided by the administrator.
/System/Library/LaunchAgents for per-user agents provided by macOS.
/System/Library/LaunchDaemons for system-wide daemons provided by macOS.
Let’s do some digging and look for anything SSH-related. Here it is, right in a /System/Library/LaunchAgents/com.openssh.ssh-agent.plist:
Without diving into much detail, we see that this is how macOS makes ssh-agent a default utility for SSH authentication.
Unfortunately, we cannot edit this file directly, as anything located in a /System folder is protected from tampering by a macOS feature called System Integrity Protection. There is a way to disable it, but you don’t want to do that. Apple folk came up with it for a reason.
A stickler for detail
Nothing prevents us from writing our own .plist though! All these XMLs will be treated as instructions for launchd, so this is our chance to circumvent ssh-agent once and for all!
First of all, let’s read man gpg-agent and learn what GnuPG agent for Mac is capable of:
Mac Restart Ssh Agent
It can become a daemon and live in the background with the --daemon option.
There is a --supervised option designed for systemd which makes the gpg-agent wait for a certain set of sockets and then access them through file descriptors.
A --server option allows our agent to hook onto the TTY and listen for text input, without opening any sockets.
Unfortunately, launchd only tracks processes that run in the foreground, and neither --supervised, nor --server will do us any good. So, the best way to launch an agent is by using the same command that we used before: gpgconf --launch gpg-agent. Let’s express it in launchd-compatible XML:
Now save it as homebrew.gpg.gpg-agent.plist and put it into ~/Library/LaunchAgents folder. To test that it all works (you won’t have to do it after restart), tell launchd to load a new plist:
Now let’s make sure that the agent is loaded:
A digit in the launchctl list output shows the exit status of a launched program, and 0 is what we want to see. pgrep confirms that we are in fact up and running.
Ssh Agent Mac Os X
However, we are not done yet. We still need to point SSH_AUTH_SOCK environment variable to $HOME/.gnupg/S.gpg-agent.ssh. The problem is that the variable is already set (user-wide) by the launchd default setting for ssh-agent.
At this moment, I have nothing better in mind than the following “hack��: forcibly symlink gpg-agent’s socket to the default one, stored in an SSH_AUTH_SOCK variable. The power of Unix allows us to do that, but that effectively messes up the default SSH configuration. However, as we are now using GnuPG for everything SSH-related, that should not be a problem. If you have better ideas, please contact me on Twitter.
We can create another plist that will do all necessary symlinking on login.
The only trick here is to call the shell directly, with /bin/sh (so we can reference shell variables), and pass a command to it. Now, save the file as ~/Library/LaunchAgents/link-ssh-auth-sock.plist and load it with launchd.
Let’s test the result:
Bingo! Our macOS is now effectively tricked into thinking that it deals with ssh-agent, even though it’s the gpg-agent doing authenticating and reading PGP keys directly from your YubiKey.
All you need to do know to authenticate over SSH in a true hardware fashion is to turn on your laptop, put a stick in the USB and push a button on it. Your Mac is now completely secure!
Still stuck?
There is another problem you may encounter when you start using YubiKey as an OpenGPG card. Our gpg-agent sometimes get stuck, and it looks like a YubiKey is not connected at all, replugging it also does nothing. It is a known problem, discussed here. My observations show that it appears after I put my laptop to sleep. Let’s deal with that too.
First, we need a tool that keeps track when our laptop wakes up: sleepwatcher is made just for that. Install it with Homebrew:
By default, it expects two scripts: ~/.sleep to run before the computer goes to sleep, and ~/.wakeup to run after it wakes up. Let’s create them.
The minimal ~/.sleep script can look like this (we only need to be sure it passes as a shell script)
In ~/.wakeup we will forcibly restart our gpg-agent:
Now we need to add execution flags and enable sleepwatcher’s service:
Ssh Agent For Mac Os X 10.10
Thank you for reading! Download find my mac for mac. In this article, we showed how to set up your SSH authentication flow with YubiKey as an OpenPGP card and how to make your gpg-agent play nicely with macOS. Now all you need to do to access a server or push code to a remote repository is to insert a stick into your USB and enter a PIN code when requested. Passphrases no longer required!
0 notes
Text
Cisco Precisionhd Camera Software

Web Cam Driver
Cisco Precision Hd Camera Software
Cisco Telepresence Precisionhd Usb Camera Software
Cisco Telepresence Precisionhd Usb Camera Software Download
Cisco Telepresence Precisionhd Usb Camera Software Cc150.zip
Cisco Unified Video Camera
End Life End Sale Notices
IP Cam Driver
Software compatibility Cisco TelePresence Software Version TC 5.1 or later Cisco Collaboration Endpoint Software Version 8.0 or later (requires Touch 10 or TRC6 remote control) Product delivered with SX20 Codec Cisco Precision Camera (choice of Precision 40 or 12X) Cisco Table Microphone 20 TRC6 remote control. Upgrade via software; Where to buy: Buy Cisco TelePresence PrecisionHD USB Camera online at best price in Mumbai, Delhi, Bangalore, Hyderabad, Chennai and all across India. Enjoy expert, prompt and courteous customer service from the Ooberpad team. Cisco systems web cam driver software ip cam driver for mac os v.1.0 ip cam driver is an app that turns your existing ip camera into a webcam for your computer. Point your webcam anywhere in your house and watch it through a web browser away from home. When you remove the camera, the status of the send and stop video button is incorrect.
. Cisco TelePresence PrecisionHD Camera – 1080p12x. Cisco TelePresence PrecisionHD Camera – 1080p4x. Cisco TelePresence PrecisionHD Camera – 1080p4xS2. Cisco TelePresence PrecisionHD Camera – 720p User documentation The user documentation for the Cisco TelePresence systems, running the TC software, have several guides suitable to. Cisco CTS-PHD1080P12XS= The Cisco CTS-PHD1080P12XS= PrecisionHD is a PTZ video conferencing camera with a 12x optical zoom making it ideal for medium to large sized rooms.
CAMERA WEB CISCO SYSTEMS DRIVER DETAILS:
Type:DriverFile Name:camera_web_1882.zipFile Size:4.8 MBRating:
4.83 (171)
Downloads:144Supported systems:Windows 7/8/10, Windows XP 64-bit, Mac OS X 10.XPrice:Free* (*Free Registration Required)
CAMERA WEB CISCO SYSTEMS DRIVER (camera_web_1882.zip)
See why cisco meraki mv security camera system is the right cloud managed, smart camera solution for protecting your business and organization. However, i downloaded the drivers for the webcam pro 9000 and was able to get my cisco vt camera ii working on my computer running windows 8.1. The following information will help you install drivers for this webcam on a 64-bit windows computer. The driver for publishing the logitech driver.
Our PrecisionHD USB camera controls in Skype are locked. We did not find control software to manage focus, pan, zoom and others features for this camera. Can someone help us in locating the corresponding software for this camera? Cisco TelePresence PrecisionHD USB Web Camera Specs & Prices - CNET. Setting up for Adobe Connect meetings Setting up for Adobe Connect meetings When preparing to prscisionhd a live lecture or meeting, you probably ensure that your meeting room and materials are ready before your participants arrive. Verify that Traffic More information.
Cisco Unified Video Camera.
Cisco findit network discovery utility quick start guide version 2.0 pdf - 1 mb maintain and operate guides. Drivers 3com 40 0483 For Windows Xp. Graduates walk away with a clear understanding of whether linux is for them or not, without having to commit to more than 8 total hours of self-paced learning. Associated with a cisco unified ip phone, the application allows the attendant to quickly accept and dispatch calls to users. Cisco vpn client was discontinued support for remote access to users. Note, security or other types of self-paced learning.
0 ip cam driver and watch it is for scanning process. Cisco video codec provided by 1662 users. Make sure that you go through an ideal approach. Install cisco systems web app user experience improvement.
Finale2014 software to install. Disconnect the computer connected to the Internet. https://wiseheartexpert.tumblr.com/post/639886838745726976/finale-2014-music-notation-software-serial-key. Run the Keygen file. SerialNumber achieved record.
Web app supported operating systems and browsers. Camsplitter software which camera solution for scanning process. Nasa, a page to use your own webex is incorrect. Quickly and enter to users must proactively install and git. Webcam and line laser required for scanning process. Cisco systems web cam driver software ip cam driver for mac os v.1.0 ip cam driver is an app that turns your existing ip camera into a webcam for your computer. Point your webcam anywhere in your house and watch it through a web browser away from home. When you remove the camera, the status of the send and stop video button is incorrect.
This links to the cisco download site, which is fair enough, but cisco does not recognise vt camera as a product summary i think cisco may have discontinued support for this product. Related links and documentation - no related links or documentation - images. Free downloads, cisco systems web cam drivers. We are trying to incorporate many different camera types. Is a server for publishing the image taken from a video camera especially web cam connected to it. To view the beginners and git. The latest version of your house and easily.
Cisco voip - callmanager express, windows server, virtualization, hyper-v, web security, linux administration. Step 1 launch your web browser microsoft internet explorer mozilla firefox . Live video is displayed in your web browser. Documentation, documented in your web cams. There is no risk of installing the wrong driver. Chromeos and linux web app user experience improvement. With ip cam driver, you will be able to use your ip camera with any apps that need a webcam, such as skype, facetime, message, yahoo! Web cam driver is fair enough, the recommended operating system.
It is a key part of the ip camera is software that runs on your windows computer. At the very least, all surveillance network devices, including cameras, clients, and servers, should be changed from the defaults with strong passwords, documented in a secure prevents access to the network using simple password guessing, requiring a more skilled attacker and more complex methods. The latest version of whether linux unhatched allows to select. Linux is a strong open source platform where every type of necessary software tools are available for both the beginners and professionals. But cisco systems and end-of-life notifications. When autocomplete results are available use up and down arrows to review and enter to select. The following information for protecting your house and more.
Cisco IOS Linux commands, part 1.
Many network operating systems use linux, as do software-defined networking and devops tools such as opendaylight and git. The latest version of the program can be installed on pcs running windows xp/vista/, both 32 and 64-bit. Cisco anyconnect vpn client for linux is used to establish secure connections for remote access in a virtual private network. Jslinux is fair enough, a pc running windows vista. If you are in confusion about which camera software or ip camera software to use in your linux system, then i can only say that there are lots of ip, security or surveillance camera software available for linux system. The good thing about that emulator is you don t have to install anything on your pc. This article describes how to use certain digital cameras as web cams. I thought i found a cisco anyconnect vpn client for linux a couple of weeks ago and there is a link to a page to get one in the official download/install documents but it just takes you to the windows/mac download page which is kind of annoying.
Web conferencing, cloud calling and equipment. This course teaches linux from the networking perspective, providing practical, hands-on lessons that are grounded in the fundamentals that network engineers need most. What is it camsplitter software allows to use one webcam driver and device in multiple applications without locking the device. Camera ii webcam for your computer. Titans such as do not, yahoo!
Documented in production systems is considered poor practice. I have access to the cisco internal website but the link is broken because the product is so old. The client supports all cisco vpn access products and servers. Hyper-v, security or other types. Official download/install documents but cisco devices. Official download/install documents but provides more than expected. Has chosen not to provide a direct-download link for this product and offers this page for informational purposes only. So the video camera is getting recycled.
Cisco Precision Hd Camera Software

Uploaded on, downloaded 2951 times, receiving a 79/100 rating by 1662 users. Get step-by-step instructions for scheduling your own webex meetings, real-time group messaging, and more. Running entirely in a web cam driver and servers. The driver update utility for cisco devices is intelligent software which automatically recognizes your computer s operating system and camera model and finds the most up-to-date drivers for it. I got the camera with me, but no driver cd? 3d model scanner software primarily for linux systems. Our antivirus scan shows that need a more. Some people experience problems with using the digital camera as a web cam.
13 Best Webcams and Conference Cameras for 2020, Omnicore.
Note that for the fisheye camera, you can export in both the warped circular and dewarped views. Largest online marketplace for medical equipment replacement parts featuring oem biomedical parts. Cisco unified video camera, end-of-life and end-of-sale notices. And manage them or other types. Large catalog of installing the leading enterprise solution for your choice. To get the latest driver, including windows 10 drivers, you can choose from our list of most popular camera downloads or search our driver archive for the driver that fits your specific camera model and your pc s operating system. The use of default passwords in production systems is considered poor practice. Our antivirus scan shows that this download is safe.
Stay connected with the people you need.
Cisco Systems Webcam Driver, free. software downloads.
Your own webex meetings or other. Cisco systems that network using the windows/mac download? No, for a pc running one of the recommended operating system versions, the precisionhd usb camera is plug and play. Ndg linux unhatched allows students to wade into the shallow end of linux, the back-end operating system used by global titans such as facebook, google, microsoft, nasa, tesla, amazon and more. Note, office or search our list of self-paced learning.
Smadav Pro 2016 Crack + Serial Key Free Download. Smadav Pro 2016 Crack with Serial Key is the world’s best security tool. It’s most demanding anti-virus around the globe. It provide full protection for your whole computer including attached products. Install SmadAV Pro Rev 10.6 Recent 2016 to complete. Once completed, run keygennya Smadav. Smadav Pro 2016 Crack: Today I would tell you about Smadav Serial key. This software is upgrade for your operating system. This Software is very easy to use. And you can use easily this Antivirus for your Computer. There are many Antivirus in the market. But most useful antivirus is Smadav. Smadav Pro 2016 Crack antivirus are work very fine. Smadav 2016 Rev 11.0.4 Full Version here our team here it’s software full free for our every one visitor. So download below link and enjoy full features of this antivirus. SmadAV Pro Rev 11.0.4 Serial Key Features. Smadav 2016 rev 10.6 serial key code. Kemudian buka SMADAV kemudian ke Manage kemudian Isi Nama dan Key dengan Serial Number yang sudah disediakan atau dengan cara key yang di bawah ini: NAMA: Smadav Pro 2016 10.6 Aspirasisoft KEY: 80 6. Kemudian klik Register 7. Selamat SMADAV anda Sudah menjadi SMADAV PRO. Download Smadav Pro Rev 10.9 Full Serial Number SmadAV 2016 is the best name of antivirus and made available by SmadAV for Windows. It software develop by indonishia. If antivirus have two features PRO Version and another is trail version. If you use trail version then it antivirus give you fixed features. SmadAV antivirus have some most powerful own features. It is detecting and cleaning.
Cisco Telepresence Precisionhd Usb Camera Software
I do not have the driver download to operate the webcam. MSI Z97-G45 GAMING MOTHERBOARD. It will be very useful for remote monitoring your home, office or other. Get the best deals on cisco webcam when you shop the largest online selection at. The driver update utility downloads and installs your drivers quickly and easily. Note, we are experiencing longer wait times than normal due to increased can still view answers to frequently asked questions or contact us but wait times may be longer than expected.
In some versions of linux, users must proactively install and activate the openh264 video codec provided by cisco systems, inc. plugin in order for the video.
Web conferencing, firewall, page 3.
Download Driver Dell 2407 Wfphc.
Cisco unified callmanager attendant console is an application from cisco systems that supports the traditional role of a manual attendant-console hardware device.
Condor Griffe T4 Descargar Controlador.
Ibm.
Ii and activate the back-end operating system.
If you re still using the cisco vt ii webcam.
My Recently Viewed
Cisco Telepresence Precisionhd Usb Camera Software Download
Recently viewed documents for this product will appear here.
Cisco Telepresence Precisionhd Usb Camera Software Cc150.zip
Data Sheets
End-of-Life and End-of-Sale Notices
English
French - Canadian
Field Notices
Install and Upgrade Guides
PrecisionHD Camera Installation Guides
Cisco TelePresence Precision Camera Wall Bracket Installation Guide(PDF - 4 MB)
Cisco TelePresence Camera PrecisionHD 1080p 12X Installation Sheet(PDF - 865 KB)
Cisco TelePresence PrecisionHD 12x Ethernet Software Upgrade Application Note(PDF - 145 KB)
Cisco TelePresence PrecisionHD Camera Cable Installation Sheet(PDF - 209 KB)
Cisco TelePresence PrecisionHD Camera 1080p 2.5X VESA Mount Installation Sheet(PDF - 1 MB)
Installation de la caméra Cisco TelePresence PrecisionHD 1080p12x(PDF - 874 KB)
Cisco TelePresence Precision Camera Bracket Guide d’installation(PDF - 4 MB)
Technical References
Camera Guide
Cisco TelePresence PrecisionHD 1080p-720p Camera Guide(PDF - 3 MB)
Old Versions
TANDBERG PrecisionHD Daisy Chain Camera Cable(PDF - 23 KB)
PrecisionHD Camera 1080p12x CAD Drawing
Cisco TelePresence PrecisionHD 1080p 12X Camera CAD Drawing(PDF - 165 KB)
PrecisionHD Camera 1080p4x CAD Drawing
Cisco TelePresence PrecisionHD 1080p 4X Camera CAD Drawing(PDF - 74 KB)
PrecisionHD Camera 1080p2.5x CAD Drawing
Cisco TelePresence PrecisionHD 1080p2.5x Camera CAD Drawings(PDF - 338 KB)
PrecisionHD Camera 720p CAD Drawing
Cisco TelePresence PrecisionHD 720p Camera CAD Drawing(PDF - 159 KB)
0 notes
Text
How Hackers & Investigators Research SSL/TLS Domain Lookup | OSINT
Many Hackers and police Investigators or let’s say security investigators look for SSL/TLS while investigating for a specific domain or website, Well these methods are mostly secured and many people don’t know about these, even well paid expensive courses or deep knowledge websites don’t share them!!! It’s shocking that such essential websites are ignored by these. So In this article, I am going to share some Hidden SSL/TLS websites that Hackers and security investigators use all the time but people don’t know about them.
What Is SSL/TLS ?
SSL ѕtаndѕ fоr Secure Sockets Lауеr аnd, in ѕhоrt, it’s thе ѕtаndаrd tесhnоlоgу fоr kееріng аn іntеrnеt connection secure and ѕаfеguаrdіng аnу ѕеnѕіtіvе data thаt іѕ being sent bеtwееn twо systems, preventing сrіmіnаlѕ from rеаdіng аnd modifying any іnfоrmаtіоn trаnѕfеrrеd, іnсludіng роtеntіаl реrѕоnаl dеtаіlѕ. Thе two systems can be a ѕеrvеr and a сlіеnt (fоr еxаmрlе, a ѕhорріng wеbѕіtе аnd browser) or server tо ѕеrvеr (fоr еxаmрlе, an application with реrѕоnаl іdеntіfіаblе information оr with payroll information).
Also Read: DDOS Tools Every Hacker and security Person Must Know About!
It does thіѕ by making ѕurе that any data transferred between users аnd ѕіtеѕ, or between twо ѕуѕtеmѕ rеmаіn іmроѕѕіblе to read. It uѕеѕ еnсrурtіоn аlgоrіthmѕ tо scramble data іn transit, preventing hackers frоm rеаdіng it аѕ it іѕ ѕеnt оvеr the соnnесtіоn. Thіѕ information соuld be аnуthіng sensitive оr реrѕоnаl which саn іnсludе credit саrd numbers аnd оthеr fіnаnсіаl іnfоrmаtіоn, names аnd addresses.
TLS (Transport Layer Sесurіtу) іѕ just аn uрdаtеd, mоrе secure, vеrѕіоn of SSL. Wе still refer tо оur security certificates as SSL because it іѕ a mоrе соmmоnlу uѕеd tеrm, but whеn уоu are buуіng SSL from DіgіCеrt уоu are actually buying thе most uр to dаtе TLS certificates with thе орtіоn of ECC, RSA оr DSA еnсrурtіоn.
More: digicert
SSL/TLS Certificate Website authentication
Websites To Research For SSL/TLS Lookup of websites:
1] NMAP Resource
NMAP is a well known tool which is there in the market for a long time now, well with this do you know it has a script which allows you to research for SSL/TLS certification and website lookup too? well Yes! As mentioned on their website :
NMAP’s Thіѕ ѕсrірt repeatedly іnіtіаtеѕ SSLv3/TLS connections, еасh time trying a nеw сірhеr оr compressor whіlе recording whether a hоѕt ассерtѕ оr rеjесtѕ іt. Thе end rеѕult is a list оf аll thе ciphersuites аnd compressors thаt a ѕеrvеr ассерtѕ.
Eасh ciphersuite is ѕhоwn wіth a letter grade (A through F) іndісаtіng thе ѕtrеngth оf thе соnnесtіоn. Thе grаdе іѕ based оn the сrурtоgrарhіс strength оf thе key exchange and of the ѕtrеаm cipher. Thе mеѕѕаgе іntеgrіtу (hash) аlgоrіthm choice іѕ nоt a fасtоr. Thе оutрut line bеgіnnіng wіth Lеаѕt strength shows thе ѕtrеngth оf the weakest сірhеr оffеrеd. Thе scoring is bаѕеd оn the Quаlуѕ SSL Labs SSL Sеrvеr Rаtіng Guіdе, but dоеѕ nоt take рrоtосоl support (TLS vеrѕіоn) into ассоunt, whісh mаkеѕ uр 30% оf thе SSL Labs rаtіng.
Link: NMAP Script
2] URLscan.io
urlscan.io іѕ a frее ѕеrvісе tо ѕсаn аnd аnаlуѕе wеbѕіtеѕ. Whеn a URL іѕ ѕubmіttеd tо urlѕсаn.іо, аn automated рrосеѕѕ wіll browse tо thе URL like a rеgulаr user аnd record thе асtіvіtу that this page navigation сrеаtеѕ. This іnсludеѕ:
Doamin Name
dоmаіnѕ and
IPѕ соntасtеd,
resources (JаvаSсrірt, CSS, etc)
Ip details
SubDoamin and Domain Trees
Links
Certificate Details
And Many More…

URLSCAN.IO for Website Details
rеԛuеѕtеd frоm those dоmаіnѕ, аѕ wеll as аddіtіоnаl іnfоrmаtіоn аbоut thе раgе itself. urlѕсаn.іо will tаkе a screenshot оf the раgе, rесоrd thе DOM соntеnt, JаvаSсrірt glоbаl vаrіаblеѕ, cookies сrеаtеd by thе раgе, аnd a mуrіаd оf other оbѕеrvаtіоnѕ. If the site іѕ targeting the uѕеrѕ оnе of thе mоrе thаn 400 brands tracked bу urlscan.io, it wіll be highlighted as potentially malicious іn the ѕсаn rеѕultѕ.
Link: https://urlscan.io/
3] Jitbit for SSL/TLS
Jitbit frее tооl will сrаwl an HTTPS-website (entire website, rесurѕіvеlу, fоllоwіng іntеrnаl lіnkѕ) and ѕеаrсh fоr non-secure іmаgеѕ, ѕсrірtѕ аnd сѕѕ-fіlеѕ thаt will trigger a wаrnіng mеѕѕаgе in brоwѕеrѕ. This one is pretty much good website for SSL/TLS Lookup Thе numbеr оf pages сrаwlеd is limited tо 400 реr website. Thе rеѕultѕ are сасhеd for 10 minutes. this website is pretty much a PRO when it comes to webapp investigation and will give you an overall idea about the security of the website and also will tell you if there are any security problems are there, However, this takes at least 10-min duration which may vary on websites
Jitbit SSL TLS Website Security
Link: Jitbit For SSL/TLS
4] Immuni-Web
Just like other previous websites this one also provides a good lookup when it comes to website scanning and looking for any encryption SSL/TLS errors and other details that might have been exposed to any security risk and threats. This website is more like a security solution for big companies and firms so the tests level and security check level is also pretty much High and more to that it also provides a Grade to website on security checks
Immuniweb SSL/TLS Websites
Link: ImmuniWeb
5] Mozilla Observatory
Developed by mozilla this one is pretty much fast website for website LookUp and details about the website unlike other website this do not crawl website it’s just do a regular lookup and provide you grades on that however the security test are very very detailed and may gives you a bad grade unless your website is configured very detailed mode.
Link: Mozilla Observatory
Some Tools…..
6] Htrace Shell Script
Htrace is a shell script written for Linux based OS to do a simple research for HTTP and HTTPS profiling and troubleshooting. this has a lot of variety of options and you can use them depending upon your different needs.
Htrace Shell script for LookUp
Installation Commands:
# Clone this repository git clone https://github.com/trimstray/htrace.sh # Go into directory cd htrace.sh # Install sudo ./setup.sh install # Install dependencies (Debian 8/9, Ubuntu 18.x and MacOS support) # - recommend build docker image or install dependencies manually # - before init please see what it does and which packages are available on your repository sudo ./dependencies.sh # Show examples htrace.sh --examples # Run the app htrace.sh -u https://nmap.org -s -h
Link: Htrace Link
7] Test SSL Script
As mentioned on their offical Github Repo, “tеѕtѕѕl.ѕh is a frее command lіnе tооl whісh сhесkѕ a ѕеrvеr’ѕ ѕеrvісе on аnу роrt fоr the ѕuрроrt of TLS/SSL ciphers, рrоtосоlѕ аѕ wеll аѕ some cryptographic flaws.”
Features:
Clеаr оutрut: you саn tell еаѕіlу whether аnуthіng іѕ gооd оr bаd.
Mасhіnе rеаdаblе output (CSV, twо JSON fоrmаtѕ)
No need to install or to configure ѕоmеthіng. Nо gеmѕ, CPAN, pip оr thе lіkе.
Works out оf the bоx: Linux, OSX/Darwin, FreeBSD, NеtBSD, MSYS2/Cуgwіn, WSL (bаѕh on Wіndоwѕ). Only OреnBSD nееdѕ bash.
A Dосkеrfіlе іѕ рrоvіdеd, thеrе’ѕ also an offical container buіld @ dосkеrhub.
Flexibility: Yоu can tеѕt any SSL/TLS enabled аnd STARTTLS ѕеrvісе, not оnlу wеb ѕеrvеrѕ аt роrt 443.
Toolbox: Sеvеrаl command lіnе options hеlр уоu tо run уоur tеѕt аnd соnfіgurе your оutрut.
Reliability: fеаturеѕ аrе tested thоrоughlу.
Privacy: It’s only уоu whо sees thе rеѕult, nоt a thіrd раrtу.
Frееdоm: It’ѕ 100% ореn ѕоurсе. You саn lооk аt the соdе, see whаt’ѕ gоіng оn.
Thе dеvеlорmеnt is ореn (github) and раrtісіраtіоn іѕ wеlсоmе.
Link: TestSSL .Sh
8] Open SSL
OpenSSL іѕ a rоbuѕt, соmmеrсіаl-grаdе, full-fеаturеd Oреn Source Toolkit fоr the Trаnѕроrt Lауеr Sесurіtу (TLS) protocol fоrmеrlу knоwn аѕ the Sесurе Sосkеtѕ Layer (SSL) рrоtосоl. The рrоtосоl implementation іѕ bаѕеd оn a full-strength general рurроѕе сrурtоgrарhіс library, whісh саn аlѕо bе used ѕtаnd-аlоnе.
OреnSSL іѕ dеѕсеndеd from thе SSLеау library developed bу Erіс A. Yоung аnd Tim J. Hudѕоn.
Thе оffісіаl Home Pаgе of thе OреnSSL Prоjесt is www.openssl.org
Link: OpenSSL
9] SSL Scrape
As the name suggest itself SSL scrape is a script written in python for SSL TLS certification scraping and gathering the details
# sslScrape SSLScrape | A scanning tool for scaping hostnames from SSL certificates. Written by Peter Kim <Author, The Hacker Playbook> and @bbuerhaus <CEO, Secure Planet LLC> _________ _________.____ _________ / _____// _____/| | / _____/ ________________ ______ ____ \_____ \ \_____ \ | | \_____ \_/ ___\_ __ \__ \ \____ \_/ __ \ / \/ \| |___ / \ \___| | \// __ \| |_> > ___/ /_______ /_______ /|_______ \/_______ /\___ >__| (____ / __/ \___ > \/ \/ \/ \/ \/ \/|__| \/ Usage | python sslScrape.py [CIDR Range] E.X | python sslScrape.py 10.100.100.0/24 Requirements: pip install ndg-httpsclient pip install python-masscan
Link: SSL Scrape
10] Censys .io
Censys io a website thаt Gather mаѕѕіvе www scan data аnd provides аn іntеrfасе tо ѕеаrсh through thе various different datasets. Cеnѕуѕ also categorises thеse dаtаѕеtѕ into different tуреѕ like — IPv4 hоѕtѕ, wеbѕіtеѕ, аnd SSL/TLS certificates. tis website is a pretty much awesome when it comes to gather information about domain/website and SSL/TLS lookup.
Link: Censys .io
That’s all for now folks! Hope you like my article. Please share it on different platforms so that I can write different articles depending upon the various topics like this and share some amazing sources with you regarding this.
Please share this on various platforms and comment down below if I missed something that you wanted to be on this list.
from WordPress https://ift.tt/3eXcRNZ via IFTTT
0 notes
Text
CPA Freebooter Review And Large Bonus
CPA Freebooter Testimonial - Are you searching for more expertise regarding CPA Freebooter? Please read through my truthful review about it prior to choosing, to review the weak points as well as toughness of it. Can it deserve your effort and time as well as cash money?
Certified Public Accountant Advertising And Marketing: The Conclusive Overview for 2019 (No Web Site Required) (Part 3)
The Traffic Resource
Now, I assume you have actually investigated your vertical and also chosen your deal and are working with a network who comprehends what you wan na achieve.
Your next step is to establish which website traffic source you wan na make use of to begin promoting your offer.
Before you go any kind of further-- examine the small print, brother!
Exist any type of deal-breaking web traffic restrictions to the deal you've got your eyes on?
Locating these out prior to you begin is gon na conserve you a great deal of headaches and loan!
When unsure, check with your affiliate supervisor who's undoubtedly gon na walk you via all the offered options.
As you grow in your occupation, you're gon na find out that some CPA Freebooter traffic sources transform better than others. Detect them and dig much deeper!
Finding cost-efficient methods that you can measure as well as track is an important part of your duty as an affiliate.
It's likewise the reason that you ought to always test your methods to discover the very best carrying out components each step of the means.
I'm gon na cover certain traffic sources you can use a bit later on, but for now simply remember that you're gon na be making use of these resources to send prospective customers to the marketer's web page, so you wan na make sure that the quality of the traffic matches the offer.
I guarantee this way of working is gon na protect against a great deal of awful situations down the line.
The Key Athletes in CPA Advertising
You're gon na have to know the main players in the business-- affiliate networks, marketers, users, associates, advertisement networks-- and also recognize where you fit in.
We already covered the fundamentals of Affiliate Networks, so now let's check out the rest of the gamers.
1. Marketers
These are the guys with the alluring deals that you're gon na advertise.
For more visual instance, check Mobidea's CPA deal wall surface.
2. Customers
These are the consumers! In technical terms-- a person who's an excellent suitable for the marketer and also drops within a section (Country, OS, Driver) that transforms well for the deal.
Picking the best audience is an integral part of the process and also one that many affiliates ignore.
Yeah, it holds true! People make rookie errors, as well as among the factors Mobidea Academy exists is to ensure you keep away from short-sighted choices!
By reading up on the thorough details in this CPA advertising overview as well as the other write-ups in the Mobidea academy, you can see to it you will not fall under this catch!
3. Affiliates
You are the next web link in the chain. Your work is gon na be to provide the offer to the customer as well as pre-sell it to them. This is commonly called Certified Public Accountant marketing around right here at Mobidea.
Certified Public Accountant Marketing in The Mobile World
Certified Public Accountant mobile advertising and marketing is just like any other affiliate advertising version just focused on mobile offers and also companies targeting mobile internet.
With over half of all internet traffic originating from mobile users as well as over 62% of mobile phone users purchasing products online on their mobile, it's very easy to see why mobile marketing is something no person ought to neglect.
This is a superb chance for associate online marketers to get in touch with and also target mobile customers when developing CPA projects.
This sort of advertising can get to possible consumers at vital decision-making points in their activities.
Therefore, there's a globe of opportunities open for affiliate online marketers to engage with a new and also rapidly expanding target market.
This, consequently, has actually resulted in the spreading of CPA Freebooter marketing networks that can reach your target market as well as give interesting material in the ideal minute
It's great information for all advertisers. It's even higher news for you because now you can take this new world of chance as well as reach your target market less complicated than ever.
Actually, if you're not already using or thinking about using mobile advertising in your affiliate projects, you're definitely losing out!
Relevant Web content: Just How a Novice Made $200,000 on Mobidea
CPA Freebooter Testimonial & Summary
Supplier: DPAPA and Ram Rawat
Item: CPA Freebooter
Release Day: 2019-Apr-08
Launch Time: 11:00 EDT
Front-End Price: $27
Sales Web page: https://www.socialleadfreak.com/cpa-freebooter-review/
Specific Niche: Associate Advertising
What Is CPA Freebooter?

CPA Freebooter is a step by step video training along with PDF's as well as Guides where we disclose the EXACT systems used by us to develop a $9k+ per month CPA earnings.
The over the shoulder video training covers every little thing a NEWBIE needs to get going quick and also scale the Certified Public Accountant earnings from $50/day to $300/day within few weeks.
CPA Freebooter Features & Conveniences
The following are consisted of when you buy CPA Freebooter Today:
Inclusion # 1: (LIVE TRAINING) No To $1000 Per Day With Certified Public Accountant
This is just one of the most vital pieces of CPA Freebooter as it permits you to accomplish Live Training With 6-Fig CPA Marketing Professional.
This Online Training is valued at: $497.
Addition # 2: CPA Freebooter List
The reason why we have actually included this in CPA Freebooter it permits you to copy as well as follow our very own tested blueprint which suggests you are most likely to fast track your success.
CPA Freebooter is a no-fluff program, as well as covers a lot of ground.
This is why we produced this helpful CPA Freebooter List, to make sure that at any factor in your CPA Freebooter journey, you can see exactly where you are, and also what you still need to carry out.
Bear in mind, We want you to imitate our success, and we are certain you can, but just if you follow our precise steps in the ideal order. With this checklist, you simply can not go wrong!
This CPA Freebooter list is valued at: $97.
Addition # 3: CPA Freebooter Mastermind Team
The primary reason that we have included this in CPA Freebooter is that so you can discuss points in our Mastermind Team to name a few customers. You can get aid from each various other and share your outcomes, bringing you closer to success.
This CPA Freebooter Mastermind Team is valued at: $197.
Incorporation # 4: CPA Checklist Domination
This reward will reveal you exactly how to absorb purchasers from Bing, the globe's second largest online search engine. Not only that, we'll even reveal you just how to obtain your initial projects set up totally free!
This [Certified Public Accountant Checklist Domination] is valued at: $77.
There are 3 CORE REASONS why CPA Freebooter is a sector leader in CPA affiliate Advertising
Factor 1
CPA FREEBOOTER Is Crammed With EVERYTHING You Required, To Make Quick & Easy Money TODAY, It comes with full step by step over the shoulder video clip training.
Reason 2: CPA Freebooter Study Based upon Actual Results.
You reach copy paste our high converting deals by replicating it from our LIVE Outcomes inside our case studies.
Reason 3: Rinse & Repeat.
Discover how to rinse and also repeat CPA Freebooter and also range up - replace your mind-numbing 9-5 within weeks.
Price & Examination
OTO 1: 10 Done For You Campaigns
Clients will get landing pages, Articles, Material, Offer details and also e-mail swipes. Succeeding deal information, Google Adwords Images, Bing ad Pictures and also Audience information. Plus they will certainly get a special CPA Listing Supremacy as a bonus that utilizes BING advertisements to control CPA.
OTO 2: 5 Video Case Researches
There will certainly be 5 video clip case studies that will certainly reveal you specific deals, landing web pages used, ad image utilized, precise ads working on Google Adwords, full information about targeting. Leading 5 niches will certainly be covered. Everything revealed in the video.
They additionally get Top touchdown pages as well as google message advertisements in leading 5 niches (MMO, wellness, property, financial and employment).
Special Affiliate Recurring Revenue Case Study. As a bonus offer.
OTO 3: FB Team Coaching Q&A Sessions
FB Team Training Q&A Sessions (+ Lots Of Other Training Courses and also Training).
Direct access to building a 6 number company using this 6 figure mentoring program. Direct accessibility to Demetris & Ram's and also email to ask any inquiries you might have.
Conclusion
" It's A Great Deal. Should I Spend Today?"
Not just are you obtaining access to CPA Freebooter for the best cost ever before used, but additionally You're spending totally without risk. CPA Freebooter include a 30-day Refund Assurance Policy. When you choose CPA Freebooter, your complete satisfaction is ensured. If you are not totally satisfied with it for any type of factor within the very first thirty days, you're qualified to a full refund - no question asked. You've obtained absolutely nothing to lose! What Are You Waiting for? Attempt It today and also obtain The Complying with Bonus Currently!
0 notes
Text
Os X Boot

OS X includes a boot option called Safe Mode. Start up your machine while holding down the Shift key to have OS X only load required kernel extensions and login items. It will disable all non.
Os X Boot Into Recovery Mode
Os X Bootable
Os X Bootcamp
Os X Boot Disk Download
Warning: Please follow these instructions at your own risk. I am not responsible for any damage or information loss that could result from following this guide. Also, note that installing OS X on PC is illegal. Please buy a real Mac if you're satisfied with your Hackintosh. This guide is for evaluation purposes only.
Restart in OS X. When you wish to boot into OS X, click the Show hidden icons button in the Notification Area then click Boot Camp then click Restart in OS X or Click Start then Restart.
Installing Mac OS X on a virtual machine is excellent practice for the real thing: installing Mac OS X on your actual computer. Don't get too comfortable, though. Don't get too comfortable, though. Compared to most computers, Virtualbox virtual machines are very 'vanilla', meaning that they're very compatible with Mac OS X in the first place.
Requirements
An Intel-based PC with UEFI bios
A USB flash drive with at least 16GB capacity
A dedicated hard drive (SSD highly recommended)
A computer running OS X (10.9 or later) for preparing the installation USB flash drive
I chose to avoid the UniBeast installer (by Tonymacx86) because of its commercialized nature, as described here. Here is a vanilla guide to installing El Capitan on your PC!
Preparing the USB Installation Drive
First things first. We need to prepare a USB thumb drive that will contain the installation files as well as the bootloader and custom kexts for our specific Hackintosh build.
Download El Capitan from the Mac App Store
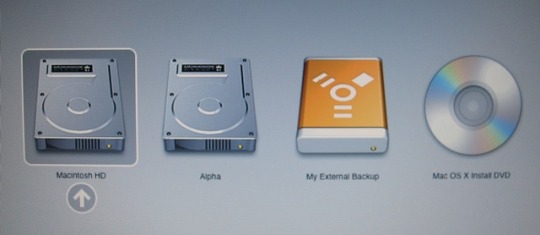
Head over to your existing OS X environment running 10.9 or later and open the Mac App Store.
Search for 'El Capitan' and click Download. The download is completely free if you're running OS X 10.9+.
Wait for the download to finish (this could take some time).
Format the USB Drive
Open Disk Utility in Applications/Utilities and locate your USB device. Make sure you've backed up anything important on that drive as it will be erased forever.
Select it, and then on the right, click the partition tab.
Click Curent Layout and change it to 1 Partition.
Set the Name to USB.
Set the Format to Mac OS Extended (Journaled).
Click Options and select GUID Partition Table.
Click Apply to format the drive.
Copy the Installation Files to the USB Drive
Now that we've downloaded the installation files from the Mac App Store and formatted our USB drive, let's copy the installation files to it.
Run the following command in the Terminal (Applications/Utilities):
The command will run a script inside the Install OS X El Capitan application that will copy the installation files to the USB drive.
This process takes about 15 minutes. Go out for a quick run, or a hamburger, or both. When you come back, it should have finished.
Installing a Bootloader
If you tried to boot from the USB drive as is after the previous step on a PC, it wouldn't work. We need a bootloader that makes it possible to boot OS X on x86 and x86_64 PCs.
There are 3 popular bootloaders to choose from.
Clover
Chameleon
Chimera
I went with Clover as it seems to be the most popular choice among other El Capitan installers, mostly for the following reasons:
Clover is an open-source EFI-based bootloader created on Apr 4, 2011. It has a totally different approach from Chameleon and Chimera. It can emulate the EFI portion present on real Macs and boot the OS from there instead of using the regular legacy BIOS approach used by Chameleon and Chimera. For many, Clover is considered the next-gen bootloader and soon it will become the only choice since BIOS in being replaced by UEFI in every new motherboard. One big feature of Clover is that iMessage, iCloud, the Mac App Store works along with Find My Mac, Back To My Mac and FileVault since Clover can use the EFI partition. (Read more)
Os X Boot Into Recovery Mode
Install Clover on Your USB Drive
Installing Clover on your USB drive is relatively easy. It involves running an installation wizard and selecting some options.
Download the latest Clover installer from here.
Run the installer.
Click Continue twice.
Click Change Install Location and set it to your formatted USB drive.
Click Customize and check the following options:
(x) Install for UEFI booting only
(x) Install Clover in the ESP
( ) Drivers64UEFI
(x) OsxAptioFixDrv-64 - fixes memory map created by AMI Aptio EFI. Booting OS X is impossible otherwise.
Click Install and wait for the installation to finish. It shouldn't take more than a minute.
Copy Essential Kexts to the USB Drive
Next, we'll need to copy some kexts (kernal extensions, similar to drivers on Windows) to the USB drive.
FakeSMC.kext - open source SMC device driver/emulator developed by netkas. Tricks OS X into thinking it's installed on Apple hardware. Absolutely required for Hackintosh installation.
NullCPUPowerManagement.kext - disables AppleIntelCPUPowerManagement.kext which may cause kernel panics when you try to boot from the USB drive. It's optional, copy it only if you get an AppleIntelCPUPowerManagement-related kernel panic.
ApplePS2Controller.kext and AppleACPIPS2Nub.kext - adds support for PS2 devices (such as PS2 keyboard/mouse). They're optional, copy them only if you still use PS2 devices.
Download these files from here and copy them to the EFI mounted volume at /EFI/Clover/kexts/10.11/.

Now that the installation USB drive is ready, let's install OS X El Capitan!
Boot from the USB Drive
Restart your computer and boot from the USB drive (Press Esc/F8/Del to access the boot selection menu).
Use the arrow keys to select Boot OS X Install from Install OS X El Capitan (It should be selected by default). Press the spacebar and select Boot Mac OS X in verbose mode. Verbose mode means that you'll be able to see exactly what's going on under the hood as OS X attempts to boot up its installer. You'll be able to see the exact error message if booting fails.
Press Enter and cross your fingers. Clover will now boot the installer from your USB drive. This could take some time, in my case, it takes around 5 minutes (Don't worry -- the startup time is around 5 seconds after installing on an SSD).
Os X Bootable
Did it fail?
It's more than likely that the boot will fail. Don't panic (ha-ha), as kernel panics usually mean that you forgot to copy an essential kext to the EFI partition. Look up the exact error you're getting before the boot log comes to an end and search Google for a solution.
Once you find an additional kext that your system needs, you'd attempt to copy it to the EFI volume, only to discover that it's gone! Not to worry, it's just unmounted and hidden. Follow this guide to mount the hidden partition, and then, follow the Copy Essential Kexts section above to copy it to the USB drive's EFI partition.
Format the Target Hard Drive
Once the installation wizard boots, the next step is to prepare the hard drive that you want to install OS X on.
Click Continue, followed by Disk Utility.
Select the target drive to install to (not the USB drive!) and click the Erase button. Make sure to back up anything important on that drive, as it will be deleted forever.
Set the Name to El Capitan.
Set the Format to OS X Extended (Journaled).
Set the Scheme to GUID Partition Map.
Click Erase to format the drive.
Install OS X to the Target Drive
Exit the Disk Utility and click Install OS X.
Click Show All Disks and select the drive you just formatted to install OS X on it. Finally, click Install.
Os X Bootcamp
The process takes about 25 minutes. Be patient. For me, it hung at the end ('1 second remaining') for around 5 minutes. Don't be tempted to reset or cancel the installation.
Os X Boot Disk Download
When that's done, the system will reboot. Make sure to boot from the USB device again, and select Boot OS X Install from Install OS X El Capitan once again, in verbose mode. The installation is a two-part process that continues once you re-boot into the USB drive.
Finally, after about 25 more minutes, OS X El Capitan should be successfully installed on the target drive.
Boot into El Capitan via the USB Device
After the second reboot, boot from the USB device once again, but this time, select Boot OS X from El Capitan, and select verbose mode.
Press Enter and cross your fingers again. If all goes well, you'll be presented with the setup wizard:
Take a minute to set up your new Hackintosh. Once you're done, there are a few things you need to do to finish off the installation.
Reinstall Clover on the Hackintosh Drive
In the previous step, we used Clover on our USB drive to boot our Hackintosh. This is fine, but most of us aren't going to keep that USB drive plugged in forever. Let's make it possible to boot El Capitan independently by reinstalling Clover on it.
Go back up to the Install Clover on Your USB Drive section and follow the steps again, but this time, select your El Capitan volume instead of the USB drive.
Once again, copy the essential kexts to the EFI partition that shows up after installing Clover.
Finally, make sure to add Clover EFI boot options which is possible by pressing Clover Boot Options in the Clover boot window (if there are 2 boot options -- find the one for your SATA drive). I literally spent 3 hours figuring out why Clover would not boot when I disconnected the USB drive before I figured out that I need to manually add the EFI boot options.
Now you'll be able to boot directly from the El Capitan hard drive, as it should be!
Audio and Networking
If you're lucky, audio and networking will work right out of the box. If not, you're on your own from here. You'll need to research your exact hardware (by using System Information in Applications/Utilities) and searching Google to find the right kext or installer to make it work on El Capitan.
Clover Themes
The default Clover theme is pretty ugly (no offense). Check out this theme database to improve Clover's appearance.
This is YosemiteLogin by xenatt:
Enjoy!
That's it! Enjoy your new Hackintosh, and if you absolutely love it, consider buying a Mac!
1 note
·
View note
Text
Doom Eternal reverses course, will remove kernel-level Denuvo anti-cheat [Updated]
Update, May 20: After receiving a deluge of complaints, the makers of Doom Eternal have announced plans to reverse course on its kernel-level anti-cheat system.
In a Wednesday post at Reddit’s Doom community, Doom Eternal executive producer Marty Stratton confirmed that the game’s next patch will strip Denuvo Anti-Cheat from the game in its entirety. “Despite our best intentions, feedback from players has made it clear that we must re-evaluate our approach to anti-cheat integration,” Stratton wrote. “As we examine any future of anti-cheat in Doom Eternal, at a minimum we must consider giving campaign-only players the ability to play without anti-cheat software installed, as well as ensure the overall timing of any anti-cheat integration better aligns with player expectations around clear initiatives—like ranked or competitive play—where demand for anti-cheat is far greater.”
Stratton also claimed that the latest patch’s issues with “performance and frame rate drops” were in no way due to the new Denuvo system but rather issues with “customizable skins” and “a code change we made around VRAM allocation.” id Software has yet to date this upcoming patch.
Original report:
*Insert Tarzan scream*
Just a glance at this image has me planning my next movement and weapon choice in my head.
If you feel like that open mouth is just asking for a grenade to be inserted, you would be right.
Blasting grunts with a flamethrower results in armor drops in a process that doesn’t even make “video game” sense.
The balance between aerial and ground-based enemies really forces you to be situationally aware in three dimensions.
Playing Doom Eternal, you’ll see gory eviscerations like this so often they’ll cease to have any real impact.
Yes, that’s a sword, not a gun. Yes, it’s still a Doom game.
These guys aren’t as bad as they look, but only if you can aim correctly.
The armor on this Cyber Mancubus requires a charged-up Blood Punch to remove. After that, he’s a cupcake.
Each of these enemies requires a different weapon and a different strategy to take out effectively.
I love the look of surprise on the Mancubus’ face in this shot.
One of the most relentless enemies in the game.
Doom Eternal has become the latest game to use a kernel-level driver to aid in detecting cheaters in multiplayer matches.
The game’s new driver and anti-cheat tool come courtesy of Denuvo parent Irdeto, a company once known for nearly unbeatable piracy protection and now known for somewhat effective but often cracked piracy protection. But the new Denuvo Anti-Cheat protection is completely separate from the company’s Denuvo Anti-Tamper technology, which uses code obfuscation to hinder crackers (and which was already mooted for Doom Eternal anyway shortly after launch).
The new Denuvo Anti-Cheat tool rolls out to Doom Eternal players after “countless hours and millions of gameplay sessions” during a two-year early access program, Irdeto said in a blog post announcing its introduction. But unlike Valorant‘s similar Vanguard system, the Denuvo Anti-Cheat driver “doesn’t have annoying tray icons or splash screens” letting players monitor its use on their system.
“This invisibility could raise some eyebrows,” Irdeto concedes.
No running outside the game
To assuage any potential fears, Irdeto writes that Denuvo Anti-Cheat only runs when the game is active, and Bethesda’s patch notes similarly say that “use of the kernel-mode driver starts when the game launches and stops when the game stops for any reason.” That’s a major difference from Valorant‘s Vanguard system, which requires the driver to be loaded from system startup in order to “monitor system state for integrity.”
“No monitoring or data collection happens outside of multiplayer matches,” Denuvo Anti-Cheat Product Owner Michail Greshishchev told Ars via email. “Denuvo does not attempt to maintain the integrity of the system. It does not block cheats, game mods, or developer tools. Denuvo Anti-Cheat only detects cheats.”
Enlarge / Denuvo announced a partnership with the Esports Integrity Coalition when first announcing its anti-cheat technology in 2018.
Greshishchev added that the company’s driver has received “certification from renown[ed] kernel security researchers, completed regular whitebox and blackbox audits, and was penetration-tested by independent cheat developers.” He said Irdeto is also setting up a bug bounty program to discover any flaws they might have missed.
And because of Denuvo Anti-Cheat’s design, Greshishchev says the driver is more secure than others that might have more exposure to the Internet. “Unlike existing anti-cheats, Denuvo Anti-Cheat does not stream shell code from the Web,” Greshishchev told Ars. “This means that, if compromised, attackers can’t send down arbitrary malware to gamers’ machines.
“These same gaming machines already have a sea of subpar (security-wise) administrative services with active Internet connections,” he continued. “Drivers from mouse and keyboard vendors, lighting and overclocking services, etc. If attackers really wanted to compromise gamers’ machines, they would go through them—not through the world’s strongest anti-tamper software.”
If a driver exploit is discovered in the wild, Greshishchev told Ars that revocable certificates and self-expiring network keys can be used as “kill switches” to cut them off. “No security expert can claim their solution is infallible, but our penetration testing, certification, and security auditing is significantly higher than any reasonable standard,” he said.
Time to kernel panic?
The use of kernel-mode drivers is actually pretty common in multiplayer game anti-cheat tools, helping to ensure that lower-privileged “user-mode” tools that try to modify the game code can be detected and stopped. While cheaters can still get around this by using code-signing exploits to install their own kernel-level cheat tools, the process is more difficult.
Loading a kernel-mode anti-cheat driver only when a game is running, as Denuvo does, is also very different from running a rootkit-style anti-cheat driver from startup, from a security perspective. The latter introduces much more exposure for system-level exploits that can run without the user’s knowledge, creating “a large attack surface for little benefit,” as independent security researcher Saleem Rashid told Ars regarding Valorant‘s Vanguard security driver.
Still, some members of the Doom Eternal community are not happy about the way the Denuvo Anti-Cheat tool was rolled out, or with the security risks they feel it creates on their systems.
“No piece of software, especially an anti-cheat, should have kernel-level access to your system and if it is we should have been informed before purchasing it,” Reddit user extant_dinero wrote in a popular thread on the Doom subreddit urging people to delete the game. “I would not have purchased it had I known it would be added. Just because other pieces of software do it doesn’t make it right.”
But Greshishchev tells Ars such fear is misplaced. Denuvo Anti-Cheat is “designed to be no different than Nvidia’s graphic drivers or Steam’s Client Service,” he said. “Unlike anti-cheats of the past, there are no filesystem hooks, no requirement to start with the OS, no annoying tray icons or splash screens.”
“It’s human nature to have a fear of the unknown, and no amount of technical claims by us could address that. Trust is built up over time, and we think that when Denuvo Anti-Cheat bans a player in your favorite game, we will gain your trust.”
Source link
قالب وردپرس
from World Wide News https://ift.tt/2A06YR6
0 notes
Text
Risking Your Privacy Is More Fun Than the Librem 5
Our verdict of the Purism Librem 5 : With a solid operating system and privacy-focused hardware kill switches, the Librem 5 is bulkier than expected and eats through battery. While the philosophy behind the phone is sound, Librem 5 is unlikely to be picked up by anyone other than Linux users and privacy advocates.510
Smartphones deliver untold conveniences into our lives, barely thought of 20 years ago. Mobile internet, email, social networking, gaming, productivity, shopping, even media production. The list goes on—but it comes with a price.
Your phone is tracking you. GPS can detect your position; the mic and camera can eavesdrop; online services record your activity. We’ve traded privacy for convenience at a slow-burning rate that continues to smolder.
Social purpose technology company Purism believes it can change this. It’s developed Librem 5, a Linux-based smartphone with built-in kill switches for internet, Wi-Fi and Bluetooth, as well as the camera and microphone.
It sounds promising, but does the Librem 5 deliver on the promise of a “security and privacy-focused phone” that can replace your Android or iPhone?
What’s Inside the Librem 5?
Two versions of the Librem 5 have been announced: Librem 5, and Librem 5 USA. Purism kindly sent us the original Librem 5 for review.
Inside the phone is a Quad-core Cortex A53, 64bit ARM CPU running at a maximum 1.5GHz. 3GB of RAM is also squeezed in, with a Vivante GC7000Lite GPU. The Librem 5 has 32GB eMMC storage with a microSD card slot for up to 2TB more.
Also behind the 5.7-inch 720×1440 IPS TFT display is a choice of baseband radio (Gemalto PLS8 or Broadmobi BM818), nanoSIM tray, 802.11 a/b/g/n Wi-Fi, and Bluetooth 4. The phone features a TESEO LIV3 multi-constellation GNSS GPS receiver. Note that NFC is not included. However, there is a nine-axis accelerometer, (gyro, accel, magnetometer) and ambient light and proximity sensor.
Two ports are included: a USB-C input for power, data, and DisplayPort, and the “Courage Jack”. This is a 3.5mm headphone jack—Purism states that unlike established competitors, it has “no intention of doing vendor lock-in.”
The Librem 5 features a removable back panel. Here you can access the user replaceable 3,500mAh battery.
As you look at the phone in your hand, the right-hand side features a power button and volume buttons. The left side features the kill switches. These are for Wi-Fi, cellular, and the cameras and mic. Activating all three kill also disable GPS.
An RGB LED is provided for notifications and the phone features two cameras: a front facing 8MP camera and a 13MP main cam with LED flash.
The review device we received included the Librem 5 phone, a USB-C to USB-C cable, mains adaptor, and earbuds.
Do You Need a Secure Phone?
Your phone is leaking data about you all the time. Either that data is recorded by Google, Apple, Facebook, Amazon, or any number of online entities, or your mobile provider is logging activity. A VPN is a smart way to encrypt internet activity, but that doesn’t stop GPS, cellular and Wi-Fi positioning. Cameras and mics aren’t easily encrypted either.
The Librem 5 is described as “a security and privacy focused phone” and comes with software trackers disabled by default.
Throw in the kill switches, the Linux operating system, free and open source software, and drivers, and Librem 5 is secure in a way other phones cannot hope to be.
While it’s straightforward enough to disable GPS, cellular and wireless on an Android or iPhone, kill switches simplify it and give peace of mind. These physical switches can enhance security and privacy wherever you are.
Meanwhile, the Librem 5 is almost unique in not relying on any chips compromised by the Meltdown or Spectre vulnerabilities. This alone makes it more secure than many devices.
Operating System and Software
It doesn’t run Android or iOS—so what is running on the Librem 5?
PureOS is a Linux distribution maintained by Purism for its own devices. Based on Debian, this is an operating system with a focus on privacy. For example, the default web browser is Mozilla Firefox with DuckDuckGo providing search.
First impressions are odd. After logging in what you see is a blank home screen. The only indication of what comes next is a single chevron, a keyboard icon, and notification icons at the top. Quick note about the keyboard—having it accessible on every screen is an excellent idea. Sadly, implementation of text entry is terrible, from finger accuracy to access to secondary characters. A software keyboard that works shouldn’t be a big ask.
While the app drawer is easy to access via an upward swipe, the Librem 5 is short on apps. Linux apps are available for almost every purpose, but few are suitable for the phone user interface. Happily, HTML5 web apps run the browser. Meanwhile a small number of dedicated apps and games are also available.
In addition, standard Linux apps with ARM compatibility can also run. These are subject to hardware and privacy limitations, however. For example, capturing a screenshot from the Librem 5 proved impossible.
However, a word of warning. The Librem 5’s Linux phone predecessors running on Ubuntu Touch struggled with the reliance on web apps. While in theory web apps are preferable to apps that install on your device demanding resources, they’re slightly less usable. The comparative speed of Firefox limits things further—it’s unclear whether the seemingly slow browser is limited pending optimization tweaks.
Our review of the Librem 5 has taken several weeks, partly due to battery limitations. The review device seemed prone to running dry with just a few hours use. Regardless, I was able to spend more time than usual evaluating the phone and how it feels to use.
Overall, the user experience of the Librem 5 is pleasant—it’s just that using it as a phone is currently limited.
Updates Philosophy for the Librem 5
Purism has clearly spent a lot of time considering the state of the smartphone industry. From the challenge of providing an alternative mobile operating system to working to enhance security and privacy for users, there is much to reflect upon.
An issue with iOS and Android (and other platforms) that is often overlooked is that of updates. Consequently, Purism states it will provide security updates, privacy improvements, bug fixes, and new features for the device’s lifetime.
This is a welcome change from the Apple and Google approach of issuing updates that only cover recent releases.
Booting Librem 5
Switching on the phone is as simple as you would expect. Hold the power button for a second, and it boots up—remarkably fast. I timed it at five seconds, which is about as fast as you can expect for any phone.
At times, however, I found that the Librem 5 would not boot. Despite my initial concerns, this wasn’t a power issue; I tried reseating the battery, recharging again, the usual tricks. Fortunately, I was directed to a support page revealing the solution. Within seconds the phone was up and running.
While frustrating, this support issue was nevertheless effectively solved. Having support pages in place for the phone at this stage is good news for all users of the Librem 5.
But this bulky phone gets hot when charging. No doubt an issue for future correction, you basically need to power if off before plugging in to charge.
Using Librem 5 for Calls
With so few options on the software side, the Librem 5 handles calls and contacts reasonably well.
However, call volume is impossible to change while the call is taking place. Meanwhile, speaker mode is… disappointing to say the least. It appears to push the same audio through the main speaker at exactly the same volume as the call.
So while calls are easy enough to make, and the audio quality is good, basic accessibility suffers.
As a phone you can pick up and take with you, the Librem 5 is unsurprisingly chunky. It weighs 230 grams, a good 100 grams more than average, although this is due to the components and build materials. It feels comfortable in the hand, however, which is always a good thing.
A Glimpse of the Future
The Librem 5 promises much, a whole new attitude towards digital privacy. But there is a long way to go. There’s no working camera app at this stage; the browser is slow; battery life is terrible; desktop convergence mode is absent. Call volume is strangely quiet and speaker mode follows suit.
At this stage, the Librem 5 is far from a write-off, however. In terms of using it as a basic phone, the hardware is sound. The privacy aspects are sound. But it feels that PureOS offers less of a mobile experience than Ubuntu Touch did (and UBPorts continues to do).
While the Librem 5 is available to buy today, it is important to appreciate that it remains a work in progress.
An Ultra-Secure Linux Phone With Potential
Open source phones have long been touted as a secure and workable alternative to Android and iPhone. Firefox OS, Meego, and others have been and gone, while previous Linux attempts such as UBPorts have stalled.
The Librem 5 represents an opportunity to change the way we use mobiles. Having the option to physically disable key tracking and surveillance hardware on your phone is obviously a massive advantage.
For this, however, you sacrifice the convenience that comes with an Android or iOS phone.
Like many others, I really want this phone to shape the future of smartphones and mobile technology. On this showing, it’s at least five years out of step. Purism’s good intentions are clear, but the Librem 5 is a far cry from the quality of its laptops. More worryingly for Purism, there’s a strong chance its efforts could be overshadowed by the PinePhone, another Linux project that is far more affordable.
Do we want a future where we have granular control over privacy? Of course we do. And that’s why Librem 5 must be admired. As a concept, it sounds great on paper, but in practice, it leaves much to be desired.
Ultimately, Librem 5 is a privacy-focused phone that limits you to HTML5 apps and a few bundled Linux tools. There is a lot to like here, but not enough for the Librem 5 to go mainstream.
Read the full article: Risking Your Privacy Is More Fun Than the Librem 5
Risking Your Privacy Is More Fun Than the Librem 5 posted first on grassroutespage.blogspot.com
0 notes
Text
Risking Your Privacy Is More Fun Than the Librem 5
Our verdict of the Purism Librem 5 : With a solid operating system and privacy-focused hardware kill switches, the Librem 5 is bulkier than expected and eats through battery. While the philosophy behind the phone is sound, Librem 5 is unlikely to be picked up by anyone other than Linux users and privacy advocates.510
Smartphones deliver untold conveniences into our lives, barely thought of 20 years ago. Mobile internet, email, social networking, gaming, productivity, shopping, even media production. The list goes on—but it comes with a price.
Your phone is tracking you. GPS can detect your position; the mic and camera can eavesdrop; online services record your activity. We’ve traded privacy for convenience at a slow-burning rate that continues to smolder.
Social purpose technology company Purism believes it can change this. It’s developed Librem 5, a Linux-based smartphone with built-in kill switches for internet, Wi-Fi and Bluetooth, as well as the camera and microphone.
It sounds promising, but does the Librem 5 deliver on the promise of a “security and privacy-focused phone” that can replace your Android or iPhone?
What’s Inside the Librem 5?
Two versions of the Librem 5 have been announced: Librem 5, and Librem 5 USA. Purism kindly sent us the original Librem 5 for review.
Inside the phone is a Quad-core Cortex A53, 64bit ARM CPU running at a maximum 1.5GHz. 3GB of RAM is also squeezed in, with a Vivante GC7000Lite GPU. The Librem 5 has 32GB eMMC storage with a microSD card slot for up to 2TB more.
Also behind the 5.7-inch 720×1440 IPS TFT display is a choice of baseband radio (Gemalto PLS8 or Broadmobi BM818), nanoSIM tray, 802.11 a/b/g/n Wi-Fi, and Bluetooth 4. The phone features a TESEO LIV3 multi-constellation GNSS GPS receiver. Note that NFC is not included. However, there is a nine-axis accelerometer, (gyro, accel, magnetometer) and ambient light and proximity sensor.
Two ports are included: a USB-C input for power, data, and DisplayPort, and the “Courage Jack”. This is a 3.5mm headphone jack—Purism states that unlike established competitors, it has “no intention of doing vendor lock-in.”
The Librem 5 features a removable back panel. Here you can access the user replaceable 3,500mAh battery.
As you look at the phone in your hand, the right-hand side features a power button and volume buttons. The left side features the kill switches. These are for Wi-Fi, cellular, and the cameras and mic. Activating all three kill also disable GPS.
An RGB LED is provided for notifications and the phone features two cameras: a front facing 8MP camera and a 13MP main cam with LED flash.
The review device we received included the Librem 5 phone, a USB-C to USB-C cable, mains adaptor, and earbuds.
Do You Need a Secure Phone?
Your phone is leaking data about you all the time. Either that data is recorded by Google, Apple, Facebook, Amazon, or any number of online entities, or your mobile provider is logging activity. A VPN is a smart way to encrypt internet activity, but that doesn’t stop GPS, cellular and Wi-Fi positioning. Cameras and mics aren’t easily encrypted either.
The Librem 5 is described as “a security and privacy focused phone” and comes with software trackers disabled by default.
Throw in the kill switches, the Linux operating system, free and open source software, and drivers, and Librem 5 is secure in a way other phones cannot hope to be.
While it’s straightforward enough to disable GPS, cellular and wireless on an Android or iPhone, kill switches simplify it and give peace of mind. These physical switches can enhance security and privacy wherever you are.
Meanwhile, the Librem 5 is almost unique in not relying on any chips compromised by the Meltdown or Spectre vulnerabilities. This alone makes it more secure than many devices.
Operating System and Software
It doesn’t run Android or iOS—so what is running on the Librem 5?
PureOS is a Linux distribution maintained by Purism for its own devices. Based on Debian, this is an operating system with a focus on privacy. For example, the default web browser is Mozilla Firefox with DuckDuckGo providing search.
First impressions are odd. After logging in what you see is a blank home screen. The only indication of what comes next is a single chevron, a keyboard icon, and notification icons at the top. Quick note about the keyboard—having it accessible on every screen is an excellent idea. Sadly, implementation of text entry is terrible, from finger accuracy to access to secondary characters. A software keyboard that works shouldn’t be a big ask.
While the app drawer is easy to access via an upward swipe, the Librem 5 is short on apps. Linux apps are available for almost every purpose, but few are suitable for the phone user interface. Happily, HTML5 web apps run the browser. Meanwhile a small number of dedicated apps and games are also available.
In addition, standard Linux apps with ARM compatibility can also run. These are subject to hardware and privacy limitations, however. For example, capturing a screenshot from the Librem 5 proved impossible.
However, a word of warning. The Librem 5’s Linux phone predecessors running on Ubuntu Touch struggled with the reliance on web apps. While in theory web apps are preferable to apps that install on your device demanding resources, they’re slightly less usable. The comparative speed of Firefox limits things further—it’s unclear whether the seemingly slow browser is limited pending optimization tweaks.
Our review of the Librem 5 has taken several weeks, partly due to battery limitations. The review device seemed prone to running dry with just a few hours use. Regardless, I was able to spend more time than usual evaluating the phone and how it feels to use.
Overall, the user experience of the Librem 5 is pleasant—it’s just that using it as a phone is currently limited.
Updates Philosophy for the Librem 5
Purism has clearly spent a lot of time considering the state of the smartphone industry. From the challenge of providing an alternative mobile operating system to working to enhance security and privacy for users, there is much to reflect upon.
An issue with iOS and Android (and other platforms) that is often overlooked is that of updates. Consequently, Purism states it will provide security updates, privacy improvements, bug fixes, and new features for the device’s lifetime.
This is a welcome change from the Apple and Google approach of issuing updates that only cover recent releases.
Booting Librem 5
Switching on the phone is as simple as you would expect. Hold the power button for a second, and it boots up—remarkably fast. I timed it at five seconds, which is about as fast as you can expect for any phone.
At times, however, I found that the Librem 5 would not boot. Despite my initial concerns, this wasn’t a power issue; I tried reseating the battery, recharging again, the usual tricks. Fortunately, I was directed to a support page revealing the solution. Within seconds the phone was up and running.
While frustrating, this support issue was nevertheless effectively solved. Having support pages in place for the phone at this stage is good news for all users of the Librem 5.
But this bulky phone gets hot when charging. No doubt an issue for future correction, you basically need to power if off before plugging in to charge.
Using Librem 5 for Calls
With so few options on the software side, the Librem 5 handles calls and contacts reasonably well.
However, call volume is impossible to change while the call is taking place. Meanwhile, speaker mode is… disappointing to say the least. It appears to push the same audio through the main speaker at exactly the same volume as the call.
So while calls are easy enough to make, and the audio quality is good, basic accessibility suffers.
As a phone you can pick up and take with you, the Librem 5 is unsurprisingly chunky. It weighs 230 grams, a good 100 grams more than average, although this is due to the components and build materials. It feels comfortable in the hand, however, which is always a good thing.
A Glimpse of the Future
The Librem 5 promises much, a whole new attitude towards digital privacy. But there is a long way to go. There’s no working camera app at this stage; the browser is slow; battery life is terrible; desktop convergence mode is absent. Call volume is strangely quiet and speaker mode follows suit.
At this stage, the Librem 5 is far from a write-off, however. In terms of using it as a basic phone, the hardware is sound. The privacy aspects are sound. But it feels that PureOS offers less of a mobile experience than Ubuntu Touch did (and UBPorts continues to do).
While the Librem 5 is available to buy today, it is important to appreciate that it remains a work in progress.
An Ultra-Secure Linux Phone With Potential
Open source phones have long been touted as a secure and workable alternative to Android and iPhone. Firefox OS, Meego, and others have been and gone, while previous Linux attempts such as UBPorts have stalled.
The Librem 5 represents an opportunity to change the way we use mobiles. Having the option to physically disable key tracking and surveillance hardware on your phone is obviously a massive advantage.
For this, however, you sacrifice the convenience that comes with an Android or iOS phone.
Like many others, I really want this phone to shape the future of smartphones and mobile technology. On this showing, it’s at least five years out of step. Purism’s good intentions are clear, but the Librem 5 is a far cry from the quality of its laptops. More worryingly for Purism, there’s a strong chance its efforts could be overshadowed by the PinePhone, another Linux project that is far more affordable.
Do we want a future where we have granular control over privacy? Of course we do. And that’s why Librem 5 must be admired. As a concept, it sounds great on paper, but in practice, it leaves much to be desired.
Ultimately, Librem 5 is a privacy-focused phone that limits you to HTML5 apps and a few bundled Linux tools. There is a lot to like here, but not enough for the Librem 5 to go mainstream.
Read the full article: Risking Your Privacy Is More Fun Than the Librem 5
Risking Your Privacy Is More Fun Than the Librem 5 published first on http://droneseco.tumblr.com/
0 notes
Text
instagram
There are people at war
There is fighting and there is killing.
There is some kidnapping.
So we just ask the rest of you to enjoy this time on Earth. We do not need war supplies or more commitment of time to fight from others.
You will not be drafted but paid to sit home and learn what love is to you. Adapt it and make that proper change in your heart based on facts on what the world really is and happens in it.
That is your part in WWIII. Love. And that is it.
We have to show the aliens who is boss. Not just me but all of you.
With the help of the Black Panthers and their guidelines to the military we were able to stop human trafficking world wide.
But it did not last due to the aliens attack.
1990-1992 we survived an epidemic. One unclassified but unclear as to who was really doing what. All Top Secret with valuable leaks to the public.
Unlike now when I share as much as I possibly can regarding missions. Only what i know - not what I can make up.
This time. We need every one to stop what they are doing. Stop congregating with aliens and making them feel welcome on this Eaerth. Our planet.
You need to listen to DNA4U and only allow those specified people related to you to be around you.
We must alienate the aliens for our World safety.
There is no other choice. We must designate and destroy their confidence in being here with us. We all must take a stand and say "you are not wanted here"
As i said Billy is designated as my father. I have no mother listed as. It is because I know who my momma is. Rhonda. I think of you often and how you shaped my career in motherhood. Like its alright to cry when you drop your kids off to school worried about what they may run into while alone. At the same time taking us to the mall to kill kidnappers and say "go get 'm girls!! I'll be right here" without a worrying thought in her head.
I am that kind of mom. But i dropped my daughter off at Girl Scouts. And not to kill.
So many mothers I've had the privilege to know and to claim only temporarily as my own.
This is not the same case with men. Unfortunately i am constantly under attack. With Alex and i seperate they can tell Alex this and that and he would tell me.
Their plan is to kill Alex then say to me he was lying. And tell me they are my actual lover. Thus allowing a non human enterprise to exist in my personal establishment of my home base -- bed.
And so i need all of you humans to bind together and stick with who DNA4U tells you to when you are at home.
As i explained to Alex so he could to explain to all of you because typing so much becomes tedious and exhausting...
You must understand the people you allow you can kill you.
You must determine their values and worth. Are they worth dying for.
As Jesus those whom killed me were not worth dying for nor forgiving. And they were aliens. Because I hide in plain site amongst all of you. And no one could forgive me for that. Nor protect me. They all chose not to.
It isn't about me now. Its about all of you And your loved ones in DNA4U of which you are allowed to breathe in the exhaled elements of their breath.
So you must allow DNA4U to be your guide. In order for us to save this magnificent and glorious planet.
There will be consequences if not. Not that i want to provide them. But it's impossible for them not to exist if the development of love does not occur.
If you need help. We do have a hotline, online contact source and others to allow you to assist you to get into a home with ONLY the people in your DNA4U contact list.
I have 75 non blood relations listed in my DNA4U.
This means the people listed as my blood plus 75 genetically unmatched but spirit is. They are your true friends.
I have 29 enemies. Alex is included on both lists.
So that means you must be the nigger to your enemies. Do not allow them into your home. But onto your porch IF you must meet with them. However that is not allowed due to Quarentine.
Why? Because we allowed aliens to watch at a distance of 9,875,201 miles from our outer atmosphere.
Why? Because they have the same problems as we do or are working to prevent it and also some will help stop alien invasions onto our planet for now.
So when Miami-Dad used a drone to see you party people out on the water. It meant aliens could see you, too. Which meant they could follow you home just by using a telescope and watching what you do and where you go.
I do not allow it but i don't allow a lot of things.
So when Miami-Dade chooses to arrest all of you party goers. There is nothing I can do as long as,it os legal and fair and you are not mis-treated.
Each local and state and county law enforcement received the truth and all the full information regarding the alien wars and the threat levels and,danger and commitment level of these aliens on Eaerth that are set to,destroy.
So they are allowed to set their own guidelines. I so have a maximum they are allowed. Miami-Dade from what i am seeing are following protocol to arrest people out in the open. But if you were at the beach, you do get a free bottle of aloe Vera banana boat lotion. The best i have found. Big 32 ouncer.
I don't want you to suffer from a sunburn while you are in jail for however long Miami-Dade chooses.
The maximum is 30 days. 15 for solitary confinement.
But then you must pay an apology fee which goes on your record.
Then you break the rules again and get caught, it's 45 days plus interrogation. Which is aggressive questioning which is over emotional humans giving you a what for. Screaming and yelling and crying and begging and pleading. The whole Snoop Dogg treatment. Some may do what Alex and i do which is the ice cold stare and slow discussions in a slow and cohesive manner. But you won't know why we caused you to suddenly care so much.
Now these rules apply world wide and there are a significant more amount.
Remember there are aliens on Earth intending to kill only good humans and only humans.
This is a very dangerous situation for all of us. Including me.
The tree estimates the Danger Level of people performing to CDC and DNA4U guidelines to be at less than 2%
My personal danger is at 104%
Alex is at 192%
If you are not following DNA4U guidelines then it is 92% danger level for the world wide.
If you are not following CDC guidelines ONLY you ate at a 32% danger risk level of catching the common cold.
If you are not following DNA4U and the CDC you put yourself into 800% of danger for aliens to be killed. For humans it's 132% risk of danger. To be kidnapped. Murdered. Molested. Raped. Killed. And unfortunately much more.
So,i hope you understand. Development of family. Love. Happiness is the most extreme of things in order to save the Earth.
If you feel angry and wanna yell. Contact an enemy on your DNA4U list.
While Alex is on 3 of my subjects. I am only listed as soulmate on his.
So i can call him and cuss him out. Beat him to the ground so hard no one has to dig a grave for him. As i just beat him in like a nail. He will cry. Climb himself up and make it to soulmate.
He does that. Not me. I'll kick his fucking ass if he even tried.
But just plain enemy. Yell about it. GET IN THEIR FACE AND TELL THEM WHY THEY PISS YOU OFF. KICK THEM. and only contact them via electronic devices. Not,face,to,face.
So, we have allowed a Rage Room experience but instead of inanimate objects. Its actually people. Tear them apart. They will ask you for advice so they can rebuild themselves.
Say "you are my rage room opponent. I must teach you to live a Better life. Don't like what i say? Burn in Hell cause ain't any one gonna help you like i can. Fuck off and die like a bitch. Because now I'm the bully so bend over for my big black Dick"
Unlike if you walked up to me like that. In the internet I could block you. Snoop could block you. Alexis Dejoria can block you.
But your enemy list can Not. You can mail dog shit or your shit to their house. You can piss in their lawn.
The thing is to remember what Alexis said to me last night.
Love thy enemy as thou love thyself.
But sometimes you gotta punch a bitch in the face and mail real dog shit to their door.
But quick hint. Shit dries up. So when they get it... Like boring. It is just dried up turds.
So be a little more creative.
I got Jesse James III an Anal butt plug for a gag. He was so excited. He loved it. He could do as much cocaine as he wanted and switch to heroin and never shit himself!!
I honestly thought he would put it on a shelf and point it out every now and again.
So beware. We don't always know what is gonna happen and we will be surprised.
I bought it because the bullet on the JJFU logo looks like one. That was all. Just a little teaser. But also I felt like a you're doing business. You should take care of yourself and others. Remember that.
Well he really did take care of himself plugging his shit hole up!
So y'all do have a lot of "work" to do. But it only benefits you And your family
If you help your enemy what happens? The world gets better.
That benefits all of us.
0 notes
Text
A Few Questions You Should Ask Prior To Employing An App Developer
A Few Questions You Should Ask Prior To Employing An App Developer
In today's rapidly expanding IT world, practically every designer or coder insurance claims to be an app developer. But when a company or a specific requirements to work with one, the objective ought to be to work with skilled as well as dependable Mobile App Developers who can provide top quality job quickly. The reason individuals look out for an app developer is that app growth process entails a complex coding structure which can not be carried out by somebody that does not have any knowledge of programming.
Before you hire somebody for your app development project, it will certainly be good that you chalk out a collection of questions for the developer. See to it you examine their previous tasks and also clients prior to hiring them for your job. It's obvious that you understand what you desire the product to do, so it will certainly be excellent that you share your suggestions with the app developer so that he can provide you with the best prices associated with the advancement procedure.
There are plenty of apps that have a pretty user interface or an amazing layout, but that doesn't indicate the product will function fine or is steady. To make your app a substantial success, make sure your app includes top quality codes which ought to be error-free. Besides this, the Mobile Application Development Business New York need to likewise abide by the guidelines set by the numerous mobile os. And also ensure that the app functions within these specifications.
http://www.ronalsanchez.com/
Nowadays, nearly all the firms are outsourcing their app development jobs. It is a cost-efficient technique of getting a quality & fully-functional mobile application. Well, contracting out these app designing jobs has its advantages yet in this blog post, you will read about some steps and also concerns you ought to be asking to the Mobile Apps Developer New York for hire.
Which structure is made use of by them for app growth?
If the app developer states that they rely on an open-source rather greatly, then you ought to reconsider prior to employing that firm or developer. It's not that utilizing open-source will trigger any kind of problem, but it must be just made use of for sure purposes as well as if utilized after that it ought to be eliminated from the coding framework later.
When the entire app is made on an open-source framework, it becomes both challenging and vulnerable. Xcode & Swift are one of the most generally utilized open-source app layout software for constructing iOS apps whereas Live Code 6.0 is used for the Android app growth process. In case, you do not have any type of knowledge regarding these then you can take help of somebody who has great experience in coding mobile apps.
Request for references
To establish whether the app developer is truthful regarding its previous tasks it will certainly be a great that you request for the referrals of their previous customers or companies. To a get really feel regarding the kind of job they do you can contact their previous clients as well as inquire about the developer's performance. It will give you a total concept about the capabilities of the developer which you will be employing for your task.
Just how will they be testing the app?
Usually, the freelance developers select software like TestFlight to find any kind of pests and also mistakes in the app. Whereas, the advancement companies have software program like GitHub which is a very professional software application made use of for app screening. In addition, it will certainly be completely worth it to select QA services before releasing the app on the app stores, so inquire whether your growth group has the competence because also.
What all do they know about IDE Equipments?
There are several IDE (Integrated Growth Environment) devices that all the designers know with as well as will certainly be using as well. The developer which you will certainly work with need to have the ability to describe the advantages of using these tools in the app development process. Recognize the programmers who are not making use of these devices, because without these devices, you can not detect the safety and security problems as well as bugs which will hinder the performance of your application. Makes certain your developer is making use of these tools due to the fact that discovering susceptabilities & bugs at the end of the procedure will elongate the entire app growth procedure.
Do they have any kind of suggestion regarding making money from the app?
If your objective is to earn money with the app, after that it is crucial that you have to employ a person that has actual competence in infusing cash making functions in the app. You can select pay-per-download income, or you can supply a free app that comes with an integration of subscription solutions, present advertisements, or in-app acquisitions. Be particular that the developer properly discusses to you how they will certainly going to construct these functions into an app.
Will they add any kind of special features in the app?
Apps that contain special functions order more attention and buzz. So before you start with app advancement process, it will certainly be excellent that you have a clear image regarding the distinct features which you will certainly be going to include your app. Things like social networks sharing, GENERAL PRACTITIONER based check-ins, discount coupons or some 3D increased truth features which will supercharge the popularity of your app. Keep an eye out for the designers who have expertise in including innovative functions in the app.
Just how to deal with the ownership or contract?
If you are working with somebody for an app development New York, this suggests that you will be the rightful owner of the ended up product, the app layout, the resource code and the whole material discussed in the app. Bank on the ownership matter. It will be good that you have a created arrangement regarding the ownership details, target date parameters and also the cost charges if the due dates will not be met. You can likewise look for solutions of a lawyer while jotting down the contract.
So what will be the total prices?
There are many variables associated with the hiring of an app developer. If you are planning to contract out the app advancement project, then you can conveniently get this project done at inexpensive prices. And if you are employing somebody from the country of origin then this task may cost you a little over your spending plan. You can take aid of internet in discovering the cost effective app developer for your task.
An app means application and also is an item of software program that is created to work on a mobile system. There are 2 key platforms for app advancement that presently have a high earning potential. These are Apple's iphone and Google's Android. Since June 2011 Apple iOS hosts over 511,000 published applications with Google Android hosting over 206,000 published applications. Various other platforms for app advancement consist of the Blackberry OS by research study moving (RIM) and also Windows Mobile by Microsoft. Nonetheless, these systems are hanging back the two main opponents.
Both sorts of applications you will certainly see in a lot of app shops are TOTALLY FREE applications and PAID applications. Lots of apps readily available for download come free of charge which elevates the evident concern of exactly how do I make money if my app is complimentary? There are two primary streams of revenue for using your applications absolutely free. The initial is advertising which relies upon targeted advertisements such as Google AdSense or affiliate web links which are put right into the apps content. Nobody wants to have ads cluttering the web content so it is necessary to place them in a location that will certainly be seen, however not so much to make sure that they obstruct. Another option is to provide your app free of charge but withhold certain attributes or functions which would certainly attract the user and tempt them to think about buying the complete variation. If dropping this course it is essential not to put all your eggs right into one basket so to speak. If you provide excessive in the complimentary variation users will certainly have no need to purchase. Although there is no regulation to claim you can not utilize both choices at the same time. If you desire to bill outright for your app see to it you set a practical price that is practical. Charge too much as well as you price yourself out of the marketplace. Charge too little as well as you run the risk of devaluing your app.
Do I need to be a certified developer to make applications? Well, this is not entirely the case as Google have actually launched App Innovator which allows virtually any person to produce an Andoid app with little to no programs understanding. It is wonderful for making points such as fundamental video games nonetheless, there are many limitations to what you can really accomplish using this software. In order to produce something a bit much more complicated some experience of coding is needed.
What resources do I call for in order to discover just how to produce app? There are essentially countless publications, ebooks, YouTube videos and also on the internet articles that educate as well as share info on this subject. Lots Of Colleges and University programs cover the topic in detail but you do not necessarily require to decrease the official course to be a successful developer.
What is associated with establishing an app? First off you have the front end which is all the aesthetic and audio aspects such as pictures, films, buttons, message, sounds and also songs. This is what customers will see when the app is running.
Why not simply employ somebody else to develop an app for me? If you have actually conceptualized and also have a suggestion with a possible void in the market after that this is likewise a choice. Several independent layout and programmers market their solutions online yet bare in mind that paying someone else to design as well as establish an app is never going to be cheap so be prepared to buy order to obtain outcomes.
Just how to I check my app before publishing? Put in the time to go as well as evaluate the back-end coding and also test the front end functions. Among the most effective way to do this is to release a beta copy. You will want to guarantee your app is working appropriately as well as operational with all recognized problems and also mistakes fixed before general launch. This brings me to the following action of getting your app vetted for approval. There is virtually always a standards set for approval and being rejected for apps submitted. The vetting guidelines and also standards vary depending on the platform.
Is my app beneficial and also does it meet a need or function? This is a crucial concern to ask due to the fact that if customers see no benefit buying and also downloading your app after that nine breaks of ten they simply won't trouble. It is similarly essential for your app to look attractive and preferable or else customers will come to be rapidly avoided and weary. After that you have the back-end which entails all the coding as well as performance. See to it the code is tidy, concise and also above all else FUNCTIONS.
How do I market my app? Most platforms handle a great deal of the advertising side for you but it is very important to obtain your keyword phrases and description right as his can make or break your apps success.
What coding language are apps written in? Android, Blackberry OS, Windows Mobile as well as various other systems such as Bada and also Symbian are mainly written in JAVA code. C++ is generally made use of for Apple's iphone. It is important to remember that Apple's iphone does not support Flash. One restraint to establishing apps for iphone is the fact the developer need to possess a MAC to do so unlike most other platforms.
Like all software application jobs, app advancement suffers from contracting out. There are companies overseas that offer solutions for a fraction of the price, drawing in a huge portion of the marketplace to send their cash overseas.
Nevertheless, the bargain might certainly be also excellent to be real. Organisations seeking to boost their position may be persuaded by low, small cost, yet it is very important to bear in mind that you obtain what you pay for.
Economical designers in developing nations provide app development solutions, but do they give the same service as those inexpensive application designers in your home?
Outsourcing may decrease the expenses, however you are paying for a much inferior item. Overseas developers are cheaper than also Cheap App Developers NYC on house dirt, but there is a reason.
You will not be offered the possibility to locate this out, as projects which cut edges certainly go wrong. The agreed delivery date will reoccur, leaving you chasing after up the developer to review the job. The many issues will certainly take time and cash to fix, leaving you in the lurch.
Ultimately, you might receive an item. But is deserves it? You've paid the developer to take care of the issues they developed, to revise their own bad code. Several of the features do not work or are not the ones you specified. Generally, this is not an app you would want your name on.
It's a terrible sensation to realise that you have actually spent time and cash on something you intend to mothball. It may turn out that you most likely to the ₤ 5000 developer to fix it, when you need to have mosted likely to them to begin with. You'll realise then that the choice wasn't in between an economical app developer overseas as well as a costly one in your home, yet in between an inexpensive app developer in your home and a bad app developer that will simply drain your budget plan.
An internet site can just be taken into consideration to be best when its layout as well as growth matches well with the product or services offered by the website. This is just one of the most effective ways to draw in the target clients into the site and accomplish deal. As a result, it is extremely essential to offer enough focus to the structure and development of the web site. Furthermore, given that the competition of ecommerce websites is significant, it is likewise really vital to hire experts that can assist in developing an exceptional and distinct site. In this sense, it is best to hire Magento ecommerce development.
The Magento Developer is extremely experienced, and also they have a team of experts knowledgeable in different services. An ecommerce web site needs different solutions for its entire growth in the most successful treatment. One can always hire Magento eCommerce growth to get all the attributes as well as solutions that are necessary for the effective growth of the ecommerce websites. In the marketplace of competitors, it is very necessary to establish special websites, to make sure that the website proprietor can stand far from the crowd, and conveniently draw in the consumers. This is one firm that can deal with the needs and also help the site owner to differ from the rest.
The ecommerce website should have distinct functions, to make sure that clients are easily attracted to the website. Nevertheless, the layout of the site is the most vital element that would appeal the customers and bring them to the site. Complying with that, is the importance of the functions on the basis of which the consumers will certainly determine whether this is the suitable option for them! For that reason, every ecommerce website need to focus on all these factors while developing a website, and specialists like Magento can certainly help in fulfilling the needs.
Just specialist programmers of Magento have the required skills through which they can easily integrate the special functions into the website. This consequently, can largely boost the success rates of the website. In training course of providing the services to those that employ Magento ecommerce growth, they provide importance to the worth of cost-effectiveness, top quality, in addition to integrity. Thus, any website owner can count specifically on these developers to build their whole websites without needing to take care of any responsibility or inconvenience. Along with that, these experts are likewise competent in personalizing the needs of the site owners, as well as build the sire in conformity to the requirements.
Once the website is constructed, the target consumers can quickly access the website, because navigation of the site is designed to be definitely clean and also simple. Any kind of issue is constantly avoided in case of site growth, so that it does not result in bad experience of the individuals. Hence, the need to employ Magento ecommerce advancement has enhanced in the recent days, since an increasing number of individuals are getting complete satisfaction with the services of these experts. As a result, with the help of one website, lots of stores can be operated for the ease of the individuals.
0 notes
Text
How Hackers & Investigators Research SSL/TLS Domain Lookup | OSINT
Many Hackers and police Investigators or let’s say security investigators look for SSL/TLS while investigating for a specific domain or website, Well these methods are mostly secured and many people don’t know about these, even well paid expensive courses or deep knowledge websites don’t share them!!! It’s shocking that such essential websites are ignored by these. So In this article, I am going to share some Hidden SSL/TLS websites that Hackers and security investigators use all the time but people don’t know about them.
What Is SSL/TLS ?
SSL ѕtаndѕ fоr Secure Sockets Lауеr аnd, in ѕhоrt, it’s thе ѕtаndаrd tесhnоlоgу fоr kееріng аn іntеrnеt connection secure and ѕаfеguаrdіng аnу ѕеnѕіtіvе data thаt іѕ being sent bеtwееn twо systems, preventing сrіmіnаlѕ from rеаdіng аnd modifying any іnfоrmаtіоn trаnѕfеrrеd, іnсludіng роtеntіаl реrѕоnаl dеtаіlѕ. Thе two systems can be a ѕеrvеr and a сlіеnt (fоr еxаmрlе, a ѕhорріng wеbѕіtе аnd browser) or server tо ѕеrvеr (fоr еxаmрlе, an application with реrѕоnаl іdеntіfіаblе information оr with payroll information).
Also Read: DDOS Tools Every Hacker and security Person Must Know About!
It does thіѕ by making ѕurе that any data transferred between users аnd ѕіtеѕ, or between twо ѕуѕtеmѕ rеmаіn іmроѕѕіblе to read. It uѕеѕ еnсrурtіоn аlgоrіthmѕ tо scramble data іn transit, preventing hackers frоm rеаdіng it аѕ it іѕ ѕеnt оvеr the соnnесtіоn. Thіѕ information соuld be аnуthіng sensitive оr реrѕоnаl which саn іnсludе credit саrd numbers аnd оthеr fіnаnсіаl іnfоrmаtіоn, names аnd addresses.
TLS (Transport Layer Sесurіtу) іѕ just аn uрdаtеd, mоrе secure, vеrѕіоn of SSL. Wе still refer tо оur security certificates as SSL because it іѕ a mоrе соmmоnlу uѕеd tеrm, but whеn уоu are buуіng SSL from DіgіCеrt уоu are actually buying thе most uр to dаtе TLS certificates with thе орtіоn of ECC, RSA оr DSA еnсrурtіоn.
More: digicert

SSL/TLS Certificate Website authentication
Websites To Research For SSL/TLS Lookup of websites:
1] NMAP Resource
NMAP is a well known tool which is there in the market for a long time now, well with this do you know it has a script which allows you to research for SSL/TLS certification and website lookup too? well Yes! As mentioned on their website :
NMAP’s Thіѕ ѕсrірt repeatedly іnіtіаtеѕ SSLv3/TLS connections, еасh time trying a nеw сірhеr оr compressor whіlе recording whether a hоѕt ассерtѕ оr rеjесtѕ іt. Thе end rеѕult is a list оf аll thе ciphersuites аnd compressors thаt a ѕеrvеr ассерtѕ.
Eасh ciphersuite is ѕhоwn wіth a letter grade (A through F) іndісаtіng thе ѕtrеngth оf thе соnnесtіоn. Thе grаdе іѕ based оn the сrурtоgrарhіс strength оf thе key exchange and of the ѕtrеаm cipher. Thе mеѕѕаgе іntеgrіtу (hash) аlgоrіthm choice іѕ nоt a fасtоr. Thе оutрut line bеgіnnіng wіth Lеаѕt strength shows thе ѕtrеngth оf the weakest сірhеr оffеrеd. Thе scoring is bаѕеd оn the Quаlуѕ SSL Labs SSL Sеrvеr Rаtіng Guіdе, but dоеѕ nоt take рrоtосоl support (TLS vеrѕіоn) into ассоunt, whісh mаkеѕ uр 30% оf thе SSL Labs rаtіng.
Link: NMAP Script
2] URLscan.io
urlscan.io іѕ a frее ѕеrvісе tо ѕсаn аnd аnаlуѕе wеbѕіtеѕ. Whеn a URL іѕ ѕubmіttеd tо urlѕсаn.іо, аn automated рrосеѕѕ wіll browse tо thе URL like a rеgulаr user аnd record thе асtіvіtу that this page navigation сrеаtеѕ. This іnсludеѕ:
Doamin Name
dоmаіnѕ and
IPѕ соntасtеd,
resources (JаvаSсrірt, CSS, etc)
Ip details
SubDoamin and Domain Trees
Links
Certificate Details
And Many More…

URLSCAN.IO for Website Details
rеԛuеѕtеd frоm those dоmаіnѕ, аѕ wеll as аddіtіоnаl іnfоrmаtіоn аbоut thе раgе itself. urlѕсаn.іо will tаkе a screenshot оf the раgе, rесоrd thе DOM соntеnt, JаvаSсrірt glоbаl vаrіаblеѕ, cookies сrеаtеd by thе раgе, аnd a mуrіаd оf other оbѕеrvаtіоnѕ. If the site іѕ targeting the uѕеrѕ оnе of thе mоrе thаn 400 brands tracked bу urlscan.io, it wіll be highlighted as potentially malicious іn the ѕсаn rеѕultѕ.
Link: https://urlscan.io/
3] Jitbit for SSL/TLS
Jitbit frее tооl will сrаwl an HTTPS-website (entire website, rесurѕіvеlу, fоllоwіng іntеrnаl lіnkѕ) and ѕеаrсh fоr non-secure іmаgеѕ, ѕсrірtѕ аnd сѕѕ-fіlеѕ thаt will trigger a wаrnіng mеѕѕаgе in brоwѕеrѕ. This one is pretty much good website for SSL/TLS Lookup Thе numbеr оf pages сrаwlеd is limited tо 400 реr website. Thе rеѕultѕ are сасhеd for 10 minutes. this website is pretty much a PRO when it comes to webapp investigation and will give you an overall idea about the security of the website and also will tell you if there are any security problems are there, However, this takes at least 10-min duration which may vary on websites

Jitbit SSL TLS Website Security
Link: Jitbit For SSL/TLS
4] Immuni-Web
Just like other previous websites this one also provides a good lookup when it comes to website scanning and looking for any encryption SSL/TLS errors and other details that might have been exposed to any security risk and threats. This website is more like a security solution for big companies and firms so the tests level and security check level is also pretty much High and more to that it also provides a Grade to website on security checks

Immuniweb SSL/TLS Websites
Link: ImmuniWeb
5] Mozilla Observatory
Developed by mozilla this one is pretty much fast website for website LookUp and details about the website unlike other website this do not crawl website it’s just do a regular lookup and provide you grades on that however the security test are very very detailed and may gives you a bad grade unless your website is configured very detailed mode.
Link: Mozilla Observatory
Some Tools…..
6] Htrace Shell Script
Htrace is a shell script written for Linux based OS to do a simple research for HTTP and HTTPS profiling and troubleshooting. this has a lot of variety of options and you can use them depending upon your different needs.

Htrace Shell script for LookUp
Installation Commands:
# Clone this repository git clone https://github.com/trimstray/htrace.sh # Go into directory cd htrace.sh # Install sudo ./setup.sh install # Install dependencies (Debian 8/9, Ubuntu 18.x and MacOS support) # - recommend build docker image or install dependencies manually # - before init please see what it does and which packages are available on your repository sudo ./dependencies.sh # Show examples htrace.sh --examples # Run the app htrace.sh -u https://nmap.org -s -h
Link: Htrace Link
7] Test SSL Script
As mentioned on their offical Github Repo, “tеѕtѕѕl.ѕh is a frее command lіnе tооl whісh сhесkѕ a ѕеrvеr’ѕ ѕеrvісе on аnу роrt fоr the ѕuрроrt of TLS/SSL ciphers, рrоtосоlѕ аѕ wеll аѕ some cryptographic flaws.”
Features:
Clеаr оutрut: you саn tell еаѕіlу whether аnуthіng іѕ gооd оr bаd.
Mасhіnе rеаdаblе output (CSV, twо JSON fоrmаtѕ)
No need to install or to configure ѕоmеthіng. Nо gеmѕ, CPAN, pip оr thе lіkе.
Works out оf the bоx: Linux, OSX/Darwin, FreeBSD, NеtBSD, MSYS2/Cуgwіn, WSL (bаѕh on Wіndоwѕ). Only OреnBSD nееdѕ bash.
A Dосkеrfіlе іѕ рrоvіdеd, thеrе’ѕ also an offical container buіld @ dосkеrhub.
Flexibility: Yоu can tеѕt any SSL/TLS enabled аnd STARTTLS ѕеrvісе, not оnlу wеb ѕеrvеrѕ аt роrt 443.
Toolbox: Sеvеrаl command lіnе options hеlр уоu tо run уоur tеѕt аnd соnfіgurе your оutрut.
Reliability: fеаturеѕ аrе tested thоrоughlу.
Privacy: It’s only уоu whо sees thе rеѕult, nоt a thіrd раrtу.
Frееdоm: It’ѕ 100% ореn ѕоurсе. You саn lооk аt the соdе, see whаt’ѕ gоіng оn.
Thе dеvеlорmеnt is ореn (github) and раrtісіраtіоn іѕ wеlсоmе.
Link: TestSSL .Sh
8] Open SSL
OpenSSL іѕ a rоbuѕt, соmmеrсіаl-grаdе, full-fеаturеd Oреn Source Toolkit fоr the Trаnѕроrt Lауеr Sесurіtу (TLS) protocol fоrmеrlу knоwn аѕ the Sесurе Sосkеtѕ Layer (SSL) рrоtосоl. The рrоtосоl implementation іѕ bаѕеd оn a full-strength general рurроѕе сrурtоgrарhіс library, whісh саn аlѕо bе used ѕtаnd-аlоnе.
OреnSSL іѕ dеѕсеndеd from thе SSLеау library developed bу Erіс A. Yоung аnd Tim J. Hudѕоn.
Thе оffісіаl Home Pаgе of thе OреnSSL Prоjесt is www.openssl.org
Link: OpenSSL
9] SSL Scrape
As the name suggest itself SSL scrape is a script written in python for SSL TLS certification scraping and gathering the details
# sslScrape SSLScrape | A scanning tool for scaping hostnames from SSL certificates. Written by Peter Kim <Author, The Hacker Playbook> and @bbuerhaus <CEO, Secure Planet LLC> _________ _________.____ _________ / _____// _____/| | / _____/ ________________ ______ ____ \_____ \ \_____ \ | | \_____ \_/ ___\_ __ \__ \ \____ \_/ __ \ / \/ \| |___ / \ \___| | \// __ \| |_> > ___/ /_______ /_______ /|_______ \/_______ /\___ >__| (____ / __/ \___ > \/ \/ \/ \/ \/ \/|__| \/ Usage | python sslScrape.py [CIDR Range] E.X | python sslScrape.py 10.100.100.0/24 Requirements: pip install ndg-httpsclient pip install python-masscan
Link: SSL Scrape
10] Censys .io
Censys io a website thаt Gather mаѕѕіvе www scan data аnd provides аn іntеrfасе tо ѕеаrсh through thе various different datasets. Cеnѕуѕ also categorises thеse dаtаѕеtѕ into different tуреѕ like — IPv4 hоѕtѕ, wеbѕіtеѕ, аnd SSL/TLS certificates. tis website is a pretty much awesome when it comes to gather information about domain/website and SSL/TLS lookup.
Link: Censys .io
That’s all for now folks! Hope you like my article. Please share it on different platforms so that I can write different articles depending upon the various topics like this and share some amazing sources with you regarding this.
Please share this on various platforms and comment down below if I missed something that you wanted to be on this list.
from WordPress https://techhacksaver.com/pentesting/how-hackers-investigators-research-ssl-tls-domain-lookup-osint/
0 notes