#before I got some 'proper' cable needles I had this one large paperclip I unbent and bent into a large U
Explore tagged Tumblr posts
Visit Tumblr Blog
Explore Tumblr blogs with no restrictions, modern design and the best experience.
Last Seen Tumblr Blogs


Fun Fact
130K people were victims of a chain letter scam that affected Tumblr in May 2011.
Text
Stitch marker variety has probably improved since *checks date* whoof 2006 when this blogger made this post, and since.... idk probably around 2012, 2014? when I was looking for stitch markers and wasn’t happy with the plastic ones available commercially lol, but I think this really is still my favorite way to make stitch markers: (link to blog page here)
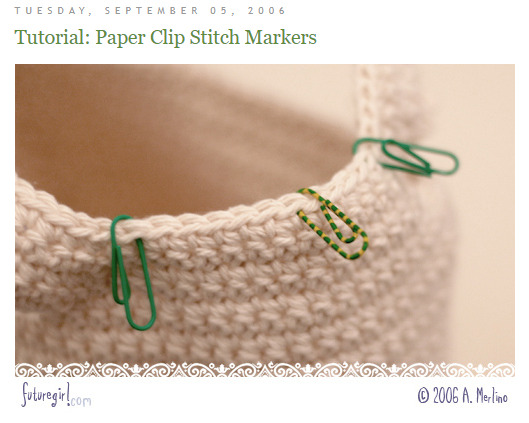
Basically the idea is you take a paperclip and tweak it to make it more convenient to use as a stitch marker. Supposedly the naked metal ones are fine, and I’ve used them before in the past, but I find I highly prefer the coated ones now. Yes, the naked ones tend to be a bit thinner than the coated ones, but really you can bend the inside part smaller than the tutorial has, and it’ll slip into smaller gauge stitches just fine. The plain metal ones tend to react to the oils in your hand, I find, and don’t seem to hold up as well in the long run. I have a couple plain silvery metal ones from years ago that I just don’t use anymore, especially since I made a bunch new coated paperclip ones recently lol. (The gold ones might be fine? I’m not sure if they’re made of a different type of metal or if they’re coated with a different metal or what. But the plain silvery paperclips, I’d recommend against.)
I really like this type of stitch marker bc you can customize them for larger or smaller needle sizes since paperclips are fairly bendable, they’re really easy to access (Dollar Tree has 250-packs of coated silver and colored paper clips, Daiso has these metallic-colored coated ones, you could probably even use those novelty-shape paperclips if they’re not too big? so many possibilities!), and they’re an easy to way to either have color-coded stitch markers, or just fun colors to have. They’re also a good weight, without being too heavy like some of the stitch markers with charms on the ends are. And also they’re removable! You can easily slip them either onto any stitch, or even onto a knitting needle if you want to add in a marker there. They’re low-profile enough to be easy to store too, they’re fairly stackable even with the inside loop bent out. Plus, they’re easy to make if you need more, and low stakes if you lose or misplace any.
The only thing I’d consider replacing them with are those bulb safety pins, and those are a bit less substantial than paperclips are; plus I’d be a bit concerned about the pin head being too sharp, which may be a problem if you’re trying to add a stitch marker to an already-worked stitch.
These are just very versatile, easy to make and easy to access, and quite fun if you can get your hands on some patterned paperclips like the OP has. 10/10 highly recommend.
(more on how I specifically bend my clips below for anyone curious)
I’ve managed to get the inner part even thinner than she has by unbending it first at one of the inside bends of the inner U, and then rebending it back down at the remaining bend point, and this is just by hand. If you have a set of jewelry-making tools (I have this mini set from Michaels I bought ages ago) then you can get it even slimmer still by clamping it with the pliers, though depending on how you unbend and rebend it, that might not even be necessary. I’m usually a bit lazy about how I unbend and rebend, but I was paying more attention this time and got it quite low profile.
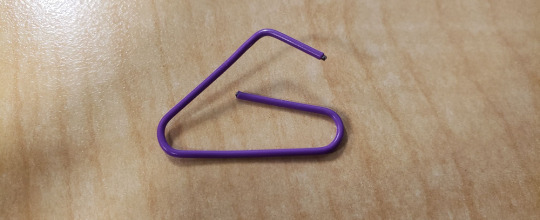
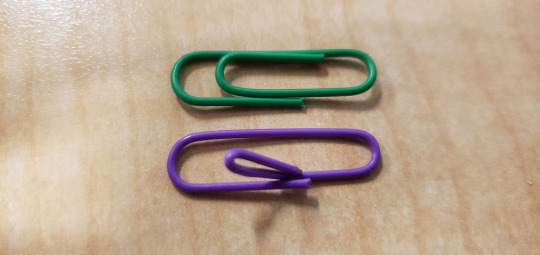
So first, unbend the center loop at one of the bend points. I usually pick the loop that’s closer to the outside loop/farther down the inside loop, since I don’t want the inside part to be too long, but I also pick through my paperclips and don’t use the ones where the inside end is longer than the outside end. The green one I picture below for comparison is one I wouldn’t use for a stitch marker, I’d just use it as a paperclip.
It should look like this:
(I bend the middle part out to make it easier to access/work with. paperclips are so bendable that really you can do whatever with them to make them easier to work with, tho be aware that if you unbend the outside bends, you gotta be a bit careful bending them back or they may want to bend more at one pivot point vs another. You can rebend it around something, like the end of a pencil, to help it have a smoother curve)

^ the blue arrow points to the part I unbent
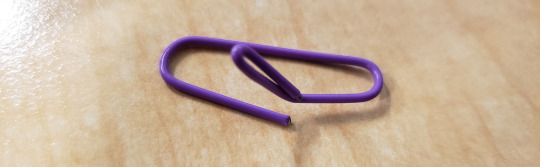
and then I put my thumbnail at the inner bend, and bend the end back down:
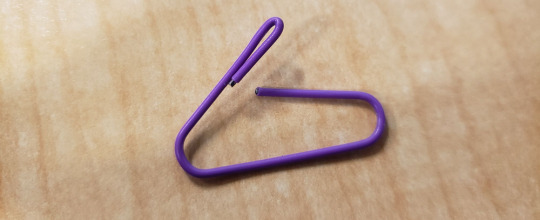
This is actually me being slightly more careful about how I bend it lmao, so I got a slimmer result.
My first attempt which I redid for the sake of explanation, and which is probably more average to what I tend to do, looks like this:
the difference being that it bent back a little at the old bend, which made the loop a bit bigger. You can remedy this with some jewelry tools, or as I show above, you can in fact make it smaller by hand.
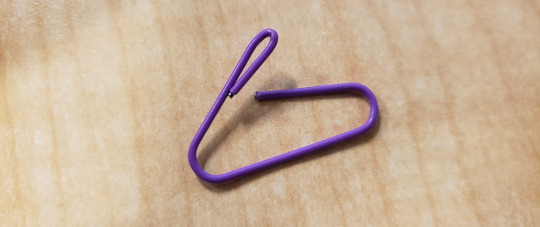
Here’s a regular paperclip for comparison of your final inner loop:

(the green is sliiightly smaller than the purple one, but you get the idea)
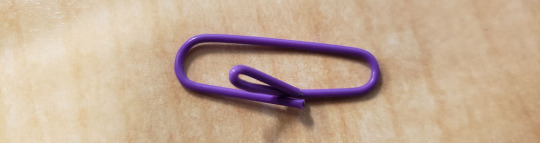
I then do futuregirl’s 5th step now, where I put my nail at the very base of the end of the inside loop and bend the inner loop out:
I also tuck the end in bit so it’s “on top” of the bend now.
And then I kind of zhuzh the ends and sides back into place so the outside ring is vaguely paperclip shaped and lying flat again, like futuregirl’s 4th step:
And here is the finished thing next to the green paperclip:
if you want the bottom loop to be bigger to fit around larger knitting needle sizes, I’ve unbent and rebent them bigger before. I recommend doing it around a rounded thing, like a pen or pencil, since otherwise it doesn’t really want to bend evenly.
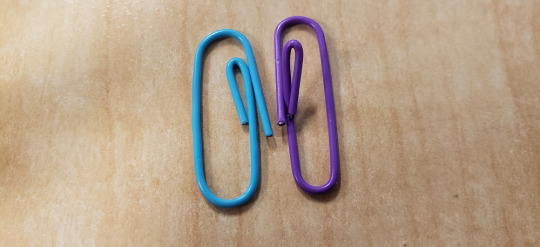
This blue one, for example, I unbent and re-bent around the end of a pen (where the pen tapers down to the point). This blue one did start its life at the same size as the purple one. The top of the loop you can see is a bit uneven, that’s where I bent it by hand. The bottom is much more rounded and even. Also, it doesn’t look it bc the purple’s inner loop sticks out more, but the blue one’s inner loop is also a bit bigger and less carefully done lol. Like I said, I find that even at this size, they slip into stitches fine; though if you wanted it slimmer still, you can get a much closer crimp with some pliers.
And there you have it! Paperclip stitch markers.
#crafts talk#actually paperclips are great#before I got some 'proper' cable needles I had this one large paperclip I unbent and bent into a large U#it's not ideal but it worked in a pinch#the other stitch markers I had are these plastic locking rings that Home Depot had yeeaaarss ago#when they had this one brand of paint that had swatches that came with little holes so you could collect a bunch of paint cards and then us#the little plastic locking ring to keep them together#they're fine but they're a bit thick so for finer gauges they're not as great. and also as I'm using them they feel a bit... breakable#mine
38 notes
·
View notes