#background remover pixlr
Explore tagged Tumblr posts
Photo


i edit my screenshots for my legacy in canva, since i also use it for work and i do really minor edits (just some brightening and saturating), but when i started working on this batch i realized they’d added the ability to edit the foreground or background separately, meaning i can do that photo blur with minimal effort. anyway here’s some bonus shots of the sisters autonomously interacting
#i use the canva background remover when i do the look books lol#that's part of the premium subscription but the background editor is free with a basic canva account#which is great because pixlr decided to only let me save three pictures a day and i always manage to screw up one of them#anyway i'm not a photo editor and have no desire to get good with photoshop#so here are the lazy and basic tools i use to get halfway decent shots#my sims#alphabet legacy
2 notes
·
View notes
Note
https://www.tumblr.com/beompercar/768996375266525184/ill-like-you?source=share
how you did the 5th image?
picked out my photos
went into canva using 500 x 500 canvas
arranged the photos equally into 4 & added border
either went to pinterest or tumblr searching "frame" (i forgot, so sorry 😞)
used pixlr, removed the background, and then added the idol pic, export
add the exported picture back into canva and slightly tilt it. export, then repeat tilting it the other direction.
go to capcut and add both images and cut it to be the speed you want it to be, then export as gif.
The process is very tedious and there's probably a lot of other ways to do this but this is what works for me!!! I hope this helps you in some way!!! lol
5 notes
·
View notes
Note
i love ur pfp! i wanted a similar one for my ac sideblog but idk how to make it look that good lol. can i ask how u made yours? <3
thank you! I think I used Pixlr online photo editor which is basically free photoshop. You can use any art app tho, i think even canva has a remove background feature. All i did was erase everything except the head of my screenshot and then put a blue background behind it :)
3 notes
·
View notes
Note
how do you make the background on the characters transparent? i'm trying to make a banner for my blog but i've never worked with WoW screenshots before.
I am not sure how familiar you are with editing software, so this tutorial is going to be detailed.
Step 1:
You need a simple screenshot of your character. Here are some ways you can get it:
a) in-game screenshot
b) Wowhead Dressing Room screenshot
c) Wow Model Viewer
d) WoW Tools
e) far stretch, but if you want to mess around with mogs, Epsilon Private Server is fantastic for that (they also support the Narcissus addon)
I prefer Wowhead's Dressing Room, so that's what I'll use. Recommendation: If you use Wowhead, use the PTR version of the page (right now it's 10.2.5) to remove Wowhead's watermarks in the background.

Step 2:
Take the screenshot of your character (Print Screen on Windows keyboard) + paste it to Paint.
Now you have your very own Screenshot with a background.
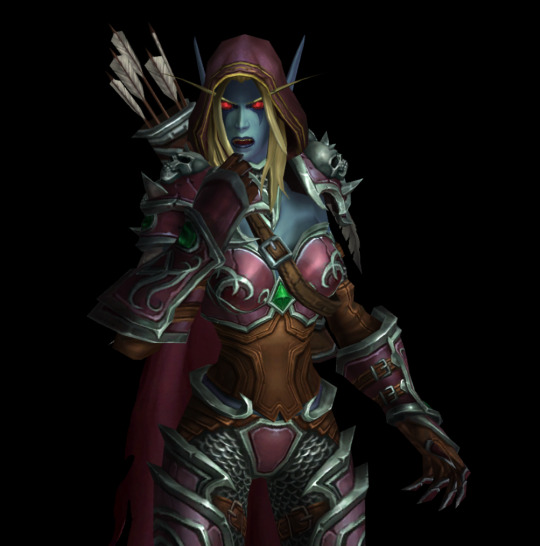
Step 3:
To remove the background, you will need an app that can do that for you. The two options I can personally recommend are:
a) Photoshop
b) Photopea (basically free in-browser photoshop) (link)
I will use Photopea for this tutorial.
Step 4:
Once you upload your screenshot to Photopea, you will need to select the character with the Magic Wand tool.
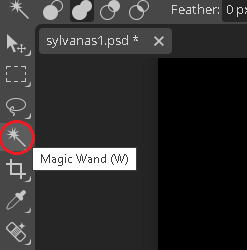
Everything you select will be outlined with a scissor line.
Step 5:
There will be some areas where the tool might 'overselect' and get bits of the background. There might also be areas which the tool will not select. To fix that, use the Lasso tool (red circle).
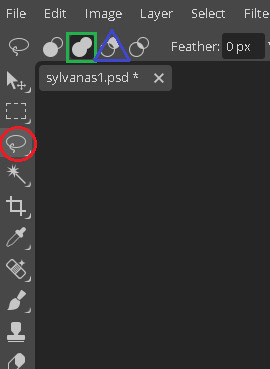
If there are any areas that are on the character, that the Magic Wand did not get, draw over them with the Unite option (green square). If there are bits of the background, exclude them with the Subtract option (blue triangle).
If you need to zoom in or out, hold Alt and use your scrolling wheel. It will make some smaller areas easier to see and select/deselect.
This is the most important step, so be meticulous.
Step 6:
After you mess around with the Magic Wand and Lasso tools, you will have something like this.
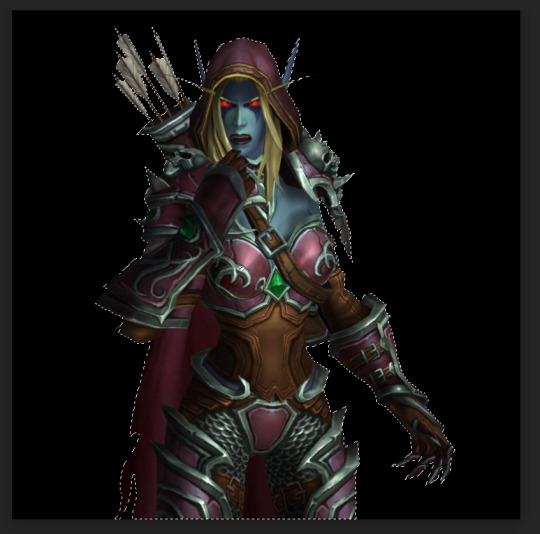
Now you need to remove the background completely. On the right side of the screen, there is the Add Raster Mask option. Click on it.
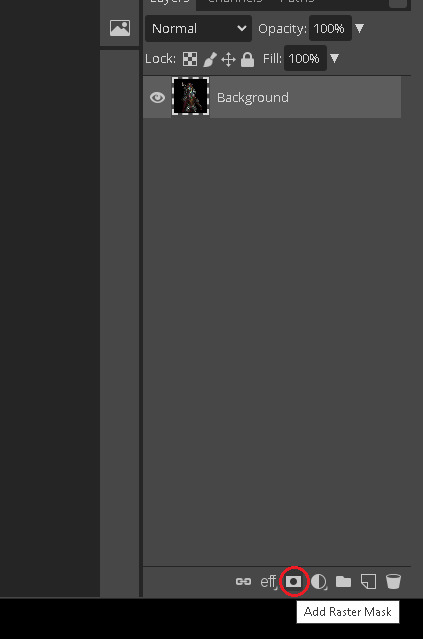
Voila!
Your character is separated from its background!
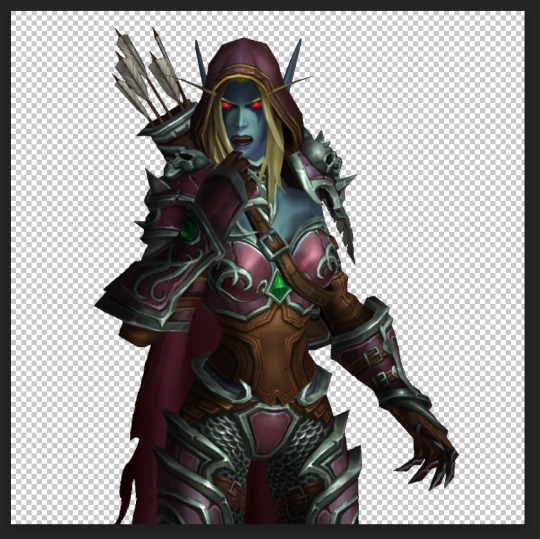
Step 7:
To save it, you will need to export it. Here's a quick how-to:
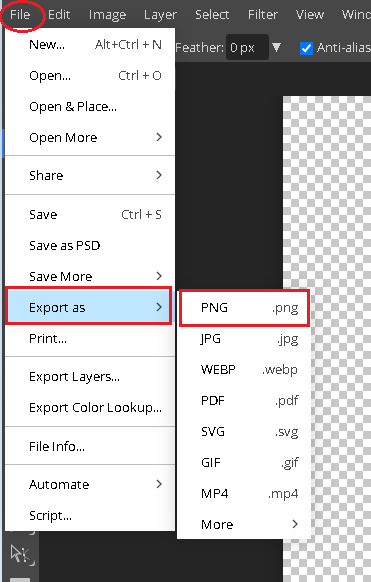
Press on File in the top left corner. Then Export as. Then save it as a PNG (make sure it's a .PNG as .JPG / .JPEG do not support transparency).
After that, you will be prompted again. Just click Save.
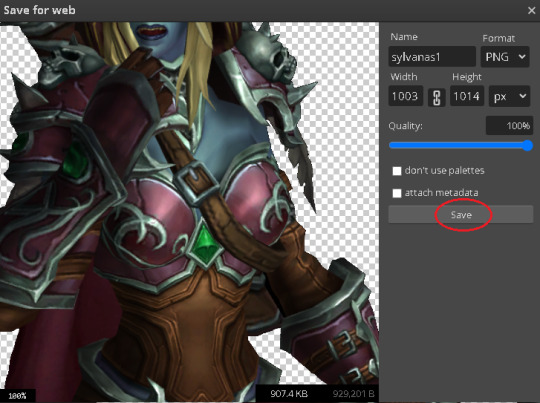
Step 8:
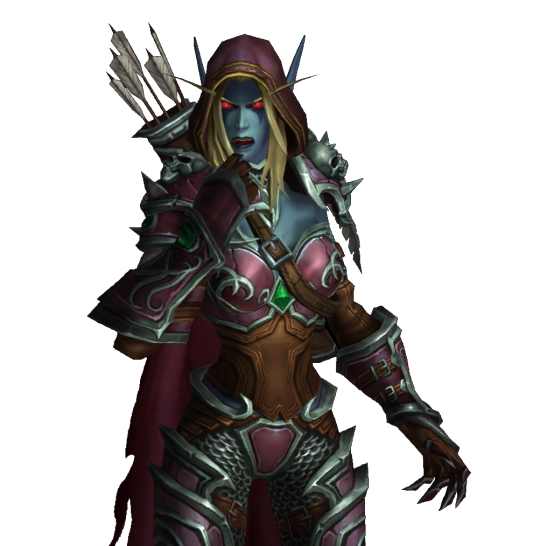
And here's your character, completely divorced from the background! Now you can use an editing app to put her in any background your heart desires. If you don't have any software of that sort, there are also plenty of websites that you can use.
Some that I know of:
a) Pixlr (link)
b) Canva (link)
c) BeFunky (link)
d) Picsart (link)
I often use BeFunky because it's easy to get the hang of, minimalistic and convenient to use!
At this point, only your creativity is the limit.
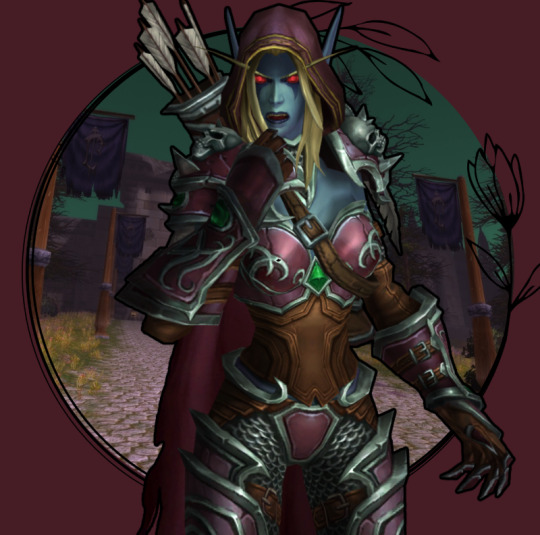
This is by far not the only way to do it (and not the fastest), but it's the simplest one that I could come up with.
It might seem a bit tedious, but I find it quite relaxing :3
Good luck, anon!
3 notes
·
View notes
Note
if this isnt weird to ask, im wondering where u make ur banners for ur smaus? bc im thinking of making my own but im stuck at the banner part💔
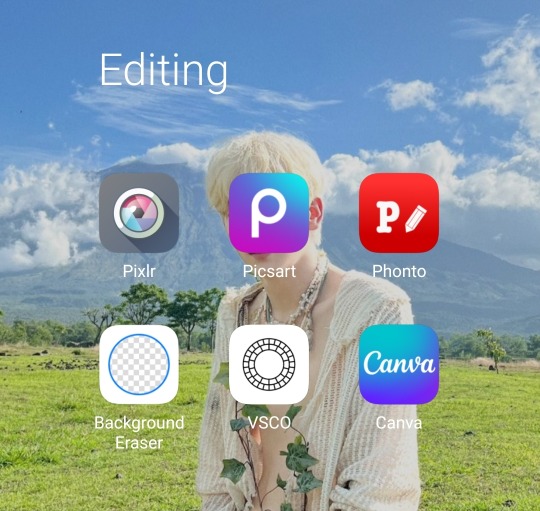
Hello! I use these apps to edit my banners and here's the reason why I use them on specific things:
Pixlr - I use it to crop the banners as I have a specific size that I follow and sometimes for color correction
Picsart - For extra designs like stickers but I rarely use it
Phonto - Where I add the text! You can find free fonts in DaFont, 1001 free font, and fontspace
Background eraser - Speaks for itself but I use this if I want to make a png or remove the background
VSCO - I only use this for filters and color correction as well
Canva - Same reason as Picsart but it has more variety for me mostly with the stickers
I hope that this helped you!! Good luck and have fun <3
3 notes
·
View notes
Text
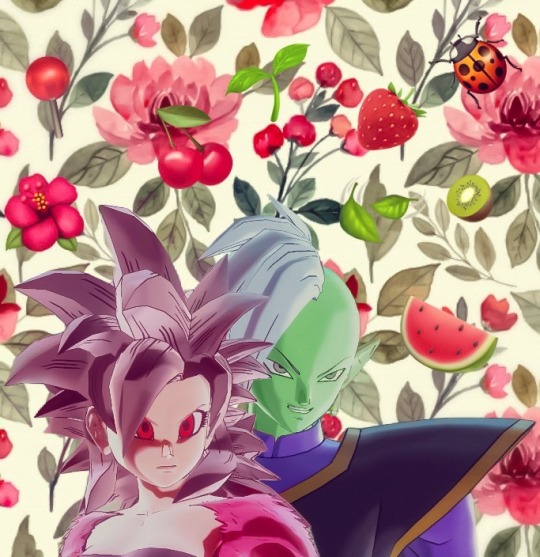
(Trying to do more with my photos. Took both of these separately in the Hyperbolic Time Chamber map and removed the backgrounds via an app. Rearranged the floral background and them in Sketchpad. Edited flattened image in Lightroom and decorated the emojis + filter on Pixlr. I don’t know how long this took me 😅. Found the background image on a free stock site)
Red squirrel and walking green bean.
4 notes
·
View notes
Text
Expert Tips for ECommerce Photo Editing: How to Enhance Your Product Images?

E-commerce businesses grow rapidly; however, a picture is worth a thousand words. Pictures of products greatly affect the buying decisions of consumers. Indeed, it has been reported that quality images can increase conversion rates by as much as forty percent. Without professional product imagery however, it does not matter what you love to sell, your e-commerce business will hardly survive.
Nevertheless, with high-quality editing services, simply taken photos can be transformed into alluring images that compel customers to purchase them. Therefore, this blog aims at providing the important tips for ecommerce photo editing which helps make one’s products easy to spot and appealing to customers. If you’re interested in starting a career as image or video editor for ecommerce stores, enrol at any good Online Image and Video Editing Course.
1. Start with High-Quality Photos
Prior to engaging in editing, it is crucial to check whether there are clear images at the foundation. No amount of editing, however professional it may be, can replace a low-quality photo, especially if it is out of focus.
Purchase a quality camera or get a smartphone with a decent resolution, and ensure to take photos within well-lit environments to avoid shadows and grain.
Best Practices:
Use ambient light or use diffused electric light to eliminate strong shadows. Photograph the entire product from all possible angles. Always use a tripod to avoid camera movements and ensure uniformity among the images.
2. Consistent Image Size and Dimensions
Uniformity in all product photos is necessary for achieving a seamless design in your e-commerce website. Customers love uniformity as it enhances their shopping experience. Oftentimes, varying image dimensions can look unprofessional and may take away the focus from the products in question.
Pro Advice:
Select a common width and height as well as the aspect ratio for all product pictures so that they fit in appropriately in the website grid. The most preferred formats in e-commerce are square (1:1) or rectangular shaped (4:3) images.
To know more about editing, enrol at the Best Image and Video Editing Institutes.
3. Background Removal and Simplification
A background that is tidy and devoid of distractions serves to better place emphasis to the product. In e-commerce in particular, the use of white background is common as it gives a professional touch to the images and guarantees that the images presented will be centred on the products.
Techniques for Background Editing:
Use Background Removal Tools: Photoshop, Clipping Magic, and Pixlr make backgrounds a snap to change and edit in just minutes.
Remove Extra Background: firstly Remove the Background, and then Use a feather or smoothing tool on the border of the product to make sure that the look is not too stark after the background has been cut.
4. Color Correction and White Balance
The images captured in your will images must reflect the accurate product colour. Distorted product colours caused by incorrect white balance, for instance, or poor lighting conditions may lead to disappointment and losses due to returns. Colour correction is hence vital to ensure that the product is well-enhanced but realistic.
How to Make the Colours Remembered Correctly?
Adjust White Balance: It may be necessary to use other programs such as Lightroom or Photoshop to change the white balance to an appropriate and more realistic one.
Increase Saturation and Vibrancy: The saturation or vibrance of the image can be increased to some level without altering the actual colour of the product and still make it visually bounce out.
Enrol at the Best Image and Video Editing Institutes, and learn ways to edit ecommerce products.
5. Use Retouching Sparingly
Retouching may enhance a product's image by eliminating dirt, scratches, or creases. Yet again, unrestrained retouching renders a product excessively artificial in a way that might irritate consumers if the product falls short of their perception in reality.
Retouching Instructions:
Take Out Distracting Factors: Get rid of any dust, unwarranted reflections, or small imperfections that could interfere with the focus on the item.
Do Not Edit More Than Necessary: Keep in mind what the product actually looks like. Excessive practice of smoothing tools or sharpening devices may create an artificial or too-shiny effect on the product.
6. Utilise Shadows and Reflections
Incorporating a light shadow or even a reflection towards the bottom of the product aids in creating a 3D visual illusion making the product become more believable. This easy and quick tip also helps separate the product from the background making it more appealing.
Shadows and Reflections Creation Tips
Drop Shadow Technique – Make use of the drop shadow option available in various editing tools to recreate realistic shadows that are soft and natural beneath the product.
Add Reflections – For example, if the product is made of glass or contains electronics, it is often helpful to include some reflection on the product.
7. Use Focus Stacking for Sharpness
With intricate items such as jewellery or electronics, one can employ Focus stacking technique to keep in focus every bit of the product. This method consists of taking a series of photographs of the same subject at different focus levels and combining them to come up with a sharp and detailed image.
Focus Stacking in Practice:
Capture the product at various levels of focus-points (i.e. Foreground/middle ground/ background) in about 5-7 angles.
Use image processing applications such as Photoshop or Helicon Focus to join the images so that there is sharpness in all the areas of the product in the picture.
Conclusion
Publishing marketing content or doing e-commerce business is a competitive field and thus it is important to engage in quality images for product promotion. If you spend some time mastering these professional image enhancing technologies such as, uniformity in image dimensions, cleaning of the background, colour enhancement, web adjustments made among many, you are likely to reap in more customers to your products and with it sales will increase.
However you should remember that where there is a need to improve editing skills, it is equally worth maintaining the attributes of the products so that the consumers will not be dissatisfied. Take your e-commerce photography to the next level by incorporating these editing strategies and see the effect your edited images have on the sales. To learn the editing skills, enrol at Best Image and Video Editing Institutes - Career Boss.
#Best Image and Video Editing Institutes#Best Image and Video Editing#Image Editing Institutes#Best Video Editing Institutes
0 notes
Text
7 AI-Powered Photo Editing Alternatives to Photoshop
AI-powered photo editors transform digital imagery by simplifying complex tasks, making sophisticated editing accessible to all.
In the world of digital imagery, capturing the perfect shot is only the beginning; it’s in the post-processing stage where true magic happens, transforming raw photos into stunning, share-worthy visuals. As demand for innovative editing solutions surges, AI-powered photo editors have emerged as essential tools, reshaping the creative process for professionals and casual users alike. From enhancing selfies to crafting high-impact visuals for marketing, AI photo editors are making a notable impact. Let’s explore some of the top AI photo editors redefining the art of image editing.
AI-enhanced photo editing has been quietly revolutionizing the industry for years, with tools like Adobe’s Content Aware Fill in 2010 and Neural Filters in 2020 offering a glimpse into how AI can elevate editing. These features have evolved into powerful tools that streamline complex tasks, from upscaling low-resolution images to replacing dull skies with vivid scenes, making sophisticated editing accessible and intuitive for users of all skill levels.
Adobe Photoshop, a leader in this space, continues to push boundaries with features like the Remove Tool and Generative Expand, which transform image manipulation into a seamless experience. Today’s AI editors leverage machine learning to deliver capabilities like automated subject selection, sky replacement, and mood optimization—simplifying tasks once reserved for seasoned experts. So, which photo edit tools truly stand out? Let’s explore the top contenders reshaping the photo editing landscape.
Pixlr
Pixlr’s AI-driven features are now concentrated within its Pixlr. The AI Cutout and Backdrop replace backgrounds in seconds, while face swap and object removal enhance versatility. Pixlr brings an imaginative touch to quick edits without compromising accuracy.

Evoto
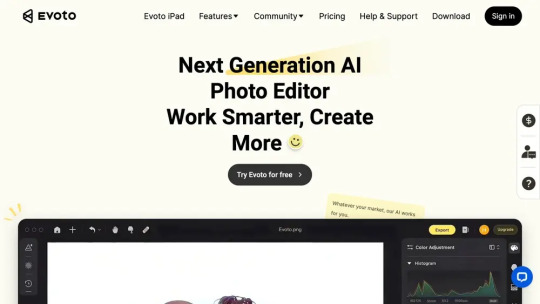
Tailored for both novices and seasoned photographers, Evoto offers potent AI capabilities to make portrait retouching seamless and establishes custom presets that effortlessly beautify images with a single click.
ACDSee
ACDSee merges AI power with user-friendliness in its Photo Studio Ultimate 2025. From RAW photo tweaks to enhanced image management, this software marries simplicity with effectivity, making AI editing both accessible and robust.

Luminar Neo
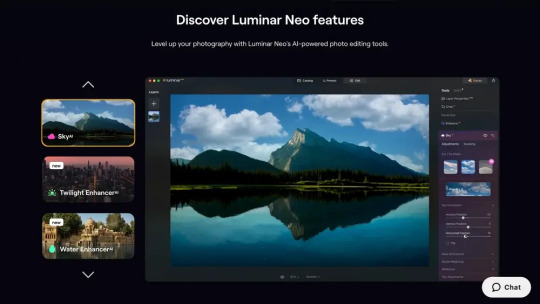
This cost-effective alternative stands out with AI-powered adjustments that enhance skies, erase distractions, and adaptively refine images. With deep integration of AI, it enriches images by enhancing tones, colors, and correcting sky imperfections.
Canva
While not a direct competitor to Photoshop, Canva shines in quick edits and social media graphics. It’s an AI-enhanced powerhouse with smart design tools like Magic Design, BG Remover and Magic Media, simplifying creative processes.

Lensa AI
Renowned for its Magic Avatar fun, Lensa AI also equips users with smartphone-based AI editing prowess. Its Magic AI tool is adept at finetuning portraits for those wanting glam or subtle tune-ups.

Capture One
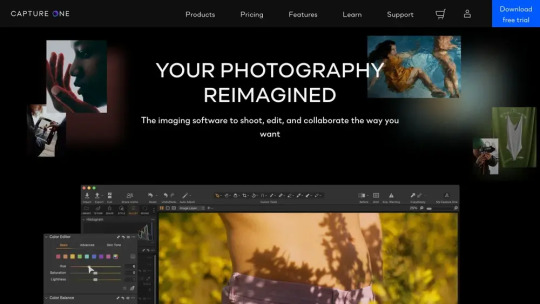
Capture One combines AI with superior image quality, emphasizing colors and collaboration. Its Smart Adjustments and AI-powered edits cut down editing time, making it a favorite among professionals seeking efficiency and image perfection.
Selecting a formidable AI photo editor involves considering the breadth of features, end-to-end ease, and ability to produce quality outputs – ensuring both casual users and professional photographers can make their images truly stand out. As technology continues to evolve, these tools will undoubtedly lead the charge in redefining visual creation.
For more blogs like this: thenextaitool.com/blog
0 notes
Text

To remove the background from an image, there are several methods you can use depending on the software or tools you have available. Here are some popular methods:
1. Using Online Tools
Remove.bg: A simple tool that automatically removes the background. Upload your image, and it will do the work for you.
PhotoScissors: Another easy-to-use online tool for background removal.
2. Using Photoshop
Open your image in Photoshop.
Select the "Quick Selection Tool" or "Magic Wand Tool" from the toolbar.
Click on the background and Photoshop will select the areas with similar colors.
Once selected, press Delete to remove the background.
Refine the selection using the "Select and Mask" option if needed.
Save the file as PNG for a transparent background.
3. Using GIMP (Free Alternative to Photoshop)
Open the image in GIMP.
Use the "Fuzzy Select Tool" or "Select by Color Tool" to select the background.
Press Delete to remove the selected area.
Export the file as PNG to preserve transparency.
4. Using Microsoft PowerPoint
Insert your image into PowerPoint.
Select the image and click "Remove Background" from the Format tab.
Adjust the selection area to include the object you want to keep.
Click Keep Changes to remove the background.
5. Using Mobile Apps
Background Eraser (Android & iOS): Allows manual and automatic background removal.
Pixlr (Android & iOS): Offers a variety of tools for background removal.
Tips:
For images with complex backgrounds, use more advanced tools like Photoshop or GIMP where you can manually refine the edges.
For simpler backgrounds, online tools and mobile apps can be quick and effective. see more details here https://everclipping.com/background-removal-services/
0 notes
Text
Best Online Image Background Editors: Effortlessly Remove or Change Backgrounds
In the world of digital content creation, the ability to edit or remove backgrounds from images is essential for producing professional visuals. Whether you're crafting stunning product photos, enhancing social media graphics, or simply fine-tuning personal images, an online image background editor can be your best tool. The good news? There are plenty of free and easy-to-use tools available online. Here’s everything you need to know about using Online Image Background Editor to transform your photos.
What is an Online Image Background Editor?
An online image background editor allows you to remove, change, or manipulate the background of an image directly from your web browser—without the need to download software. These tools are particularly useful for:
E-commerce sellers: To make products stand out by removing distracting backgrounds.
Social media creators: To create eye-catching posts with clean, professional images.
Designers and marketers: For creating marketing visuals, presentations, or promotional materials.
Personal use: Enhancing vacation photos, profile pictures, or creative projects.
Top Free Online Image Background Editors
Here’s a rundown of some of the best free online background editors available today:
Remove.bg
Remove.bg is one of the most popular and user-friendly background removal tools available online. With just a few clicks, this tool automatically detects the subject of your image and removes the background for you.
Features: Automatic background removal, transparent background download, ability to replace backgrounds with custom images or colors.
Best For: Quick and precise background removal for personal and commercial use.
Pros: Extremely fast, simple, and requires no technical skills.
Limitations: Free version limits image resolution; high-resolution downloads require a paid plan.
Canva
While Canva is widely known for its design features, it also has a robust background removal tool available for its Pro users. However, even in the free version, Canva offers easy-to-use tools for changing or adding backgrounds.
Features: Background removal tool (Pro), background color replacement, image overlays, and access to design templates.
Best For: Social media creators and marketers who want to add customized backgrounds to their images.
Pros: Beginner-friendly interface, access to various design elements, and drag-and-drop functionality.
Limitations: Background removal is only available with a paid Canva Pro subscription.
Pixlr
Pixlr is a versatile online photo editor offering both basic and advanced tools for image editing. Pixlr X is designed for beginners, while Pixlr E provides more advanced editing options, including background removal.
Features: Manual background removal with lasso and magic wand tools, automatic AI-powered background removal (Pixlr X), layer-based editing (Pixlr E).
Best For: Users who need both simple and detailed background editing options.
Pros: Offers a range of editing tools in both Pixlr X and E, free to use with access to advanced features.
Limitations: The free version includes ads, and more advanced background removal tools are found in Pixlr E, which can be complex for beginners.
Fotor
Fotor is an easy-to-use online photo editor that also offers background removal capabilities. It’s great for users who want a simple interface without too many complicated tools.
Features: Background removal, color replacement, preset filters, and easy editing options.
Best For: Quick edits for social media, personal use, and simple product photography.
Pros: Clean and intuitive interface, great for beginners.
Limitations: More advanced background editing features are part of Fotor’s premium plan.
PhotoScissors
PhotoScissors is another highly effective online background remover, designed for users who want a straightforward tool. With this editor, you can remove backgrounds automatically or manually fine-tune the edges for better precision.
Features: Automatic background removal, manual touch-up options, ability to replace backgrounds with solid colors or images.
Best For: Users who want a simple background removal tool without complex editing features.
Pros: No need for sign-up, fast results, easy manual adjustments.
Limitations: Limited functionality beyond background removal, and high-resolution exports require a paid plan.
Adobe Express
Formerly known as Adobe Spark, Adobe Express offers a wide range of design features, including an intuitive background removal tool. It’s ideal for content creators and marketers who want to edit backgrounds while also designing professional visuals.
Features: Background removal, drag-and-drop editing, access to design templates, and text overlays.
Best For: Marketers and content creators who want to combine image editing with design elements.
Pros: Simple to use, integrates with other Adobe tools, and offers free templates.
Limitations: Full background removal is part of the paid Adobe Express plan.
How to Choose the Best Online Image Background Editor
Choosing the right background editor depends on several factors:
Skill Level: If you’re a beginner or just need quick background removal, tools like Remove.bg or PhotoScissors are perfect. If you’re more experienced and need additional design features, Canva or Pixlr might be a better fit.
Editing Needs: For simple background removal, Fotor or Remove.bg can handle most tasks. However, if you need more advanced editing options like layer adjustments, go for Pixlr E or PhotoScissors.
Image Quality: Some free tools limit the resolution of edited images. If high-quality exports are important to you, look for editors like Pixlr or consider paid plans for high-res downloads in tools like Remove.bg.
Design Integration: If you plan on doing more than just removing backgrounds, tools like Canva or Adobe Express offer additional design features that make them great all-in-one platforms.
Tips for Effective Background Editing
Choose High-Contrast Images: Automatic background removers work best when there is a clear distinction between the subject and background.
Zoom In for Precision: If you’re manually editing a background, zooming in helps you clean up the edges and achieve a professional look.
Experiment with New Backgrounds: After removing a background, try replacing it with different colors or scenic images to see how it transforms your photo.
Final Thoughts
Online Image Background Remover editors offer a simple and accessible way to improve your visuals, whether for professional or personal use. With plenty of free options available, you can easily remove or change backgrounds without needing expensive software or technical skills. Whether you’re crafting marketing content, creating social media posts, or refining product images, the tools above will help you achieve impressive results.
0 notes
Note
hi! 👋 how do u make ur banners? They’re super crisp & good quality panels and cute!
thank you anon!!! 🥺🥺 i’m currently in the process of changing my banners bc they’re . very low effort and turn out a bit grainy sometimes 💀 but i’m glad you like them!! i usually find the panels on pinterest (just search ”gojo manga icon” and etc!!), turn them transparent (canva’s background remover works pretty well but you can also do it manually with pixlr!!).. after that i just pick a colour and overlay with the character!! it usually doesn’t take much time :33
0 notes
Text
ok im kinda desperate for a way to speed up this process, so im wondering if anyone knows a program (free please) or website where one can export an image with text on it, with a transparent background. pixlr and photopea dont work because shrinking the text causes anti-aliasing (which i cant use for my blinkies). photoshop and mspaint both pixelate shrunken text like i want, but photoshop takes up WAAYYY too much space considering i would ONLY use it for generating text, and mspaint (what im using rn) cant save transparent so i have to manually remove the white background. please someone help im desperate
0 notes
Note
how do you guys make the userboxes???? :3 it's okay if you don't wanna tell I just wanna get into making userboxes

Well there's a few ways you can. Any photo editing or art program should offer shape tools and text layers. If you make the canvas transparent and rectangular you can fit your custom shapes into place in the style of a userbox
The one we have is just a blank one we found online and there are plenty available to use.
We run this blog on our phone so we use the art app we have, Ibspaintx. To change the colours we colour picked and changed the colour we were going to use on the colour wheel before using the pain bucket tool and smoothing the colour out with a brush. Some programs allow you to colour shift a layer with different tools, tho that's just Photoshop programs.
We either make transparents for a corner image by using an online free background remover or use existing ones we find and just perspective move tool it into place.
It's easier for us just to use the existing image we have on Ibspaintx, changing the text and image only so we don't have to remake boxes or make whole new ones and take extra time altering the text to match and still be readable
Some other programs I can suggest are photopea, I think canva? And pixlr.e, photopea and Pixlr are free and have some great tools
0 notes
Text
Exploring the Best AI Image Processing Tools for 2024

The Rise of AI Image Processing
In the rapidly evolving world of artificial intelligence, image processing has become a cornerstone for various applications ranging from art creation to detailed image enhancements. With AI technology, users can transform their photos in ways that were previously unimaginable. This article explores some of the top AI image processing tools available in 2024, offering a comprehensive look at their capabilities and features.
Top AI Image Processing
DeepAI
Overview: DeepAI offers a suite of AI tools, including style transfer, super-resolution, and image colorization. These tools leverage deep learning to provide high-quality results that are accessible to both novice and expert users.
Features: Real-time processing, intuitive interface, diverse application range.
Learn More: DeepAI.
2. OptiGlow at AIConvert
Overview: AIConvert offers a comprehensive set of free tools for AI image processing, including art generators, photo editing, and more. It stands out for its accessibility and the wide range of functionalities it provides without any subscriptions.
Features: Free access, no sign-ups, diverse toolset.
Explore More: OptiGlow.
3. Pixlr
Overview: Pixlr is a versatile online photo editor that provides AI-powered features such as automatic background removal and advanced photo effects. It is user-friendly and suitable for both casual users and professionals.
Features: AI background remover, extensive photo effects, easy-to-use interface.
Learn More: Pixlr.
4. Fotor
Overview: Fotor offers a comprehensive photo editing suite with AI capabilities including photo enhancement, beauty retouching, and HDR effects. It is well-regarded for its powerful editing features and accessibility.
Features: AI photo enhancement, beauty retouch, HDR effects.
Learn More: Fotor.
Benefits of AI Image Processing
Enhanced Creativity: AI tools open up new creative possibilities by allowing users to experiment with different styles and effects effortlessly.
Time Efficiency: Automated processes significantly reduce the time required for tasks such as photo editing and image enhancement.
Accessibility: Many AI tools are designed to be user-friendly, making advanced image processing techniques accessible to a broader audience.
Conclusion
AI image processing tools have revolutionized the way we interact with and manipulate images. Whether you're a professional looking to enhance your workflow or an enthusiast exploring new creative avenues, these tools offer powerful capabilities that can help you achieve your goals. By staying updated with the latest tools and technologies, you can harness the full potential of AI in your projects.
0 notes
Text
Amazon Product Photo Editing: A Comprehensive Guide

In the competitive world of e-commerce, high-quality product images are crucial for attracting customers and driving sales. On platforms like Amazon, where countless products vie for attention, the quality of your product photos can significantly impact your success. This guide will walk you through the essential aspects of Amazon product photo editing to ensure your listings stand out and comply with Amazon's stringent image requirements.
Why Photo Editing Matters
First Impressions: High-quality images create a positive first impression, establishing trust and encouraging potential buyers to click on your product.
Increased Conversions: Clear, detailed images help customers understand what they are purchasing, leading to higher conversion rates.
Reduced Returns: Accurate, well-edited images reduce the likelihood of returns due to mismatched expectations.
Amazon's Image Requirements
Before diving into editing techniques, it's important to understand Amazon's image guidelines:
Main Image: The main image must have a pure white background (RGB 255,255,255), fill 85% of the frame, and show only the product being sold.
Image Quality: Images should be at least 1000 pixels on the longest side and 500 pixels on the shortest side to enable the zoom function.
Format: Acceptable formats include JPEG (.jpg), TIFF (.tif), PNG (.png), and GIF (.gif).
Key Editing Techniques
Background Removal:
Use tools like Adobe Photoshop or online editors like Remove.bg to isolate the product and replace the background with pure white. This ensures compliance with Amazon's main image requirements.
For secondary images, consider using a consistent, clean background to maintain a professional look.
Color Correction:
Adjust the brightness, contrast, and saturation to make the product appear more vibrant and true to life.
Use the color balance tool to ensure the colors are accurate and represent the product correctly.
Shadow and Reflection:
Add subtle shadows or reflections to give the product a more natural, three-dimensional look.
Use soft shadows to avoid distracting from the product itself.
Cropping and Alignment:
Crop the image to ensure the product fills 85% of the frame without cutting off any important parts.
Align the product centrally to create a balanced and aesthetically pleasing image.
Retouching and Cleaning:
Remove any dust, scratches, or imperfections using the clone stamp or healing brush tools.
Ensure the product looks as clean and polished as possible.
Consistency Across Images:
Maintain a consistent style across all images in the listing. This includes lighting, color tones, and angles.
Consistency helps create a cohesive and professional brand image.
Tools for Amazon Photo Editing
Adobe Photoshop: The industry standard for photo editing, offering advanced tools for background removal, color correction, and retouching.
Lightroom: Ideal for batch processing and color correction, ensuring consistency across multiple images.
GIMP: A free alternative to Photoshop with powerful editing capabilities.
Online Editors: Tools like Canva, Pixlr, and Fotor offer user-friendly interfaces for basic editing needs.
Final Tips
High-Resolution Images: Always start with high-resolution images to maintain quality during editing.
Compliance Check: Regularly review Amazon's image guidelines to ensure compliance and avoid potential issues.
A/B Testing: Test different images to see which ones perform best in terms of click-through rates and conversions.
In conclusion, investing time and effort into editing your Amazon product photos can significantly enhance your product listings. By following the best practices outlined in this guide, you'll create compelling, high-quality images that attract more customers and drive higher sales.
0 notes
Text
Step-by-Step Tutorial: Creating Stunning Visuals with Image Editing
In today’s digital age, visuals are everything. Whether you’re a social media influencer, a small business owner, or a digital marketer, captivating images are essential for grabbing attention and making a lasting impression.
However, not every photo you capture is going to be perfect straight out of the camera. That’s where image editing comes in, and one of the most powerful tools in your arsenal is photo background removal.
In this step-by-step tutorial, we’ll guide you through the process of creating stunning visuals with image editing.
1. Select the Right Tool:
Before diving into the editing process, it’s crucial to choose the right tool for the job. While there are many software options available, Adobe Photoshop and Adobe Lightroom are among the most popular choices for professionals and amateurs alike. If you prefer a more user-friendly interface, online tools like Canva and Pixlr offer excellent alternatives.
2. Prepare Your Image:
Once you’ve selected your tool, it’s time to prepare your image for editing. Start by opening the photo you want to work on and assessing its composition. If the subject is clear and well-defined, proceed to the next step. However, if the background is cluttered or distracting, consider using the photo background removal tool to isolate the subject.
3. Use Photo Background Removal:
Now comes the fun part – removing the background from your image. In Photoshop, you can use the Magic Wand tool or the Pen tool to select and delete the background manually. Alternatively, newer versions of Photoshop offer the Select Subject and Remove Background features, which use artificial intelligence to automatically detect and remove the background.
4. Refine and Fine-Tune:
Once you’ve removed the background, take a closer look at your image and make any necessary refinements. Pay attention to details like edges and shadows, ensuring that your subject seamlessly blends into its new background. Use tools like the Eraser tool or the Refine Edge feature to fine-tune your selection and achieve professional-looking results.
5. Add a New Background:
With the background removed and your subject refined, it’s time to add a new background to your image. Whether you opt for a solid color, a gradient, or a dynamic scene, choose a background that enhances the overall composition and reinforces the message you want to convey.
6. Experiment and Have Fun:
Finally, don’t be afraid to experiment with different editing techniques and effects. Try adjusting the brightness, contrast, and saturation levels to enhance the visual appeal of your image further. Add filters, overlays, and text to personalize your creation and make it stand out from the crowd.
In conclusion, photo background removal is a powerful tool for creating stunning visuals that captivate and engage your audience. By following this step-by-step tutorial, you can harness the power of image editing to transform ordinary photos into extraordinary works of art. So why wait? Give it a try today and see the difference it can make for your online presence!
Read more: Reasons for using background removal service in Business
24 Hidden Photoshop Tricks:
youtube
1 note
·
View note