#and then you'll also build a really sticky place behavior over time
Explore tagged Tumblr posts
Visit Tumblr Blog
Explore Tumblr blogs with no restrictions, modern design and the best experience.
Last Seen Tumblr Blogs


Fun Fact
Women make up for the other 50% of Tumblr’s audience.
Text
Custom Bins with CaDoodle
This tutorial assumes a basic familiarity with Zack Freedman's Gridfinity system and no familiarity with CAD software. Here's what you'll need:
Inkscape is a Free And Open Source vector illustration program. Vectors aren't really images themselves so much as a running list of defined points and lines on a coordinate plane that a computer can then display as an image. Because these are simply points on a plane, digital vector images can scale infinitely. These points also map to physical
CaDoodle is a Free And Open Source CAD program loosely based on Autodesk's tinkerCAD. Using boolean operations, you can build out basic shapes. CaDoodle can also use OpenSCAD plugins, and has the Gridfinity plugin available to use out of the box.
Start by tracing the objects you want in the orientation you want onto a piece of paper, keeping your pencil as straight as possible (I've used a pen for this entire process so that you can actually see it, but you really should use a pencil). If you have a flat bed scanner, simply put your object on the scanner. This will give you a far more accurate shape to work with and skip the scaling process.
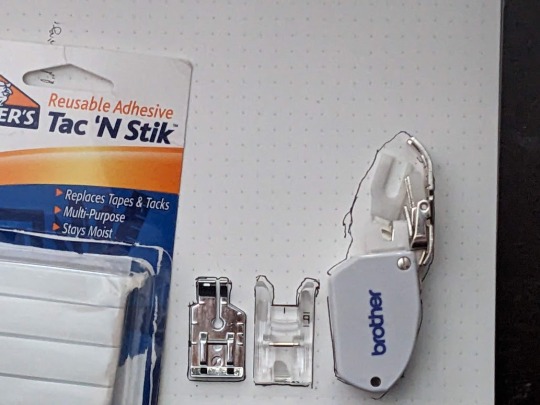
You may find that a little sticky tack to hold each object in place will help. For the two smaller presser feet, I've tried to get as close as possible to the edges. The walking foot, however, has a moving arm that feels so delicate and I don't want to mess it up so I just got the general shape.

I also marked the hole in the center of the small foot on the far left, and I marked where that arm sits on the presser foot. I then removed the feet from the paper and went over the messier lines, refining them a bit into something neater. After that, I held my phone as level as I could and photographed the tracings. The dots on my paper are 5mm apart, so I can use that to scale the photo later.

I also made sure to take a BUNCH of reference photos with calipers for every object.
Next, it's time to load up Inkscape. I paste my photo of my traced lines into inkscape and use the Measure tool (M) to check on those dots

They're about 15mm apart, so the photo needs to be shrunk to 33.33% of its original size to get them down to 5mm apart. Use the Selection tool (S) and click on the photo. Then, at the top of the screen, you'll have some controls for altering the size of this object.

Changing the units from "mm" to "%" will have you working in percentages. Making sure the padlock icon between the W and the H numbers is closed will ensure that the whole picture scales evenly at the same time. Then enter 33.33%, and press enter. After this, I'm able to check the distance between dots both horizontally and vertically at all four corners of the image and confirm that it's scaled properly. If you used a flatbed scanner, you'll be able to skip this step. Next, select the Pen tool (B) on your keyboard and begin tracing one object.

Click on corners to pivot. Cut off rounded edges with a straight line, as we're going to go back and curve them after the shape is closed. Once you're done, you can select the Node tool (N) to refine the shape. Dragging individual nodes moves them, while clicking and dragging on lines will cause them to curve.
After your tracing looks the way you want it, go to Edit>Preferences>Behavior>Steps and change the "Inset/Outset by" setting to 0.5mm:

Close this window and select your shape. Then, go Path>Outset. This expands the entire path by half a millimeter so your object has some wiggle room. This step is optional, of course, and some people prefer the aesthetic look of a perfect fit, but for your first bins this will increase the chances of your finished product being usable.

At this point you can continue tracing other shapes on the same document if you wish. MAKE SURE YOU SAVE your file as an .SVG as you go.
Next, open CaDoodle. At this point I recommend that you create a fresh CaDoodle document by clicking on the CaDoodle logo in the upper left corner and selecting "New Doodle." Next, click the "Import" button in the upper right corner and select your .svg file that you made in Inkscape. CaDoodle will then load up all your shapes for you, each of which can be moved around independently. They'll even keep whatever colors you were using in Inkscape!

The objects we're working with represent holes. You don't want the recess your object sits in to encompass it completely, because you won't be able to get it out again easily. Set each object's thickness to match the thickness of the object you're storing, minus about 5 to 10 millimeters, by clicking on the height node at the center of the object and either dragging, or manually entering a number.

Then, generate a Gridfinity bin. In the right-hand pane, choose "OpenSCAD_Plugins" from the drop-down, and click on the Gridfinity bin to drop one into your document. A default bin will then generate.

You have tons of options here but we're just going to use the default bin for simplicity-- 42x42x42mm, with no dividers.
Next, select your shape. Right now this shape is a solid that will be printed as-is, and that's useless to us. Click on the "hole" property to turn it into a negative we can cut out of the bin.

Next, either press C on the keyboard or click the magnet icon in the upper right to activate Cruise. This will let you place your shape directly on top of the surface of the bin.
Next, select the black cone icon above the Z axis node. This value should be equal to the height of your gridfinity bin (so 42mm for 6 z-axis units, or in my case 14mm for 2 z-axis units).

Subtract the thickness of your object from this number to sink it into the bin. Mine was 5mm thick, so I want this value to be 37

Finally, with your object still selected, hold down shift and click on the bin. Then, click on the "GROUP" button in the upper right corner, or simply press "G" on the keyboard.

And that's it. This bin is ready to export as an .stl

You can also use the basic shapes in CaDoodle to add finger holes or create recesses for less specific objects. For example, a short cylinder on its side is all I need for a spool of thread, and will serve my purposes better than a custom shape.
0 notes