#Might buy a 3d printer if I'm good at it
Explore tagged Tumblr posts
Text
I started taking a 3D printing class and I will "not" be taken advantage of it for fursuiting.
4 notes
·
View notes
Text
I had a message the other day asking (among other things) what kind of tools and equipment I use in making books, and as it's something I like to go into detail on, I realized I couldn't fit everything I had to say in a message so it's getting its own post. With photos!
Disclaimer that I'm not a professional bookbinder, I'm entirely self-taught and probably have habits and practices that would drive a pro nuts. I'm no authority, but these are the things that have worked for me, and maybe you can adapt them to work for you too.
This post will not cover: storage options, materials like board and glue, or equipment specific to one narrower aspect of the hobby like embossing or gilding. It is also not a tutorial on how to make a book, though I am covering things in more-or-less the order I use them in during the book-making process.
This post will cover: What I've found useful, what I've regretted buying, and some things you can co-opt from other, more common hobbies. A lot of it you may already have in your house. Some of it is for beginners, some is nicer equipment you might want as you get further into making books. They are not separated, it's just a list and some description.
Keep reading below the cut; this is gonna be a very long one and there are a lot of photos of everything.
If you want to make books you will need access to a printer. I'm not going to go into detail on this part and I didn't take a photo of my HP (not the best brand, but that's a long discussion in and of itself). Once you've got your pages printed and it's time to fold it into signatures, it helps to have a folding tool like these:
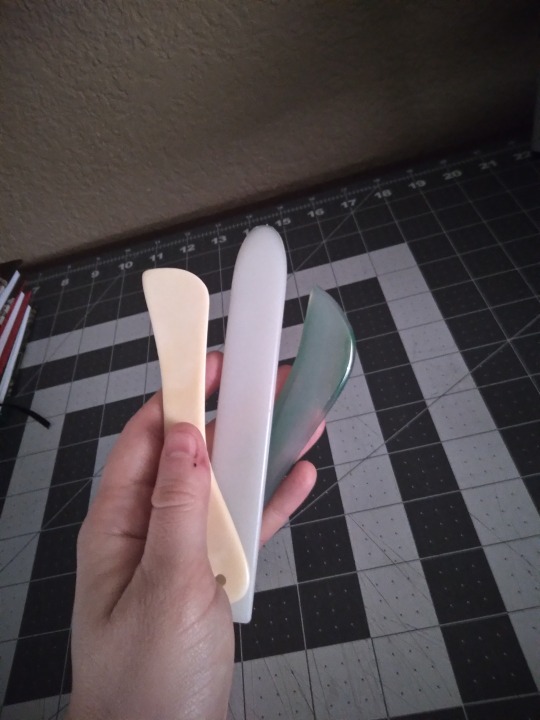
Folding tools can be anything as long as they're smooth and flat. The one on the left here is an actual bone folder from an art supply shop, but the center one is a plastic leatherworking tool that I got at Hobby Lobby, and the one on the right is an agate burnisher that I got from Amazon. None of these cost more than $10, and you can also use the edge of a pen (as long as it has no rubber grip or cap/clip) or the back of a spoon. Or your fingers, but the tools make it faster and the folds are more precise. I once worked a job where I had to fold maps, and all my coworkers were wondering how I did them so much faster and why mine were flatter than everyone else's, and it was because I'd grabbed a sharpie and started using the back end like a bone folder.
Once it's folded, you'll need to poke holes for sewing. I use one of these:
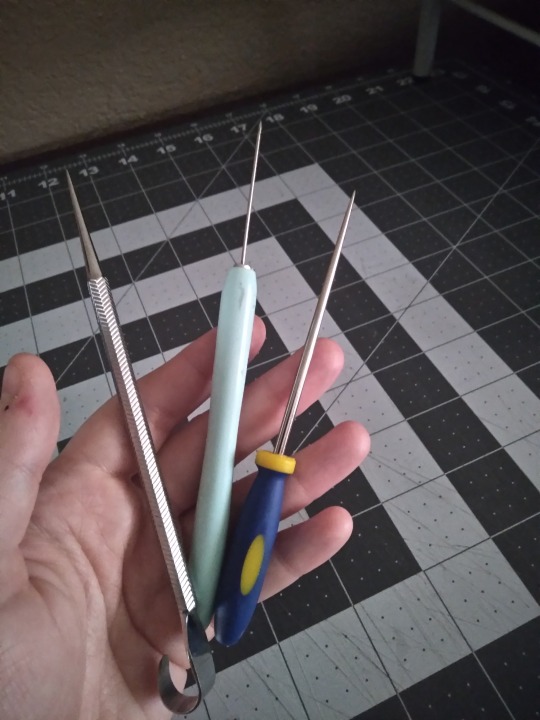
Left is, again, an actual bookbinding awl from an art supply store, while the center one is a paper quilling tool and the right one is a beadwork awl, both of which came from a big chain craft store. The bead one is my favorite; it's a good size and very stable. The quilling thing has too long and thin of a blade and it's wobbly, and I don't like the tapering on the bookbinding awl. It tends to make the holes in the middle page too big, and the outer ones too small. Again, these were cheap, about $10 each, but you can also use a sewing needle stuck in a cork, or a thumbtack or pushpin. If it's pointy and rigid, it'll work.

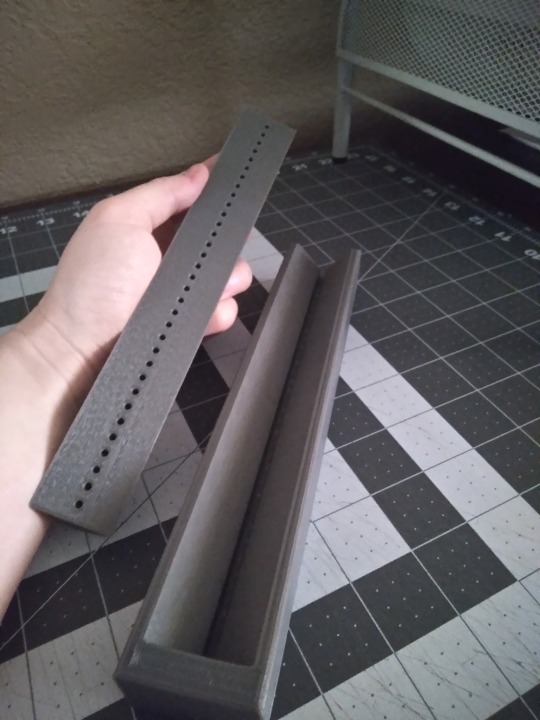
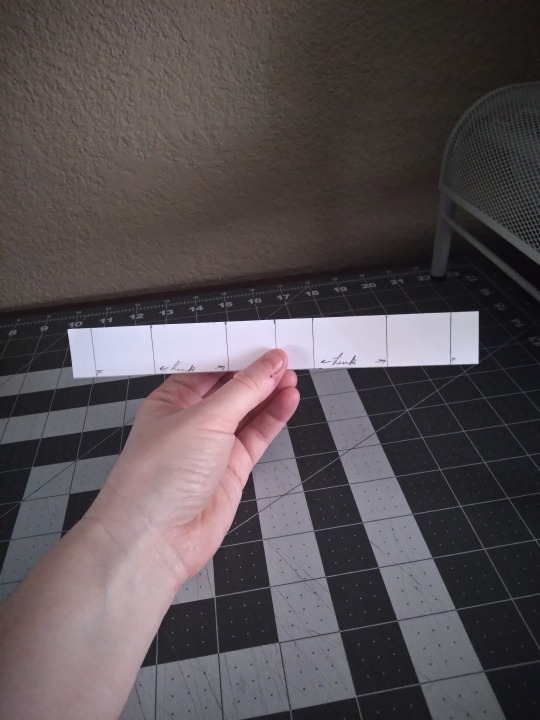
This isn't a requirement by any means, but I've found I like having a punching cradle for the hole-poking step. I got this 3d printed one from a fellow bookbinder, who was designing their own and made this one as a prototype. There are a lot of tutorials on how to make a punching cradle, or you can buy them online from several different vendors. They don's all look like this, and you can make them from wood or cardboard (though those don't usually have guide holes). If you're just starting out or this doesn't appeal, you can just use a paper template like the one on the far right. The cradle helps get the holes lined up and evenly spaced, and I've never liked this step so anything that makes it faster and less fussy is a win. If you use this kind, check that your hole-poking tool fits in the guide holes--the binding awl pictured above doesn't, but the other two do.
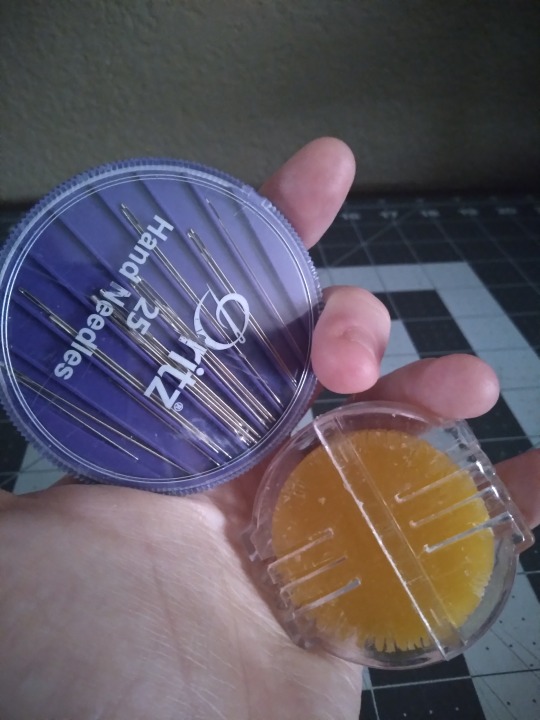
We've made holes, so let's stitch them up. These are just regular sewing needles and beeswax, to make your thread less prone to tangling. You can get both of them in any store that has a sewing department. There are dedicated bookbinding needles, like curved needles, and some binders like them, but I've never gotten the hang of the curved ones and they aren't necessary, especially when you're just starting out. If it fits through the holes you made, it will work.
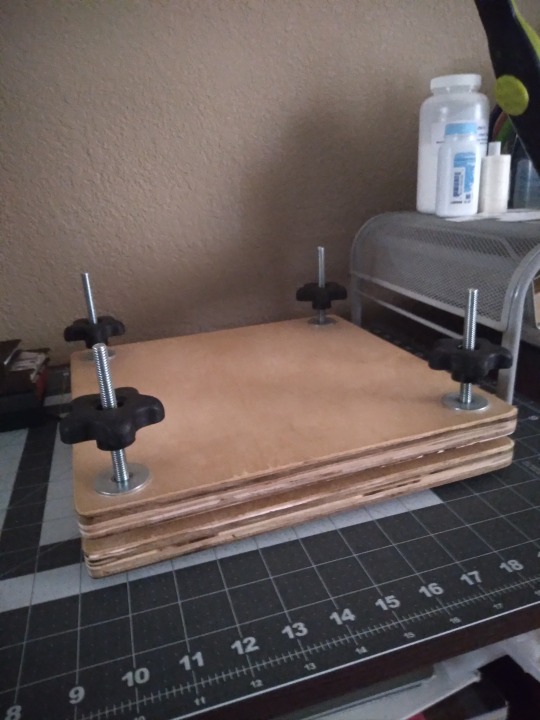
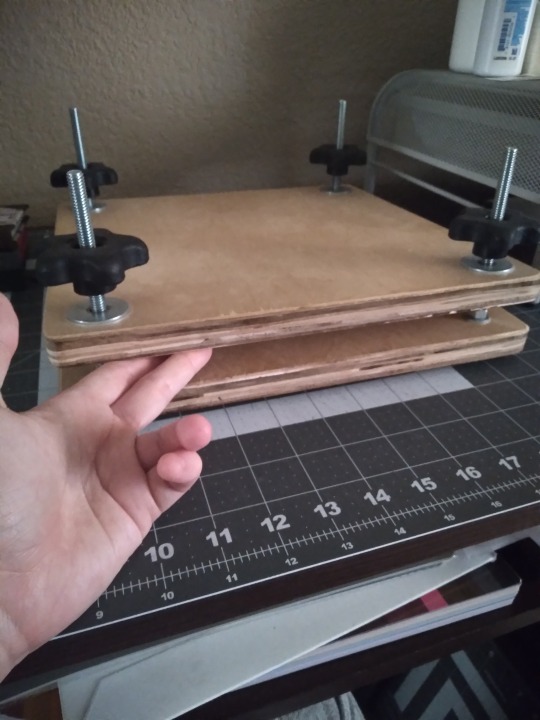
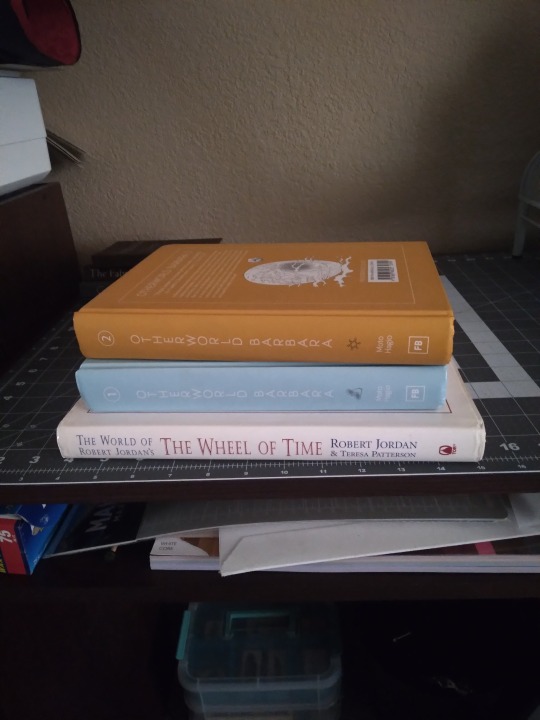
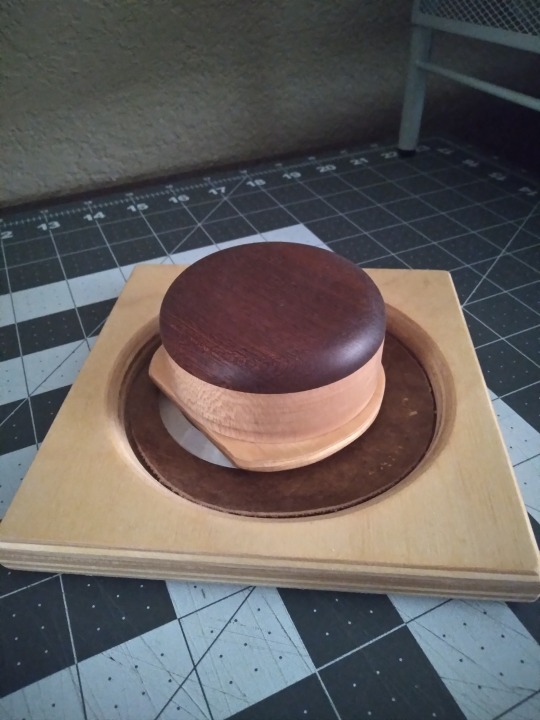
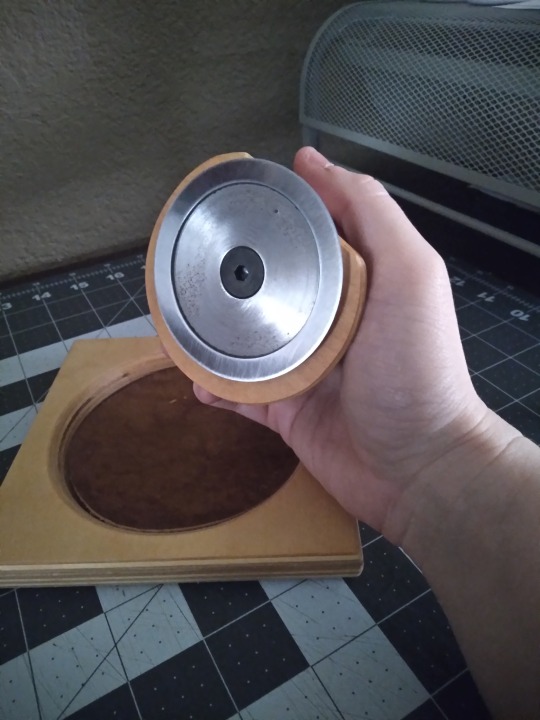
Once it's sewn, you probably want to squish your new text block so it's flat. I've got a laying press that I bought a couple of years ago when I was first getting started. It was marketed as a book and flower press, and it's honestly not the best. I would probably not have bought it if I had known that it wasn't essential to the process, and I mainly use it now when I'm squishing a text block and still want to use my work space, because once it's tight I can move it somewhere else. You can really use almost anything for squishing as long as it's heavy and flat and rigid on one side, like the stack of books in the right-hand photo. Textbooks, encyclopedias, art and photo books, and comic book omnibuses are all great. I've seen people use all kinds of things, like paper-wrapped bricks and doorstops, and there are tutorials out there to make your own press out of cutting boards if you do want one.
If you like your books to have smooth, flat page edges you're going to have to trim them. This is a book plow from Affordable Binding Equipment, and it was the first piece of actual expensive equipment that I bought. Not all plows look like this; I think the design is unique to ABE, but I've never used the traditional kind. In the interest of full disclosure, you can also trim edges with a sharpened chisel, which is much cheaper and can be bought at any hardware store, and some binders love this method. I do not love this method and have had zero regrets about caving and getting the plow. Very easy to use but does require some grip strength. Not pictured: the setup for sharpening the blade, which isn't hard but requires a bit of space and a small sheet of plate glass that you have to source yourself. Even with that, I still prefer it to the chisel. That said, this is not an essential step and you can leave your books with a "sawtooth" or deckled edge. Most of my early books have them, and some people just like them better than the flat ones and never learn to trim them. As another side note, some tutorials will say that you can trim your edges flat with a knife. You can't. Maybe on a pamphlet you can, but if it's more than 10 or 20 pages you just can't. It will look terrible.
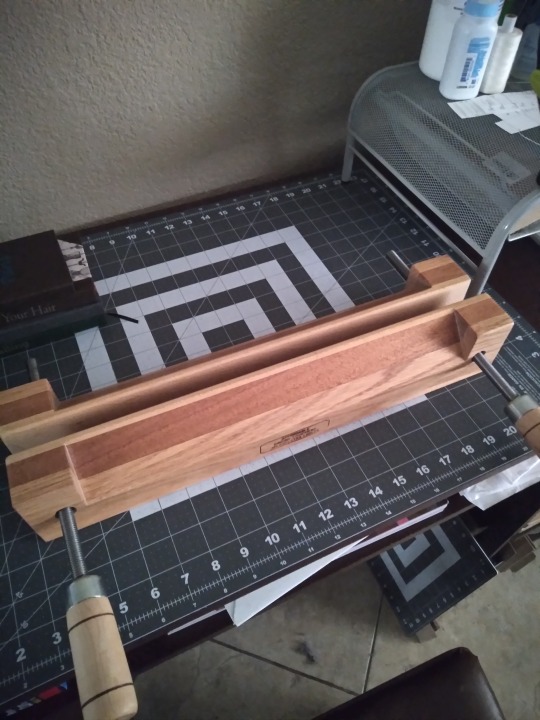
If you're going to use a plow, you've got to have the right kind of press. The one I talked about further up the thread is the wrong kind (full disclosure: I did use it with that press turned on its side, before I bought this one. But it's harder, more time-consuming, less comfortable, and less safe. Don't be like me). So here's a photo of my finishing press (also from Affordable Binding Equipment). I bought it so I could make backed books, but I use it for trimming too. The top part here has a narrow tapered section for backing, but if you flip it over it's totally flat, which is what you need for trimming. Not pictured: the stand that it came with for backing, or the c-clamps that I use to attach it to the desk for trimming. Again, though--this isn't a requirement for bookbinding. This is a later stage that's entirely optional. On the subject of backing, though:
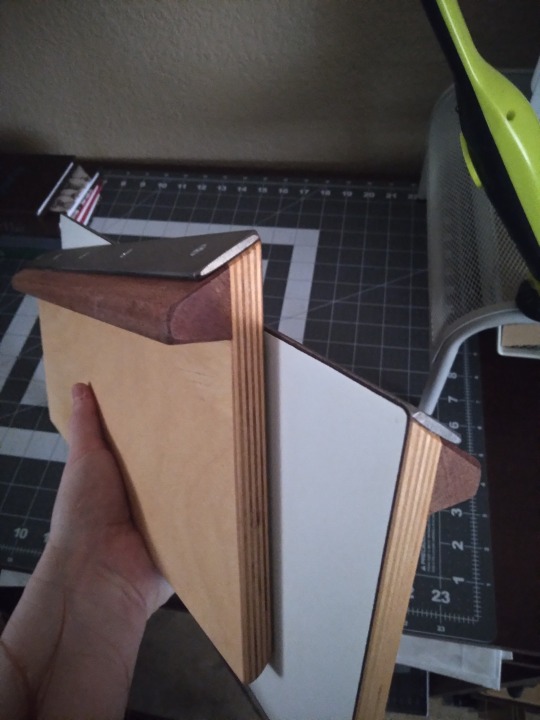
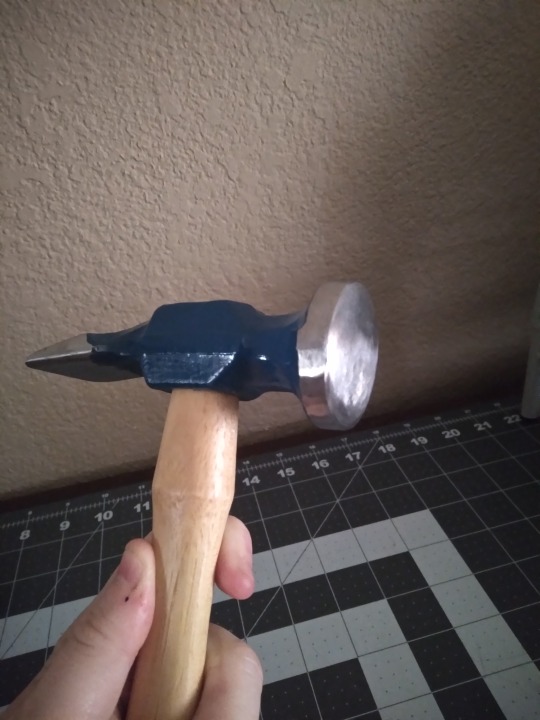
You don't need special equipment to round the spines of your books, but you do for backing. Left image is the set of backing boards I got from, once again, Affordable Binding Equipment, and on the right is a backing hammer from Hollander's. Neither of these are essential. Even if you get the boards (which have to be used in a press with a tapered edge, like the one directly above) you can actually use a regular hammer as long as the front part has no scratches or gouges. This one is a backing hammer, the primary difference being that it has a wider, convex head than a regular household hammer, to make the kind of glancing blows needed for backing a little easier. Honestly, I'm still learning how to use these and I'm not very good with them yet. Comes of being self-taught, probably. I don't think youtube is the best vehicle for learning this part, but it's what I have and I'm making do. Not every book is going to benefit from backing, either; it's primarily for helping mitigate spine swell.
Okay, time for my favorite repurposed equipment hack.
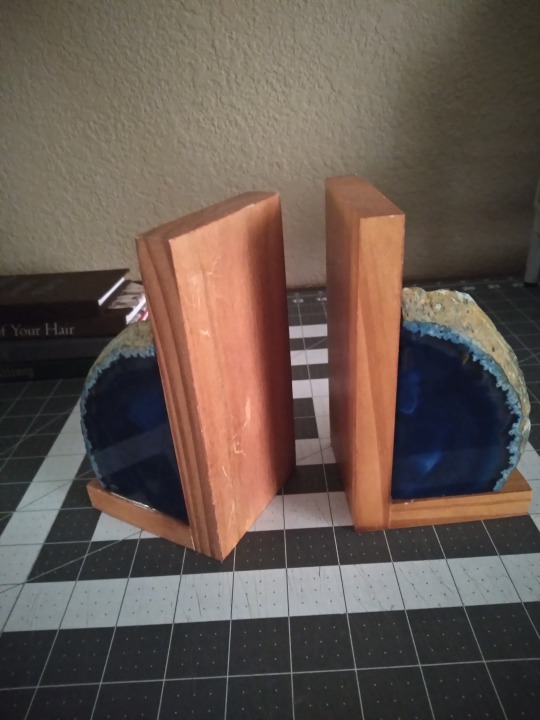
It's bookends. Regular bookends that I've had for ages and that probably came from Ross or some other place that doesn't even sell craft supplies.
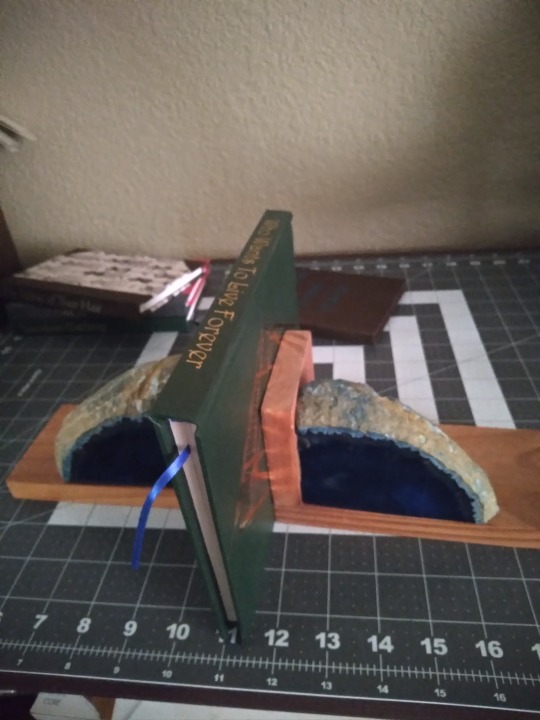
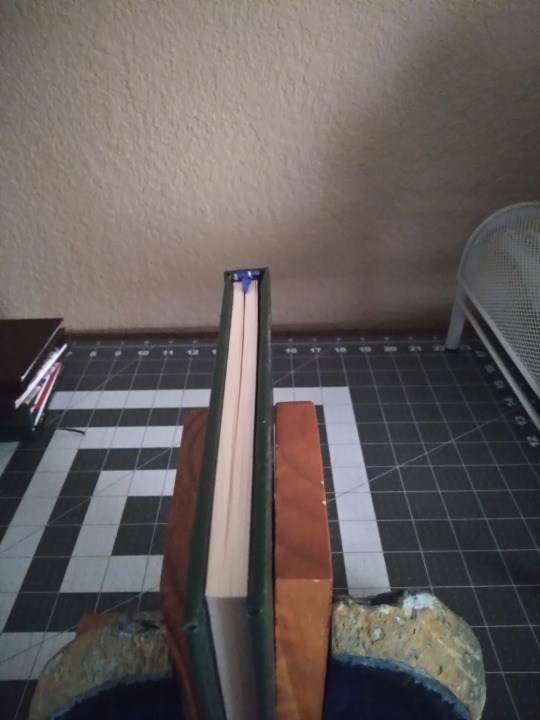
Want to keep the text block upright while you glue it? Bookends. Want to sew some custom end bands but your text block keeps falling over? Bookends. They won't provide pressure for squishing, but if you just need to hold something upright while you work on it, bookends are the answer. They hold up books, it's right there in the name. Having said that, you want some with a little weight to them, like these agate slices, so they won't slide around. And you want something with a smooth finished edge like these, so they won't scratch up your text block or leave dents. I have other sets but these are the only ones I use for this purpose, and they're better for it than anything else I've got.
Moving on from making the text block, let's look at what I use to make covers.
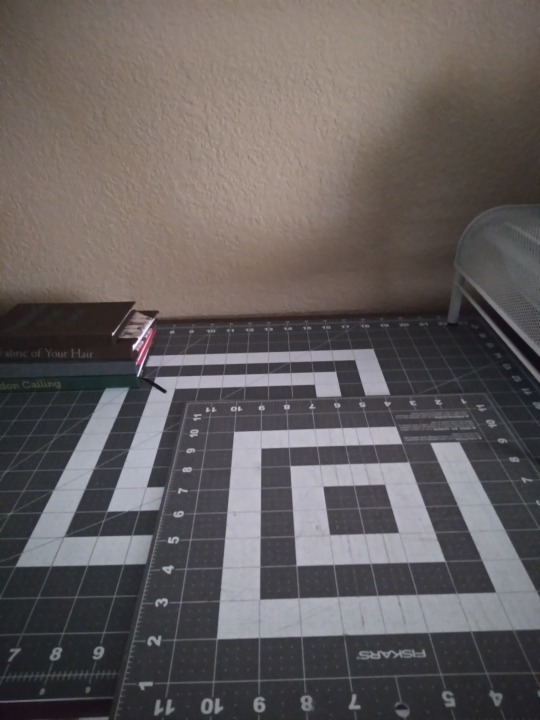
It's appeared in the background of most of the other photos, but here's a photo of just the desk surface covered in cutting mats. I really recommend a mat to protect the surface of your furniture and keep your knives from going immediately dull. I've got a big one that covers almost the full surface, and a small one for when I want to be more mobile. I started with just the small one and it was good until I started working with larger sheets of paper. The big one was bought largely for convenience but I have no regrets about it. They're self-healing, non-slip, and you can get them in the sewing section of any big craft store.
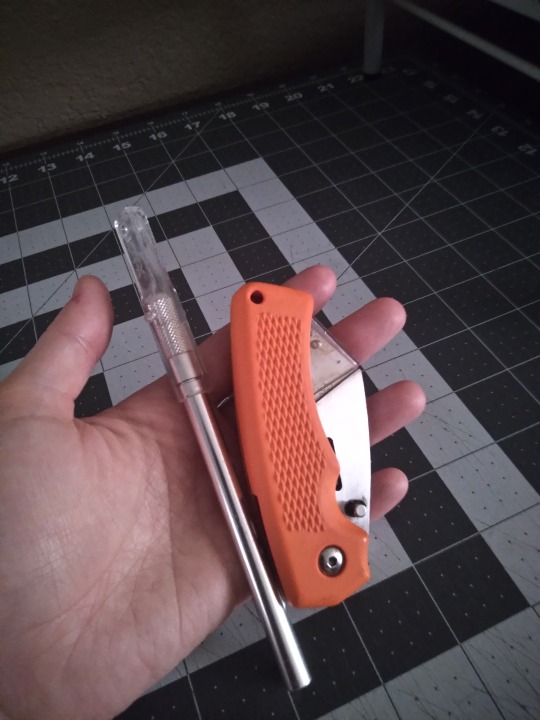
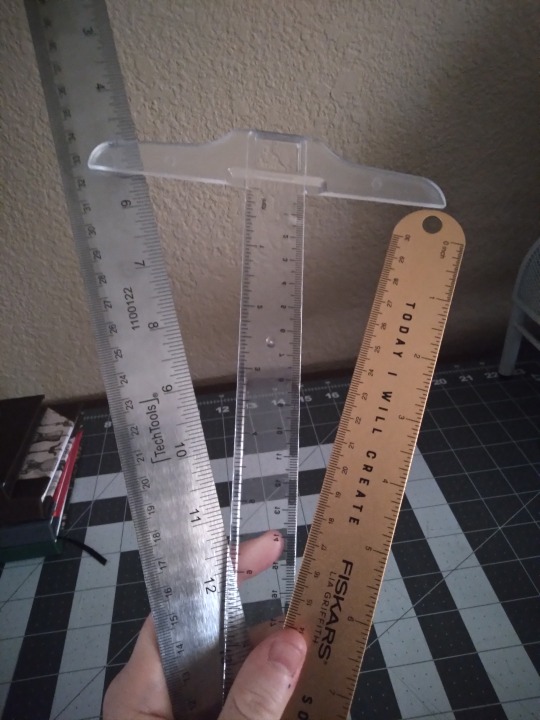
I'll be honest, I am not big on knives. I've got a regular box cutter for trimming board, and a razor knife for paper and cloth, and that's it. There are a lot of kinds and really all you need is one sharp blade for board. Paper and cloth can be cut with scissors if you want, though I find I get more consistently straight lines with the knives. Also pictured: Metal rulers and a T-square. You want a metal ruler for this. Plastic will flex and wood won't lay flat. Ideally you want one without a cork backing (my 18" one has this problem) and with the tick marks etched in rather than printed (my 12" one has this problem). For larger sheets of paper and cloth, the 18" one is great, but you can get by with the smaller one. The T-square is for making right angles; mine is plastic and only 12", and I really wish I had a longer one that was metal. These are drafting tools and you'll find them in the section of the craft store that has easels and sketch pads and they're usually pretty cheap.
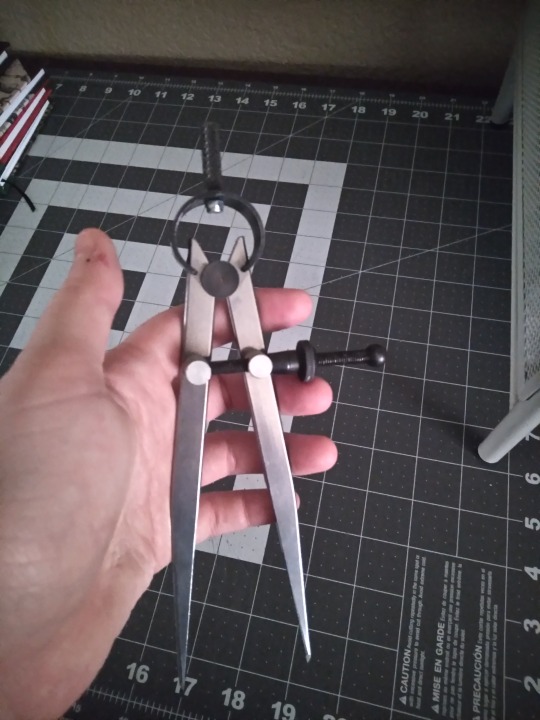
This is an adjustable compass. You can probably get these at craft stores but I got mine on Amazon. It's for measuring hinge gaps and the width of spines, both essential for making sure your cover fits your text block and your hinges open the way they should. Both of those are incredibly frustrating situations, and this thing makes it so much easier to avoid them.
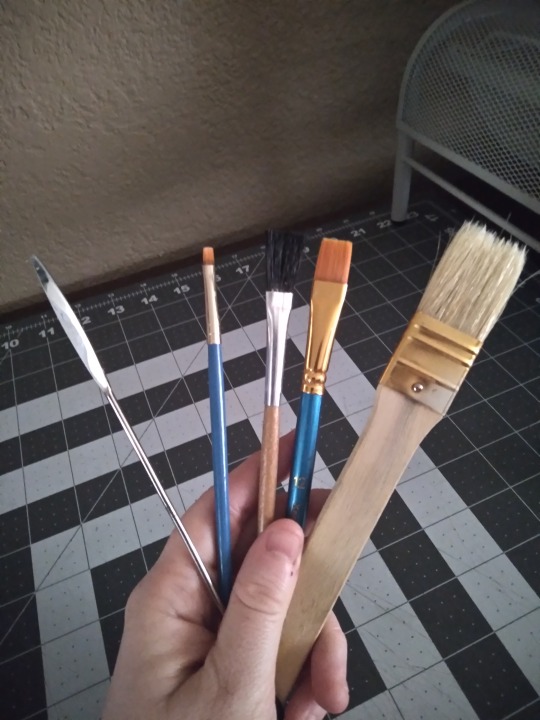
Things to spread glue with! Any old paintbrush will do, though I like to have a few different sizes and textures on hand to choose from. I like the big one for cover boards and casing in, the mid-size ones for doing turn-ins, and the little fellow for details and touch-ups. I don't care for foam brushes because I find them hard to clean when glue is involved, but if you like you can use those. The metal thing on the left is a micro-spatula, and I did have to special order it from an art supply place but it was cheap and it's very helpful to have on hand for when the brushes are too thick, for doing turn-ins on rounded spines, and for separating pages if you decide to learn edge foiling. Not essential, but recommended.
One thing I neglected to take a photo of is my crepe eraser. Despite the best intentions, no matter how careful you are, you will at some point get glue where you don't want it, where it will be visible on the finished book. This is where the crepe eraser comes in; you can use it to remove dried glue from cloth or (to a lesser extent) paper. Very annoyingly, none of the craft or art supply places I went to had even heard of these and I had to get mine from Amazon. It was cheap (under $10) and I strongly recommend getting one.
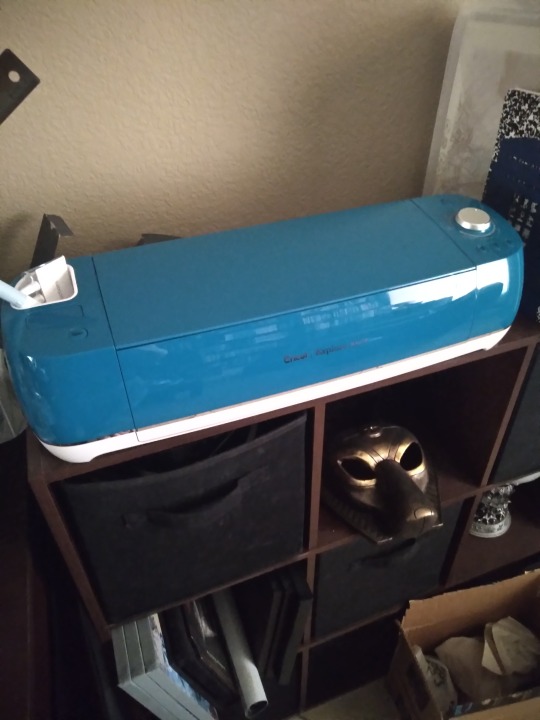
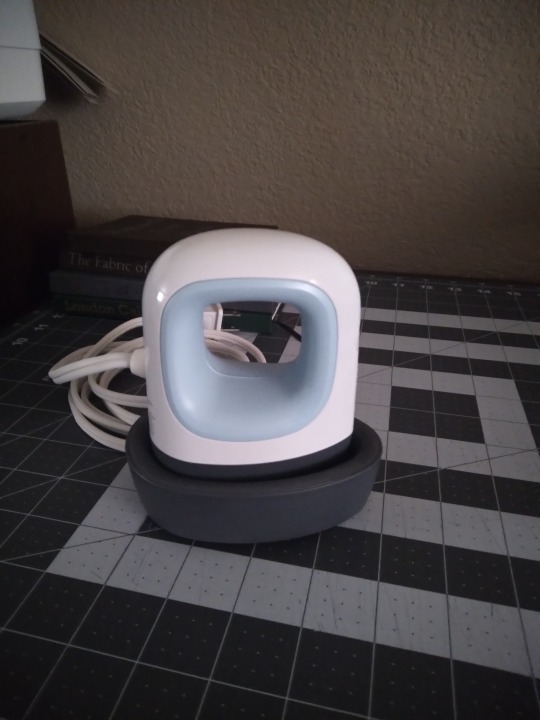
Once your cover is made, you have some options. You can leave it blank, hand-letter or draw an image, stamp it with ink or embossing powder, use a stencil, or do what I usually do these days and make a cover graphic from HTV. I've got a cricut for this (though they're not the only kind of cutting machine; it pays to research other brands) and a mini heat press (I want a bigger one, but I got this one cheap because the box is messed up). A lot of libraries have cricuts you can use, and you can use a regular iron to apply the HTV. Getting it to stick is a bit tricky, but that's true no matter which tools you use. Not pictured: a cutting mat, different than the kind shown above, necessary with most materials you can cut (mine came with one, they're about $20 at most craft stores, and they're lightly sticky to keep your materials in place while it's being cut). I don't know if other brands require them, but cricut does unless you're using their Smart Materials (I have never used these). If your library has a cutting machine, they will also have the appropriate cutting mats. Also not pictured: weeding tools. Weeding is when you remove the bits of HTV that you don't want in the final image, usually the spaces between letters and such. The negative space, if you want to get artsy. The special tools cricut sells aren't necessary, you can use an awl or needle and the dull edge of your knife blade, but I have a set of theirs and I like mine.
I didn't take a photo of it, but sometimes I use embossing inks and powder to make cover designs and text. You only need a heat gun for embossing powder, it takes up way less space than the cricut does, and it's cheaper. I got mine free from a family member so I don't know what it cost initially, but cutting machines are a really big expense; the cricut is my third most expensive piece of equipment, after the finishing press and the plow.
Good god I think that's everything. It sounds intimidating, I know. And it sounds like it takes up tons of space in your home, and to be honest it can, but it doesn't have to. The first dozen or so books I made, I made completely to my satisfaction with tools and materials that fit in one 12x16" moving box. If you love the hobby and can make the space, the bulkier items might be worth it down the line, but especially when you're first getting started it's smart to keep things low-cost and compact. Most of the basics are simple and your fellow bookbinders are delighted to share their shortcuts and substitutions if you ask.
The end! I hope it was helpful, @cardassianexpats! I did warn you it would be wordy, lol.
#bookbinding#fanbinding#long post#like ridiculously long post omg#my own verbosity will be my downfall#if anything is unclear please tell me#i can't always tell when i'm over-explaining#or when i think i've given enough info but my audience thinks i haven't#snek makes books#but sometimes she just talks about them
23 notes
·
View notes
Note
Hello! Quick question, sending it here since I don't have a twitter. Where did you get the 3d print files for Donnie's staff and Leo's odachi? You've inspired me to repaint my own figures, but the spare disaster twins set I'm painting for a friend is missing their weapons, and I'd hate to send them off empty-handed. Thank you, and I absolutely adore your work! Keep it up!!
Aaah, thank you so much! 🤩☺️🥺
I've actually been meaning to make a post for the files, but life keeps getting away from me! This was the push I needed to get it done, so thank you for the ask! 😄
Leo's Odachi is actually ripped from the Ninja Run mobile game! It isn't detailed as you probably saw, but it's still great for that unique shape found in Rise. It shouldn't take much to modify the handle into a better shape, as it consists of edges, instead of being round.
The Rise weapon files are here:
Notes on the Odachi:
- If I remember right, I imported the obj file to Prusa, then exported it as an stl for printing.
- I think printed it to be 152mm from end to end, but I might increase that to 155mm for a better fit for the 10.5" Leo figure.
Donnie's Tech Bo is originally a cosplay file from Dangerous Ladies (They have his goggles too!!! 🤩). You can buy it here, it's way more detailed than the Ninja Run version:
Notes on the Tech Bo:
- Originally, the file was in multiple pieces, but I sent them a message and for a small fee, Dangerous Ladies was able to modify it into either one solid piece, or into two: The handle and the Spike top. I don't know if the modified file is now available by default at purchase, but if it's not, Dangerous Ladies were SUPER nice and accommodating!! They can help you out. 😄
- A little bit of modification was needed to account for resin shrinkage between the top and the main handle, but it was fairly straightforward
- The two-piece format works best if you're printing in resin; the amount of force needed to push the handle into Donnie's hand would either snap the Bo, or scrape the paint. By leaving it in two, you can thread the handle into his hand, and snugly fit the top in place afterwards.
- My notes say I printed the handle to be 273mm in length or at 16.20%, for the 10.5" Donnie action figure. Increase the Spike top just a touch above that, for a better fit. I have a large printer though, so you may need to further cut and key it into smaller pieces depending on your set up.
Sorry for the mini essay! 😂 Good luck with repainting your figures and have fun!! 😄
#ckaoanswers#rottmnt#rise of the tmnt#saveriseofthetmnt#save rise of the teenage mutant ninja turtles#unpause rise of the tmnt#tmnt
17 notes
·
View notes
Text
For anyone curious about resin printing prices, I just thought I'd share my 2 cents as a hobbiest printer.
Resin printing requires a lot of PPE (more than filament printing afaik, though that requires some too)! Protective equipment alone can run upwards of $100 dollars. I spent time hunting for good prices and my setup ended up being around $130. You need stuff like nitrile gloves to handle the resin with, masks (ideally a good particulate and VOC filter so you can sand with the same mask you use for fumes), ducting to vent the fumes out somewhere (and everything else venting involves), and so on. There's lots of little things, and they'll add up fast.
There's also other equipment you'll need besides just a printer. Resin printing requires post processing requires something to wash the print in (usually IPA) and something to cure it with (UV light). You can re-use IPA and cure in the sun, but how you choose to process the resin afterwards is still an up-front cost to consider. You'll need containers to store the IPA to save it in, and you'll need a funnel with a good filter in order to save extra resin from prints. (Up-front costs for long-term materials saving. if you skip those, you'll pay more replacing them in the long term.)
In order to have a setup that's comfortable instead of only functional, many people will want extra supplies for their battle stations, like mylar boxes (like indoor greenhouse tents) to contain fumes and hide the printer from sunlight, and silicone mats to protect surrounding surfaces from resin. And omg, you can see how this is starting to take up a lot of space...
That's not even touching the cost of resin itself! even really cheap resin is going to be over $10 a kg. and if you want more than one color, you're either going to need to buy lots of UV-proof chemical bottles to store your different custom mixed colors, or you'll need to buy more colors. (If you mix your own, you'll need dyes.) You'll need to acquire elastic to string the doll, and you'll usually want to purchase metal s-hooks. resin has many strengths as a medium (high detail, etc), but unfortunately, it is brittle, which makes it a poor candidate for tiny objects under a lot of stress. so, 3D printing the s-hook is usually not a good idea. (Unless you're paying extra for, like, some siraya tech tenacious, or something like that. but even then, I'm not sure it's the best choice.) And if you want to assemble the doll with magnets instead of snap fits, you'll need magnets too.
TL;DR Resin printing is a high-investment hobby. It might be cost effective if you're making ten dolls, but if you want one or two, it won't save you money or time. (I still think people should try making their own dolls if they're interested!! :) It doesn't have to be about money. Making your own custom dolls is a rewarding experience! But it's not a cheat code to avoid the cost of this hobby.)
~Anonymous
25 notes
·
View notes
Text
so my current 3D printing project is this: I am making a giant lego man
not super huge, just 5x regular lego size. It'll be about eight inches tall when complete
the reasons for this are, primarily, because it’s cool, and also. I just bought legos with my own adult money for the first time, and it turns out that lego people are for some reason considerably more expensive than lego bricks. I had a whole rant about it earlier that I'm not going to retype here, but the short version is, I did not buy any lego people
but then I went on thingiverse and I found a model for a large-scale lego person! (with this remix for better arms)
and I thought, that is very cool. I am going to make a giant lego person, who can sit on top of the lego box and guard the bricks
and then, because it would take quite a while to print the whole thing, I did a miniature test print at regular lego size, which is 20% of the original file size
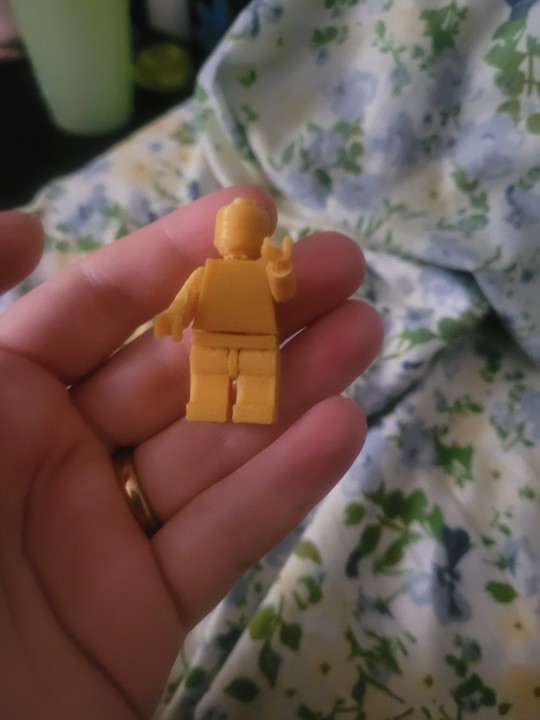
it took about an hour
and he is a pretty good little lego man!
His head's a little loose, but not too bad. I had to reprint the hands cause I originally oriented them stupidly and they broke immediately, but once I redid them in a smarter position, they just took a little sanding of support droopies before they fit great.
The shoulders took some effort to pop into place, but I had expected that. On the rare occasion an arm came off of a lego person when I was a kid, I remember it being extremely difficult to put it back on. Once I got the arms in place and wiggled them back and forth a few times, they moved perfectly smoothly
The legs were trickier to attach to the hips, and one of them keeps angling itself oddly, so that he stands a bit pigeon-toed. If you mess with it too much, it will fall off.
Also the hips keep springing back out of the torso, which isn't great.
Based on this, plus a couple comments on thingiverse which said several connections were not working great, I knew I might need to make some adjustments. And to know exactly how it needed to be adjusted, I needed to print it at full scale
but I didn't want to spend several days printing, only to have to make adjustments and potentially have to reprint every file
so, first, I made a connection test file
I cut the individual pieces up into just their connection points: a slice of neck from the torso, and the bottom of the head. the shoulder pin on the arm, and the shoulder hole in the torso. The hip pin and hole. the wrist, and the entire hand because it's the smallest piece and didn't make nearly as much of a difference if I printed the whole thing. Plus, it rests on the hand on the buildplate, and it would be tricky to get just the hand post to print without including the hand
the first printing attempt spaghettified
it slipped horizontally not far in, and I suspect that caused the spaghetti, when it tried to print over somewhere that should have been supported and now wasnt. Can't be sure, because nobody saw it happen. My husband called me down to stop the printer when he noticed.
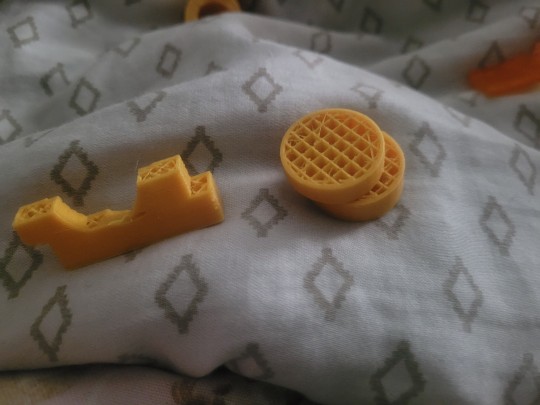
this is the shoulder hole and neck post
it wasn't a total waste, however. I was able to tell from what little had printed of the neck and head that the neck hole was far too large for the post.
So, I made an adjustment to the torso file, making the neck post larger, and restarted the test print with the new version. Unfortunately, restating meant that it went into the evening rather later than I had initially planned, sparking a conversation about what times of day would be most convenient for me to print things so as to not render the living room unhospitible (no hard feelings in either direction, it's just. a loud machine. and it can get annoying to listen to)
That test print went fine, and I was able to test all the fits
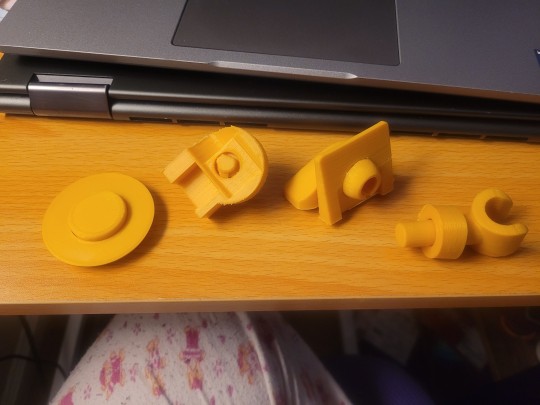
conclusions:
the neck now fits perfectly
the hand post is much too small for the wrist
the hip and shoulder joints are both too snug. I was able to force them together, but they will not rotate (they also now will not separate, and the layers around the shoulder hole split when forcing the shoulder pin inside)
so, back to the modeling program to make more adjustments. The simplest of these was to thicken the arm post
for the shouder, I measured all the bits and discovered that part of the problem is that the wall of the torso around the shoulder hole was thicker than the length of the pin before the flared head
in short, the pin was not long enough to reach all the way through the hole and have the flared head pop out on the other side
so, I lengthened the pin, and also put the slit on the flared head on the top as well as the bottom, for extra squishability
For the hips, they have a different pin shape than the shoulder, so I decided to replace it with the same mushroom-shaped kind of pin the shoulder has. I also widened the hole in the leg piece slightly.
You may notice that I didn't mention testing the hip-to-torso connection, despite noting that there was an issue on my initial miniature print. This is because in order to test it, I'd need to print a large enough portion of both the hip and torso pieces that I might as well print the whole thing, so I figured it would be better to get all the other connections correct first, and then adjust that one as need be.
I did take a look at it in the modeling program, however, and discovered that when assembled, the posts in the hips and the sides of the torso attempt to be in the same location. So I trimmed the hip posts to fit.
Then I printed all the altered files in miniature again, because that's a pretty quick test print
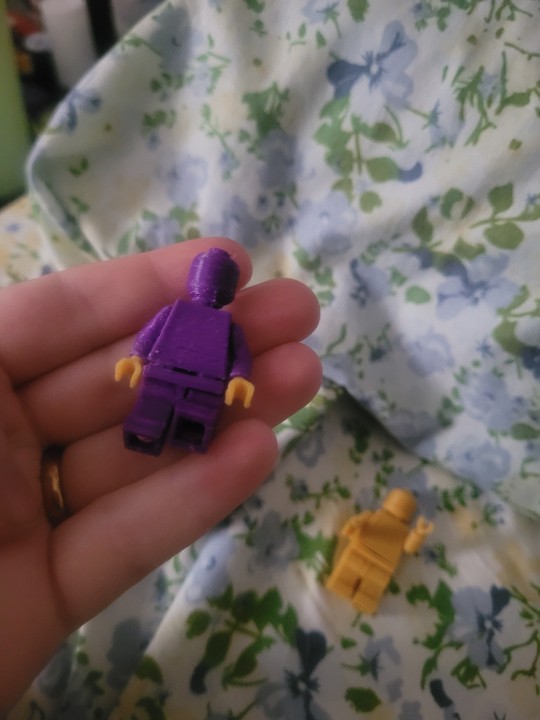
As I had hoped, the legs clicked on much better and more sturdily, and the hips fit into the torso much more securely as well.
The hands and head no longer fit at all, but I'd figured that would be the case as well, considering their fit on my initial test and my subsequent adjustments. I'd printed four hands when reprinting them earlier, testing two slightly different positions (the difference in results was negligible), so I used the extras for the new figure. I sanded down the neck post a bit to get the head to fit, and perhaps I should have sanded a bit more but I didn't feel like it
With that promising test, I prepared a new test print file to test the fit of all the adjusted parts at full scale (save the neck, already tested, and the hip-to-torso connection, will test later as explained earlier - so, just the hip and shoulder joints, and the hand, since I didn't change the wrist and can reuse it to test the new hand)
That's printing currently. Will update when it's done.
10 notes
·
View notes
Text
Not to reveal myself as more of a nerd than y'all already know I am, but I've been super into medieval history lately and I'm looking into putting together a Knights Hospitaller kit. My poor best friend has been tortured with these ramblings for several days now.
(Technically, I want two versions of the same kit. I want a nice functional steel one eventually, but they're expensive as all Hell, so I'll be starting with a more lightweight cosplay-material version.)
I'm specifically aiming for a 13th century look, though I do want a greathelm because I just think they're fucking cool. I love greathelms. They're pretty great.

My free time is increasingly limited, but I'm planning:
Greathelm (Either 3D-printed or EVA foam. I WILL be buying a steel version once I can afford it.)
13th century short sword (3D printed. Also going to be investing in a decent sword later on. Probably sooner than anything else on this list. I did some fencing as a lad and I really miss having swords.)
Hositaller tunic + cape (Sewing the tunic myself. Might buy the cape because capes are kind of a pain to sew.)
Chainmail coif + shirt (Probably 3D printing, but it does take my printer over 24 hours for a full square foot. I'm going to at least try to make my own steel chainmail before I decide.)
Gambeson + cap & mantle (Sewing these myself)
Shield, currently undecided
Leather goods like gloves and sword belt will be bought because I loathe working with leather. Will you ever get to see this once completed? Idk. I think it might be very funny for the only public image of me on the internet to be in full authentic Knights Hospitaller garb though. If any of you happen to be into this same thing and have any advice on putting together my first kit, it's very welcome.
5 notes
·
View notes
Text
CW: Thinking out loud post
(you may reply with thoughts if you wish though)
Trying to work out why I'm so acutely bothered by a Christmas gift I got. Like, it's not a bad gift by any means, very neutral, well-intended, it's even red, but something has been bothering me.
The situation: I am a generally crafty person when I have the means + energy to do crafty things, and I have been making my own hats since 2019, mostly through knitting and then felting. This year a relative asks me what i want for Christmas so I give them the url to the exact range of wool I use and say "buy me more of this so I can make more hats". The relative thanks me for being so exact (I am often vague because asking for/receiving gifts makes me uncomfortable unless under specific circumstances) and for Christmas I receive...
...a bag for using with knitting, and a mug, the bag and mug each feature a witty, knitting-themed, graphic.
You might be thinking "Okay, you talked about knitting and got a knitting-related gift, what's the problem?"
I'm thinking what it might be is this: I do many crafts. I like making stuff- I love making stuff. But when I sculpt stuff out of polymer clay I don't get given t-shirts saying "I can't buy FIMOre clay!" and when I 3D print stuff I don't get given a little keychain in the shape of a 3D printer nozzle. And that's good! I don't want those gifts. The point is the stuff I'm making, not the process, though I love the process and take joy in all the different ways of making things. But now that I'm having to shift most of my creative output to knitting because I (very literally) can't afford materials for many different creative processes just now, I have moved into an area where there is merchandise FOR the process, that gets marketted to people who don't know what kind of gifts to get their friends and relatives who knit. And... I do not see knitting any differently to any of my other creative skills, it is a way to make things and I like the things I'm making. And with knitting I only make one thing, it's not like I knit for the sske of knitting, I don't do it because my great granny knitted (though true) it's about wizard hats for me, so gifts *about* knitting make no sense, you know?
Yes, I think that's it. Not a big deal, but I don't want to end up getting knitting themed gifts every year so I probably did need to know what was bothering me there.
14 notes
·
View notes
Text
Couple things I’d like to add (this got so long, I’m so sorry)
Bigger bullets don’t always equal more recoil. Recoil is affected by a lot of things from powder amount, bullet size, grip, and gun mass. .357 magnum is going to kick in a revolver, but put it in a lever action rifle and the recoil is a lot less noticeable.
Modern 9mm and .45 ACP are ballistically close enough that it doesn’t make much difference. 9mm is smaller but faster, .45 is bigger but slower, and stopping power really isn’t a thing here (that said, some calibers are better than others).
Guns don’t go necessarily go click when they’re empty, and many will lock their bolts/slides back after the last round. Pulling the trigger will make some noise, but the click you’re thinking of is from the hammer or striker falling. If it isn’t cocked back, or if the gun is only single action (pulling the trigger only drops the hammer, doesn’t also cock it like a double action) then you’re not really gonna get a click. That said, I’m told that the click is one of the loudest noises in a gunfight when you were expecting a bang (clean and service your guns, people. And carry with one in the chamber).
Pump action shotguns can't do the cool movie thing with the pump (you know what I'm talking about) without ejecting a shell due to where the loading gate for the tube magazine is located. Good news though, racking the slide on a pistol or semiauto rifle can be just as intimidating sounding.
Most “Assault Rifles” civilians own are just semiauto rifles, effectively little different from the M1 Garand from WW2. Thanks to Ronald Regan, the only machine guns most people can buy were built before the cutoff of 1986 and are very expensive as a result. The only other ways are illegally, or going through a long drawn out process and paying extra money per year to be allowed to manufacture your own or have “post 86” guns. Also AR in AR-15 doesn’t stand for Assault Rifle; it stands for the company that designed it, Armalite. The term assault file comes from the STG-44 the Germans made during WW2. Its name, Sturmgewehr-44, translates to Storm Rifle-44, or Assault Rifle.
That said, there are some ways of making “full auto” guns. Binary triggers and bump stocks, Forced Reset triggers (which reset the trigger after every shot and therefor are not machine guns since they’re one round per trigger pull, bite me ATF). You can also do stuff with coat hangers or 3D printers, but that’s illegal.
Cool and sexy doesn’t always translate well to the battlefield. Doesn’t matter that you invented the AlienBlaster9000 if you can’t afford it, build enough fast enough to keep your army supplied, or it jams if you look at it funny. Which could be an interesting plot point.
The M16 is not a jam-fest, nor is the AK-47 impossible to jam. The M16 had teething issues, was issued without cleaning kits, and had the powder in its bullets messed with which affected its cycling. The AK platform was built by the Soviets who thrived on hiding faults and boasting success; it might’ve ironed its kinks out before combat but I doubt it didn’t have any at all. Go watch GarandThumb or InrangeTV’s mud and freeze tests to see them in action. You might be surprised.
On the “cars aren’t bulletproof” point above, neither are a lot of modern walls. Your walls at home are likely made of drywall, insulation, and wooden frames. Not a lot there to stop bullets, which is another reason why knowing what is behind your target is so freaking important, as is training so you’re more likely to hit and not miss. Even then, sometimes the bullet has enough energy to come out the other side (not as fast and not in a straight line, but still).
Firearms self defense is no different from other martial arts in that you are no good if you don’t train. A character who owns a gun but doesn’t go to self defense training or at least the range semi regularly is not going to be even remotely John Wick. IRL they probably will never need to be that good but at least some training is necessary for competence.
Guns aren’t just for bearded redneck hunters in pickup trucks. Certain demographics have traditionally tended towards gun culture, but it’s not a prerequisite. Most are just happy to see more people join. Young or old, male or female, straight or gay, as long as you aren’t an asshole yourself and follow basic safety rules you’re not gonna have any more of a problem than in any other hobby (unless you vote to restrict gun rights and mess things up for everyone else. Then you’re probably gonna get a lot of dirty looks).
Lastly, armed minorities are harder to oppress/bash. Look at history; almost every dictatorship waits until after everyone but they are disarmed before committing atrocities (Not every disarmament ends in genocide, but every genocide begins with disarmament). If you or your characters feel like they’re facing oppressing/bashing, consider taking classes and renting firearms at ranges to see what you think.
I don’t know who needs to hear this, but modern guns won’t go off when dropped.
3K notes
·
View notes
Note
Hey Oki! I'm thinking of getting into cosplay! Do you have any tips on making props and foam armor?
Before I start: If you’re like, not 18 or well trained in using things like power tools or other hardware craft stuff, some of the advice/tools im gonna talk about will requre adult supervision or aid. Just wanted to say that b/c sometimes younger cosplayers message me about advice or what to do with cosplay, and i don’t want y’all using a heat gun or bandsaw because i told you to lol. Please use common sense and if you are not sure how to do something, ask an adult or someone who know’s what they’re doing :’D
Props advice:
If you’re looking to make something like a staff, bow, wand, something like that, PVC pipe is a great way to build a skeleton/base for things like wands or staffs. I used this to make my Dragonspyre Wand as well as one of the wizard city staffs. Wodden dowel rods (they come in so many sizes) also are a great base- that’s what makes up the shaft of morganthe’s wand.
Clear plastic “ornaments” are what a lot of people use to make translucent bulbs or orbs by painting the inside of them or hooking LED’s inside the ornament- you can easily find these on amazon or at a crafts store like Jo-Annes.
Styrofoam balls (and triangles and squares and so many other shapes) can also be a great base for making props. I used a 48 in. styrofoam ball for morganthe’s staff and then paper mache’d the spider design ontop with newspaper and then just painted it from there!
I only have done one foam armor costume and let me just say- your first foam armour is probaly not going to look exactly how you want it to. Unless you really plan out what you want to do and make test patterns (which reminds me, PLEASE use patterns for stuff instead of guestimating measurments and stuff, it’ll save you a lot of heart ache, and if you want to re-do a prop or piece of armour, you won’t have to start from scratch that way!), foam armour can be fairly fickle for begginers because you’re just starting out with it. Which is okay! Practice makes progress!!
Other materials that i have not used but also know work well- Worbla is GREAT for armor esp if you have a heat gun! It might seem more intimidating that craft foam but if you have the extra cash to spend i’d reccomend trying worblas for certain props or armour depending on what you’re doing!
Clear worbla is also fantastic for making translucent blades or glasses or visors that have a specific shape!
3D printing has also been a godsend for a lot of cosplayers- if you have acess to a 3d printer, please utilize it! You can make a plethora of tiny detailed things instead of doing it by hand which is always helpful!
Instilation foam is also fantastic for making huge props or armour necause it’s incredibly light weight!
Tools to use with some of the products i’ve mentioned:
A heat gun is normally used to shape/form worbla and craft foam.
A hand dremel (or just hand sanding with sandpaper, but that takes SO much longer) can be used to decorate or impliment designs onto craft foam, instulation foam, and at times worbla. You can also use them to touch up your props and make them look smoother!
Hotwire Cutters/ Hot Knife Cutters can also be used to decorate, shape, or cut instulation foam (and sometimes craft foam)
Box cutters can also be used for general cutting out your rough shapes of
It is maybe a good idea to work on a selfhealing mat so you don’t completely ruin the table you’re working on (unless you don’t mind getting hundres of cut marks into your table lol)
YOUTUBE! For the love of go,d there’s so many tutorials on how to use all of these materials and where to start/buy them from as well. They honestly will be of more help that this post is imo, this is just what i have learned from my years of cosplay!
Also another learning resource for me was cosplay tutorial (link to the website atatched)! This is a collection of how other cosplayers make specific things. It has everything from sewing, wigs, props, to acessories. I hihgly reccomend it as it might also help!
I hope this was at least semi helpful- and don’t be sad if what you first attempt to make doesn’t look exactly how you want! Just keep trying and you’ll learn a lot of skills by doing that! Also cosplay is about haiving fun no matter what your “skill” is, so even then just have fun and do your thing (safely)!
20 notes
·
View notes
Photo
However! I will say as someone who kind of got into it for fun: you can do a lot to repair and refurbish furniture with relatively little equipment. I fixed a couch for the cost of a manual staple gun and webbing at under $1/yd. I spent a lot of time removing staples and made a mess, but it was cheap.
Furniture has suffered from the same issue as fast fashion. It used to be made in a way that you could readily repair it and it would last generations. Now it's barely lasting a decade. Being able to have the skills to fix what you can with fairly simple tools will save you money in the long run. My dresser just got a bunch of cracks because I had my humidifier on it - but it's not that expensive to sand it and re-finish it - it's definitely way less than buying a new one. Maybe $15 for sandpaper and finish, if I don't have it on hand.
Also, many libraries and maker spaces will lend tools! You don't have woodworking tools? Your library might! (Mine's got 3d printers, sewing machines, and even CNC equipment). You can also look for a Repair Cafe.
I got into upholstery to fix a couch, and now it's a hobby that I spend on because I enjoy it as an activity as well as the end product.
I definitely am not out there making furniture from nothing, but being able to repair and restore furniture is a good thing and a step toward fighting a culture of disposability. For me, it's the same principles as the right to repair movement. It's true for houses, clothing and furniture just as it is for electronics and cars.
Yeah, the guys on YouTube acting like it's cheap and easy with a fully stocked garage are not it, but DIY is cool and punk and I'm also not going to fault someone who fell in love with it and invested in the tools over time. Especially because a lot of them are super willing to share with someone who is interested, you just gotta ask.

His garage is a hardware store
7K notes
·
View notes