#I'm 3 rows in and no lines of code written
Explore tagged Tumblr posts
Text
Girl help I opened the project that's due in a week and then immediately started knitting another hat
#I'm 3 rows in and no lines of code written#I'm in danger I'm going to die but also knitting is a very textile experience I crave the feeling now it' so fucked#why can't I get addicted to the textile feeling of a keyboard and get my fucking work done fkdjdjfjdj#this hat's gonna be for my aunt she asked me to make her two but I'lm doing the one and then-#I'm gonna ask her to buy the more expensive material herself bc I'm already making them for free might as well not pay for the yarn
3 notes
·
View notes
Text

did i ever talk about the a4 planner notebooks i designed and had made on here? 👀 (they all have blank covers which i decorate with stickers each month)
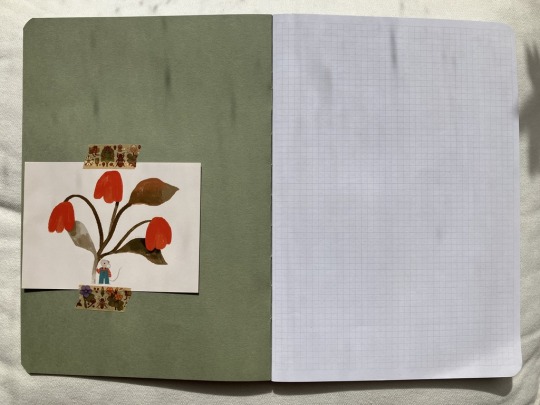

blank inside cover (this is my may/june planner which i started decorating yesterday, so there's a thank you note from my raahatillustration order in there), all the printed pages are printed on square paper! next page is a 2024 and 2025 calendar (minimum print quantity was 10 books, so i designed each book to cover 2 months and had 12 printed, for 2 years supply!), followed by a blank grid for future log of the 2 months that come after the ones in the current notebook).

page for trackers! i use the left hand page to write the things i'm tracking (sideways in the top box, so a column of boxes is assigned to each activity/task), then colour in the boxes corresponding to the date and each activity/thing each day. also doubles as a migraine log (colour in the box containing the date when i have a migraine), and the blank column is so i can colour in a mood tracker. the right hand page is for making a record of what i'm reading and watching (genre, start date, end date, title and author if applicable). lots of extra space for decorating or notes if i want to.

monthly page! (2 per book). the left is for a monthly overview that is heavily decorated/all the things i'm doing are written in (no completed version to show bc i have too much personal info in my completed ones to redact. sad bc they turn out very cute!!!). the space underneath that is where i stick in a copy of the playlist i'm listening to that month/any decorations i want to add. the boxes at the bottom have 31 spaces, so on the left of that i write down 4 physical therapy things i track to fill in each day. on the right hand page is where i write a little brief list of things that will be nice the following day, then the grids at the bottom are for me to shade in 'the degree to which i went outside', and a 'big picture' idea of the weather.
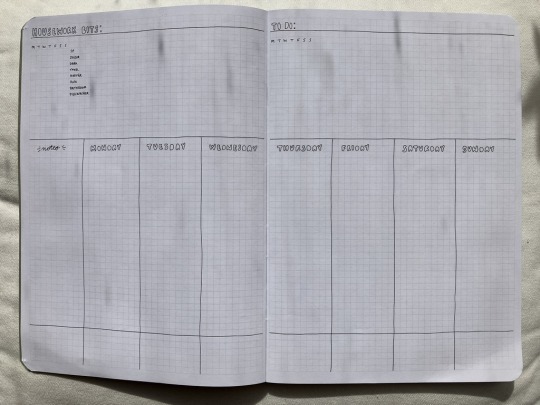
weekly spread! (10 per book). how i keep on top of the day! for vertical planning, with a running list-ish style chores log on the top left corner, and a blank setup on the top left corner of the right page for things i want to achieve across the week but that i can't assign to a specific day yet (or take place over multiple days). lots of room for me to stick in photos, a column for notes, and a gap at the base of the page for me to track other things. i colour code each month so it's easier for me to keep track of where i am in time, so a strip of washi tape goes along the bottom 3 rows of squares, and then above that i'm left with 3 more rows of squares - in the 'notes' column i pick 3 things to track, and then draw a line across the column for each day of the week when i do that activity/task in the corresponding row. for example:


weekly horizontal spread (10 per book). this is for my daily reflections, i write down things like my step count for keeping track of health stuff/energy expenditure, when i got up/any time i had to lay down, a bullet point summary of all the activities i did that day, times i made a decision that was, like, good for me, things like that!


blank squared pages (7 per book) and inside back cover for miscellaneous uses. i've used them for far for garden planning diagrams and collages, sticking in notes and ephemera, and collecting odds and ends of stationery. i usually stick an envelope that i've made inside the back cover so i can stuff a bunch of papers in there as i accumulate them (receipts, tags from clothes, order delivery notes, etc), for example:
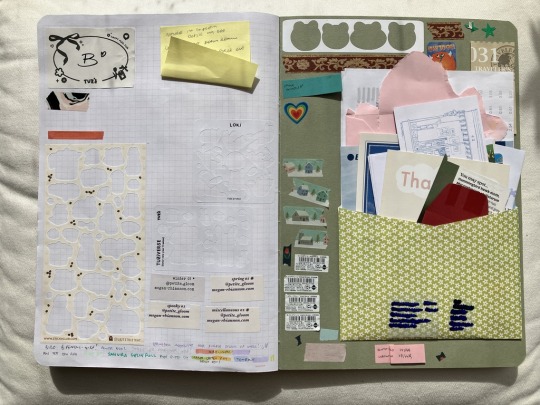
tada! really happy with how these turned out, very good investment of the money i would have put into buying a hobonichi each year for example, which is simply too small for my needs!
#how do i tag this :P#planner#planner notebook#journal#uhhhhh#scrapbook#stationery#<- will i be able to find it later to reference via any of those tags.... who knows........
33 notes
·
View notes
Text
Balatro-Inspired Spinning Card Tweetcart Breakdown
I recently made a tweetcart of a spinning playing card inspired by finally playing Balatro, the poker roguelike everybody is talking about.
If you don't know what a tweetcart is, it's a type of size-coding where people write programs for the Pico-8 fantasy console where the source code is 280 characters of less, the length of a tweet.
I'm actually not on twitter any more, but I still like 280 characters as a limitation. I posted it on my mastodon and my tumblr.
Here's the tweetcart I'm writing about today:
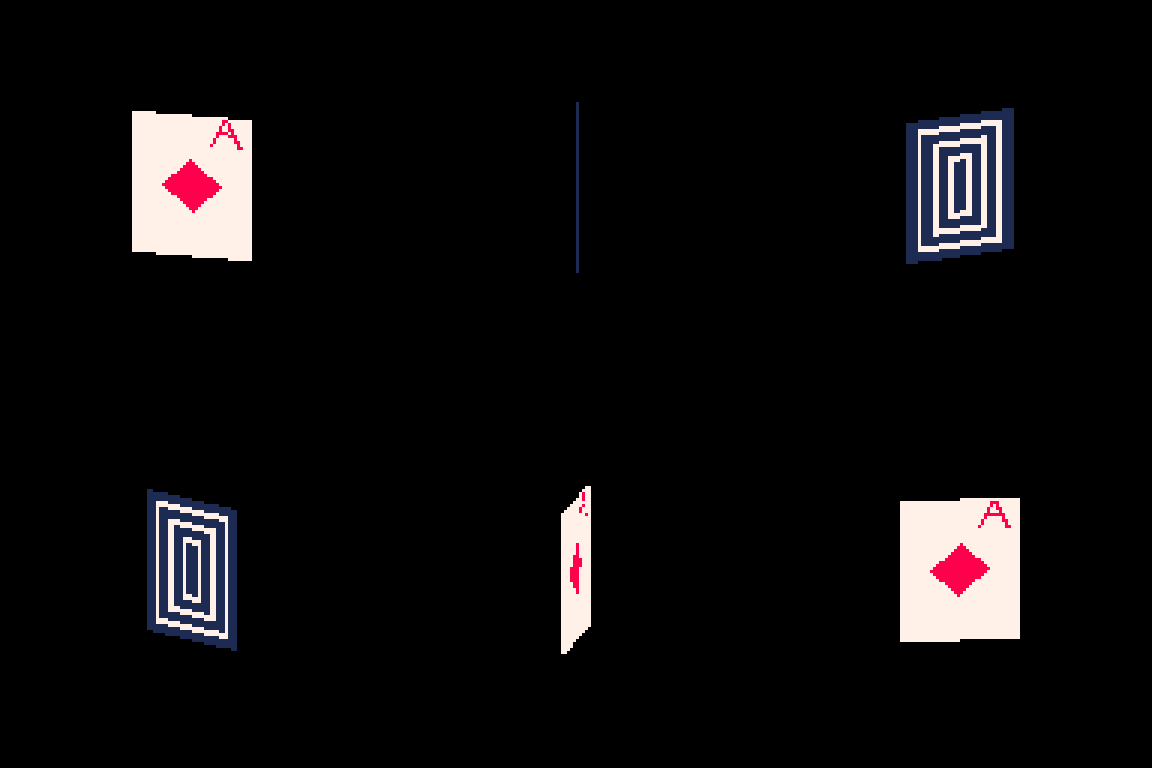
And here is the full 279 byte source code for this animation:
a=abs::_::cls()e=t()for r=0,46do for p=0,1,.025do j=sin(e)*20k=cos(e)*5f=1-p h=a(17-p*34)v=a(23-r)c=1+min(23-v,17-h)%5/3\1*6u=(r-1)/80z=a(p-.2)if(e%1<.5)c=a(r-5)<5and z<u+.03and(r==5or z>u)and 8or 8-sgn(h+v-9)/2 g=r+39pset((64+j)*p+(64-j)*f,(g+k)*p+(g-k)*f,c)end end flip()goto _
This post is available with much nicer formatting on the EMMA blog. You can read it here.
You can copy/paste that code into a blank Pico-8 file to try it yourself. I wrote it on Pico-8 version 0.2.6b.
I'm very pleased with this cart! From a strictly technical perspective I think it's my favorite that I've ever made. There is quite a bit going on to make the fake 3D as well as the design on the front and back of the card. In this post I'll be making the source code more readable as well as explaining some tools that are useful if you are making your own tweetcarts or just want some tricks for game dev and algorithmic art.
Expanding the Code
Tweetcarts tend to look completely impenetrable, but they are often less complex than they seem. The first thing to do when breaking down a tweetcart (which I highly recommend doing!) is to just add carriage returns after each command.
Removing these line breaks is a classic tweetcart method to save characters. Lua, the language used in Pico-8, often does not need a new line if a command does not end in a letter, so we can just remove them. Great for saving space, bad for readability. Here's that same code with some line breaks, spaces and indentation added:
a=abs ::_:: cls() e=t() for r=0,46 do for p=0,1,.025 do j=sin(e)*20 k=cos(e)*5 f=1-p h=a(17-p*34) v=a(23-r) c=1+min(23-v,17-h)%5/3\1*6 u=(r-1)/80 z=a(p-.2) if(e%1<.5) c= a(r-5) < 5 and z < u+.03 and (r==5 or z>u) and 8 or 8-sgn(h+v-9)/2 g=r+39 pset((64+j)*p+(64-j)*f,(g+k)*p+(g-k)*f,c) end end flip()goto _
Note: the card is 40 pixels wide and 46 pixels tall. Those number will come up a lot. As will 20 (half of 40) and 23 (half of 46).
Full Code with Variables and Comments
Finally, before I get into what each section is doing, here is an annotated version of the same code. In this code, variables have real names and I added comments:
[editor's note. this one came out terribly on tumblr. Please read the post on my other blog to see it]
This may be all you need to get a sense of how I made this animation, but the rest of this post will be looking at how each section of the code contributes to the final effect. Part of why I wanted to write this post is because I was happy with how many different tools I managed to use in such a small space.
flip() goto_
This pattern shows up in nearly every tweetcart:
::_:: MOST OF THE CODE flip()goto _
This has been written about in Pixienop's Tweetcart Basics which I highly recommend for anybody curious about the medium! The quick version is that using goto is shorter than declaring the full draw function that Pico-8 carts usually use.
Two Spinning Points
The card is drawn in rows starting from the top and going to the bottom. Each of these lines is defined by two points that move around a center point in an elliptical orbit.
The center of the top of the card is x=64 (dead center) and y=39 (a sort of arbitrary number that looked nice).
Then I get the distance away from that center that my two points will be using trigonometry.
x_dist = sin(time)*20 y_dist = cos(time)*5
Here are those points:
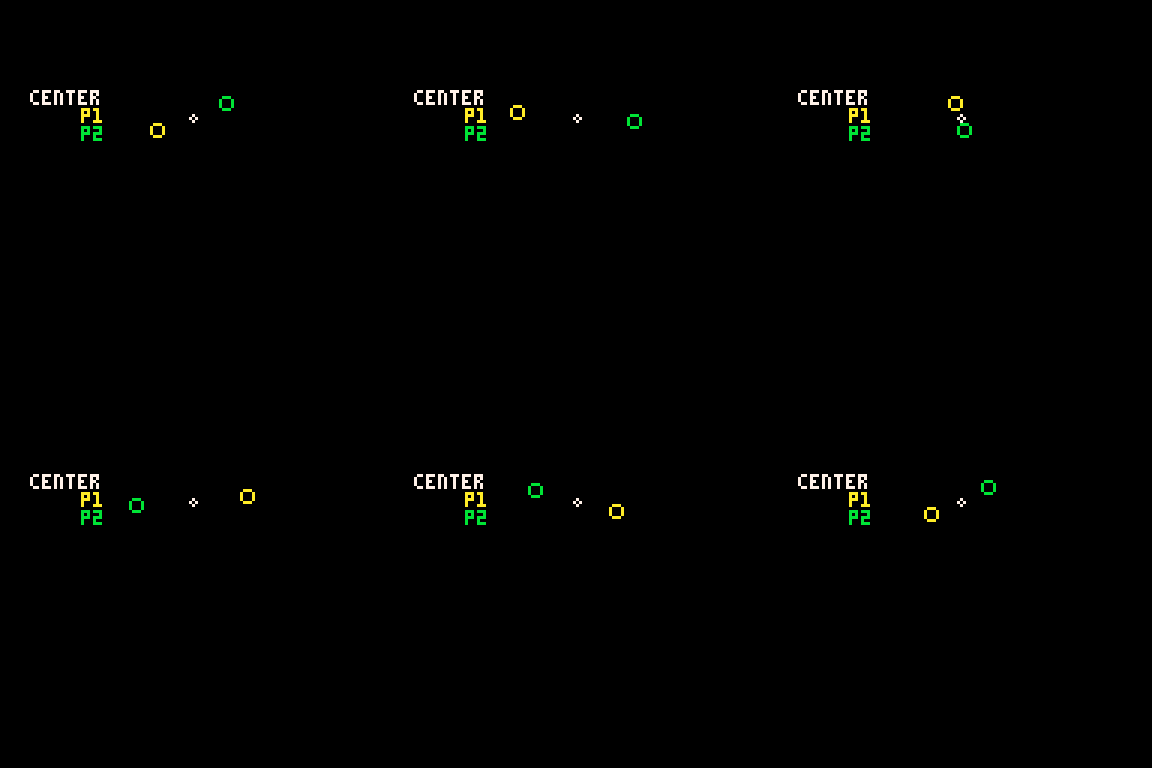
P1 adds x_dist and y_dist to the center point and P2 subtracts those same values.
Those are just the points for the very top row. The outer for loop is the vertical rows. The center x position will be the same each time, but the y position increases with each row like this: y_pos = row+39
Here's how it looks when I draw every 3rd row going down:
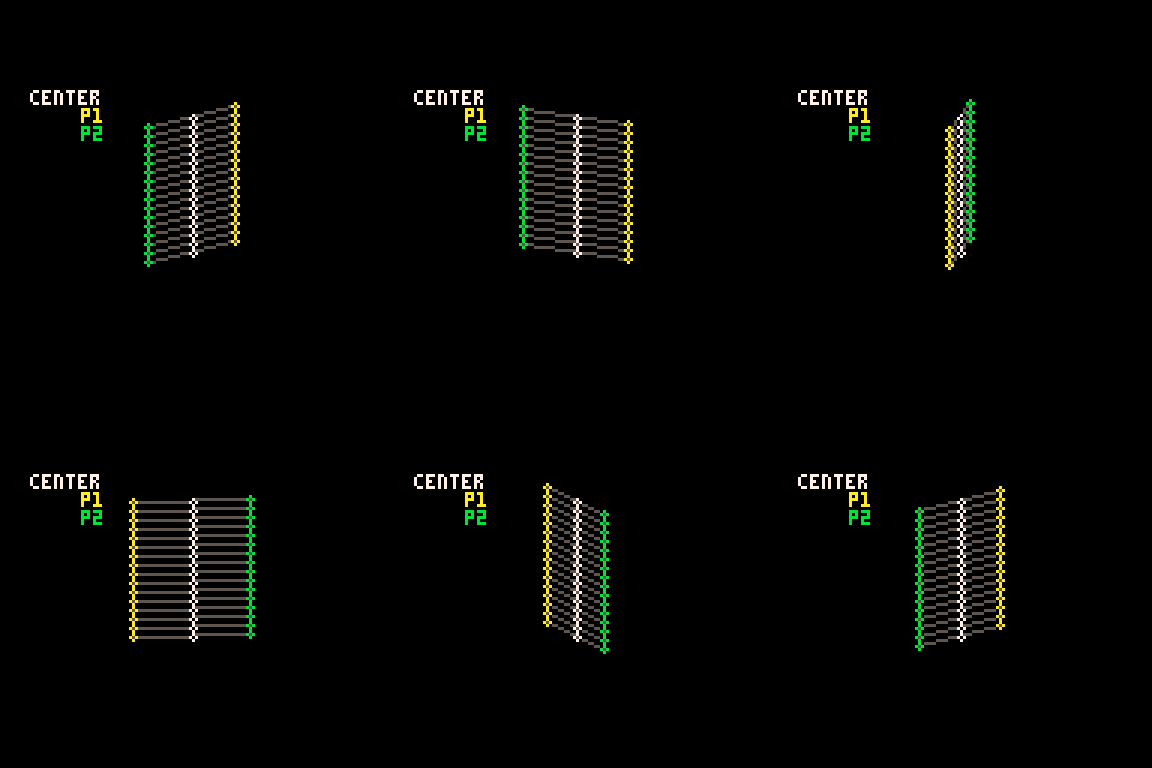
It is worth noting that Pico-8 handles sin() and cos() differently than most languages. Usually the input values for these functions are in radians (0 to two pi), but in Pico-8 it goes from 0 to 1. More info on that here. It takes a little getting used to but it is actually very handy. More info in a minute on why I like values between 0 and 1.
Time
In the shorter code, e is my time variable. I tend to use e for this. In my mind it stands for "elapsed time". In Pico-8 time() returns the current elapsed time in seconds. However, there is a shorter version, t(), which obviously is better for tweetcarts. But because I use the time value a lot, even the 3 characters for t() is often too much, so I store it in the single-letter variable e.
Because it is being used in sine and cosine for this tweetcart, every time e reaches 1, we've reached the end of a cycle. I would have liked to use t()/2 to slow this cart down to be a 2 second animation, but after a lot of fiddling I wound up being one character short. So it goes.
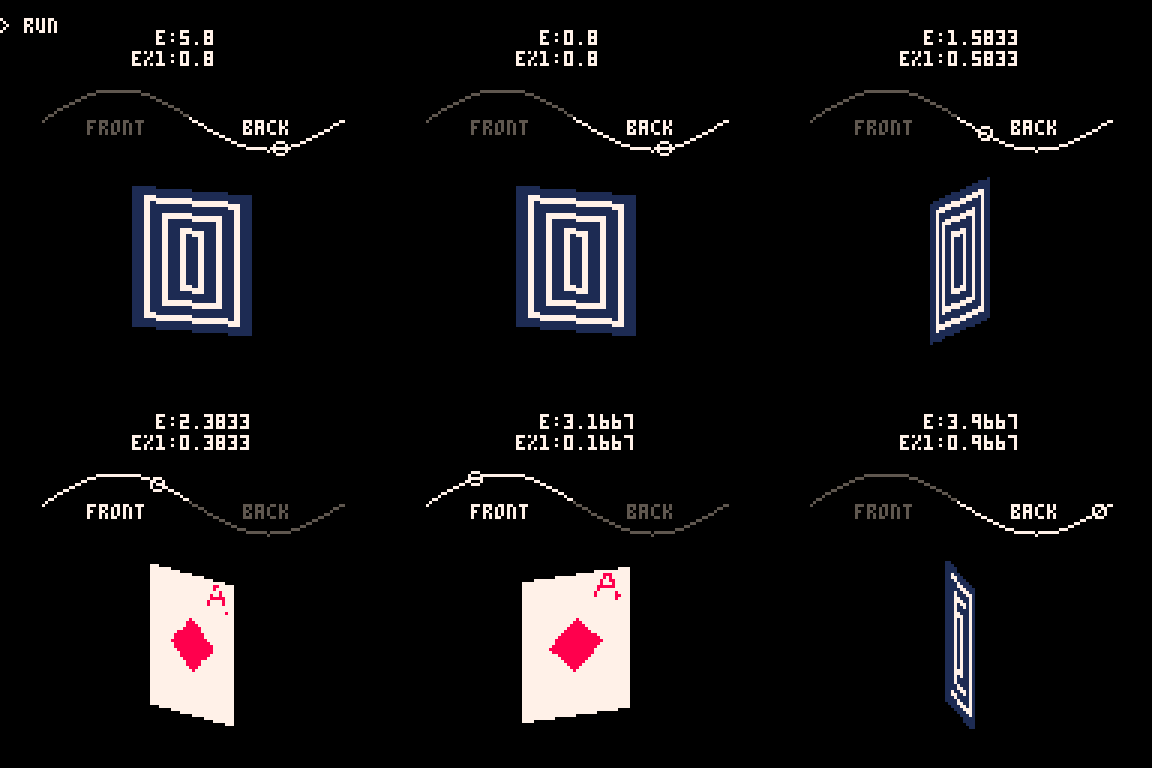
e is used in several places in the code, both to control the angle of the points and to determine which side of the card is facing the camera.
Here you can see how the sine value of e controls the rotation and how we go from showing the front of the card to showing the back when e%1 crosses the threshold of 0.5.
Drawing and Distorting the Lines
Near the top and bottom of the loop we'll find the code that determines the shape of the card and draws the horizontal lines that make up the card. Here is the loop for drawing a single individual line using the code with expanded variable names:
for prc = 0,1,.025 do x_dist = sin(time)*20 y_dist = cos(time)*5 ... y_pos = row+39 pset( (64+x_dist)*prc + (64-x_dist)*(1-prc), (y_pos+y_dist)*prc + (y_pos-y_dist)*(1-prc), color) end
You might notice that I don't use Pico-8's line function! That's because each line is drawn pixel by pixel.
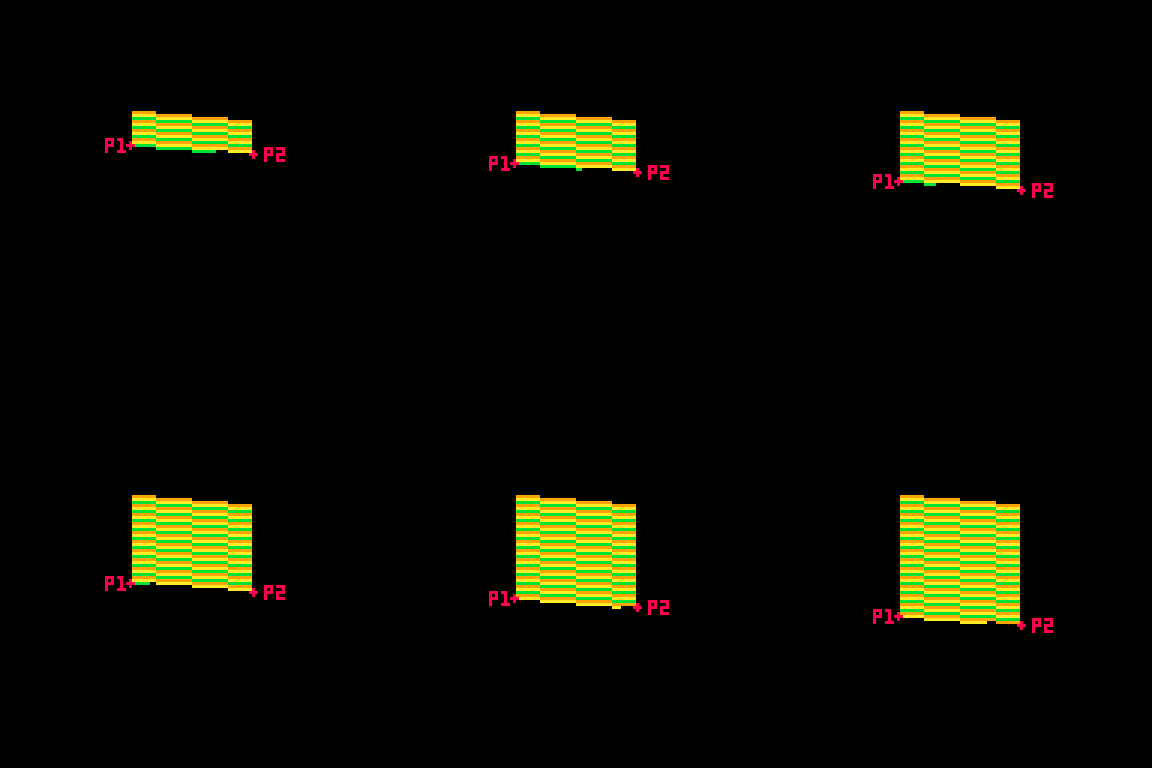
This tweetcart simulates a 3D object by treating each vertical row of the card as a line of pixels. I generate the points on either side of the card(p1 and p2 in this gif), and then interpolate between those two points. That's why the inner for loop creates a percentage from 0 to 1 instead of pixel positions. The entire card is drawn as individual pixels. I draw them in a line, but the color may change with each one, so they each get their own pset() call.
Here's a gif where I slow down this process to give you a peek at how these lines are being drawn every frame. For each row, I draw many pixels moving across the card between the two endpoints in the row.
Here's the loop condition again: for prc = 0,1,.025 do
A step of 0.025 means there are 40 steps (0.025 * 40 = 1.0). That's the exact width of the card! When the card is completely facing the camera head-on, I will need 40 steps to make it across without leaving a gap in the pixels. When the card is skinnier, I'm still drawing all 40 pixels, but many of them will be in the same place. That's fine. The most recently drawn one will take priority.
Getting the actual X and Y position
I said that the position of each pixel is interpolated between the two points, but this line of code may be confusing:
y_pos = row+39 pset( (64+x_dist)*prc + (64-x_dist)*(1-prc), (y_pos+y_dist)*prc + (y_pos-y_dist)*(1-prc), color)
So let's unpack it a little bit. If you've ever used a Lerp() function in something like Unity you've used this sort of math. The idea is that we get two values (P1 and P2 in the above example), and we move between them such that a value of 0.0 gives us P1 and 1.0 gives us P2.
Here's a full cart that breaks down exactly what this math is doing:

::_:: cls() time = t()/8 for row = 0,46 do for prc = 0,1,.025 do x_dist = sin(time)*20 y_dist = cos(time)*5 color = 9 + row % 3 p1x = 64 + x_dist p1y = row+39 + y_dist p2x = 64 - x_dist p2y = row+39 - y_dist x = p2x*prc + p1x*(1-prc) y = p2y*prc + p1y*(1-prc) pset( x, y, color) end end flip()goto _
I'm defining P1 and P2 very explicitly (getting an x and y for both), then I get the actual x and y position that I use by multiplying P2 by prc and P1 by (1-prc) and adding the results together.
This is easiest to understand when prc is 0.5, because then we're just taking an average. In school we learn that to average a set of numbers you add them up and then divide by how many you had. We can think of that as (p1+p2) / 2. This is the same as saying p1*0.5 + p2*0.5.
But the second way of writing it lets us take a weighted average if we want. We could say p1*0.75 + p2*0.25. Now the resulting value will be 75% of p1 and 25% of p2. If you laid the two values out on a number line, the result would be just 25% of the way to p2. As long as the two values being multiplied add up to exactly 1.0 you will get a weighted average between P1 and P2.
I can count on prc being a value between 0 and 1, so the inverse is 1.0 - prc. If prc is 0.8 then 1.0-prc is 0.2. Together they add up to 1!
I use this math everywhere in my work. It's a really easy way to move smoothly between values that might otherwise be tricky to work with.
Compressing
I'm using a little over 400 characters in the above example. But in the real cart, the relevant code inside the loops is this:
j=sin(e)*20 k=cos(e)*5 g=r+39 pset((64+j)*p+(64-j)*f,(g+k)*p+(g-k)*f,c)
which can be further condensed by removing the line breaks:
j=sin(e)*20k=cos(e)*5g=r+39pset((64+j)*p+(64-j)*f,(g+k)*p+(g-k)*f,c)
Because P1, P2 and the resulting interpolated positions x and y are never used again, there is no reason to waste chars by storing them in variables. So all of the interpolation is done in the call to pset().
There are a few parts of the calculation that are used more than once and are four characters or more. Those are stored as variables (j, k & g in this code). These variables tend to have the least helpful names because I usually do them right at the end to save a few chars so they wind up with whatever letters I have not used elsewhere.
Spinning & Drawing
Here's that same example, but with a checker pattern and the card spinning. (Keep in mind, in the real tweetcart the card is fully draw every frame and would not spin mid-draw)
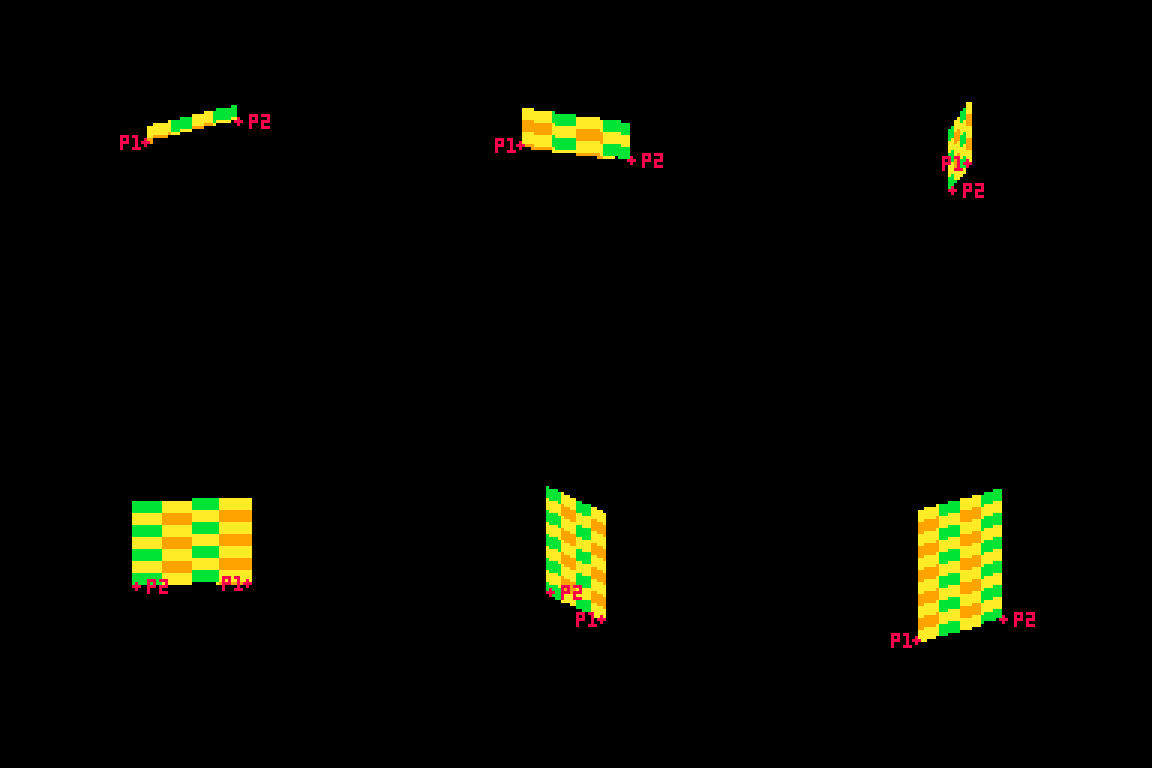
This technique allows me to distort the lines because I can specify two points and draw my lines between them. Great for fake 3D! Kind of annoying for actually drawing shapes, because now instead of using the normal Pico-8 drawing tools, I have to calculate the color I want based on the row (a whole number between0 and 46) and the x-prc (a float between 0 and 1).
Drawing the Back
Here's the code that handles drawing the back of the card:
h=a(17-p*34) v=a(23-r) c=1+min(23-v,17-h)%5/3\1*6
This is inside the nested for loops, so r is the row and p is a percentage of the way across the horizontal line.
c is the color that we will eventually draw in pset().
h and v are the approximate distance from the center of the card. a was previously assigned as a shorthand for abs() so you can think of those lines like this:
h=abs(17-p*34) v=abs(23-r)
v is the vertical distance. The card is 46 pixels tall so taking the absolute value of 23-r will give us the distance from the vertical center of the card. (ex: if r is 25, abs(23-r) = 2. and if r is 21, abs(23-r) still equals 2 )
As you can probably guess, h is the horizontal distance from the center. The card is 40 pixels wide, but I opted to shrink it a bit by multiplying p by 34 and subtracting that from half of 34 (17). The cardback just looks better with these lower values, and the diamond looks fine.
The next line, where I define c, is where things get confusing. It's a long line doing some clunky math. The critical thing is that when this line is done, I need c to equal 1 (dark blue) or 7 (white) on the Pico-8 color pallette.
Here's the whole thing: c=1+min(23-v,17-h)%5/3\1*6
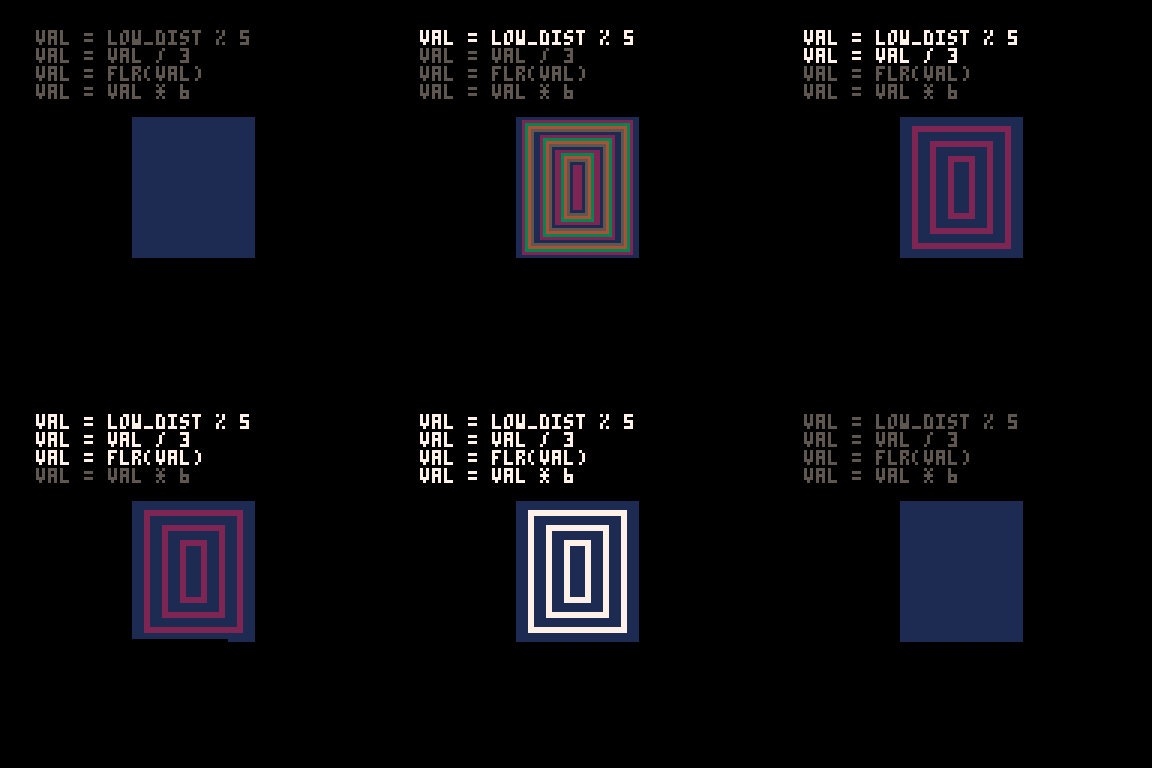
Here is that line broken down into much more discrete steps.
c = 1 --start with a color of 1 low_dist = min(23-v,17-h) --get the lower inverted distance from center val = low_dist % 5 --mod 5 to bring it to a repeating range of 0 to 5 val = val / 3 --divide by 3. value is now 0 to 1.66 val = flr(val) --round it down. value is now 0 or 1 val = val * 6 --multiply by 6. value is now 0 or 6 c += val --add value to c, making it 1 or 7
The first thing I do is c=1. That means the entire rest of the line will either add 0 or 6 (bumping the value up to 7). No other outcome is acceptable. min(23-v,17-h)%5/3\1*6 will always evaluate to 0 or 6.
I only want the lower value of h and v. This is what will give it the nice box shape. If you color the points inside a rectangle so that ones that are closer to the center on their X are one color and ones that are closer to the center on their Y are a different color you'll get a pattern with clean diagonal lines running from the center towards the corners like this:

You might think I would just use min(v,h) instead of the longer min(23-v,17-h) in the actual code. I would love to do that, but it results in a pattern that is cool, but doesn't really look like a card back.

I take the inverted value. Instead of having a v that runs from 0 to 23, I flip it so it runs from 23 to 0. I do the same for h. I take the lower of those two values using min().
Then I use modulo (%) to bring the value to a repeating range of 0 to 5. Then I divide that result by 3 so it is 0 to ~1.66. The exact value doens't matter too much because I am going round it down anyway. What is critical is that it will become 0 or 1 after rounding because then I can multiply it by a specific number without getting any values in between.
Wait? If I'm rounding down, where is flr() in this line: c=1+min(23-v,17-h)%5/3\1*6?
It's not there! That's because there is a sneaky tool in Pico-8. You can use \1 to do the same thing as flr(). This is integer division and it generally saves a 3 characters.
Finally, I multiply the result by 6. If it is 0, we get 0. If it is 1 we get 6. Add it to 1 and we get the color we want!
Here's how it looks with each step in that process turned on or off:
A Note About Parentheses
When I write tweetcarts I would typically start by writing this type of line like this: c=1+ (((min(23-v,17-h)%5)/3) \1) *6
This way I can figure out if my math makes sense by using parentheses to ensure that my order of operations works. But then I just start deleting them willy nilly to see what I can get away with. Sometimes I'm surprised and I'm able to shave off 2 characters by removing a set of parentheses.
The Face Side
The face side with the diamond and the "A" is a little more complex, but basically works the same way as the back. Each pixel needs to either be white (7) or red (8). When the card is on this side, I'll be overwriting the c value that got defined earlier.
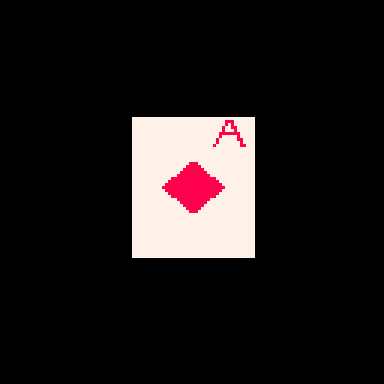
Here's the code that does it (with added white space). This uses the h and v values defined earlier as well as the r and p values from the nested loops.
u=(r-1)/80 z=a(p-.2) if(e%1<.5) c= a(r-5) < 5 and z < u+.03 and (r==5 or z>u) and 8 or 8-sgn(h+v-9)/2
Before we piece out what this is doing, we need to talk about the structure for conditional logic in tweetcarts.
The Problem with If Statements
The lone line with the if statement is doing a lot of conditional logic in a very cumbersome way designed to avoid writing out a full if statement.
One of the tricky things with Pico-8 tweetcarts is that the loop and conditional logic of Lua is very character intensive. While most programming language might write an if statement like this:
if (SOMETHING){ CODE }
Lua does it like this:
if SOMETHING then CODE end
Using "then" and "end" instead of brackets means we often want to bend over backwards to avoid them when we're trying to save characters.
Luckily, Lua lets you drop "then" and "end" if there is a single command being executed inside the if.
This means we can write
if(e%1 < 0.5) c=5
instead of
if e%1 < 0.5 then c=5 end
This is a huge savings! To take advantage of this, it is often worth doing something in a slightly (or massively) convoluted way if it means we can reduce it to a single line inside the if. This brings us to:
Lua's Weird Ternary Operator
In most programming language there is an inline syntax to return one of two values based on a conditional. It's called the Ternary Operator and in most languages I use it looks like this:
myVar = a>b ? 5 : 10
The value of myVar will be 5 if a is greater than b. Otherwise is will be 10.
Lua has a ternary operator... sort of. You can read more about it here but it looks something like this:
myVar = a>b and 5 or 10
Frankly, I don't understand why this works, but I can confirm that it does.
In this specific instance, I am essentially using it to put another conditional inside my if statement, but by doing it as a single line ternary operation, I'm keeping the whole thing to a single line and saving precious chars.
The Face Broken Out
The conditional for the diamond and the A is a mess to look at. The weird syntax for the ternary operator doesn't help. Neither does the fact that I took out any parentheses that could make sense of it.
Here is the same code rewritten with a cleaner logic flow.
--check time to see if we're on the front half if e%1 < .5 then --this if checks if we're in the A u=(r-1)/80 z=a(p-.2) if a(r-5) < 5 and z < u+.03 and (r==5 or z>u) then c = 8 --if we're not in the A, set c based on if we're in the diamond else c = 8-sgn(h+v-9)/2 end end
The first thing being checked is the time. As I explained further up, because the input value for sin() in Pico-8 goes from 0 to 1, the midpoint is 0.5. We only draw the front of the card if e%1 is less than 0.5.
After that, we check if this pixel is inside the A on the corner of the card or the diamond. Either way, our color value c gets set to either 7 (white) or 8 (red).
Let's start with diamond because it is easier.
The Diamond
This uses the same h and v values from the back of the card. The reason I chose diamonds for my suit is that they are very easy to calculate if you know the vertical and horizontal distance from a point! In fact, I sometimes use this diamond shape instead of proper circular hit detection in size-coded games.
Let's look at the line: c = 8-sgn(h+v-9)/2
This starts with 8, the red color. Since the only other acceptable color is 7 (white), tha means that sgn(h+v-9)/2 has to evaluate to either 1 or 0.
sgn() returns the sign of a number, meaning -1 if the number is negative or 1 if the number is positive. This is often a convenient way to cut large values down to easy-to-work-with values based on a threshold. That's exactly what I'm doing here!
h+v-9 takes the height from the center plus the horizontal distance from the center and checks if the sum is greater than 9. If it is, sgn(h+v-9) will return 1, otherwise -1. In this formula, 9 is the size of the diamond. A smaller number would result in a smaller diamond since that's the threshold for the distance being used. (note: h+v is NOT the actual distance. It's an approximation that happens to make a nice diamond shape.)
OK, but adding -1 or 1 to 8 gives us 7 or 9 and I need 7 or 8.
That's where /2 comes in. Pico-8 defaults to floating point math, so dividing by 2 will turn my -1 or 1 into -0.5 or 0.5. So this line c = 8-sgn(h+v-9)/2 actually sets c to 7.5 or 8.5. Pico-8 always rounds down when setting colors so a value of 7.5 becomes 7 and 8.5 becomes 8. And now we have white for most of the card, and red in the space inside the diamond!
The A
The A on the top corner of the card was the last thing I added. I finished the spinning card with the card back and the diamond and realized that when I condensed the whole thing, I actually had about 50 characters to spare. Putting a letter on the ace seemed like an obvious choice. I struggled for an evening trying to make it happen before deciding that I just couldn't do it. The next day I took another crack at it and managed to get it in, although a lot of it is pretty ugly! Luckily, in the final version the card is spinning pretty fast and it is harder to notice how lopsided it is.
I mentioned earlier that my method of placing pixels in a line between points is great for deforming planes, but makes a lot of drawing harder. Here's a great example. Instead of just being able to call print("a") or even using 3 calls to line() I had to make a convoluted conditional to check if each pixel is "inside" the A and set it to red if it is.
I'll do my best to explain this code, but it was hammered together with a lot of trial and error. I kept messing with it until I found an acceptable balance between how it looked and how many character it ate up.
Here are the relevant bits again:
u=(r-1)/80 z=a(p-.2) if a(r-5) < 5 and z < u+.03 and (r==5 or z>u) then c = 8
The two variables above the if are just values that get used multiple times. Let's give them slightly better names. While I'm making edits, I'll expand a too since that was just a replacement for abs().
slope = (r-1)/80 dist_from_center = abs(p-.2) if abs(r-5) < 5 and dist_from_center < slope+.03 and (r==5 or dist_from_center>slope) then c = 8
Remember that r is the current row and p is the percentage of the way between the two sides where this pixel falls.
u/slope here is basically how far from the center line of the A the legs are at this row. As r increases, so does slope (but at a much smaller rate). The top of the A is very close to the center, the bottom is further out. I'm subtracting 1 so that when r is 0, slope is negative and will not be drawn. Without this, the A starts on the very topmost line of the card and looks bad.
z/dist_from_center is how far this particular p value is from the center of the A (not the center of the card), measured in percentage (not pixels). The center of the A is 20% of the way across the card. This side of the card starts on the right (0% is all the way right, 100% is all the way left), which is why you see the A 20% away from the right side of the card.
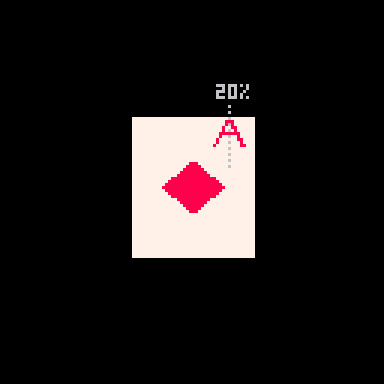
These values are important because the two legs of the A are basically tiny distance checks where the slope for a given r is compared against the dist_from_center. There are 3 checks used to determine if the pixel is part of the A.
if a(r-5) < 5 and z < u+.03 and (r==5 or z>u) then
The first is abs(r-5) < 5. This checks if r is between 1 and 9, the height of my A.
The second is dist_from_center < slope+.03. This is checking if this pixel's x distance from the center of the A is no more than .03 bigger than the current slope value. This is the maximum distance that will be considered "inside" the A. All of this is a percentage, so the center of the A is 0.20 and the slope value will be larger the further down the A we get.
Because I am checking the distance from the center point (the grey line in the image above), this works on either leg of the A. On either side, the pixel can be less than slope+.03 away.
Finally, it checks (r==5 or dist_from_center>slope). If the row is exactly 5, that is the crossbar across the A and should be red. Otherwise, the distance value must be greater than slope (this is the minimum value it can have to be "inside" the A). This also works on both sides thanks to using distance.
Although I am trying to capture 1-pixel-wide lines to draw the shape of the A, I could not think of a cleaner way than doing this bounding check. Ignoring the crossbar on row 5, you can think about the 2nd and 3rd parts of the if statement essentially making sure that dist_from_center fits between slope and a number slightly larger than slope. Something like this:
slope < dist_from_center < slope+0.03
Putting it Together
All of this logic needed to be on a single line to get away with using the short form of the if statement so it got slammed into a single ternary operator. Then I tried removing parentheses one at a time to see what was structurally significant. I wish I could say I was more thoughtful than that but I wasn't. The end result is this beefy line of code:
if(e%1<.5)c=a(r-5)<5and z<u+.03and(r==5or z>u)and 8or 8-sgn(h+v-9)/2
Once we've checked that e (our time value) is in the phase where we show the face, the ternary operator checks if the pixel is inside the A. If it is, c is set to 8 (red). If it isn't, then we set c = 8-sgn(h+v-9)/2, which is the diamond shape described above.
That's It!
Once we've set c the tweetcart uses pset to draw the pixel as described in the section on drawing the lines.
Here's the full code and what it looks like when it runs again. Hopefully now you can pick out more of what's going on!
a=abs::_::cls()e=t()for r=0,46do for p=0,1,.025do j=sin(e)*20k=cos(e)*5f=1-p h=a(17-p*34)v=a(23-r)c=1+min(23-v,17-h)%5/3\1*6u=(r-1)/80z=a(p-.2)if(e%1<.5)c=a(r-5)<5and z<u+.03and(r==5or z>u)and 8or 8-sgn(h+v-9)/2 g=r+39pset((64+j)*p+(64-j)*f,(g+k)*p+(g-k)*f,c)end end flip()goto _

I hope this was helpful! I had a lot of fun writing this cart and it was fun to break it down. Maybe you can shave off the one additional character needed to slow it down by using e=t()/2 a bit. If you do, please drop me a line on my mastodon or tumblr!
And if you want to try your hand at something like this, consider submitting something to TweetTweetJam which just started! You'll get a luxurious 500 characters to work with!
Links and Resources
There are some very useful posts of tools and tricks for getting into tweetcarts. I'm sure I'm missing many but here are a few that I refer to regularly.
Pixienop's tweetcart basics and tweetcart studies are probably the single best thing to read if you want to learn more.
Trasevol_Dog's Doodle Insights are fascinating, and some of them demonstrate very cool tweetcart techniques.
Optimizing Character Count for Tweetcarts by Eli Piilonen / @2DArray
Guide for Making Tweetcarts by PrincessChooChoo
The official documentation for the hidden P8SCII Control Codes is worth a read. It will let you do wild things like play sound using the print() command.
I have released several size-coded Pico-8 games that have links to heavily annotated code:
Pico-Mace
Cold Sun Surf
1k Jump
Hand Cram
And if you want to read more Pico-8 weirdness from me, I wrote a whole post on creating a networked Pico-8 tribute to Frog Chorus.
19 notes
·
View notes
Text



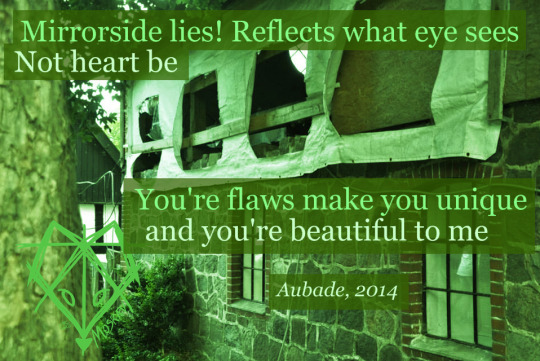


Lyrics through the decade 2/10
I've decided to collect all the songs I've made through the last decade and share my favourite snippets with you guys. The pictures for the backgrounds will (as much as possible) be pictures I've taken the same year as the lyrics were written. The full lyrics may or may not be made official someday.
Part 2; 2014
In March 2014 I made my first song and so with the new found interest in songwriting I started experimenting a lot with different themes and moods of songwriting that I've tried to show here.
More info under the line
Stay creative, my fellow foxes 🦊💚
Song 1 (pic 1); Ray of Sunshine
First song I ever wrote with a very simple form of three verses in a row. I had tried to learn an ATL song on guitar yet in my failed attempt to learn the rhytmn I made a melody instead (very hard to sing but fun for what it is)
Featured lyric: Clouds outside are starting to gather
[and] my mind in as terrible weather.
Song 2 (pic 2); Female Dress Code
The second song I ever wrote and the first with a chorus - way more singable than RoS. I call it my 'Not Like Other Girls' song since I through the song describe this one girl I say is the opposite of me and how I don't understand women fashion.
Featured lyric: the best thing you can wear is a smile,
but has been hidden away for a while.
Song 3 (pic3); Instant Camera
A song about longing for a relationship (not autobiografical if I remember correctly). This song is special to me not in its themes but that I played it for the talent show at my high school and won first prize. I spend the money to buy a new guitar.
Featured lyric: As May turned to December,
We took photographs with your old instant camera
((Extended)) are you gonna burn them like orange autumn leaves?
Song 4 (pic4); Aubade
First song written on piano (and I made it a spanish intro because I could). As song about supporting a friend in need. Has some really cute lines in retrospect.
Featured lyric: Mirrorside lies! It reflects what eye sees not heart be.
Your flaws make you unique, and you're beautiful to me.
Song 5 (pic5); Train
An angst song. Written together with a friend that accidentally also came out as trans years later. It is a very angry song full of self dread and hate. Very teenager.
Featured lyric: I'll go down in history as another nobody
starring out in nowhere wasting time.
Song 6 (pic6); Corner
First song that I remember where I didn't make up a character to tell the story from but instead used my own experiences. Although some parts of it is half inspired by Perks of Being a Wallflower.
Feautured lyric: Observer. I'm lost in a world were I don't exist
((Extended)) no wonder why my voice's dismissed.
Song 7 (pic7); Stranger 7-10-8-1
Probably one of my strangest titles (pun intended) this song is about seeing the beauty in people around you and that we cannot know everybody's story. Also it is a cute little love song to all the strangers you might meet on your way.
Featured lyric: I have to say, you look good today.
We haven't met, but anyways
everybody's beautiful in their own way.
Song 8 (pic8); Not All Heroes Wear Capes Mine Plays Guitar
Can you tell that I liked Fall Out Boy and Panic! At the Disco from the sheer length of this title x'D? This was a song made and dedicated to one of my then favourite musician, Jack Barakat from All Time Low which is funny when I read it now since a few bits of the lyrics can be used to describe one of my favourite musicians today (Jere Pöyhönen aka Käärijä)
Featured lyric: He's a ticking time bomb filled with bad jokes and contagious joy
Honorable mention:
Flower bud, he trives on the stage tonight.
#lyrics#2014#ray of sunshine#female dress code#corner#aubade#instant camera#train#stranger 7-10-8-1#not all heroes wear capes mine plays guitar#mosraev#mosræv
5 notes
·
View notes
Text
...in retrospect, posting this when I was exhausted from a long day at work was a mistake. I went over how I got the inputs, but didn't even explain the code. So, take 2.
This is a script written in Python, a programming language that I am not very familiar with but that can be run online without any setup. The text in the script has three parts:
A function to solve Captain Cajun instances in the abstract
Data that will inform the program about the specific instance to be solved
Invocation of the function with the data
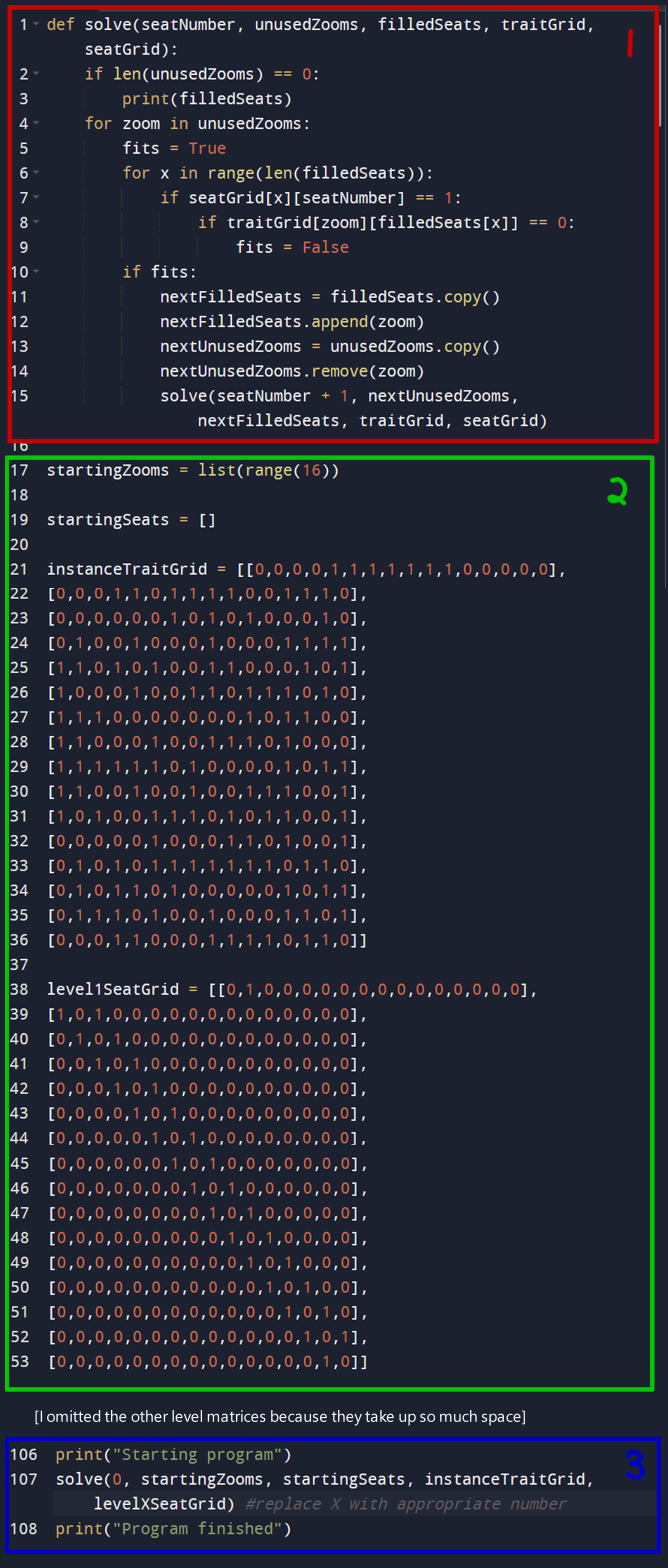
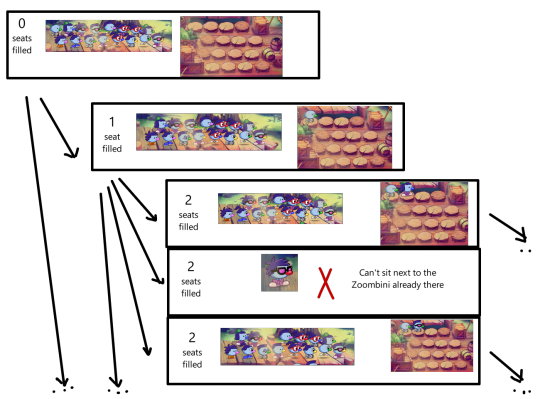
The function is recursive, meaning that when it is invoked, it will take a step towards solving the problem, then invoke itself again with the updated data. Specifically, it will determine which zoombinis are allowed to sit in a particular seat, then invoke itself again to fill the next seat. It will continue until all seats are full- in which case it outputs a description of the seating arrangement- or there are no zoombinis that would be allowed in the current seat, then it rewinds to the last time it made a choice and tries something else. In theory I could have made it stop completely when it finds a solution that works, to save time and energy, but a) 16 is a small enough dataset that it runs quickly and b) I didn't feel like looking up how to do that properly in Python.
How does it determine which zoombinis are allowed to sit in the current seat? That's what the matrices (those big squares of zeroes and ones) are for. Imagine the seats are numbered 1-16 (or 0-15 by computer science convention, as in the code. It's kinda like how US floors go first, second, third, and UK floors go ground, first, second). If seats 1 and 2 are adjacent to each other on the Captain's raft, so zoombinis there need to share a trait, you mark a 1 in the cell in 1st row and 2nd column of the matrix. If they aren't adjacent, you mark a 0. You repeat this with 1 and 3 for first and third, 2 and 3 for second and third, and so on, until every cell is filled out. I used the graph-making site for this, because I found it faster and easier to visualize. You do the same thing with the zoombinis- numbering them, then marking a 1 if they share at least one trait and a 0 if they don't.
Here's the level 4 seat with adjacency lines drawn on, the graph I made online, and the matrix generated by the graphing website.
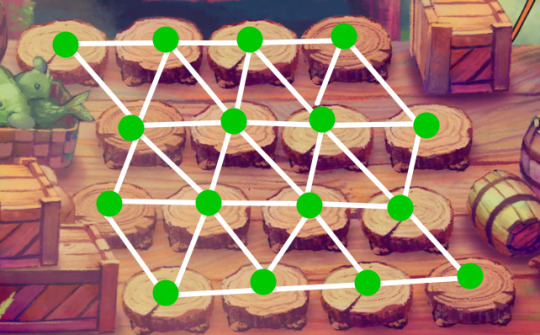
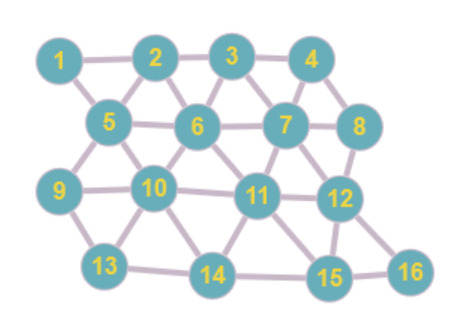
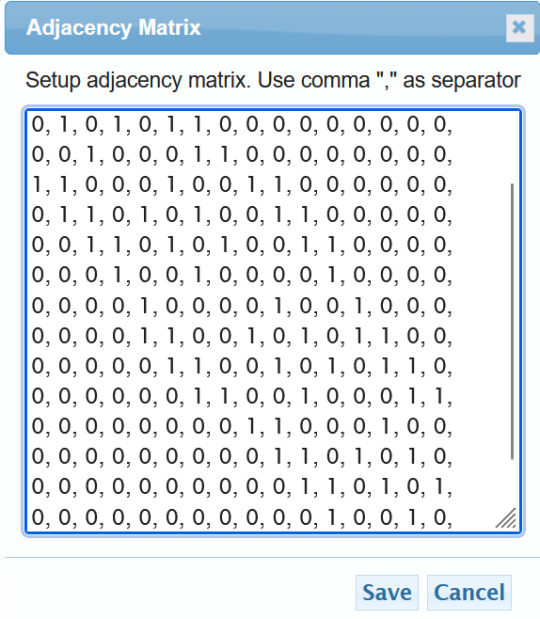
The zoombini graph looks really messy because many of them share traits with enough others that the lines are hard to make out, so I won't include a picture of that.
The code fills the seats in numerical order. To determine whether a certain zoombini can sit in seat X, it will check the filled seats by looking up the number in the first row and the Xth column, then the second row and the Xth column, up to the X-1st row and the Xth column. Whenever it finds a 1, meaning the seats are adjacent, it gets the number of the zoombini sitting there. Then it checks the trait matrix, using the numbers of the zoombini being validated and the seated zoombini, to see if they share traits. If the zoombini shares traits with those in all adjacent seats, it marks the zoombini down and sends the description of the new problem state to the next instance of the function to fill the next seat.
I'm getting sleepy so I hope that's clear enough.
Here's some output for the instance that I've been getting screenshots from:
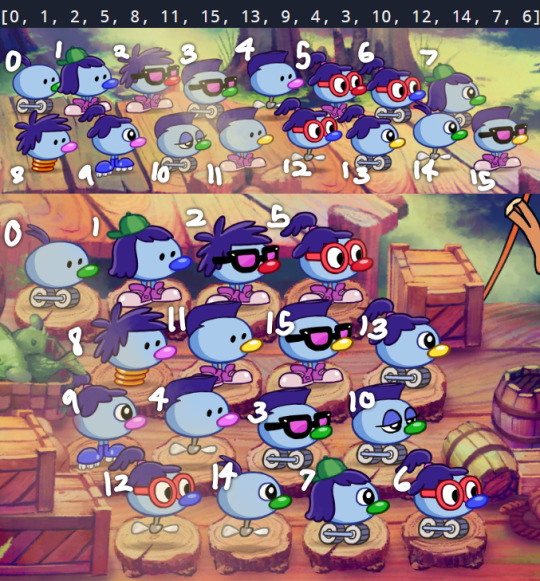
I will come back to this at some point; I'd like to post the script as text so people can save it and use it for themselves, along with instructions for using the graph site and python online interpreters. I might also do a line-by-line breakdown of what's happening in the code.
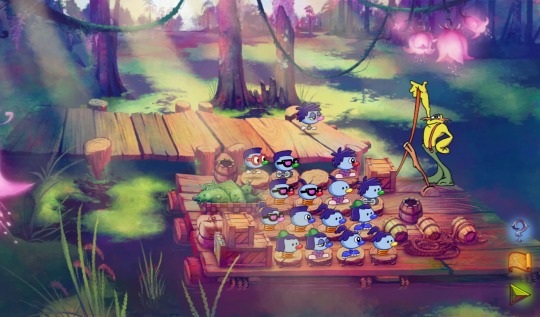
Throwing this out there: is it unsolvable
Every zoombini can only sit next to zoombinis with whom they share at least one feature. The seats are arranged diagonally so each zoombini must have similar zoombinis on all sides.
432 notes
·
View notes
Text
probably ted lasso spoilers
I went through the TL season 3 playlist so you don't have to and made some notes! (I considered this playlist done but we'll see how this goes) hope you enjoy!
The song Superstar is from the rock opera Jesus Christ Superstar. It’s sung by Judas’ spirit who had committed suicide earlier. I don’t want to put a parallel between Ted and Jesus and Nate and Judas but it kinda lies on the surface? And lines Every time I look at you I don't understand Why you let the things you did get so out of hand. You'd have managed better if you'd had it planned. Why'd you choose such a backward time in such a strange land? OH MY GOD
Three songs by Nigerian artists go in a row, so ep3 or 4 is probably about Sam and his restaurant or include this plotline in any way. Or we're getting another Nigerian player!
Everybody knows is an interesting choice because this song raises a lot of social and relationship problems. I think the most important is hypocrisy or, rather, knowing about issues and not doing anything to fix them, letting them be. Maybe it refers to everyone who is close to Ted and notices what’s happening with him but not paying proper attention.
Joker and The Thief is used in “The Hangover” which is referred in s2e11 when Beard calls Ted out for being too closed off.
I bet Fist Fight! is either about Jamie’s dad or Rupert being beaten up. Please.
Sinister Kid may be about Nate and him thinking that he was naturally-born evil and he can’t change it? But he’ll soon find out that it’s untrue. (And that's me, that's me The boy with the broken halo That's me, that's me The devil won't let me be)
Something tells me that Don’t think twice, it’s all right is about Tedbecca. Also second Bob Dylan song per season, first one plays when Ted cleans up his flat. So it’s also can be about Michelle. (I ain't saying you treated me unkind You could have done better, but I don't mind And you just sorta wasted my precious time But don't think twice it's all right) Upd: it occurred to me that it might be about Jamie or Keeley referring to each other.
Oh What A Performance! (I won an Oscar for playing a fool) and Quiet (Goodbye Don't cry You know why And it'll be just as quiet when I leave As it was when I first got here) give me an ache for some reason. Ep 6’s (apparently) gonna hurt.
But Wake Me Up Before You Go-Go straight after Nirvana’s song is suspicious. Hopefully it’s about Roykeeley who are back together.
CONGRATS GUYS HET WERD ZOMER, VENUS AND ZIJ GELOOFT IN MIJ ARE DUTCH SONGS AND IN THE PLAYLIST THEY’RE SOMEWHERE NEAR EP8 THEREFORE “WE’LL NEVER HAVE PARIS” IS MOST LIKELY THE NETHERLANDS EP!
Let’s talk about Boy by Book of Love!!! The song is said to be about woman who has feelings for a gay man. To me this song is also kind of trans-coded. AND Book of Love’s songwriter stated that this song “written about Boy Bar, which was a very exclusive gay club in the East Village.”. (I want to be where the boys are But I'm not allowed I wait outside of the boy's bar I wait for them to all come out)
I’m 99% sure that ep8 is THE episode.
It’s interesting that after Three Little Birds (Ajax anthem) comes The Angel (North London Forever) (song dedicated to Arsenal). Maybe we’ll see UEFA Champions League in some way or it’s just a coincidence and it’s just Richmond playing with Arsenal.
Dreams was used in the trailer of “Boys on The Side” where one of the main plotlines is unrequited love of a woman to a woman who has something with a man. But then both girls admit their love for each other (not necessarily romantic but still). Interesting, right? Might be another coincidence though.
Centerfield confuses me, song about baseball in a show about football? Is it irony or what.
Doomed speaks about the experience of aromantic people, the song is in the album “Aromanticism” and its writer explores corners of life without possibility of feeling romantic attraction. Are we getting an aromantic character??
Criminal feels like a Nate song, him feeling bad for mistakes and wanting to pay for his wrongdoings. (Heaven help me for the way I am Save me from these evil deeds before I get them done I know tomorrow brings the consequence at hand But I keep living this day like the next will never come)
And finally songs from “La Cage aux Folles”, a 1983 musical about gay couple, Georges, who’s an owner of a drag nightclub named “La Cage aux Folles”, and Albin, who’s a drag queen. Let’s add a little bit of a context. Georges and Albin’s son Jean-Michel is engaged to Anne whose parents are conservative and they don’t know yet that their daughter’s future-in-laws are a gay couple. Jean-Michel asks Georges to tell Albin to absent himself from his extravagant behavior and even invite Jean-Michel’s biological mother for a dinner instead of Albin so they can seem ‘normal’. Georges hadn’t had a chance to explain the situation to his spouse as Albin went performing to the club.
It’s the moment when La Cage aux Folles plays, the song describes the nightclub, its vulgarity and eccentricity, how it’s tolerant and welcoming to everyone (https://www.songlyrics.com/la-cage-aux-folles/la-cage-aux-folles-lyrics/ - here’s the lyrics if someone needs). I have no idea when this song might play in s3, especially when it comes to the end of it, honestly.
So, Georges and Jean-Michel started redecorating their house to make it look less gay without Albin knowing. Albin accidentally notices the two, Georges has to explain and Albin performs I Am What I Am practically letting them know that he’s proud of being himself and won’t change for anyone.
As someone had mentioned before this song basically became a “gay anthem” and was widely recorded. It’s the finale number of the first act as it apparently will be the last song of the third season. Considering all of the above I doubt that they chose both of these songs by accident and put them in an exact same order as they are in the musical. Something’s coming.
We know that we’re getting Ted at the airport as the last scene of the season. He might be waiting for his mother or Michelle with Henry to arrive (or leave) but either way he’s not going to change for them and they’ll have to accept him the way he is. And yes, I believe it’ll be a message about queerness. There are too much signs (and songs) pointing at that.
Perhaps when Jason said “Maybe by May 31, once all 12 episodes of the season [have been released], they’re like, ‘Man, you know what, we get it, we’re fine. We don’t need anymore, we got it.’” he addressed conservative fans of the show (they form a great percentage of the audience, don’t forget) who wouldn’t want more of TL since it became ‘woke’.
That’s it, let me know your thoughts :)
31 notes
·
View notes
Text
When I got my ADHD diagnosis, I looked at the questions on the screening form and thought, "If this result comes back positive, then I'm definitely not the only person in my family who has it." Questions like
"Have difficulty finishing one activity before starting another one" and
"I finish others' sentences before they can finish it themselves" and
"have trouble staying on one topic when talking"
...I thought were just weird quirks of my family, but no. When I got my results, I contacted my cousin, and she contacted her sisters and mother, and .. .. yeah. Basically everyone in my dad's side of the family is ADHD.
Now there are some problems with that, obviously, (getting family reunions to stick to a schedule is lol no) but there are some really fantastic perks. For one thing, no one in that family minds if I interrupt them while they're talking ... everyone's happy to keep 3 conversations going at the same time .... and no one minds if you fidget constantly.
But the best perk -- at least that I've found so far -- is that all of our parents have coping mechanisms, and passed them on to us. When I found myself unable to handle tasks with more than one step, my father didn't say "WTF are you talking about? It's easy! Just do the thing! Stop being lazy!" No, he could relate completely, and he sat down and taught me how to handle that.
So today, I'm going to pass on to you the coping mechanism my dad taught me for handling the "cannot put tasks in order / cannot get started / forget what I'm doing" problem. You'll need to adjust it for your own needs and your own struggles, but hopefully it'll be helpful in setting up your own process.
I'm going to walk through it with a big project I'm doing at work, just to have a concrete example. That will make some of the discussion specific to computer programming and technical writing, but I do the same thing for all my projects, so hopefully it'll be generalizable.
So to set the stage:
I was supposed to modify this piece of code -- we'll call it "Rosetta" -- to make it handle call data as well as what it was already doing. I did that.... but we now need the code to be able to handle calls (if that's wanted) but also to be able to handle NOT having calls (if THAT'S wanted).
Which is just .... ugh. So much. SOOOOOOOO much.
So. Break it down.
Step one is to get some recording mechanism - pen and paper, whiteboard, blank computer document, whatever
(Technically, this is a different coping strategy, so we'll just take a quick detour: WRITE THINGS DOWN. Your brain is shit at remembering things, and anyway you've already got limits on your working memory; why would you choose to tie up some of that limited resource in something that could be accomplished with literal stone-age technology? Don't even try to remember things. WRITE THEM DOWN.)
I like sticky notes: they're readily available in all offices, they're pretty cheap, and (most importantly) they can be rearranged if it turns out that I forgot a step or put the steps in the wrong order (which, like, let's be honest, I am definitely going to do). But they kill trees and create unnecessary methane emissions, so I've recently switched over to using virtual sticky notes. That's the format I'm going to use for this example, but you can use anything that meets your purposes.
So, you've got something to write with, you're ready to start.
The first question is: what are you trying to accomplish here? What would "done" look like? What is our goal?
I need to end up with a version of Rosetta that will make the correct results if you don't want calls, and will also make the correct results if you do.
The goal here is that you end up with a statement that you can definitively say (a) Yes this is what I wanted or (b)No this is not right because _______
In this case, in order to do that, I'll need to define "correct results" for both call- and non-call versions. But if I have that nailed down, then this statement meets that criterion: I'll be able to say "Yes, this is what I wanted: see, it makes the correct result for calls, and it makes the correct result for not-calls". Or else I'll be able to say, "No, this is wrong: see, it makes the correct result for calls, but on not-calls it does X and we wanted Y."
I have a clear, definitive standard about what I need to do and whether or not I've done it.
But there was a prerequisite there: I need to define "correct results".
So that goes on a sticky note: Create test that will compare my results to existing call!Rosetta-results and to existing not-call!Rosetta-results.
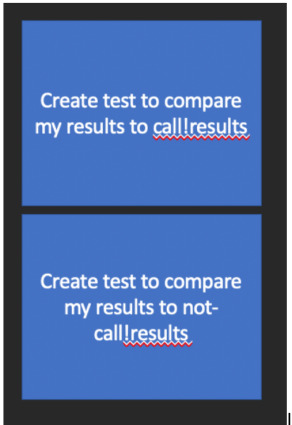
[ID: Two blue boxes, one on top of the other. The top one says in white text "Create test to compare my results to call!results" The bottom one says "Create test to compare my results to not-call!results"] OK. So now we know what we want. The second question is: what do we need to do in order to get that? Here's where the sticky-note recording system really shines, because you don't have to answer this question sequentially. You just start writing down every single thing that is not the way you want it to end up.
I need it to remove commas in the python script, not the bash script
I need to delete the first part of the get_runs() function, which doesn't do anything
I need to delete the rest of the parameters passed to build_query_script() function, because runs encompasses all the others
while we're on that subject, runs doesn't even need the group_variable, so let's pull that out of the parameter document
we also have a dmf defined, which the bash script demands but doesn't use; let's change that demand
since we're changing the structure of the parameter document, we don't need to pull new metrics for each run, so let's move that outside of the runs() loop and only run once
right now the parameter document is ALMOST but not quite "one row per template". Make it so it's actually one row per template.
among other things, that's going to require making it possible for a template to be followed by nothing at all, since it's the assumption that a template will have a metrics block after it that makes it not quite one row per template. So make it possible to publish a template with a null block
the other thing that's weirdly hard-coded is the definition of what a block looks like. Would it make more sense to separate that out into an input file, like the parameters document? On the one hand, that would make it much more flexible; on the other hand, that's another piece that can break. Don't know. Put a question mark on it.
etc
Here's what it looks like at the end of this step:
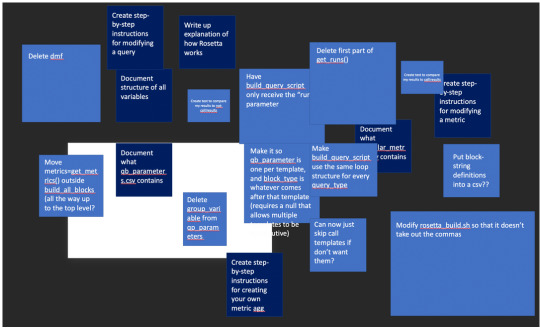
[ID: A black and white background showing many boxes in two different shades of blue, all with white text. Some of the boxes are overlapping each other.]
As you can see, at this phase you don't need to worry about any of the following:
ordering the tasks. Just stick 'em right on top of each other for now
how you're going to do any of this. Right now we just need to know what, not how
sticking to only one project. As I was working on this, it occurred to me that this whole process would have been a heck of a lot easier if someone had just made a user manual for this, and since I have to go through all the code line-by-line anyway, I might as well write up the documentation while I'm at it. (To help out future-me, if nothing else.) So I put those tasks on another color of sticky note.
making notes that make any ***ing sense to anyone else. This process is for you, and only you need to understand what you're talking about it. Phrase it in ways that make sense to your brain, and to hell with anyone else.
on that topic, also don't worry about making steps that are "too small" or "too dumb" to write down. This is for you. If "save document" feels like a step to you, then write it down.
You also don't need to get every single step involved in the project right now. Get as many as you can, to be sure, but the process is designed on the assumption that you ARE going to forget important steps, and is designed to handle that.
When you can't think of any more steps, then the third question is: what order does it make sense to do these in? Are there any steps that would be easier if you did another step first? Are there any that literally cannot be done unless another step is complete?
This is also a good place to group steps if they fit together nicely. When I used physical sticky notes, I used two different sizes; digitally I can of course make them whatever size I want.
So I have several documentation steps that (a) do need to be written to make sense to other people and (b) I really need to know what's going on before I can do that. I could write them now, but if I did, I'd just end up re-writing them based on things that change as I'm coding. So we'll move those to the end:
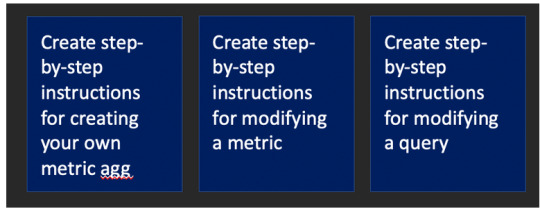
[ID: Three dark blue boxes with white text. They read "Create step-by-step instructions for creating your own metric agg", "Create step-by-step instructions for modifying a metric", "Create step-by-step instructions for modifying a query."]
These parts, though -- if I had all the variable structures written down, I could look at them while I'm coding. Then I won't have to keep scrolling back and forth in the code, trying to remember if it's an array or a dictionary while also trying to remember what part of the code I was working on. Brilliant. Move that to the front.
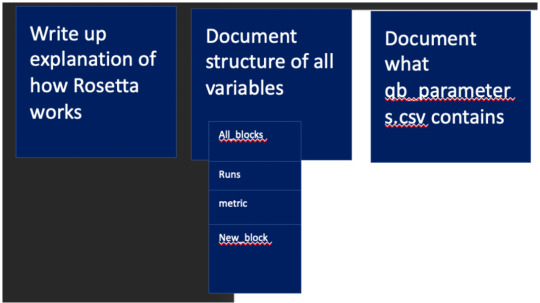
[ID: Seven dark blue boxes with white text, three large, four small. The first one is large and says "Write up explanation of how Rosetta works." The second one is large and says "Document structure of all variables." Attached to that one are four smaller boxes that say "All_blocks", "Runs", "metric", "New_block". The third large one says "Document what qb_parameters.csv contains"]
Also, while I'm at it, I should get the list of variables I need to document -- then I won't have to keep scrolling to find them. Make those sub-steps.
I definitely keep needing to look up what's in the parameters document, so I should write that down, too. For the user manual I also should write down what's in the metric document, but I don't need that for myself, so I can send that to the end.

[ID: The same three dark blue boxes from two screenshots ago (create step-by-step instructions for metric agg, modifying a metric, and modifying a query), now with another dark blue box in front of them with white text that says "Document what granular_metrics.tsv contains."]
These five are all small steps, and are all related in that they don't actually (hopefully) change the functionality of the code; they're just stuff left over from prior versions of this code. So we can lump them all together.
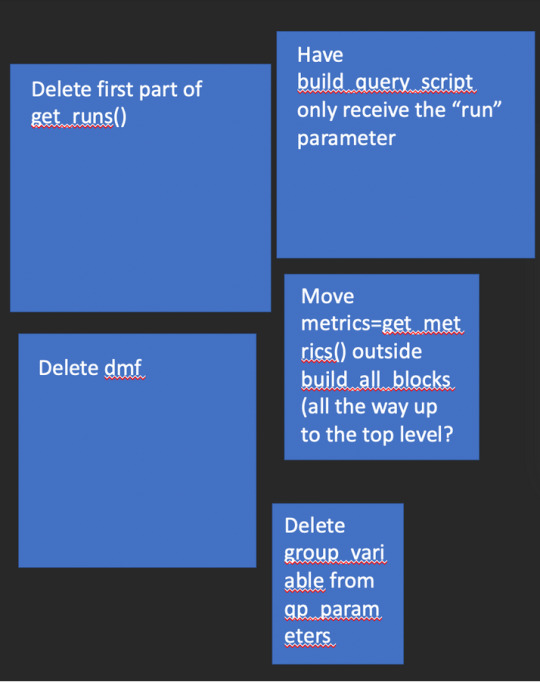
[ID: Five light blue boxes with white text that say "Delete first part of get_runs()", "Have build_query_script only receive the "run" parameter" "Delete dmf" "Move metrics=get_metrics() outside build_all_blocks (all the way up to the top level?" "Delete group_variable from qp_parameters"]
My brain likes this better, so that I can keep track of fewer "main steps", but that's just a peculiarity of me -- you should lump and split however you prefer to make this process easier for you.
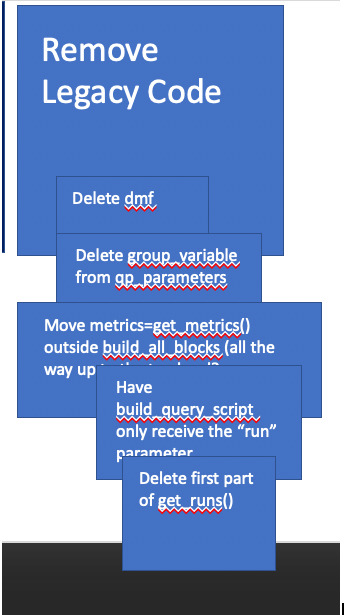
[ID: The same five boxes from the prior screenshot, now all made smaller and attached to a larger box that says "Remove Legacy Code"]
Keep going, step by step, sticky by sticky, until you've got them in order. If -- while you're doing this -- you remember another thing you need to do, write it on a sticky and slap it on the pile; you don't have to stop what you're doing to deal with it, because it's written down and it's on the pile and it will get processed; you can just keep working on the thing you're on right now.

[ID: All the same boxes from the first screenshot, now in a neat row. Some of the original boxes have been grouped together. The ones that were said to be at the beginning of the process are on the left and the ones that were said to be at the end are on the right.]
Step four: for the love of all that's holy, SAVE THIS LIST.
Write it on your cubicle whiteboard where it won't be erased
write it on a piece of paper and tape it to the office wall
send an email to yourself
take a picture with your phone
I don't care but save it.
When I used physical sticky notes, I kept them all on the hood of my cubicle's shelf. Now, as you can see, I use Powerpoint, which is irritating af but does allow me to keep everything in a single document, which I can write down the path of.

[ID: White text on a black background says "open ~/Documents/Rosetta\ Modifications\ and \Documentation.pptx" The next line says "Notes in Rocketbook pg 10-12, 16" The next line says "Turn that into documentation that can be used for making modifications."]
And now (finally) you can answer the question "How would I even get started on that?" You look at the first thing on the list, and you treat it as its own project. You can hyperfocus on this step and completely forget about everything else this project requires, because everything you need to remember for the rest of it is written down.
If, as you're working a step, you think of something else you need to do for the big project, write it on a sticky and slap it on the pile. Don't even worry about trying to order it or identify sub-steps; as long as it's not blocking the thing you need to work on right now, you don't have to care. Just stick that bugger anywhere at all on the list, and go back to what you were doing. When you un-hyperfocus and come back to look at your list, there'll be a big sticky note stuck sideways across all the rest of the steps, and you'll remember to file and order it then.
Other benefits of this system
1) The first question really helps with unclear directions from your boss. You can take whatever they told you to do, and translate it into a requirement that is clearly either met or not-met, and then run it back by the boss.
If they say, "No, no, we want ______" then phew! You just saved a huge miscommunication and weeks of wasted work! What a good employee you are! What an excellent team player with strong communication skills!
If they say "Yes, that's what I want," then you know -- for sure -- what it is you're trying to accomplish. Your anxiety is reduced, and your boss thinks you're super-conscientious.
(And if your boss is a jerk who likes to move the goalposts and blame it on their subordinates, then have this conversation over email, so you can show it to their boss or to HR should it become necessary.)
2) Having this project map means that when you spend an hour staring at the requirements and trying to figure out how to get started (which, let's be honest, you were definitely going to do anyway) ... When your boss/coworker comes by and says, "How's it going?" Instead of having to say "I haven't even started 😞" You can say, "Pretty well! I've got all the steps mapped out and am getting ready to start on implementation!" and show them your list, and they think you're very organized and meticulous. 3) Sometimes, especially in corporate jobs, you and your coworkers will run into a problem that's too big for even Neurotypicals to hold all in their heads. At that point, the NTs will be completely lost -- they've never had to develop a way to handle projects they can't just look at and know how to get started. So then you pipe up in the meeting and say, "OK, well, what exactly are we trying to accomplish?" and everybody at the conference table looks at you like you're a goddamned genius and you don't have to tell them that you use this exact same process to remember how to make a sandwich 😅
4) Having this project map makes it so much easier to stop work and then start it up again later, but this post is already really really really long, so I'm going to address that in a separate (really really long) post.
#adhd#adhd life#tips#semi-solicited advice#gpoy#your mileage may vary#long post#very long post#sorry I wish I wrote more concisely too
117 notes
·
View notes
Note
Hi, WBAD!! Firstly, I want to say that I truly enjoy your fics. They're entertaining, well-written, and I look forward to reading more of your work. Your stories have actually been giving me the desire to pick up where I left off and resume my own CluClu stories... But unfortunately, I'm having a hard time with motivation. I always have story and next chapter ideas in my head but it's getting the words to flow that is the issue. So, I was wondering... What advise would you give? Thanks.
Hellooooo~ Thank you for your kind words, for reading my fics, and for finding them entertaining no matter how messy they are. 😂😅
Your stories have actually been giving me the desire to pick up where I left off and resume my own CluClu stories...
I'm flattered, and honestly don't understand how my messy fics and awkward writing help, but I'm glad that it does, in whatever way, shape, or form. 😅
But unfortunately, I'm having a hard time with motivation. I always have story and next chapter ideas in my head but it's getting the words to flow that is the issue. So, I was wondering... What advise would you give?
Honestly, same 🤣😂 But before I say (or type) anything more, take my advice with a grain of salt. Because what might work for me might not work for others, and vice-versa.
You're not alone in the dry-spells though. I have a hard time with motivation too -- especially when it comes to finishing multi-chapters. I'm extra careful with those because I have a shameful track record of incomplete fics from my old FFN account, and I'm sad that the habit bled through in my WBAD account. Like, I didn't finish the 1st WIP for Code Geass, and the 1st Vampire AU fic I wrote for CG either.
Anyways~ If word flow is the issue, that's a bit tough; because every writer has their own method on how to get out of the rut.
Me, personally, I read novels from bestselling authors. My automatic and favorite go-tos are Sarah J. Maas, George R. R. Martin, Becca Fitzpatrick, and Lauren Kate.
Try:
1. Reading published books from bestselling authors
Every word on those books are their own, and they have the aid of a publishing house, editors, proofreaders, etc (basically a writing team) to produce literary work for mass consumption. So, they're usually good resources for vocabulary, figures of speech, storytelling, creative descriptions, structure, etc.
Plus, it's also refreshing to see different characters and whatnot.
2. Listening to music
It's rare (or common, depending on who you are), but sometimes there will be lines in songs that would just light the creative spark. It's weird and random, but it can happen. It happened for me, multiple times. It's just very inconvenient when I'm in the middle of other important tasks and I get hit with an epiphany because of some song playing on Spotify. 😅
3. Reading fanfics for the same show, but a different genre
Getting comfortable with your main cast of characters is fun and all, but it's a little dangerous too (again, just speaking my own opinion and experience). I find that if I'm too close to Lelouch and C.C. (as characters), I develop a habit of writing them in a specific way every single time. It's like I stuck them in a mold in my head, and now they refuse to budge if I want changes.
Ergo, word flow that feels clunky and overused.
Point is, maybe try taking a step back and read other genres or about other characters. As much as I love Lelouch and C.C., I read stuff for other CG characters too. One, because it offers a refreshing change in perspective; and two, it's interesting to read about how different fanfic writers portray different characters in different genres.
4. Leave it. Pick it up later.
Sometimes issues in word flow happen because you're just not in the mood. It's sort of a hard fact to swallow, especially when you know you want to write, but when you're not in the mood, you're just not in the mood.
Don't force it.
5. Just write. Do something else that makes you happy. Come back and edit.
#5 is what I've been doing a lot lately. If I can't bring myself to leave it because I know it needs to get done, I just write whatever is in my head without thinking about quality, but knowing that I'll come back and edit later.
And it works! XD Most times, anyway. You get a front-row seat of how different your mindset is when you take a break and do something else and then come back in a refreshed mental state.
Like, I'm writing part 6 of The Chaining Booth right now and I know it needs to get done for the sake of the requestor who's been waiting on my sluggish ass. I want to finish it, but I want it to be decent too. So I have parts of the story written down, some dialogue sprinkled through the chapter + plot notes, and then I'll leave it for a while to play video games or read a book or watch a YouTube video, and then I come back with a much better mental state -- more prepared to write descriptions and figure out the next string of words that need to go wherever.
With that said,
I hope that was some form of help, and I don't trust myself when it comes to these things.
Regardless, I wish you the best in your own fanfic writing for CLuCLu. 🤗😁 And if you've published fics before (WIP or complete on FFN or AO3), perhaps you're one of the writers I've come to love and enjoy reading from too~
Thank you! 🥳
2 notes
·
View notes
Text
I'm imagining it as composition software (i have no idea how that improv thing would work). I think the hardest thing would be that Wii music innately has some programming that allows improv and I'm not sure how they've programmed it for each song. Is it based solely on the song's chords - would chords that are more complex than 3 note major/minor then be possible to compose on this software? That would also likely limit the composition to be individually adding each note (no recording feature no piano) with a Wii remote which is a hellish way to compose even though it would technically be possible. What would probably be better is the ability to import pre-written songs (possibly on other software possibly on Wii music software for the computer) into Wii music (although this doesn't necessarily solve the improv question).
I don't really imagine it being put onto Mii rigs - more like directly editing the sheet music that would later be viewable in custom jams - but speaking of I think a basis for the composition software *could* be brought from the pitch perfect minigame where you have to line the miis up at the right rows and columns to make the correct song. It would just need to be free play, longer, and portable to jams. Ya i think either is possible to code.
I think the tutes are already not just AI but real people, so that question is unnecessary.
I need a song making application that's use Wii music. Like where i can change up the notes myself (or at least set the base melody and chords and tempo) but it can keep the six instrument set up and the instrument availability and most importantly the tutes and the miis
11 notes
·
View notes