#I know its just a recolor of the asset but I wanna go with the option that doesn't make me eat my fist again
Explore tagged Tumblr posts
Text
I MAY just be looking too deep into this but I THINK we actually got to see one of Amelia's concept designs in ONE 10.

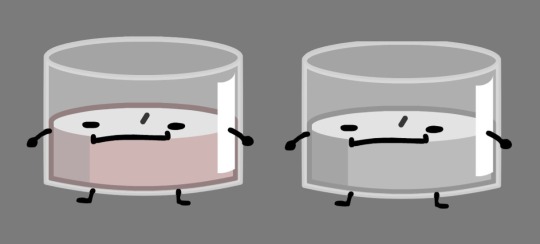
#hfjone production files#I know its just a recolor of the asset but I wanna go with the option that doesn't make me eat my fist again#hfjone#onehfj#hfjone scenty#hfjone amelia#osc
109 notes
·
View notes
Text
how to custom color clothes (in vanilla!)

i recently became familiar with how to spawn completely custom colored fashion items in starbound and while it’s generally common knowledge by now and there are many guides out there on how to do this, i still wanted to write up a simple guide explaining the process of how i do it from the building blocks up + how to troubleshoot issues etc which should hopefully help some folks! a lot of my own friends didn’t know about /admin or /spawnitem so this will cover all the basics!
this is completely vanilla compatible as it is via the /spawnitem command, thus is NOT a mod, does NOT require save file editing, and is multiplayer friendly! you can also gift custom colored items between players and they will retain their colors, so you can make special colored clothing for friends if you want! i also explain how to do this without having to open up your game’s assets file
in order to do this, you will have to be comfy with using the /admin command in your chatbox. this will do several things such as making you invulnerable and making you able to spawn just about any item. you can turn it back off if you don’t want the effects to be permanent
introduction to /admin and /spawnitem
if you go into starbound and type /admin into your chatbox and hit enter, it will tell you something like “admin privileges now given to [playerName]” and grant you a ‘server admin’ status which will work in both single player, steam invite multiplayer, and in servers where the server owner allows players to do this (if you’re on a multiplayer server that doesn’t let you toggle /admin on you’ll have to talk it out with the server owner)
you will be granted immortality and access to some different fun commands like /timewarp and /spawnmonster, but the command we will be focusing on is /spawnitem which grants you the ability to spawn any item in the game (yes, ANY item. it’s so much power)
how to /spawnitem properly
/spawnitem works in a simple format:
/spawnitem [itemIDName] [number you want spawned]
so for example:
/spawnitem visorhead 1
will spawn a singular visor headpiece item! note that the item ID name there isn’t “visor” but rather “visorhead”-- while some items have IDs the same as the item’s name, many are named differently in the game files, and it’s that name in the game file that you need in order to spawn the item. luckily, you can easily find this by looking up any item on starbounder.org and scrolling to the bottom and looking where it says itemName
this is where we go deeper
so regular item spawning is all good and fun, you can collect all the hats in the world for free if you desired to plug itemNames into starbound for an hour straight, but on top of /spawnitem being a thing, starbound accepts additional commands tacked onto the end of the /spawnitem command which will alter the item further. these additional commands are known as “directives” and they primarily alter the item’s physical appearance
starbounder.org has a full list of every directive possible here but i will be covering the few i think are most useful for creating custom fashion items (ignore the part of the page that describes this as ‘modding’. it is NOT modding. it uses tools completely available to you in vanilla. it does not add mods to your game)
the basic format

/spawnitem itemName 1 ‘{”directives”:”?directiveYouwant=valuenumber”}’
to break it down: /spawnitem is the command you are telling the server to do. itemName is what the item you want is named within the game’s asset files. the number after the itemname is how many you want; leave it at 1 if you only want one but don’t delete it as you need at least a 1 to be there. the directives are in a set of apostrophes and curly brackets, directives is in quotes and it tells the game that you are using directives. then there’s a colon and after that, in another set of quotes, the name of the type of directive effect you want to use (like hueshift or brightness), and then = and basically a number representing how strong you want the effect to be
it’s really important to note that just like any other coding, you need to have complete symmetrical sets of brackets, apostrophes, and quotes. if your game tells you it can’t recognize your parameters or otherwise fails to spawn the item, make sure your words and numbers are in the correct brackets/quotes/etc and that the brackets/quotes/etc are symmetrical and in the right place and that you didn’t accidentally delete one or add an extra one in there
hueshift
/spawnitem visorhead 1 '{"directives":"?hueshift=180"}'
hueshift will change the ‘hue slider’ on your item relative to the number you plug into it, so for example hueshift=180 on a red item will turn it blue. you can use both negative and positive values like 45, -60, 90, 112, and so on! it will take some toying with
brightness
/spawnitem snowinfantrypants 1 '{"directives":"?brightness=-70"}'
also a ‘slider’, it’s very simple, it alters the brightness of your item. it accepts positive and negative values. so -70 will decrease the brightness by 70%. good for making already dark items darker! or already light items eyesearing if that’s your thing. you could do some neato pastel edits probably
saturation
/spawnitem visorhead 1 '{"directives":"?saturation=-100"}'
also what it says on the box, saturation increases or decreases the saturation of the item, and accepts both negative and positive values. -100 will completely desaturate the item and turn it black/grey/white for maximum emo effect. much higher values can turn you into a lisa frank nightmare
combining the above directives
/spawnitem snowinfantrypants 1 '{"directives":"?brightness=-70?saturation=-100"}'
if you want the darkest edgiest coat possible, or the most colorful pastel one imaginable, you can combine the brightness and saturation directives like so! (you can also add hueshift to this presumably, but i’ve neglected to in the premade code since it may look Weird to combine all these effects. if you want to add it in anyway just paste the ?hueshift=180 after the ‘100′ in the provided code, and make sure it’s within the quotation marks)
filters will only take you so far. we need to go deeper *matrix sfx*
there is an item directive much more complex than the others, known as the replace directive!
/spawnitem visorhead 1 '{"directives":"?replace;ffca8a=e6e6e6;e0975c=494949;a85636=313131;6f2919=121212;008cd9=d90000;60b8ea=ff0000"}'
what this directive does is tells the game to look at the image file for the item, find the hex color codes on the left, and replace them with the new hex color codes that you listed on the right. this includes parts of the items that are not dyeable!
note that there are some slight limits to this: imagine each different color in an item’s image is a “slot” for a dye. you cannot add more slots, and when you specify a hex color to replace, it will always replace ALL pixels of that color. for example, you can change the visor item to have a red lens, but you cannot have a rainbow lens because there simply aren’t enough differently colored pixels to replace there in order to make it have a rainbow look! you CAN make different colors all turn into the same color, you simply cannot add more colors to an item than there are by default
(if you want to make an item one singular solid color, try using the setcolor directive which is much less complex than the replace directive)
how to use the replace directive - step 1: formatting basics
firstly, the basic formatting is such:
/spawnitem itemName 1 ‘{”directives”:”?replace;OLDHEX=NEWHEX;OLDHEX=NEWHEX”}’
the hex color code you want to replace is always on the left, and the one you want to replace it with/your custom color is always on the right. you can add and subtract as many custom colors from this string as you want, so you can replace only one color or replace allll the colors if you like!
if you want to replace multiple colors, separate the OLDHEX=NEWHEX bits by semicolons, with semicolons inbetween all of them but NOT at the end of the very last one you add (so the OLDHEX=NEWHEX bit at the very end of the code next to the “}’ part should Not have a semicolon at the end of it, but the others before it should. like this:
/spawnitem itemName 1 ‘{”directives”:”?replace;OLDHEX=NEWHEX;OLDHEX=NEWHEX;OLDHEX=NEWHEX;OLDHEX=NEWHEX;OLDHEX=NEWHEX ”}’
a replace directive code that replaces only one color should look like this:
/spawnitem itemName 1 ‘{”directives”:”?replace;OLDHEX=NEWHEX”}’
how to use the replace directive - step 2: actually creating your custom item
(note: you can skip the wiki image hunting step if you have access to the game assets and can open up the actual .png file used within the game’s files. this can save you some strife later. i don’t do this because pak files scare me so i’ll use some workarounds for this)
first what you want to do is have some kind of image editor program on hand that at minimum needs an eyedropper tool and a color selector that tells you the hex color code of the color you select. i use photoshop and in this tutorial i use the new layer and filler bucket features in my method since that makes it easier for me. if your image editing program doesn’t have a layers or fill bucket feature you might have to get creative
now what you wanna do is look up the item on the starbounder.org wiki, and obtain the image for it of it on a test dummy, and leave the tab open because you’ll need its itemName later to put it into the code
i’m going to use the copper goggles for this tutorial because they’re good looking but gee sure would be awesome if the lenses could change color!

whip open the image in your image editing program, duplicate the base mannequin image and make it a new layer above the basic one, and on the new layer go hogwild and use filler bucket or whatever to recolor the item to however you want, making sure you remember 1 color = 1 color and when you replace one color of pixel on the item, you replace all the pixels of that color
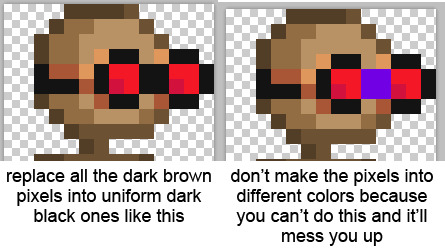
make sure to also ignore the mannequin underneath so you don’t get confused as to what pixel underneath is what (you can delete the mannequin’s pixels entirely if it helps)

i recolored the goggles to black and green as shown, with the gif on the left showing the difference between the base and the recolor!
time to CODE IT!
turning dreams into reality
you want to whip out your spawnitem code and begin the process of eyedropper-ing the hex color code of the color you want to replace, and then putting an = after it and then eyedropper-ing the color you wanna replace it with (from that recolored layer you made) and writing that down to the right of the equal sign
soooo for example:
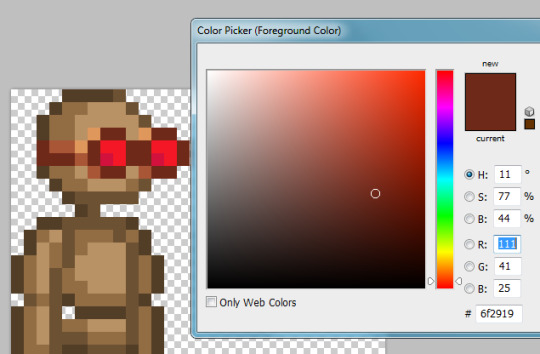
when i use eyedropper tool, i can see the darkest brown color of the goggles is hex color code 6f2919! this means i know that my code will start out like this (remember to edit in the itemName):
/spawnitem copperarmorhead 1 ‘{”directives”:”?replace;6f2919 =HEXCOLORCODETOREPLACETHATBROWN”}’
and now i use my eyedropper tool to find the color on the recolored version that will be replacing those darkest brown pixels...
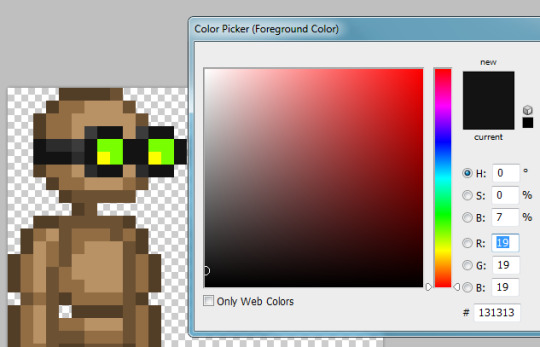
....which is 131313! so now i know that in order to spawn an item where the dark brown goggle color is replaced by dark grey, i have to make my code like this:
/spawnitem copperarmorhead 1 ‘{”directives”:”?replace;6f2919 =131313”}’
you will do this same process for the rest of the colors until every single hex color code you want to replace is listed out with its appropriate replacement!
note that since it uniformly applies the replacement, you only need to list out each color once-- you don’t need to list the replacements multiple times for each pixel or anything like that! ?replace; 6f2919 =131313 will automatically replace every dark brown pixel with dark black, you don’t need to go pixel by pixel or do ?replace;6f2919 =131313;6f2919 =131313;6f2919 =131313 or whatever. 1 color = 1 color!
in the end, my code ends up looking like this in order to replace all of the colors in this item:
/spawnitem copperarmorhead 1 ‘{”directives”:”?replace;6f2919=131313;a85636=2c2c2c;e0975c=3c3c3c;d3113d=fcff00;f41725=78ff00”}’
now just a copypaste and an enter key...
(NOTE: your custom item will spawn on your cursor. don’t spawn it underground or under your ship on accident. it will despawn eventually if not picked up but it’s still annoying if you spawn it ‘out of bounds’)
aaaand......
my item turned out perfectly!
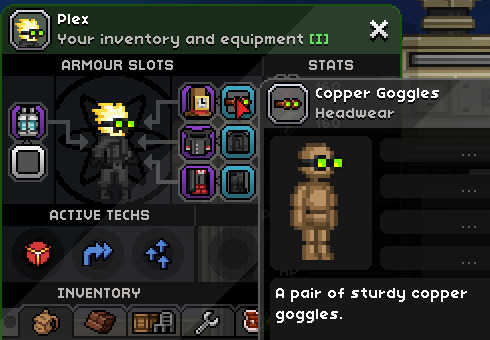
if you got your item custom recolored to your specifications (NOTE: it may not be reflected in the items thumbnail but it will look fine in the actual item itself) you did it right and starbound didn’t fight you on it! congrats!
the game isn’t recognizing my code and my quotation marks are turning into squares??
some text editing programs do weird shit to quotes and apostrophes. including tumblr. try writing your spawnitem code in notepad instead or copypasting it into notepad and replacing all of the “ and ‘ whilst in there and that should do it (or just rewrite them within the game’s chatbox itself)
the game launched a HOMESTUCK REFERENCE at me instead?!
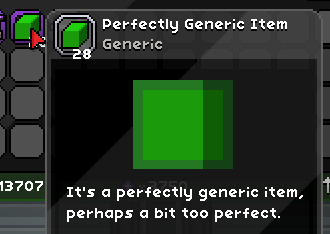
you typoed the itemName or used an otherwise incorrect itemName so the game gave you a generic filler item instead! check that your itemName is correct and matches the exact itemName on the wiki! remember that it is case sensitive
my item turned COMPLETELY INVISIBLE or the game yelled at me!!
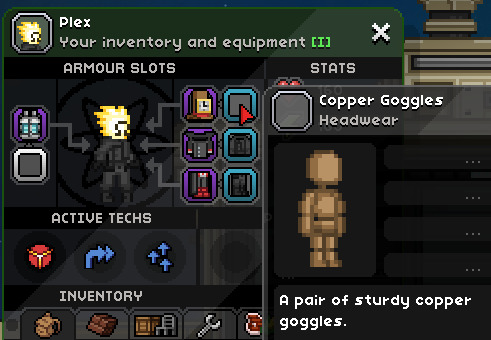

whoops, congrats on accidentally making an invisible item even though there’s a much easier way to intentionally do that!
if either of these things happened to you, there’s likely an error within your code itself somewhere. double check that all the brackets, quotes, and apostrophes are symmetrical, in the right amounts, and that you didn’t stick an extra one in there or delete one on accident. make sure that the semicolons are between your oldhex=newhex bits but that there isn’t an extra semicolon on the last one before the final quotation mark. make sure you didn’t accidentally insert a space anywhere
oh god my item somehow changed colors (probably to a weird coppery brown) and only some bits got replaced!! why is it doing this, why is it changing colors help me!!
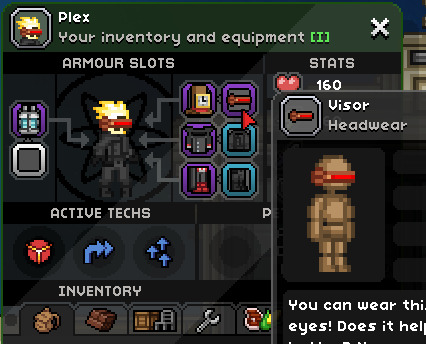
(note: i used the visor as an example here instead of the goggles because i had no issues with the goggles but did have problems with the visor before a kind soul on a starbound discord i’m in enlightened me as to why this issue happens. i will be talking about the visor but this troubleshooting process is applicable to any item that mysteriously gains new unreplaceable colors when you try to spawn a custom colored one)
this is gonna be the BANE of anyone not directly using the .png’s found in the asset files and using the wiki instead. don’t worry, it’s fixable, it’s just a pain in the butt and it will happen a lot. you will end up spawning a lot of items as ‘beta tests’ only to correct their colors again due to this issue
essentially, sometimes in starbound, the colors that an item has by default are not actually the colors that the .png file the game assets have. for example, here’s what the visor looks like by default when you equip one you found normally in a chest or whatever:

bbbuuuut that’s not actually what it’s file in the assets looks like. those coppery brown colors are the SECRET COLORS that exist underneath the grey. the file in the assets is what your game is going to look at to try to use for the custom colored item, and when it does that, instead of seeing the grey hex color codes from wiki, it will see the coppery brown hex color codes from the assets file. you told it to replace those grey colors you see, but the game doesn’t see any grey colors in this file! it only sees coppery brown ones! and you didn’t tell it to replace the coppery brown files with anything, so it’ll leave those intact and ignore the command to replace the grey colors that don’t actually exist on the item
what you want to do is grab a screencap of the Failed Beta Test item (NOTE: remember to turn off f.lux or sweetfx or any other program that will alter the color of your screencaps), and use the eyedropper tool to find out what the hex color codes of those ‘unreplaceable’ colors are:
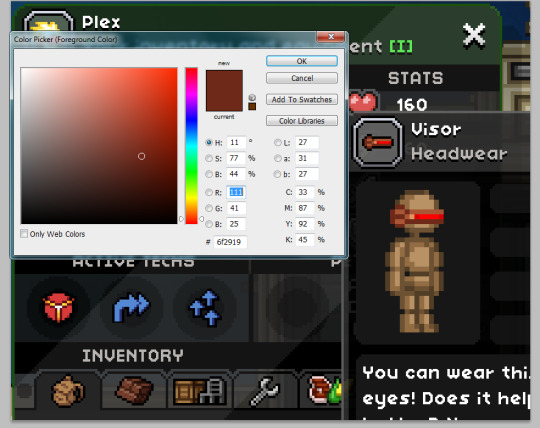
when i was making this visor before, i THOUGHT that the hex color codes to replace for the grey bits were 373737, 7b7b7b7, and 6b6b6b. it turns out that the hex color codes for those bits in the game files are, in same order, 6f2919, a85636, and e0975c!
this means that if my code looked like this before, with errant hex color codes bolded:
/spawnitem visorhead 1 '{"directives":"?replace;6b6b6b=494949;7b7b7b=313131;373737=121212;008cd9=d90000;60b8ea=ff0000"}'
...it should be corrected to this instead, with the corrections bolded:
/spawnitem visorhead 1 '{"directives":"?replace;e0975c=494949;a85636=313131;6f2919=121212;008cd9=d90000;60b8ea=ff0000"}'
so instead of telling the game to correct hex colors that it doesn’t think exist on the item, you are now telling it to replace those pesky copper brown colors that it DOES think exist on the item and now can properly replace because you’ve given it the direction to
..aaaaand that should sort most things out!
coding this stuff can be FUSSY so there may still be errors and whatnot! i am not a coding expert but if you CANNOT get something to behave then feel free to shoot me an ask! happy recoloring!!!
(while you’re at it, if this guide isn’t enough for you, check out https://silverfeelin.github.io/Starbound-Hatter/ which can create text commands to generate FULLY custom hats. supposedly. i haven’t tried it)
74 notes
·
View notes