#Hose Pipe Assembly
Explore tagged Tumblr posts
Visit Tumblr Blog
Explore Tumblr blogs with no restrictions, modern design and the best experience.
Last Seen Tumblr Blogs


Fun Fact
Tumblr.com is the 103rd most visited website in the world.
Text

5 Steps to Installing a Tap
The "5 Steps to Installing a Tap" guide on Tapron.co.uk offers a clear, step-by-step approach to fitting a new basin tap, emphasizing preparation, correct assembly, and installation techniques. It outlines essential tools and accessories needed, including sealing tape and wrenches, and covers everything from dismantling the old tap to connecting pipes and verifying the installation's success. This practical guide is aimed at ensuring a smooth DIY tap installation process. For a detailed walkthrough, check the full guide here.
#ap installation guide#DIY tap installation#Tools for tap installation#Flexible hose vs. rigid inlet#Step-by-step tap assembly#Sink tap installation process#Securing tap connections#Tightening stud-nut#Connecting water pipes to taps#Checking for leaks after tap installation
0 notes
Text
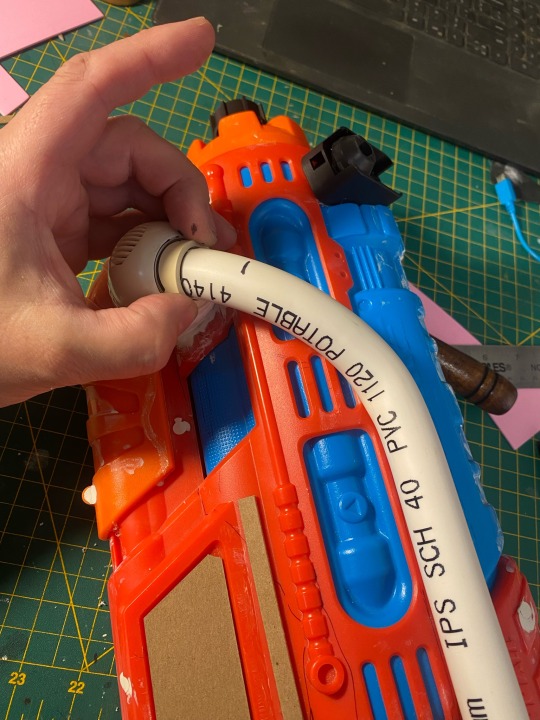


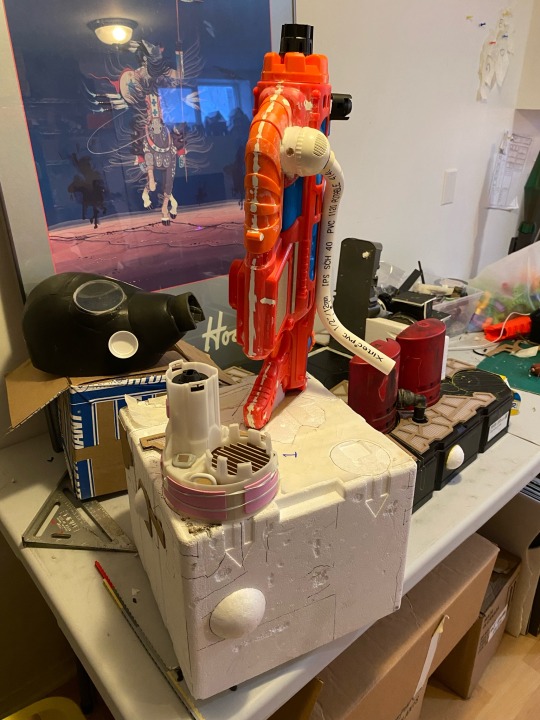
BIOMECH TOWER:
Work progressing quickly, thanks to some unexpected downtime in the day job.
I'm especially glad with how the "mini-chimney" assembly is coming together, it was a good idea to fill the lower circular hole with vent-fins. Couple small hoses and details, and it's almost good enough.
I'm trying to NOT go crazy with small details. In general I've decided that a piece should have a consistent level of overall detail, and for this project I'm setting the tininess limit of any added component at about 1 cm. Details on that component should not be smaller than 1mm. I'm using the detail level of the original watergun as a guide.
The bending of PVC pipe using heat is a success! Managing kinking while making tight turns is an issue, anything over 45 degrees with a turn radius of ~1" is difficult. That's okay for now, but bending jigs may be something I investigate in the future...
17 notes
·
View notes
Photo


On November 27, 1978, angered that he wasn’t to be reappointed to the Board of Supervisors slot he resigned from on November 10, Dan White enters San Francisco City Hall at 10:30 a.m. through a basement window.
Mayor George Moscone agrees to meet with White, who shoots the mayor four times at point-blank range with a .38 Smith & Wesson revolver.
Leaving the 49-year-old father of four dead, White reloads and then walks to where the supervisors’ offices are located and asks Supervisor Harvey Milk, the state’s first openly gay elected official, if he can speak with him in private.
White ushers Milk into White’s former office and kills him with five gunshots, two to the back of his head.
A stunned and tearful Dianne Feinstein, president of the board, announces the murders: “Both Mayor Moscone and Supervisor Harvey Milk have been shot and killed… The suspect is Supervisor Dan White,” she tells reporters.
Tens of thousands of mourners form an impromptu candlelight march, beginning in the Castro District and ending at City Hall. Joan Baez leads the assembled in “Amazing Grace.” Moscone and Milk lay in state at City Hall. Moscone’s funeral is attended by 4,500 people.
Feinstein becomes mayor – the first woman to hold the office. She is mayor until 1988 and wins election as a U.S. Senator for California in 1992.
White surrenders to police officers one hour after the shootings. He is tried for first-degree murder, but his lawyers convince the jury that White’s depression creates “diminished mental capacity,” which prevents the premeditation necessary for first-degree murder.
Convicted of voluntary manslaughter, White is paroled in 1984 — spending just over five years behind bars for the murders. On October 21, 1985, the 39-year-old White runs a hose from the exhaust pipe of his 1979 yellow Buick LeSabre into the passenger compartment, poisoning himself with carbon monoxide, the New York Times reports.
[This caption is an abridged version of a piece for Cal@170, written by California State Librarian Greg Lucas.]
#Harvey Milk#History#California#San Francisco#LGBT#LGBTQ#LGBTQIA#Gay Rights#Gay History#Pride#Pride 2023#Pride Month
30 notes
·
View notes
Text
A brief tale of adventures in repair and stupid coincidences
So last weekend our dishwasher stopped cleaning stuff well, especially stuff on the top rack. It was also making a really obnoxious groaning/buzzing noise when run. We were contemplating the miserable cost of having to replace the whole thing, but we've also taken it apart and put it back together before, so why not at least give it a try.
And I won't deny that there's a deep satisfaction to feeling handy.
So we dismantle it. As I said, done before, but this time I'm really pulling the thing's guts out, the full sump motor assembly. Side note: the bits of stuff stuck in the drain pipe were beyond nasty. There was a lot of other gross stuff crammed into various recesses and encrusting screens, but that was the stuff that really smelled, I assume it was bits of rancid fat.
Well, the housings are fine, the impeller's fine, the motor shaft spins freely, without noise, and there's no play in it. I'd read once that buzzing from a motor could be a capacitor problem, so we take the fat 23.5μF thing off, and take it to an appliance repair shop, they obviously have a tester and tell us it's just fine. (Note to self, get a multi-meter that isn't from the bargain bin.)
Side note 2, small vicissitudes of life: taking the washing machine out meant disconnecting the hot water supply and the drain hose, which go to the hot water line and drain for the sink. A: turns out, if we take out the T-junction for the hot water line, the line to the faucet is no longer long enough. B: we happened to have a cap for the T-junction to the drain. But putting the mess back together we broke one of the nuts, and it leaked copiously. Cue a day of not being able to use the kitchen sink before we could make it to the hardware store for a replacement drain nut and a cap for the hot water t-junction. (We also got a flexible supply line for the dishwasher, because getting around the rigid copper line was the most frustrating part of working on the thing.)
So we're left with the decision making math. A new sump motor assembly is, shockingly, "only" 160$. (Also incredible is that they still make and sell this same assembly from our 20 year old dishwasher. I guess in some industries if it ain't broke they don't fix it.) A new dishwasher of comparable performance is around 600$. Obviously if the new assembly works, that's a huge savings. If it doesn't though, it's a fair amount of money almost literally down the drain.
We decide to reassemble the dishwasher and see if we've cleaned something or jogged something back into place and it will work better now. I'm halfway done and notice an extra part, a flat washer. In a device that mixes water and electricity, washers are exactly the sort of thing I wanna make sure are right. Nothing else jumped out at me so I hit up the web to figure out where it goes (shout out to Parts Select for hosting diagrams and copious pictures!). As I do so, something catches my eye.


(Can you spot the difference?)
The mangler (aka chopper assembly) covers the intake from the sump (where dirty water and food particles accumulate) to the main spray pump. Thus, if the mangler is no longer mangling, that screen is going to be clogged (and it was, with a mat of weird fibrous stuff). And if the intake is clogged, the pump is going to have a much harder job. I can only imagine I threw out the broken blades with the little pile of gunk and hard bits that had accumulated there under the plastic shield (there looked to be bits of pasta and beans in there).
A new mangler is 14$ and two day shipping. And I might've spent 160$ on a new sump+motor assembly (which includes a mangler) if I hadn't noticed. And while it's obvious and glaring now, I can't say for sure I would've spotted it if I hadn't gone looking for a spare washer's home. (Which was the spray arm assembly, by the way.)
I'll update this if it doesn't work, but otherwise, you must imagine cthulhubert happy (with their clean dishes).
10 notes
·
View notes
Photo

Back in a former life, I had an addiction that I loved beyond sanity. Here’s the story of it. 2002 2003 2004 2005 2006 2007 2008 2009 pt1 2009 pt2 2009 Redux
This is the final spec list for my glorious, insane Brutal Truth.
Nissan Skyline BCNR33 GT-R (Type 2) manufactured in April 1996. JDM non V-Spec vehicle retailed through Osaka Nissan Prince in May/June 1996. Imported to the UK in June 1997. Remained in original JDM spec without speedometer conversion until August 2002. Only the steering wheel & white dial sets were fitted in Japan.
Nismo RB26N1 bare engine: [N1 water pump (improved flow & less cavitation)/Reinforced cylinder block head bolt boss/Increased sump capacity (6L 20w60)/1.2mm oil restrictor]
N1 head with 0.5mm overbore (2598cc)
Cryogenically hardened N1 crankshaft
Wossner forged & cryogenically hardened pistons
Abbey Motorsport reinforced & cryogenically hardened con-rods
ACL Race Series conrod & crankshaft bearings
Tomei sump baffle kit
Tomei high flow (larger drive gears) oil pump
HKS 1.2mm metal head gasket
Tomei Procam Spec 2 cam kit (270 degree inlet & outlet with 10.25mm lift)
HKS V-Cam System Step 1 Type B (variable 248-278 degree inlet; replaces Procam inlet camshaft)
HKS vernier cam pulleys
HKS kevlar reinforced timing belt
Trust metal intake & throttle gaskets
HKS front pipe & decat gaskets
GReddy Iridium 08 Racing sparkplugs
Mocal 19-row oil cooler & Abbey Motorsport remote oil filter assembly
Abbey Motorsport catch tank & washer reservoir with SFS breather hoses
Abbey Motorsport Pro Alloy large radiator
Tomei fuel pump, fuel regulator & 600cc injectors
A’PEXi Power Intake induction kit
A’PEXi GT Spec intercooler (237x610x136mm) & hard pipe kit
HKS GT-SS turbos
HKS twin AFM delete kit
Tomei turbo elbows
HKS downpipes
HKS Silent Hi-Power exhaust
Abbey Motorsport 80mm decat pipe
Mine’s VX-ROM
HKS F-Con V Pro
HKS EVC 6 boost controller (1.6 bar)
AEM wideband lambda sensor
Splitfire DI Super Direct Ignition System
HKS Circle Earth kit
HKS GD Max twin-plate clutch (with lightened flywheel)
Abbey Motorsport rebuilt transfer box
Abbey Motorsport rebuilt gearbox with cryogenically hardened gear set, modified Nissan synchromesh upgrade and OS Giken strengthening plate
Abbey Motorsport rebuilt rear diff
Nismo gearbox mounts
Nismo Solid Shift gear stick (10% short shift)
Omex Shift Light Sequential
Sunsei SE-135 solar panel trickle charger mounted on a custom aluminium riser between the rear parcel shelf speaker enclosures.
Team Dynamics Equinox alloys 19x9.5, ET+15 in silver with polished stainless steel rim.
Falken FK452 265/30/19 Y-rated tyres
Cusco brake master cylinder brace
Cusco rear steering delete kit
Cusco front & rear upper suspension links
AST Sport Line 1 full suspension kit with UK spring setup
Nismo stainless steel braided brake hoses
StopTech 355mm rotor 4 pot caliper front brake kit
StopTech 355mm rotor 2 pot caliper rear brake kit with Abbey Motorsport modified pad retainers
Ferodo DS2500 brake pads front & rear
Bomex AD-390 front splitter
Nismo R34 smoked front indicators in custom aluminium mounting plates finished in crackle black
Nissan Xenon headlamp units
Border Racing Aero Fenders (vented front wings) with silver GT emblems from a R32 Skyline
Nismo smoked side repeaters
Top Mix one-off FRP twin blade rear spoiler on custom aluminium mounting plates
Entire exterior resprayed in BMW black (code 086) base and lacquer
Nissan Motorsport International carbon fibre B-pillar plates
PIAA carbon effect silicon wipers, front pair with spoilers, rear without
Nismo white face dial sets (dashboard & centre console) in carbon fibre panels
AEM AFR gauge mount replaces the lighter socket
HKS EVC display mounted on custom carbon fibre plate replacing the ashtray
Lighter socket relocated to the fog light switch panel
Nissan Momo steering wheel (with airbag)
Dressycar Nismo harness pads
Redline Automotive leather gearstick & handbrake gaiters
Abbey Motorsport carbon fibre door sill trims
Carbon fibre boot sill trim
Inlet plenum and sundry induction pipework finished in powder grey
Trust clear cam pulley cover
HKS Kansai Service carbon fibre spark plug cover
Right hand cam cover finished in crackle black
Nismo radiator & washer reservoir caps
HKS Kansai Service front strut brace finished in high gloss black
GReddy aluminium slam panel finished in crackle black
Tein bonnet dampers with black sleeves
Custom made one-off Cobra Misano Lux front seats: [Alcantara (colour code 9189) outers/Alcantara (colour code 9182) centre panels/One-piece carbon fibre backs/Sidewinder bases on custom subframes adapted by Abbey Motorsport/Cobra logo in silver thread on the headpads/GT-R logo beneath the grommets on seat backs]
JVC KD-AVX2 multi-media DVD/CD receiver with built-in 3.5” widescreen monitor
2x JL Audio Evolution VR600-CXi 6” speakers (front)
2x JL Audio Evolution TR650-CXi 6.5” speakers (rear)
Multiple and interlaced Thatcham rated security systems.
500 bhp. 520 ft/lb.
Ludicrously, hilariously, unbelievably fast.
Hope you enjoyed this little trip down memory lane with me. Cheers! JM.
(Photo by N. Liassides.)
#r33#bcnr33#skyline#gt-r#nissan skyline#Abbey Motorsport#HKS#Bomex#Tomei#A'PEXi#GReddy#Nismo#RB26N1#Mocal#Team Dynamics
13 notes
·
View notes
Text
Fuel Leak Snowball...
Firstly apologies for it being almost 38 months since my last post. Nothing happened with 16606 for the majority of that time, what with the pandemic, and then as lockdowns started to lift we started a building project at home, so the D went for a little holiday to a storage facility on a farm in deepest Essex. I had her back in late August 2022, got it re-taxed and MOT'd with only a few outings around the block until very recently.
Trust the D to ruin a lovely day
It was a lovely sunny Sunday on 30th September when I decided to take 16606 for a short spin following some in and out TLC. After parking up on the drive something drew me to look under the car where I found a liquid dripping from the mid section of the car.
youtube
Upon closer inspection is stank of fuel.
Side-note: Readers of this blog will know I've been on a learning journey with this car and as each issue arises I try to learn what needs to be done and then dive in, admit defeat and speak nicely to members of the DeLorean Eurotec club for assistance (who are always beyond fantastic and generous with their time), or go down the professional garage route (this is the last resort, not because I don't want to pay professional prices but because they tend to have never encountered a DeLorean, let alone a car of some 40 years old, and are actually not often able to do a "professional" job).
After taking advice from members of the DeLorean Eurotec club I tentatively started the engine and drove the D back into the garage in the knowledge that I should check the fuel pump. This filled me with dread since this was an area of the car I had no previous experience of and the thought of messing with the pump, fuel tank and fuel in general required me to pluck up courage and just go for it.
The following documents the journey I went on that comprised getting the job done over two attempts and almost giving in and asking a new business created by a club member to do the job in-between.
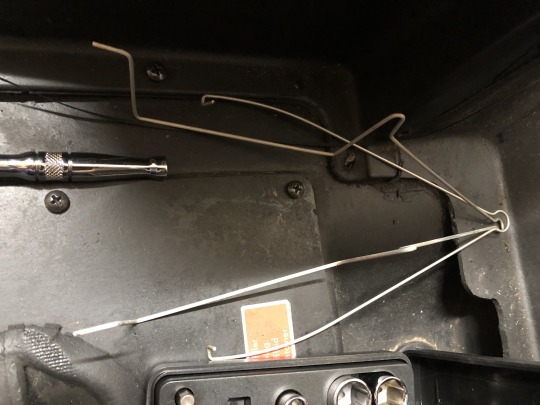
I got the car back into the garage and emptied my mandatory travel tools and parts out in order to access the fuel tank.

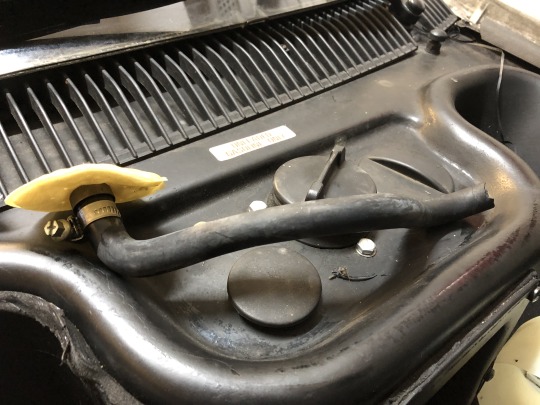
Inside the "Frunk" of the DeLorean, under the mat is this sunken area where the original spare tyre resides. I took this out, the first time I'd touched it since getting the car back following restoration in 2016. Once set aside I undid the screws to the access panel as seen above. This would expose the fuel tank and associated hoses and equipment.
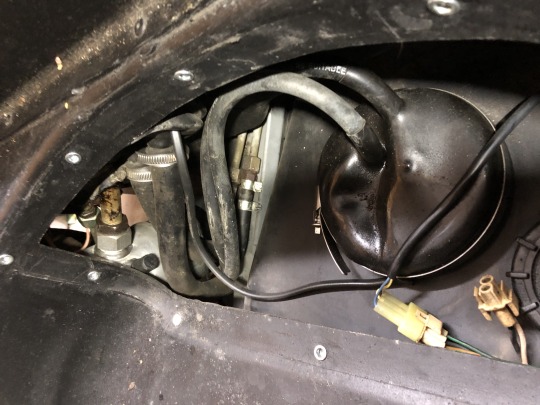
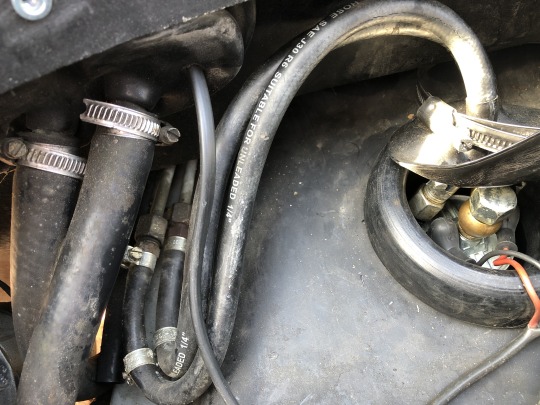
For reference the photo above shows, beneath the access panel, the fuel feed and return hoses coming from the fuel pump seal that covers the pump boot (that houses the pump). The boot is set into the tank, the black area beneath and surrounding the boot. On the left the fuel hoses attach to the pipes that flow eventually to the engine at the rear of the car.
With the access panel removed I could smell the over-powering odour of fuel (and odour but one of those strangely nice ones...). Mild panic set in when I saw the remnants of spilt fuel. I could see that the boot seal was a strange shape and not clamped down by the jubilee clip. I lifted the accessible part of the seal and could see the pump covered in fuel residue. Wondering how this had happened, and how it had apparently seeped over and out onto the top of the fuel tank, I decided to start the car to get the pump working. The following video is what I was confronted with.
youtube
The shakiness of the above video gives some idea of the "holy crap" moment I was experiencing. At this same time I had also noticed that the fuel feed and return lines were also deteriorating, showing signs of cracking all along the outside.
I had to figure out what to do next, so after switching the engine off, the fuel in the boot drained back into the tank and I stepped away from the offending car and did some research and messaging with the DeLorean Eurotec club over the course of the next week.
I watched some videos on YouTube to learn how the fuel pump assembly works and fits together so I could become familiar with this journey into the unknown. I specifically got benefit from the following two,
The first part of this video showing the extraction of the pump and it's assembly:
youtube
The following for learning how the fuel feed and return hoses attach.
youtube
I realised I needed to buy some parts so got on to DeLoreanGo.com and ordered,
SKU 106979 Fuel Hose - return and feed line
SKU 101391PU Polyurethane Fuel Pump Boot
SKU 106684PU Polyurethane Fuel Pump Cover Seal
SKU SP10830 W1 Steel Spring Clip for Fuel Pump Boot
SKU SP10356 Stainless Hose Clamp (lower fuel pump boot)
SKU 10349 Stainless Hose Clamp
Needless to say the turnaround at DeLoreanGo.com was amazingly fast and they arrived in a couple of days.
Next weekend
On 8th October I rolled the car out of the garage to start work. I was going to
Replace the feed and return fuel lines
Replace the fuel pump boot
Fit the W1 steel spring clip that was missing
Replace the fuel pump boot cover seal
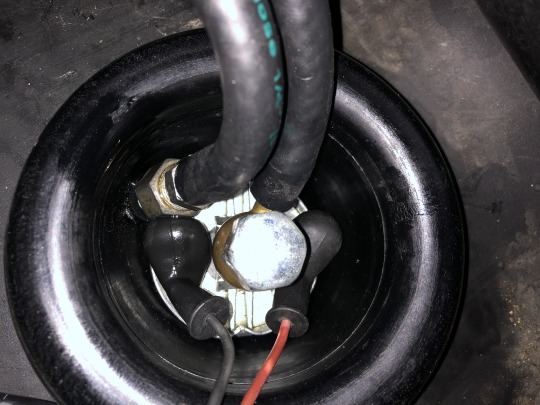
I made sure I had noted what goes where. I took the following photos to remind me which hose was the feed and the return, and which colour electrical connects went to positive and negative terminals
The feed is the hose from the banjo to right of the two fuel pipes, and the return runs from the left.
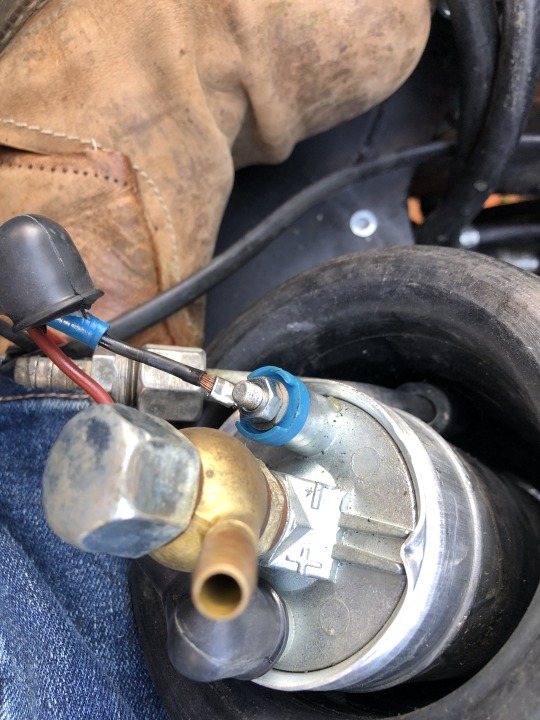
The black wire is the negative whilst the red is the positive.
Whilst the boot was in situ, the pump was surprisingly moveable which I'm not sure it should have been. This made it difficult to pull the fuel hoses off and could have been a possible reason for why the boot was filling with fuel.
I undid the hose clamps to the fuel hoses and with plenty of tissue at the ready, in case of spills, I manipulated them until free at both ends.

So far so good. Next it was time to fit the new hoses, boot and seal and to reconnect the wires to the terminals. Easier said than done!
These were the parts purchased from DeLoreanGo.com. I had already transferred the return hose and support ring to the new boot.

Whilst removing the old hoses and attaching the new ones required a lot of manipulation and strength, I found this task to be less troublesome than the YouTube videos had implied.
The first connections were made to the pipes. It was as I was getting ready to attach them to the pump that I spotted how cracked the fuel pick up hose was.

No sooner had I noticed the state of this pick up hose, then as I picked it up to start attaching the fuel hoses it completely disintegrated and broke off.

With an almost full tank of fuel I had to find a cord to tie and secure the pick up hose to stop it falling back in.
It was clear that I would then need to get the pick up hose replaced, but that then also meant dealing with the baffle and associated parts, plus I had a virtually full tank of fuel. I realised this was as far as I was going to get for the day, and that I should pack away and spend some time thinking about how to tackle the new problem. I couldn't push the car back in to the garage due to the slope of my driveway, so I took a Stanley Knife to the pick up hose to make the end level and then reattached it to the pump. I then attempted to reconnect everything else to enable me to drive the car back in to the garage.
When trying to reconnect the wires to the terminals I could not get the rubber boots back over the connectors, they had turned from malleable to solid rubber with no give. This concerned me greatly since I was unsure what the consequence might be if fuel filled the boot once more when moving the car and these terminals were flooded. I took more advice from the Eurotec club and watched some more YouTube that some cars didn't even have rubber boots and also experienced similar flooding to me. So I risked it. Fortunately nothing happened and I was able to drive the car back into the garage.
Over the next day or two I searched more videos on YouTube and found the following one particularly useful to explain to me what it takes to replace the fuel pick up hose. It's a great tutorial.
youtube
Watching this also made me realise that my pump/tank had no return hose to return fuel back to the baffle area as well as no Baffle Seal. After watching I also felt confident that this was a job I could do if it were not for the almost full tank of fuel. My ability to do this job flip-flopped over the course of the next week. What was clear to me however was that I would not have this fixed before the following weekend, which was the DeLorean Eurotec October Meeting, 100 miles north in King's Lynn, Norfolk.
Having replayed the above video a few times I then generated a list of the parts I would need. I ordered the following from DeLoreanGo.com,
SKU 106287 Fuel Pickup Hose
SKU 106287A Stainless Fuel Pickup Hose Reinforcement Spring
SKU 106318 Pickup Pipe Baffle Seal
SKU 106286 Viton Lower Return Fuel Hose
SKU SP10573 Stainless Hose Clamp (fuel return pipe)
SKU SP110085 Fuel Pump Terminal Connectors
In true DeLoreanGo.com form these parts then arrived less than 24 hours after ordering with just the regular free shipping option selected.
DeLorean Eurotec October Meet Weekend
That next weekend I attended the Eurotec meet and garnered opinions about how to tackle the fuel pick up hose job. Opinions ranged from "dive in despite the full tank of fuel, it'll be fiddly, messy and your arms might sting somewhat" to "you must drain the tank before starting, then it will be fiddly". I also learnt that weekend how it seemed many owners were also experiencing fuel pump related issues. This is when I came to learn of one owner who had set up his own business for working on DeLorean's. I tentatively arranged for him to come and do mine next time he was in the area, which would have been a few weeks later, however during the journey home I changed my mind.
Close to home I decided to stop to charge my daily driver at Tesla Tottenham. Whilst charging I grabbed myself a tea and biscuits at the showroom. I sat in the lounge and started googling options for pumping out fuel from tanks. It was then I found the following product from Euro Car Parts, and fortuitously there was a branch, open across the road.
I was a little unsure at first but the reviews convinced me, and at £8.99, it wouldn't be a huge loss if it turned out not to be appropriate.
I purchased said pump and over the course of the next week I managed to find sufficient fuel cans/containers for up to 50 litres.
The Weekend after that
Okay, so it's now this recent weekend, the kids are away at Scout camp, it's peaceful at home so now is the time to do this!
I decided to leave the car in the garage this time due to constant rain so there wouldn't be much room around the side of the car to work.
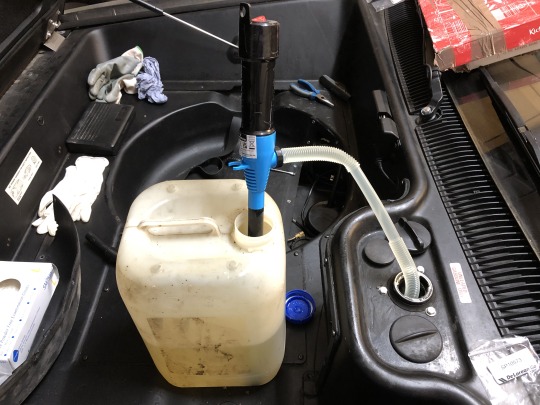
After preparing the area I proceeded to pump the fuel out from the tank. This turned out to be amazingly simple with the new pump, so much so that I almost forgot to film the process. The following shows almost the final fuel being pumped out. The pump can do about 22 litres per minute, which I reckon we achieved, however the clip below is a little slower as the final fuel is trickier to pick up, but it did the job.
youtube
In the end I calculated I had taken approximately 46 litres of fuel out of the tank.

Following the pumping out I had a peek into the tank with my phone camera.
youtube
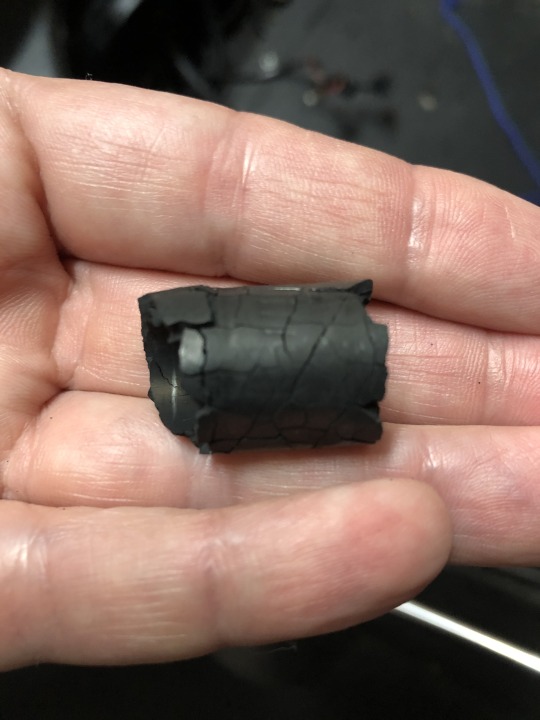
Whilst getting ready for pumping out the fuel I of course had to remove the boot and pump. When doing this I could see that the current pick up hose had in fact disintegrated further, unattached to the pump, lying in the tank. I felt relief that I had not attempted to drive up to the previous weekends' DeLorean Eurotec meeting, since once the fuel level would have dropped below the bottom of the pump, it would not have been able to draw any more fuel and I would have been stranded.
The following piece of pick up hose is all that was left attached to the pump, surrounded by the hose clamp.
I also removed the electrical connections from the pump terminals which I would later trim to attach new connectors and boots. Those boots were rock solid!

I set the pump and boot assembly to one side and then began tackling removal of the baffle in order to fit the new pick up hose, seal and return line.
The only minor issue I faced in removing the baffle was removing the Fuel Tank Baffle Outer Retainer Spring, DGo SKU 108683. The YouTube video showed it being attached over the top of the baffle to the sides, however as can just be seen in the picture below, mine was attached through the perforations of the lower baffle assembly, which was very tricky to dislodge.

Once the baffle was removed the stud that the baffle and retaining springs attach to can be seen (near the fuel sender casing)

With all the components out of the tank I could take a closer look. Below you can see the failed fuel pick up hose complete with filter, the baffle with signs of disintegrated rubber settled on it, and the retaining springs.

I then reassembled the baffle with the new parts outside of the tank to ensure I knew how it all went together for when I would do it effectively blind inside.

As mentioned in the YouTube video I found I didn't have the clip to attached the end of the return hose to, so I used a tie to affix it to the baffle.
Since I couldn't make a video of me rummaging around inside the tank to fit all the components of the baffle assembly together, the photo below is a fast forward to the finished job.

Following the instructions in the YouTube video my only variation was that I did it from a standing position from the front passenger side wing, leaning over with just one hand in the tank. I expected to be really frustrated with this step but I think I got lucky. Everything slotted together nicely and the only minor difficulty encountered was attaching the nut on top of the washer and retainer springs to lock down the baffle. I found the arm of the baffle had an arch in it so I found a metal rod to push down on it, between the springs. Once flat the nut went on easily.
Relieved at the in-tank baffle success I now needed to replace the boots and connectors to the pump wiring.
Below shows the current state of the wires. The picture doesn't relay how solid the boots had become. These can't be replaced without removing the connectors, but even by my standards this is an simple job.

Below you can see the replaced wires with the new boots and connectors.

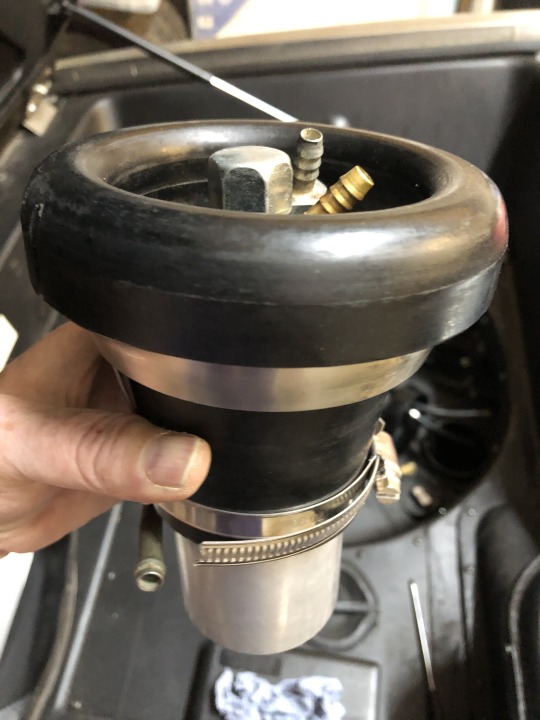
Now for re-connecting the fuel pump assembly and fitting it back into the tank.
Lessons learnt from my first attempt a couple of weeks back is that the positioning of the pump in the boot relative to the electrical connections, the fuel feed and return hose barbs, and the eventual placement in the tank so that hoses do not hinder the re-fastening of the compartment cover panel is very important. It would be a real pain to have to undo it all if you cannot fit the panel after all the hard work. Believe me I found out the hard way!
I'm not saying the following is the "correct" positioning, but it's what worked for me.

I think the indentations in the pump casing on opposite sides is designed to allow the return pipe to sit nicely in between, however I could not get the hoses to fit sufficiently such that the boot seal then can close nicely over the boot. So the above photo shows how I ended up positioning the pump and return pipe.
Below you can see a side on view that also shows the position of the return pick outside of the boot.

I then attached the pick up hose to the pump and the return hose to the pipe.
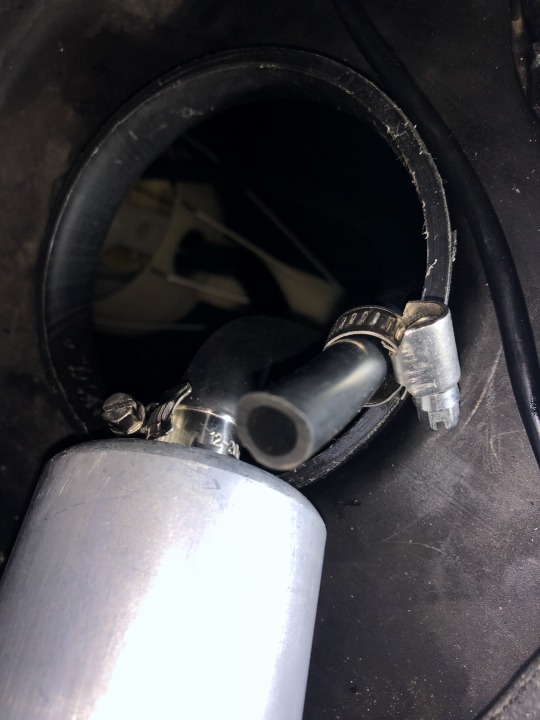
I inserted the boot into the tank and attached the electrical connections and the feed and return hoses.
I then completed this part of the job by sliding down the seal and after the below photo was taken, tightened the hose clamp.

As per the lesson learned, mentioned just above, I had to slightly twist the boot clockwise a little to position the hoses more pointing backwards so the compartment cover could be screwed back in.
Before closing the compartment I wanted to check to see if my low fuel indicator light worked. By my reckoning, with no fuel in the tank I should be able to turn ignition to position two and see the light illuminated in the binnacle.

Either my theory was wrong or my low fuel light wasn't working, as I had long suspected. I next put back a couple of litres of fuel and tried again also fully starting the car, no luck, then added up to five litres, repeated, and still nothing.
Finally I pumped all fuel back in to the tank.
and after starting the car for a final check, replaced the compartment cover.

Job done! Hopefully...
Upcoming jobs that I'll aim to document soon include fitting a fan override switch, and fitting new circuit breaker holder clips.
Stay tuned!
5 notes
·
View notes
Text
I’ve kind of always had to help out my dad with practical stuff around the house. Ever since I was old enough and strong enough to help, he’d call me over instead of my mum. And even as I got a little brother, he far more often relied on me.
It’s not even that either of us are super practical. My dad has taught himself a lot of stuff through the years, but none of it really comes easily to him. He’ll struggle through it, huff and puff, and it is always a goal to get it done as fast as possible.
It’s caused some rows between us now and again, when he’d pushed me past my boiling point of what I can and will tolerate. I’ll help with no (or only minor) complaints but I refuse to be shouted at in frustration. It’s gotten a whole lot better as I got older and better able to communicate clearly.
He respects that I don’t like being rushed through, just as I respect that he’d rather have annoying practical tasks around the house done as efficiently as possible. I’ll often act like his third hand. (It was always that “I don’t have three hands”), and try my best to predict what he needs.
He often think it’s obvious what the next step would be, but it really isn’t when it’s something you’re unfamiliar with. But he’s gotten a lot better with making himself describe exactly what kind of support and help he needs, and I like to think that I’ve also gotten better and predicting next steps.
Because that’s just the thing. I’ve learned a lot of little hacks and stuff just from being on the sidelines helping. I’m still not good at it, but I’ve got faith that I can figure out most things, if needed. And if I need help in my flat, my dad is just a call away.
Just yesterday I was crouched behind the shower cabin (a bit movable object) in the upstairs bathroom in the family house, putting dissolving powder down a drain and a hose into a pipe to try and unclog whatever was making the water run over. It is the most fun to be crouched in such a corner with gross water and cobwebs? Decidedly not but I almost didn’t bat an eye.
Because I’ve helped out like this before. It’s like the third or fourth time we’ve done this, and I always end up squished in there, carrying out instructions because I’m smaller. And it’s a pain free process now. And we did it! Shower drain unclogged!
I’ve helped put together sink pipes, assemble all type of furniture, rip up and tile the garden, attach cords for lamps, and much more. All things I considered chores but in a way he taught me how to do those things. I’m not sure I could do them that well on my own, but I have a frame of reference for it now. And I know if I should need the support in something, he’d be right there.
12 notes
·
View notes
Text

Established in 1994, our company has been focusing on injection molding technique and specialized in developing and manufacturing dust proofing products for automotive pipes since 2006. In 2010, more products to be developed, include: plastic quick connectors, SAE quick connectors, VDA connectors, fuel line connectors, water line connectors, check valves (single way valve, shut off valve, Pressure Reducing Valve) and dust proofing products. Guided by market demand, now we have been developed a wide range of quick connectors, fuel line hose assemblies and hose dust plugs. We also provide sample processing and OEM service.
2 notes
·
View notes
Text
Improving Industrial Safety with the RAAH Snare Tool
The RAAH Snare Tool, offered by RAAH Group Inc, is designed to address the challenges of handling heavy equipment and materials in demanding industrial environments. Built to enhance safety, the RAAH Snare Tool is an essential tool in industries such as oil and gas, construction, manufacturing, and shipping. Below, we’ll explore the features, benefits, and applications of this tool in the U.S. industrial sector.
Key Features and Benefits of the RAAH Snare Tool
Hands-Free Operation for Optimal Safety
One of the standouts features of the RAAH Snare Tool is its hands-free design, allowing operators to guide, lift, or shift materials without direct contact. This reduces the risk of common injuries such as hand crushes, finger pinches, and ergonomic strains, which are especially prevalent in high-risk environments.
The extended reach of the snare tool enables workers to maintain a safe distance from potentially dangerous loads or surfaces, reducing the chance of accidents.
Enhanced Control and Stability
Designed with a robust snare mechanism, the RAAH Snare Tool provides an excellent grip on various materials, ensuring that operators have full control when maneuvering loads. This is essential for tasks requiring precision, as it minimizes the risk of materials slipping or shifting unexpectedly.
The stability and control offered by the RAAH Snare Tool contributes to operational efficiency and provide peace of mind in environments where accidents can lead to costly downtime.
Durability and Adaptability
Manufactured to withstand tough industrial conditions, the RAAH Snare Tool is built from high-quality materials that resist wear from exposure to moisture, extreme temperatures, and abrasive elements. Its long-lasting construction makes it a valuable addition to any industrial tool inventory.
The RAAH Snare Tool can be adapted for multiple uses across various industries. It is compatible with other safety tools, making it suitable for handling diverse loads in complex industrial settings.
Applications Across Key U.S. Industries
Oil and Gas: Perfect for handling pipes, hoses, and other hazardous materials, especially in confined spaces where safety risks are heightened.
Construction: Ideal for moving heavy or awkward materials that require precise positioning, reducing the likelihood of injury on construction sites.
Manufacturing: Useful for assembly lines or work areas that require exact control of materials, promoting safety and reducing injury risk.
Shipping and Logistics: Helps secure, load, and unload cargo while keeping operators at a safe distance from potentially hazardous materials.
Why the RAAH Snare Tool is Essential for U.S. Industrial Safety
By adding the RAAH Snare Tool to your safety protocol, companies in the U.S. can enhance workplace safety, minimize injury risks, and improve operational efficiency. This tool is a testament to RAAH’s commitment to providing quality safety solutions that protect workers while enabling them to perform tasks effectively.
For companies focused on minimizing workplace incidents and creating a secure work environment, the RAAH Snare Tool is an invaluable investment. Prioritizing worker safety through quality tools like the RAAH Snare Tool ensures a safer, more productive industrial operation.
0 notes
Text
Latest Update on Hose and Piping Chokers for Industrial Use & Importance
Industrial environments that utilize high-pressure hoses and piping systems face a significant risk of sudden failures, which can lead to hazardous whipping actions. Hose and Piping Chokers are essential safety devices designed to prevent hoses and pipes from whipping uncontrollably in the event of a rupture or disconnection.
With new innovations in design and material strength, Hose and Piping Chokers are now more effective than ever, offering superior protection for industrial workers and equipment.
Latest Updates on Hose and Piping Chokers
The latest generation of hose and piping chokers incorporates advanced materials, improved durability, and enhanced pressure resistance, making them indispensable for industrial safety.
1. High-Strength Cable & Webbing Materials
Designed with reinforced steel cables and ultra-durable synthetic webbing.
Provides maximum resistance against extreme pressure failures.
2. Improved Pressure Resistance & Load Capacity
Can withstand higher pressure loads for both hoses and rigid piping systems.
Ensures secure restraint even in demanding industrial conditions.
3. Enhanced Flexibility & Compatibility
Updated designs allow for easy installation on various hose and pipe sizes.
Available in different sizes and configurations for customized applications.
4. Quick & Secure Installation
Fast and easy setup ensures immediate protection.
No tools required, reducing downtime and simplifying deployment.
5. Compliance with Industry Safety Standards
Meets OSHA, API, and MSHA safety requirements.
Helps industries enhance workplace safety and meet legal regulations.
Importance of Hose and Piping Chokers in Industrial Use
A hose or piping failure can lead to catastrophic accidents, causing serious injuries, equipment damage, and costly downtime. Hose and Piping Chokers are crucial in mitigating these risks and ensuring a safer work environment.
1. Preventing Hose & Pipe Whip Accidents
Restrains hoses and pipes securely in case of a sudden failure.
Prevents injuries caused by high-speed whipping actions.
2. Protecting Workers & Equipment
Reduces the risk of impact-related injuries.
Prevents damage to machinery, pipelines, and industrial infrastructure.
3. Essential for High-Risk Industrial Applications
Used in oil refineries, mining operations, chemical plants, and manufacturing sites.
Ensures safety in fluid and gas transfer operations.
4. Compliance with Regulatory Standards
Meets global safety regulations (OSHA, API, MSHA).
Reduces liability risks for industrial businesses.
5. Cost-Effective Safety Solution
Low investment with high safety benefits.
Minimizes financial losses from accidents and equipment failures.
Industries That Require Hose and Piping Chokers
These safety devices are vital in environments where hoses and pipelines operate under extreme pressure conditions.
1. Oil & Gas Industry
Used for high-pressure fluid transfer, drilling, and fracking operations.
Prevents hose and pipe whip accidents in offshore and onshore rigs.
2. Chemical Processing Plants
Essential for handling hazardous chemicals under high pressure.
Prevents leaks and explosions due to sudden disconnections.
3. Mining & Construction
Protects workers using hydraulic hoses, air hoses, and water supply lines.
Ensures safe operations in underground and surface mining.
4. Manufacturing & Industrial Facilities
Used in assembly lines and material transport systems.
Ensures safe movement of fluids and gases in industrial pipelines.
5. Marine & Offshore Operations
Critical for fuel and water transfer systems in shipyards.
Reduces risks in harsh offshore environments.
Key Features of Hose and Piping Chokers
✔ Heavy-Duty Construction – Engineered with reinforced cables and webbing for maximum durability.
✔ High-Pressure Resistance – Designed to withstand extreme hose and pipe pressures.
✔ Quick & Easy Installation – No tools required for fast deployment.
✔ OSHA-Compliant – Meets global safety regulations for industrial use.
✔ Available in Multiple Sizes – Customizable for different hose and pipe diameters.
✔ Enhances Workplace Safety – Eliminates risk of hose or pipe whip accidents.
Benefits of Using Hose and Piping Chokers
Investing in Hose and Piping Chokers provides numerous safety and operational benefits.
1. Maximum Workplace Safety
Prevents hose whip-related injuries and fatalities.
Reduces equipment damage and operational hazards.
2. Improved Hose & Piping System Performance
Keeps hoses and pipes secure to prevent unnecessary strain.
Increases the lifespan of industrial hose and pipe systems.
3. Cost-Effective Safety Investment
Long-lasting and reusable, providing excellent return on investment.
Reduces expenses associated with workplace accidents and legal claims.
4. Quick & Easy Maintenance
Low-maintenance and easy-to-install for hassle-free safety implementation.
Helps industries stay compliant with minimal effort.
5. Supports Compliance & Regulatory Standards
Meets industry-specific safety requirements for safe hose and pipe handling.
Helps businesses avoid regulatory penalties and maintain high safety standards.
Why Choose Hose and Piping Chokers from NewE Traders?
The Hose and Piping Chokers available at NewE Traders are engineered for maximum durability, efficiency, and industrial safety compliance.
Why Buy from NewE Traders?
✔ High-Quality, Industrial-Grade Materials – Engineered for harsh environments.
✔ Innovative & Reliable Design – Superior hose and pipe restraint solutions.
✔ Custom Fit for Various Sizes – Available in multiple configurations.
✔ Compliant with OSHA & API Standards – Ensuring 100% safety compliance.
✔ Fast & Reliable Procurement – Quick order processing & bulk availability.
Conclusion
Hose and Piping Chokers are essential safety devices that eliminate the risks of hose and pipe whip accidents in high-pressure industrial environments. By investing in high-quality choker restraints, industries can enhance workplace safety, protect workers, and ensure operational efficiency.
📢 Don’t wait for an accident to happen! Secure your hoses and pipes with Hose and Piping Chokers from NewE Traders today!
0 notes
Text
Finding the right partner best valve manufacturers in pune
In the industrial heart of Pune, reliable and high-performing valves are essential for a multitude of sectors, from manufacturing and processing to infrastructure and energy. Choosing the right valve manufacturers is crucial for ensuring the smooth and efficient operation of any industrial system. This blog post explores the key considerations when selecting valve manufacturers in Pune and highlights why Parth Valves and Hoses LLP stands out as a trusted and dependable partner.
The Crucial Role of Valves in Industrial Applications
Valves are mechanical devices that control the flow of liquids, gases, or slurries within piping systems. Their applications are diverse and critical, impacting everything from process efficiency to safety and environmental protection. Some key applications include:
Fluid Control: Regulating flow rate, pressure, and direction of fluids in various industrial processes.
Process Automation: Enabling automated control of fluid flow in manufacturing and processing plants.
Safety Systems: Providing emergency shut-off capabilities to prevent accidents and protect personnel.
Environmental Protection: Controlling emissions and preventing leaks to minimize environmental impact.

Diaphragm Valves
Key Factors to Consider When Choosing Valve Manufacturers:
Selecting the right valve manufacturers in Pune is a critical decision that can significantly impact the performance and reliability of your operations. When evaluating potential partners in Pune, consider the following factors:
Product Range: A comprehensive product range ensures you can find the right valve type and size for your specific application.
Material Expertise: The manufacturer should have expertise in selecting and working with various materials, including stainless steel, brass, cast iron, and specialized alloys, to ensure compatibility with different media and operating conditions.
Quality Standards and Certifications: Look for manufacturers with recognized quality certifications, such as ISO 9001, which demonstrate a commitment to quality management and consistent product quality.
Manufacturing Capabilities: Assess the manufacturer’s production capabilities, including their manufacturing processes, equipment, and capacity to handle large orders.
Customization Options: The ability to customize valves to meet specific requirements can be crucial for certain applications.
Technical Expertise and Support: Choose a manufacturer with a knowledgeable technical team that can provide expert guidance on valve selection, installation, and maintenance.
Reputation and Experience: Look for manufacturers with a strong reputation in the industry and a proven track record of delivering reliable products.

Ball Valves
Parth Valves and Hoses LLP: A Leading Choice Among Valve Manufacturers in Pune
Parth Valves and Hoses LLP distinguishes itself among valve manufacturers in Pune by offering a unique combination of quality, expertise, and customer focus. While specializing in hygienic valves, FDA hoses, and dampers, their deep understanding of fluid control systems makes them a valuable partner for various valve needs.

Flush Bottom Valve
What makes Parth Valves and Hoses LLP stand out?
Focus on Hygiene and Quality: Our expertise in hygienic valves and FDA hoses demonstrates our commitment to the highest standards of cleanliness and material quality. This translates to superior quality even in our standard valve offerings.
Premium Materials and Traceability: We utilize premium materials in all our products, ensuring durability and reliability. Our commitment to complete material batch traceability provides transparency and accountability.
12-Month Product Guarantee: We offer a 12-month product guarantee on our hygienic valves, hoses, and damper assemblies, reflecting our confidence in the quality of our products.
Expert Guidance and Support: Our experienced team can provide expert guidance on valve selection and application, ensuring you choose the right product for your specific needs.
Conclusion:
Choosing the right valve manufacturers in Pune is crucial for the success of your industrial operations. When searching for valve manufacturers in Pune, Parth Valves and Hoses LLP offers a compelling combination of quality, expertise, and customer service. Contact us today to discuss your valve requirements and experience the Parth Valves and Hoses LLP difference.
0 notes
Text
The Importance of High-Quality Clamps and Bushings in Automotive Performance
When it comes to optimizing vehicle performance, using high-quality components is essential. From exhaust systems to suspension setups, every detail matters. One of the most overlooked yet critical components in automotive assembly is the clamp. Proper clamping ensures safety, durability, and peak performance. Whether you're upgrading your vehicle for better efficiency or maintaining its structural integrity, investing in stainless steel clamps and control arm bushings can make a significant difference.
Enhancing Performance with High-Quality Clamps
Stainless Steel Constant Tension Clamp
A Stainless Steel Constant Tension Clamp provides superior grip even under fluctuating temperatures. Ideal for applications requiring a secure fit, these clamps automatically adjust tension to prevent leaks and maintain a tight seal.
Stainless Steel Embossed Clamp
For a lightweight yet durable option, the Stainless Steel Embossed Clamp is perfect for securing hoses with precision. Its embossed design enhances grip without damaging hoses, making it a preferred choice for automotive and industrial applications.
Stainless Steel Exhaust Pipe Clamp Sleeve
Exhaust system integrity is crucial for performance and emissions. A Stainless Steel Exhaust Pipe Clamp Sleeveprovides a reliable seal for exhaust pipes, preventing leaks and ensuring optimal engine efficiency.
Stainless Steel Fuel Injection Clamp
Fuel systems require precise sealing to maintain pressure and prevent leaks. The Stainless Steel Fuel Injection Clamp is designed for high-pressure applications, offering a secure fit for fuel injection hoses.
Stainless Steel Spring Loaded T-Bolt Clamp
For heavy-duty applications, the Stainless Steel Spring Loaded T-Bolt Clamp provides extra security with its spring-loaded mechanism. It compensates for thermal expansion and contraction, making it ideal for turbo and intercooler piping.
Stainless Steel T-Bolt Clamp
A Stainless Steel T-Bolt Clamp offers high-torque fastening, ensuring reliability in high-performance automotive applications. These clamps are perfect for securing hoses in turbocharged and high-pressure systems.
Stainless Steel V-Band Clamp
For quick and secure assembly of exhaust components, the Stainless Steel V-Band Clamp is a top choice. It allows for easy disassembly and reassembly, making maintenance hassle-free.
316 Marine Grade V-Band Clamp
Built for extreme environments, the 316 Marine Grade V-Band Clamp offers corrosion resistance and superior durability, making it perfect for marine and high-moisture applications.
Stainless Steel Worm Gear Liner Clamp
For general-purpose applications, the Stainless Steel Worm Gear Liner Clamp offers an adjustable and reliable clamping solution, ideal for air intake and coolant hoses.
Upgrading Your Suspension for Better Handling
A well-maintained suspension system is key to vehicle stability and performance. Bushings and camber kits help maintain alignment and improve handling.
Control Arm Bushing
A Control Arm Bushing minimizes vibrations and enhances suspension stability, ensuring a smoother ride. Replacing worn-out bushings improves steering response and extends the lifespan of suspension components.
Front Upper Camber Kit
For better alignment control and handling, the Front Upper Camber Kit allows for precise camber adjustments. This upgrade is essential for performance-oriented driving and track applications.
Rear Upper Camber Kit
A Rear Upper Camber Kit is crucial for maintaining proper tire contact with the road, reducing uneven tire wear, and enhancing overall vehicle stability.
Final Thoughts
Investing in high-quality stainless steel clamps and suspension components significantly improves vehicle performance, longevity, and safety. Whether you're working on an exhaust system, fuel lines, or suspension setup, using the right components ensures reliability and efficiency. Upgrade your vehicle with premium clamps and bushings today to experience enhanced performance and durability!
0 notes
Text
Industrial Hose Pipe Couplings: Ensuring Efficiency and Safety in Industrial Operations
In the modern industrial landscape, reliable connections for fluid transfer are crucial for smooth operations. Industrial hose pipe couplings play a pivotal role in this domain, ensuring the secure and efficient flow of various liquids and gases. Whether for high-pressure applications, chemical handling, or general industrial use, choosing the right hose coupling is essential for both safety and performance.
What Are Industrial Hose Pipe Couplings?
Industrial hose pipe couplings are connectors used to join hoses to pipes or other hoses. They are widely used in various industries, including chemical, petroleum, agriculture, and manufacturing. These couplings are designed to provide a secure connection that prevents leaks, ensuring that operations run smoothly while minimizing risks of fluid loss or accidents.
Why Choose High-Quality Industrial Hose Pipe Couplings?
The choice of hose coupling impacts both the safety and efficiency of your operations. High-quality industrial hose pipe couplings can withstand extreme pressures, resist corrosion, and offer quick assembly and disassembly for ease of maintenance. Manxpower is a leading industrial hose clamps supplier, offering products designed to handle even the most demanding environments.
Key Features of Industrial Hose Pipe Couplings:
Durability: Made from high-grade materials like stainless steel or brass to withstand pressure and corrosive elements.
Safety: Engineered to prevent leaks and ensure secure connections, reducing the risk of accidents.
Versatility: Suitable for a wide range of applications, from firefighting equipment to chemical transfer systems.
Ease of Installation and Maintenance: Many of these couplings are designed for quick connection and disconnection, reducing downtime.
At Manxpower, we provide top-of-the-line industrial hose pipe couplings that are known for their durability and performance. As an experienced industrial hose clamps supplier, we also offer various other solutions to complement our hose coupling products, ensuring that you have everything needed for optimal system functionality.
Other Solutions for Industrial and Fire Safety:
In addition to hose couplings, we supply a variety of essential fire and safety equipment, such as:
(1) Commercial Fire Sprinkler Supplier: Protect your industrial space with reliable fire suppression systems.
(2) Wall Mount for Fire Extinguisher: Keep your fire safety equipment easily accessible and in place with sturdy mounts.
(3) Pressure Gauge for Fire Safety: Monitor pressure levels in fire safety systems to ensure their effectiveness.
(4) Conventional Fire Alarm Systems: We provide high-quality, conventional fire alarm systems for early detection and prevention.
About Manxpower:
Manxpower is a leading supplier of industrial hose pipe couplings, clamps, and fire safety equipment. Located in the heart of Delhi, our company has built a reputation for providing reliable and efficient products tailored to the needs of industries across the region.
Contact Information:
Phone: +91–7428115550
Email: [email protected]
Address: 3963/9, Ground Floor, City Market, Ajmeri Gate, Delhi 110006
We are committed to ensuring your operations run smoothly with high-quality products designed to meet the highest standards of safety and performance. Get in touch with us today to learn more about our industrial hose pipe couplings and other products!
0 notes
Text
Top Tips for Water Heater Installation in Riverside

Water heaters are essential for every household. There is a temporal dimension to a water heater installation, or a water heater repair in Riverside and if the work is right the first time, it's perfect. So, let's get down to some work-able tips to ensure your installation runs as easily and stress-free as possible.
1. Introduction
Planning to install or repair a water heater? It’s more than just connecting pipes and wires. When properly installed the water heater system is effective and does not cause significant (if any) other problems. No matter if you are a DIY kind of person or you are going to hire a professional, these tips will prepare you for success.
2. Why Proper Installation Matters
A poorly installed water heater can lead to issues like leaks, energy inefficiency, and safety hazards. Proper installation ensures your heater runs smoothly, reduces energy bills, and enhances safety.
3. Types of Water Heaters
There are several types of water heaters to choose from:
Tank Water Heaters: Store hot water and are ideal for families.
Tankless Water Heaters: Provide on-demand hot water and save space.
Solar Water Heaters: Use solar energy, making them eco-friendly.
Consider your household size and energy needs when choosing the type.
4. Choosing the Right Water Heater
The right water heater depends on factors like:
Energy Efficiency: Look for Energy Star-rated models.
Capacity: A larger household may need a bigger tank.
Installation Space: Ensure the unit fits your designated area.
5. Tools and Materials You’ll Need
Before starting, gather these essentials:
Wrenches and screwdrivers
Teflon tape
Pipe cutter
Flexible pipes
Safety gloves and goggles
Having the right tools saves time and prevents errors.
6. Preparing for Installation
Preparation is key. Follow these steps:
Turn off Utilities: Shut off the water supply and power source.
Drain the Old Heater: Use a hose to drain water completely.
Clean the Area: Remove debris and ensure adequate ventilation.
7. Step-by-Step Installation Guide
Here’s a simplified guide for installing a water heater:
Position the Heater: Place the unit on a flat surface.
Connect Pipes: Use Teflon tape to ensure leak-proof joints.
Attach the Power Source: Connect to the electrical or gas supply.
Test for Leaks: Turn on the water supply and inspect connections.
Power On: Restore power and set the desired temperature.
Think of this process as assembling a puzzle – every piece must fit perfectly for the system to work.
8. Common Mistakes to Avoid
Avoid these pitfalls:
Skipping the manufacturer’s instructions.
Over-tightening connections.
Ignoring local plumbing codes.
9. When to Call a Professional
Some installations are best left to the experts. Call a professional if:
You lack the necessary tools.
The installation involves complex wiring.
You encounter unexpected issues.
10. Regular Maintenance Tips
Keep your water heater in top shape with these tips:
Flush the Tank: Remove sediment buildup annually.
Inspect the Anode Rod: Replace it if it’s corroded.
Check for Leaks: Regularly inspect connections.
11. Benefits of Timely Repairs
Timely repairs can:
Prolong your water heater’s lifespan.
Prevent costly damage.
Maintain consistent water temperature.
12. Safety Precautions During Installation
Stay safe by:
Wearing protective gear.
Following manufacturer guidelines.
Ensuring proper ventilation for gas heaters.
13. How to Extend Your Water Heater’s Lifespan
Simple habits can make your heater last longer:
Avoid setting the temperature too high.
Use a water softener if you have hard water.
Schedule annual professional inspections.
14. Comparing DIY vs. Professional Installation
DIY: Cost-effective but requires skills.
Professional: Hassle-free and ensures compliance with codes.
15. Conclusion
A well-installed water heater is a cornerstone of home comfort. Whether you’re tackling the job yourself or hiring a pro, following these tips ensures a seamless experience. Keep your system maintained to enjoy reliable hot water for years to come. At EZ Heat and Air, our comprehensive HVAC and air conditioner maintenance services ensure your systems operate efficiently, reducing the risk of costly breakdowns and high energy bills. Contact us now for more information. View Source - https://medium.com/@nilsstocks007/top-tips-for-water-heater-installation-in-riverside-ec9f3abfa31d
0 notes
Text
Hydraulic Fittings
Hydraulic fittings are components used to connect hydraulic hoses, tubes, and pipes in hydraulic systems. They play a crucial role in ensuring leak-free connections and proper fluid transfer within hydraulic machinery and equipment.
Here are some key aspects of hydraulic fittings
Types of Hydraulic Fittings:
Threaded Fittings: These fittings have threads on their ends that screw into compatible ports or connectors.
Flared Fittings: Used with tubing, these fittings have a conical flare at the end that mates with a matching cone on the fitting body..
Crimp Fittings: Typically used with hoses, these fittings require a crimping tool to compress a ferrule around the hose and fitting to create a secure seal.
Push-to-Connect FittingsThese fittings allow for quick assembly without the need for tools, using features like O-rings or gripping mechanisms to seal and secure connections.
Materials:
Hydraulic fittings are commonly made from materials such as steel, stainless steel, brass, and aluminum, chosen based on factors like strength, corrosion resistance, and compatibility with hydraulic fluids
Sealing Mechanisms:
Depending on the type of fitting, sealing can be achieved through threads (using O-rings or thread sealants), compression (as in flare fittings), or mechanical grip (as in push-to-connect fittings).
Applications:
Hydraulic fittings are used in a wide range of applications across industries including construction, agriculture, automotive, and manufacturing. They are essential for connecting hydraulic hoses and tubes in equipment such as loaders, excavators, presses, and hydraulic power units.
1 note
·
View note
Text
Hydraulic Flange Spreaders: A Powerful Tool for Industrial Applications
Hydraulic flange spreaders are specialized equipment designed to efficiently and safely expand or contract flanges in various industrial settings. These tools are essential for pipe installation, maintenance, and repair, where precise control and force are required.
How Hydraulic Flange Spreaders Work
Hydraulic flange spreaders operate on the principle of hydraulic pressure. They consist of a hydraulic power unit, a spreader head, and connecting hoses. The hydraulic power unit generates high-pressure fluid, which is transmitted through the hoses to the spreader head. The spreader head has powerful jaws that expand or contract when the hydraulic pressure is applied.
Key Features and Benefits of Hydraulic Flange Spreaders
Powerful and Efficient: Hydraulic flange spreaders can exert significant force, making them suitable for even the toughest flange applications.
Precise Control: The hydraulic system allows for precise control of the spreading or contracting process, ensuring accuracy and preventing damage to the flanges.
Versatility: These tools are available in various sizes and configurations to accommodate different flange dimensions and applications.
Safety: Hydraulic flange spreaders are designed with safety features, such as pressure relief valves and emergency stop buttons, to protect operators.
Durability: Constructed with high-quality materials and components, these tools are built to withstand demanding industrial environments.
Applications of Hydraulic Flange Spreaders
Hydraulic flange spreaders are widely used in a variety of industries, including:
Oil and Gas: For pipeline installation, maintenance, and repair.
Chemical Processing: For equipment installation and maintenance.
Power Generation: For turbine and boiler maintenance.
Construction: For pipe fitting and installation in industrial facilities.
Manufacturing: For equipment assembly and maintenance.
Choosing the Right Hydraulic Flange Spreader
When selecting a hydraulic flange spreader it is essential to consider the following factors:
Flange Size: Ensure the spreader is compatible with the flange dimensions.
Required Force: Determine the amount of force needed for the specific application.
Portability: If mobility is a factor, choose a spreader that is easy to transport.
Safety Features: Look for spreaders with built-in safety features to protect operators.
Brand and Reputation: Consider the reputation of the manufacturer and the quality of their products.
Industries can improve efficiency, safety, and overall productivity by carefully selecting and using a hydraulic flange spreader
0 notes