#Deep Pour Epoxy Resin
Explore tagged Tumblr posts
Visit Tumblr Blog
Explore Tumblr blogs with no restrictions, modern design and the best experience.
Last Seen Tumblr Blogs


Fun Fact
There are dozens of funny blogs to kill time on Tumblr.
Text
arts and crafts compilation videos
#was watching this 'amazing epoxy creations!!' video and like all but one of them kind of sucked#casting objects in resin and turning a hollow cylinder is like the most basic thing you can do. he didnt even put something in the middle#just hollowed out the whole thing. waste of material. also it was ugly#same guy did too deep a pour on another piece and it overheated. 'amazing creations' my ass this is amateur stuff#there was a lamp that was cool but it used pigment dyes and some parts were too dark for light to shine thru so they were just black#another piece wouldve been nice but was full of air bubbles so the turned result had a rough surface#the fact that i had to scroll so far down the comments just to see other people pointing this stuff out#ive never worked with epoxy in my life but ive watched a lot of videos so im basically an expert 👍
0 notes
Text
Here are the steps and some tricks that I use to make water bases for my minis! (〃´▽`〃)
Thank you @lisuune for asking!~☆ I hope this will be of help!
1st step is to decide what the base "water" colour is!
For murky pounds you can use browns and beige, for a swamp, I use dark greens, olive, and sepia, for deep water the best would be shades of blue, depending of the depth that you want.
I'll use this mini as an example. I had some fun pouring cheap acrylics mixed with regular white/school glue (not obligatory, but I added a drop of silicone oil for the eye effects). I cut a plastic bag in two and let the acrylics dry. After acrylics dry, they turn to plastic, which is easy to cut and glued on the base.
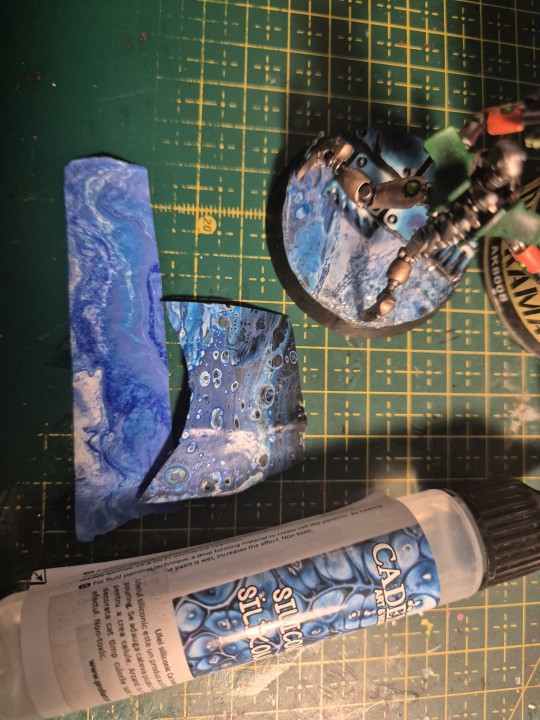
(I need to flip my cutting mate, sorry for the mess (ó﹏ò。))
Always let painrs dry in a well ventilated place.
2nd step is to decide what sort of "water" you shall use.
I am mostly using two materials, but there are a few others as well. I never tried them, but I read that people use transparent glue, varnish medium, or medium gel. I personally have experience with resin (both UV and regular epoxy resin) and clear acrylic.
(! Always work in a well ventilated space with resin ! It is super important, the fumes are toxic! Wearing gloves with resin is a must!)

When pouring, you can use a silicone mold for the base, or as my silly ass did the first time, use a little tape to create a dam (this only works if you intend to pour just a little).
Depending on how much you need, you can use: acrylic and epoxy resin for projects where you need a lot. Those allow you to pour multiple layers that will merge marvellously!
The trick is to be patient to let it dry, and pour very slowly to avoid air bubbles. Usually, a spritz or spray of alcohol is enough to eliminate the surface bubbles!
While acrylic is way safer and friendly for beginners, resin allows you to do neat tricks.
Use UV resin when you don't have to use a lot, because it doesn't layer as nicely as the regular one that needs to dry to gel (harden).
You can leave the UV resin under sunlight, and it will harden, or you can use an UV lamp, or flashlight, which will cause it to harden in seconds!
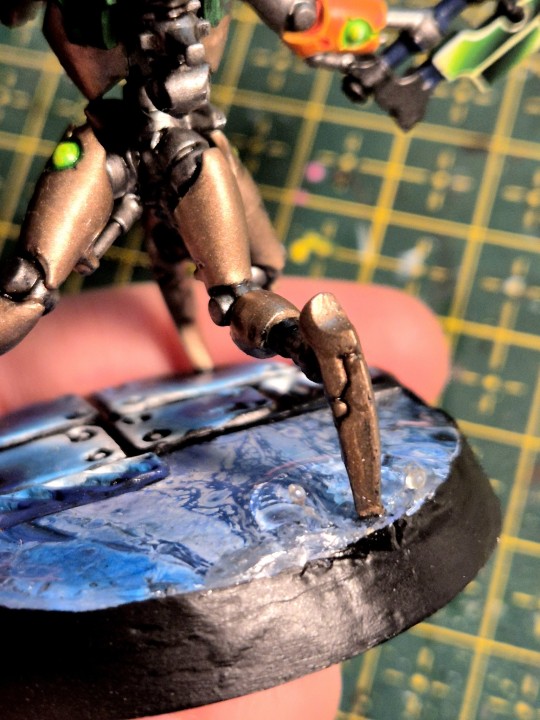
I made here a watter ripping by using a compressed air can and curing as it was blown into place. (*sensible chuckle*).
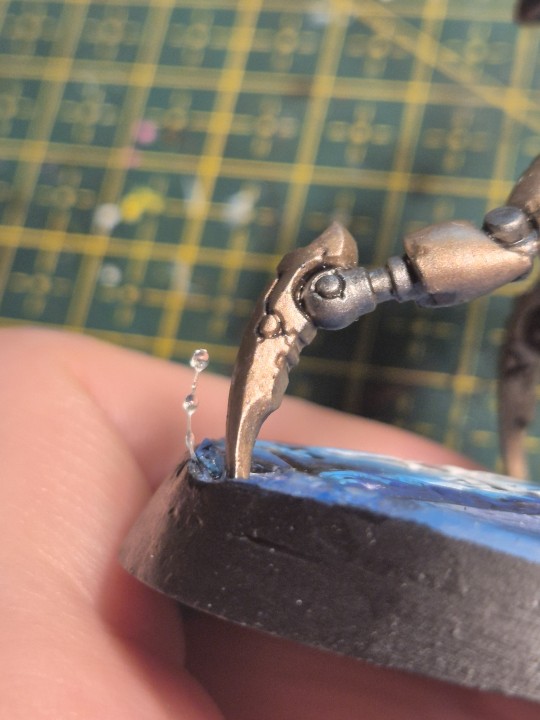
If you have fishing wire or transparent tread, you can pour a few drops on it and cure it for a cute splash effect!
As an extra, I use putty to make the "solid ground". I really like the Green Stuff world rolling pins, but a 3D printed one can work just as fine! (Don't forget to cover them with sculptor vaseline, or just water. For me, I prefer starch, that is why mine are so dusty)

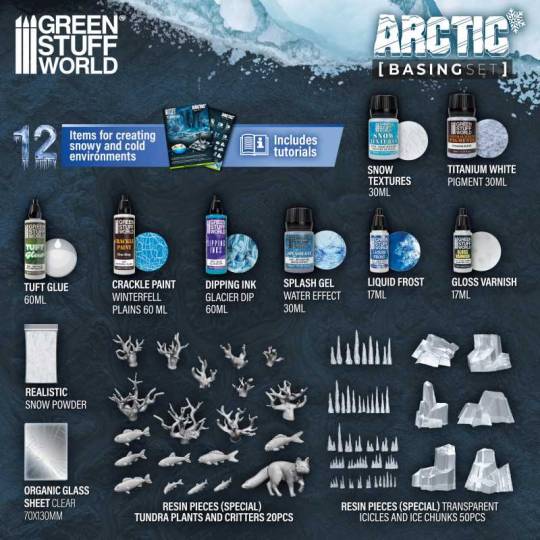
I saw some beautiful basing kits from GSW, that I will absolutely buy to try. They have them for all kinds of terrain, including water, swamps, lava etc.
Happy basing !~♡
(。・ω・。)ノ♡
15 notes
·
View notes
Text
More dye adventures with Zonda Journey, Zephyr Slip alt deco


Okay, this is going to be a bit text heavy and process oriented, and there's no snazzy new design to show off, just sharing my process a bit as it develops.
April wanted her copy of Zephyr Slip in custom colors, so following Transformers redeco tradition, Zephyr now has a sister, Zonda Journey. (The Zonda is a wind from the mountains in Argentina, though far to the west of the locale where Austroraptor was discovered.)
The build was a mixed success but a learning experience in my pursuit of a dying process that results in uniform, predictable, and durable color.
Aside from a more stable kickstand, Zonda's design didn't change much from Zephyr's. For ease of dying and painting, the scooter floor, wing insets, and nasal / maxilla area were all separate pieces this time and glued into place with two-part epoxy, but not much else has changed in the model.

The build does differ from Zephyr Slip in that several of Zonda's joints use clear polyurethane rods in place of ABS ones, most importantly in the feet and tail. These have to be threaded into place and cut, but they're compliant, so while posing is a little spongy, they support more weight with more stability and absorb some shock, making the figure less likely to tip over from bumping the shelf.

But back to the dyes. Details like the inside of Zonda's headlights and taillights, and her claw emblem, pinstripes, face details, and rims are painted, and as usual she has paper decals for her eyes and console. But the bulk of her color, everything magenta, purple, or black, is dyed. I'm going to work through those in reverse order here, black, purple, magenta.
Some of the black parts were printed in stock black resin, like the wheels, but I've had difficulty with failed prints using it, and elements like the black sections of the tail and head where I've used white resin and dyed it black end up with a uniform, more satin finish, so I think that I'm going to prefer that method from now on.

Using black ink for brushed-in details like the shoe treads works, but it's risky, because the ink can sometimes find the grain of the printed surface and wick away where I don't want it. Anywhere I intend to do this on future models will require a deep trench in the model to capture the ink, similar to the grooves used for Zonda's pinstriping seen on the part above.

Zonda's darker purple elements could have been more uniform with a couple more tries. Brushing the ink on with any color but black leaves a patchy, cloudy surface, and dying in a bath requires far too much ink. Workbenchmaniac suggested using an airbrush to apply the ink, and that seems to work very well, with a lot less waste than a bath and much more uniform results than brushing, so with a bit more practice, that might be my go-to method for dying parts, especially with a layer of clearcoat on top as here.
Zonda's magenta parts were simply printed in color, but I ran into a novel problem right away that I didn't solve at all: she was never intended to be magenta in the first place. The dyed liquid resin was lavender.


I already knew from working on Nova that dying liquid resin would really only work for pastel colors, and that the color after curing wouldn't quite match the liquid form. Nova's pink was also a little less punchy and fluorescent after printing. But I wasn't prepared for the wild swing around the color wheel this dye underwent with printing and curing.
I've read that alcohol dyes are ironically susceptible to UV photodegradation, but I'm not convinced that's what's at work here. In fact, all of Zonda's headlights and taillights have clear UV resin poured in and cured in place after painting, which means that areas of both the magenta and the surface-dyed purple have been exposed to much longer UV blasting with no visible effect.

So I've learned some things from this process. I think the most reliable tools in my kit in relation to dye are brushed black dye and airbrushed everything else. Airbrushing gives me bright and predictable colors, and with practice I can make them pretty uniform. Black dye, which is always uniform and can go over any other color, is a handy tool for detailing as long as the model is prepared with grooves to control the spread. And breaking elements down into parts that can be dyed separately continues to be a reliable and useful step that saves much more workbench time than it takes in Blender time.

As for Zonda Journey, I have a lot of things to improve on for next time, but I'm reasonably happy with the result for now, and April is happy with her, which is what counts.
7 notes
·
View notes
Text
Posted for sale!
You can request colors.
5 notes
·
View notes
Text
(The resin is just about ready, a bit of dye even mixed in to one of the two buckets-- if you're going to be remade and prepared, might as well do it with honor, like kintsugi.)
(Mary is lying on the crates, rope tying the body parts together in their splay to give the reinforcements time to settle and harden. The wood glue had dried a while ago, and now it was time for the resin.)
(She began to pour the deep sea blue to navy epoxy where the splinters could not be patched.)
(The fluid crested down the edge of the bucket, folding among itself as it began to settle in the wounds, reinforcing the structure.)
(The doll kept humming a lullaby of a tune as she worked, ocasionally whispering words of comfort to the puppet's prone form.)
(Overtop of the deep blue went the clear resin, gently over each part, a paint-thin layer of protection from the elements to blend over top the gashes in wood.)
5 notes
·
View notes
Text
DIY RESIN KEYCHAIN a fun and easy craft for beginners
you're into crafting or looking for a fun, relaxing hobby, making a DIY resin keychain is a perfect place to start. Not only is it a great creative outlet, but it’s also an opportunity to make personalized gifts or even start a small side hustle. With just a few basic supplies and a little patience, you can create custom keychains that are durable, colorful, and totally unique.
What Makes Resin Keychains So Popular?
Resin is a glossy, clear material that cures into a hard, plastic-like finish. This makes it ideal for keychains that you can carry daily without worrying about wear and tear. The best part? You can embed almost anything inside—from glitter and confetti to tiny flowers, beads, or even small photos. The possibilities are endless, and no two pieces ever look exactly alike!
Materials You'll Need
Before you start your DIY resin keychain project, gather the following supplies:
Epoxy resin (typically a two-part formula)
Silicone molds (specifically made for keychains)
Key rings and jump rings
Mixing cups and stir sticks
Gloves and a face mask
Decorative elements: dried flowers, glitter, mica powders, charms, etc.
Small drill (if your mold doesn’t have pre-made holes)
Optional: UV resin and lamp for quick-drying topcoats or designs.
Step-by-Step Instructions
Set Up Your Workspace Cover your working surface and make sure you’re in a well-ventilated area. Resin can get messy, and safety is a priority.
Mix the Resin Follow the instructions on your resin kit. Usually, it’s equal parts resin and hardener. Mix slowly and thoroughly to avoid bubbles.
Add Decorations After mixing, add your decorative elements. Mix-ins like glitter, dried flowers, and color pigments work well. Stir gently so everything is evenly distributed.
Pour Into Molds Carefully pour the resin into your keychain molds. Use a toothpick to pop any bubbles or position decorations where you want them.
Let It Cure Depending on your resin type, curing takes 12–24 hours. Keep the molds in a dust-free space and avoid moving them.
Add Hardware Once fully cured, remove the keychain from the mold. If your mold doesn’t include a hole, use a small hand drill to create one. Then, attach the key ring with a jump ring.
Optional Touch-Up For extra shine or to fix rough edges, apply a thin layer of UV resin and cure it under a UV lamp.
Creative Ideas
Make monogrammed keychains using letter molds.
Create galaxy-inspired designs with deep blues and glitter.
Press real flowers or tiny charms inside for a whimsical look.
Final Thoughts
Making your own DIY resin keychain is a simple yet satisfying craft that allows for tons of creativity. Whether you're crafting for fun, gifts, or to sell online, resin keychains are always a hit. The best part is, each one is as unique as the person making it. So grab your supplies, let your imagination flow, and start creating your own little works of art!
0 notes
Text
Exploring the Versatility of Epoxy Resin Color in Creative Projects
In the world of DIY crafts, interior design, and industrial applications, epoxy resin color plays a critical role in enhancing visual appeal and functionality. Whether you're creating jewelry, countertops, artwork, or furniture, choosing the right pigment can significantly impact the final look and feel of your project.
What Is Epoxy Resin Color?

Epoxy resin color refers to pigments or dyes added to clear epoxy resin to give it a specific hue, shade, or special effect. These colorants come in various forms, including liquid dyes, powder pigments, metallics, pearlescents, and even glow-in-the-dark options. The flexibility in color selection makes epoxy resin an attractive medium for artists and manufacturers alike.
Types of Pigments Used in Epoxy Resin
There are several types of pigments that can be mixed into epoxy resin:
Liquid Pigments: Easy to blend, ideal for a uniform color throughout the resin.
Powder Pigments: Great for rich, deep colors, often used in larger projects.
Metallic and Pearlescent Powders: Add shimmer and depth to artwork or tabletops.
Alcohol Inks: Used for creating marbled effects or flowing abstract art.
One popular pigment in traditional and modern art projects is meena colour, known for its vibrant and lasting hues. This color, deeply rooted in Indian enamel art, is now finding new applications in resin-based creations.
How to Choose the Right Epoxy Resin Color

Selecting the right color depends on the type of project you're working on and the desired effect. For instance:
For ocean-themed art: Choose blues, teals, and white pigments to mimic water and waves.
For modern countertops: Earth tones or marble-like effects are popular choices.
For jewelry: Vibrant, translucent pigments can make small items stand out.
Consider the background surface and the amount of light the project will be exposed to, as this can affect how the final color appears once cured.
Tips for Coloring Epoxy Resin
Start Small: Always test your pigment with a small amount of resin before committing to a full batch.
Mix Thoroughly: Ensure pigments are fully blended to avoid streaks or uneven color.
Watch Ratios: Too much pigment can affect curing time and the final texture of the resin.
Use Heat Wisely: Use a heat gun to remove bubbles after mixing, especially when working with thicker resin pours.

Adding epoxy resin color transforms a functional material into a medium of artistic expression. With a wide array of pigment options and endless combinations, your creative potential is virtually limitless. For quality pigments and trusted resin products, many professionals turn to MB Epoxy, known for its commitment to consistency and innovation.
0 notes
Text
Mica Powder for Resin: How to Add Stunning Shimmer & Color
Resin art and crafts have taken the creative world by storm, offering endless possibilities to create beautiful, shimmering designs. One of the best ways to enhance your resin projects is by using mica powder—a natural, non-toxic mineral powder that adds stunning shimmer and vibrant color to resin.
Whether you’re a beginner or an experienced resin artist, this guide will walk you through everything you need to know about using Mica Powder for Resin, from how to mix it properly to creative project ideas and expert tips.
What is Mica Powder?
Mica powder is a finely ground mineral that naturally reflects light, giving resin a luminous and iridescent effect. It is widely used in resin art, cosmetics, soaps, candles, and more. Available in a variety of colors and effects—such as metallic, pearlescent, and holographic—mica powder is a versatile and essential material for resin artists.
Why Use Mica Powder in Resin Art?
Rich, Vibrant Colors: Mica powder provides a wide spectrum of colors that don’t fade over time.
Shimmer & Shine: Adds a unique pearlescent or metallic effect to resin projects.
Non-Toxic & Skin-Safe: High-quality mica powders are safe to use in art and crafts.
Easy to Mix: Blends well with resin without clumping.
UV Resistant: Helps prevent color fading in resin projects exposed to sunlight.
How to Use Mica Powder in Resin
1. Gather Your Materials
Before you begin, ensure you have the following:
Epoxy Resin & Hardener
Mica Powder (various colors)
Mixing Cups & Stir Sticks
Silicone Molds or Resin Casting Surface
Gloves & Protective Gear
2. Mix Mica Powder with Resin
Prepare Your Resin: Mix your epoxy resin and hardener according to the manufacturer’s instructions.
Add Mica Powder: Start with a small amount (about 1-2% of the resin mixture). You can add more if you want a deeper color.
Stir Thoroughly: Mix well until the mica powder is evenly dispersed.
Pour into Molds: Carefully pour the resin mixture into silicone molds or onto your desired surface.
Eliminate Bubbles: Use a heat gun or torch to remove air bubbles for a smooth finish.
Cure the Resin: Allow the resin to cure fully according to the recommended time.

Creative Resin Project Ideas with Mica Powder
Looking for inspiration? Here are some creative ways to use mica powder in resin:
1. Resin Coasters
Add metallic or pearlescent mica powder to create stunning resin coasters that shimmer under light.
2. Jewelry Making
Use mica powder to create beautiful, colorful pendants, earrings, and rings with a pearlescent glow.
3. River Tables
Enhance your epoxy river tables with deep blues and greens, giving the illusion of water flowing through wood.
4. Resin Paintings
Mix mica powder with resin to create dazzling resin artwork with unique swirling effects.
5. Keychains & Bookmarks
Make personalized resin keychains and bookmarks with a touch of glittering mica powder.
Tips for Using Mica Powder in Resin Art
Test Before Mixing: Always test mica powder on a small resin batch to see how the color develops.
Layer Different Colors: Create unique depth effects by layering multiple mica powder shades.
Use a Soft Brush: Lightly dust mica powder inside molds before pouring resin for a subtle shimmer.
Combine with Other Pigments: Mix mica powder with alcohol inks or liquid resin dyes for custom shades.
Avoid Overuse: Too much mica powder can affect resin curing; use moderate amounts for the best results.
FAQs About Mica Powder for Resin
1. Can I use any mica powder for resin?
Yes, but it's best to use cosmetic-grade or resin-specific mica powders to ensure safety and high-quality results.
2. Will mica powder settle in resin?
Mica powder can settle if the resin is too thin. Stir well and pour immediately to maintain even distribution.
3. How much mica powder should I use?
A general guideline is 1-2% of the resin mixture. Too much mica powder can affect the curing process.
4. Can I mix mica powder with other pigments?
Absolutely! Mica powder blends well with alcohol inks, resin dyes, and acrylic paints.
5. Does mica powder fade over time?
High-quality mica powders are UV-resistant and won’t fade, but always seal your resin projects for longevity.
Final Thoughts
Using mica powder for resin is an easy and effective way to enhance your resin art with vibrant colors and a shimmering finish. Whether you’re making jewelry, coasters, or large resin projects, mica powder opens up endless creative possibilities.
Ready to start your next resin project? Explore our collection of premium mica powders at Touchwood Design and bring your resin art to life!
0 notes
Text
https://www.epodex.us/product/deep-pour-casting-epoxy-resin-kit/?utm_source=facebook&utm_medium=cpc&utm_content=US_North+Carolina_Epoxy_AI+Ad+Set&utm_campaign=US_North+Carolina_Epoxy_AI&utm_term=US_Video+Rivertable+%26+Countertop_Video&utm_id=120214734843310480&ad_id=120214734843410480&adset_id=120214734843360480&placement=Facebook_Mobile_Feed&site_source_name=fb&fbclid=IwZXh0bgNhZW0BMABhZGlkAasWqhg3yHABHX01jxy-yIPRhiFxhW4DFYKhDI0UUjRS1aIe7k-sOLW9_r0_jtT7Uw-QRA_aem_nJZOjr4nTWT9zECEsgwEgw&sfnsn=mo
0 notes
Text
Foundation Crack Repair Methods
Poured concrete foundations can crack for several reasons, and we recently shared an article outlining these causes. In this post, we will explore the various crack repair options available, highlighting the benefits and drawbacks of each method.
Before diving into the specifics of repair techniques, it’s essential to emphasize that foundation crack repairs should be handled by a professional basement waterproofing company—no exceptions. Handymen and plumbers typically lack the necessary qualifications for these jobs. Conversely, waterproofers are not suited for tasks like hanging drywall or installing water heaters; it all hinges on the company's experience and expertise standing behind the repair.
Cracks in foundations can be sealed from either the interior or exterior. When performed correctly, both methods can be equally effective. If obstacles like decks or patios exist, or if your basement remains unfinished, sealing from the inside is more common. Conversely, if drywall or paneling is present, or if a furnace obstructs access, the exterior sealing method may be preferred.
Interior foundation crack repair has evolved significantly from the old method of "chipping it out and patching it." This involved using a rotary chipping hammer to create a V-shaped groove a few inches deep along the crack and patching it with hydraulic cement. Unfortunately, this method often didn’t endure well since it didn't fill the crack entirely to the outer soil, and hydraulic cement lacks the strength and durability needed.
Now, crack injection is the favored technique for interior foundation repairs. You may have heard about "epoxy injection" or "urethane injection." This process involves sealing the crack's inside face with an epoxy paste and injecting a resin (epoxy or urethane) that fills the entire crack to the external soil. We typically favor urethanes due to their flexibility and their effectiveness for waterproofing, whereas epoxy is better suited to structural concerns.
Externally, some homeowners still believe that the best method for fixing foundation wall cracks is from the outside. This mindset is often held by those from an older generation, before crack injection gained popularity. Repairing from the exterior remains a sound approach, especially when compared to a hydraulic cement patch.
To effectively seal a crack from the exterior, the adjoining earth must be excavated to expose the crack entirely from the top of the wall down to the footing. While some companies might simply dig a large hole, we prefer a less disruptive method using a post hole digger, typically creating a hole about 8 to 12 inches in diameter.
This method minimizes disruption to your landscaping, as there is no need for extensive excavation. After fully exposing the crack from top to bottom, we fill the hole with granular clay, forming an impermeable water barrier that prevents further moisture intrusion.
0 notes
Text
Guide to Crafting and Polishing Resin Table Tops

Resin tables have become popular for homeowners across the UK, offering an exceptional blend of beauty, durability, and versatility. Whether a sleek poly resin coffee table or a custom dining table featuring embedded elements, resin tables are perfect for adding a creative and functional touch to various interior styles.
A Look at Resin Table Styles and Trends
Resin tables come in various styles, each bringing its unique appeal. From a resin and wood dining table that adds a touch of elegance to your dining space to a resin coffee table with hidden storage for added functionality, resin furniture effortlessly merges style with sturdiness. In the UK, resin tables with embedded items like coins, flowers, or even stones are particularly in demand. For example, the vibrant pink epoxy table and the rustic pine resin table allow homeowners to showcase their personal tastes and artistic creativity.
Choosing the Right Resin for Your Table
Selecting the correct resin type is crucial for achieving your resin project's desired strength, clarity, and finish.
Epoxy Resin: This is a top choice for its crystal-clear finish and strength. It's ideal for DIY enthusiasts working on smaller projects like coffee tables or decorative resin items. Its clarity makes it perfect for embedding objects like flowers, coins, or shells in projects like koi ponds or inlay tables.
Polyester Resin: Durable and affordable, polyester resin is an excellent option for outdoor furniture like patio tables. It's commonly used for larger pieces like resin dining tables or BBQ tables. However, it may turn yellow over time if exposed to sunlight for extended periods.
Poly Resin: Lightweight and easy to work with, polyresin is often used for smaller tables, such as coffee or end tables. It's particularly suited for decorative projects with small items embedded within the resin, making it an excellent choice for resin art tables.
Selecting the Base Material for Your Resin Table
The choice of base material impacts the table's overall look, weight, and longevity.
Wood: Wood is a classic choice in live-edge or wood-filled resin tables. It adds a natural, rustic charm that pairs beautifully with a glossy resin surface, making it perfect for creating statement dining tables.
Concrete: For an industrial, modern aesthetic, concrete is a durable option frequently seen in outdoor settings. It is commonly used in gardens or patio furniture, providing a robust base to withstand the elements.
Stone and Timber: If you're after a rugged and natural vibe, stone or timber bases are an excellent option. The combination of resin and these materials results in a durable and aesthetically appealing table.
Preparing Your Table for Resin Pouring
Preparation is essential for achieving a flawless resin surface. Here's a step-by-step guide to ensure your table is ready for resin application.
Sanding and Cleaning the Surface: Start by sanding the table base. For wood, use fine-grit sandpaper, and for tougher materials like concrete or stone, use coarse-grit. This step ensures a smooth surface for the resin to bond effectively. After sanding, clean the surface with a damp cloth to remove dust and debris, then allow it to dry completely.
Adding Embedded Elements: To personalize your table, consider embedding decorative items like bottle caps, coins, or flowers. As seen in resin bottle cap tables, arranging these elements beneath a clear resin layer adds a personal and creative touch to your project.
Step-by-Step Guide to Pouring Resin
Pouring resin requires attention to detail, but following these steps will help you achieve a professional-looking finish.
Mixing the Resin: Always follow the manufacturer's instructions to avoid common issues like bubbling or clouding. For larger tables, such as dining or conference tables, ensure the resin is mixed thoroughly to ensure an even and clear finish.
Pouring Techniques: For deep or multi-layered tables, such as river or island tables, pour the resin in stages to avoid overheating. This also allows for gradually embedding decorative items, ideal for tables with intricate designs, like chess or anchor-themed tables.
Eliminating Bubbles: Gently run a heat gun or torch over the surface of the resin to eliminate any trapped air bubbles. This is a crucial step, especially for projects requiring clarity, such as resin crystal tables.
Polishing Resin Tables for a High-Gloss Finish
Polishing is the final step that gives your resin table its signature shine. This process enhances the overall aesthetic and highlights the details of embedded elements.
Choosing Polish and Tools: Select a polish specifically formulated for resin. Use a buffing machine and polishing pads to achieve a mirror-like finish, especially on larger surfaces like dining or coffee tables.
Polishing Techniques: To smooth the surface, begin by wet sanding with progressively finer grit sandpaper. After sanding, a polishing compound buffs the surface to a high-gloss sheen. This method works well for all table sizes, from small bedside tables to large dining pieces.
Essential Tips for Polishing Resin Tables
Here are some tips to ensure your resin table maintains flawless shine over time. When polishing, always apply even pressure to avoid creating swirl marks on the surface. Regular polishing is recommended, especially for tables that experience frequent use, to keep them looking pristine.
Safety Precautions for Polishing Resin
When working with resin, always ensure you are in a well-ventilated area. Use protective gear such as gloves and masks to avoid inhaling fumes or skin contact. Polishing can create a mess, so covering the surrounding area with a protective sheet is a good idea.
Maintaining Your Resin Table
Proper care ensures that your resin table remains in excellent condition for years.
Cleaning: Use a soft cloth and mild cleanser for regular cleaning. Avoid harsh chemicals, particularly for clear resin tables, to prevent damaging the finish.
UV Protection: If your resin table is exposed to sunlight, such as in outdoor settings, apply a UV-protective spray regularly to prevent yellowing and discoloration.
Popular Resin Table Styles in the UK
Resin tables have used various styles to match different interior aesthetics, from modern to rustic.
Embedded Art: A growing trend is embedding decorative items like flowers, coins, or personal mementos into the resin. Tables with these designs, such as floral or coin tables, offer a one-of-a-kind appeal.
Rustic and Natural: Combining resin with natural elements like wood or stone creates a timeless, rustic charm. Styles like pinecone resin tables or reclaimed wood tables are perfect for adding warmth and character to any space.
Bold Colours: UK homeowners increasingly choose vibrant colors to make a statement in their home décor. For instance, a bright red resin table can serve as an eye-catching centerpiece in any room.
Conclusion
Resin tables offer an extraordinary way to blend functionality with artistic design, making them a great addition to any home. Using the right techniques and materials, such as those offered by Mayyari, you can craft a resin table that reflects your unique style and stands the test of time. Whether a rustic resin dining table or a vibrant coffee table, your resin creation will be a conversation piece for years.
0 notes
Text
So I've been doing some calculations on what costs/selling would be for resin stuff.
For a gallon of resin (which is actually .5 gallon epoxy, and .5 gallon hardener) costs about $45 and up, more expensive for 'deep pour' resin (which is what should be used in those cute dragon molds). So just to cover the costs of resin, I would have to charge $2.59 per ounce of resin used. One of the cute dragon molds is 9.4 ounces.
So 9.4 x $2.59 = $24.34 for just 1, that's not counting all 3 in the set. Plus charge for time, mica powder, dyes or anything else used... I don't think people would really buy that. Now, not all 3 of those dragon's are the exact same ounces, there's some variation, and they are about 4 inches tall, but selling them with this pricing would not happen. Others on etsy are selling them for way cheaper. Like $30 for all 3.
Maybe I could offer them as gifts for first time gold members on my ko-fi at first, and when (more like if) I get a better income I can make them for my etsy shop??
The trays I made will be cheaper I think, and they can actually be used for stuff. Would people like them more??
Any opinions guys?
2 notes
·
View notes
Text
How to Clean Concrete Floors the Right Way and Tackle Tough Stains
Concrete floors are known for being an extremely resilient surface; but even they can get dirty from dust, debris and sticky spills over time and require regular cleaning to look their best. There are some easy steps you can follow to restore the appearance of your newly-resurfaced floor or tackle stains in your garage to make concrete look brand new again.

Find out how to clean Residential Polished Concrete Floors with our guide!
Hoe often to Clean Concrete Floors
Clean interior concrete floors (whether sealed, polished, stained, or painted) every two weeks (or as necessary when dirt and grime begin to build up). Plan on deep cleaning unsealed concrete garage floors at least once annually along with stain removal as necessary.
Before You Begin
In order to protect and clean concrete floors effectively, it is crucial that you understand their type of finish. Any stains or spills should be immediately addressed so as to minimize potential damage.

Homeowners frequently make use of these concrete floor treatments:
Sealed: Sealed concrete is coated with acrylic resins, penetrating silicates, epoxy or urethanes to make it nonporous and stain-resistant.
Polished: Modern Polished Concrete Floors are both wet and dry to produce a glossy, wax-free surface that never requires recoating or waxing, with multiple sheen levels available that mimic marble, granite or any other polished stone surfaces. Furthermore, staining allows the final appearance to match that desired look of Polished Concrete Flooring containing stones such as marble and granite.
Stained: If grey isn't your go-to hue, there are many other stains available to color freshly laid or existing concrete surfaces. Stains penetrate deeply and permanently color both surfaces; their finish can then either be sealed over or left unsealed for easy maintenance.
Painted: Though concrete tends to accept stains easily, achieving an oil- or latex paint surface that lasts can be more challenging. Concrete Sealing Salt Lake City may prevent proper adhesion between paint layers; otherwise peeling could occur.
Unsealed Concrete: Poured concrete without additional treatment is known as unsealed, meaning its surface remains porous and susceptible to staining from liquid-based substances such as oil. You will require equipment and tools for this task such as brooms, dust mops or vacuum cleaners as well as wet mop.
How to Clean Sealed Concrete Floors
Clean Away Surface Dust and Debris
Sweep, vacuum or dust mop the floor regularly to help avoid scratches from dirt and grit, helping protect its finish and prolong its longevity.
Create a Cleaning Solution and Mop
Mix 2 gallons of warm water with 2 teaspoons of dishwashing liquid in a bucket or sink before mopping with it on your floor.
Rinse and Dry
Repeat Step 3 using clean water and a wet mop to rinse away any leftover soapy residue from the floor and allow the air to dry the floor completely.
0 notes
Text
Transforming Creativity with Epoxy Resin: A Journey Through Art and Craft
In the realm of artistic expression and functional craftsmanship, epoxy resin has emerged as a versatile medium that captivates both artists and hobbyists alike. This synthetic material, known for its robustness and glossy finish, has sparked a revolution in the way people create everything from intricate jewelry to large-scale art installations.
Beyond its utilitarian purposes, the epoxy resin store stands as a beacon of creativity and human ingenuity, where imagination meets technical precision.
Exploring the World of Epoxy Resin Stores:
Innovative Products: Epoxy resin stores offer a myriad of products, from basic resin kits to advanced formulations tailored for specific applications such as wood coating, tabletops, and casting.
Variety of Colors and Effects: Artists and creators can choose from a dazzling array of colors and effects, including metallic finishes, pearlescent swirls, and even glow-in-the-dark options, allowing for limitless creative possibilities.
Tools and Accessories: Beyond resin itself, stores provide essential tools like mixing cups, stirring sticks, molds of various shapes and sizes, and safety equipment to ensure a smooth and secure crafting experience.
The Human Touch: Emotions and Artistry
Inspiration and Passion: Epoxy resin stores are not just about selling products; they cultivate inspiration and passion within the artistic community. Artists often find themselves inspired by the materials themselves, sparking ideas that lead to unique creations.
Emotional Connection: Crafting with epoxy resin fosters a deep emotional connection between the artist and their work. The process of mixing resin, pouring it into molds, and witnessing its transformation evokes a sense of anticipation and fulfillment.
Artistic Satisfaction: Completing a resin art piece or a functional resin creation provides a profound sense of satisfaction. Artists experience pride in their craftsmanship, knowing they have brought their vision to life through meticulous planning and execution.
From Hobby to Business: Epoxy Resin as a Lifestyle
Entrepreneurial Endeavors: Many enthusiasts start by exploring resin as a hobby and eventually turn their passion into a business. Epoxy resin stores support this transition by offering bulk purchasing options, business resources, and workshops on advanced techniques.
Community Building: Beyond transactions, epoxy resin stores serve as hubs for community building. Artists connect with fellow creators, share tips and tricks, and celebrate each other's successes, creating a supportive network that spans the globe.
Environmental Responsibility: As awareness of sustainability grows, epoxy resin stores are increasingly offering eco-friendly alternatives and promoting responsible resin disposal practices, ensuring that creativity does not come at the cost of environmental harm.
Conclusion:
In essence, the epoxy resin store is more than just a retail outlet; it is a gateway to a world where human intelligence and emotion converge to produce stunning works of art and practical creations. It fuels creativity, nurtures passion, and fosters a sense of community among artists and craftsmen worldwide. Whether you are a seasoned artisan or a novice enthusiast, stepping into an epoxy resin store is an invitation to embark on a journey of discovery and self-expression.
Embrace the possibilities that epoxy resin offers. Let your imagination run wild, guided by the technical expertise and boundless creativity that these stores encapsulate. Together, we can continue to push the boundaries of what is possible in the realms of art, design, and craftsmanship, all while fostering a deep appreciation for the beauty that human hands can create.
0 notes
Text
Unveiling the Beauty and Durability of Epoxy Resin Flooring
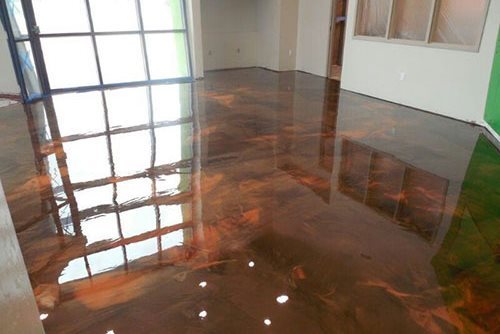
Are you tired of the same old flooring options that lack character and durability? It's time to step into the world of innovation and sophistication with Epoxy Resin Flooring. Buckle up as we take a deep dive into this transformative flooring solution that's changing the game in the United States.
The Epoxy Resin Revolution
Imagine a floor that not only stands the test of time but also adds a touch of elegance to your space. That's precisely what epoxy resin flooring brings to the table. This liquid gold of the Seamless Resin Flooring Systems world, when applied, transforms into a seamless, glossy surface that is not only visually stunning but also exceptionally robust.
What Sets Epoxy Resin Flooring Apart?
Durability Beyond Imagination: Ever dreamed of a flooring solution that laughs in the face of wear and tear? Epoxy resin is your answer. It creates a surface tougher than your grandmother's secret cookie recipe, making it ideal for high-traffic areas in both residential and commercial spaces.
Endless Design Possibilities: Why settle for bland when you can have bold? Epoxy resin flooring is a chameleon, effortlessly adapting to your design preferences. Whether you're envisioning a sleek, modern look or a vibrant, artistic masterpiece, epoxy resin can make it happen.
Seamless Application: Who has time for complicated installations? Epoxy resin flooring boasts a hassle-free application process. The liquid nature of epoxy allows it to conform to any surface, creating a flawless finish that looks like it was poured by the flooring gods themselves.
Stain Resistance Extraordinaire: Spills and stains, be gone! Epoxy resin flooring repels stains like a superhero deflecting bullets. Say goodbye to the constant worry of red wine mishaps or coffee disasters – with epoxy resin, your floor remains untarnished.
A Closer Look at the Epoxy Application Process
So, how does this magical transformation from liquid to solid happen? Let's break down the fascinating process of applying epoxy resin flooring:
Surface Preparation: Think of it as the canvas for an artist. Before applying epoxy, the surface needs to be clean and smooth. Any imperfections are like unwanted blemishes on a masterpiece – they need to be addressed before the real work begins.
Primer Application: Consider this the primer before the big performance. A thin layer of epoxy primer is applied to ensure proper adhesion. It's like giving the floor a firm handshake before the grand entrance.
Epoxy Resin Application: Time for the magic potion. The epoxy resin is mixed and poured onto the prepared surface. It self-levels, creating a seamless, mirror-like finish that's as mesmerizing as it is durable.
Curing Time: Patience is a virtue. Once applied, the epoxy needs time to cure. It's like waiting for a cake to rise – the end result is worth every second of anticipation.
Optional Topcoat: The cherry on top. For added durability and shine, a topcoat can be applied. It's like putting a glossy finish on a cherished painting – it enhances the beauty and protects the masterpiece beneath.
Practical Benefits of Epoxy Resin Flooring
1. Easy Maintenance:
Tired of spending hours scrubbing floors? Epoxy resin flooring is a breeze to clean. Just a quick mop or a gentle sweep, and your floor looks as good as new. It's like having a low-maintenance pet that always looks pristine.
2. Cost-Effective Long-Term Investment:
Investing in the future without breaking the bank. While the initial cost of epoxy resin flooring might raise an eyebrow, consider it a long-term investment. Its durability means fewer replacements over the years, saving you both time and money.
3. Versatility in Application:
Why limit yourself when the sky's the limit? Epoxy resin isn't just for living rooms and kitchens. It's a versatile solution suitable for garages, industrial spaces, and even creative studios. It's like having a single superhero that can adapt to any situation.
4. Enhanced Safety Features:
Slippery when wet? Not with epoxy. Many epoxy resin formulations come with anti-slip properties, making it a safer choice for areas prone to spills. It's like having a guardian angel watching over your every step.
Overcoming Common Myths Surrounding Epoxy Resin Flooring
Myth 1: Epoxy Flooring is Only for Industrial Spaces.
Who said practicality can't be beautiful? While epoxy is indeed a go-to choice for industrial settings, its aesthetic adaptability makes it perfect for residential spaces seeking a modern and sophisticated flair.
Myth 2: Epoxy Flooring is High Maintenance.
Time to debunk this myth. Epoxy resin flooring is a low-maintenance wonder. Its seamless surface doesn't allow dirt and grime to settle, making cleaning a breeze. It's like having a self-cleaning floor that always looks pristine.
Myth 3: Epoxy Floors are Limited in Color and Design Options.
Say hello to a world of possibilities. Epoxy resin can be customized to match your wildest design fantasies. From vibrant colors to intricate patterns, your floor becomes a canvas waiting for your creative brush strokes.
DIY vs. Professional Installation: The Showdown
So, you're ready to take the plunge into the world of epoxy resin flooring. The big question now is: to DIY or not to DIY?
DIY Installation:
Thrill of the Adventure: DIY projects are like a rollercoaster ride – exciting and full of surprises.
Cost Savings: Saving some bucks is always a win, right?
Personal Satisfaction: Completing a project with your own two hands is a satisfaction like no other.
Professional Installation:
Expertise at Your Doorstep: Professionals bring years of experience and technical know-how.
Time Efficiency: While you DIY, the pros can have your floor ready in no time.
Warranty Assurance: Professionals often provide warranties, offering peace of mind for the long run.
The Verdict: If you're up for an adventure and have a knack for DIY projects, go for it! However, for a flawless finish and the assurance of a warranty, the professionals might just be your epoxy superheroes.
Conclusion: Embrace the Epoxy Elegance
In a world where flooring options often feel mundane, epoxy resin emerges as a beacon of innovation and style. It's more than just a floor; it's a canvas waiting for your unique imprint, a surface that defies the limits of wear and tear, and a statement of sophistication.
So, are you ready to step into a world where your floor isn't just something to walk on but a piece of art to marvel at? Epoxy resin flooring invites you to embrace durability without sacrificing style, to dance on a surface that not only withstands the test of time but does so with unmatched elegance.
youtube
#Epoxy Flooring for Garages#Commercial Resin Flooring Options#Epoxy Resin Finishes#Epoxy Floor Specialists#Youtube
1 note
·
View note