#Arduino circuit components online
Explore tagged Tumblr posts
Visit Tumblr Blog
Explore Tumblr blogs with no restrictions, modern design and the best experience.
Last Seen Tumblr Blogs


Fun Fact
Celebrities use Tumblr as well.
Text
Budget-Friendly Robotics Lab Setup Ideas for Schools
In today’s fast-paced, technology-driven world, education must evolve to prepare students for the future. One of the most exciting ways to do this is by introducing robotics into the classroom. Robotics labs foster creativity, problem-solving, and hands-on learning—skills that are crucial in a digital world. But many schools hesitate, assuming such a lab would require a big budget.
The truth is, with smart planning and the right approach, schools can set up functional and inspiring robotics labs without overspending. Let’s explore cost-effective, scalable ideas that make robotics education accessible to schools of all sizes and types.
1. Begin with Basic, Budget-Friendly Kits
A robotics lab doesn't need to start with high-end machines or advanced AI robots. For beginners, there are plenty of affordable kits that help students grasp foundational concepts like motion, coding, and sensor interaction.
Simple kits using platforms like Arduino, LEGO Education, or DIY robotic arms offer tremendous learning value. These kits are reusable and modular—one kit can support multiple learning modules across different grades.
If you're working with younger students, choose age-appropriate options designed for safe and simple handling. A Robotic lab for kids should include large components, visual coding interfaces like Scratch, and simple projects like line followers or maze navigators that build confidence and spark curiosity.
2. Make Use of Existing Space
You don’t need a dedicated room to create a robotics lab. Repurpose an underused classroom, the library, or even a science lab during robotics sessions. The goal is to create a safe, comfortable environment with enough room for collaboration, group work, and movement.
Modular furniture such as foldable tables and stackable chairs can help convert any area into a lab temporarily. Using existing space creatively not only saves money but also encourages flexibility and wider access to the lab throughout the week.
3. Tap Into Free Software and Online Resources
Instead of spending on expensive software, explore open-source tools and free educational platforms. Programming environments like Arduino IDE, Tinkercad (for circuit simulation), and Scratch are all free and beginner-friendly. These platforms allow students to learn core programming and electronics without the need for physical kits in the initial stages.
Many YouTube channels, STEM websites, and educational nonprofits also offer free lesson plans, tutorials, and project ideas. These resources can guide both students and teachers as they explore the world of robotics together.
4. Build a Teacher-Led Model
Training teachers in-house is one of the most effective ways to make a robotics program sustainable. Instead of relying on external trainers, identify tech-savvy staff members and provide them with short-term certification programs or online training.
Once your educators are confident, they can lead sessions and adapt content to suit your school’s specific needs. This model saves on recurring training costs and builds capacity internally. Plus, students often feel more comfortable learning from familiar faces.
5. Use a Phased Rollout Strategy
You don’t have to set up everything at once. Start small and scale gradually. A phased rollout allows you to measure impact, adapt based on feedback, and budget smarter over time.
Phase 1: Focus on grades 4–6 with visual programming and simple builds.
Phase 2: Expand to middle school with text-based coding (like Python).
Phase 3: Introduce advanced robotics, automation, and AI elements for high school.
This staged approach makes the program manageable and gives your robotics curriculum room to grow with the students. Planning a Robotics lab in your school this way ensures long-term value without overwhelming your resources in the first year.
6. Partner with Local Experts or CSR Initiatives
Many local colleges, STEM startups, and NGOs run educational outreach programs or are open to collaborations. Partnering with them can provide access to training, equipment, and mentoring without huge costs.
Look into CSR (Corporate Social Responsibility) programs from tech companies that focus on education. These often fund infrastructure, provide training materials, or even help set up pilot robotics labs in schools. It’s a great way to add value while staying within budget.
7. Encourage Reusability and Innovation
A key principle of robotics is innovation—and that extends to resource use as well. Encourage students to reuse materials, repurpose parts from older kits, and work on open-ended projects. Over time, you’ll build a collection of reusable components like motors, sensors, wires, and boards.
Give students the freedom to prototype, dismantle, and reassemble. Not only does this stretch the utility of your kits, but it also promotes creative thinking and deeper understanding. Encouraging students to document their projects and create DIY guides adds value for peers and supports collaborative learning.
A creative and frugal approach to building a Robotics Lab for Kids in School in India ensures that every child—regardless of their school’s financial limitations—can gain exposure to next-gen skills and concepts.
8. Involve the Whole School Community
A robotics lab can be a powerful community-builder. Host student exhibitions, parent workshops, and inter-house competitions to showcase what’s happening in your lab. These events increase visibility and may inspire sponsorship or volunteer support.
You can also invite alumni, local businesses, or retired engineers to contribute with their time, donations, or mentorship. This support often becomes invaluable for expanding your program affordably.
Conclusion: Innovation Within Reach
Creating a robotics lab on a tight budget is not only possible—it can be incredibly rewarding. With thoughtful planning, open-source tools, and phased implementation, schools can introduce robotics education that truly engages students without compromising on quality.
The real investment lies not in equipment, but in curiosity, creativity, and courage to try something new. By making robotics part of your school’s learning journey, you're empowering students to become thinkers, makers, and future-ready innovators—no matter your budget.
0 notes
Text
Buying Electronic Components Online in India — What to Keep in Mind
Electronics is a field where small parts make a big difference. If you're building something — a simple sensor circuit, maybe a GSM tracker, or even just testing modules — sourcing the right components is half the work.
Going shop to shop looking for capacitors, ICs, or GPRS modules can be draining. Not to mention, stock may not be available, or the part isn’t original. That’s where online sellers come in.

Why Online Works Better (Most of the Time)
Instead of wasting hours traveling or calling five vendors, it’s easier to go online and search the part directly. You get to check datasheets, ratings, specs, pricing — all at once. It’s a better way to find both common and rare components.
In India, the trend is clear: more developers, students, and even R&D engineers now prefer to buy electronic components online. It's faster and often cheaper, too.
Looking for Specific Parts Like GPRS Modules?
Not every local store stocks communication modules. A GPRS module is commonly used in IoT, vehicle tracking, or remote data transmission projects. Online, you can compare multiple options, check if it’s quad-band, serial-compatible, or needs an antenna, etc. That’s hard to do in a store with no documentation or help.
Be Cautious With Semiconductors
If you’re sourcing semiconductors, ICs, or microcontrollers, don’t compromise on quality. Faulty or cloned parts can damage your boards. It’s always safer to stick with semiconductor distributors in India who have proper sourcing, and ideally, tie-ups with top semiconductor companies in India.
Use reliable sources, particularly for projects where long-term dependability is important, such as medical or industrial construction. They may be slightly more expensive, but you can avoid problems later.
The Benefits of Sites Like OM Electronics
OM Electronics provides a fair combination between working stock, clear specifications, and a respectable choice. Whether you want Arduino boards, relays, resistors, or modules, they have categories that are easy to browse. Bulk ordering is available too, which is useful for college labs or small companies.
The interface is clean, and support is better than most smaller sellers. If you're serious about online sourcing, having 2–3 such trusted sites bookmarked really helps.
Final Words
Buying electronic parts online is no longer risky like it was five years ago. With verified platforms, fast logistics, and better inventory systems, sourcing has become smoother. Just remember to avoid unknown sellers and always double-check specs before buying.
Whether it’s a sensor, GPRS module, or a logic IC, you now have more control over quality and delivery. That’s a big win for anyone working in electronics today.
#buy electronic components online#electronic components online india#electronic parts online#top semiconductor companies in india#gprs module#semiconductor distributors in india
1 note
·
View note
Text
Building Your Own Mechanical Dog: A Beginner’s Guide
In the ever-evolving world of robotics, creating your own mechanical dog is a fascinating and rewarding challenge. Whether you're a hobbyist, a student, or simply curious about robotic engineering, building a mechanical dog can be a fun way to learn about coding, mechanics, and artificial intelligence. It’s more than just assembling wires and parts—it's about bringing movement and purpose to a machine that mimics a beloved companion. At mechanical dog, we believe that anyone passionate about robotics can take the first step in developing a robotic pet with personality. This guide will walk you through the essentials—from selecting the right components to programming basic functions—to help you build your first functional and interactive mechanical dog.
Understand the Core Functionality of a Mechanical Dog
Before jumping into assembly, it's crucial to understand what makes a mechanical dog function. These robotic companions typically involve servos or motors to mimic the movements of legs, a microcontroller as the brain, and a power source for mobility. Sensors such as ultrasonic detectors help the mechanical dog navigate its environment. Grasping the roles of each component ensures a more efficient build process and sets the foundation for future customization. It also helps in troubleshooting and upgrading the design later. Learning this early provides a technical roadmap and gives you clarity on what parts to prioritize as a beginner in robotics.
Choosing the Right Materials and Parts to Begin
Starting with the right components makes a big difference in your mechanical dog’s performance. You'll need a sturdy yet lightweight frame, preferably 3D-printed plastic or aluminum. Essential parts include servo motors for leg movement, a rechargeable battery pack, a microcontroller like Arduino or Raspberry Pi, and wiring kits. Buying beginner-friendly kits from reputable robotics stores is highly recommended. Mechanical dog recommends selecting components based on simplicity and expandability. Focus on acquiring parts that allow trial and error without breaking your budget. This stage sets the groundwork for building something durable and modifiable over time.
Assembling the Frame and Installing Motors
Once you have the necessary parts, it’s time to bring your mechanical dog to life. Begin by assembling the body and legs, using screws and brackets to fix the frame. Install the motors at the joints to replicate knee and hip motion. Precision in alignment is key—improper placement may result in unbalanced movement. Make sure each motor is securely fastened and capable of smooth rotation. During this stage, mechanical dog builders often test the range of motion manually before connecting to the control board. Taking your time here helps prevent mechanical issues down the line.
Wiring and Connecting Your Microcontroller System
With the frame and motors in place, the next step is wiring. Connect each motor to the microcontroller using jumper wires or a motor shield. Labeling wires helps reduce confusion later, especially when debugging. Your microcontroller acts as the brain of the mechanical dog and sends commands that control movement. Power connections must be secure and insulated to prevent short-circuiting. This phase requires patience and organization, particularly for first-timers. Once everything is in place, running a basic movement script is a great way to ensure your connections work and to see your mechanical dog come alive.
Programming Basic Movement and Direction Controls
Programming is where your mechanical dog learns to walk. Start with simple scripts that control forward and backward movement using timed signals to motors. As you progress, introduce directional turns and stop-start commands. Platforms like Arduino IDE or Python make this easy for beginners, especially with online resources and libraries. At mechanical dog, we encourage experimenting with code to understand how speed and timing affect performance. Getting these basics down sets the stage for more advanced behaviors, like obstacle avoidance and voice command integration. Programming breathes life into your build and gives it functionality.
Integrating Sensors for Navigation and Interaction
Sensors make your mechanical dog interactive and responsive to its environment. Ultrasonic sensors help it detect walls, infrared sensors track lines or paths, and gyros assist in balance. Proper sensor placement is essential—usually on the head or front body of the robot. Once installed, they are connected to the microcontroller and incorporated into your code. This enables your mechanical dog to avoid obstacles or follow predefined routes. These intelligent behaviors enhance the experience and demonstrate real-world robotics applications. Adding sensors is a significant upgrade and a fun learning curve for every builder.
Testing, Troubleshooting, and Future Enhancements
Once all systems are connected and programmed, it’s time to test your mechanical dog. Watch for issues like jerky movement, sensor misreads, or battery drainage. Take notes and go step-by-step to troubleshoot. This is where hands-on learning is most valuable. Mechanical dog builders often revisit earlier steps for fine-tuning. After successful testing, consider adding voice control, facial recognition, or remote operation via Wi-Fi. With every enhancement, you’ll grow your skills and make your mechanical dog smarter. Remember, every successful robotics project involves problem-solving and persistence.
Conclusion
Building a mechanical dog from scratch is a fulfilling journey that combines creativity, logic, and hands-on learning. Whether you’re doing it as a personal challenge or stepping into the field of robotics professionally, the experience offers a deep understanding of engineering and artificial intelligence. With patience and curiosity, your mechanical dog will not only move and interact but also reflect the effort you’ve invested in learning. At mechanical dog, we support all levels of builders and believe that even a beginner can create something incredible. Start small, think big, and bring your robotic companion to life.
0 notes
Text
I had to run by a Radio Shack on a few occasions for electronics components right up til their eventual closure. They had the “electronics components” as a category, but they were largely supplying them from a small stack of cabinets, and not even all of that was populated, alongside maybe two or three types of ‘general starter electronics kit’. Forget “building a radio”: the local place didn’t even have a full E6 resistors or magnet wire. And their staff would be better trained to sell RC cars or cell phones (the latter of which was nearly half the store by 2012) than to answer even simple electronics questions.
((Note the lack of transformers even listed on those cabinets; at best they’d have a couple variable-voltage wall warts.))
Their online catalog was better in variety -- I got a lot of copper-plated boards during their going-out-of-business sale -- but it was nowhere near competitive with online sellers even before dropshipping ate the world. In many cases you’d be looking at three- to five-fold markup over McMaster-Carr or DigiKey prices, even including shipping.
Which... kinda points to the issue with foone’s alternate proposal. A RadioShack trying to sell to hobbyist enthusiasts would have still had to compete with the internet, and hobbyists ended up being pretty fickle about large purchases, too, no matter how much brand loyalty they might have had at a day-to-day basis.
With good reason: those electronics components cabinets often had a 10-fold markup over buying the same from local used electronics shops or 20-fold from online vendors, but if you needed a D-25 or a stack of LEDs in a hurry you’d be willing to pay a couple bucks for the convenience. And those really weren’t enough to keep the lights on or doors open at the scale -- even small family used electronics shops have to operate at a drastically different format. Meanwhile, if you wanted to make even a moderately-complicated electronics circuit, you’d be looking at tens if not hundred of dollars in price differences between RadioShack’s local options and online sellers.
((And, separately, the modern education system had absolutely slaughtered any interest in low-level electronics pre-Arduino, and not just as primary or secondary school levels. I’ve talked with post-grad EEs who hadn’t touched a component smaller than a NAND gate. The internet has done amazing things for connectivity and community among hardware enthuisiasts, but we’re still a dying breed.))
But RadioShack’s pre-00s business model sold the small stuff like transformers and capacitors so that it could also sell the big stuff: sound systems, full radio kits, so on. Even back in the 1980s, they were far more . The point of selling mechanical keyboards, had they made it to today, wouldn’t be to sell a handful of 50-cent cherry switches for $3 each, but that they could sell a 50-buck mechanical keyboard kit for $200. I think that would have been a more successful approach in retrospect... but it’d also be the sort of thing that would have been ‘successful’ on the scale of a few hundred stores at most, rather than the thousands that RadioShack was operating (and often locked into).
((They did sell Arduino and RaspberryPi-style kits, mostly MAKE magazine or Seeed-variant stuff, just around 2012-2013. But they were very much marketed at Young Children Educational Gifts rather than viable projects.))
Microcenter and some hardware stores have taken that approach, and they do exist -- though it’s still not their core focus so much as a way to drive other sales -- but they’re the sort of business that can only support a location or two per city, rather than the convenient strip-mall front that RadioShack aimed for.
Does anyone remember what happened to Radio Shack?
They started out selling niche electronics supplies. Capacitors and transformers and shit. This was never the most popular thing, but they had an audience, one that they had a real lock on. No one else was doing that, so all the electronics geeks had to go to them, back in the days before online ordering. They branched out into other electronics too, but kept doing the electronic components.
Eventually they realize that they are making more money selling cell phones and remote control cars than they were with those electronic components. After all, everyone needs a cellphone and some electronic toys, but how many people need a multimeter and some resistors?
So they pivoted, and started only selling that stuff. All cellphones, all remote control cars, stop wasting store space on this niche shit.
And then Walmart and Target and Circuit City and Best Buy ate their lunch. Those companies were already running big stores that sold cellphones and remote control cars, and they had more leverage to get lower prices and selling more stuff meant they had more reasons to go in there, and they couldn't compete. Without the niche electronics stuff that had been their core brand, there was no reason to go to their stores. Everything they sold, you could get elsewhere, and almost always for cheaper, and probably you could buy 5 other things you needed while you were there, stuff Radio Shack didn't sell.
And Radio Shack is gone now. They had a small but loyal customer base that they were never going to lose, but they decided to switch to a bigger but more fickle customer base, one that would go somewhere else for convenience or a bargain. Rather than stick with what they were great at (and only they could do), they switched to something they were only okay at... putting them in a bigger pond with a lot of bigger fish who promptly out-competed them.
If Radio Shack had stayed with their core audience, who knows what would have happened? Maybe they wouldn't have made a billion dollars, but maybe they would still be around, still serving that community, still getting by. They may have had a small audience, but they had basically no competition for that audience. But yeah, we only know for sure what would happen if they decided to attempt to go more mainstream: They fail and die. We know for sure because that's what they did.
I don't know why I keep thinking about the story of what happened to Radio Shack. It just keeps feeling relevant for some reason.
34K notes
·
View notes
Text
Best Python Coding Kits for Kids and Teens

Python is a great programming language for beginners, especially kids and teens. It’s easy to learn, versatile, and used in many areas, such as game development, data science, and even robotics. Python's simple structure makes it perfect for young learners, allowing them to grasp programming basics quickly. If your child or teen is interested in coding, Python kits can make learning fun and interactive.
This article will guide you through some of the best Python coding kits for kids and teens. These kits help kids build skills through hands-on projects while making coding enjoyable.
1. Kano Computer Kit
The Kano Computer Kit is a fun way for kids and teens to learn coding while building their own computer. The kit includes a Raspberry Pi, keyboard, and screen. It also comes with a step-by-step guide to help them learn how to code using Python. Kano’s interactive lessons are simple and engaging, letting kids create games, websites, and animations. This kit is designed for kids as young as 6, but it’s great for any beginner who wants to learn coding through play.
Key Features:
Build a computer from scratch
Uses Python to teach coding in fun ways
Great for kids 6 and up
2. Raspberry Pi Starter Kit
The Raspberry Pi Starter Kit is an affordable and powerful option for kids and teens who want to dive into Python programming. The Raspberry Pi is a small computer that can be connected to various devices and used for projects. This kit includes all the necessary components to get started, such as a Raspberry Pi, power supply, and cables. Kids can explore Python programming through exciting projects like creating games or building robots. It’s perfect for teens who want to learn coding while experimenting with hardware.
Key Features:
A small, affordable computer
Learn Python by building projects
Ideal for teens who enjoy working with tech
3. Piper Computer Kit
The Piper Computer Kit allows kids to learn coding by building their own computer with a Raspberry Pi. What makes Piper unique is its hands-on workbook with coding challenges. The kit uses a visual programming language based on Python, making it easier for kids to understand programming concepts. It’s perfect for children aged 8 and up, encouraging them to think creatively while solving coding problems.
Key Features:
Build your own computer with Raspberry Pi
Learn coding through interactive challenges
Suitable for kids 8 and up
4. Arduino Starter Kit
The Arduino Starter Kit is great for teens who are interested in electronics and coding. Arduino is a platform that lets users create interactive projects, such as robots, sensors, and smart devices. While the primary language for Arduino is C, Python can also be used with certain libraries, allowing teens to practice coding while working on hardware projects. If your teen is interested in both coding and building things, the Arduino kit is an excellent choice.
Key Features:
Create interactive electronics projects
Supports Python coding with special libraries
Ideal for teens interested in robotics and hardware
5. Tinkercad and Codeblocks (Online)
Tinkercad is a free online platform that lets kids and teens design 3D models. It also includes a Python coding tool called Codeblocks, where users can control their designs with code. This is a great way for kids to learn Python by programming their 3D creations. It’s an excellent choice for kids who enjoy digital design and want to learn how coding affects what they see on screen.
Key Features:
Free online platform for coding and 3D design
Python-based coding tool
Great for creative kids and teens
6. Adafruit Circuit Playground Express
The Adafruit Circuit Playground Express is a small programmable board that comes with built-in sensors and LEDs. It’s a fun way to learn Python programming while also experimenting with electronics. Kids can start by writing Python code to light up LEDs, measure temperature, or make sounds. The kit supports both block-based programming and Python, making it an excellent choice for beginners, especially younger kids.
Key Features:
Programmable board with sensors and LEDs
Learn Python while creating fun projects
Great for younger kids and beginners
7. CodeCombat
CodeCombat is an online game where kids and teens learn coding by solving challenges. The game uses Python as its programming language, allowing players to write code to control characters and solve puzzles. It’s a fun and interactive way for kids aged 9 and up to learn Python in a game-like setting. The game is designed to teach coding step-by-step, making it suitable for beginners as well as those with some experience.
Key Features:
Learn Python through an online game
Great for kids 9 and up
Fun, interactive coding challenges
8. Thames & Kosmos Robotics Coding Kit
For kids who want to combine coding with robotics, the Thames & Kosmos Robotics Coding Kit is a fantastic option. This kit lets kids build a robot and code it using Python. The kit includes motors, sensors, and a controller, offering endless possibilities for fun projects. It’s perfect for teens who are interested in programming and robotics and want to learn coding through hands-on activities.
Key Features:
Learn Python through robotics
Build and program a robot
Ideal for teens interested in engineering
Conclusion
Python is a wonderful language for kids and teens to start learning programming, and these kits make it easier and more fun. From building computers with Kano to creating robots with Thames & Kosmos, these kits provide hands-on learning experiences that engage young learners. Whether your child is interested in electronics, gaming, or design, there’s a Python coding kit that fits their interests.
If you're looking for a simple and effective way to get started with Python, check out the Python Starter Kit from Crafting Table. This kit is designed to be beginner-friendly, making it a perfect starting point for young coders. It’s a great tool for developing programming skills and sparking creativity, giving kids and teens a solid foundation in coding while having fun.
0 notes
Text
Arduino Projects
Microcontroller boards and a software development environment make up the flexible Arduino platform. These boards have the ability to read inputs, such as a light on a sensor, a finger on a button, or a tweet, and translate them into outputs, such as turning on an LED, publishing something online, or turning on a motor.
The Arduino platform supports creativity by providing:
Software that is easy to use: even for novices, programming is made simpler by the Arduino IDE.
Hardware that is reasonably priced: Arduino boards are widely accessible and reasonably priced.
Flexibility: Suitable for a range of sensors, modules, and parts.
Strong community support: A thriving community provides resources, forums, and tutorials.
Top Arduino Projects for Beginners
LED Blink Project
Temperature Monitoring System
Obstacle Avoiding Robot
Getting Started with Arduino Projects
Installing the Arduino IDE requires downloading it from the official website.
Select a Project: Begin with easy projects like sensor interfacing or LED control.
Learn the Fundamentals: Gain an understanding of component integration, circuit design, and fundamental coding.
Experiment and Innovate: Add more sensors and actuators to gradually advance to more complicated projects.
Arduino projects open up a world of creativity by empowering creators to automate processes, develop interactive systems, and solve real-world issues. With Arduino, the possibilities are unlimited, whether you're creating a straightforward LED pattern or an Internet of Things-based solution. Thus, take an Arduino board, discover what it can do, and follow your creativity.
Launch your Arduino adventure now to realize your creative concepts!
To know more, click here.
0 notes
Text
Exploring the World of Electronics: A Comprehensive Guide

Exploring the World of Electronics: A Comprehensive Guide
The field of electronics is one of the most exciting and dynamic domains that has revolutionized the way people live, work, and communicate. Electrons have become the backbone of modern technology, from advanced smartphones to laptops and the latest robots and renewable energy systems.Well, with this in mind, any person who wants to venture into any electronics undertaking has to know the rudimental principles of the said project, acquire all required pieces of equipment, and find the appropriate platform on which the whole thing can be bought or sold. In this write-up, we will therefore guide you on how one can get the best results regarding his electronics project by exploring and using Classimonk as well as Chennai Free Classified Ads.
Why electronic Projects Matter
The project is not just for a professional or a student in an engineering degree but rather for a curious mind interested in innovation. It enables a fundamental understanding of the principles behind physics and electrical engineering, enhances problem-solving skills, and cultivates creativity. Whether you are creating a simple LED circuit or working on some complex IoT device, it is a priceless experience.
Sourcing Components for Your Electronics Project
The success of any electronics project highly depends on the quality and availability of its components. Long lists of essentials include resistors, capacitors, microcontrollers, sensors, and wires, and so on. It's a big task to find a reliable source for all of these, but not hard at all with the help of Chennai Free Classified Ads.
Chennai Free Classified Ads is a lively marketplace offering everything from electronic component sales to tool sales to entirely assembled products. This has enabled you to view comparative pricing and spec data along with user reviews so you can buy without needing any stress. This website is handy for students and hobbyists trying to get equipment without an added layer of hassle for expensive things.
Classimonk: A Platform for Electronics Enthusiasts
Classimonk is another good resource for electronics enthusiasts. This platform gives a friendly interface to buy, sell, and even exchange electronics-related items. Be it finding a rare microcontroller or selling excess components from the previous project, Classimonk simplifies the process. Its categorized listings and advanced search features help you find what you need quickly.
Classimonk is also community-driven, as it allows users to share tips, tutorials, and project ideas. This makes it more than just a marketplace; it is a hub for learning and collaboration. For example, if you are working on a project that involves Arduino programming, you may find helpful tutorials and discussions on Classimonk's forums.
Project Ideas to Kickstart Your Journey
If you’re unsure where to begin, here are a few electronics project ideas:
Smart Home Automation System: Use microcontrollers and sensors to create a system that controls lights, fans, and appliances remotely.
Portable Charger: Build a power bank using lithium-ion batteries and a charging circuit.
Weather Station: Use sensors like DHT11 and BMP180 to measure temperature, humidity, and atmospheric pressure.
Line-following robot: Design a robot that follows a predetermined path using infrared sensors.
Renewable Energy Model Device Powered by Solar Energy Design.
Benefits of Using Online Platforms
In both Chennai Free Classified Ads and Classimonk, several benefits come to electronics enthusiasts:
Inexpensive Solutions: Purchased second-hand or surplus components at economical prices.
An extensive variety: Access broad-based products from multiple sellers
Support from a community: Obtain advice and inspiration from the community of like-minded folks
Easy: Browse through and buy from home.
Conclusion
Electronics project work is one such rewarding journey that brings a blend of creativity, technical skills, and innovation in one. Chennai Free Classified Ads and Classimonk facilitate the journey by making these affordable components available to their customers, offering them worthwhile resources, and creating an interactive community that is essential for any kind of endeavor. Whether you are an expert or a curious amateur, these platforms can actually bring your ideas to reality.
So, get deep into the world of electronics, explore the limitless opportunities, and make your name in this dynamic field with the right tools, resources, and community support; tomorrow's breakthrough project could just be waiting for you.
0 notes
Text
How to Learn Embedded Systems: A Comprehensive Guide
Embedded systems are integral to countless applications, from consumer electronics to industrial automation. Understanding how to learn embedded systems can open up a world of opportunities in various fields, including robotics, automotive, healthcare, and IoT. Here’s a structured approach to mastering embedded systems.

1. Understanding the Basics
Start with the fundamentals of embedded systems. Familiarize yourself with key concepts such as:
What are Embedded Systems?
Embedded systems are specialized computing systems that perform dedicated functions within larger mechanical or electrical systems. Unlike general-purpose computers, they are designed to execute specific tasks with high reliability.
Components of Embedded Systems:
Microcontrollers and Microprocessors: Understand the difference between the two. Microcontrollers are compact integrated circuits designed to govern a specific operation in an embedded system, while microprocessors are the central unit of a computer that performs calculations and logic operations.
Memory: Learn about different types of memory (RAM, ROM, Flash) used in embedded systems.
Input/Output Devices: Familiarize yourself with sensors, actuators, and communication interfaces (UART, SPI, I2C).
2. Choose Your Learning Resources
Select resources that match your learning style. Here are some options:
Books:
"Embedded Systems: Introduction to the MSP432 Microcontroller" by Jonathan Valvano
"Programming Embedded Systems in C and C++" by Michael Barr
Online Courses:
Platforms like Coursera, Udemy, and edX offer courses in embedded systems. Look for those that cover microcontrollers, programming, and interfacing.
YouTube Channels:
Channels like "The DIY Life" and "NPTEL" provide practical insights and tutorials on embedded systems.
3. Get Hands-On Experience
Theory is essential, but hands-on practice is crucial for mastering embedded systems. Consider the following:
Development Boards:
Start with popular development boards like Arduino, Raspberry Pi, or ESP32. These platforms are beginner-friendly and have extensive community support.
Build Projects:
Create simple projects like LED blinkers, temperature sensors, or motor controls. Gradually move to more complex projects like home automation systems or robotic applications.
Use Simulation Tools:
Familiarize yourself with simulation tools like Proteus or MATLAB/Simulink for testing your designs virtually.
4. Learn Programming Languages
Embedded systems often require programming skills. Focus on:
C/C++ Programming:
C is the most commonly used language for embedded systems due to its efficiency and control over hardware. Learn the syntax, data structures, and memory management.
Assembly Language:
Understanding assembly language can provide deeper insights into how microcontrollers operate.
5. Explore Real-Time Operating Systems (RTOS)
Many embedded systems require multitasking and real-time performance. Learning about RTOS concepts can be beneficial:
Understand the Basics:
Familiarize yourself with the concepts of task scheduling, inter-task communication, and resource management.
Hands-On with RTOS:
Try using an RTOS like FreeRTOS or Zephyr on your development board. Implement multitasking projects to get practical experience.
6. Join Online Communities
Engaging with fellow learners and professionals can enhance your learning experience:
Forums and Discussion Groups:
Platforms like Stack Overflow, Reddit, and specialized forums (e.g., Embedded Related) are great for seeking help and sharing knowledge.
Attend Workshops and Webinars:
Participate in online workshops or local meetups to learn from experts and network with peers.
7. Stay Updated with Industry Trends
The field of embedded systems is constantly evolving. Keep yourself updated with the latest trends and technologies:
Follow Industry News:
Subscribe to blogs, newsletters, and magazines related to embedded systems.
Participate in Hackathons:
Engage in hackathons or coding competitions focused on embedded systems to test your skills and learn from others.
Conclusion
Learning embedded systems requires a mix of theoretical knowledge and practical experience. By following this structured approach—starting from the basics, choosing the right resources, getting hands-on experience, and staying engaged with the community—you can build a strong foundation in embedded systems. Whether you aim to work in robotics, IoT, or automation, mastering embedded systems can significantly enhance your career prospects. Start your journey today, and embrace the exciting world of embedded systems!
0 notes
Text
Components for a DIY BCI
EEG (Electroencephalography) Hardware:
The most basic BCIs rely on EEG sensors to capture brainwaves.
OpenBCI is a popular, relatively affordable option for DIY BCI projects. While it costs a few hundred dollars, it is one of the most versatile kits available.
NeuroSky MindWave or Muse Headband are other cheaper alternatives, ranging from $100-$200. These are commercially available EEG devices for consumer-grade BCIs.
OpenEEG is another open-source project that allows you to build your own EEG hardware from scratch, though it requires more technical skill.
Electrodes:
You’ll need wet or dry electrodes to attach to your scalp. Wet electrodes give more accurate readings but are messier, while dry electrodes are more convenient.
You can order pre-gelled electrodes online or even repurpose ECG/EMG electrodes.
Amplifier:
The signal from the brain is very weak and needs to be amplified. Most consumer-grade EEG headsets already include built-in amplifiers.
If you're building your own, you’ll need to add an instrumentation amplifier like the INA114 to your circuit.
Microcontroller (optional but recommended):
You can use a microcontroller (e.g., Arduino or Raspberry Pi) to process and transmit the EEG signals.
This allows you to handle signal conditioning (filtering noise, extracting frequency bands like alpha or beta waves) before passing the data to a computer.
Signal Processing Software:
To interpret the brainwave data, you’ll need software to process the EEG signals.
OpenBCI GUI or BrainBay (open-source software for EEG processing) are good choices.
If using a commercial device like the Muse headband, you can use their respective apps or SDKs.
Python libraries like MNE-Python or OpenBCI_Python can be used for more advanced data processing and visualizations.
Steps to Build a Basic DIY BCI
Choose Your EEG Hardware:
If you're starting from scratch, something like OpenBCI Cyton board is a good start. It’s open-source, has good community support, and includes everything from the signal acquisition to the interface.
Set Up Your Electrodes:
Attach electrodes to specific parts of the scalp. The 10-20 system is commonly used in EEG to position electrodes. For basic experiments, placing electrodes on the frontal or occipital lobes is common for reading alpha and beta waves.
Amplify the Signal:
If you're using raw hardware, you need to amplify the EEG signal to make it usable. Most DIY kits or premade EEG headsets have built-in amplifiers. If you're building one from scratch, the INA114 or a similar instrumentation amplifier can be used.
Capture the Data:
Use a microcontroller or a computer interface to collect and transmit the amplified EEG data. For example, with an Arduino or Raspberry Pi, you can read analog signals from the amplifier and stream them to your PC via serial communication.
Process the Data:
Use software like OpenBCI GUI, BrainBay, or MNE-Python to filter and visualize the brainwave data. You’ll want to filter out noise and focus on frequency bands like alpha waves (8–12 Hz) for meditation or relaxation signals.
Analyze and Create Control Mechanisms:
Once you have the processed data, you can start building applications around it. For instance:
Detecting Alpha waves: You can trigger certain actions (e.g., turning on a light or moving a cursor) when you detect increased alpha activity (indicating relaxation).
Training with Neurofeedback: Users can learn to modulate their brain activity by receiving real-time feedback based on their brainwave patterns.
DIY EEG Project Example: Arduino-based EEG
Here’s a simplified example of how you could set up a basic EEG using an Arduino:
Materials:
Arduino Uno
EEG electrodes (you can buy inexpensive ECG electrodes online)
Instrumentation amplifier (e.g., INA114 or an open-source EEG shield for Arduino)
Resistors, capacitors for noise filtering
Cables to connect electrodes to the amplifier
Steps:
Assemble the amplifier circuit:
Build a simple differential amplifier circuit to pick up the small EEG signals from the electrodes.
Use the INA114 instrumentation amplifier to boost the signal.
Connect to Arduino:
The amplified signal can be connected to one of the Arduino’s analog inputs.
Write an Arduino script to read the analog value and send it to the PC via serial communication.
Filter and Process the Signal:
On your PC, use Python (or Processing) to capture the signal data.
Apply digital filters to isolate the EEG frequency bands you’re interested in (e.g., alpha, beta, theta waves).
Visualize or Control:
Create a simple application that shows brainwave activity or controls something based on EEG input (like blinking an LED when alpha waves are detected).
Further Ideas:
Neurofeedback: Train your brain by playing a game where the user must relax (increase alpha waves) to score points.
Control Mechanisms: Use the brainwave data to control devices, such as turning on lights or moving a robotic arm.
Estimated Cost:
EEG Kit: If using pre-made kits like Muse or NeuroSky: $100–$200.
DIY EEG Build: OpenBCI costs around $300–$400 for more advanced setups, while OpenEEG might be built for less, but requires more technical expertise.
Challenges:
Noise Filtering: EEG signals are weak and can easily be corrupted by muscle movements, electrical interference, etc. Filtering noise effectively is key to a successful BCI.
Precision: DIY BCIs are generally not as accurate as commercial-grade devices, so expect some limitations.
Building a homebrew BCI can be fun and educational, with a wide variety of applications for controlling electronics, games, or even providing neurofeedback for meditation
0 notes
Video
youtube
IOT Based Industrial Air Pollution Monitoring System using Arduino with LabVIEW and Zigbee on Thingspeak | iot based air pollution monitoring system using arduino | IoT Projects using ESP32 | IoT Projects Arduino | WSN Based Real Time Air Pollution Monitoring System Using Zigbee and LabVIEW | Industrial Monitoring System using LabVIEW and GSM.***********************************************************If You Want To Purchase the Full Working Project KITMail Us: [email protected] Name Along With You-Tube Video LinkWe are Located at Telangana, Hyderabad, Boduppal. Project Changes also Made according to Student Requirementshttp://svsembedded.com/ https://www.svskits.in/ http://svsembedded.in/ http://www.svskit.com/M1: 91 9491535690 M2: 91 7842358459 We Will Send Working Model Project KIT through DTDC / DHL / Blue Dart / First Flight Courier ServiceWe Will Provide Project Soft Data through Google Drive1. Project Abstract / Synopsis 2. Project Related Datasheets of Each Component3. Project Sample Report / Documentation4. Project Kit Circuit / Schematic Diagram 5. Project Kit Working Software Code6. Project Related Software Compilers7. Project Related Sample PPT’s8. Project Kit Photos9. Project Kit Working Video linksLatest Projects with Year Wise YouTube video Links157 Projects https://svsembedded.com/ieee_2022.php135 Projects https://svsembedded.com/ieee_2021.php 151 Projects https://svsembedded.com/ieee_2020.php103 Projects https://svsembedded.com/ieee_2019.php61 Projects https://svsembedded.com/ieee_2018.php171 Projects https://svsembedded.com/ieee_2017.php170 Projects https://svsembedded.com/ieee_2016.php67 Projects https://svsembedded.com/ieee_2015.php55 Projects https://svsembedded.com/ieee_2014.php43 Projects https://svsembedded.com/ieee_2013.php1100 Projects https://www.svskit.com/2022/02/900-pr...***********************************************************Creating an IoT-based Industrial Air Pollution Monitoring System using Arduino with LabVIEW and Zigbee on ThingSpeak involves integrating various components and technologies. Here's a step-by-step guide to help you get started:Components Needed:1. Arduino Board (e.g., Arduino Uno):• Used for sensor interfacing and data processing.2. Air Quality Sensors (e.g., MQ series sensors):• Measure air pollution parameters like CO, CO2, particulate matter, etc.3. Zigbee Module:• Enables wireless communication between Arduino and the central system.4. LabVIEW Software:• Used for creating a graphical user interface (GUI) and processing data.5. ThingSpeak Account:• Online platform for storing and analyzing sensor data.Hardware Setup:1. Connect Air Quality Sensors to Arduino:• Wire the sensors to the analog or digital pins on the Arduino.2. Connect Zigbee Module to Arduino:• Use UART communication to connect the Zigbee module to the Arduino.3. Power Supply:• Ensure that all components have a stable power supply.4. Configure Zigbee Communication:• Set up Zigbee communication between the Arduino and the central system.Software Implementation:1. Arduino Programming:• Write a program to read sensor data and send it to the Zigbee module.• Implement error handling and data formatting.2. LabVIEW GUI Design:• Create a LabVIEW VI (Virtual Instrument) for the user interface.• Add indicators to display real-time sensor data.• Implement controls for system configuration.3. LabVIEW Serial Communication:• Use LabVIEW to establish serial communication with the Arduino through the Zigbee module.• Implement data parsing to extract sensor values.4. ThingSpeak Integration:• Create a ThingSpeak channel to store the sensor data.• Use the ThingSpeak API in LabVIEW to send data to ThingSpeak.Data Visualization:1. LabVIEW Visualization:• Use LabVIEW to create charts, graphs, or other visual representations of air pollution data.2. ThingSpeak Dashboard:• Explore ThingSpeak's built-in tools for data visualization and analysis.Testing and Debugging:1. Test the System:• Ensure that the hardware connections are secure.• Check data transmission between Arduino and LabVIEW.• Verify data upload to ThingSpeak.2. Debugging:• Use serial monitoring tools for Arduino to debug communication issues.• Check LabVIEW code for any errors or unexpected behavior.Finalization:1. Optimization:• Optimize the code for efficiency and reliability.• Consider implementing features like data logging or notifications.2. Documentation:• Document the system architecture, hardware connections, and software implementation.3. Deployment:• Install the system in the industrial environment.• Monitor and maintain the system as needed.By following these steps, you can create a robust IoT-based Industrial Air Pollution Monitoring System using Arduino, LabVIEW, Zigbee, and ThingSpeak.
0 notes
Text
Introduction Model rocketry is an exciting hobby that combines both technology and creativity. Model rocketry enthusiasts are always looking for new and innovative ways to improve their rockets, and one such way is by using an Arduino-based altimeter. An altimeter is a device used to measure altitude or height above sea level. The Arduino-based altimeter is an electronic device that utilizes the power of Arduino microcontrollers to record and store the altitude data of your model rocket's flight. The Arduino-based altimeter can be used for a range of things, such as measuring the maximum altitude of your rocket and ensuring that it deploys its parachute at the correct time. In this article, we’ll provide you with an in-depth guide on how you can build a model rocket altimeter using Arduino. How to Build a Model Rocket Altimeter using Arduino To build an Arduino-based altimeter for your model rocket, you will need the following components: - Arduino Uno R3 board - BMP280 digital pressure sensor - Lipo battery - PCB board - Resistors - Jumper wires - LEDs Once you have all these components, follow these steps to construct your model rocket altimeter: Step 1: Assemble the circuit Using the PCB board, assemble the circuit according to the schematics provided. Start by connecting the BMP280 pressure sensor to the Arduino Uno board. You can do this by connecting the SDA and SCL pins of the sensor to the A4 and A5 pins of the board. Additionally, connect the VIN and GND pins of the sensor to the 5V and GND pins of the board, respectively. Step 2: Add a switch To power the altimeter on and off, add a switch. The switch should be connected to the VIN and GND of the Lipo battery. Step 3: Connect the LEDs Connect the LEDs to the digital pins of the board, ensuring that the resistors are used to limit the current that flows through them. Step 4: Upload the code Once you have assembled the circuit, upload the code to the Arduino Uno board. The code is readily available online, and you can find it on the Arduino IDE or in various online forums. Step 5: Power the altimeter The altimeter should now be powered on, and you can test it by connecting it to the Lipo battery. You can then place the altimeter into your model rocket, and it will record and store the altitude data during the rocket's flight. FAQs About Model Rocket Altimeter Arduino 1. What is the maximum altitude the Arduino-based altimeter can measure? The BMP280 pressure sensor used in this altimeter has a range of 300-1100 hPa, equivalent to an altitude range of approximately 9,000 meters above sea level. However, the maximum altitude that can be measured by the altimeter is dependent on factors such as the quality and accuracy of the sensor, the barometric pressure of the location of the rocket launch, and the sensitivity of the pressure sensor. 2. How can I calibrate my altimeter? To calibrate your altimeter, you will need to use a known elevation location such as a mountain or hilltop. Once you get to this location, insert a battery and turn on the altimeter, then wait for it to stabilize before writing down the altitude data. Repeat this process a few times, and then calculate the average deviation between the readings. You can then adjust the calibration constants in the code to ensure that the altitude measurement is accurate. 3. Can the altimeter record temperature? The BMP280 pressure sensor used in this altimeter can measure temperature in addition to pressure, meaning that the altimeter can record both altitude and temperature data. You can even customize the code to record and store temperature data, in addition to the altitude data. Conclusion An Arduino-based altimeter for model rockets is an innovative way to record and store the altitude data of your rocket's flight. By using this altimeter, you can ensure that your model rocket deploys its parachute at the correct time, and you can also record its maximum altitude. Building an Arduino-based altimeter for model rockets is straightforward and requires only a few components.
With the right skills and knowledge, you can also customize the code to record other data such as temperature. If you have any questions or comments Please contact us on our contact page or via our Facebook page. #model #rocket #altimeter #arduino
0 notes
Text
Unleashing Creativity with Development Board Kits: A Dive into the World of Electronic Exploration
In the dynamic realm of electronics, where innovation and creativity thrive, there exists a magical tool that has become the go-to companion for enthusiasts and professionals alike — the development board kit. If you’re an aspiring electronics wizard or just someone curious about the fascinating world of circuits and code, you’re in for a treat.
Imagine a miniature universe enclosed within a compact board — a universe where your ideas come to life, where you experiment, tinker, and innovate. That’s precisely what a development board kit is all about.
So, what exactly is a development board kit? Well, think of it as a playground for your electronic dreams. It’s a ready-to-go platform equipped with all the essential components — from microcontrollers to sensors, buttons, and LEDs — to kickstart your projects without the hassle of wiring everything from scratch.
One of the key players in this electronic wonderland is the Arduino development board kit. It’s like the superhero of the electronics world, empowering beginners and seasoned tech enthusiasts alike. With its user-friendly interface and a vast community of supporters, Arduino has become synonymous with innovation.
The beauty of these development board kits lies in their versatility. Whether you’re into robotics, home automation, or simply want to create interactive art, there’s a development board kit tailored just for you. It’s like having a Swiss Army knife for electronics — one tool, endless possibilities.
Let’s break down why these kits are a game-changer. First and foremost, they eliminate the intimidation factor. You don’t need a PhD in electrical engineering to get started. The boards come with intuitive software and extensive documentation, making the learning curve less steep and more enjoyable.
Imagine you want to build a weather station to satisfy your inner meteorologist. With a development board kit, you can easily connect sensors for temperature, humidity, and barometric pressure. Couple that with a display and some code magic, and voilà — you’ve got yourself a personalized weather station! The process is not only educational but also incredibly satisfying.
Furthermore, these kits foster a sense of community. The online forums and communities buzzing with like-minded individuals provide a platform for sharing knowledge, troubleshooting, and showcasing your projects. It’s a camaraderie that transcends geographical boundaries, connecting electronic enthusiasts from all corners of the globe.
But the development board kit isn’t just for beginners; it’s a playground for professionals too. Seasoned engineers and developers use these kits as rapid prototyping tools, allowing them to bring their ideas to life quickly. The convenience of having a pre-built platform accelerates the development process, making it a valuable asset in the fast-paced world of technology.
Unleashing Creativity with Development Board Kits: A Dive into the World of Electronic Exploration
0 notes
Text
Single Board Computers: Unveiling the Miniverse of Computing

In the realm of electronics, miniaturization has revolutionised the way we interact with technology. Single Board Computers (SBCs) stand as a testament to this transformative trend, encapsulating an entire computer system onto a single circuit board. These compact marvels have not only democratised computing but also opened up a plethora of possibilities for innovation and experimentation.
Demystifying Single Board Computers: A Comprehensive Overview
At its core, a Single Board Computer (SBC) is a fully functional computer system integrated onto a single printed circuit board (PCB). It comprises all the essential components of a traditional computer, including a central processing unit (CPU), memory, storage, and input/output (I/O) ports. Unlike conventional desktop computers that require assembly of separate components, SBCs offer a plug-and-play solution, making them ideal for embedded systems and DIY projects.
Types of Single Board Computers: A Spectrum of Choices
The world of SBCs is a diverse landscape, catering to a wide range of applications and user needs. Some of the most prominent SBC families include:
Raspberry Pi: A popular choice for beginners and hobbyists, the Raspberry Pi is known for its affordability, versatility, and extensive online community support.
Arduino: Renowned for its ease of use and focus on microcontroller programming, Arduino boards are widely used in educational settings and prototyping projects.
BeagleBone Black: A powerful and feature-rich SBC, the BeagleBone Black is favoured for its robust hardware, Linux operating system, and industrial applications.
Unlocking the Power of SBCs: How They Work
The operation of an SBC is essentially the same as that of a traditional computer. The CPU acts as the brain of the system, executing instructions and processing data. Memory stores temporary data and programs, while storage holds permanent data, such as the operating system and applications. I/O ports facilitate communication with external devices, such as keyboards, displays, and sensors.
A Universe of Applications: Where SBCs Shine
The versatility of SBCs makes them indispensable in a vast array of applications, spanning from education and hobbyist projects to industrial and commercial solutions. Some notable use cases include:
Robotics: SBCs are the backbone of many robotic systems, controlling movement, sensor data acquisition, and autonomous behaviour.
Home Automation: SBCs form the heart of smart home systems, enabling remote control of appliances, lighting, and security systems.
Industrial Automation: In industrial settings, SBCs are employed for machine control, data monitoring, and process optimisation.
Internet of Things (IoT): SBCs power a significant portion of IoT devices, collecting, transmitting, and analysing data from sensors and actuators.
Education and DIY Projects: SBCs serve as valuable learning tools, providing hands-on experience with programming, electronics, and embedded systems.
The Future of Single Board Computers: A World of Endless Possibilities
The evolution of SBCs continues to accelerate, with advancements in processor technology, power efficiency, and connectivity. As SBCs become more powerful and affordable, their impact is expected to expand even further, shaping the landscape of computing for years to come.
SBCs represent a paradigm shift in the way we interact with technology, empowering individuals and businesses to innovate, experiment, and create. Their compact size, versatility, and affordability have opened up a world of possibilities, making them an invaluable tool for education, prototyping, and a wide range of applications across industries. As technology advances, SBCs are poised to play an even more prominent role in shaping the future of computing.
0 notes
Text
Arduino Programming Courses
Arduino is an open-source electronics platform that is perfect for both novices and experts because it is built on simple hardware and software. You may build interactive systems, automate and control gadgets, and work on a variety of projects with an Arduino microcontroller, from simple LED circuits to intricate robotics. The Integrated Development Environment (IDE), which enables code authoring, compilation, and uploading straight to an Arduino board, is the foundation of Arduino programming.
Why Take an Arduino Programming Course?
Hands-On Learning
Coding Skills
Embedded Systems Knowledge
Creativity and Innovation
Career Advancement
Skills You Will Gain in an Arduino Programming Course
Understanding Microcontrollers
C/C++ Programming for Arduino
Circuit Design and Wiring
Sensor Integration
Real-World Projects
Top Recommended Arduino Programming Courses
Arduino Step by Step—Udemy
Introduction to Arduino—Coursera
Arduino Programming and Hardware Fundamentals with HaHackster—X
Advanced Arduino Boards and Tools—LinkedIn Learning
Advanced Arduino Boards and Tools—LinkedIn Learning
Tips for Success in Arduino Programming
Start Small
Utilize Online Communities
Experiment with Components
Document Your Progress
Never Stop Learning
Anyone interested in electronics, code, or the Internet of Things can explore a world of creativity and invention by enrolling in Arduino programming courses. There is a course that can help you reach your full potential, regardless of your level of experience. You will be prepared to take on real-world problems in robotics, the Internet of Things, and embedded systems if you have solid foundation in Arduino. Explore the world of Arduino now to realize your technological concepts!
To know more click here
0 notes
Text
What is Arduino?
Today, the world is developing so fast. But the question is, are we?
Today’s stunning technologies are used by us all the day, all the time. Sometimes, we are ourselves fascinated by what we are able to do by just the click of a button. But, what if, we could make all of that, ourselves?
INTRODUCTION
So, the question arises, how can I make fascinating technologies?
The answer is simple: Learning electronics.
And, how to start with it?
The answer is: ARDUINO
All those people who are interested in robotics or hardware engineering might be familiar with Arduino, unless you haven’t made anything from it yet. Arduino is a open-source (open to public) electronic platform based on easy-to-use hardware and software. In other words (for a simpler definition), Arduino refers to an open-source electronics board and the software used to program it. Arduino is a fantastic way for anyone to learn about robotics, hardware engineering and programming. Over the years Arduino has been the brain of thousands of projects, from everyday objects to complex scientific instruments. Arduino boards are able to read inputs — light on a sensor, a finger on a button, or a Twitter message — and turn it into an output — activating a motor, turning on an LED or publishing something online.

Excited to learn it? Here we go!
HISTORY
The Arduino project was started at the Interaction Design Institute Ivrea (IDII) in Ivrea, Italy. The project goal was to create simple, low cost tools for creating digital projects. At that time, the students used a BASIC Stamp microcontroller at a cost of $50, a considerable expense for many students. In 2003 Hernando Barragán created the development platform Wiring as a Master’s thesis project at IDII, under the supervision of Massimo Banzi and Casey Reas. Wiring was important for Arduino since it is based on wiring in both software and programming language. In 2005, Massimo Banzi, with David Mellis, another IDII student, and David Cuartielles, extended Wiring by adding support for the cheaper ATmega8 microcontroller. The new project, forked from Wiring, was called Arduino.

Massimo Banzi
“Hardware becomes a piece of culture that anyone can build upon, like a poem or a song.”
-Massimo Banzi
WHY ARDUINO?
We know what is Arduino, but why should we choose it. There are dozens of other options out there, so why Arduino:
Arduino is an open-source electronic platform. This means that, not only can the public openly use the software and hardware, it can also constantly update and modify the hardware and software, proving Arduino to be diverse collection of boards. As a matter of fact, huge amounts of software libraries have been made by people at various communities to make the Arduino capable of working and behaving much better with more and more electronic components which are coming up.
Apart from that, Arduino is also one of the most cloned microcontroller boards out their. This means that Arduino is unexpectedly cheap. Moreover, Arduino gives a lot of options to choose from while building your project. It has several boards, some small, some large, each having their own features.
Not only that, the Arduino IDE (Integrated Development Environment) is an all-in-one software IDE, which allows us to program in the same language, for almost every Arduino board out there! This helps a lot as we do not have to download a different IDE each time we buy a different Arduino board!
Since Arduino is an open-source electronic platform, A worldwide community of makers — students, hobbyists, artists, programmers, and professionals — has gathered around this open-source platform, their contributions have added up to an incredible amount of accessible knowledge that can be of great help to novices and experts alike. :)

“A child educated only in school is an uneducated child”
— Unknown
HARDWARE
Arduino is open-source hardware. This means layout and production files for some versions of the hardware are also available. Although hardware and software designs for the arduino boards are freely available under the copyleft license, the developers have requested the name “Arduino” to be exclusive to the official product and not be used for derived works without permission. Most Arduino boards consist of an Atmel 8-bit AVR microcontroller (ATmega8, ATmega168, ATmega328, ATmega1280, or ATmega2560) with varying amounts of flash memory, pins, and features. The most famous and common boards include Arduino UNO, Arduino Mega and Arduino Nano. The boards use single or double-row pins or female headers that facilitate connections for programming and incorporation into other circuits. This allows for the connection of wires with male heads and also the connections for shields. Shields here refer to special arduino boards that can be attached over other boards, so as to increase their functionality. Some arduino boards also include ethernet connections, while some are as small as your thumb! Special arduino boards like the Arduino Lily can also be stitched upon clothes, to make wearable devices.

SOFTWARE
Any hardware is useless without a software. We need someone to explain the boards what we need them to do. For this, we have to speak the board’s language. This language is known as machine code and it exists as a series of 1’s and 0’s inside the memory of the board or the computer. Although machine code might be great for computers, it is extremely difficult for humans to understand. Early computers in the 1940’s and 1950’s had what was known as an Assembler. The job of this assembler was to translate assembly language into machine code. Users could write instructions for the computer known as a program with numbers and things that almost looked like words. While it was still difficult to understand, the language was also unique to each type of computer. It was better than writing a machine code but having to write assembly and learn a new set of instruction for each new computer was quite burdensome. So, people began to create high-level programming languages in the 1950’s, such as COBOL, Lisp and Fortran. These languages did not talk in the native language of the computers, but relied on a compiler to translate the high-level language into something the computer can understand. A compiler is simply a program that does the above mentioned work. When you write a program in Arduino, you write in the combination of C and C++ which is a high-level programming language used to construct instructions for Arduino. Arduino has a special software known as the Arduino IDE (short for, Integrated Development Environment) which provides us an environment to write our code into and upload it to the Arduino board.
That was all about Arduino, and believe me, this was just an introduction. Further, we will be diving deeper into this marvelous world of electronics, made up of wires and pcb’s!
Do not forget to follow and share with your friends and colleagues. Stay tuned for further updates!
Till then, Keep innovating!!
3 notes
·
View notes
Text
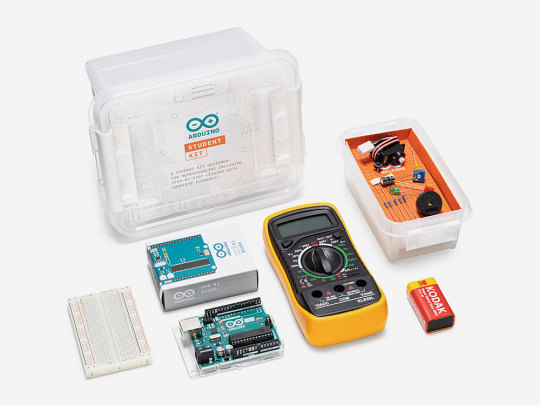
A GUIDE FOR PARENTS: HOW TO LEARN ELECTRONICS & CODING WITH THE ARDUINO STUDENT KIT
Schools have recently had to make a sudden and seismic shift in the way they teach. As both educators and students get used to remote learning, the onus is now more on parents to support their children through homeschool, and that means parents themselves need support. At Arduino Education, we want to help you and your children by making remote learning experiences as smooth (and fun!) as possible.
LEARNING ELECTRONICS & CODING AT HOME
As parents to children aged 11-plus, learning electronics and coding with them at home may not be something you’d ever think you’d be doing. But don’t worry, it really isn’t as daunting as it sounds, and electronics and coding skills are crucial in the world your children are growing up in.
ABOUT ELECTRONICS & CODING
Learn coding and the basic concepts of electricity together with your child at home with the Arduino Student Kit. It comes with all of the electronic components you need, as well as step-by-step instructions for how to start coding. But what is coding, exactly? Well, it’s simply the language that computers understand. It’s how we tell a computer what to do. In the Student Kit, you get pre-programmed code to help you understand how it works. You could also explore drag-and-drop visual coding such as Scratch to help you get a better understanding of what coding is.
LEARN ELECTRONICS & CODING AT HOME WITH THE ARDUINO STUDENT KIT
The Student Kit is a hands-on, step-by-step homeschool starter kit for children aged 11-plus that will help them get started with the basics of electronics and coding at home. You’ll get all the hardware and software you need for one person, as well as complete guidance, step-by-step lessons, exercises, and a logbook where you can answer the lesson questions and find solutions.
HOW THE KIT HELPS YOU HOMESCHOOL YOUR CHILDREN
This is your hands-on, step-by-step remote learning learning tool that will help your child learn the basics of programming, coding, and electronics at home. As a parent, you don’t need any prior knowledge or experience as you are guided through step-by-step. The kit is linked directly into the curriculum so you can be confident that your children are learning what they should be, and it provides the opportunity for them to become confident in programming and electronics. You’ll also be helping them learn vital skills such as critical thinking and problem-solving.
WHAT’S IN THE KIT?
All the basic electronic components you need to complete each lesson
Access to an online platform which helps children take their first steps into the world of electronics and inventions
Nine step-by-step lessons with up to 25 hours of learning time
Two open-ended projects. These projects don’t have a right or wrong answer – the solution to the project question is unique to each individual
A digital logbook that students can use to annotate their exercises, observations, and experiments. Parents can also use the logbook to find solutions
WHAT DOES THE KIT HELP TO TEACH?
By using the kit at home, you’ll be mirroring what your children would learn in their classroom. As well as how to code, the kit teaches:
Basic concepts of electricity
Safety
Schematics
Writing code
Controlling a circuit
Coding concepts
Controlling a servo motor
Producing sounds, tones, and music
Measuring the intensity of light
WHAT YOU NEED
You’ll need to purchase one Student Kit per child – you can either find your country’s distributor or buy the kit online. To use the kit, you’ll need a desktop computer, laptop or tablet device which has a compatible operating system and meets minimum requirements for downloading the Arduino software. Find out more about this here.
A GUIDE FOR PARENTS: HOW TO LEARN ELECTRONICS & CODING WITH THE ARDUINO STUDENT KIT was originally published on PlanetArduino
1 note
·
View note