#Aluminum Padded Tool Case
Explore tagged Tumblr posts
Visit Tumblr Blog
Explore Tumblr blogs with no restrictions, modern design and the best experience.
Last Seen Tumblr Blogs


Fun Fact
Premium Tumblr themes are available from anywhere between $9 to $49.
Text
Putting a headphone jack in a Fairphone 4
TLDR with this procedure you sacrifice the lower loudspeaker, but the upper one will still behave as normal. Calls and other audio seem to work just fine. There is some interference from internals that gets picked up by amplified speakers, I'm sure there's a way to filter it, this is mainly a proof of concept. This is not really a guide and I do not guarantee anything at all.
I really liked my Fairphone 4 except that it didn't have a 3.5mm jack like normal phones used to have. And my car has never heard of Bluetooth. So I started joking about drilling a hole in it.

I found this green TRS jack on a USB DAC and found it would fit inside. I took this photo with a DSi camera. Originally I thought I might be able to fit both the jack and the speaker, and I had this elaborate plan to make a cut in the mainboard and move the vibrating motor elsewhere,

but decided against it because I had no idea what losing that one contact would do. I did a test and found no major issues with removing the bottom loudspeaker. If I needed the phone to be loud, I'd hook something else up anyway. I bought a second loudspeaker and horrendously dissected it.

I used a knife. If you do this you should absolutely use a dremel tool and not a knife. Unless you don't have a dremel tool
The plan is, remove the speaker part. You do not have to completely de-laminate the two layers of plastic. Just this section of the bottom layer. The top layer has pretty colors and conductive tape and contacts for mysterious purposes. Maybe antenna.

Next, you must drill the hole. We're not quite sure what the case is made of, but it probably involves aluminum. I had a drill press and clamps, but I went to my friend's house. He doesn't have clamps or many drill bits, but he knows metal. The jack barrel was like 5.1mm in outer diameter, and after lamenting that all our bits were in imperial, we settled on a 7/32". We removed all components from the chassis including mainboard and screen before drilling.
Here, we went for a hole that was centered on the middle hole of the speaker grill. However, if you do this, you will need to also remove some more metal, because the jack will need to be kind of submerged in the floor. We also had to sand down one side of the jack paper thin to make it sit flat against the back of the screen module. In hindsight, I should have marked where the jack wanted to sit before drilling. This would have us drill at the edge of the case, but it would be closed off by the phone's back cover anyway so it wouldn't matter. Just plan out your hole instead of eyeballing it.
Unfortunately, we did not get any pictures of the fit after we were done. Probably for the best, so no one has to see the metal carnage.
Once it was in place, it was time to wire it. The speaker module presses a flat flex cable up against these two contacts on the board.
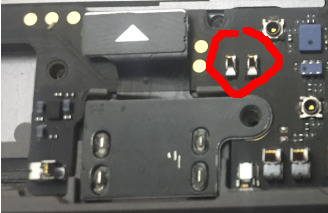

I originally managed to solder to the flat cable, but then made a mistake and tore the pads, so I ended up soldering directly to those spring pins on the mainboard. I used magnet wire for everything. I just connected both the L and R pins of the jack to this one speaker output because I didn't feel like probing out the top speaker connector and running wire up there just yet. Ideally I would have a switched jack that interrupts the top speaker, but that's for later. I might salvage something from an Apple device, their jacks tend to be compact.

Hot glued the thing in place, and this is the end result. It works just great with passive headphones. I'll upload a demo video when I get the chance, I've already used my 1 video. I wish I had taken better pictures, but it wasn't very convenient.
The caveats in the beginning apply. It's also way too loud because it's meant to drive a speaker, and it's balanced for that too. I might be able to put a resistor divider on there to reduce the output volume and let a louder signal drown out the interference a bit better?
I have no idea if this is a thing people do, putting audio jacks in their phones. But I would think that replacing the speaker like this would work on a lot of different phones. Maybe worth trying?
5 notes
·
View notes
Text
Advanced Guide to Installation of LED Display Boards
LED display panels have become the star of commercial spaces, conference rooms, exhibition halls and even home decorations for their high brightness, bright colors and flexibility. The LED display panel installed on the ceiling can save space, enhance the sense of technology, and bring shocking visual effects. However, installing an LED display panel is not just about hanging it up, it involves multiple links such as structure, electrical and debugging. This article will provide you with an installation guide from entry to proficient, helping you create a safe and cool visual feast, with the word count controlled within 1,000 words, which is easy to understand and professional.

Preparation: Lay a solid foundation and achieve twice the result with half the effort
Clarify requirements and budgets
Before installation, figure out the purpose: whether to play advertisements, display artistic content, or conference presentation? The purpose determines the screen specifications, such as P2 (pixel spacing 2mm) is suitable for close viewing, while P4 is more suitable for long distances. The budget is also very important. Ordinary indoor screens are about 5,000-10,000 yuan per square meter. With the frame and installation fee, the total cost may be between 8,000-15,000 yuan per square meter. How to reduce the installation cost of LED walls?
Check equipment and tools
When counting the equipment, confirm whether the LED module, control card, power supply and cable models match. Prepare professional tools: torque wrench ensures uniform screw fixation; anti-static bracelets and pads protect sensitive components; cable testers check line faults. These details can greatly improve installation efficiency.

Assess the ceiling and environment
Ceiling load-bearing is the top priority! The LED display panel weighs 20-50 kilograms per square meter, and structural engineers need to be asked to evaluate whether the ceiling needs to be reinforced. Consider environmental factors: choose a screen with IP54 or above protection level in places with high humidity; choose a high-brightness model (≥1000 nits) in strong light environments. Don't forget to reserve maintenance space for future maintenance.

Installation steps: Make every step and strive for excellence
Design a solid framework
The core of ceiling installation is a fixed frame, usually made of steel structure or aluminum alloy, and needs to be customized according to the screen weight and size. The frame and the ceiling are connected with expansion bolts or embedded parts to ensure stability. Outdoor screens also need to consider factors such as wind load and snow load, and welding and anti-rust treatment must also be in place. Give you a steel frame LED screen: key features, case studies and buying tips.
Electrical wiring and safety
The power supply and signal wiring should be standardized to avoid cross-entanglement and meet fire protection requirements. The power cord diameter must match the screen power, and it is recommended to be equipped with a UPS to prevent power outage. The signal line is made of high-quality materials, and long-distance transmission can be used to consider optical fiber to reduce interference. The metal housing and power supply system must be well grounded to prevent leakage or static electricity.

Module splicing and debugging
During installation, the modules should be spliced piece by piece, and leveling is used to ensure smoothness, and fine-tuning screws or gaskets to eliminate height differences. The cable connection should be aligned with the interface to lock it to prevent loosening. After the installation is completed, debug the brightness, color and white balance to ensure that the picture is uniform and has no color difference. Large screens may require correction of software optimization display effects.

Post-maintenance: Make the screen shine for a long time
Regular inspection
Check the frame, cooling system and cables every six months to prevent loosening or aging. Pay special attention to whether the waterproof joints and sealing tape are intact when outdoor screens are available.
Cleaning and Maintenance
Wipe the screen gently with a soft cloth to avoid using a damp cloth or chemical cleaner to avoid damage to the surface coating. Clean the dust regularly to maintain the display effect.
Content Management
Update play content regularly, combining festival or event themes to keep the screen attractive. Choose a system that supports remote control to facilitate content updates and troubleshooting.
Fees and supplier selection
The cost varies from project to project. The total cost of screen, frame and installation is about 8,000-15,000 yuan/square meter. Creative styling or high-end control systems will be more expensive. When choosing a supplier, don’t just look at the price! The qualifications, cases and after-sales service are inspected, and a reliable supplier will provide full-process support and a 3-5-year warranty. After installation, please ask for drawings and maintenance manuals for easy management. China LED screen factory, this is more reliable!
Conclusion
The ceiling-mounted LED display panel can give the space a technological charm, but the key to success lies in preliminary planning, fine construction and continuous maintenance. From demand analysis to debugging and optimization, you can’t be careless in every step. I hope this guide can help you create a safe and cool visual space from getting started to master! Have a question? Find a professional team to consult and let your LED display panel shine in the audience!
Thank you for watching. I hope we can solve your problems. Sostron is a professional LED display manufacturer. We provide all kinds of displays, display leasing and display solutions around the world. If you want to know: Small-pitch LED large screen: illuminates the vista, not just "small". Please click read.
Follow me! Take you to know more about led display knowledge.
Contact us on WhatsApp:https://api.whatsapp.com/send?phone=+8613510652873&text=Hello
0 notes
Text
A Comprehensive Guide to AR-15 Stocks, Grips, and Handguards: Enhancing Your Rifle’s Performance and Comfort
The AR-15 is one of the most customizable firearms in the world, beloved by enthusiasts and professionals alike. Whether you're using it for recreation, home defense, or as a precision tool, the versatility of the AR-15 platform allows for modifications that can drastically improve performance. Among the most significant upgrades are the stocks, grips, and handguards. These components are often overlooked by newcomers, but they play crucial roles in determining comfort, accuracy, and control.
In this article, we’ll take a deep dive into AR-15 stocks, grips, and handguards, explaining their importance, key features to look for, and how to choose the best options for your specific needs.
The Importance of Stocks, Grips, and Handguards
To understand why stocks, grips, and handguards matter, it’s essential to first recognize that every element of the AR-15 contributes to the way the rifle performs and feels in the user’s hands. These parts are not just cosmetic; they impact the shooter’s ability to handle recoil, maintain accuracy, and shoot comfortably over long periods.
Stocks influence the overall length and stability of your rifle, affecting both accuracy and comfort.
Grips offer better control and ergonomic support, which is especially critical for precise shooting and recoil management.
Handguards provide a stable platform for your support hand while protecting your hand from the heat generated during sustained shooting.
Upgrading these components can lead to a more comfortable, efficient, and personalized shooting experience.
AR-15 Stocks: Enhancing Stability and Comfort
The stock of an AR-15 is the part of the rifle that rests against the shooter’s shoulder. It plays a crucial role in the rifle’s stability, accuracy, and overall comfort, especially during extended shooting sessions.
Types of AR-15 Stocks
Fixed Stocks Fixed stocks are set in place and do not allow for any adjustment. They provide a solid, stable platform that is ideal for precision shooting. Since they don’t have moving parts, they’re often considered more durable and reliable. However, their lack of adjustability may not be ideal for all users.
Adjustable Stocks These stocks allow you to modify the length of pull, which is the distance from the trigger to the end of the stock. Adjustable stocks are popular for their versatility, making them a great option for different body types or shooting positions. They’re particularly useful for law enforcement and military professionals who need to adjust their rifle on the fly.
Collapsible Stocks Collapsible stocks are similar to adjustable stocks, but they offer even more flexibility. These stocks can be collapsed to a smaller size for easier storage and transport. They’re commonly seen on rifles used for tactical purposes, as the ability to adjust the stock length allows for fast transitions between various shooting stances.
Pistol Brace Stocks Although not technically considered a "stock" in the traditional sense, pistol braces are designed for stabilizing AR pistols. They are especially popular for those who prefer to shoot AR-15s in a more compact configuration while still maintaining control and accuracy.
Key Features to Look For in an AR-15 Stock
Material: Stocks are typically made from durable materials like polymer, aluminum, or carbon fiber. The material will affect both weight and durability.
Adjustability: Choose between adjustable, collapsible, or fixed depending on your needs. Consider how important portability or customization is for your use case.
Comfort: Some stocks come with rubberized pads or adjustable cheek risers to improve comfort during long shooting sessions.
Weight: A lightweight stock can reduce the overall weight of the rifle, making it easier to carry and handle.
AR-15 Grips: Improving Control and Precision
The grip of an AR-15 is another crucial component that affects the way the rifle feels in your hands. A comfortable and ergonomic grip can drastically improve your ability to handle the weapon, especially during rapid fire or extended shooting periods.
Types of AR-15 Grips
Pistol Grips The most common type of grip for AR-15s, pistol grips are designed to fit the shooter’s hand naturally, allowing for a comfortable shooting stance. They come in various shapes, sizes, and materials, and many have ergonomic contours to reduce fatigue.
Vertical Grips Vertical grips are mounted under the handguard and allow for better control when shooting from the standing position or while moving. They help reduce muzzle rise and improve shooting stability, especially during rapid fire.
Angled Grips Angled grips are a compromise between a traditional pistol grip and a vertical grip. Mounted at a 45-degree angle, they allow for a more natural wrist position and better control when shooting at various angles.
Thumbhole Grips Thumbhole grips are another variation, often found on certain stock designs. These grips provide additional support by cradling the thumb and index finger, making it easier to control the rifle during high-pressure situations.
Key Features to Look For in an AR-15 Grip
Ergonomics: A well-designed grip should fit comfortably in your hand, reducing fatigue and improving accuracy.
Texture: Look for grips with textured surfaces or rubberized coatings to ensure a firm hold, even in wet or slippery conditions.
Angle and Position: Choose between different angles (e.g., 20°, 30°, 45°) depending on your shooting style and preference.
Material: Grips are usually made from polymer, rubber, or even metal. Consider the durability and comfort of the material when selecting the right grip.
AR-15 Handguards: Enhancing Performance and Comfort
Handguards are one of the most important parts of your AR-15, providing a stable platform for your support hand while protecting it from the hot barrel. In addition, handguards also serve as a mounting platform for accessories like lights, lasers, and grips.
Types of AR-15 Handguards
Drop-In Handguards Drop-in handguards are the easiest to install, as they don’t require the removal of the rifle’s front sight. These are typically the least expensive option but may not offer the same level of customization or performance as other types of handguards.
Free-Floating Handguards Free-floating handguards are the most advanced option, as they don’t make contact with the barrel. This allows for greater accuracy, as there’s no pressure from the handguard affecting the barrel’s harmonics. Free-floating handguards are ideal for precision shooters and those looking to mount multiple accessories.
M-LOK Handguards M-LOK is a popular mounting system for attaching accessories to the handguard. Unlike the traditional Picatinny rail, M-LOK allows for a lightweight, low-profile solution for adding accessories without adding extra bulk.
Picatinny Handguards The Picatinny system is a tried-and-true standard, offering a solid, reliable platform for attaching accessories. Picatinny rails are often found on more tactical or military-grade rifles.
Key Features to Look For in an AR-15 Handguard
Material: Handguards are often made from aluminum or polymer. Aluminum handguards are more durable and resistant to heat, while polymer options may offer a lighter weight.
Rail System: Decide between M-LOK, Picatinny, or KeyMod based on the types of accessories you plan to use.
Weight: Lighter handguards are easier to carry, but heavier options can offer better heat dissipation and durability.
Ventilation: Handguards with adequate ventilation help dissipate heat, especially during extended firing sessions.
Conclusion: Selecting the Right AR-15 Components for Your Needs
When it comes to upgrading your AR-15, selecting the right stock, grip, and handguard is essential to tailoring the rifle to your preferences. These components influence your comfort, control, and accuracy—three crucial factors for any shooter. By considering the various types, features, and materials available, you can optimize your AR-15 for your specific needs, whether you’re hunting, target shooting, or using your rifle in a tactical environment.
Investing in quality stocks, grips, and handguards will not only enhance your shooting experience but also ensure your AR-15 performs at its best in any scenario. Keep in mind that your personal shooting style and intended use should always guide your decisions, and when in doubt, don’t hesitate to seek expert advice or try out different options to find the perfect fit for you.
0 notes
Text
The Ultimate Guide to Choosing the Perfect Rolling Makeup Case for Professionals
In the fast-paced world of beauty and makeup, having the right tools and storage solutions can make all the difference. Whether you're a professional makeup artist, a beauty influencer, or someone who simply loves makeup, a rolling makeup case is an essential investment. Not only does it keep your products organized, but it also ensures that you can transport them safely and efficiently. In this comprehensive guide, we’ll explore everything you need to know about rolling makeup cases, with a special focus on the high-quality options available at Just Case USA.
Why Every Makeup Artist Needs a Rolling Makeup Case
As a makeup artist, your kit is your lifeline. It contains everything you need to create stunning looks, from foundations and eyeshadows to brushes and lashes. However, carrying all these products can be a hassle, especially if you’re constantly on the go. This is where a rolling makeup case comes in.
1. Portability and Convenience: A rolling makeup case is designed with mobility in mind. Equipped with sturdy wheels and a retractable handle, it allows you to effortlessly transport your makeup kit from one location to another. Whether you’re heading to a photoshoot, a wedding, or a client’s home, you won’t have to worry about lugging around heavy bags.
2. Superior Organization: One of the biggest challenges for makeup artists is keeping their products organized. A rolling makeup case typically features multiple compartments, drawers, and dividers, allowing you to categorize your products by type, brand, or usage. This not only saves time but also ensures that your products are easily accessible when you need them.
3. Protection for Your Products: Makeup products are often fragile and expensive. A rolling makeup case provides a secure and padded environment to protect your investments from damage during transit. Many cases also come with customizable foam inserts, so you can create a snug fit for each item.
4. Professional Appearance: Arriving at a job with a sleek and professional-looking rolling makeup case can leave a lasting impression on your clients. It shows that you take your craft seriously and are well-prepared for any situation.
Key Features to Look for in a Rolling Makeup Case
When shopping for a rolling makeup case, it’s important to consider your specific needs and preferences. Here are some key features to look for:
1. Durability: Your rolling makeup case should be built to last. Look for cases made from high-quality materials like polypropylene or aluminum, which are both lightweight and durable. Reinforced corners and heavy-duty zippers are also indicators of a well-constructed case.
2. Size and Capacity: Consider the size of your makeup collection and the types of jobs you typically work on. If you have a large kit or frequently work on multiple clients in a day, opt for a case with ample storage space. Just Case USA offers a variety of sizes to suit different needs.
3. Customizable Interiors: A customizable interior allows you to tailor the case to your specific requirements. Look for cases with adjustable dividers, removable trays, and foam inserts that can be cut to fit your products perfectly.
4. Mobility Features: Smooth-rolling wheels and a comfortable handle are essential for easy transportation. Some cases also come with additional features like 360-degree swivel wheels or telescopic handles for added convenience.
5. Security: Make sure your case has reliable locking mechanisms to keep your products safe during transit. Some cases even come with TSA-approved locks, which are ideal for travel.
6. Aesthetic Appeal: While functionality is key, there’s no harm in choosing a case that reflects your personal style. Many rolling makeup cases come in a variety of colors and finishes, so you can find one that suits your taste.
Why Choose Just Case USA for Your Rolling Makeup Case?
When it comes to high-quality rolling makeup cases, Just Case USA stands out as a trusted provider. Here’s why:
1. Premium Quality: Just Case USA is known for its commitment to quality. Their rolling makeup cases are crafted from durable materials and designed to withstand the rigors of daily use.
2. Customizable Options: With Just Case USA, you can customize your case to meet your exact needs. From adjustable dividers to foam inserts, their cases offer unparalleled flexibility.
3. Wide Range of Sizes: Whether you need a compact case for a small kit or a large case for an extensive collection, Just Case USA has you covered. Their diverse range ensures that you’ll find the perfect fit.
4. Exceptional Customer Service: Just Case USA prides itself on providing excellent customer service. Their team is always ready to assist you with any questions or concerns, ensuring a seamless shopping experience.
5. Competitive Pricing: Despite their premium quality, Just Case USA’s rolling makeup cases are affordably priced, making them accessible to professionals at all levels.
Tips for Maintaining Your Rolling Makeup Case
To get the most out of your rolling makeup case, it’s important to take proper care of it. Here are some maintenance tips:
Clean Regularly: Wipe down the exterior and interior of your case with a damp cloth to remove dirt and makeup residue.
Inspect Wheels and Handles: Check the wheels and handle periodically to ensure they’re functioning properly. Tighten any loose screws or bolts as needed.
Organize Frequently: Reorganize your case regularly to keep it clutter-free and ensure that all products are in their designated spots.
Avoid Overloading: While it’s tempting to pack as much as possible, overloading your case can strain the wheels and handle. Stick to the recommended weight limit.
Store Properly: When not in use, store your case in a cool, dry place to prevent damage from moisture or extreme temperatures.
Conclusion
A rolling makeup case is an indispensable tool for any makeup artist or beauty enthusiast. It combines portability, organization, and protection into one sleek package, making it easier than ever to transport your makeup kit with confidence. By choosing a high-quality case from Just Case USA, you’re investing in a product that will enhance your workflow and elevate your professional image.
Whether you’re just starting out or are a seasoned pro, a rolling makeup case is a game-changer. So why wait? Explore the collection at Just Case USA today and find the perfect case to suit your needs. Your makeup kit—and your clients—will thank you!
0 notes
Text
Skull Clamp Market Growth: Doubling to $2.4B by 2033 with a 7.2% CAGR
Skull Clamp Market is at the forefront of neurosurgical innovation, dedicated to manufacturing and distributing devices for cranial stabilization during intricate procedures. With options like three-pin and four-pin skull clamps, these tools are crucial for ensuring surgical precision and patient safety. Serving hospitals, clinics, and specialty surgical centers, the market thrives on advancements in ergonomic design, material innovations, and enhanced patient comfort, mirroring the evolving demands of neurosurgical treatments.
To Request Sample Report: https://www.globalinsightservices.com/request-sample/?id=GIS26350 &utm_source=SnehaPatil&utm_medium=Article
Key Market Dynamics
The Skull Clamp Market is experiencing substantial growth, driven by:
Advancements in Neurosurgical Techniques: Cutting-edge technologies increase demand for precision tools.
Rising Healthcare Investments: Expanding infrastructure boosts accessibility to neurosurgical equipment.
Growing Neurological Disorder Prevalence: Increasing cases necessitate surgical intervention.
Market Highlights 🚀
Segment Performance:
Adult Skull Clamps: Lead with a 55% market share, supported by a higher prevalence of adult neurological conditions.
Pediatric Skull Clamps: Second with 30% share, reflecting increased focus on pediatric care.
Veterinary Skull Clamps: Account for 15%, catering to specialized applications in animal surgeries.
Regional Insights:
North America: Dominates due to advanced healthcare systems and robust R&D activities.
Europe: Second-largest region, benefiting from an aging population and heightened awareness of neurological conditions.
Top Countries:
United States: Leads with substantial healthcare expenditure and a high incidence of neurological disorders.
Germany: Emerges as a strong player with a robust medical device industry and favorable regulations.
Market Segmentation
By Type: Manual, Automatic, Adjustable Skull Clamps.
By Product: Pediatric, Adult, Disposable, Reusable Skull Clamps.
By Technology: Mechanical, Hydraulic, Pneumatic Skull Clamps.
By Component: Base Units, Support Arms, Pressure Pads, Locking Mechanisms.
By Application: Neurosurgery, Orthopedic Surgery, ENT Surgery, Trauma Surgery.
By Material Type: Stainless Steel, Aluminum, Titanium, Plastic.
By End User: Hospitals, Ambulatory Surgical Centers, Specialty Clinics, Research Institutes.
By Functionality: MRI Compatible, CT Compatible, X-ray Compatible.
By Installation Type: Fixed, Portable.
Market Forecast 🌟
2023 Volume: Estimated at 1.2 million units, projected to reach 2 million units by 2033.
Growth Drivers: Technological innovations, growing healthcare expenditures, and focus on patient safety.
Key Players
Integra LifeSciences: Renowned for advanced product portfolios.
Stryker Corporation: A leader in surgical innovation.
Micromar: Focusing on ergonomic and safety-enhanced designs.
#SkullClampMarket #Neurosurgery #MedicalDevices #PatientSafety #SurgicalPrecision #HealthcareInnovation #AdultSkullClamps #PediatricCare #AdvancedSurgery #MRICompatible #HealthcareInvestments
0 notes
Text
Cargo Control Revolution: Why Rack Logistics Bar Holders are Essential for Freight Safety
The logistics industry relies heavily on precise and secure freight management to avoid accidents and delays. In modern times, securing cargo effectively has evolved beyond traditional methods, as freight safety continues to gain priority. One essential element in this process is the use of logistics bar holder systems, which streamline cargo control for safer transportation. For drivers of semi truck cab racks, the ability to store and access load management tools efficiently makes a significant difference in maintaining safety and preventing disruptions.
The Rise of Modern Freight Safety: From Straps to Bar Holders
Securing cargo has progressed over the years from using simple straps and ropes to advanced systems that enhance both safety and efficiency. As the demand for transporting goods has increased, so have the risks associated with shifting cargo during transit. Traditional load-securing methods now require additional support to meet today’s standards. In this evolving landscape, logistics bar holders have emerged as a game-changer, offering organized and secure storage for bars used to stabilize cargo loads. These holders not only make transportation safer but also reduce loading and unloading times, thus contributing to more efficient operations.
Critical Components of Freight Safety: Rack Logistics Explained
Rack logistics plays a crucial role in freight safety by providing a secure place for drivers to store load bars when they’re not in use. With high-performance semi truck cab racks installed, drivers can quickly access the necessary tools to keep loads stabilized throughout the journey. This is where logistics bar holders become invaluable—they offer a designated place to hold load bars, preventing clutter in the cab and ensuring that drivers always have the right tools on hand when needed.
These logistics solutions, such as the Yellow Rack system, are designed to maximize storage while maintaining safety. Yellow Rack’s Cab Rack Bottom Boot, for example, is compatible with the Yellow Rack 4-Bay Rack, featuring noncorrosive aluminum diamond plates and heavy-duty rubber padding. The boot holds up to six logistics bars or a combination of jack bars, making it an ideal choice for freight operators looking to streamline their cargo control process.
Minimizing Risks: Preventing Shifting Cargo and Potential Hazards
One of the primary reasons for using logistics bar holders is to minimize risks associated with shifting cargo. Improperly secured freight can lead to accidents, injuries, and even legal liabilities. Rack systems that incorporate logistics bar holders not only keep tools organized but also ensure drivers are equipped to stabilize loads effectively during transport.
The danger of cargo shifting isn’t limited to goods being damaged. In severe cases, it can impact vehicle control, causing accidents that put lives at risk. A well-organized rack system allows drivers to respond quickly to cargo control issues, especially when transporting goods across rough terrains or over long distances.
Making the Right Choice: Trusted Providers of Cab Loading Racks
Choosing the right cab rack system is essential for maximizing both safety and efficiency in freight transportation. Yellow Rack stands out as a trusted provider for cab loading solutions, offering durable and functional designs tailored to meet the needs of freight operators. Their Cab Rack Bottom Boot, compatible with the Yellow Rack YRY40WM rack, exemplifies high-quality design, featuring noncorrosive materials and rubber padding for extra durability. These racks are ideal for holding six load bars or a combination of different types, including jack bars, to suit various cargo needs.
By investing in reliable logistics bar holders like those from Yellow Rack, freight operators can significantly improve cargo control, reduce downtime, and enhance overall road safety. The right equipment not only ensures compliance with safety regulations but also provides peace of mind for drivers and fleet managers.
Conclusion
The logistics industry has experienced a significant transformation with the rise of innovative cargo control solutions. Logistics bar holder systems have become essential tools for ensuring freight safety, especially for drivers of semi truck cab racks. With providers like Yellow Rack offering specialized solutions, operators can maintain organized cabs, improve safety, and minimize risks associated with shifting cargo.
0 notes
Text
Essential Photography Accessories: Elevate Your Craft
Photography is an art form that relies heavily on the right tools and techniques to capture stunning images. While the camera and lenses are fundamental, the accessories you choose can make a significant

difference in the quality and creativity of your work. This article will delve into the various accessories that every photographer should consider, ranging from basics to advanced tools that can enhance your photography experience.
1. Tripods: The Foundation of Stability
Importance of Tripods
A tripod is an essential accessory for any photographer, providing stability and support for your camera. Whether you're shooting landscapes, portraits, or long exposures, a tripod allows for sharper images and greater compositional freedom.
Types of Tripods
Standard Tripods: Ideal for general use, these tripods are versatile and come in various materials (aluminum, carbon fiber) and sizes.
Compact Tripods: Lightweight and portable, these are perfect for travel and outdoor photography.
GorillaPods: Flexible tripods that can grip onto various surfaces, offering creative positioning options.
Choosing the Right Tripod
When selecting a tripod, consider the weight capacity, height, and material. Carbon fiber tripods are lighter and more durable, while aluminum options are often more affordable.
2. Camera Bags: Protecting Your Gear
Importance of a Good Camera Bag
A quality camera bag is crucial for protecting your equipment from the elements and ensuring safe transport. It also helps you stay organized, making it easier to access your gear when needed.
Types of Camera Bags
Backpacks: Great for photographers who need to carry multiple lenses and equipment. They distribute weight evenly and often have additional compartments for personal items.
Shoulder Bags: Easier to access quickly, these bags are ideal for street photography or events where you need to grab your camera rapidly.
Hard Cases: Provide maximum protection for your gear, especially during travel. These are often waterproof and impact-resistant.
Features to Look For
Look for padded compartments, weather resistance, adjustable dividers, and comfortable straps when selecting a camera bag.
3. Lens Filters: Enhancing Your Images
The Role of Lens Filters
Lens filters serve various purposes, from protecting your lens to enhancing your images. Understanding the different types of filters and their effects can help you make better photographic choices.
Types of Lens Filters
UV Filters: Primarily used to protect the lens from scratches and dust, UV filters have minimal impact on image quality.
Polarizing Filters: Help reduce reflections and enhance colors, particularly in landscapes. They are excellent for capturing rich skies and vibrant foliage.
Neutral Density (ND) Filters: These filters reduce the amount of light entering the lens, allowing for longer exposures in bright conditions. ND filters are ideal for achieving silky water effects or motion blur.
Choosing the Right Filters
When selecting filters, consider the size that fits your lens and the quality of the filter glass to avoid degrading image quality.
4. External Flashes and Lighting Equipment
The Importance of Good Lighting
Lighting can make or break a photograph. While natural light is beautiful, having the right lighting equipment can provide flexibility and creativity in various shooting conditions.
Types of Lighting Equipment
External Flashes: These add light to your scenes, allowing for balanced exposures. They can be mounted on the camera or used off-camera for creative lighting setups.
Softboxes: These diffusers soften harsh light, making it more flattering for portraits and reducing shadows.
Reflectors: Useful for bouncing light onto your subject, reflectors can help fill in shadows and enhance highlights.
Tips for Using Lighting Equipment
Experiment with different lighting setups and modifiers to find what works best for your style. Off-camera flash techniques can significantly enhance your creative options.
5. Memory Cards: Storing Your Captured Moments
The Importance of Reliable Memory Cards
Memory cards are essential for storing images, and using high-quality cards can ensure that your data is safe. Understanding the different types of memory cards and their specifications is crucial.
Types of Memory Cards
SD Cards: The most common type of memory card, available in various speeds and capacities.
CF Cards: Often used in professional cameras, CF cards typically offer faster speeds and larger capacities than standard SD cards.
XQD and CFast Cards: Used in high-end cameras for their speed and performance, ideal for continuous shooting.
Choosing the Right Memory Card
Look for cards with high write speeds, especially if you plan on shooting in burst mode or recording high-resolution video. Always have backup cards on hand to avoid missing important moments.
6. Remote Shutter Releases: Capturing the Perfect Shot
Why Use a Remote Shutter Release?
A remote shutter release allows you to take pictures without physically pressing the shutter button, reducing the risk of camera shake. This accessory is particularly useful for long exposures, macro photography, and self-portraits.
Types of Remote Shutter Releases
Wired Remote: A straightforward option that connects directly to your camera.
Wireless Remote: Offers more freedom and flexibility, allowing you to take shots from a distance.
Smartphone Apps: Many cameras now support apps that allow you to control your camera remotely using your smartphone.
Tips for Using Remote Shutter Releases
Practice using the remote in different settings to understand its timing and features, ensuring you're prepared when it counts.
7. Cleaning Kits: Maintaining Your Gear
Importance of Keeping Your Equipment Clean
Dust, fingerprints, and smudges can significantly affect image quality. Regularly cleaning your gear ensures optimal performance and longevity.
Essential Cleaning Tools
Lens Cleaning Solution: Specially formulated to clean lenses without causing damage.
Microfiber Cloths: Ideal for wiping down lenses and screens without scratching.
Rocket Blower: Helps remove dust and debris from camera bodies and lenses without contact.
Best Practices for Cleaning
Always follow manufacturer guidelines for cleaning your equipment. Avoid using household cleaners, as they may damage sensitive surfaces.
8. Light Meters: Perfecting Exposure
Understanding Light Meters
A light meter measures the amount of light in a scene, helping you determine the correct exposure settings for your camera. While modern cameras have built-in light meters, standalone light meters can offer greater accuracy and flexibility.
Types of Light Meters
Incident Light Meters: Measure the light falling onto a subject, providing accurate exposure readings regardless of the subject's reflectivity.
Reflected Light Meters: Measure light reflecting off a subject. Most cameras come equipped with this type of meter.
When to Use a Light Meter
Consider using a light meter in challenging lighting situations, such as mixed light environments or high-contrast scenes.
9. Backdrops and Props: Enhancing Composition
The Role of Backdrops and Props
Backdrops and props can transform a simple photograph into a compelling narrative. They provide context and enhance the overall composition.
Types of Backdrops
Seamless Paper: Affordable and available in various colors, perfect for studio portraits.
Fabric Backdrops: Offer texture and depth, ideal for creating a specific mood.
Vinyl Backdrops: Durable and easy to clean, suitable for various shooting environments.
Incorporating Props
Props can add interest to your images and help convey stories. Choose props that complement your subject and theme, ensuring they don't distract from the main focus.
10. Editing Software: Perfecting Your Images
The Importance of Post-Processing
Editing software allows photographers to enhance their images, correct mistakes, and add artistic flair. Understanding how to use these tools is essential for producing high-quality work.
Popular Editing Software
Adobe Lightroom: Excellent for organizing and editing images with a user-friendly interface.
Adobe Photoshop: Offers advanced editing capabilities, ideal for detailed retouching and creative effects.
Capture One: Known for its powerful color grading and tethering features, popular among professional photographers.
Tips for Effective Editing
Maintain a consistent editing style that reflects your artistic vision. Take the time to learn the software's features and shortcuts to streamline your workflow.
Conclusion
Accessories play a pivotal role in enhancing your photography experience, from ensuring the stability of your shots to perfecting your images in post-processing. As you explore the world of photography, investing in the right accessories can elevate your craft and open up new creative possibilities.
For aspiring photographers, understanding how to use these tools effectively can lead to stunning results, whether you're shooting landscapes, portraits, or events. And if you're looking for inspiration, consider the Top 10 wedding photographers in Dehradun, whose work exemplifies the art of photography at its finest.
By equipping yourself with essential accessories and honing your skills, you can transform your photographic journey into an extraordinary adventure, capturing moments that resonate and tell powerful stories.
0 notes
Text
Must Have 4x4 Parts And Accessories For Off-road And Camping – Rampedup 4×4
For off-road vehicles, ensuring a smooth and safe adventure involves adding key modifications and accessories that improve performance, durability, and safety. Here are the must-have modifications and accessories:
1. All-Terrain or Mud-Terrain Tires -Purpose: Essential for traction on uneven, rocky, or muddy terrain.
- Recommendation: Consider upgrading to larger tires with a stronger sidewall to prevent punctures.
2. Suspension Lift Kit - Purpose: Increases ground clearance, allowing the vehicle to handle rough terrain and obstacles better. -
Recommendation: A moderate lift (2-4 inches) is ideal for most off-road adventures without compromising vehicle stability.
3. Skid Plates - Purpose: Protects the vehicle’s undercarriage (oil pan, transfer case, fuel tank) from rocks and debris.
- Recommendation: Steel or aluminum skid plates offer a good balance of durability and weight.
4. Winch - Purpose: Helps recover your vehicle when stuck in mud, sand, or other difficult conditions.
- Recommendation: Choose a winch with a load capacity of 1.5 times the weight of your vehicle.
5. Off-Road Bumpers - Purpose: Provides added protection against impacts and can support accessories like winches or extra lights.
- Recommendation: Steel bumpers are durable but heavier, while aluminum bumpers are lighter but less sturdy.
6. Locking Differentials - Purpose: Helps distribute power evenly to all wheels, improving traction in challenging off-road conditions. -
Recommendation: Both manual and automatic locking differentials are available, depending on driving style.
7. Recovery Gear - Purpose: Essential for vehicle recovery in case of getting stuck. -
Recommendation: Carry items such as tow straps, D-shackles, a recovery jack, and traction mats.
8. Off-Road Lights - Purpose: Enhances visibility during nighttime adventures or in foggy/dusty conditions.
- Recommendation: LED light bars or spotlights are common, offering durability and brightness.
9. Air Compressor - Purpose: Allows you to air down tires for better traction on soft surfaces and re-inflate them after the trail.
- Recommendation: A portable 12V air compressor is convenient and can be stored easily.
10. Snorkel - Purpose: Raises the air intake to prevent water from entering the engine during deep water crossings.
- Recommendation: Ensure the snorkel is sealed properly for maximum effectiveness.
11. Rock Sliders - Purpose: Protects the sides of the vehicle from damage caused by rocks or stumps when navigating difficult trails.
- Recommendation: Steel rock sliders are preferred for heavy-duty protection.
12. Off-Road GPS or Navigation System** - Purpose: Helps navigate in remote areas where traditional maps or mobile GPS signals might fail.
- Recommendation: Look for GPS units designed for off-road use with detailed trail maps and tracking features.
13. Dual Battery System - Purpose: Provides a backup power source for running accessories like fridges, lights, or winches without draining the main battery.
- Recommendation: An isolator system will keep the second battery charged when driving.
14. Roof Rack or Cargo Storage - Purpose: Increases your vehicle’s storage capacity for carrying camping gear, spare parts, or additional fuel.
- Recommendation: Choose roof racks designed for off-road use with secure mounting systems.
15. Upgraded Brakes - Purpose: Improves braking performance, especially when carrying extra weight from gear and modifications.
- Recommendation: Consider high-performance brake pads and rotors for better stopping power.
16. First Aid and Emergency Kits - Purpose: Provides essential tools and medical supplies in case of accidents or breakdowns.
- Recommendation: Include items like fire extinguishers, first aid kits, and a multi-tool.
These modifications and accessories will enhance the capability, safety, and comfort of your off-road vehicle, allowing you to tackle challenging terrains with confidence. For more information you can browse https://rampedup4x4.com.au/
#car parts#4x4 accessories#4x4 parts and accessories#online auto parts#4x4 accessories australia#auto accessories spares online
1 note
·
View note
Text
PCB Manufacturing: From Design to Production

The unsung hero of electronics is the Printed Circuit Boards (PCBs), without which our devices would not function. Being an integral part of most digital devices, PCBs form the crucial building blocks of today’s technology-laden society, from the mobile devices in our pockets to communication satellites orbiting our planet. In this blog post, I will explore the detailed process of producing PCBs, from designing to manufacturing them. Understanding PCBs So, before going deeper into the manufacturing process, let’s explain what a PCB is. A printed circuit board is an interconnecting device with electronic components joined by conductive paths, pads, and features. These components are produced by etching the insulated copper from sheets laminated on an insulating base. PCBs can be single-sided (One Copper Layer), double-sided (Two Copper Layers), or multi-layered. The PCB Manufacturing Process A complex series of actions must transform a circuit idea into a completed PCB. Let's take a closer look at each of these. 1. Design and Layout The most significant element of the creation of the PCB is the creation of the design. A chip engineer employs linear circuits Electronic Design Automation (EDA) software to develop a schematic view of the circuit. This is then translated to a printed circuit board layout where one defines the placement of the components and the interconnection paths. Key considerations during the design phase include: Circuit functionality Component placement Signal integrity Power distribution Thermal management Manufacturing constraints When the design is finished, it is exported as a collection of Gerber files, complete with all the data required for production. 2. Material Selection Different materials used in the PCB production process determine its performance, lifespan, and cost. The primary material most often used is FR-4, an epoxy resin glass fiber reinforced laminate. Other materials such as polyimide, aluminum, and ceramics are also used for specific purposes. Various factors impact the choice of material, such as: Operating temperature range Dielectric constant Thermal conductivity Coefficient of thermal expansion Cost 3. Inner Layer Processing In the case of multi-layer PCB, the procedure starts from the internal layers of the respective PCB boards. The process typically involves these steps: The process typically involves these steps: - Cleaning: The copper-clad laminate is first rinsed to wash away any contaminants from the surface. - Photoresist Application: Coating of photoresist onto the copper layer This is a layer of photoresist applied onto the copper surface used in the etching process. - Image Transfer: Typically, the circuit is formed when UV light transfers the circuit pattern onto the photoresist. - Developing: This exposed and processed photoresist makes the circuit pattern whereby the unexposed portion of the photoresist is washed away. - Etching: The rest of the copper is stripped off, thus exposing only the required copper traces. - Stripping: They come through the top layer of resist, wash off the rest of the photoresist, and we can see the copper circuit pattern. - Optical Inspection: Various inspections are done on the layers, including checking for defects. 4. Layer Alignment and Bonding The separate layers of a multi-layer PCB must be aligned and glued together: - Layer Up: The inner layers are placed with layers of prepreg placed between them; this material is a material that has been soaked in epoxy resin. - Registration: They are accurately located in relation to each other through the use of the tooling holes. - Bonding: In a lamination press, high pressure and temperature are applied, thus making the prepreg flow and laminating the stack. 5. Drilling The PCB has various holes drilled for the component leads, which connect the different layers. This is usually achieved by using computerized drilling equipment for accuracy in terms of positions to be drilled. The types of holes include: Through-holes: Continue through all the layers Blind vias: Attach an outer shell to an inner compartment Buried vias: I: Integrate inner layers without going through the skin 6. Plating and Coating The board goes through multiple plating and coating procedures after drilling. - Desmear: This one clears any melted resin from the drilling process. - Electroless Copper Deposition: A thin layer of copper is then dissolved by an electrolytic process on various parts of the board, even the holes. - Copper Electroplating: A further increment of thickness is done by electroplating in copper. - Tin Plating: This includes applying a thin layer of tin to cover the layer of copper so that it may be protected from etching. 7. Outer Layer Imaging As with the outer layers, the photoresist is applied to the outer layers and then exposed and developed the same way that the inner layers are to form the circuit pattern through etching. 8. Solder Mask Application Finally, a solder mask is provided to the board; this makes the PCB look green (but can also come in other colors). This layer: It avoids the formation of solder bridges between tiny and adjacent solder pads Acts as a shield to the copper traces against corrosion Provides electrical insulation 9. Surface Finish Several surface finishes can be applied on exposed copper pads and traces to avoid oxidation and improve solderability. Common finishes include: Hot Air Solder Levelling (HASL) Electroless Nickel Immersion Gold Immersion Tin Immersion Silver Organic Solderability Preservative (OSP) 10. Silkscreen All texts, signs, and symbols are applied with the help of silkscreen printing. This includes information on rightful designators of one or several components, distinctive threats or precautions, and the logos of their manufacturers. 11. Electrical Testing Before the PCBs are shipped, they are subjected to an electrical test to check whether they have short circuits or open circuits. Flying Probe Test: Uses Moving probes to check connections. Bed of Nails Test: Goes to the test specification point and employs a fixture with spring-loaded pins that touch the test points. 12. Cutting and Profiling In this case, it would be separated here if it had to produce one or more PCBs on a panel. One way to accomplish this is by: V-scoring and breaking Routing Laser cutting 13. Final Inspection and Packaging The manufactured PCBs are visually and optically inspected and tested using automated optical inspection. Automated Optical Inspection Aoi They are cleaned, packed, and ready for dispatch. Future Trends in PCB Manufacturing The PCB manufacturing sector is still developing. Among the new developments are: 3D Printing: Currently, there are attempts to use AM technologies to make PCB prototypes and production designs. Flexible and Stretchable PCBs: There is a shift to developing new materials and manufacturing methods that would allow PCBs to flex or compress. Embedded Components: Components are now being placed directly into the PCB's layers, offering an even higher density. Smart Manufacturing: Industry 4.0 concept is applied at the moment, and itted to manufacturing PCBs with data analysis and increased automation. Green Manufacturing: Sustainability has become an issue of concern within the clothing industry, where material use and waste production are also of concern. Conclusion Printed Circuit Board manufacturing is a complex process that involves lots of technology and finesse. Every stage of the creation process begins with careful planning and follows the exact sophisticated procedures to ensure the maximum quality. PCB manufacturing also remains ripe for further development in the years to come as technology continues to create more compact, faster, and more intricate electronics. Understanding this process not only makes the commoner appreciate the gadgets they use in their everyday life but also gives an insight into the upcoming electronics manufacturing processes. Read the full article
0 notes
Text
The Ultimate Guide to Help You Carrying Case with Handle
Whether you are a frequent traveler, a photographer, or someone who simply needs to organize tools, choosing the right carrying case with handle is essential for convenience and protection. A well-designed case ensures that your valuable items are safe while providing the portability you need. This guide will walk you through the key factors to consider when selecting the best carrying case with handle for your needs.
1. Durability and Material
The durability of the carrying case is crucial, especially if you will be using it frequently or in rugged conditions. Look for cases made from hard-shell materials like ABS plastic or aluminum for ultimate protection. For lighter needs, soft materials like nylon or polyester can offer flexibility. Make sure the carrying case with handle you choose can withstand drops, impacts, and varying weather conditions.
2. Size and Fit
The size of the carrying case should comfortably accommodate your items without being too bulky. Many cases come with customizable foam interiors or padded dividers that allow you to secure your gear in place. Measure your equipment before purchasing to ensure it fits snugly in the carrying case with handle you choose. It's also important to strike a balance between protection and portability, so you don’t end up with a case that is too large to carry easily.
3. Comfortable Handle Design
One of the most important aspects of a carrying case with handle is, of course, the handle itself. You’ll want to ensure that the handle is ergonomic, padded, and securely attached to the case. Handles that are too thin or poorly designed can cause discomfort over time, especially when carrying heavier items. Look for cases with a rubberized or contoured grip to reduce strain on your hands.
4. Locking Mechanism and Security
For those who carry valuable or sensitive items, a secure locking mechanism is a must. Some carrying cases with handles come with built-in combination locks or padlock-ready designs for added protection. This feature is particularly important when traveling, as it adds an extra layer of security for your belongings.
Conclusion
Selecting the right carrying case with handle ensures that your items are protected and easy to transport. Focus on factors like durability, size, handle comfort, and security to make the best choice for your specific needs.

0 notes
Text
𝗦𝗸𝘆𝗧𝗿𝗮𝗸+ 𝗦𝗜𝗚𝟴 𝗚𝗼𝗹𝗳 𝗦𝗶𝗺𝘂𝗹𝗮𝘁𝗼𝗿

The Indoor Golf Shop’s SIG8 SkyTrak Package is the best of both worlds…
With an 8'W screen it's a smaller screen option that's packed with features to deliver the perfect mix of entertainment and accuracy - all the while still hanging around in our more affordable simulator class!
Featuring the SkyTrak+ Launch Monitor, this golf simulator package gives you the tools to improve your game. The SkyTrak+ tracks ball data, club data, and includes golf simulation software.
What's Included In The SkyTrak+ SIG8 Package
SkyTrak+ Golf Launch Monitor
Protective Case
Play & Improve Software
SIG8 Golf Simulator Enclosure
Landing Pad Turf
Choice of Golf Hitting Mat
Golf Simulator Projector
Ceiling Mount
50' HDMI Cable and HDMI to Lightning Cable
Charging Cable for SkyTrak+
Here's What You're Getting
SkyTrak+ Golf Launch Monitor
The newest launch monitor from SkyTrak, the SkyTrak+. Bringing major advancements in the core technology, the Skytrak+ adds a dual doppler radar system and updated software to provide unmatched accuracy. With the added radar system, the SkyTrak+ is now able to track club data without the use of club stickers.
The SkyTrak+ brings multiple improvements not only in software and tracking but with functionality with the Shot Optimizer. The ST+ also allows for outdoor & indoor use, take it to the range or use it as your own personal golf simulator.
Features
Tracks Ball & Club Data
New & Improved Shot Optimizer
Does Not Require Marked Balls or Club Head Stickers
Indoor/Outdoor Unit
Play & Improve Software Included
SkyTrak+ Protective Case
Included with your Skytrak+ SIG10 Golf Simulator Package is a protective case for your Skytrak+. Accidents happen, don't let a ball coming off the toe of your club damage your new unit! Made from a durable plastic material, the SkyTrak+ Protective Case ensures your unit won't sustain damage from a poor shot.
Features
Durable Lightweight Plastic that will take the impact of a ball or club
Adjustable Legs for leveling/raising your SkyTrak+
Easy access to buttons & ports of your unit
SkyTrak+ Play & Improve Software (Yearly Subscription)
The Play & Improve Plan with the Skytrak+ unlocks multiple features that transform your unit from a training device into a full Golf Simulator
Included With PIP
15 E6 Courses (iOS & PC) - Aviara, Belfry, Sanctuary, Wade Hampton, Stone Canyon, Bandon Dunes, Oakmont, Torrey Pines, Troon North, Prairie Dunes, Banff, Barton Creek, Loch Lomond, Pelican Hill, Cabo Del Sol
15 WGT Courses (iOS) - PGA National, Pebble Beach, St Andrews, Bethpage Black, Olympic Club, Ocean Course at Kiawah, Chambers Bay, Erin Hills, Pinehurst #2, Congressional CC, Merion GC, Wolf Creek, Royal St Georges
6 Nine Shot Challenge Courses - Edgewood Tahoe Celtic Manor, Valhalla, Harbor Town, Pinehurst #8, Bandon Dunes – Best of Par 3, Lanai GC
Ability to integrate other third party softwares ( TGC2019, Creative Golf, Protee Play)
SIG8 Golf Simulator Enclosure
The SIG8 screen and enclosure pairs beautifully with the SkyTrak+. Built tough, the SIG8 screen can withstand the hardest of golf shots time after time. Unlike other screen systems, we designed the SIG8 so that it can fit within compact spaces with as little as 9'W. Due to the squareness of the screen, the image will fill in 80% of the screen - there will be some white space above and below the image.
Features:
Image Fills In 80% Of The Screen in HD
Premium, Handcrafted, Made in the USA
Powder Coated Aluminum Frame
Tight Knit Polyester Impact Screen
Protective Foam Padding Around The Screen
Dimensions: 8'4"H x 8'4"W x 5' D
Golf Simulator Projector
With WUXGA (1920×1200) resolution and 6,000 Lumens, your golf simulator projector will have the best image and color quality for your indoor golfing experience.
Landing Pad Turf
The landing pad is made specifically for the SIG8 golf simulator. It fills in the area between the screen and the hitting mat making it aesthetically pleasing and protects your floor from golf ball strikes.
Ceiling Mount
The Ceiling Mount is a permanent option that ensures your projector is out of the way and safe from any stray golf shots.
Cables and Adapters
A 50' HDMI cable is included! If your launch monitor has IOS compatibility a Lightning to HDMI Adapter will also be included.
Choice of Golf Mat
Fairway Series 5' x 5' Golf Mat
Our Fairway Series mat is 5' x 5', roughly one inch thick and can hold a real tee. Ideal for those seeking realistic feel.
SIGPRO Softy 4' x 7' Golf Mat
The SIGPRO 4' x 7' is easy on the joints, and has enough space to set the SkyTrak on the mat so it is level with the ball.
SIG8 Golf Simulator Flooring
The Indoor Golf Shop's simulator flooring is a great option for those seeking the clean, professional look of a custom install - with the convenience of a done for you, easy to assemble kit.
It combines the best of two worlds: an integrated hitting strip embedded into the floor for full swing shots, surrounded by a putting green with four cups for dialing in your short game.
Not only does this look great, but it also conserves space by reducing the footprint of the hitting surface and maximizing the putting and chipping surface.
That's the beauty of SIGPRO's golf simulator flooring.
𝗖𝗹𝗶𝗰𝗸 𝗛𝗲𝗿𝗲 𝘁𝗼 𝗥𝗲𝗮𝗱 𝗠𝗼𝗿𝗲
𝗪𝗲𝗯𝘀𝗶𝘁𝗲 www.bestgolfsimulatorguide.com
#golfing#golf#gamechanger#golfer#golfmat#improveyourswing#swingturf#golf accessories#sports#golf equipment#golflife#golfstagram#golfswing#golfcourse#instagolf#golfaddict#golfers#pga#golfclub#golfislife#pgatour#golftips#golfpro#golfday#golfcoach#golfshot#golfswag#golfisfun#golfporn#lovegolf
0 notes
Text
The Definitive Guide to Jewelry Trays and Travel-Friendly Carrying Cases
Home
Understanding Jewelry Trays
Embracing Travel-Friendly Carrying Cases
Conclusion

In the fast-paced world of fashion and style, every accessory tells a story. From the delicate pearls passed down through generations to the sparkling diamonds acquired for special occasions, our jewelry reflects our personalities, memories, and aspirations. But amidst the glamour, there lies a practical necessity—the humble yet indispensable jewelry tray and its trusty companion, the travel-friendly carrying case.
Understanding Jewelry Trays
Let’s start with the foundation of every well-organized jewelry collection—the tray. Jewelry trays are essential tools for maintaining order and protecting your precious pieces. These trays come in a variety of sizes, materials, and designs, but they all share one common goal: to keep your jewelry safe, secure, and easily accessible.
Modern jewelry trays often feature compartments, dividers, and padded inserts to accommodate different types of jewelry, from rings and earrings to necklaces and bracelets. Sometimes, this tray can be convenient, but a bit of a hassle if you are looking for diversity. Aptly, there are also jewelry trays and liners offered as separate units. This allows for more variety with that tailored touch. Construction materials are another factor to consider. Soft materials like velvet or felt to prevent scratches and damage to your treasures.
Whether you prefer a classic wooden tray for timeless elegance or a sleek black plastic tray for a modern cost-effective touch, there’s a jewelry tray to suit every style and storage need. And with customizable options available, you can create a personalized jewelry storage solution that fits your collection perfectly.
Embracing Travel-Friendly Carrying Cases

Now, let’s turn our attention to the jet-setting companion of every jewelry enthusiast—the travel-friendly carrying case. Whether you’re embarking on a weekend getaway or a globetrotting adventure, a reliable carrying case is essential for keeping your jewelry safe and secure while on the move.
Travel carrying cases are specifically designed to withstand the rigors of travel, with durable exteriors and secure closures to prevent damage or loss of your precious pieces. A great example of the homage to security would be an aluminum carrying case. These types of carrying cases feature compact, midweight designs that maximize space efficiency without compromising on protection. Afterall, aluminum is sturdier than plastic.
Many travel carrying cases incorporate clever storage solutions such as removable sectioning, zippered pouches, and adjustable dividers to accommodate different types of jewelry trays. This is a great feature because it perfectly fits your tray of choice which is a relief from travel damages.
There’s a travel-friendly carrying case to suit every traveler’s needs and preferences. And with innovative designs and materials constantly evolving, today’s carrying cases offer unparalleled convenience and peace of mind for jet-setting jewelry lovers.
Conclusion
In the world of jewelry storage and travel accessories, the humble tray and the travel-friendly carrying case reign supreme as indispensable tools for organization, protection, and convenience. Whether you’re at home or on the go, these essential accessories ensure that your precious pieces remain safe, secure, and ready to dazzle at a moment’s notice.
So, whether you’re a seasoned jewelry collector or a novice enthusiast, invest in quality trays and carrying cases to safeguard your treasures and elevate your accessorizing experience. With the right tools at your disposal, you can unleash your creativity, express your individuality, and embrace the elegance of accessorizing with confidence, wherever your adventures may take you.
0 notes
Text
Expert Tips for Cleaning Aluminum Oxidation on Vehicles
Aluminum oxidation can be a persistent and unsightly problem for vehicle owners, causing dullness, discoloration, and even structural damage if left unchecked. While it may seem daunting to tackle, there are effective methods for cleaning aluminum oxidation and restoring the shine to your vehicle's surfaces. In this article, we'll explore expert tips for cleaning aluminum oxidation on vehicles, providing a comprehensive guide to help you maintain the appearance and integrity of your car or truck.
Understanding Aluminum Oxidation
Before diving into the cleaning process, it's important to understand what aluminum oxidation is and why it occurs. Aluminum, when exposed to oxygen in the air, forms a thin layer of aluminum oxide on its surface. This layer acts as a protective barrier against further corrosion. However, over time, this oxide layer can become damaged or contaminated, leading to the formation of aluminum oxide, a powdery white substance that mars the appearance of the metal.
Identifying Signs of Aluminum Oxidation
The first step in cleaning aluminum oxidation is to identify its presence on your vehicle. Signs of aluminum oxidation include a dull or chalky appearance on the surface of the metal, white or grey discoloration, and rough patches or pitting. These symptoms are most commonly found on exposed aluminum surfaces such as wheels, trim, and body panels.
Gathering the Right Materials
To effectively clean aluminum oxidation, you'll need the proper materials and tools. Start by gathering:
Aluminum cleaner or polish
Soft microfiber cloths or applicator pads
Fine steel wool or aluminum oxide sandpaper (optional for stubborn oxidation)
Water and mild detergent for pre-cleaning
Pre-Cleaning Preparation
Before applying any cleaner or polish, it's essential to pre-clean the aluminum surface to remove dirt, grime, and debris that can exacerbate oxidation. Begin by washing the affected areas with a mixture of water and mild detergent, using a soft cloth or sponge to gently scrub away surface contaminants. Rinse thoroughly and allow the aluminum to dry completely before proceeding.
Applying Aluminum Cleaner or Polish
Once the surface is clean and dry, it's time to apply the aluminum cleaner or polish. Choose a product specifically designed for removing oxidation, following the manufacturer's instructions for application. In most cases, you'll apply the cleaner or polish using a soft cloth or applicator pad, working in small sections to ensure thorough coverage.
Buffing and Polishing
After applying the cleaner or polish, use a clean microfiber cloth to buff the aluminum surface, working in circular motions to remove oxidation and restore shine. For stubborn oxidation, you may need to use fine steel wool or aluminum oxide sandpaper, being careful not to scratch the metal. Always test these abrasive methods on a small, inconspicuous area first to ensure they won't damage the surface.
Rinsing and Drying
Once you've finished buffing and polishing, rinse the aluminum surface with clean water to remove any remaining cleaner or polish residue. Use a separate microfiber cloth to dry the surface thoroughly, ensuring no water spots or streaks are left behind.
Applying Protective Coating
To prevent future oxidation and maintain the shine of your aluminum surfaces, consider applying a protective coating or sealant. There are various products available specifically formulated to protect aluminum from corrosion and environmental damage. Follow the manufacturer's instructions for application, ensuring the surface is clean and dry before applying the coating.
Regular Maintenance
Finally, to keep your aluminum surfaces looking their best, incorporate regular maintenance into your vehicle care routine. This includes washing your vehicle regularly to remove dirt and debris, avoiding harsh chemicals or abrasive cleaners that can damage the aluminum, and periodically reapplying protective coatings as needed.
Conclusion
Cleaning aluminum oxidation on vehicles may require time and effort, but the results are well worth it. By following expert tips and using the right materials and techniques, you can effectively remove oxidation and restore the shine to your aluminum surfaces. With proper care and maintenance, you can keep your vehicle looking sleek and stylish for years to come.
0 notes
Text
Argon NEO 5 Raspberry Pi 5 Case: Pros and Cons

Argon’s latest case, the Neo 5, is a Raspberry Pi 5 case. The $19 case continues the success of the Argon Neo, one of the best cases for two years, for the latest flagship Raspberry Pi.
Argon Neo 5 has three parts. A plastic base, two aluminum cooling system pieces, and a case lid. Matte black, scarlet plastic, and white text are 1980s-inspired. This is enhanced by a Porsche-style cooling wave.
Can the Argon Neo 5 cool the turbo-boosted Raspberry Pi 5? Or will the engine overheat and sputter?
Argon Neo 5 Technical Specifications
The three-part design has a plastic base and two aluminum pieces. The aluminum body and custom “fins” form a wave from the cooling fan (which looks like a black Active Cooler) to the USB ports.
Overclocking the CPU can heat this cooling wave, surprising USB devices. The aluminum case lid slides in with a satisfying “clunk”. It covers the attractive cooling system but can be secured to the case with optional screws.
Easy assembly. They thermally pad the SoC and PMIC and connect the 30mm PWM fan to the Pi 5’s fan header. It gets tricky here. Fan cables must be routed around a channel on the main body.
This connects to the plastic base, but avoid nipping the cable. It took several attempts and some persuasion to get the cable into the channel and away from the plastic base. They did it, so can you. Take your time and place the cable with a blunt plastic tool. Only four screws secure the base; two more secure the lid to the body.
GPIO, camera/display ports, and the new PCIe connector are accessible from the main body, which has a lovely pinout. However, the Neo 5 repeats the EDATEC mistakes. Tight camera/display and PCIe connector access. To safely lever the plastic lock, we need dexterous fingers or a plastic tool.
Widening cutouts is problematic because the “cooling wave” is nearby. That would need to be cut. The case supports NVMe SSD boards. The Pineberry Pi Hat Drive Top works without the case lid. Outside the case, a Pineberry Pi Hat Drive Bottom or Pimoroni’s upcoming NVMe Base will work.
Returning to the Raspberry Pi pinout listing and GPIO is welcome. It provides Broadcom (BCM) pin mapping, the standard supported by all Raspberry Pi documentation. This will help beginners and old-timers who forget the pinout.
HATs can be directly connected to the GPIO, but we recommend using a male header pin extension to keep them away from the cooling fan. However, few HATs support Raspberry Pi 5. The case’s lid hatch allows GPIO breakout cables to replace header extensions. This makes GPIO breakout to a breadboard or external breakout board via ribbon cable easy.
The optional screw cover covers the micro SD card slot, the last port. This protects the card, but since it doesn’t protrude from the case, we don’t see the point.
They started the Raspberry Pi 5 and let it cool for five minutes for their tests. Then ran a five-minute stress test on all cores after an automated script recorded the idle temperature for one minute.
After a one-minute cool down, they recorded the resting temperature. All data was logged to a CSV file for analysis.
Neo 5 has great thermal performance. The CPU registers 34°C at idle and 54.3°C under stress with the case closed. For comparison, EDATEC-Pi5Case-BS reached 36.2°C and 52.7°C. At stock speeds, the Neo 5 excels. At 50°C, the quiet active cooling fan starts.
The idle temperature strangely rose to 36.7°C with the lid off (even after settling). However, the stress test raised it to 54.3°C, matching the closed case.
The Argon Neo 5’s overclocking performance? Their 4GB test Pi 5 failed to boot at 3 GHz, but they overclocked the CPU to 2.8 GHz, which generated heat. The Pi 5 reached 36.2°C with the lid on and 59.3°C under stress. Several degrees hotter than stock speeds, but well below CPU thermal throttle point. Again strangely below the case closed temperature, the CPU idled at 35.1°C with the lid off. The CPU reached 57.6°C under stress, 2°C cooler than with the lid closed.
Overall, the Argon Neo 5 cools your Raspberry Pi 5. Though not aluminum like the EDATEC case, it works well and simplifies port access.
Wi-Fi Performance Before testing the Argon Neo 5, we tested two EDATEC cases and found that one affected Raspberry Pi 5 Wi-Fi performance. After benchmarking with iperf on a Windows 10 PC connected via Ethernet, they connected three Raspberry Pi 5s via Wi-Fi 5 to a downstairs router.
After the EDATEC results, tested the Neo 5’s Wi-Fi performance and found 79.7 Mbits per second with the case closed. This is much higher than EDATEC’s 51.2 Mbit/s. It reached 75.7 Mbits/s with the case open. Unfortunately, this was 4 Mbits per second slower than with the case closed. We can call this an anomaly given external factors that can affect radio transmissions.
Ethernet is best for maximum bandwidth! However, not everyone has or wants Ethernet cables throughout their home.
The Argon Neo 5 is a basic Raspberry Pi 5 case. It works great, looks good, and exposes the GPIO. Camera/display and PCIe ports are problematic, but they can be fixed.
The wave heatsinks and active cooler cooling system looks good and keeps the Pi 5 cool even when overclocked! This could be one of the best Raspberry Pi cases.
Read more on Govindhtech.com
0 notes
Text
Gimme a brake.
The blue bike (Canyon CR7) has disc brakes. I have fancy aero wheels I got a few months ago and swapped the brake disks and cassette over no problemo. I just realized that it is about one year ago I got it. I have about 4100 km on her. I wonder how the brakes are doing? It is easy to check rim brakes, you look at them. Disc pads are buried inside some bracketry.
I want to check the pads for wear. On-line they say they can wear out in a thousand miles. Oh dear dear I am way over that. No mention if that is crazy downhill mountain bikers or what. I need a micrometer caliper thingy to measure the pads. Brand new they are about 2mm thick. That aint much. They are at the end of life at 0.5mm, that is less.
So I root around my tools looking for my old caliper. My tool box is subject to quantum uncertainty. When I am looking for a particular tool it is never there. It will be in the way of everything when I am not looking for it though. It is an old thing and uses a vernier gauge no batteries or digital read out.
Anyway it refuses to be found. I really want to check the wear as in three weeks I am going to Whistler. OK I will buy a new one. Only about 30 bucks for a digital readout fancy thing in a nice case. Hard to lose that in the quantum toolbox. I do so purchase one.
I pull out the little tiny pads on the back wheel. Type J05C if that means anything. They have fancy heat sink fins on them for mountain biking. I measure the total thickness at 3.5mm. The metal backing is 1.6mm, so 1.9mm of pad almost new? I do not think I am particularly gentle, but I aint particularly fast either. Same on the front pads. Hmmmm.
I bought a set of new pads in spring just in case. They are J04c which are a metallic compound. They are the only ones I could find that looked like the ones on my bike. These pads are about the same price as for my car brakes. I suppose in the big picture they are more life critical. In any event I have a lot more life left in these things and that included some winter riding. Though I do not do muddy mountain bike and gravel stuff.
I wonder about the discs then. Apparently you stop using them if they go under 1.5mm thick. I have to measure them too. Those are actually more expensive than on my car, but they are laminated with stainless on two sides of aluminum. Very tricky to do that they are metallurgically incompatible. I will measure that when I go out tonight for my Tuesday ride. Probably pretty new as well I reckon.
#disc brakes#fitblr#bikeblr#old man on a bike#granfondo whistler#cycling in vancouver#shimano ultegra
0 notes
Text
Know the benefits of metal interior furniture
Interior Furniture in Hyderabad
In recent years, there has been a growing trend toward interior furniture in Hyderabad, and this can be attributed to a number of factors. One reason is the modern and sleek appearance of metal, which can give a contemporary edge to any room. Metal furniture often has a minimalist and industrial look that is popular among younger generations and those who appreciate clean, simple lines.
In terms of style and customization, metal furniture offers many options that are not available with wood furniture. Metal can be shaped and formed into a variety of designs and styles, and can be finished in a range of colors and textures. This allows for a greater degree of personalization and customization to fit the specific needs and preferences of the individual.
While metal furniture may last longer than some types of wood furniture, wood furniture is prone to destruction within 2 to 3 years. However, it is true that metal furniture is more resistant to pests and moisture than wood furniture. This is because metal does not provide a food source or a suitable environment for pests to thrive, and is less susceptible to warping and rotting caused by moisture.
Interior Furniture Manufacturers in Hyderabad
Benefits of metal over wood according to interior furniture manufacturers in Hyderabad
Highly Durable
Metal furniture is known for its durability and strength, making it a preferred choice for many people. Unlike wooden furniture, metal furniture can withstand pressure and is less likely to break or splinter. This property makes metal furniture ideal for use in homes, schools, and hospitals. Furthermore, metal furniture is resistant to pet damage and accidents, making it a long-lasting investment. In fact, many interior furniture manufacturers in Hyderabad offer 10 or 15-year warranties on their metal furniture due to its durability.
As a result, metal furniture is gaining popularity in areas where wooden furniture has been traditionally used. For example, a metal bed with matching case pieces can provide both comfort and durability for your living space.
One of the main reasons to choose metal furniture is its affordability and durability. Unlike wooden furniture, metal furniture can retain its appeal over time due to its resistance to moisture and sunlight exposure. Additionally, metal furniture can offer a modern and stylish look to your space, although wooden furniture can provide an antique appearance.
Moreover, metal furniture is resistant to moisture and extreme temperatures, making it ideal for home environments. It is also less prone to oxidation and corrosion, which makes it an excellent choice for collective spaces. In fact, most metal furniture frames can hold over 100 kilograms, making it a more durable option than wooden furniture.
Easy to clean
Stainless steel furniture has numerous benefits that make it a popular choice for both home and commercial environments. One key advantage is its scratch-resistant and easy-to-clean surface. Simply wiping the surface with a damp cloth can remove dirt and prevent rusting. However, it’s important to avoid using sponges and scouring pads as they can scratch the surface. Unlike other metals such as aluminum and chrome, stainless steel is not susceptible to rust, making it a more durable option.
Cost effective
In terms of cost, metal furniture is generally less expensive than wooden furniture. This is because wood requires more investment in tools and equipment for processing and shaping, while metal is easier to work with. These savings can be passed on to the consumer, making metal furniture a more affordable option.
Perfect for Outdoor Use:
Metal furniture is highly durable and can withstand harsh weather conditions better than any other material, making it ideal for outdoor use. Whether you have a garden, patio, or balcony, metal tables, chairs, and shelves can withstand monsoons or summers without getting damaged. This makes them a practical choice for outdoor furniture, especially for those living in apartments who may not have the space to store furniture indoors.
Stylish and Versatile:
Modern metal furniture comes in a variety of styles and designs that can be as aesthetically pleasing as wooden furniture. You can even find furniture made from a combination of metal and wood or opt for pieces painted in natural colors that look like wood. This versatility allows you to find metal furniture that complements any decor theme, making it an excellent choice for any home or office.
Security:
Metals are known for their strength and durability, which makes them a great choice for furniture that needs to be secure. Unlike wood or other materials, metal furniture can withstand tampering or theft attempts. It is also fire-resistant, providing a sense of safety and security in case of unexpected fires or accidents.
Eco-Friendly:
As environmental concerns continue to rise, metal furniture is becoming a popular choice due to its eco-friendliness. Metals can be recycled easily, reducing the need for new resources and minimizing waste. Additionally, the production of metal furniture involves fewer harmful chemicals compared to other materials, making it a healthier choice for both humans and the environment. By choosing metal furniture, you can contribute to a sustainable future while also enjoying its many benefits.
Low Maintenance:
One of the biggest advantages of metal furniture is its low maintenance. Unlike other materials, such as wood or leather, metal furniture does not require extensive upkeep to stay in good condition. With metal furniture, all you need is a simple cloth or a mild soap and water solution to clean and maintain it. This not only saves time but also makes metal furniture a convenient option for those who have a busy lifestyle.
Another benefit of metal furniture is that it is highly durable and resistant to wear and tear. With proper maintenance and care, metal furniture can last for years without needing any repairs or replacements. Additionally, rust and corrosion can be prevented by applying a fresh coat of paint, making metal furniture a long-lasting and cost-effective option.
Overall, the low maintenance requirements of metal furniture make it an ideal choice for those who value convenience and durability. With its easy-to-clean surface and long-lasting properties, metal furniture is a practical and stylish option for any home or office space.
.Pest-Resistant:
While bed bugs can still be an issue in metal furniture, it is generally easier to manage pests in metal furniture compared to wooden furniture. You can easily clean metal furniture with soap to remove any chemicals, while with wooden furniture, you may need to wait for several days for the chemicals to dissipate.
Future is of metal furniture
It’s important to consider the sustainability of the materials we use to make furniture. While it’s true that trees are cut down to make wooden furniture, sustainable forestry practices can help to minimize the environmental impact. In addition, using reclaimed wood and recycled materials can help to reduce the number of new resources needed to create furniture.
On the other hand, metal furniture can also have a significant environmental impact, particularly if it’s made from non-renewable metals like aluminum or produced using energy-intensive methods. It’s important to consider the entire lifecycle of the materials used in furniture production, from extraction to disposal, in order to make informed decisions about which materials are most sustainable.
Ultimately, the future of furniture design will depend on a variety of factors, including consumer demand, technological innovations, and environmental considerations. It’s likely that both wood and metal will continue to be used in furniture production, but hopefully in ways that prioritize sustainability and minimize negative impacts on the environment.
More customization options are available
It is true that metal furniture can be customized into various shapes and designs, giving it a modern and contemporary look. This is because metal can be easily bent and shaped into different forms. On the other hand, wood furniture is limited to its natural form and may require intricate woodworking skills to achieve a specific design. However, it is important to note that both metal and wood furniture can be designed beautifully, and the choice ultimately depends on personal preferences and the overall aesthetic of the space.
Final words
Innofab is a company that specializes in designing and manufacturing metal interior furniture in Hyderabad. They offer a range of furniture items such as tables, chairs, shelves, cabinets, and more, all made from high-quality metals such as steel, aluminum, and brass.
One of the advantages of metal interior furniture is its durability and strength. Metal furniture is able to withstand wear and tear, making it a great investment for long-term use. Innofab’s metal furniture is also customizable, allowing customers to choose from different colors and finishes to match their personal style and interior design.
In addition to being stylish and durable, metal furniture is also easy to maintain. It can be cleaned with a damp cloth and doesn’t require much upkeep. This makes it a great option for busy individuals who want furniture that looks great without the hassle of constant maintenance.
Overall, Innofab’s metal interior furniture is a great choice for those who want stylish, durable, and low-maintenance furniture for their homes or businesses.
#Innofab#Innofab Hyderabad#Interior Furniture#Interior Furniture In Hyderabad#Interior Furniture In India#Interior Furniture Manufacturers In Hyderabad#Interior Furniture Manufacturers In India#Interior Furniture Near Me#Metal Interior Furniture#Metal Interior Furniture In Hyderabad#Metal Interior Furniture Manufacturers#Metal Interior Furniture Manufacturers In Hyderabad
1 note
·
View note