#( 2 lazy 2 search for a gif icon )
Explore tagged Tumblr posts
Text
Murf's Top 50 Mods - Part 3 (2020 - 2023 Edition)
I made a Top 50 list (Pt 1 and Pt2) back in 2016, talking about mods that I've used & love. But with all the goated content that the amazing TS3 community continues to churn out, I NEEDED to update my list! This one in no way diminishes or negates the other mods I've already listed--like, I shouldn't have to sit here and explain how NRAAS continues to carry TS3 on its freaking shoulders, ok. This is just MORE mods, the Top 50 most RECENT ones I've tried out since, like, quarantine.
I am a VERY niche simmer--I love fantasy gameplay, so my fave mods are the ones that not only offer general quality of life improvements, but also add new abilities and interactive objects inspired by different cultures, time periods, or genres. So y'all already KNOW which ones have earned my top spots. They're not based on which mods are "better," just which ones I personally have been using the most.
1: Smooth Patch, LazyDuchess
I've already gushed about this mod, but oh well. Like--I use an EFFTON of CC. My Live Mode gameplay itself doesn't tend to lag so much as my game's slow to LOAD, slow to save, CAS is a nightmare, I can do my taxes waiting for the Misc Decor section to open, etc etc. But the Smooth Patch loads everything so much quicker for me! 😭

One thing is that on the EA App version (curse you, EA) the Master Controller package didn't work on my end, so I took it out, but everything else has been great!
2: Search Mod, LazyDuchess
Speaking of the Misc Decor section -- HOW LONG did we ask EA for a Search function y'all? Only to be ignored. Then the second TS4 is released, it ain't got a effing thing in it, but it's got a Search function??? 🤔 ISTG it's like the simgurus were told to take all of the TS3 community's best suggestions, and poach them for TS4 (like vampire coffins--NO I'm not over it!). WHY do modders have to do your frikkin job for you, EA?! I call EA lazy all the time cuz EA you suck, so it's the most ironic thing ever that LazyDuchess is out here KILLING IT.

My ONLY "complaint" about the Search mod is the position of the icon. I use A LOT of Collection Files, and I noticed that the Search icon actually covers the Delete button when in the Collection viewer. So I can't delete items in collections with the Search icon in the way.
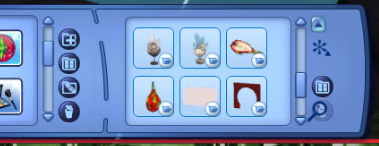
But this is a MINOR nitpick--I almost never delete items, it's just something I noticed is all.
3 - 8: OCCULT MODS: EVERYTHING by @puddingface1902
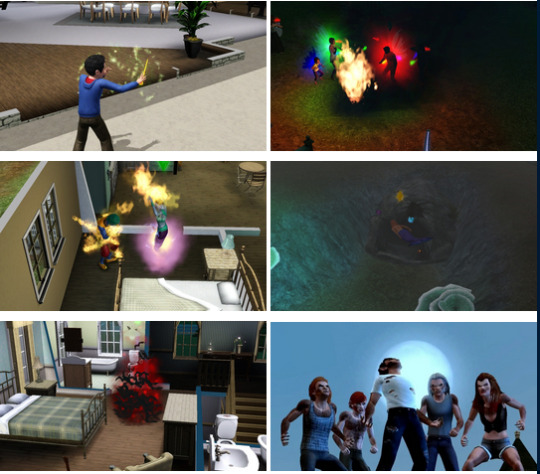
Y'all already know the Enhanced Witches mod is my favorite mod ever made. But PF1902 also made cool enhancements to the Fairies, Genies, Vampires, Werewolves, and Mermaids too! My sims are usually Nraas hybrids (e.g.: Sakura is a faery, witch & plantsim; Magnus Bane is a witch & genie; etc.), so it's FANTASTIC having so many new abilities for my magical occults. 😍
9 - 11: OCCULT MODS by xantak22
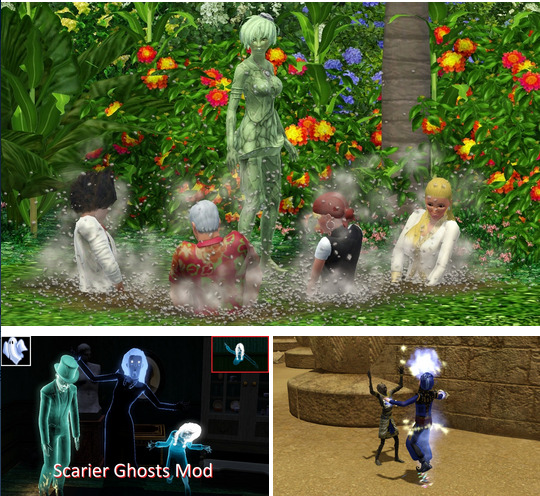
Even more occult mods at MTS are for enhanced Plantsims, Ghosts, and Mummies! I was dying for more Plantsim abilities, omg, they're my 3rd fave occult after Witches & Fae.
12: Sim Control Tools by Knight
Sooooo many quality of life mods have come out! ^0^

I've been ABUSING the Teleport To Me function, to quickly get sims off of lots & where I need them to be. It also lets sims unlock more Social/Romantic interactions. (Now all we need is a way to interact with sims from EA's useless thumbnails.)
13 - 18: @anitmb's mods

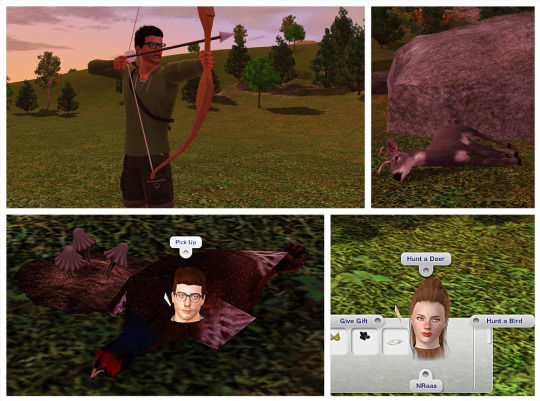
There are SOOOO many--most I've yet to even try. But so far newer ones I've been using are the Deck of Cards (FINALLY something other than EA's bulky AF poker table!), Farm Mod (look at all these CHICKENS!), and Hunting mod so my 8000 archer sims can actually hunt! (Ofc I've also used the Woodcutter and Anvil mods in my older gameplay posts, too.) And @mspoodle1's edit of the Cup of Tea mod is so pretty.
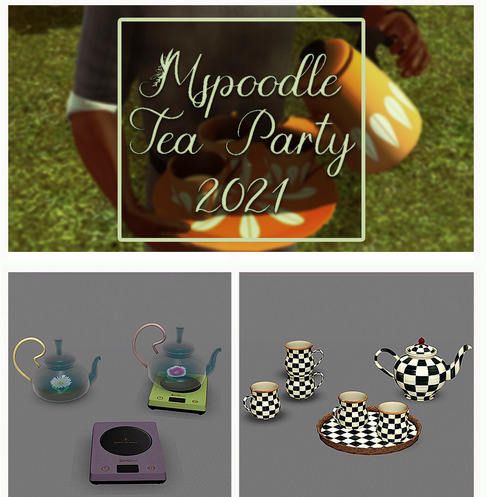
19: @mspoodle1's Poker table

Another excellent cards mod is this medieval style poker table I use a lot now, too.
20: @omedapixel's Wildflowers DR

I like EA's default wildflowers from SSNS, but Omeda's are just sooooo much nicer. (I haven't gotten around to trying out their Harvestable Plant DR yet.)
21: Swordfighting mod by CyrusBanefort
En garde! This mod is so freaking epic!
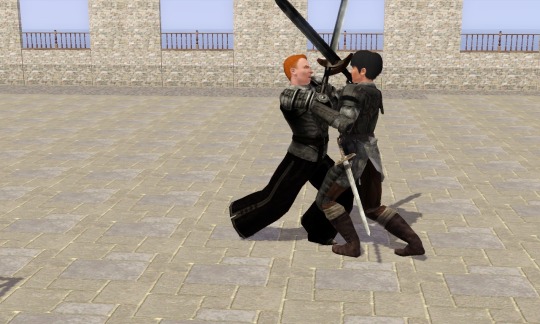
One thing I've noticed is that the game lags while it waits for the mod to boot up (a message has to first pop up saying it's running when you first launch your saves). But other than that this mod is excellent.
22 - 24: Yoga rugs
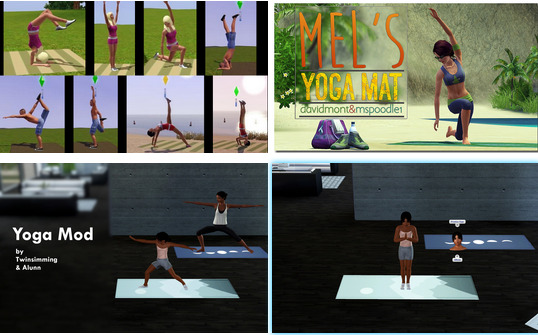
I've long been using the yoga rugs by Kitabalibar and the edited one from @mspoodle1. But now there's the newest one by @twinsimming, with brand new animations & features. The more the merrier I say, LOL. What's especially neat is the kids wobbling around as they try to do yoga! :3
25 - 30: TheSweetSimmer's mods--so cute! :3
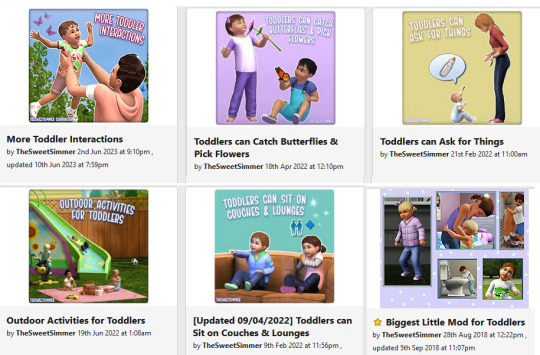
Omg so frikkin many, I can't even catch up! The interactions are so freaking precious, like from the More Toddler Interactions (cuddle, look at, etc) & Biggest Little Mod (hug legs), I've never had so much fun playing with kids! <3 And I LOVE that they can Catch Butterflies and Pick Flowers--you'd think plantsim children would be able to do this by default, EA! Honestly, just grab everything by TSS, your kid sims will thank you!
31 - 33: @spheresims Medieval/Nature/Tribal mods

Y'all know I'm crazy about the Functional Fireplaces mod (the cauldrons, baby! 😈), but the One with Nature and Wildlife Hunting mods are great too, perfectly complimenting the off-the-grid realness.
34: @olomayasims/Cmomoney Smoking Mod Overhaul
The original smoking mod was on my first Top 50 list, so it's awesome seeing it get new upgrades, interactions & animations.
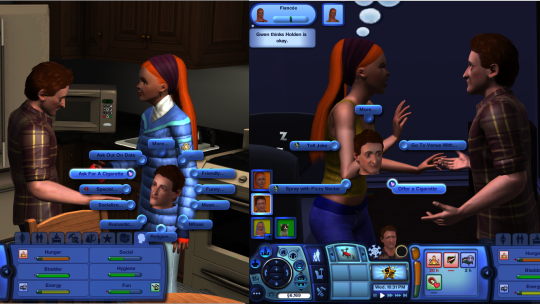
I've never smoked IRL, but sooooo many of my sims just puff-puff away; I'm such an enabler. U_U Now all we need is cigars and pipes!
35 - 38: Callia-Evergreen/Camkitty's CAS CC for animal hybrids at MTS
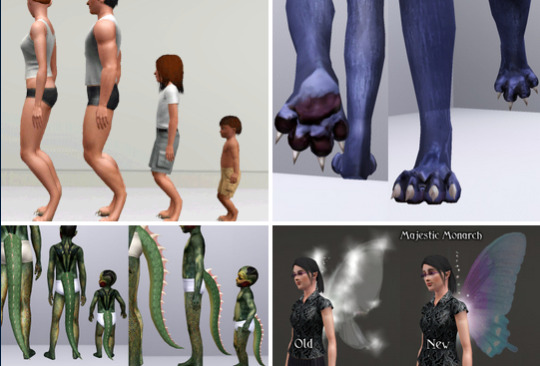
Not a "mod" per se, but whatever--my list my rules! I love ALL of their CC, but I get SO MUCH use out of animal-themed CC like the digitigrade sliders, wolf feet, lizard tails, and fae wings. Do check them out if you like to play with horror and monster-sims!
39: @greenplumbboblover's Sheep

EASILY one of the most incredible mods I've ever seen. Like....HOW? (Once @omedapixel's Goats are done I'm gonna start screaming someone do llamas pleeeeeaaaaase!!!)
40: Arsil's musical instruments mod
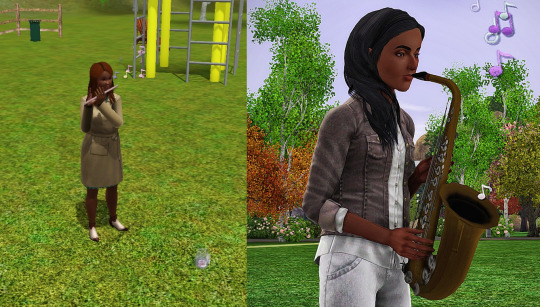
I used the sax most recently in my IWTV gameplay, and it was excellent, perfect for the NOLA vibes! However, although I use the flute A LOT more (for my Untamed gameplay--it's been such a GODSEND!), I really wish the hands were positioned better, preferably using the poses from Chisims' flute poseset. (But I don't eff with poses/animations, otherwise I'd do it myself. U_U) Ah well, it's still one of my fave mods though.
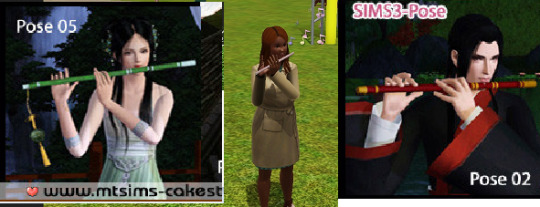
41 - 42: Flower Arranging mod by zoe22 + @mspoodle1's Florist Collection

Guys, I've been wanting this mod since FOREVER! ^0^ (I swear, the best thing about TS4 is all the 4t3 conversions, LMAO!) I just wish Teens could Dabble and use it, too--all they can do is stock the table.
43: Just Sit/Nap Anywhere by FloTheory

Sometimes you just want sims to fall asleep anywhere, DANG, EA!
44: @sweetdevil-sims' Toddler Food DR
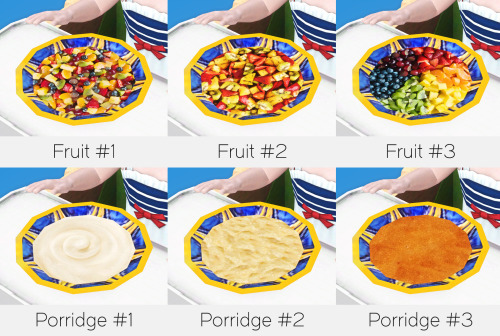
Cuz EA's food is UUUUUUUUGLY~! I kept forgetting to install it, only to be rudely reminded every time I had to look at my toddler sims eating MUD.
45 - 46: @mspoodle1's mail pen quill DR and @omedapixel's pencil quill DR
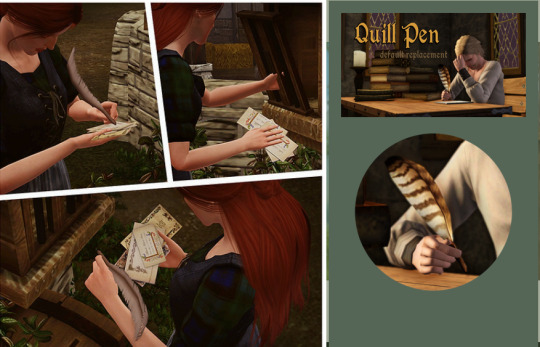
I looooove quill pens IRL (ballpoint pens, not the fountain pens--I'm way too messy), so having mods that let my sims use them too is 👌
47: Fireflies Enhanced! by Canibal_MLO
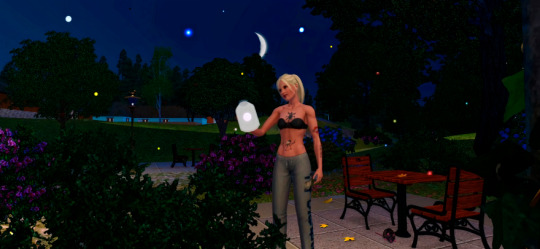
I love anything that enhances the wildlife and collectibles/harvestables to be more dynamic and interactive. And I was JUST about to do a firefly catching scene for my IWTV insp. gameplay, so this came right on time! The falling leaves effect is delightful, but I kinda wish it was falling flower petals instead, cuz ofc I do. 🌸
48: Unicorn Aurora DR by Canibal_MLO
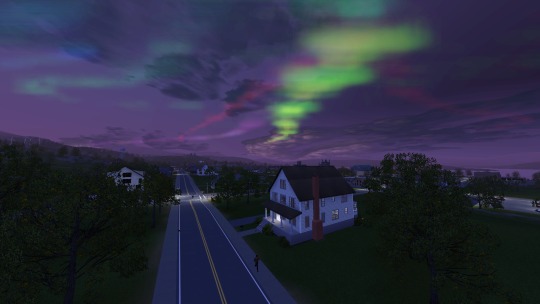
GORGEOUS. This mod replaces the unicorn mist with northern lights, like.... I love the genius ideas simmers have.
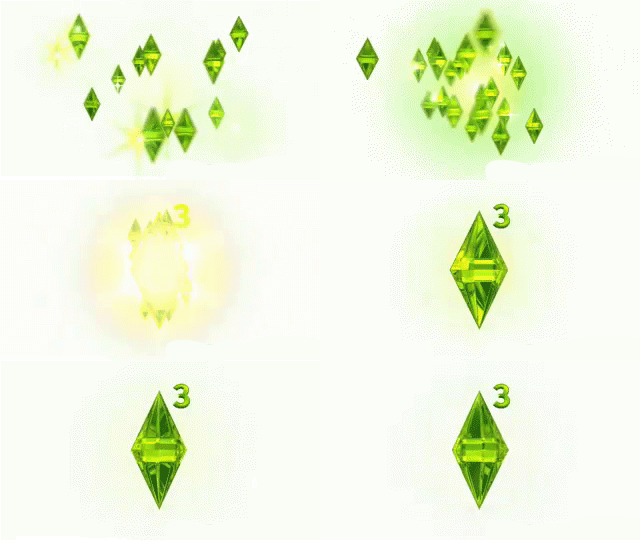
49: Custom Plumbbob Color tool by CrossTheMersey

What a neat idea! Although the default Maxis colors are ingrained in my psyche, with the iconic green plumbbob, as soon as I saw this mod I knew I wanted to at least try something different and play around with it.
50: @aa6x7's Teru Teru Bozu + other edits [Honorable Mention]

I rave about Cmomoney's Time/Weather Mod all the time, I use it constantly. AA6x7's Teru Teru Bozu (Japanese "Sunshine Monk" charms) is kinda like a simpler version of it, as it just resets bad weather back to Sunny. But it's such a cute idea and perfect for my gameplay. Plus, AA6x7 makes all kinds of neat edits/mods to EA's bulky AF meshes, so if you haven't checked them out already, DO!
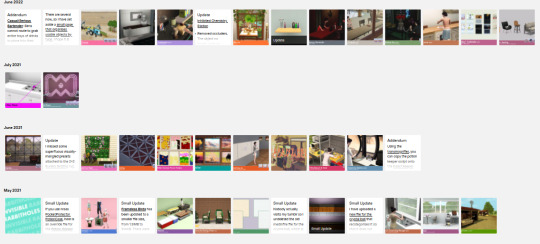
And that's all the mods I've managed to try out recently!
I don't have anywhere near the kind of free time that I used to, so my simming has been put on the backburner and I've missed all kinds of cool and exciting releases. But trust: I am taking note, so that I know what to try once I have time.
All my deepest & sincerest gratitude & love to the entire sims community, for keeping The Sims 3 going--this year was the 14th anniversary! Here's to 14 more! 🥳 Happy Simming!
#simblr#sims 3 mods#sims 3 content list#the sims 3#sims 3 medieval#sims 3 fantasy#sims 3 supernatural#EA you suck
1K notes
·
View notes
Text
tag game ✨
huge thank you to the lovely zey @thasorns for thinking of me. i love you too (´▽`ʃ♡ƪ)
1. why did you choose your url?
no one remembers her but claire dearing from jurassic world will always hold a special place in my heart.

2. any sideblogs? if you have them name them and why you have them.
poomphuripan - the bl sideblog that i started just because my main got deactivated for a bit but i guess for now, it's mostly uppoom and msi-focused. in december, it'll probably be torjj and spare me your mercy-focused. i think i'll probably just be using these for the ql series i have a crazy hyperfixation about.
huiyanan - a pentagon yanan/hui focus sideblog
coryjeacoma - my musical theatre sideblog for random audio bootlegs and sometimes musical gifs
ryuvachirawich - my unused (mostly lakorn) gifs blog for extra gifs i make but that doesn't make it into any main or sideblogs. at first i was trying to keep this sideblog lowkey but then i needed to tag the gifs w my gif tag anyway so i could search for them so disclosing is fine 🤣
3. how long have you been on tumblr?
2014... what do you mean it's been a decade since i started using tumblr.... time isn't real
4. do you have a queue tag?
i tried but i've given up on queue-ing in general so i don't. my tumblr is constantly in two modes: super active or going months without a single post lmaoooo.
5. why did you start your blog in the first place?
i wanted to be where all the gifmakers are but i have too much interests so this shall remains a multi-fandom blog or more like a "whatever media claire is consuming atm" blog
6. why did you choose your icon/pfp?
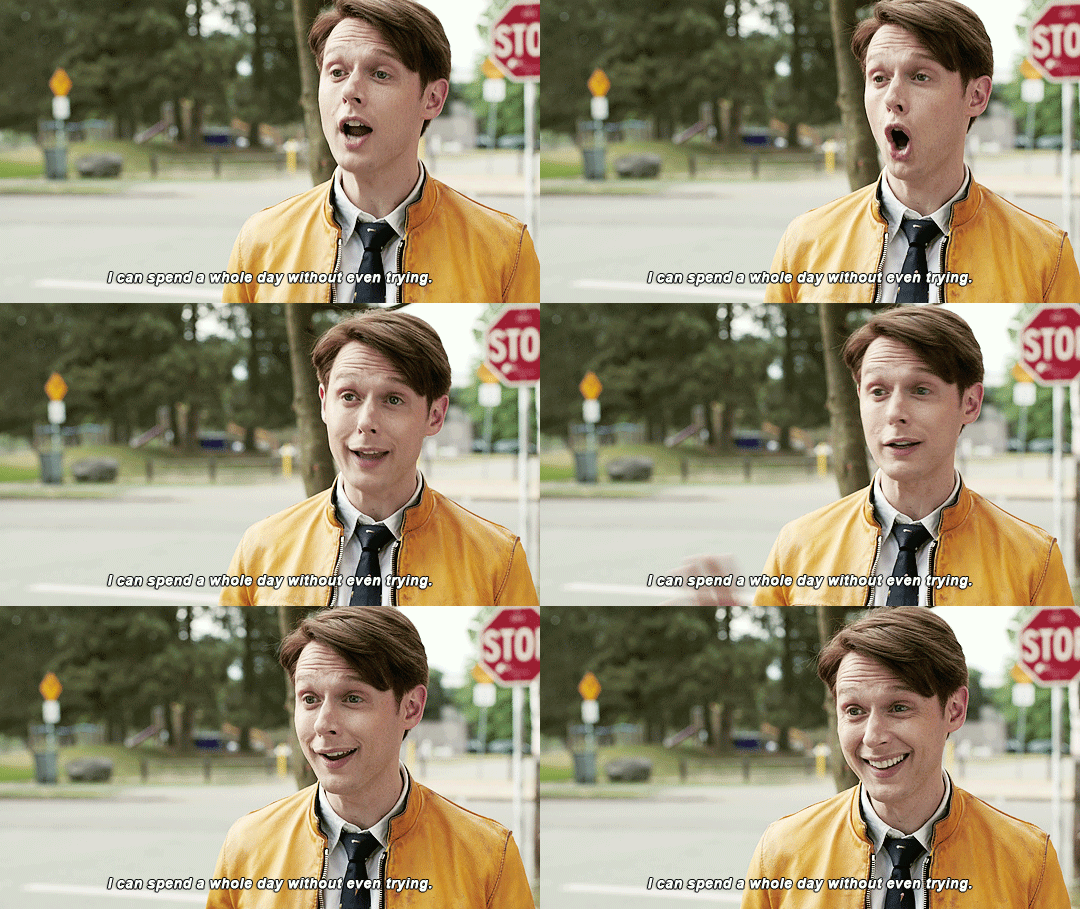
dirk gently is the single most perfect holistic detective in existence. sometimes i'm too attached to my url and my icon, i don't think i can ever change them. headers i can but i haven't changed my url/icon for 3-4 years i think.
7. why did you choose your header?
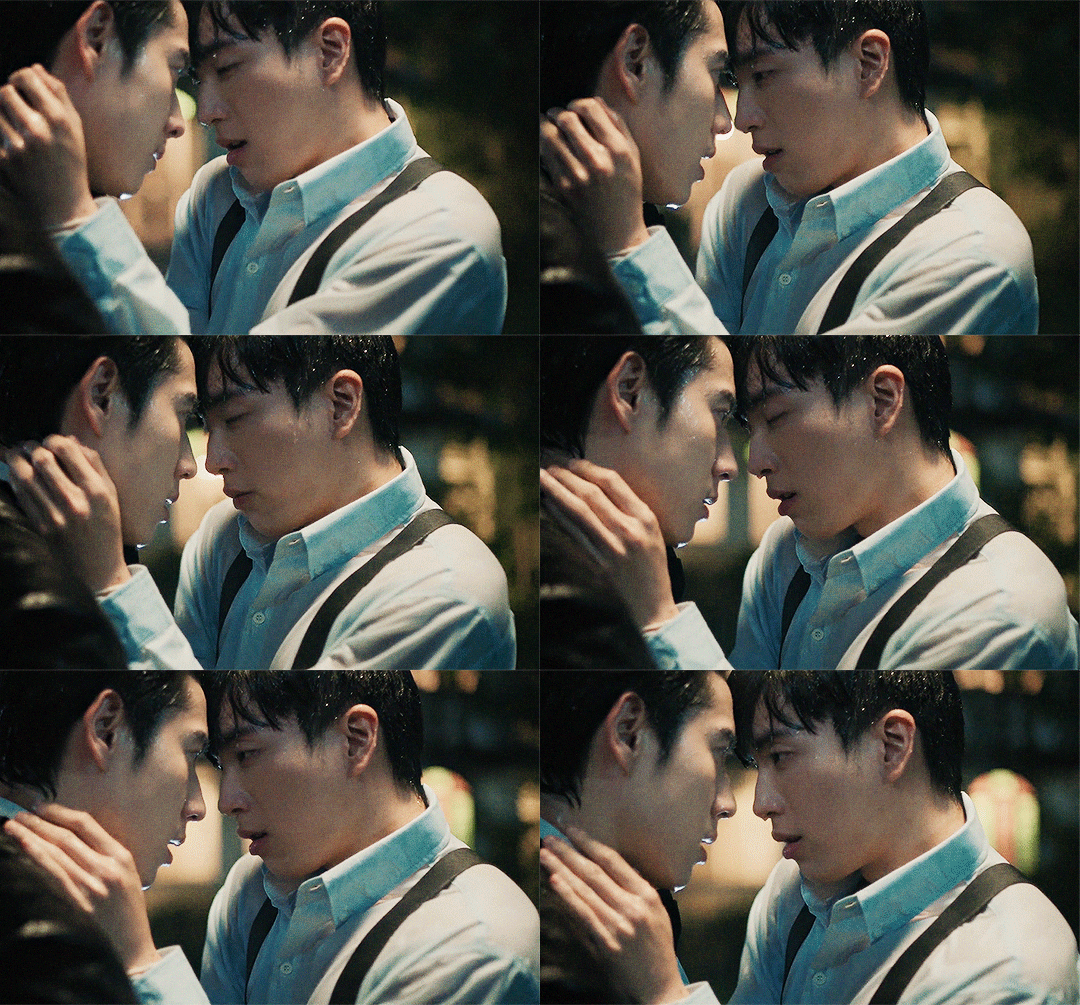
i feel you linger in the air is THAT series for me. dethroned almost every other thai series on my all time fave list (i say almost because bad genius series is still holding its crown well)
8. what’s your post with the most notes?
i just checked and apparently it's my first and only merlin gifset 😅
9. how many mutuals do you have?
i have no idea but i love all my mutuals (づ ̄3 ̄)づ╭❤️~
10. how many followers do you have?
i hit 1k recently. crazy to me because i've left this tumblr empty for months before starting being active again last october???
11. how many people do you follow?
4000+ but that's only because i'm too lazy to unfollow people. so yea i rarely see things on my dash. i just end up scrolling through my fave gifmakers tags to find things they make.
12. have you ever made a shitpost?
i don't think so????? i mean the closest is probably me saying super random things on this tag.
13. how often do you use tumblr each day?
it used to be once a week... but these days it's really a daily routine lmao. although i'm pretty sure i'll leave my tumblr dusting once my stand-in ends... who knows... we'll see...
14. did you have a fight/argument with another blog once?
how can i? i'm so non-confrontational, i reblog things in private to argue with op 😭 lmao (arguments that op will never see lmao, i'm saving them and me both the trouble really). just enfp things.
15. how do you feel about ‘you need to reblog this’ posts
huh why do i never get them on my dash (⊙x⊙;)
16. do you like tag games?
sometimes i forget but i love being tagged in them because i get to know about all the great mutuals i have on here, especially music tags because i always get incredible new music recommendations
17. do you like ask games?
apparently i had my asks closed without knowing for quite some time so i haven't received asks for so long. maybe one day i'll do them but i have bad records of answering asks so ƪ(˘⌣˘)ʃ
18. which of your mutuals do you think is tumblr famous?
i'm not sure if being THE certified way apologist/way gifmaker qualifies her as tumblr famous but maybe sasa @zhouxiangs is the most famous mutual i have
19. do you have a crush on a mutual?
let's call this mutuals whose editing skills i wanna steal (´▽`ʃ♡ƪ)
lana @sherrymagic whenever you see me reblogging lana's joe sets every week, you'll see me gushing about the consistency in her coloring and that's because that's something i'm obsessed with, especially considering my stand-in's grim/dark cinematographic coloring. also i don't know how lana chooses the perfect lines from each eps to do her recap sets because most of the times i can't even choose between which scenes to gif.
eva @alienwlw eva makes the most beautiful lyrics set and is willing to do my most niche requests and i'm always looking forward to seeing her gifs because it's always so warm and grainy and crisp and i'm just like wahhhh *heart eyes emoji* every time
20. tags?
no pressure tagging anyone today ヾ(⌐■_■)ノ♪
8 notes
·
View notes
Photo

maziekeen's gif + coloring tutorial
i’ll use an action to speed up the process because i’ve been making gifs for a long time, and i am lazy, so it will not be a detailed step by step tutorial, but the action will make your life easier i’m sure
my coloring tutorials:
two parts tutorial
hthaigtct tutorials, small ones from scratch no base psd
useful links:
download the action
download the psd
crop sizes (new dimensions)
text settings
save for web & devices (gif settings)
my ko-fi <3
notes:
i’m using photoshop cs5 and this action works better on this one. but if you’re using cs6+ you can use this action, won’t have the second settings i use for low quality videos but follows the same steps as mine and have lots of versions you can pick
i’m using kmplayer to take my screens, but if you use any other program the result is the same, but you’ll have to look for the best settings
the tutorial, finally:
1. screencaps
open the video you want and look for the part you want to gif. pause there, press ctrl + g on your keyboard and this window will appear.
extrair para (extract to) you click on the yellow folder to select where the screens will be saved
the red parts are the most important. on método (method) you set yours to “only video image”

now to take the screens is simple:
press start on the window and press play on the video
after you take the screens you want you can either pause the video and press pause on the window, or just press pause on the window so the screens will stop
done!
2. loading screens on photoshop
first, let’s open the action:
window > actions (if you don’t have it yet)
then click on this icon and go to load actions

select the best action ever you downloaded <3
load the screens:
file > scripts > load multiple dicom files
or load files into stack. but dicom files are SO FAST, it’s way better. either way you’ll have to search the folder where you saved the screens
3. crop the gif and do the magic
press letter c on your keyboard or go to the crop tool, my settings are:

crop the gif the way you want
now, let me explain the action there:
500% 0,03px are the common settings that everyone are using, this one here
500% 0,03px & 400% 0,03px are in fact two sharpens that i use for low quality videos or bigger gifs, like 540x350
since i don’t have the luxury to use only 1080p+ videos, i use mostly 720p. but you can use this with 1080p+ videos too, will be even better i guess
DICOM Files and Load Files Into Stack you use depending on the way you loaded the screens on photoshop
the red boxes are just where i sharpen two times, this way if i want to change the settings before it apply i can do it. to get rid of if you just open the action on the blue arrow and uncheck the boxes that are checked (?)


now you just pick one, hit play, and it’s done!
you can’t use this to “test” the sharpening, because this action will apply the sharpening and basically make the gif for you. i explain the process here
if you want to test, you duplicate the document after you crop and then apply the action
4. the coloring yay
well, after literally no effort at all (i loaded the screens, cropped, apply the action and it’s done) i have the gif sharpened with the right speed:

4.1 CURVES
click on the white eye dropper

select the whitest or close to that part on the gif. doesn’t have to be perfect, you’ll need a better light and color correct if possible, if you think it’s not as bad as it was before, then move on

settings:

result, like i said.... not as bad as before, this coloring i can work with

4.2 PHOTO FILTER
they are just AMAZING. i used 3 of them:


result:

4.3 EXPOSURE
not too much, but let’s brighten a little more. i use especially gamma to brighten their faces, while exposure will brighten around them only

result:

4.4 LEVELS
doesn’t look like much, but trust me will make a difference

result:

4.5 SELECTIVE COLOR
create a selective color and change the blending mode to color

settings:


result:

4.5 SELECTIVE COLOR 2
create another selective color and change the blending mode to luminosity

settings:


result:

aaaaaaaaaaaand, it’s done! thank you if you understand any of part of my rambling <3
#dearindies#gif tutorial#coloring tutorial#tutorials#privateraelle#userjass#tallycraven#I HOPE THIS HELPS#my tutorial#the mfs fandom tagging u#bc i found a new way to color this hell of a show that we love so much#sakjdhjkas#psds#actions#gif sharpen action#my coloring tutorial
515 notes
·
View notes
Text
COMPREHENSIVE GIFFING TUTORIAL (vapoursynth + ps cc 2018) + some tips and tricks on color correction, blending and subtitles
You guys asked for it, so here we are! This is by no means the gold standard to giffing. Rather, this is simply my process and my own preferences. Take it as you will. Additionally since I use a mac some of my controls/panels may look different than what you would see for windows users.
DOWNLOADING YOUR SOURCE
This step is extremely important to the quality of your gifset. If you want high-quality gifs I would recommend giffing sources in 1080p whenever possible (especially if you’re going for larger dimensions). You may get away with 720p for smaller gifs. For kdramas, your go-to source would be dr*maday or torrents. (you can search my faq tag if you’d like to know specifics on finding and downloading torrents).
IMPORTING + PROCESSING YOUR FILES WITH VAPOURSYNTH (VS)
Please note that this tutorial does not cover basic installation and set-up of vs. If you would like to know how to download and set-up vapoursynth (it works for both mac and pc) along with some of it’s basics you can find more information at: https://hackmd.io/@nibreon/vapoursynth-book/%2F%40nibreon%2Fvapoursynth-book
Once you’ve identified what portion of your video you’d like to gif, simply drag your video file into VS. Specify the start time and duration of the clip you’d like to import. Typically you’ll be aiming for ~3-8 second clip depending on how big your gifs will be. I am very lazy when it comes to importing. The less of it I have to do, the better. Therefore, I often import clips that are 10-15 seconds long, sometimes even up to 20 seconds. I wouldn’t recommend going over 15 seconds most of the time though, because this will usually bring you over the 500 frames photoshop allows you to import at once. (when I do go over, I will sometimes import the processed VS file into PS in segments). You can also choose to import the VS output as segments if you want all your gifs on separate canvases. (I'll go into more detail on this later)
Once you’ve imported the clip into VS your screen should roughly look like this once the resizer pops up:
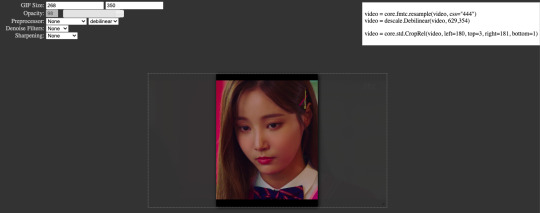
In the top left is where you will be applying your cropping, sharpening and denoising filters. Cropping: Keep in mind the Tumblr dimensions: 540px for full-width gifs and 268px for half size gifs, 177/178/177px for 3 gifs across. The height is completely up to your own preference. Usually I work in 540x300px. Once you edit those parameters you can drag/resize your video file to fit your new canvas. Sharpening + Denoising: You can choose to skip this if you would rather sharpen in ps. I personally do all my cropping, denoising and sharpening in vs. I use finesharp and KNML for sharpening and denoising respectively. Once you select those two filters from their drop down menus, be sure the select the checkbox as well. You should now notice 2 additional lines of code in the top right box. The line that reads: video = core.knlm.KNLMeansCL(video, 0, 6, 4, 1.2, channels="YUV") is where you will adjust your denoising parameters. You will only be adjusting those 4 numbers. I usually use: 0, 1, 0, 1.2. Now find the line that reads: video = hnw.FineSharp(video, sstr=0.22). These are your sharpening parameters. once again we’re only adjusting the number at the end. I typically use somewhere between 0.33-0.55. Depending on the quality of your source and preferences these parameters may change.
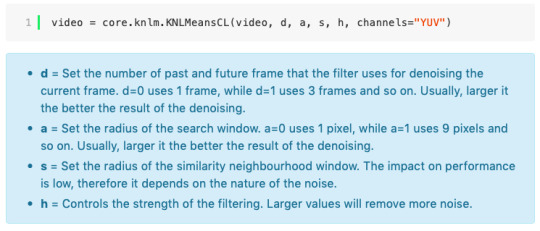
Here is a breakdown of the KNML parameters (source: @/nibreon HackMD):
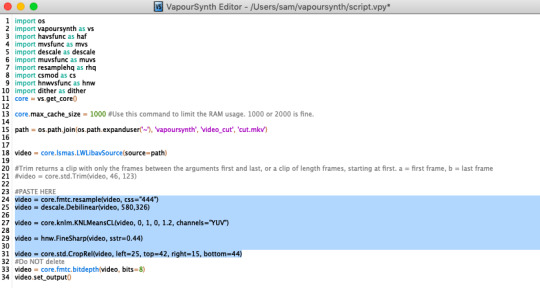
Once you have finalized your parameters, copy all the code in that top right box and paste it into your vapoursynth editor. Note: you can ‘inactivate’ certain lines of code by adding the # symbol at the start the line. That line of code will then be greyed-out. This is what your code should now look like (the highlighted section is the part I just copy and pasted):
If you would like to preview your filters and see if you need to make any adjustments, simply navigate to the top bar and select script > preview. If you like what you see, great! If not, you can adjust the parameters directly in the editor until you see a result you’re happy with. Once you’re happy you can move onto the final step in vs: processing.
Processing: Once again, navigate to the top bar and select script > encode video. Another window should pop up. Make sure you set ‘header’ to ‘Y4M’ then click ‘start’. Patiently wait for that to finish processing. The longer your clip is and the more filters you add, the longer it will take.
IMPORTING YOUR CLIP INTO PHOTOSHOP (PS)
Now you’re done with the vapoursynth section! Not too hard, right? I use the timeline method when I gif. To import your video file into ps navigate to file > import > video frames to layers. Here you can use the sliders to further specify what range you would like to import. Make sure the ‘make frame animation’ box is checked. To optimize smoothness of your gif, avoid checking the ‘limit to every _ frames’ box. Hit ‘OK’ and wait for the frames to import. Depending on the size of your clip, ps may notify you that you are importing a large file and it may take a long time to process, simply say ‘ok’ to this. UNLESS you get a message saying it will limit to 500 frames. This means your clips contained more than 500 frames and you should select a smaller section to avoid cutting out any critical parts. (Note: you can always go back and repeat this process to select a smaller range of frames from the same video clip until you’ve imported all the frames you need).
Timing: You can adjust the timing of your gifs before converting to timeline. Select all the frames (Navigate to the icon with the 4 bars at the bottom right of you screen. Select “select all frames”). Click the drop down next to the timing of any of the frames. Select ‘other’ and input a your preferred timing. I personally use ‘0.04′ but I've seen people use anywhere from 0.4-0.8ms. Also as a note: when you convert your gif to timeline it has a tendency to mess up your timing so even if you input 0.04 or 0.05 it won’t actually be that timing later. If you want the true frame rate you can set your timing right before saving. You can also adjust timing at the end. (see export/saving gif section for more info)
Now the next part can be tedious and for that reason I’ve created numerous actions to speed up this process. But for the sake of this tutorial I will walk you through the steps. At the bottom of your screen is your timeline. As you can see, it defaults to frames, but we want to convert this into a smart object so that all your coloring/edits are made to all of the layers. To do this: 1) Navigate to the icon with the 4 bars at the bottom right of you screen. Select “select all frames” 2) Now select all your layers in your layer panel. On mac you can use cmd + option + A as a shortcut. 3) Back to the icon with the 4 bars, select “convert to video timeline” 4) Right click on all layers (which should still all be selected) and find “convert to smart object”
(Aside: Actions) actions are SUPER helpful to streamlining your giffing process. you can find actions people have made available on resource blogs like itsphotoshop OR you can choose to make your own custom actions. To do this, all you need to do is locate your action panel. Then from the controls at the bottom of the panel select the one that looks like a sheet of paper to “create a new action” Once you’ve named it and hit ‘ok’ the record icon should now be red. PS will now basically ‘record’ whatever you do. To stop recording hit the square icon. Now whenever you want ps to execute the same set of steps you just did, you can locate the action you just made and ‘play’ it by selecting the triangle icon. I highly recommend making an action for the steps I just outlined above to convert your gif into a smart object timeline. It will make your process much faster and more painless.
COLORING
Now the fun part! I focus on emphasizing the colors already present in the video source or getting rid of some less-than desirable overtones when I color. It gives the gif a natural look, but makes everything pop a little more. We will be working with selective color, curves, levels, and brightness/contrast mostly. This is the original gif I will be using to demonstrate coloring:
Curves: I always start with curves. The first curve layer I use to set a desirable black point. To do this, locate the top dropper icon from the curves panel and select the darkest point of your image. This will set that section to “true black” Feel free to play around with this until you find a desirable outcome. Now add another curves layer. This one we will be using to adjust the brightness/contrast. First, I always start off with ‘auto’ and see where that takes me. If you like the outcome, great! If you don’t play around with the different curve points until you get an outcome you like.

Selective Color: This adjustment layer will be your best friend. For me, I will typically work with reds, yellows, and black. If the source has a lot of blue/cyan I will use those too. Basically look at your source and determine which base colors you’d like to emphasize/alter. For blacks I usually up the black by +1-5 depending on the source. For reds, it also depends on the source. But I will typically either decrease cyan (to make red stand out more) or increase cyan (to make the red not look so overexposed). You want to be careful here. Overexposing the red can make your skin tones look like red tomatoes! And for my content base, where most of the actors are of asian descent, we should be emphasizing the yellows and NOT the reds (see aside on color correction + skin tones for more info). After altering the reds to my liking, I do the same process for the yellows. To bring back natural skin tones and color, you will likely want to darken the yellows, expose them a bit more and maybe even up the yellow slider. A common rule of thumb: if you want to make any of the colors less exposed, increase the cyan. If you want to increase exposure on any of the colors, decrease the cyan. If you want a color to appear more strongly or prominently, increase the black. The magentas and yellows I use more to adjust hues. You can add multiple selective color layers to further emphasize your changes.
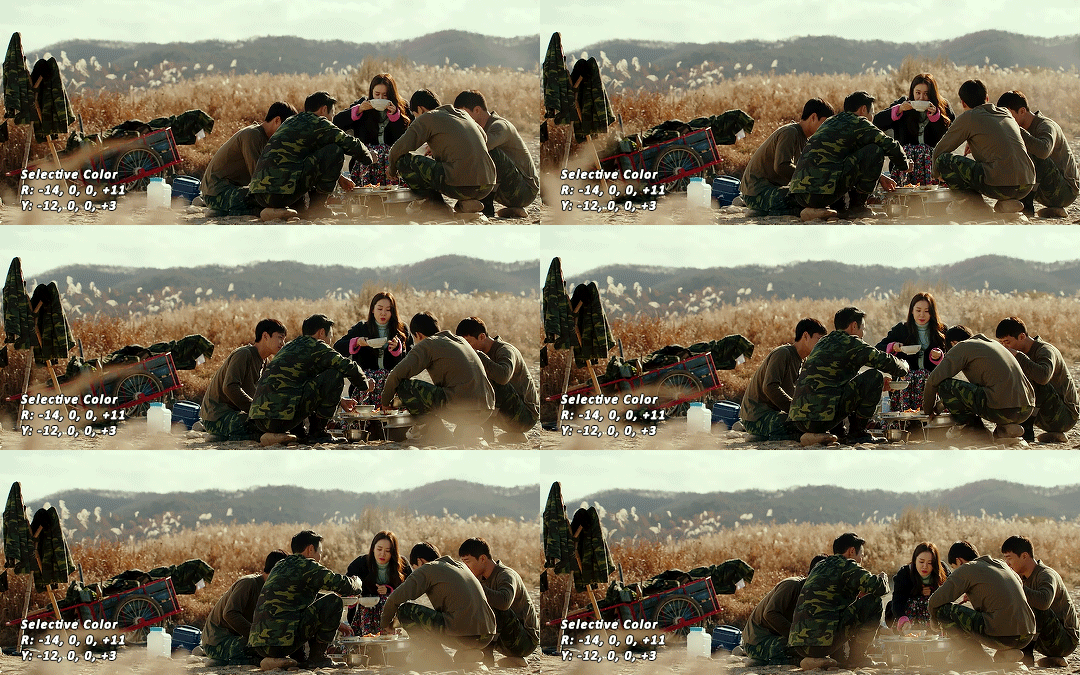
Levels: Now we will work on the lighting some more. This creates more contrast and depth to your gif, often making them look ‘crisper’ To emphasize the bright parts, move the right-hand slider to the left. The emphasize the dark parts, move the left-hand slider to the right. You may also choose to move the middle slider to adjust more neutral lighting. Do so until you find a setting to your liking.
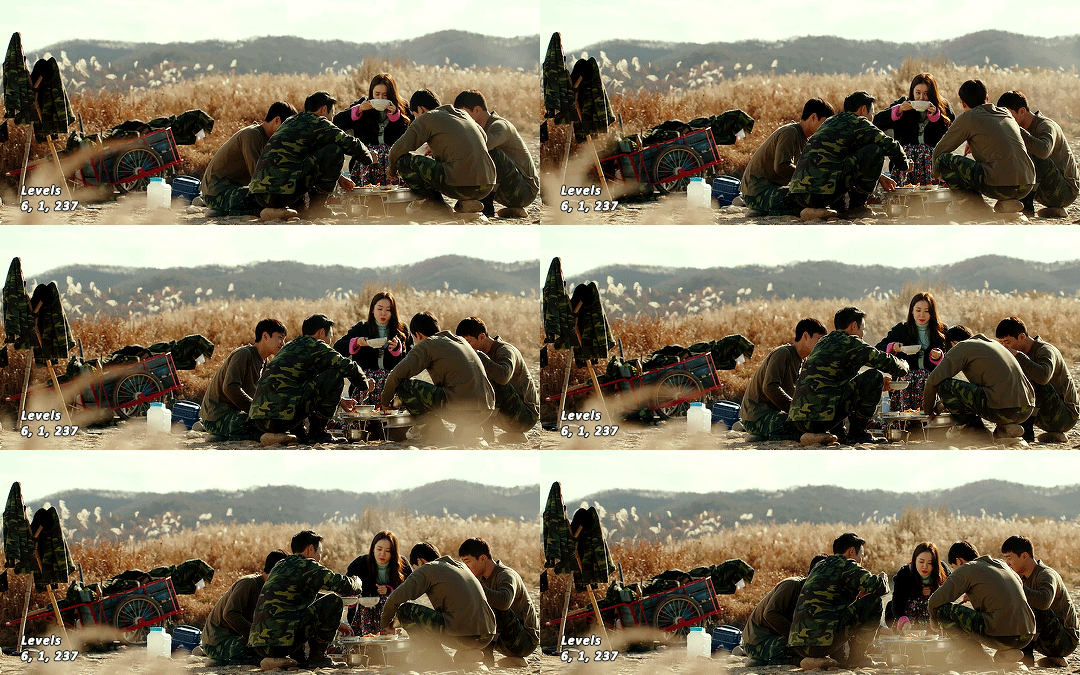
Miscellaneous: Depending on your gif you may need to play with other adjustment layers. Some other ones I often use are the brightness/contrast and exposure to adjust lighting and add more dimension to the gif. For additional color correction I use color balance and to a lesser extent hue/saturation and vibrance.
(Aside: Color correction + skin tones): We are anti-whitewashing and anti-redwashing when it comes to asian media. Like I mentioned earlier, natural asian skin tones have yellow undertones, not red/pink. Therefore when you’re bringing in color you should be mindful of this delicate balance. Adding more red does NOT equal un-whiteashing. Be VERY careful how you balance the yellows with selective color/hues/color balance.
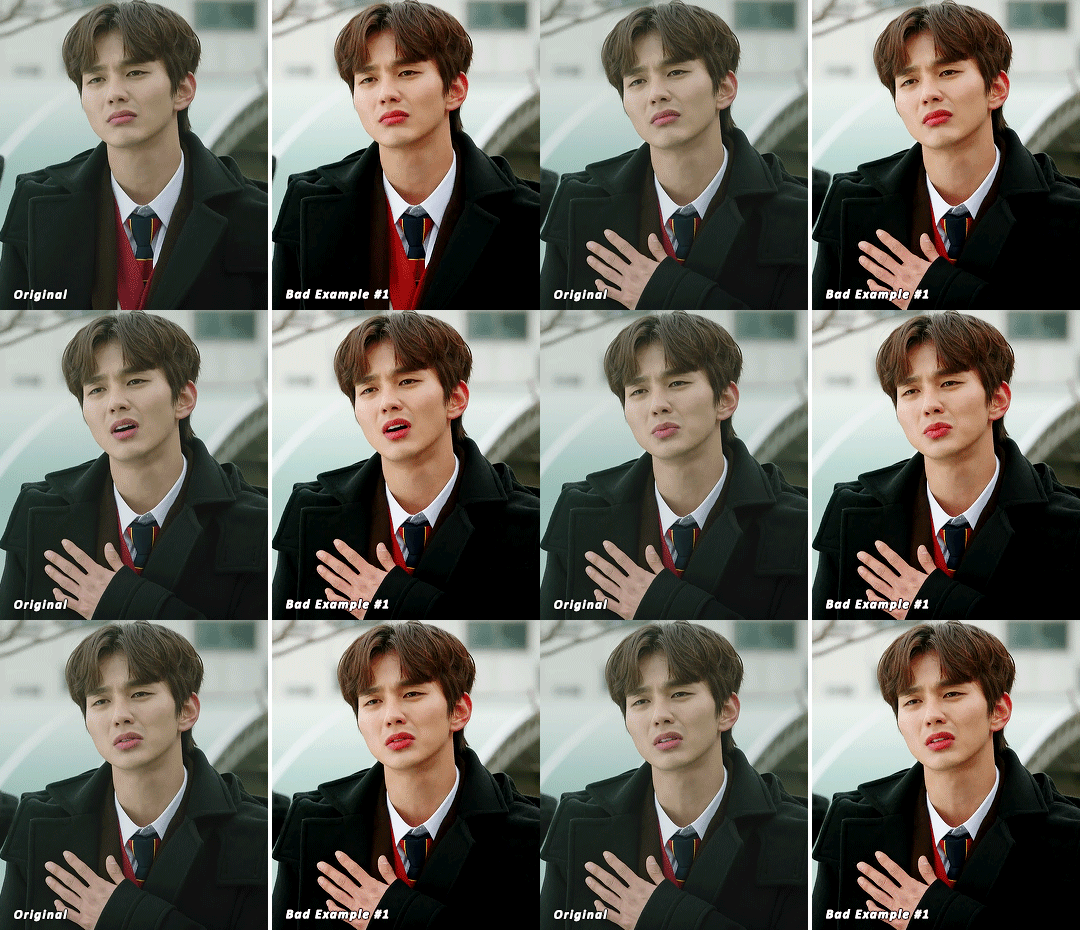
^^ Here is an example of what I mean by overexposing the reds. Poor seungho is looking as sunburnt as a cherry tomato. Note: if your original source is already overexposed with red, fix it! You can do this by applying the same basic principles I explained earlier. Try upping the cyan on the reds in selective color, or shifting the color balance to favor cyan over red with the color balance adjustment layer. You may also choose to favor the yellow over blue.
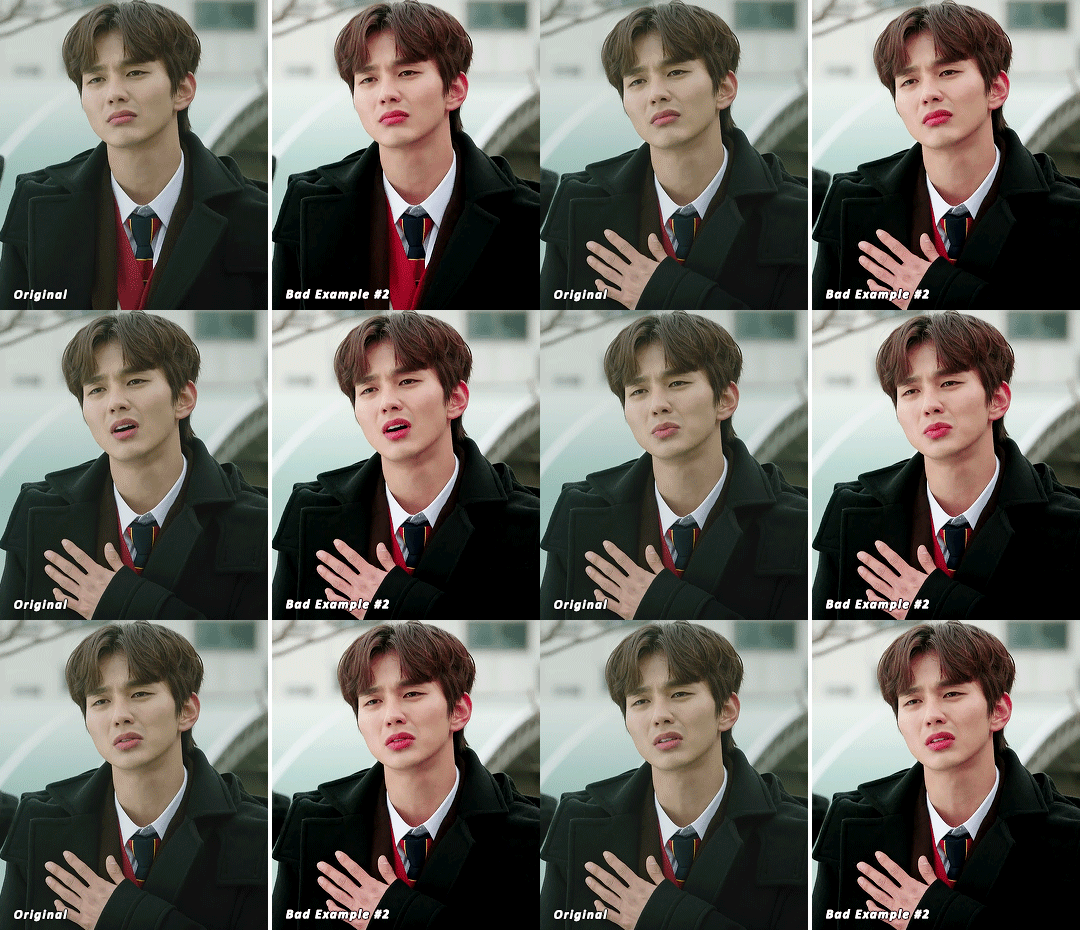
^^ Now this is straight-up whitewashing. This is what happens when you are not careful with your correction of yellow. I’m not saying you can’t touch the yellow slider or get rid of some yellow form the overall image (because sometimes it is very much needed), but you should be very mindful how your corrections can affect skin tones. If you decide to decrease saturation of yellows, or decrease yellow in the selective color section of the reds, do so with caution. If your reds are looking too pink, add some yellow in the red selective color, up the yellow and black of the yellow selective color.
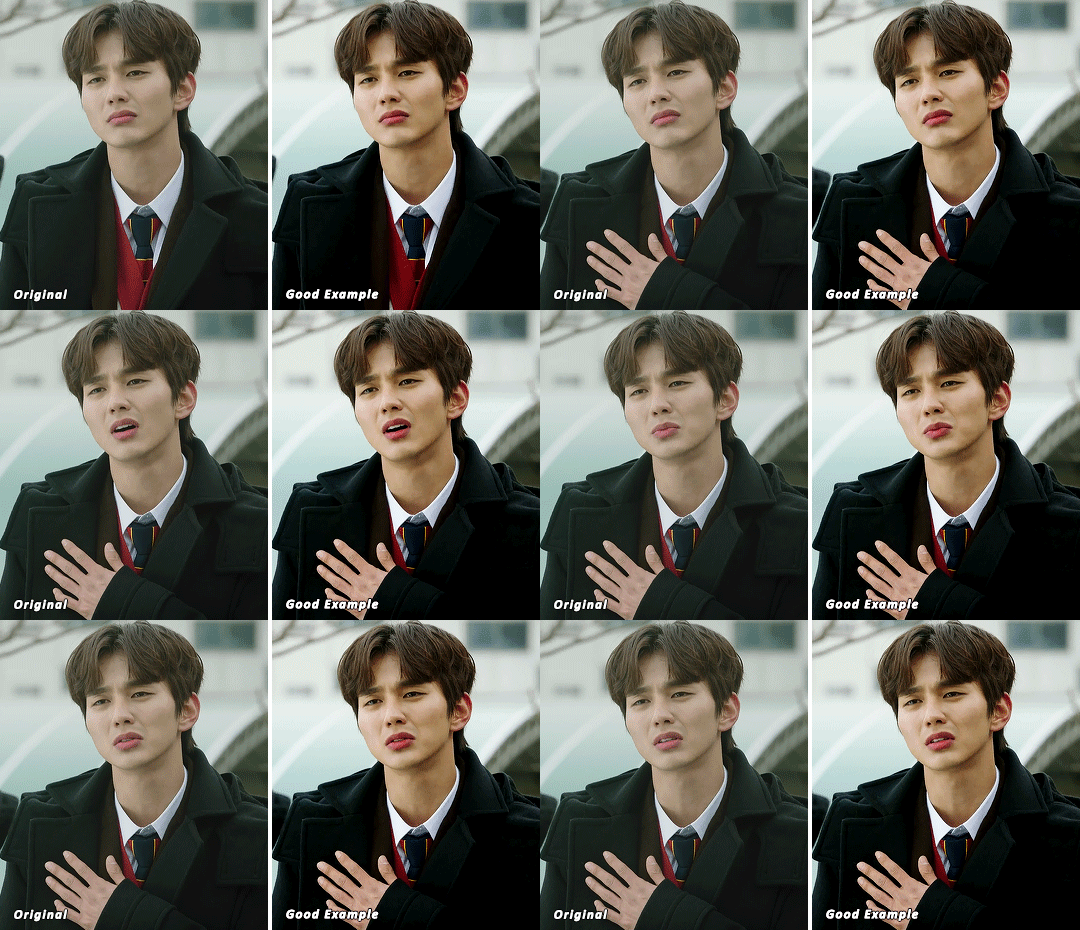
^^ If you hit that happy medium, you can emphasize the natural skin tones without overexposure. Here the underlying tones are very much still in the yellow range.
(Aside: Blending): I will very briefly talk about how to blend two gifs together. First make sure you’ve imported both your gifs into ps and converted them into the timeline format. On one of the gifs, right click the gif layer in the layer panel > duplicate layer > select the canvas of the gif you’d like to blend the gif with. On the canvas you just copied your second gif to, you can now drag the two layers around the on the canvas to get your desired positioning. On the top gif apply a layer mask. This can be found in your layers panel at the bottom, and is indicated by the white rectangle with the circle. Next, make sure you select the mask in the layer panel (it will show up as a white rectangle on the layer you applied the mask). Grab your paintbrush tool and make sure your color is set to black. Now you can effectively ‘erase’ the part of the top gif you don’t want to show anymore. I recommend setting your brush hardness to 0% to get a smoother transition. You can also play with the opacity settings. If you want to add back in a part you erased, just switch to a white paintbrush and you will be able to undo what you had just ‘erased’ with the black. When you merge the gifs, they will play the same number of frames. This means your blended gif length is limited by the gif with the fewer number of frames. You can move around your timeline layer and shorten the included portion by dragging either end of the timeline layer in until you get both gifs to play the parts you want.

CAPTIONS/SUBTITLES
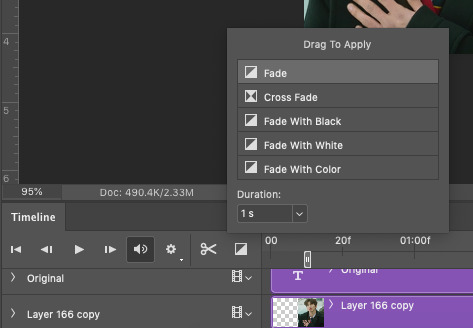
I often get asked about my subtitle font/styling settings. Personally I find the best fonts for subtitles are calibri and arial. I use calibri with the following settings: 12-14px, bold italic plus faux bold, 1px black stroke (optional: drop shadow set to ‘multiply’ at around 85% opacity), and tracking (VA) set to 75. If you would like your subtitles to fade-in or fade-out you can apply the ‘fade effect’. Locate the b/w square icon in your timeline panel. Select fade and drag it onto your text layer in your timeline. You can then right click on the wedge shape to adjust your fade duration. I usually use 0.35s. If you drag and drop the effect towards the beginning of your text you can get the fade-in effect. To get the fade-out, simply drag and drop your fade towards the end of your text layer.
SAVING/EXPORTING YOUR GIF
We’ve reached the final stretch! If you need to adjust your frame rate timing: you will need to revert your timeline to frames. To do this: 1) Navigate to the icon of 4 bars at the right of your timeline panel. Select convert frames > flatten frames into clips. 2) Navigate to the icon of 4 bars at the right of your timeline panel. Select convert frames > convert to frame animation > when promoted hit ’ok’. If at this point you see more than one frame in your timeline panel, delete the frames until only one is left. In the example below I would delete the first frame by hitting the trash icon from the timeline panel.

If there is only one frame, leave it as is. 3) Navigate to the icon of 4 bars at the right of your timeline panel. Select ‘make frames from layers’ You will most likely need to delete the first frame in your timeline panel (it won’t have your coloring). Sometimes ps adds in some ‘blank’ frames as well, delete those too. Now you can adjust your timing.
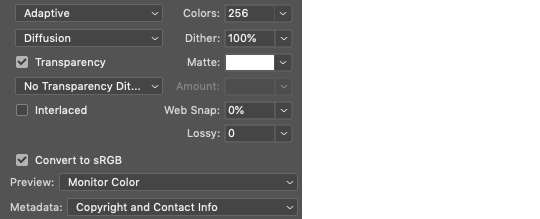
Once your timing is set: When you’re saving your gif, just keep in mind it must be under 10mb. Navigate to file > export > save for web. When it comes to your save settings I typically use either selective diffusion or adaptive diffusion. I also also occasionally use adaptive pattern (I find this is best for dark scenes without a lot of contrast). Set colors to 256, quality to bicubic and looping options to forever. If you want to preview your gif, hit the preview button in the bottom left. Otherwise, go ahead a hit ‘save’ and you’re DONE!

ADDITIONAL RESOURCES
Feel free to check out my ‘ps things’ tag for more photoshop stuff/mini tutorials. Additionally @/nibreon and the hackmd site I linked previously are your best resources for vs questions. If you would like to see my giffing process in motion feel free to check out this video. It’s sped up but you can slow down the playback. Additionally be sure to check out resource blogs like itsphotoshop for more helpful tutorials and resources.
If you reached the end of this beast, kudos to you! I hope this helps and never be afraid to reach out with any questions.
539 notes
·
View notes
Text
I'm going to make a response to a SU video made a few years ago by @robobuddies, who goes by "Red Van Buskirk" the video is called "The Steven universe rant." The video was uploaded in 8 Sep in 2017.
Keep the date in mind because is going to become important later.
I going to refer to Red Van Buskirk as "they/them" since they prefer these pronouns and "Red Van" for short.
And don't harass this person in social media! This is supossed to be a response. Nothing else. I'm saying this because i know how things work. So, don't bully them. OK?
I'm not going to make a rebuttal of every single tiny detail because the video is 40 minutes long and the creator of the video sometimes jumps from one point to another and loses focus on what they are talking about:
First they start the video with a Disclaimer: "I'm going to be harsh and hyperbolic for the sake of entertainment".
Now here's my problem: i get sometimes youtube critics want to play a "persona" but sometimes comes off more as an lazy excuse to avoid criticism. This has happened before with Cinema Sins many times. It's not exactly a very good way of starting your video, specially if you want to be considered a profesional or be taken seriously.
Like if i'm going to give my opinion about something, i do it, i don't say "It's just my persona", i want to honest with my mutuals and people who like my content.
They also mention how the SU fandom can't take criticism and sometimes consider everything a personal attack. While i agree this fandom can be a living nightmare, the reason of why we sometimes get so mad is because people who sometimes do these types of rants don't do their research about the show, the video gets millions of views and well..
Which goes to my next point:
-Red Van, you need to do your research.
A huge part of the video they talk about the animation behind the show and mention "Motorcity" as a good example of composition.
Here's the thing: They barely mention which programs the creators use to create these shows or the animation studios which is quite a problem if you are going to talk about animation for half of your video.
"Motorcity is animated with a combination of Flash, Maya and After Effects – with backgrounds and other elements created in Photoshop."
"Created by Chris Prynoski, Motorcity is produced by Robin Red Breast, Inc. (a subsidiary of Titmouse, Inc.) and Disney Television Animation."
Link (X)
Steven universe was animated by two korean studios: Summin and Rough Draft
Link (X)
The programs the crewniverse used to animate Steven universe Link: (X)
They mention how the animators of Steven universe were "lazy" for not making the scene of "Mr.Greg"- Is over, isn't it? More interesting..
Here's the thing.. they wanted to:
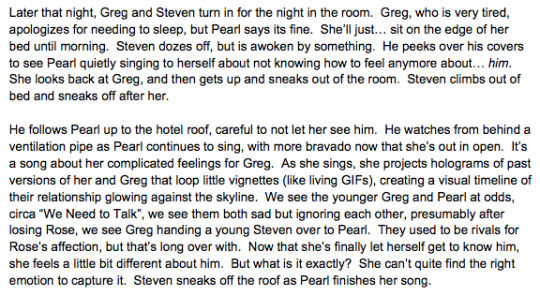
This was the original concept but they didn't have time to animate it into the show. They were time restraints to animate it.
Link that talks about the episode Mr.Greg and the animatic: (X)
Now this episode "Mr.Greg" came out in 2016, and Red Van's SU video rant was uploaded in September 2017. That's like an year to find that post.. so why didn't they search for it?
They complain about the writers forgeting about the powers of the characters.. So, i'm just going to leave this right here from a SU reddit AMA:
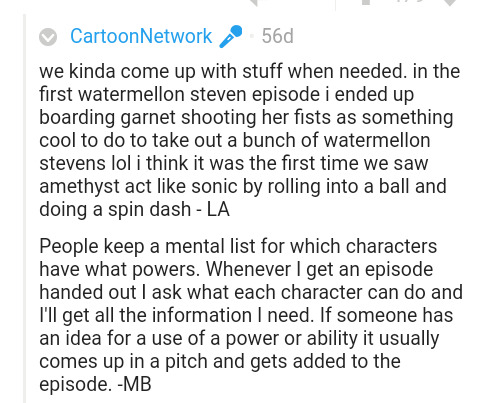
The writers kinda came up with some powers but they also had a list of what powers they could do.
Now to be fair to Red Van, this AMA was made in way after their video, so i can't blame them for not knowing this detail.
They also mention how the gems don't use their powers to catch Peridot: The issue with this argument is that the gems had no idea how Gem Homeworld technology had changed and Peridot had tons of tricks to get the upper hand. And the gems only fight Peridot two times in season 2 before they catch her in "Catch and Release". That's why they catch her quickly in "Catch and Release" they already know her tricks and catch her by surprise.
"Peridot is coming.And we don't know who or what she'll be coming with. She's a modern gem with modern gem technology that's bound to overpower us." -Garnet Political Power
They also complain about Amethyst not using her shapeshifting powers to catch Peridot.. but later in "Message received" Amethyst shapeshifts into a helicopter to stop Peridot and her robot.. why they don't mention this?

Amethyst also used her shapeshifting powers in other battles (Ocean gem, Steven vs Amethyst).. they brieftly mention this for a second but don't go into much detail in their video.
In one part of their video they talk about the writing..they fail to mention how the process works.
Here's is how it works:
"As some of you know, Steven Universe is a storyboard driven show, meaning a team of storyboard artists are given an outline off of which they write all of the dialogue and storyboard the episode. The job of the outline, and my job, is to give them the basic framework for the episode - the story."
Link to Ben Levin post (X).
Here's is another one about Ian talking about the writing process: (X)
Now the Ben Levin post about writing is from 11 sep 2015. I think with 10-15 minutes you can find the post. And if i remember correctly it was even in the SU subreddit. And is from the episode "Lion 3"
They also mention Adventure time several times in their rant to compare it to Steven universe.
Now wasn't Adventure Time a storyboard driven show like Steven universe?
Well, yes.
"Each episode of Adventure Time takes about nine months to produce and begins in a writer’s room with series creator Ward, producers Adam Muto and Kent Osborne, and staff writer Jack Pendarvis. From that meeting, they generate a barebones, two-page outline. Those outlines are handed over to one of four storyboard teams who have two weeks to visually outline the episode. “They’re basically directing,” says Osborne. “They’re writing all the jokes, editing the outline, picking all the camera shots… what the episode is going to look like.”
Link
https://www.thedailybeast.com/this-is-how-an-episode-of-cartoon-networks-adventure-time-is-made#:~:text=Each%20episode%20of%20Adventure%20Time,barebones%2C%20two-page%20outline.&text=“They're%20basically%20directing%2C”%20says%20Osborne.
It's also worth of mentioning that Rebecca Sugar worked previously on Adventure time.. i think Red Van doesn't mention this detail in their video.
Rebecca Sugar was nominated for the episodes : "It Came from the Nightosphere" and "Simon and Marcy". She storyboarded " I Remember you" which has one of the most iconic moments in modern western animation. ( People who complain about Steven universe but like Adventure time rarely seem to mention this detail).
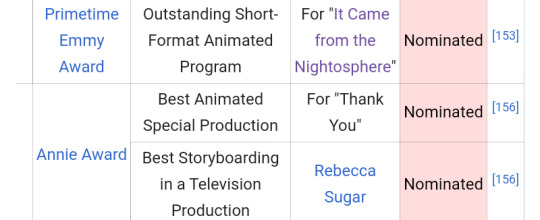
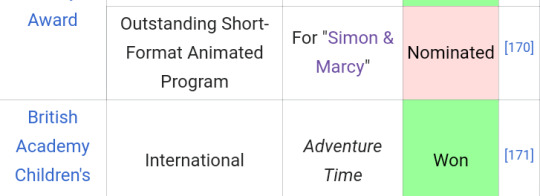
Link (X) (Episodes she storyboarded in Adventure time)
There is also one point they just start nitpicking and tearing down the show, which reminds me of Cinema sins, except is not as funny.
Red Van, what you are doing here in this part can be done with any other show and is a very easy thing to do. I could also make a 30 minute rant of MotorCity or tmnt 2012 nitpicking every tiny detail but it's not exactly good criticism.
They later complain about the Steven universe perspective..
I leave this here,is from that same SU AMA reddit i mentioned earlier in the post which explains the Steven's perspective.
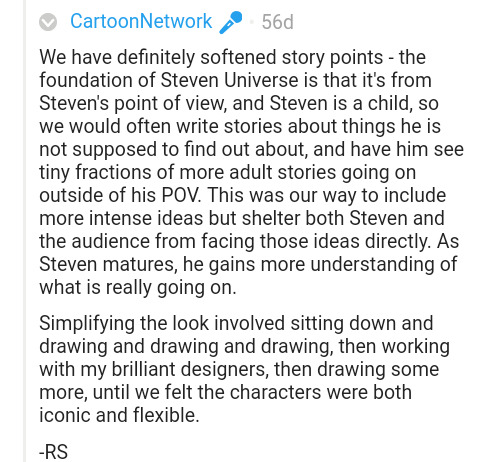
Now, i didn't have a problem with the Steven only perspective. In many ways its what makes the story of SU work. We learn about the world as Steven learns. The more Steven grows, the more we learn things aren't as simple as they seemed to be.
Characters sometimes will hold information about X person from Steven, so he's forced to ask other characters about it.
It seems to be suggestive since i only actually started paying attention to it when people brought it up. Like, it wasn't such a big deal for me.
Now i could go on and on with this response but i would like to leave it here.
What do i think of this video? If i was a teacher and a student tried to show me a video like this for my class, i would probably ask the student to make it again. Not because it complains about Steven universe, is just is poorly organized in some parts and lacks proper research.
As someone who likes analyzing media is quite difficult for me to take this rant seriously. It has issues and is like those Cinema sins videos but isn't that funny.
And there's one more thing:
I found this youtube comment in which Red Van admitted that they should have done more research into the show production and animation. At least is good to know they are honest and say they made some mistakes in their video.
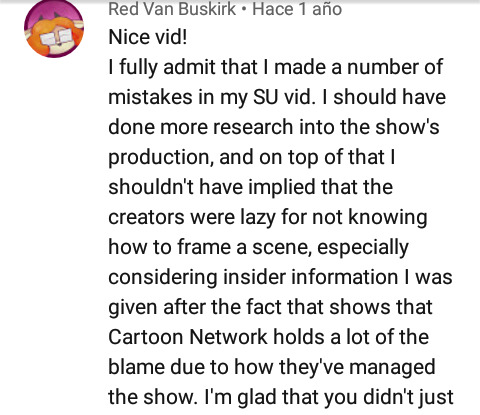
The problem is that.. well.. since their Steven universe rant many others have cited their work and their video has 1 million of views... even though it contain a few errors that the creator admitted.
I wouldn't call Red Van a bad person, they actually are nice. However.. Their SU video is a bit misguided and somewhat problematic. But is not the worst thing ever.
#steven universe#animation#rebecca sugar#crewniverse#bad takes#SU youtube#media analysis#western animation#response#long long post
9 notes
·
View notes
Text
ASK IS FINALLY OPEN AGAIN!!


hello! before i open the ask, here some things i wanna explain. please, read. (i hate do it ughh this makes my page look too serious)
1. if you want icons/headers of any person/group, just search the name of this person in my page just to look if i already make icons (if i already did and you want more, just send me a "more icons of xx please?" ♡.
2. sometimes i can be REALLY lazy doing requests... and sometimes your ask can be delayed more than the usual.
3. i don't make icons of gothcore/messycore because i really don't know how to do it and i don't like how my edits look in this type of icons.
4. i just make only icons and headers from korean groups!!!
(i think it's just it? idk what to put more here lmao)
11 notes
·
View notes