#'here is how to use an angle grinder for cutting'
Explore tagged Tumblr posts
Visit Tumblr Blog
Explore Tumblr blogs with no restrictions, modern design and the best experience.
Last Seen Tumblr Blogs


Fun Fact
Tumblr was acquired by Yahoo for $1.1B in 2013.
Text
How to introduce your knife
Knives' main introduction in episode 3 starts with two of the oldest tricks in the book - or one, really, depending if we're counting the use of a code and the trope/convention it builds one technique or two.

The film language is not subtle. Whilst elements such as the massive amounts of gore, unsettling sound design and deep blue fog make for striking imagery, the star of the show is undoubtedly the classic low-angle shot, slowwww-ly tracking in to the diner entrance.
And I do mean track and not zoom. The camera movement here isn't stable, there's a couple of bumps and jerks that serve to imitate how someone would hold it in their hands, and it gives this scene the feel of a POV shot despite being so close to the ground. Tracking in also serves to accentuate the impact of the low-angle shot, since the angle at which you're looking up at something naturally gets more harsh as you get closer to it.
Low angles in film are typically used as a way to give whatever they're filming agency and power, which here means adding a significant element of intimidation to whatever's behind that door. And with the help of such a long cut, it plays into another very basic yet very effective technique - the classic horror trope that states that you don't show the audience the monster. Fear of the unknown reigns supreme.

This trope actually continues with Knives himself, with his big cocoon-blanket-hoodie-thing obscuring his body from the viewer. If it wasn't for the light glinting off of him, you could easily miss the guy at first glance. (Technically you could read that light above Knives as halo or eye imagery but ehhhhhhhhhh it's a stretch) Indeed, the focus of this shot seems to be less on Knives and more on the meat-grinder-ing of E.G he's just done here. That and the lighting. It's overwhelmingly bright, and a good quarter or so of the screen is just pure white. Obviously light = divinity and at this level of saturation, the implied higher power is so removed from humanity that we can barely look at it without averting our gaze.
And when we avert our gaze, the next thing we are drawn to in this scene is Knives. Touched by divinity, still alien, but not so much that we can't look at him. Keep in mind that there is a deliberate choice here to have Knives not be the one emitting light - he and Vash are emissaries of a higher power, not directly part of it.

This also contextualizes Knives' statement immediately after. There are two ways I see you could read this - either Knives is positioning himself as a god, and mocking E.G's poor attempt to worship him, or he is asking Vash if Vash shares a desire of his to converse with the divine. When taken together with the coding of the prior scene, there's an unstated question to the audience as to where exactly the twins fall on the scale between human and divine.
There's obviously something off about Knives here though. Partly through his alien costuming, but also from the fact that he seemingly cut a guy's arms off with an unseen super weapon and the incident of someone's limbs being separated from their body is such an unnoteworthy occurrence that he can't even be bothered to turn around from whatever he's thinking about as he sits at the piano.

Vash is so obviously emphasized as the opposite of his brother here. Outside of the blood, he's the only colour in the entire room, the only one with his weapon out and the only one of the twins visibly open and expressive. And he's so, so obviously powerless in this scene. It's a full doubling up on him film language wise, with him both isolated via the frame-within-a-frame of the door and the dirty shot to make sure Vash never gets to stand here in full view whilst simultaneously making Knives look gargantuan in comparison.


These two shots are utterly evil in their composition, and how the mise en scene of the blood on the wall lines up in such a way that it looks like it came from Vash's gun. There's not much to say that I haven't touched on before - Vash is boxed in by the roof above when Knives is in the open, Vash's posing is dynamic and he speaks in a panicked manner where Knives' is calm and composed. Knives is bathed in light and now we also get the addition of Vash being bathed in shadow, away from the divine whilst Knives is positioned far closer to it.
When Knives claims ownership of the plant, he also claims it as his property first, then corrects himself to him and Vash. Knives first, Vash second, the townspeople a very distant third place. Any opinion the plants themselves have on this matter isn't brought up.

For once we actually get a shot where Vash is framed as larger, which perhaps acts as a way to emphasize his convinctions and validate them as something that gives him strength. This is also the first time we see Knives in front of the window and thus not only casting his own shadow but blocking the light out, as if to suggest he isn't as holy as he thinks he is.
(I think there might also be a continuity error in this shot. The piano seems to have shifted forwards a bit to place in front of the window)

Once Knives asks Vash "who's side are you on?", he goes back to dominating the conversation however, and the scene shifts aptly. Knives is once again framed as large, Vash as small, although he's not quite as stifling as last time. The perspective doesn't have him blocking out any part of Vash's body, and the frame-within-a-frame consisting on the diner entrance around Vash is less noticeable. Vash has gained a little bit of power in this conversation, albeit by not much.

Then, when Knives talks of Vash's loneliness, it cuts to a shot of Vash by himself to match. Vash being so audibly and visibly panicked drives this home, because who could find company in someone who makes you so angry and scared, even if they are your own brother?

I have yet to come to a conclusion on why Knives' feet are such a large motif in the story, other then the fact that the foley artist probably had a blast with the 'bare feet on blood' sfx. Perhaps it's to show Knives as someone who walks literally on top of blood, not caring to look down at the pain and suffering below him.
Hands are also major motif throughout the story, and they're typical paired either with the gain or loss of connections. Here however, whilst Knives may connect with Vash literally, it's not a positive or typical form of connection. Instead, Knives' touch brings disconcertion, fragility and isolation, cracking Vash's gun and shoving him alone into the state of a confused vulnerable child, in what reads to me like a shockingly acute depiction of a dissociative flashback. If you removed all the sci-fi language, you could tell me this was an artsy depiction of a PTSD episode and I would probably believe you.
TL;DR: Knives is a creature with divine connections who believes himself more holy then he is and is also fucking terrifying, especially to Vash.
21 notes
·
View notes
Text
Pro-gamer!Gojo, Geto, Sukuna, and Toji
Writing this on my phone because life been putting me thru a meat grinder and i dont have the time to write an actual fic so i'mma ramble about the fic i been writing in my head when i dissociated
Imagine e-sport AU JJK
Youre a girl that's joining a 5 members first person shooter esport team call Curse Technique (CTQ) cuz women respresantation in esport fucking damn it
Your teammates are Gojo (Sixeyes), Geto (spiriteater), Sukuna (malevolent), and Toji (topji)
Theyre all streamers turn pro-gamers and are the most cocky bastard alive. The have never lose a single tournament ever since the game launched.
They got scouted by CTQ organizations from their stream when the game first launch
They fight each other for the second position on the leader board.
Note how i say second
Because someone with the in-game name KandyCat have the top position. Undefeated. Many have tried. But they cant even come close to thag ranking score
And goddamn did the 4 of them tried. They did a 1 week subathon with the sole purpose of tryna take the number 1 spot. They got their ass handed to them by said KandyCat in their solo rank games. So they temporarily gave up.
They always curios who this KandyCat is tho, becaude they are not a streamer, there are nothing about them on the internet beside the fact that theyre number one on the game leaderboard.
Over times, their curiosity and completitiveness against KandyCat before some sort of admiration and obsession. They really want to know who this person is and learn from them.
Now let's talk about when the team manager introduced you to them.
They thought you were their new assistant. They were expecting their last teamate would be another well known streamer or pro-player
The disbelief on their face when your manager said "this is y/n, she's your 5th member and also will be your in-game leader"
You almost let out a snicker
They threw a tantrum. That's for sure. Not cuz youre a girl. It's cuz theyre prideful as fuck
They cant fathom how a literal no body, someone they never heard of before, be their leader?!? Theyre literally the top 5 players of the game. Impossible. No. If leader is one of them, the rest will be bitter but they still relinquish. But their leader is someone they have never heard of before??? They wont stand for this
No. They refused "she can be our leader if she can beat all 4 of us in 1v1s" sukuna scoff and for the first time theyre all in agreement about something.
"Sure!" You said "let's make it more fun by placing a bet, whoever win get a wish from the loser"
Your manager, nanami, just sigh a long sigh and let yall duke it out on the game.
You logged into your account (y/n0nt0p) and gojo immediate poke fun of you "after this you should chsnge it to y/nthebottom"
They were all so confident. Already thinking of what their wish gonna be.
LOL MAN DID THEY GOT THEIR ASS HANDED TO THEM
They could not even land a shot on you
For the first time in their career they went negative on their Kill Death ratio. It was tragic. You were abusing mechanic they have never seen before. Taking angle they didnt know exist. Shooting through wall they didnt know were made out of paper.
They were floored
Complete. Utter. Defeated.
"How?" Toji, the last one to went against you, ask in disbelief.
" You surely dont think this is my main account right? I dont even have any cosmetic on here" you said with a smirk, hinting to them that this isnt the account you will be competing under.
Nanami let out another sign, he need painkiller after this "if you would let me finish introduced her before throwing a tantrum, you coulda save your pride." He said while shaking his head "y/n will be competing under an alias "KandyCat" or Cat, she specifically put in the contract that she does not want her identity to be out in the public including her appearance so----"
"KANDYCAT?!" Gojo shouted cutting nanami off once again.
"The. KandyCat??? Number one player on the leader board. That KandyCat?" Getou said, not believing his ears
Poor men.... theyre going thru so many shocking things in one day. It's like their word just got turned upside down.
Honestly, i havent thoughts about it after this but it would be fun to be like a choose your own adventure fic. Where they all fell head over heel for you over the course of the competitive season.
#gojo satoru#jujutsu kaisen#jjk#geto suguru#prairie's rambling#geto#gojo#ryomen sukuna#jjk sukuna#sukuna x reader#gojo x reader#suguru geto x reader#jjk headcanons#toji#toji x reader#gojo headcanons#geto headcanons#sukuna headcanons#toji headcanons#jujutsu kaisen fanfic#jujutsu sukuna#gojo jujutsu kaisen#jujutsu geto#jujutsu gojo#jujutsu ryomen#jujustsu kaisen x reader
172 notes
·
View notes
Text
where the ivy grows

chapter one: the retrieval
The jeep skidded to a halt a mile before Hawkeye and Trapper ever made it to the gates. Dust spiraled around them, catching sunlight like ash. The land out here was yellow and brittle, bleached by weather and neglect. A single tent squatted behind a faded You Are Now Entering INCHEON Containment Sector sign, stitched between rusted poles like a battlefield relic.
An MP waited outside, rifle slung lazily over one shoulder. He barely glanced up before gesturing them forward with a gloved hand.
The outside looked better than the inside.
A high chain-link fence crowned in coiled razor wire stretched across the horizon. Neat. Gleaming. Unnatural. Ivy wound through the steel mesh like veins, tugged loose and raw in spots by the blunt claws of the staff—if you could call them that.
The cursed.
Trapper’s nose wrinkled. Muzzled and chained in pairs, the cursed animals “stationed” at Incheon moved in grim silence. Not military. Not patients. Not people. They were made to work the perimeter, dragging claws through underbrush and concrete, tearing away weeds, cleaning the dead things that built up along the fences. Their paws bled dark onto the pale dust.
Looks were deceiving.
Trapper had scented the rot a mile back. He knew it the moment it burned the back of his throat—sour and metallic, layered under a sterile antiseptic stink that screamed cover-up. The kind of place that wanted you to smell lemon to forget the blood.
Too many cursed species in one place. Predators and prey shoved together like meat in a grinder. The air itself felt unnatural—sick with fear, quiet with despair. Trapper’s fur bristled beneath his coat.
This wasn’t survival. This was containment. A slaughterhouse that hadn’t turned the blades on yet.
His claws scraped the hem of his yellow aloha shirt. Hawkeye stood beside him, silent but shaking. His fingers twitched at his sides like he was resisting the urge to grab the nearest scalpel and start cutting through red tape and throats.
They didn’t say it out loud, but both were thinking the same thing:
They were going to kill Frank Burns.
“We’re here for Fletcher Kim,” Hawkeye said finally. His voice was steadier than his hands. “We’ve got the papers right here. Transfer of ownership. Medical documentation. Signatures.”
The guard—young, smug, human—barely glanced up. He took the file from Hawkeye like it was sticky with something foul. “That dumb mutt?” he muttered, flipping through the forms. “Number 295—yeah. You’ll bring it right back. Don’t play nice with others.”
Hawkeye froze. A blink, a breath. Then his jaw set, slow and tight.
It.
The word hung in the heat like a mosquito, whining in Trapper’s ears. His lip curled before he could stop it, and the growl in his chest slipped free—a low, warning thing.
Hawkeye’s hand landed firmly between Trapper’s shoulders. Not soothing. Just anchoring.
Not here. Not yet.
The gate buzzed open like a hive had been rattled, and the guard waved them through without a word. Past the fence line, the facility spread like an infection—barracks and pens, concrete corridors with barred doors, open yards under floodlights even though the sun still sat high in the sky.
A second handler—a sheep hybrid, broad and grim-faced—appeared from the far side of the yard. In their grip, yanked forward in awkward steps, was a girl.
Fletcher.
At least—she should’ve been.
Trapper’s breath caught in his chest.
She was thinner than he remembered. Not just skinny, but starved. Her shoulders were sharp angles under a standard-issue cotton shirt two sizes too big. Her legs wobbled like they weren’t used to standing this long. She moved like a creature who didn’t know how to walk on two legs anymore.
There were bruises across her wrists, dark and raw beneath thick leather cuffs. Her tail was wrapped halfway around her ribs in a protective curl. And the muzzle—too tight, plastic, caked with blood at the seams—bit into her skin like a parasite.
Her eyes flicked up at them, amber overtaken by black.
No spark of recognition. No blink of relief.
Just wide-eyed caution. Ready to run. Or worse—ready to fight.
“She’s been a handful,” the sheep handler said, almost gleefully. “Snaps at anyone who comes close. Broke one of my guy’s fingers. You’ll be lucky if she doesn’t try to rip your throat out in your sleep.”
Trapper stepped forward, bristling, but Hawkeye caught his arm again—gentle this time.
Fletcher twitched at the movement. She lowered her head in submission, ears flat, eyes averted.
An apex predator, cowed.
“Fletcher Kim,” the guard said, scribbling something on a clipboard. “Alive, fed, and technically yours.”
“Technically,” Trapper repeated under his breath. He wanted to rip the pen from the man’s hand and stab it straight into his eye.
Instead, he focused on her.
She was shivering. That wasn’t the cold. That was adrenaline and exhaustion. That was instinct. That was trauma written into muscle memory.
Trapper crouched slowly, letting his coat fall open, exposing his hands. No sudden moves. No loud voices.
“Hey, Flick,” he said, soft. “It’s us.”
Her ears twitched at the nickname. A flicker.
Still, she didn’t move.
“We came to take you home,” Hawkeye added, kneeling beside Trapper, tone hushed like he was talking to a wounded animal—and maybe he was. “It’s safe now. You’re safe now. I promise.”
When he reached to undo her muzzle, she flinched—hard. Her hands snapped up like she expected to be struck. Trapper froze.
“I got it,” Hawkeye whispered, patient. “Just helping.”
It took a full minute before she stopped shaking enough for him to slide the buckle loose.
The moment the muzzle fell, she didn’t lunge. She didn’t speak. She just lowered her head into the dirt and made a noise Trapper had never heard before—a breathless, creaking sob that barely escaped her throat. Her breathe stuttered once and then it was over, like it never happened.
Hawkeye placed a hand on her shoulder. Light. Careful.
“I bet the stars missed you, Scout,” he said.
Above them, the sky had already started to shift. Pale gold washed into rose, the first points of starlight barely visible behind the wire.
Fletcher didn’t answer. But she didn’t pull away either.
The paperwork was signed. The muzzle was gone.
But Fletcher didn’t move.
Not until Trapper rose to his feet, slow and steady, holding his coat out like an offering. The yellow aloha print peeked from beneath the lining—familiar. From another life.
She didn’t take it.
So he stepped forward and draped it over her shoulders, gently, like he was tucking a child into bed. She flinched so hard he saw white in her eyes—but didn’t pull away. Didn’t shake it off.
That was something.
They didn’t speak as they left the yard.
The gate buzzed open again. The same MP watched them go, unimpressed and unmoved. Fletcher walked behind Hawkeye and Trapper like a shadow. Not beside. Behind. Head low. Steps light. Defensive. Just out of reach.
Trapper could hear her breathing. Uneven, shallow. A caught animal’s rhythm.
The jeep came into view, parked just off the dusty road where they’d left it. The fading light caught on the windshield, and the sky was bleeding orange, stars winking in.
Fletcher paused.
She lifted her head, just a little. Stared up at the sky like she wasn’t sure it was real. Her ears were still pinned back, her tail tight around her thigh, but her eyes had changed.
Just a little.
“Still there,” Hawkeye said softly, glancing up with her. “See that dip in the top? That’s the big one. Orion’s belt. Your mom taught you that one, right?”
Fletcher blinked slowly.
“I bet they missed you, Scout.”
Her lip twitched. Not a smile. Just movement. Like the idea of being missed was foreign.
Trapper walked ahead, pulled open the back of the jeep. “You want front or back?”
She didn’t answer.
She climbed in without a sound and curled up in the backseat, knees pulled to her chest, Trapper’s coat still wrapped around her. She tucked her face into the collar like a pup hiding under leaves.
Hawkeye shut the door gently behind her.
“You good to drive?” Trapper asked.
“No,” Hawkeye said, climbing in. “But I will.”
The jeep rumbled to life, and they pulled away from Incheon, the sky blooming into full starlight behind them.
No one spoke.
But after a while, Fletcher’s head dipped sideways. Rested on Trapper’s shoulder. She didn’t look at him. Didn’t say a word.
Didn’t need to.
They had her now.
And they weren’t letting go.
“we‘ve got you kid,” hawkeye whispered, exhaustion creeping through. “you’re ours, Scout.”
#bee's fictional cgs !!!#cg!hawkeye pierce#cg!trapper mcintyre#mashposting#sfw agere#age regression#hawkeye pierce#mashblr#trapper mcintyre
3 notes
·
View notes
Text
Japanese plane setup (Wilbur’s version) - 8: sharpening, flatness, and cutting corners
I won't sugarcoat this. Sharpening a used Japanese plane blade is a bit of a chore, because of the less than ideal condition the blade will be in.
Your best friend will be a sharpening jig of some sort that can hold the plane blade, and a coarse diamond plate. The jig is for convenience. You're going to have to spend time holding the blade at your desired angle on the bevel side. This gets old fast. The coarse diamond plate is for quick removal of steel without dishing out the surface of your sharpening media. I love my waterstones, but the reality is that between the time I'll have to spend on the tool and the fact that coarser waterstones tend to dish out faster means that having sharpening media that won't dish out is the better option.
I'll start by using the coarse diamond plate to work on the back and bevel.

Again, this will take time. But there are some things to do make things better. I generally keep an eye on the second hand of the clock in my shop, and make sure that I work the tool for 60 seconds before checking it. This doesn't really speed things up, but it makes sure that I'll make a visible amount of progress. There's nothing more discouraging than working the tool, then checking it, and not seeing any progress.
Second, I'll use my grinder to remove metal from the soft layer if needed. This is far faster than using my diamond plate to do that, and if I am careful to make sure that the grinder wheel is only touching the soft metal layer, there's less chance of overheating the hard layer and drawing out the temper. This method is most useful if I'm increasing the bevel angle of the blade. In this situation, the jig will be set up so that the cutting edge touches the sharpening media first, and it's fast to get through the hard layer. But once the bevel expands into the soft layer, things slow down. This is when I'll use the grinder to remove a little of the bulge of soft metal on the bevel.
Conversely, if I wanted to lower the bevel angle, the top part of the soft metal layer on the bevel will touch the sharpening media first. I could use the diamond plate to get rid of this, but a grinder will be faster. In this case, I would position the grinder wheel so that it touches the top part of the soft layer.
Third, when working the back of the blade, don't be shy about tapping out. As scary as tapping out may seem, it's faster than just using the diamond plate.
Finally, use some method of visualizing the plane blade so you can really see how you're progressing.
After a while, the bevel and back will be worked by the coarse diamond plate, leaving flat surfaces on the back and bevel with coarse scratches. The rest of sharpening will be to get rid of the coarse scratches.
Here's where the importance of flatness comes in. I've found that there's a stereotype of Japanese tool fans being obsessed with flatness when sharpening. It's not a fascination with flatness for its own sake. It's because making sure that all your sharpening media is flat means that you'll get through the next steps quickly. It's all about efficiency.
Here's why. All sharpening media, except for diamond plates, has the potential to dish out in use. If the sharpening media is dished out, it will leave a slightly convex surface on the tool. When it's time to move on to the next step in sharpening, the convex surface will not match the surface of the next step unless you got really lucky. That means it will take longer to cover the surface with the new sharpening media.
The way to avoid this is to make sure that your sharpening media is flat. If the sharpening media is flat, then the surface of the tool will be flat when you're done with that step. And if the sharpening media for the next step is flat, then they will match, and it will take little time to complete the subsequent steps.
I've found this to be true in practice. I haven't timed myself, but the first step I use for sharpening seems to take 85-90% of the total time, and the subsequent steps are quite fast.
In any case, eventually I get to the last step in sharpening, on my finest grit waterstone.

And I can place the sharpened plane blade into the body.

There are a couple of issues that still need addressing. The first is that the blade sits too low with just hand pressure. I generally want the blade to sit about 1/16" short of the mouth with just hand pressure, which means that it will take just a few taps with a hammer to get the blade into cutting position. On this plane, I can get the blade past the mouth with just hand pressure.
The second is that the corners of the blade extend to the outside of the throat of the plane. This will cause problems, as the corners of the blade would create a shaving, but then that part of the shaving would get hung up because there's nowhere for it to go.

Dealing with the position will wait until we work on the bed of the plane body. Dealing with the corners is straightforward. The first thing to do is to mark the blade so we know where the throat will be. This can be done by using a pencil to draw a line where the inside of the throat meets the back of the plane blade.

The lines are clearly visible after taking the blade out.

Then I grind down the corners until they are just inside those lines.


And now the cutting edge doesn't stick out past the sides of the throat anymore. As you use a Japanese plane and sharpen it, the width of the cutting edge will widen over time, and at some point you'll have to grind the corners back.

6 notes
·
View notes
Text
5 Signs You’re Using the Wrong Carbide Burr
Using the wrong carbide burr can damage materials, get poor results and waste time. Whether you’re working in metal fab, automotive finishing or tool and die maintenance industry, the right burr for the job matters. The SA-5 carbide bur is designed for specific tasks. But how do you know it’s the right one in your grinder?
Here are five signs you might be using the wrong carbide burr for your application.
Material Is Chipping or Burning
If you’re seeing chips, burns or heat marks on your workpiece, your burr may not be designed for that material. The SA-5 carbide bur is best on metals like steel, stainless steel and cast iron. If you’re using it on soft materials like aluminum or wood, you’re causing heat buildup and uneven cutting. Use aluminum cut burrs for soft materials and single cut burrs for rapid stock removal on hard surfaces.
Too Much Vibration During Use
A matched burr should run smooth with the right speed and material. If your tool is shaking or skipping it’s probably the wrong size or cut. The SA-5 has a 1/2" head diameter and 1/4" shank, designed for high RPM grinding. Using it on the wrong grinder or at the wrong angle will give you poor results.
Slower Than Expected Cutting Speed
If the burr isn’t cutting as fast as you expected the problem might be with the design. The SA-5 has a double cut, great for smooth finishes and control. But if you need to remove a lot of material fast a single cut burr might be better. Check your cutting goals before you choose the burr.
Irregular Wear or Burr Damage
Check out the burr’s teeth—are they dull, chipped or uneven? This means you’re using it on the wrong material or speed. SA-5 carbide burs are tough but still need to be used correctly to perform. Running above recommended RPM’s or applying too much pressure will shorten the life of the burr.
Inconsistent Surface Finishes
If your finish is rough or uneven you’re using the wrong shape or cut. The SA-5 is a cylindrical shape for right angle corners and flat surfaces. Using it on rounded or contoured areas will give you inconsistent results. For curved profiles use ball shaped or tree point burs instead.

Final Word
Choosing the correct carbide burr is crucial for getting the job done efficiently and safely. The SA-5 carbide bur is a powerful tool when used correctly—but it's not a one-size-fits-all solution. Match your burr to your task, material, and machine for the best results.
Looking to upgrade your toolkit with the right burr for the job? Shop the SA-5 carbide bur and other high-performance options at Burrs4Less!
0 notes
Text
How to Trim Your Dog’s Nails: A Complete Guide by The Paw Dynasty
Trimming your dog’s nails is an essential part of their grooming routine. Yet, for many pet owners, it’s one of the most stressful tasks. Whether it's the fear of hurting your pet or just not knowing the right technique, you're not alone. At The Paw Dynasty, we understand your concerns and are here to help you master the process with confidence. If you've been wondering how to trim your dog’s nails, this comprehensive guide will walk you through everything you need to know.
Why Nail Trimming is Crucial for Your Dog’s Health
Long nails in dogs aren't just an aesthetic issue—they can lead to several health and behavioral problems. When a dog’s nails grow too long, they can curve inward and dig into the paw pads, causing pain, infection, or even posture and joint issues. Additionally, overgrown nails can split or crack, which is both painful and prone to infection.
At The Paw Dynasty, we advocate for regular grooming practices that not only make your dog look great but also enhance their overall well-being. Knowing how to trim your dog’s nails safely and effectively is a valuable skill every dog owner should learn.
How Often Should You Trim Your Dog’s Nails?
The frequency of nail trimming depends on your dog’s lifestyle and breed. Dogs that walk frequently on hard surfaces like concrete may naturally wear their nails down and need less frequent trimming. However, indoor dogs or those that mostly walk on soft surfaces like grass or carpet may require trimming every 3–4 weeks.
A good rule of thumb from The Paw Dynasty: if you can hear your dog’s nails clicking on the floor, it’s time for a trim.
Preparing to Trim Your Dog’s Nails
Before you begin, preparation is key. Make sure you have all the necessary tools ready:
Dog nail clippers (scissor-style or guillotine-type)
Styptic powder (to stop bleeding if you cut the quick)
A file or grinder (optional for smoothing edges)
Treats (to keep the experience positive)
At The Paw Dynasty, we always recommend choosing high-quality grooming tools that are specifically designed for dogs. Using human nail clippers or dull instruments can increase the risk of injury.
Understanding the Quick
One of the most important aspects of learning how to trim your dog’s nails is understanding the anatomy. Inside each nail is a sensitive area called the “quick,” which contains nerves and blood vessels. Cutting into the quick causes pain and bleeding.
In dogs with light-colored nails, the quick is visible as a pinkish area. For dogs with dark nails, it's harder to see. In such cases, trim a little at a time and stop when you see a gray or white circle inside the nail.
Being cautious and conservative is the safest approach, especially for beginners.
Step-by-Step: How to Trim Your Dog’s Nails
Here’s a simplified step-by-step guide on how to trim your dog’s nails:
Get your dog comfortable – Choose a quiet room and have your dog either lie down or sit calmly. You might want someone to help you if your dog is particularly nervous.
Inspect each paw – Look for dirt, debris, or any signs of infection or injury.
Start trimming slowly – Hold the paw firmly but gently. Trim a small bit of nail at a 45-degree angle. Avoid cutting too close to the quick.
Use a nail file – If your dog’s nails have sharp edges, gently file them down for a smoother finish.
Reward your dog – After trimming each paw, give a treat or praise. Positive reinforcement will make future sessions easier.
At The Paw Dynasty, we stress the importance of patience. If your dog becomes stressed or anxious, take a break and try again later.
Dealing with Accidents
Despite your best efforts, accidents can happen. If you accidentally cut into the quick, don’t panic. Apply styptic powder or cornstarch to stop the bleeding. Comfort your dog and postpone further trimming until the next day.
Remember, learning how to trim your dog’s nails is a process, and each session helps you and your dog become more comfortable.
When to Seek Professional Help
If your dog strongly resists nail trimming, or if you're just not comfortable doing it yourself, it’s okay to seek professional help. Groomers and veterinarians have the experience and tools to do the job quickly and safely.
At The Paw Dynasty, we encourage responsible pet ownership. Knowing your limits and asking for help when needed ensures your dog’s safety and comfort.
The Paw Dynasty Tip: Make Nail Trimming Routine, Not a Chore
One of the best things you can do is make nail trimming a regular part of your dog’s grooming routine. Start when they’re young to help them get used to it. Combine it with other positive experiences like brushing, playtime, or cuddles.
Consistent nail maintenance can prevent health problems down the road and contribute to a happier, healthier dog. At The Paw Dynasty, we believe in building strong, trusting relationships between pets and their owners, and that starts with regular care.
Final Thoughts
Learning how to trim your dog’s nails might seem intimidating at first, but with the right guidance and a bit of practice, it becomes a simple and rewarding task. It’s an essential part of your dog’s grooming routine and contributes significantly to their overall health and happiness.
As always, The Paw Dynasty is here to support you with expert advice, helpful tips, and a community of fellow dog lovers who are all on the same journey. Whether you’re a first-time dog parent or an experienced pet owner, we’re with you every step of the way.
Stay tuned to The Paw Dynasty for more pet care tips, grooming guides, and everything you need to keep your furry friend happy and healthy.
Need more dog grooming advice? Visit The Paw Dynasty today and explore our latest articles, videos, and dog-loving community.
0 notes
Text
The Shocking Dangers of DIY Tree Removal - Why You Should Leave It to the Experts
Considering DIY tree removal in Ulladulla? It may seem simple, but the risks are real. Coastal winds and tricky terrain make it even more dangerous. Misjudging a tree’s fall or using heavy equipment without training can lead to serious injuries or property damage.
At Batemans Bay Tree Removals, we offer expert tree care services with a focus on ethics and professionalism. Serving Ulladulla, Batemans Bay, and nearby areas, we are your trusted tree removalist in Ulladulla. This post explains the risks of DIY tree removal and why hiring professionals is the safest choice for your property.
The Risks of DIY Tree Removal
Removing a tree involves more than simply cutting it down. It requires proper planning, specialized tools, and knowledge of tree anatomy. Without these, DIY attempts can quickly turn dangerous.
Personal Injury
Tree removal often requires working at heights, using sharp tools like chainsaws, and handling heavy branches. Without proper training,
You risk falling from ladders or trees.
You could be struck by falling limbs or debris.
Mishandling equipment like chainsaws can result in severe cuts or life-threatening injuries.
Property Damage
Trees are unpredictable when cut improperly. Misjudging the angle or direction of a fall can result in,
Damage to your home, car, or neighbouring properties.
Broken windows or roofs from falling branches.
Harm to nearby structures like fences or power lines.
Unstable Trees
Decaying trees or those affected by pests are weak and unpredictable. Trust a professional tree removalist in Ulladulla to safely handle them, ensuring proper removal and minimizing risks to your property.
Equipment Mishandling
Tree removal requires specialized tools such as chainsaws, stump grinders, and ropes. In inexperienced hands,
Chainsaws can cause accidents due to improper handling.
Ropes or chains used for pulling stumps may snap under pressure, causing injury.
Legal and Environmental Risks
In some areas, removing trees without permits can result in fines or legal action. Additionally,
Improper removal methods may harm surrounding plants or soil.
Cutting trees near power lines can lead to electrocution or outages.
Why Professional Tree Removal Is Safer
Here is how they minimize risks:
Professionals understand tree anatomy and can predict how a tree will fall based on its structure and surroundings. This knowledge ensures controlled and safe removal.
Experts use specialized tools designed for tree removal, including cranes for large trees and stump grinders for efficient cleanup. They also wear protective gear to minimize injury risks.
Professionals assess potential hazards such as unstable branches, proximity to power lines, and nearby structures before starting the removal process.
Certified arborists are insured, meaning any accidental damage during the process is covered, something DIY enthusiasts cannot guarantee.
Final Words
DIY tree removal might seem like a simple task, but the risks involved far outweigh the benefits. For your safety and to avoid costly damage, it is always better to trust professionals who have the right skills, equipment, and insurance.
At Batemans Bay Tree Removals, we prioritize safety and professionalism in every tree removal project. As your trusted tree removalist in Ulladulla, our skilled arborists use advanced tools like cranes and stump grinders for efficient, safe removal. We conduct thorough risk assessments to protect your property. Trusting our experts ensures the job is done right, minimizing risks and safeguarding both your property and well-being.
Disclaimer: This is generic Information & post; content about the services can be changed from time to time as per your requirements and contract. This is written for only SEO purposes; we are not claiming it is 100% accurate as it's general content. The images we use in this context have been taken from the official website of Batemans Bay Tree Removals. To get the latest and updated information, contact us today or visit our website.
0 notes
Text
A Beginner's Guide to Using Machine Grinders Effectively

Machine grinders are versatile tools that can significantly enhance any workshop's capabilities, whether you're a hobbyist, DIY enthusiast, or professional craftsman. Understanding how to use a machine grinder effectively can transform raw materials into finely crafted pieces, achieving precision cuts and smooth finishes. This guide will delve into the essentials of using machine grinders, offering tips and insights to ensure you make the most of this indispensable tool.
Understanding Machine Grinders
Machine grinders come in various types, each designed for specific tasks. The most common types include bench grinders, angle grinders, and die grinders. Each type serves a distinct purpose, from sharpening tools and shaping metal to polishing surfaces and cutting through tough materials. Selecting the right machine grinder depends on the task at hand and the materials you're working with.
Setting Up Your Machine Grinder
Before using your machine grinder, proper setup is crucial for safety and efficiency. Here's a step-by-step guide:
Choose the Right Grinder: Identify the correct type of grinder for your specific needs. For instance, an angle grinder is ideal for cutting and shaping metal, while a bench grinder is used for sharpening tools.
Secure the Work Area: Ensure your work area is clean and free of clutter. Secure the machine grinder on a stable surface to prevent movement during operation.
Inspect the Grinder: Check the grinder for any signs of wear or damage. Ensure all parts are functioning correctly, and the grinding wheel is in good condition.
Use the Appropriate Safety Gear: Always wear safety goggles, gloves, and ear protection when operating a machine grinder. Loose clothing should be avoided to prevent accidents.
Operating the Machine Grinder
Once your grinder is properly set up, follow these steps to operate it effectively:
Start the Grinder: Turn on the machine and allow it to reach full speed before using it on your material. This ensures a smoother cut and reduces the risk of kickback.
Position the Material: Securely position the material you're working on. Ensure it is stable to prevent movement during grinding.
Apply Consistent Pressure: Gently guide the material into the grinding wheel, applying consistent pressure. Avoid forcing the grinder, as this can cause overheating and damage both the material and the wheel.
Move Evenly: For even results, move the material evenly across the grinding wheel's surface. This helps achieve a uniform finish and prevents uneven wear on the grinding wheel.
Regular Checks: Regularly check the material's progress and adjust your technique as needed. This helps prevent over-grinding and ensures a high-quality finish.
Maintaining Your Machine Grinder
Proper maintenance of your machine grinder is essential for longevity and performance. Here are some maintenance tips to keep your grinder in top condition:
Regular Cleaning: After each use, clean your machine grinder to remove dust and debris. This prevents buildup that can affect performance.
Inspect the Grinding Wheel: Regularly inspect the grinding wheel for wear and damage. Replace it when necessary to maintain optimal performance.
Lubricate Moving Parts: Periodically lubricate the machine's moving parts to ensure smooth operation and prevent wear.
Check for Loose Components: Regularly check for loose nuts, bolts, and other components. Tighten them as needed to ensure safety and performance.
Conclusion
Mastering the use of machine grinders can significantly enhance your craftsmanship, allowing you to achieve precision cuts and smooth finishes with ease. By understanding the different types of grinders, setting up your workspace properly, and maintaining your machine, you can effectively harness the power of machine grinders for all your projects. At Tomahawk Tools, we offer a range of high-quality machine grinders designed to meet the needs of both professionals and enthusiasts. Trust in our expertise and equip your workshop with the reliable, efficient grinders that set the industry standard.
FAQs:
1. What is the difference between a bench grinder and an angle grinder?
A bench grinder is typically stationary and used for sharpening tools and shaping metal. An angle grinder is handheld and versatile, suitable for cutting, grinding, and polishing a variety of materials.
2. How often should I replace the grinding wheel on my machine grinder?
The grinding wheel should be replaced when it shows signs of wear, damage, or when it becomes inefficient in cutting or grinding. Regular inspections can help determine when replacement is necessary.
3. Can machine grinders be used on wood?
Yes, machine grinders like angle grinders can be used on wood for shaping and smoothing. However, it's essential to use the correct wheel or disc designed specifically for wood to achieve the best results.
4. How do I prevent overheating while using a machine grinder?
To prevent overheating, avoid applying excessive pressure on the material and allow the grinder to reach full speed before use. Taking regular breaks during extended grinding can also help manage temperature.
5. What safety precautions should I take when using a machine grinder?
Always wear personal protective equipment, such as safety goggles, gloves, and ear protection. Ensure your work area is clean and free of obstructions, and never wear loose clothing that could become entangled in the machine.
0 notes
Text
Essential Tools and Machinery for Efficient Service Delivery by BellevueNebraska

In today’s fast-paced world, having the right tools and machinery can be the difference between an average job and exceptional service. At BellevueNebraska, we understand the importance of equipping our team with industry-grade tools that not only ensure precision but also boost efficiency, safety, and customer satisfaction.
Whether we’re handling a complex service request or a routine job, having the proper tools on hand helps us get the job done right the first time. From diagnostics to repairs, installations, or maintenance, our toolbox is built to tackle both challenges and surprises with professionalism and ease.
In this blog, we’ll walk you through the key tools and machinery we rely on, why they matter, and how they contribute to our trusted service delivery. Plus, we’ve included five of the most frequently asked questions about our equipment and methods — giving you an inside look at how BellevueNebraska stays a step ahead.
Our Core Tool Categories
1. Diagnostic Tools
Before any service begins, it’s important to assess the situation correctly. Diagnostic tools help us pinpoint issues accurately.
Multimeters – Essential for testing electrical systems.
Thermal Imaging Cameras – Detect overheating components or hidden leaks.
Moisture Meters – Help identify water damage in walls, floors, and ceilings.
Inspection Cameras – Perfect for looking inside pipes or wall cavities without invasive demolition.
2. Power Tools
Speed and precision matter. Power tools allow our technicians to execute tasks faster while maintaining control.
Cordless Drills and Drivers – Great for quick assembly and installation.
Angle Grinders – Used in surface prep and metal cutting.
Reciprocating and Circular Saws – Make cutting through various materials efficient.
Impact Wrenches – Ideal for high-torque applications such as loosening rusted bolts.
3. Lifting and Access Equipment
Safety and accessibility are crucial, especially for services involving elevated or tight spaces.
Extension Ladders and Step Ladders – Provide reach without compromising stability.
Portable Scaffolding Systems – Used when working on multi-level structures.
Hoists and Winches – Ensure safe lifting of heavy machinery or parts.
4. Plumbing and HVAC Tools
For plumbing or climate control services, having dedicated tools is non-negotiable.
Pipe Cutters and Threaders – Provide custom fitting solutions on-site.
Drain Augers and Jetters – Used for clearing clogs and blockages efficiently.
Manifold Gauge Sets – Essential for HVAC diagnostics and refrigerant charging.
Vacuum Pumps – Used for evacuating air and moisture from HVAC systems.
5. Safety and Personal Protective Equipment (PPE)
Our tools would be meaningless without safety. We prioritize the well-being of both our technicians and clients.
Hard Hats, Safety Glasses, Gloves – Basic PPE for every site.
Respirators and Dust Masks – Critical when dealing with contaminants or dust.
Fall Arrest Systems – Used when working at height.
Why Tools Matter to Our Customers
Using the right tools doesn’t just make life easier for our team — it directly benefits our customers. Here’s how:
Faster turnaround – Jobs that might take hours with manual tools can be completed in half the time.
Higher accuracy – Precision tools mean fewer mistakes and more dependable results.
Reduced property disruption – Advanced diagnostics and minimally invasive methods help us protect your space.
Long-term savings – Quality service reduces the need for repeat work or future repairs.
Our Machinery at a Glance
In addition to portable tools, BellevueNebraska uses several heavy-duty machines for large-scale or specialized projects:
Mini Excavators – Used for outdoor digging, trenching, or grading tasks.
Concrete Cutters and Mixers – Allow for quick surface modifications or patch jobs.
Mobile Air Compressors – Power pneumatic tools on remote sites.
Generators – Ensure uninterrupted power supply during off-grid jobs.
These investments ensure that we stay self-sufficient, reliable, and ready for any situation that comes our way.
5 Frequently Asked Questions (FAQs)
1. What types of services require heavy machinery?
Heavy machinery like mini excavators and concrete mixers are typically used for outdoor installations, foundation repair, utility line access, and large-scale remodeling. These machines help speed up work while ensuring a high-quality finish.
2. Do you bring all the necessary tools to every service call?
Yes. Our technicians arrive fully equipped for the job. We assess the scope during the booking process and ensure the van is stocked with everything needed — from basic hand tools to specialized equipment.
3. Is your equipment regularly maintained?
Absolutely. We have strict internal policies that require regular calibration, inspection, and maintenance of all our tools and machinery. Well-maintained tools reduce risks and ensure efficiency.
4. How do you ensure safety when using large machinery?
Every operator at BellevueNebraska is trained and certified. We also perform site assessments before beginning any task, use PPE, and follow industry-standard safety protocols to protect both our team and your property.
5. Can I request specific tools or methods for my project?
Definitely! If you have a preference — such as non-invasive diagnostics or eco-friendly tools — let us know when booking. We’re happy to tailor our approach to meet your expectations.
Final Thoughts
At BellevueNebraska, we believe in doing things right. That starts with showing up prepared, equipped, and ready to solve problems efficiently. Our wide range of tools and machinery ensures we’re ready for just about anything — from small fixes to major overhauls.
Choosing a service provider isn’t just about cost — it’s about confidence. With our top-tier equipment, experienced technicians, and a commitment to excellence, you can rest easy knowing your project is in capable hands.
#BellevueNebraska#ProfessionalTools#MachineryMatters#ServiceEfficiency#HomeRepairs#DiagnosticTools#PowerTools#HVACandPlumbing#SafetyFirst#QualityService
0 notes
Text
How to make a PCB

Today, I will cover in detail and show the process of making a printed circuit board at home. In addition to a soldering iron and a pair of side cutters, you will need a laser printer, an iron, a micro drill, and a few other tools for this job.
I test my designs on traced PCBs and do not use universal prototyping boards. It’s more convenient for me personally, and here’s why.
On the one hand, tracing a PCB takes time. On the other hand, it is also required to carefully arrange components and connections on a universal board. Additionally, you will need to cut traces on a stripboard or, on the contrary, make the traces you need on a breadboard if it is a matrix of pre-drilled holes with separate copper pads.
A board designed in CAD can then be copied in any number, either by making it yourself or by ordering from a factory, all new and shiny, already with a solder mask and silkscreen printing.
Finally, repairing and modifying a circuit on a printed board can be easier than on a universal one. Especially if long pins of the components on a universal board are used as tracks.
So, I drew the scheme in Schematic Editor, part of the KiCad 7.0 software package. This will be a microphone preamp; I will describe it more thoroughly in the upcoming posts. Moreover, this essay is on making the actual board, not its schematics.

Next, one needs to run the footprint assignment tool and specify the footprint for each and every component.

Then, we need to export the netlist.

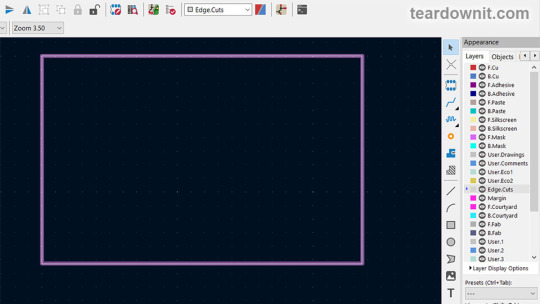
On the Edge. Cuts layer draw a rectangle that specifies the dimensions of our future PCB.

Now, we need to lock that rectangle so that it does not stand out too much and prevent it from being changed while we continue to draw our board layout.
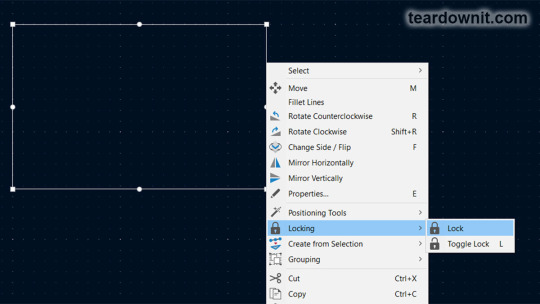
One should ensure the Locked Items checkbox is unchecked on the Selection Filter.
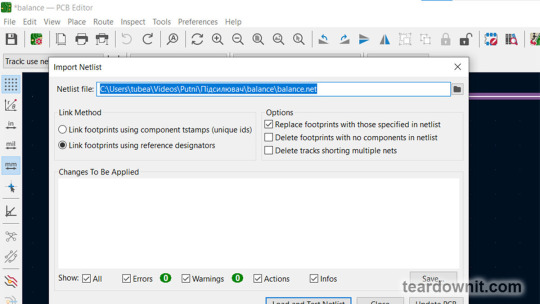
Next, open PCB Editor and import the netlist.

Click Load and Test Netlist, and then Update PCB.
Then, you can place the components and draw the tracks.

We can view a 3D model of the future board at any time.

Once all the components are in place and the traces and polygons are drawn, one can print an image of the copper layer. You should turn off the toner save mode on your laser printer.
You can use glossy photo paper (designed for inkjet printing), any pages from glossy ad brochures or magazines, or special heat transfer paper for laser printers from electronics enthusiasts' stores. It is often colored yellow.
My board is single-sided, with all the components on the front side and all the copper on the backside. Therefore, we select the B.Cu and Edge.Cut layers for printing. The print scale should be 1:1.
If printing the front copper layer of F.Cu, we need to check the "Print Mirrored" checkbox.
Next, you must cut out a board of the required size from foil fiberglass. Some of us have access to professional cutters or use tin snips.
Others can utilize a rotary power tool with a cutting wheel or even an angle grinder. This is not the best option since fiberglass dust contains microscopic glass particles that irritate the skin and are very harmful if inhaled.
Due to its material, fiberglass PCB quickly dulls any tool except a diamond one. You can see the PCB with a hacksaw, but it will end up its teeth very quickly.
I use an adjustable tile hole cutter for cutting fiberglass. It contains two carbide cutters that can scratch a deep groove in the board and then simply break it along this groove.

These cutters are specifically designed for working on rigid materials, so CEM will not soon dull them. With this technique of cutting the PCB by scraping the track, we minimize the amount of glass dust and do not scatter it in the air.
Next, you need to carefully clean the surface of the copper foil. You can use the finest sandpaper, mild abrasive powder, or steel wool for dish cleaning. I use just a hard eraser. The point of cleaning is not only to remove dirt, oils, and oxides but also to cause micro-scratches for the toner to stick to.
Immediately after, the board must be thoroughly washed to remove any small foreign particles, then fried and degreased with acetone, lighter fluid, ethyl, or isopropyl alcohol.
So, we have a clean, dry fiberglass blank and a piece of glossy paper with traces printed on it. Textolite and paper are the same size. I fold them together and wrap them in a layer of office paper, newspaper, or, better yet, rolling paper.
Thin paper is needed so the glossy paper does not move relative to the PCB. Now, we place the wrapped board blank on a heat-resistant flat surface that we don't mind getting dirty. I use a stack of a few cardboard packaging sheets.
We take the iron, turn it on, and set the temperature as high as it goes. We place it on the blank board and iron it for three to four minutes so the blank has time to warm up nicely.
There is no need to press too hard, but the pressure should be firm. The skill comes with experience. To hold the hot workpiece while ironing, you can use a chopstick.
Remove the iron from the board and turn it off. Remove the wrapping paper from the board after it has cooled off, and place the PCB and the glossy paper in a warm water bath.
Next, slowly and carefully tear off the paper piece by piece from the fiberglass. The tracks and pads on the copper foil should be imprinted.

If some part of the board's design comes off, it can be restored with a permanent marker after the board is completely dry. If a significant piece of the polygon has fallen off, you can just tape it.
Next, I glue strips of tape on the non-foil side of the board to make small hanging rings to hold the board while etching. Throwing a chopstick through these rings is convenient to keep the board hanging. For etching to occur evenly, the board must be swiveled from side to side to mix the solution.

I use a ferric chloride solution for etching, which can be used multiple times. You can store it in a plastic or glass container with a non-metallic lid. This poisonous solution will corrode almost any metal, including stainless steel, so it should be stored, marked, and used cautiously.
To prepare an etching solution, you must take water at room temperature, pour it into a non-metallic container, and add ferric chloride little by little, stirring until the ferric chloride stops dissolving.
The solution will heat up during the dissolution process, not as much as when slaking lime, but noticeably. There is no need to filter the prepared solution or remove the sediment from the bottom of the container.
The optimal temperature for etching the board is 105–130°F (40–55°C). You can heat the solution past that, but then it may wash away permanent marker drawings.
I use plastic food containers for etching and a microwave to heat up the solution. I place the plastic container with the lid loosely closed inside a second bigger one with a lid on and turn on the microwave for one minute. This way, I can be sure that ferric chloride will not damage the microwave.
Once the excess copper on the board has completely dissolved, the board should be immediately washed with plenty of water using a toothbrush. If you do this over a metal sink, be sure not to leave a drop of etching solution anywhere; it can eat right through the sink.

Using acetone, we erased the toner from the washed and dried board and began drilling holes with a microdrill.

Trying the board in the case.

Then, you can begin soldering the components immediately. Still, the best results are obtained if you tin the entire copper foil. I use solder paste for this; just remember that it is toxic, and after working with it, you must wash your hands and wipe the table's surface clean.
Apply solder paste using a spatula in as thin a layer as possible, as if applying thermal paste to a processor. Next, heat the copper foil with a soldering iron.

Now, wipe or rinse the board with the same degreaser liquid you've used before transferring the toner, and you can place and solder the components.

0 notes
Text
Wholesale Tools: A Comprehensive Guide for Retailers and Contractors
When it comes to building a successful business in the construction or home improvement sector, having access to reliable wholesale tools is essential. Whether you're a retailer looking to stock up on high-demand items or a contractor seeking cost-effective solutions, the right tools can make all the difference. In this article, we’ll explore why Boxer Tools is the go-to choice for wholesale tools and how their offerings can elevate your business.
Why Choose Wholesale Tools?
Purchasing tools in bulk offers several advantages:
Cost Savings: Buying wholesale often means significant discounts compared to retail prices.
Consistent Supply: Wholesale suppliers ensure you have a steady inventory of essential tools.
Quality Assurance: Reputable wholesalers like Boxer Tools deliver high-quality, durable products.
Diverse Selection: Wholesale suppliers often carry a wide range of tools, catering to various professional needs.
Boxer Tools: Your Trusted Wholesale Partner
Boxer Tools has earned a stellar reputation in the industry as a trusted supplier of wholesale tools. Their commitment to quality, innovation, and customer satisfaction sets them apart from competitors. Here's why they should be your first choice:
1. Extensive Product Range
From power tools to hand tools, Boxer Tools offers an expansive catalog to meet the needs of every professional. Their selection includes:
Drills and drivers
Welding machines
Cordless tools
Measurement instruments
2. High-Quality Standards
Boxer Tools ensures that every product is built to last. Their tools are designed to withstand heavy-duty use, making them ideal for construction sites, workshops, and DIY projects.
3. Competitive Pricing
Boxer Tools understands the importance of affordability for businesses. Their wholesale pricing structure is tailored to help you maximize your profit margins without compromising on quality.
4. Customer-Centric Approach
With exceptional customer service and a commitment to building long-term relationships, Boxer Tools is more than just a supplier—they're a partner in your business success.
Top Products to Watch
If you're looking to stock up on must-have tools, here are some of Boxer Tools’ bestsellers:
Cordless Angle Grinders: Versatile and powerful, these grinders are perfect for various cutting and grinding tasks.
Welding Machines: Designed for precision and durability, these machines are a favorite among professionals.
Hand Tools: From screwdrivers to wrenches, Boxer Tools offers a wide variety of essential hand tools.
How to Partner with Boxer Tools
Getting started with Boxer Tools is simple:
Visit their website to explore their product catalog.
Contact their sales team for personalized recommendations and bulk pricing.
Place your order and enjoy timely delivery to your location.
Choosing the right wholesale supplier is crucial for the success of your business. With their extensive range, commitment to quality, and competitive pricing, Boxer Tools stands out as the ultimate partner for all your wholesale tool needs. Whether you’re a retailer or a contractor, Boxer Tools has the solutions you need to grow and thrive in a competitive market.
Get in touch with Boxer Tools today and experience the difference a trusted wholesale partner can make.
1 note
·
View note
Text
How to Cut Aluminum Sheet Metal: A Comprehensive Guide
Aluminum sheet metal is a versatile material widely used in construction, automotive, and DIY projects. Known for its durability, lightweight nature, and resistance to corrosion, aluminum sheet metal has become a go-to choice for professionals and hobbyists alike. However, cutting aluminum sheet metal requires the right tools, techniques, and safety precautions to ensure precise results without damaging the material.

In this guide, we’ll explore the step-by-step process to cut aluminum sheet metal effectively, focusing on its use in construction and DIY projects. Whether you’re a professional or a beginner, this guide will help you achieve clean and accurate cuts.
Why Use Aluminum Sheet Metal? Aluminum sheet metal is a preferred material in many industries, particularly for metal for construction projects. Its lightweight nature makes it easy to handle, while its strength ensures longevity. From roofing panels and siding to intricate decorative elements, aluminum sheet metal offers unparalleled flexibility and functionality.
Additionally, aluminum’s natural resistance to rust and corrosion makes it ideal for outdoor and high-humidity environments. With such widespread applications, knowing how to cut this material is an invaluable skill.
Tools Needed for Cutting Aluminum Sheet Metal Cutting aluminum requires tools that are specifically designed or adapted for metals. Here are some commonly used tools:
Tin Snips: Ideal for cutting thin sheets of aluminum. These are perfect for straight or slightly curved cuts. Jigsaw: Equipped with a fine-toothed blade, a jigsaw can handle thicker aluminum sheets and allows for intricate cuts. Circular Saw: Use a blade designed for cutting metal, such as carbide-tipped blades. This is best for straight cuts on thicker sheets. Angle Grinder: Suitable for precision cuts, especially on thicker aluminum sheet metal used in construction. Plasma Cutter: A high-end tool for professionals, plasma cutters can achieve precise, complex cuts with minimal effort. Each tool has its advantages, and the choice will depend on the thickness and type of aluminum sheet you’re working with.
Step-by-Step Guide to Cutting Aluminum Sheet Metal
Measure and Mark the Cut Line Before cutting, measure and mark the aluminum sheet using a pencil or marker. Use a ruler or straightedge to ensure accuracy. For curved designs, use a template or stencil for guidance.
Secure the Aluminum Sheet Place the aluminum sheet on a stable surface and secure it using clamps. This prevents movement during the cutting process, ensuring precise and safe cuts.
Choose the Right Tool Depending on the thickness of the sheet and the desired cut, select the appropriate tool:
For thin sheets (under 1mm), tin snips work well. For thicker sheets or complex designs, opt for a jigsaw or angle grinder.
Begin Cutting If using tin snips, start from the edge and cut along the marked line, applying steady pressure. For power tools like a jigsaw or circular saw, align the blade with the marked line before turning on the tool. Cut slowly to avoid overheating the metal or damaging the blade.
Smooth the Edges After cutting, the edges of the aluminum sheet may be sharp or rough. Use a metal file or sandpaper to smooth the edges, making the sheet safe to handle.
Clean the Aluminum Sheet Finally, wipe down the sheet with a damp cloth to remove any debris or residue from the cutting process.
Safety Tips for Cutting Aluminum Sheet Metal Working with aluminum sheet metal involves certain risks, so safety should always be a priority:
Wear protective gloves to prevent cuts and abrasions. Use safety goggles to shield your eyes from flying metal shards. Work in a well-ventilated area to avoid inhaling metal dust. Ensure all tools are in good condition and appropriate for the task. Applications of Aluminum Sheet Metal in Construction Aluminum sheet metal plays a critical role in metal for construction projects. Its versatility allows it to be used in applications such as:
Roofing panels and cladding Window and door frames Decorative elements and signage Electrical enclosures and HVAC systems For these uses, cutting the aluminum sheet to precise dimensions is essential, ensuring it fits seamlessly into the project.
Why Choose Bobcometal for Your Aluminum Needs? When working with aluminum sheet metal, quality matters. At Bobcometal, we provide premium-grade aluminum sheets tailored to meet the demands of your construction and DIY projects. Our sheets are lightweight, durable, and easy to work with, making them the ideal choice for both professionals and hobbyists.
Whether you need aluminum for roofing, siding, or custom designs, Bobcometal is your trusted partner for all things metal. Explore our extensive range of metal for construction materials and get started on your next project today.
Conclusion Cutting aluminum sheet metal doesn’t have to be intimidating. With the right tools, techniques, and safety measures, you can achieve precise cuts that enhance your project’s quality and durability. From thin sheets to heavy-duty panels, aluminum remains a versatile and reliable choice for construction and creative applications.
For high-quality aluminum sheet metal and expert advice, trust Bobcometal to deliver the materials and support you need. Visit our website or contact us to learn more about our range of products and services.
0 notes
Text
How to Trim Your Dogs Nails: A Complete Guide for Pet Parents
Keeping your dog’s nails trimmed is an important part of their health and happiness. Long nails can cause discomfort, affect the way your dog walks, and even lead to serious health problems. But if you're unsure how to trim your dogs nails, don't worry—you’re not alone!
At The Paw Dynasty, we’re here to make pet care simple and stress-free. In this easy-to-follow guide, you’ll learn everything about how to trim your dogs nails safely, confidently, and with love.
Why Trimming Your Dog’s Nails Is So Important
Before we dive into how to trim your dogs nails, let’s talk about why it matters so much.
If your dog’s nails get too long, it can cause:
Painful pressure on the paw joints
Changes in walking posture (which can lead to injuries)
Splitting, cracking, or breaking of the nail
Risk of nails curling into the paw pads
Increased risk of infections
Learning how to trim your dogs nails the right way helps keep your pet happy, healthy, and active.
How Often Should You Trim Your Dog’s Nails?
A good rule of thumb is to trim your dog’s nails every 3–6 weeks. However, the timing depends on:
Your dog’s breed
Their activity level (dogs who walk on hard surfaces often wear nails down naturally)
Their individual nail growth rate
If you hear a “click, click, click” when your dog walks on the floor, it’s definitely time to learn how to trim your dogs nails!
What You Need Before You Start
Having the right tools makes all the difference when learning how to trim your dogs nails. Here’s what you’ll need:
Dog nail clippers (choose the right size for your dog)
Styptic powder or cornstarch (to stop bleeding in case you nick the quick)
Treats and praise
A towel or mat (for comfort and grip)
Good lighting (so you can see the nail clearly)
Optional: A nail grinder for smooth finishing after clipping.
Step-By-Step Guide: How to Trim Your Dogs Nails
Now, let’s get into the heart of how to trim your dogs nails safely and easily.
Step 1: Create a Calm Environment
Choose a quiet, calm space free from distractions. If your dog is nervous, take a little extra time to help them relax. You can pet them, speak gently, or even practice handling their paws before you start.
At The Paw Dynasty, we recommend associating nail trims with positive experiences. A relaxed dog = an easier trim!
Step 2: Get Your Dog Comfortable
Hold your dog’s paw gently but firmly. If your dog pulls away, don’t yank—stay calm and patient. Gently rub their paws for a few seconds each day leading up to the trim if they’re not used to it.
Building trust is key to mastering how to trim your dogs nails.
Step 3: Identify the Quick
Inside each nail is a pinkish area called the quick. It contains blood vessels and nerves. Cutting into the quick can cause pain and bleeding.
For light-colored nails: You can easily see the quick—cut only the tip.
For dark-colored nails: Be extra cautious. Trim little by little, stopping when you see a gray or white center appear.
A big part of learning how to trim your dogs nails is avoiding the quick!
Step 4: Trim Little by Little
Use your clippers to snip off a small part of the nail at a 45-degree angle. It’s better to take off too little than too much.
Pro tip from The Paw Dynasty: If you’re nervous, trim just a tiny bit off and plan to trim again in a week.
Small, regular trims are much safer and less stressful when learning how to trim your dogs nails.
Step 5: If You Accidentally Cut the Quick
Don’t panic! Even experienced groomers sometimes clip the quick.
Apply styptic powder or cornstarch to the bleeding nail.
Press gently until the bleeding stops (usually a few minutes).
Offer your dog lots of comfort and treats.
Mistakes happen—it’s part of the journey when you’re learning how to trim your dogs nails.
Step 6: Reward Your Dog
After each nail (or at least after the whole session), give your dog praise, a treat, or their favorite toy.
Positive reinforcement teaches them that nail trimming isn’t scary—it’s just another part of bonding with you.
This step is critical for long-term success with how to trim your dogs nails.
Tips for Success: How to Trim Your Dogs Nails Without Stress
Start young: Get puppies used to nail trimming early.
Short sessions: It's okay to trim a few nails at a time instead of doing them all at once.
Use quality clippers: Dull blades can crush or split the nail.
Have a helper: Another person can help hold or distract your dog if needed.
Practice paw handling: Regularly touch and handle your dog’s paws to desensitize them.
At The Paw Dynasty, we always say: “Go slow, stay positive, and keep the experience happy!”
What About Using a Nail Grinder?
Nail grinders are a great option for dogs who hate clippers or for owners who are afraid of cutting the quick.
Grinders gently sand down the nail, allowing you to remove small amounts at a time. They can leave a smoother finish and are especially helpful for thick or black nails.
Using a grinder can be an excellent addition to your toolbox for how to trim your dogs nails safely.
When to Call a Professional
Sometimes it’s better (and safer) to let a groomer or vet handle it. Call a professional if:
Your dog is extremely anxious or aggressive about nail trims
You can’t see the quick clearly
Your dog has deformed, brittle, or very thick nails
You simply feel unsure or nervous
There’s no shame in asking for help! The important thing is that your dog’s nails stay healthy.
Final Thoughts from The Paw Dynasty
Learning how to trim your dogs nails is one of the best skills a pet parent can have. It helps your dog stay comfortable, avoids health problems, and strengthens your bond.
Remember, at The Paw Dynasty, we believe pet care should be simple, stress-free, and full of love. Whether you’re clipping nails, choosing the right dog food, or wondering "Can Dogs Eat Mango", we’re here to help with easy guides you can trust.
Quick Recap: How to Trim Your Dogs Nails
✅ Create a calm environment ✅ Use the right tools ✅ Trim small amounts at a 45-degree angle ✅ Watch for the quick ✅ Reward your dog ✅ Stay patient and positive
Mastering how to trim your dogs nails isn’t just about keeping them pretty—it’s about keeping them healthy, happy, and ready to run and play by your side.
🐾 Visit The Paw Dynasty for more pet care tips, product reviews, and expert advice today!
0 notes
Text
Supplier of Stainless Steel Square Bar in Maharashtra

Arisa Impex is a Supplier of a Stainless Steel Square Bar in Maharashtra, India. Our Manufacturer Unit is in Ahmedabad, Gujarat, India. Arisa Impex is a Manufacturer, Exporter, and Supplier of Stainless Steel Products, including Stainless Steel Round Bars, Wires, Rods, Sheets, Coils, Pipes, Flat Bars, Square Bars, Hexagonal Bars, Angles, Flanges, and Alloy Steel. We are selling high-grade quality series such as 200, 300, and 400. Why Choose Us? Experience and Expertise: With years of experience in manufacturing stainless steel products, we have honed our skills to deliver exceptional quality. Customer-Centric Approach: We prioritize our customers’ needs and work closely with them to provide tailored solutions. Timely Delivery: Our efficient production process ensures that we meet deadlines without compromising quality. Competitive Pricing: We offer high-quality stainless steel square bars at competitive prices, providing excellent value. Specifications: Stainless Steel Square Bar Grades: 202, 304, 304L, 304H, 316, 316L, 316Ti, 310, 310S, 321, 321H, 317, 347, 347H, 904L, ASTM A276, ASTM A484 Size: 3mm to 800mm Length: Long Bars: 15-20 Random Lengths Tolerances: H8, H13, H11, H10, H9, K9, H12, K11, K12, K10 Length: 12 Random Lengths What are the different sizes of stainless steel square bars available? Stainless steel square bars are available in a wide range of sizes, from small bars measuring ¼ inch to large ones exceeding 4 inches. Customers can order custom dimensions depending on the needs of the project, with the most common sizes ranging from 1/4 inch to 2 inches. How are stainless steel square bars cut? You can cut stainless steel square bars using various tools, including hacksaws, bandsaws, and angle grinders. For larger quantities or thicker bars, industrial-grade machines like band saws or plasma cutters make precise cuts. Arisa Impex is a Supplier of Stainless Steel Square Bar in Maharashtra including locations like Mumbai, Pune, Nagpur, Thane, Pimpri-Chinchwad, Nashik, Kalyan-Dombivli, Vasai-Virar, Aurangabad, Navi Mumbai, Solapur, Mira-Bhayandar, Bhiwandi-Nizampur, Jalgaon, Amravati, Nanded-Waghala, Kolhapur, Ulhasnagar, Sangli, Malegaon, Akola, Latur, Dhule, Ahmednagar, Chandrapur, Parbhani, Ichalkaranji, Jalna Ambarnath, Bhusawal, Panvel, Badlapur, Beed, Gondia, Satara, Barshi, Yavatmal, Achalpur, Osmanabad, Nandurbar, Wardha, Udgir, Hinganghat. For more information about our product catalog, please feel free to reach out to us through the provided contact details. View Product: Click Here Read the full article
#Achalpur#Ahmednagar#Akola#Amravati#ArisaImpex#Aurangabad#Badlapur#Barshi#Beed#Bhiwandi-Nizampur#Bhusawal#Chandrapur#Dhule#Exporter#Gondia#Gujarat#Hinganghat#Ichalkaranji#India#Jalgaon#JalnaAmbarnath#Kalyan-Dombivli#Kolhapur#Latur#Maharashtra#Malegaon#Manufacturer#ManufacturerofStainlessSteelSquareBar#Mira-Bhayandar#Mumbai
0 notes
Text
Wednesday
October 23rd, 2024
First thing I did today was prep the pieces I cut last time. I used the angle grinder with the grinding disk and quickly went over each of the edges.

I didn't get all the mill scale off but I don't care. This is for practice welding, not practice grinding! I was anxious to get started.
Then I tacked five pieces together to form practice plate #4 (PP4)!


Lol, my tack welds. These always crack as I'm filling in the groove. I need a lesson on how to do better tack welds.
Then I did a root pass. I accidentally broke the arc partway through, but I cleaned up the slag and continued. It looks okay on the upper toe; not much undercut! Voids on the bottom toe though, I think.


Then I did a fill pass:

Immediately I knew my work angle was wrong because the profile of this bead was quite flat (relative to the groove).
The next few fill passes kinda helped disguise that because they were able to sit atop the first pass and flatten out the overall profile of this layer.


Here you can see some low spots caused by unsteady hand and inconsistent fill :)
The next layer of fill passes was also mildly flat.


It's kinda flat? Also, I know--that last one is just gross. But it'll get covered up! However, the voids might stay...
Then finally the cap layer. Ugh. It is always so unnerving and didfficult to do that first cap pass. In this case it was quite saggy and squiggly which was greatly disheartening.


The next cap pass was also squiggly because I did not have a steady hand and at the very beginning the wire kinda sputtered and then broke/restarted the arc, and a lump was formed.
The third and last pass of the cap had a ton of undercut (forgot to get a picture!) and/or underfill so I brought it to Javier to look at and he said "Do one more pass where the undercut is"
So I did that and thought it was equally bad and undercutty, but Javier said it was a lot less jagged and actually not really undercut because there were no steep/notched valleys formed.


So in the end the only flaws were that spazzy lump in the second cap pass (excessive reinforcement), and the fact that the toes of the first cap pass could be less pronounced/saggy, and more smooth. Javier said if I increase my travel speed it will be less saggy.
He also said "a weld that looks good is not the same as a good weld" but I said "ok well how am I supposed to judge my welds on anything other that how it looks; I don't have the ultrasonic technology" and he said "we will cut open these and check" and i said "ok well until then i have no idea what I'm doing :)"
So THEN I started on a second groove on PP4. I did a root pass that seemed to look pretty decent.


Idk why this weird porosity is here. I checked the gas but it was working fine.
Then I tried to choose the best angle for the filler pass. I think it turned out better than the one I did on the first groove. The profile was less flat. My strategy was to aim the electrode slightly above the bottom toe edge of the root pass, and hold the gun at an almost perpendicular angle to the plate. I tilted it just the slightest amount up, but visually it still looked perpendicular.


I think this strategy is better than what I was doing before!
Then I cleaned up because I wanted to catch the 8:25pm BART.
0 notes
Text
How to Sharpen Lawn Mower Blades

Sharpening your lawn mower blades is essential for maintaining a healthy lawn and ensuring your mower performs efficiently.
Remove the blade safely. For instance, disconnect the spark plug to prevent accidental starts, and use a wrench to remove the blade carefully.
Sharpen the blade at the correct angle. Using a file or grinder, maintain the original angle of the blade edge for a sharp, clean cut.
Balance the blade before reinstallation. After sharpening, check the balance by hanging the blade on a nail; an unbalanced blade can cause vibrations and damage to the mower.
Here are some key insights to consider:
Regular sharpening ensures a cleaner cut, reducing stress on your lawn.
Properly balancing the blade after sharpening prevents mower damage and ensures smooth operation.
Sharpening your mower blades regularly is key to effective lawn care.
There is more!
Learn how to sharpen your lawn mower blades effectively here: How to Sharpen Lawn Mower Blades
0 notes