#space 325
Photo

Jeff Feld, Untitled. 2022
33″ x 20″ x 13″, Steel, concrete, plastic fly swatter.
#objects#Jeff Feld#space 325#abstract art#conceptual art#contemporaryart#Ridgewood#brooklyn#Bushwick#artists on tumblr#Artist Run Spaces#sculpture#art#support small artists
67 notes
·
View notes
Text

Stephen Whisler
Installation view, Past is Prologue
325 Project Space
Photo credit - Beth O'Brien
#325 project space#jeff feld#sculpture#art gallery#contemporary art#ridgewood#painting#charles goldman#artists on tumblr#bushwick#stephen whisler#beth o'brien
2 notes
·
View notes
Text
How I ditched streaming services and learned to love Linux: A step-by-step guide to building your very own personal media streaming server (V2.0: REVISED AND EXPANDED EDITION)
This is a revised, corrected and expanded version of my tutorial on setting up a personal media server that previously appeared on my old blog (donjuan-auxenfers). I expect that that post is still making the rounds (hopefully with my addendum on modifying group share permissions in Ubuntu to circumvent 0x8007003B "Unexpected Network Error" messages in Windows when transferring files) but I have no way of checking. Anyway this new revised version of the tutorial corrects one or two small errors I discovered when rereading what I wrote, adds links to all products mentioned and is just more polished generally. I also expanded it a bit, pointing more adventurous users toward programs such as Sonarr/Radarr/Lidarr and Overseerr which can be used for automating user requests and media collection.
So then, what is this tutorial? This is a tutorial on how to build and set up your own personal media server using Ubuntu as an operating system and Plex (or Jellyfin) to not only manage your media,, but to stream that media to your devices both locally at home, and remotely to anywhere in the world where you have an internet connection. This is a tutorial about how building a personal media server and stuffing it full of films, television shows and music that you acquired through indiscriminate and voracious media piracy various legal methods like ripping your own physical media to disk, you’ll be free to completely ditch paid streaming services. No more will you have to pay for Disney+, Netflix, HBOMAX, Hulu, Amazon Prime, Peacock, CBS All Access, Paramount+, Crave or any other streaming service that is not named Criterion Channel (which is actually good). If you want to watch your favourite films and television shows, you’ll have your own custom service that only features things that you want to see, and where you have control over your own files and how they’re delivered to you. And for music fans out there, both Jellyfin and Plex support music streaming, meaning you can even ditch music streaming services. Goodbye Spotify, Youtube Music, Tidal and Apple Music, welcome back unreasonably large MP3 (or FLAC) collections.
On the hardware front, I’m going to offer a few options catered towards differing budgets and media library sizes. The cost of getting a media server up and running using this guide will cost you anywhere from $450 CDN/$325 USD at the entry level to $1500 CDN/$1100 USD at the high end. My own server was priced closer to the higher figure, with much of that cost being hard drives. If that seems excessive, consider for a moment, maybe you have a roommate, a close friend, or a family member who would be willing to chip in a few bucks towards your little project provided they get a share of the bounty. This is how my server was funded. It might also be worth thinking about cost over time, how much you spend yearly on subscriptions vs. a one time cost of setting up a server. Additionally there's just the joy of being able to scream "fuck you" at all those show cancelling, movie deleting, hedge fund vampire CEOs who run the studios through denying them your money. Drive a stake through David Zaslav's heart.
On the software side I will walk you step-by-step through installing Ubuntu as your server's operating system, configuring your storage as a RAIDz array with ZFS, sharing your zpool to Windows with Samba, running a remote connection between your server and your Windows PC, and then a little about started with Plex/Jellyfin. Every terminal command you will need to input will be provided, and I even share a custom #bash script that will make used vs. available drive space on your server display correctly in Windows.
If you have a different preferred flavour of Linux (Arch, Manjaro, Redhat, Fedora, Mint, OpenSUSE, CentOS, Slackware etc. et. al.) and are aching to tell me off for being basic and using Ubuntu, this tutorial is not for you. The sort of person with a preferred Linux distro is the sort of person who can do this sort of thing in their sleep. Also I don't care. This tutorial is intended for the average home computer user. This is also why we’re not using a more exotic home server solution like running everything through Docker Containers and managing it through a dashboard like Homarr or Heimdall. While such solutions are fantastic and can be very easy to maintain once you have it all set up, wrapping your brain around Docker is a whole thing in and of itself. If you do follow this tutorial and had fun putting everything together, then I would encourage you to return in a year’s time, do your research and set up everything with Docker Containers.
Lastly, this is a tutorial aimed at Windows users. Although I was a daily user of OS X for many years (roughly 2008-2023) and I've dabbled quite a bit with various Linux distributions (mostly Ubuntu and Manjaro), my primary OS these days is Windows 11. Many things in this tutorial will still be applicable to Mac users, but others (e.g. setting up shares) you will have to look up for yourself. I doubt it would be difficult to do so.
Nothing in this tutorial will require feats of computing expertise. All you will need is a basic computer literacy (i.e. an understanding of what a filesystem and directory are, and a degree of comfort in the settings menu) and a willingness to learn a thing or two. While this guide may look overwhelming at first glance, it is only because I want to be as thorough as possible. I want you to understand exactly what it is you're doing, I don't want you to just blindly follow steps. If you half-way know what you’re doing, you will be much better prepared if you ever need to troubleshoot.
Honestly, once you have all the hardware ready it shouldn't take more than a weekend to get everything up and running.
(This tutorial is just shy of seven thousand words long so the rest is under the cut.)
Step One: Choosing Your Hardware
Linux is a light weight operating system, depending on the distribution there's close to no bloat. There are recent distributions available at this very moment that will run perfectly fine on a fourteen year old i3 with 4GB of RAM. Moreover, running Plex or Jellyfin isn’t resource intensive in 90% of use cases. All this is to say, we don’t require an expensive or powerful computer. This means that there are several options available: 1) use an old computer you already have sitting around but aren't using 2) buy a used workstation from eBay, or what I believe to be the best option, 3) order an N100 Mini-PC from AliExpress or Amazon.
Note: If you already have an old PC sitting around that you’ve decided to use, fantastic, move on to the next step.
When weighing your options, keep a few things in mind: the number of people you expect to be streaming simultaneously at any one time, the resolution and bitrate of your media library (4k video takes a lot more processing power than 1080p) and most importantly, how many of those clients are going to be transcoding at any one time. Transcoding is what happens when the playback device does not natively support direct playback of the source file. This can happen for a number of reasons, such as the playback device's native resolution being lower than the file's internal resolution, or because the source file was encoded in a video codec unsupported by the playback device.
Ideally we want any transcoding to be performed by hardware. This means we should be looking for a computer with an Intel processor with Quick Sync. Quick Sync is a dedicated core on the CPU die designed specifically for video encoding and decoding. This specialized hardware makes for highly efficient transcoding both in terms of processing overhead and power draw. Without these Quick Sync cores, transcoding must be brute forced through software. This takes up much more of a CPU’s processing power and requires much more energy. But not all Quick Sync cores are created equal and you need to keep this in mind if you've decided either to use an old computer or to shop for a used workstation on eBay
Any Intel processor from second generation Core (Sandy Bridge circa 2011) onwards has Quick Sync cores. It's not until 6th gen (Skylake), however, that the cores support the H.265 HEVC codec. Intel’s 10th gen (Comet Lake) processors introduce support for 10bit HEVC and HDR tone mapping. And the recent 12th gen (Alder Lake) processors brought with them hardware AV1 decoding. As an example, while an 8th gen (Kaby Lake) i5-8500 will be able to hardware transcode a H.265 encoded file, it will fall back to software transcoding if given a 10bit H.265 file. If you’ve decided to use that old PC or to look on eBay for an old Dell Optiplex keep this in mind.
Note 1: The price of old workstations varies wildly and fluctuates frequently. If you get lucky and go shopping shortly after a workplace has liquidated a large number of their workstations you can find deals for as low as $100 on a barebones system, but generally an i5-8500 workstation with 16gb RAM will cost you somewhere in the area of $260 CDN/$200 USD.
Note 2: The AMD equivalent to Quick Sync is called Video Core Next, and while it's fine, it's not as efficient and not as mature a technology. It was only introduced with the first generation Ryzen CPUs and it only got decent with their newest CPUs, we want something cheap.
Alternatively you could forgo having to keep track of what generation of CPU is equipped with Quick Sync cores that feature support for which codecs, and just buy an N100 mini-PC. For around the same price or less of a used workstation you can pick up a Mini-PC with an Intel N100 processor. The N100 is a four-core processor based on the 12th gen Alder Lake architecture and comes equipped with the latest revision of the Quick Sync cores. These little processors offer astounding hardware transcoding capabilities for their size and power draw. Otherwise they perform equivalent to an i5-6500, which isn't a terrible CPU. A friend of mine uses an N100 machine as a dedicated retro emulation gaming system and it does everything up to 6th generation consoles just fine. The N100 is also a remarkably efficient chip, it sips power. In fact, the difference between running one of these and an old workstation could work out to hundreds of dollars a year in energy bills depending on where you live.
You can find these Mini-PCs all over Amazon or for a little cheaper on AliExpress. They range in price from $170 CDN/$125 USD for a no name N100 with 8GB RAM to $280 CDN/$200 USD for a Beelink S12 Pro with 16GB RAM. The brand doesn't really matter, they're all coming from the same three factories in Shenzen, go for whichever one fits your budget or has features you want. 8GB RAM should be enough, Linux is lightweight and Plex only calls for 2GB RAM. 16GB RAM might result in a slightly snappier experience, especially with ZFS. A 256GB SSD is more than enough for what we need as a boot drive, but going for a bigger drive might allow you to get away with things like creating preview thumbnails for Plex, but it’s up to you and your budget.
The Mini-PC I wound up buying was a Firebat AK2 Plus with 8GB RAM and a 256GB SSD. It looks like this:

Note: Be forewarned that if you decide to order a Mini-PC from AliExpress, note the type of power adapter it ships with. The mini-PC I bought came with an EU power adapter and I had to supply my own North American power supply. Thankfully this is a minor issue as a barrel plug 30W/12V/2.5A power adapters are plentiful and can be had for $10.
Step Two: Choosing Your Storage
Storage is the most important part of our build. It is also the most expensive. Thankfully it’s also the most easily upgrade-able down the line.
For people with a smaller media collection (4TB to 8TB), a more limited budget, or who will only ever have two simultaneous streams running, I would say that the most economical course of action would be to buy a USB 3.0 8TB external HDD. Something like this one from Western Digital or this one from Seagate. One of these external drives will cost you in the area of $200 CDN/$140 USD. Down the line you could add a second external drive or replace it with a multi-drive RAIDz set up such as detailed below.
If a single external drive the path for you, move on to step three.
For people with larger media libraries (12TB+), who prefer media in 4k, or care who about data redundancy, the answer is a RAID array featuring multiple HDDs in an enclosure.
Note: If you are using an old PC or used workstatiom as your server and have the room for at least three 3.5" drives, and as many open SATA ports on your mother board you won't need an enclosure, just install the drives into the case. If your old computer is a laptop or doesn’t have room for more internal drives, then I would suggest an enclosure.
The minimum number of drives needed to run a RAIDz array is three, and seeing as RAIDz is what we will be using, you should be looking for an enclosure with three to five bays. I think that four disks makes for a good compromise for a home server. Regardless of whether you go for a three, four, or five bay enclosure, do be aware that in a RAIDz array the space equivalent of one of the drives will be dedicated to parity at a ratio expressed by the equation 1 − 1/n i.e. in a four bay enclosure equipped with four 12TB drives, if we configured our drives in a RAIDz1 array we would be left with a total of 36TB of usable space (48TB raw size). The reason for why we might sacrifice storage space in such a manner will be explained in the next section.
A four bay enclosure will cost somewhere in the area of $200 CDN/$140 USD. You don't need anything fancy, we don't need anything with hardware RAID controls (RAIDz is done entirely in software) or even USB-C. An enclosure with USB 3.0 will perform perfectly fine. Don’t worry too much about USB speed bottlenecks. A mechanical HDD will be limited by the speed of its mechanism long before before it will be limited by the speed of a USB connection. I've seen decent looking enclosures from TerraMaster, Yottamaster, Mediasonic and Sabrent.
When it comes to selecting the drives, as of this writing, the best value (dollar per gigabyte) are those in the range of 12TB to 20TB. I settled on 12TB drives myself. If 12TB to 20TB drives are out of your budget, go with what you can afford, or look into refurbished drives. I'm not sold on the idea of refurbished drives but many people swear by them.
When shopping for harddrives, search for drives designed specifically for NAS use. Drives designed for NAS use typically have better vibration dampening and are designed to be active 24/7. They will also often make use of CMR (conventional magnetic recording) as opposed to SMR (shingled magnetic recording). This nets them a sizable read/write performance bump over typical desktop drives. Seagate Ironwolf and Toshiba NAS are both well regarded brands when it comes to NAS drives. I would avoid Western Digital Red drives at this time. WD Reds were a go to recommendation up until earlier this year when it was revealed that they feature firmware that will throw up false SMART warnings telling you to replace the drive at the three year mark quite often when there is nothing at all wrong with that drive. It will likely even be good for another six, seven, or more years.

Step Three: Installing Linux
For this step you will need a USB thumbdrive of at least 6GB in capacity, an .ISO of Ubuntu, and a way to make that thumbdrive bootable media.
First download a copy of Ubuntu desktop (for best performance we could download the Server release, but for new Linux users I would recommend against the server release. The server release is strictly command line interface only, and having a GUI is very helpful for most people. Not many people are wholly comfortable doing everything through the command line, I'm certainly not one of them, and I grew up with DOS 6.0. 22.04.3 Jammy Jellyfish is the current Long Term Service release, this is the one to get.
Download the .ISO and then download and install balenaEtcher on your Windows PC. BalenaEtcher is an easy to use program for creating bootable media, you simply insert your thumbdrive, select the .ISO you just downloaded, and it will create a bootable installation media for you.
Once you've made a bootable media and you've got your Mini-PC (or you old PC/used workstation) in front of you, hook it directly into your router with an ethernet cable, and then plug in the HDD enclosure, a monitor, a mouse and a keyboard. Now turn that sucker on and hit whatever key gets you into the BIOS (typically ESC, DEL or F2). If you’re using a Mini-PC check to make sure that the P1 and P2 power limits are set correctly, my N100's P1 limit was set at 10W, a full 20W under the chip's power limit. Also make sure that the RAM is running at the advertised speed. My Mini-PC’s RAM was set at 2333Mhz out of the box when it should have been 3200Mhz. Once you’ve done that, key over to the boot order and place the USB drive first in the boot order. Then save the BIOS settings and restart.
After you restart you’ll be greeted by Ubuntu's installation screen. Installing Ubuntu is really straight forward, select the "minimal" installation option, as we won't need anything on this computer except for a browser (Ubuntu comes preinstalled with Firefox) and Plex Media Server/Jellyfin Media Server. Also remember to delete and reformat that Windows partition! We don't need it.
Step Four: Installing ZFS and Setting Up the RAIDz Array
Note: If you opted for just a single external HDD skip this step and move onto setting up a Samba share.
Once Ubuntu is installed it's time to configure our storage by installing ZFS to build our RAIDz array. ZFS is a "next-gen" file system that is both massively flexible and massively complex. It's capable of snapshot backup, self healing error correction, ZFS pools can be configured with drives operating in a supplemental manner alongside the storage vdev (e.g. fast cache, dedicated secondary intent log, hot swap spares etc.). It's also a file system very amenable to fine tuning. Block and sector size are adjustable to use case and you're afforded the option of different methods of inline compression. If you'd like a very detailed overview and explanation of its various features and tips on tuning a ZFS array check out these articles from Ars Technica. For now we're going to ignore all these features and keep it simple, we're going to pull our drives together into a single vdev running in RAIDz which will be the entirety of our zpool, no fancy cache drive or SLOG.
Open up the terminal and type the following commands:
sudo apt update
then
sudo apt install zfsutils-linux
This will install the ZFS utility. Verify that it's installed with the following command:
zfs --version
Now, it's time to check that the HDDs we have in the enclosure are healthy, running, and recognized. We also want to find out their device IDs and take note of them:
sudo fdisk -1
Note: You might be wondering why some of these commands require "sudo" in front of them while others don't. "Sudo" is short for "super user do”. When and where "sudo" is used has to do with the way permissions are set up in Linux. Only the "root" user has the access level to perform certain tasks in Linux. As a matter of security and safety regular user accounts are kept separate from the "root" user. It's not advised (or even possible) to boot into Linux as "root" with most modern distributions. Instead by using "sudo" our regular user account is temporarily given the power to do otherwise forbidden things. Don't worry about it too much at this stage, but if you want to know more check out this introduction.
If everything is working you should get a list of the various drives detected along with their device IDs which will look like this: /dev/sdc. You can also check the device IDs of the drives by opening the disk utility app. Jot these IDs down as we'll need them for our next step, creating our RAIDz array.
RAIDz is similar to RAID-5 in that instead of striping your data over multiple disks, exchanging redundancy for speed and available space (RAID-0), or mirroring your data writing by two copies of every piece (RAID-1), it instead writes parity blocks across the disks in addition to striping, this provides a balance of speed, redundancy and available space. If a single drive fails, the parity blocks on the working drives can be used to reconstruct the entire array as soon as a replacement drive is added.
Additionally, RAIDz improves over some of the common RAID-5 flaws. It's more resilient and capable of self healing, as it is capable of automatically checking for errors against a checksum. It's more forgiving in this way, and it's likely that you'll be able to detect when a drive is dying well before it fails. A RAIDz array can survive the loss of any one drive.
Note: While RAIDz is indeed resilient, if a second drive fails during the rebuild, you're fucked. Always keep backups of things you can't afford to lose. This tutorial, however, is not about proper data safety.
To create the pool, use the following command:
sudo zpool create "zpoolnamehere" raidz "device IDs of drives we're putting in the pool"
For example, let's creatively name our zpool "mypool". This poil will consist of four drives which have the device IDs: sdb, sdc, sdd, and sde. The resulting command will look like this:
sudo zpool create mypool raidz /dev/sdb /dev/sdc /dev/sdd /dev/sde
If as an example you bought five HDDs and decided you wanted more redundancy dedicating two drive to this purpose, we would modify the command to "raidz2" and the command would look something like the following:
sudo zpool create mypool raidz2 /dev/sdb /dev/sdc /dev/sdd /dev/sde /dev/sdf
An array configured like this is known as RAIDz2 and is able to survive two disk failures.
Once the zpool has been created, we can check its status with the command:
zpool status
Or more concisely with:
zpool list
The nice thing about ZFS as a file system is that a pool is ready to go immediately after creation. If we were to set up a traditional RAID-5 array using mbam, we'd have to sit through a potentially hours long process of reformatting and partitioning the drives. Instead we're ready to go right out the gates.
The zpool should be automatically mounted to the filesystem after creation, check on that with the following:
df -hT | grep zfs
Note: If your computer ever loses power suddenly, say in event of a power outage, you may have to re-import your pool. In most cases, ZFS will automatically import and mount your pool, but if it doesn’t and you can't see your array, simply open the terminal and type sudo zpool import -a.
By default a zpool is mounted at /"zpoolname". The pool should be under our ownership but let's make sure with the following command:
sudo chown -R "yourlinuxusername" /"zpoolname"
Note: Changing file and folder ownership with "chown" and file and folder permissions with "chmod" are essential commands for much of the admin work in Linux, but we won't be dealing with them extensively in this guide. If you'd like a deeper tutorial and explanation you can check out these two guides: chown and chmod.

You can access the zpool file system through the GUI by opening the file manager (the Ubuntu default file manager is called Nautilus) and clicking on "Other Locations" on the sidebar, then entering the Ubuntu file system and looking for a folder with your pool's name. Bookmark the folder on the sidebar for easy access.

Your storage pool is now ready to go. Assuming that we already have some files on our Windows PC we want to copy to over, we're going to need to install and configure Samba to make the pool accessible in Windows.
Step Five: Setting Up Samba/Sharing
Samba is what's going to let us share the zpool with Windows and allow us to write to it from our Windows machine. First let's install Samba with the following commands:
sudo apt-get update
then
sudo apt-get install samba
Next create a password for Samba.
sudo smbpswd -a "yourlinuxusername"
It will then prompt you to create a password. Just reuse your Ubuntu user password for simplicity's sake.
Note: if you're using just a single external drive replace the zpool location in the following commands with wherever it is your external drive is mounted, for more information see this guide on mounting an external drive in Ubuntu.
After you've created a password we're going to create a shareable folder in our pool with this command
mkdir /"zpoolname"/"foldername"
Now we're going to open the smb.conf file and make that folder shareable. Enter the following command.
sudo nano /etc/samba/smb.conf
This will open the .conf file in nano, the terminal text editor program. Now at the end of smb.conf add the following entry:
["foldername"]
path = /"zpoolname"/"foldername"
available = yes
valid users = "yourlinuxusername"
read only = no
writable = yes
browseable = yes
guest ok = no
Ensure that there are no line breaks between the lines and that there's a space on both sides of the equals sign. Our next step is to allow Samba traffic through the firewall:
sudo ufw allow samba
Finally restart the Samba service:
sudo systemctl restart smbd
At this point we'll be able to access to the pool, browse its contents, and read and write to it from Windows. But there's one more thing left to do, Windows doesn't natively support the ZFS file systems and will read the used/available/total space in the pool incorrectly. Windows will read available space as total drive space, and all used space as null. This leads to Windows only displaying a dwindling amount of "available" space as the drives are filled. We can fix this! Functionally this doesn't actually matter, we can still write and read to and from the disk, it just makes it difficult to tell at a glance the proportion of used/available space, so this is an optional step but one I recommend (this step is also unnecessary if you're just using a single external drive). What we're going to do is write a little shell script in #bash. Open nano with the terminal with the command:
nano
Now insert the following code:
#!/bin/bash
CUR_PATH=`pwd`
ZFS_CHECK_OUTPUT=$(zfs get type $CUR_PATH 2>&1 > /dev/null) > /dev/null
if [[ $ZFS_CHECK_OUTPUT == *not\ a\ ZFS* ]]
then
IS_ZFS=false
else
IS_ZFS=true
fi
if [[ $IS_ZFS = false ]]
then
df $CUR_PATH | tail -1 | awk '{print $2" "$4}'
else USED=$((`zfs get -o value -Hp used $CUR_PATH` / 1024)) > /dev/null AVAIL=$((`zfs get -o value -Hp available $CUR_PATH` / 1024)) >
/dev/null
TOTAL=$(($USED+$AVAIL)) > /dev/null
echo $TOTAL $AVAIL
fi
Save the script as "dfree.sh" to /home/"yourlinuxusername" then change the ownership of the file to make it executable with this command:
sudo chmod 774 dfree.sh
Now open smb.conf with sudo again:
sudo nano /etc/samba/smb.conf
Now add this entry to the top of the configuration file to direct Samba to use the results of our script when Windows asks for a reading on the pool's used/available/total drive space:
[global]
dfree command = home/"yourlinuxusername"/defree.sh
Save the changes to smb.conf and then restart Samba again with the terminal:
sudo systemctl restart smbd
Now there’s one more thing we need to do to fully set up the Samba share, and that’s to modify a hidden group permission. In the terminal window type the following command:
usermod -a -G sambashare “yourlinuxusername”
Then restart samba again:
sudo systemctl restart smbd
If we don’t do this last step, everything will appear to work fine, and you will even be able to see and map the drive from Windows and even begin transferring files, but you'd soon run into a lot of frustration. As every ten minutes or so a file would fail to transfer and you would get a window announcing “0x8007003B Unexpected Network Error”. This window would require your manual input to continue the transfer with the file next in the queue. And at the end it would reattempt to transfer whichever files failed the first time around. 99% of the time they’ll go through that second try, but this is still all a major pain in the ass. Especially if you’ve got a lot of data to transfer or you want to step away from the computer for a while.
It turns out samba can act a little weirdly with the higher read/write speeds of RAIDz arrays and transfers from Windows, and will intermittently crash and restart itself if this group option isn’t changed. Inputting the above command will prevent you from ever seeing that window.
The last thing we're going to do before switching over to our Windows PC is grab the IP address of our Linux machine. Enter the following command:
hostname -I
This will spit out this computer's IP address on the local network (it will look something like 192.168.0.x), write it down. It might be a good idea once you're done here to go into your router settings and reserving that IP for your Linux system in the DHCP settings. Check the manual for your specific model router on how to access its settings, typically it can be accessed by opening a browser and typing http:\\192.168.0.1 in the address bar, but your router may be different.
Okay we’re done with our Linux computer for now. Get on over to your Windows PC, open File Explorer, right click on Network and click "Map network drive". Select Z: as the drive letter (you don't want to map the network drive to a letter you could conceivably be using for other purposes) and enter the IP of your Linux machine and location of the share like so: \\"LINUXCOMPUTERLOCALIPADDRESSGOESHERE"\"zpoolnamegoeshere"\. Windows will then ask you for your username and password, enter the ones you set earlier in Samba and you're good. If you've done everything right it should look something like this:

You can now start moving media over from Windows to the share folder. It's a good idea to have a hard line running to all machines. Moving files over Wi-Fi is going to be tortuously slow, the only thing that’s going to make the transfer time tolerable (hours instead of days) is a solid wired connection between both machines and your router.
Step Six: Setting Up Remote Desktop Access to Your Server
After the server is up and going, you’ll want to be able to access it remotely from Windows. Barring serious maintenance/updates, this is how you'll access it most of the time. On your Linux system open the terminal and enter:
sudo apt install xrdp
Then:
sudo systemctl enable xrdp
Once it's finished installing, open “Settings” on the sidebar and turn off "automatic login" in the User category. Then log out of your account. Attempting to remotely connect to your Linux computer while you’re logged in will result in a black screen!
Now get back on your Windows PC, open search and look for "RDP". A program called "Remote Desktop Connection" should pop up, open this program as an administrator by right-clicking and selecting “run as an administrator”. You’ll be greeted with a window. In the field marked “Computer” type in the IP address of your Linux computer. Press connect and you'll be greeted with a new window and prompt asking for your username and password. Enter your Ubuntu username and password here.

If everything went right, you’ll be logged into your Linux computer. If the performance is sluggish, adjust the display options. Lowering the resolution and colour depth do a lot to make the interface feel snappier.

Remote access is how we're going to be using our Linux system from now, barring edge cases like needing to get into the BIOS or upgrading to a new version of Ubuntu. Everything else from performing maintenance like a monthly zpool scrub (this is important!!!) to checking zpool status and updating software can all be done remotely.

This is how my server lives its life now, happily humming and chirping away on the floor next to the couch in a corner of the living room.
Step Seven: Plex Media Server/Jellyfin
Okay we’ve got all the ground work finished and our server is almost up and running. We’ve got Ubuntu up and running, our storage array is primed, we’ve set up remote connections and sharing, and maybe we’ve moved over some of favourite movies and TV shows.
Now we need to decide on the media server software to use which will stream our media to us and organize our library. For most people I’d recommend Plex. It just works 99% of the time. That said, Jellyfin has a lot to recommend it by too, even if it is rougher around the edges. Some people run both simultaneously, it’s not that big of an extra strain. I do recommend doing a little bit of your own research into the features each platform offers, but as a quick run down, consider some of the following points:
Plex is closed source and is funded through PlexPass purchases while Jellyfin is open source and entirely user driven. This means a number of things: for one, Plex requires you to purchase a “PlexPass” (purchased as a one time lifetime fee $159.99 CDN/$120 USD or paid for on a monthly or yearly subscription basis) in order to access to certain features, like hardware transcoding (and we want hardware transcoding) or automated intro/credits detection and skipping. jellyfish features for free. On the other hand, Plex supports a lot more devices than Jellyfin and updates more frequently. That said Jellyfin's Android/iOS apps are completely free, while the Plex Android/iOS apps must be activated for a one time cost of $6 CDN/$5 USD. But that $6 fee gets you a mobile app that is much more functional and features a unified UI across Android and iOS platforms, the Plex mobile apps are simply a more polished experience. The Jellyfin apps are a bit of a mess and the iOS and Android versions are very different from each other.
Jellyfin’s actual media player itself is more fully featured than Plex's, but on the other hand Jellyfin's UI, library customization and automatic media tagging really pale in comparison to Plex. Streaming your music library is free through both Jellyfin and Plex, but Plex offers the PlexAmp app for dedicated music streaming which boasts a number of fantastic features, unfortunately some of those fantastic features require a PlexPass. If your internet is down, Jellyfin can still do local streaming, while Plex can fail to play files. Jellyfin has a slew of neat niche features like support for Comic Book libraries with the .cbz/.cbt file types, but then Plex offers some free ad-supported TV and films, they even have a free channel that plays nothing but Classic Doctor Who.
Ultimately it's up to you, I settled on Plex because although some features are pay-walled, it just works. It's more reliable and easier to use, and a one-time fee is much easier to swallow than a subscription. I do also need to mention that Jellyfin does take a little extra bit of tinkering to get going in Ubuntu, you’ll have to set up process permissions, so if you're more tolerant to tinkering, Jellyfin might be up your alley and I’ll trust that you can follow their installation and configuration guide. For everyone else, I recommend Plex.
So pick your poison: Plex or Jellyfin.
Note: The easiest way to download and install either of these packages in Ubuntu is through Snap Store.
After you've installed one (or both), opening either app will launch a browser window into the browser version of the app allowing you to set all the options server side.
The process of adding creating media libraries is essentially the same in both Plex and Jellyfin. You create a separate libraries for Television, Movies, and Music and add the folders which contain the respective types of media to their respective libraries. The only difficult or time consuming aspect is ensuring that your files and folders follow the appropriate naming conventions:
Plex naming guide for Movies
Plex naming guide for Television
Jellyfin follows the same naming rules but I find their media scanner to be a lot less accurate and forgiving than Plex. Once you've selected the folders to be scanned the service will scan your files, tagging everything and adding metadata. Although I find do find Plex more accurate, it can still erroneously tag some things and you might have to manually clean up some tags in a large library. (When I initially created my library it tagged the 1963-1989 Doctor Who as some Korean soap opera and I needed to manually select the correct match after which everything was tagged normally.) It can also be a bit testy with anime (especially OVAs) be sure to check TVDB to ensure that you have your files and folders structured and named correctly. If something is not showing up at all, double check the name.
Once that's done, organizing and customizing your library is easy. You can set up collections, grouping items together to fit a theme or collect together all the entries in a franchise. You can make playlists, and add custom artwork to entries. It's fun setting up collections with posters to match, there are even several websites dedicated to help you do this like PosterDB. As an example, below are two collections in my library, one collecting all the entries in a franchise, the other follows a theme.

My Star Trek collection, featuring all eleven television series, and thirteen films.

My Best of the Worst collection, featuring sixty-nine films previously showcased on RedLetterMedia’s Best of the Worst. They’re all absolutely terrible and I love them.
As for settings, ensure you've got Remote Access going, it should work automatically and be sure to set your upload speed after running a speed test. In the library settings set the database cache to 2000MB to ensure a snappier and more responsive browsing experience, and then check that playback quality is set to original/maximum. If you’re severely bandwidth limited on your upload and have remote users, you might want to limit the remote stream bitrate to something more reasonable, just as a note of comparison Netflix’s 1080p bitrate is approximately 5Mbps, although almost anyone watching through a chromium based browser is streaming at 720p and 3mbps. Other than that you should be good to go. For actually playing your files, there's a Plex app for just about every platform imaginable. I mostly watch television and films on my laptop using the Windows Plex app, but I also use the Android app which can broadcast to the chromecast connected to the TV. Both are fully functional and easy to navigate, and I can also attest to the OS X version being equally functional.
Part Eight: Finding Media
Now, this is not really a piracy tutorial, there are plenty of those out there. But if you’re unaware, BitTorrent is free and pretty easy to use, just pick a client (qBittorrent is the best) and go find some public trackers to peruse. Just know now that all the best trackers are private and invite only, and that they can be exceptionally difficult to get into. I’m already on a few, and even then, some of the best ones are wholly out of my reach.
If you decide to take the left hand path and turn to Usenet you’ll have to pay. First you’ll need to sign up with a provider like Newshosting or EasyNews for access to Usenet itself, and then to actually find anything you’re going to need to sign up with an indexer like NZBGeek or NZBFinder. There are dozens of indexers, and many people cross post between them, but for more obscure media it’s worth checking multiple. You’ll also need a binary downloader like SABnzbd. That caveat aside, Usenet is faster, bigger, older, less traceable than BitTorrent, and altogether slicker. I honestly prefer it, and I'm kicking myself for taking this long to start using it because I was scared off by the price. I’ve found so many things on Usenet that I had sought in vain elsewhere for years, like a 2010 Italian film about a massacre perpetrated by the SS that played the festival circuit but never received a home media release; some absolute hero uploaded a rip of a festival screener DVD to Usenet, that sort of thing. Anyway, figure out the rest of this shit on your own and remember to use protection, get yourself behind a VPN, use a SOCKS5 proxy with your BitTorrent client, etc.
On the legal side of things, if you’re around my age, you (or your family) probably have a big pile of DVDs and Blu-Rays sitting around unwatched and half forgotten. Why not do a bit of amateur media preservation, rip them and upload them to your server for easier access? (Your tools for this are going to be Handbrake to do the ripping and AnyDVD to break any encryption.) I went to the trouble of ripping all my SCTV DVDs (five box sets worth) because none of it is on streaming nor could it be found on any pirate source I tried. I’m glad I did, forty years on it’s still one of the funniest shows to ever be on TV.
Part Nine/Epilogue: Sonarr/Radarr/Lidarr and Overseerr
There are a lot of ways to automate your server for better functionality or to add features you and other users might find useful. Sonarr, Radarr, and Lidarr are a part of a suite of “Servarr” services (there’s also Readarr for books and Whisparr for adult content) that allow you to automate the collection of new episodes of TV shows (Sonarr), new movie releases (Radarr) and music releases (Lidarr). They hook in to your BitTorrent client or Usenet binary newsgroup downloader and crawl your preferred Torrent trackers and Usenet indexers, alerting you to new releases and automatically grabbing them. You can also use these services to manually search for new media, and even replace/upgrade your existing media with better quality uploads. They’re really a little tricky to set up on a bare metal Ubuntu install (ideally you should be running them in Docker Containers), and I won’t be providing a step by step on installing and running them, I’m simply making you aware of their existence.
The other bit of kit I want to make you aware of is Overseerr which is a program that scans your Plex media library and will serve recommendations based on what you like. It also allows you and your users to request specific media. It can even be integrated with Sonarr/Radarr/Lidarr so that fulfilling those requests is fully automated.
And you're done. It really wasn't all that hard. Enjoy your media. Enjoy the control you have over that media. And be safe in the knowledge that no hedgefund CEO motherfucker who hates the movies but who is somehow in control of a major studio will be able to disappear anything in your library as a tax write-off.
807 notes
·
View notes
Text
Giaçintè - Shimmering
Buy & Support on Bandcamp: Giaçinté - Vehemence EP
1 note
·
View note
Text
How To Set Up An Ao3 Exchange
One of the first things I say whenever anyone asks me about running exchanges is that if you have more than about 30 people in the exchange, do NOT try to match it by hand. That is so much work and takes so much time. Use Ao3's matching algorithm. And people say sure, and then they look at how Ao3 works and they go uhhhhhhhhhh I think we can make a google form work. Because google forms are reasonably intuitive to make work, and Ao3 exchanges are— not.
But the thing is, once you understand the underlying logic for Ao3 collections, they are not that bad, and seriously I can't overstate the benefit of having Ao3 do the matching for you. That's like the difference between 80 hours of curating data as it comes in and then matching it (what happened with hand-matching 325 people for holiday exchange), or 2 hours of double-checking the matching (what happened with matching 125 people for 48 hour exchange). You have to put in extra work to get an Ao3 exchange set up, but it super pays off in the end. So! Here is an intro to how Ao3 exchanges work on the back end. This explanation assumes you know how to sign up for an exchange because I've posted ones like that before, for example, here.
Let's get into it.
THE COLLECTION
The first thing you want to do is set up your exchange collection. If you go to your right-hand drop-down menu, you click on My Collections.
That brings you to every collection you have ever made, and you go to to the right and click "New collection".

That brings you into the back end of the collection. You want to go down and put in a name for the collection that will be the url (so no spaces), a display name, an email for the collection to email when something happens to the collection (this will be public, so use a fandom email), and a basic description.

There's places there to do custom icons and headers, but those are optional, but you can go in and make your exchange pretty later if you want!
We are still in the "setting up" stage of the exchange, so once we go to preferences, you want to select all the tick boxes and make it look like this.
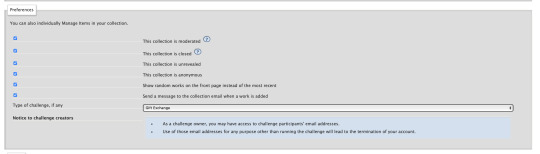
Moderated means that you'll have to manually approve things to be added to the collection (not absolutely necessary but can keep out trolls, and it also means that you can manually check that gifts meet minimums before you let them in to the exchange), Closed means that no one can submit things to the collection yet (once you open your exchange you de-select this), Unrevealed means that any works in the collection will show up as "mystery works" and not be readable (so you keep it unrevealed until the posting date, so people can post early but not spoil the surprise), anonymous means that all authors will be anonymous (this depends on if you have an anonymous portion of your exchange, so it's optional), "show random works" just means that you get a selection of different works when people visit the collection at different times, "send a message to the collection email" is optional but is useful for moderation (like if you're checking people off a list when their gifts get delivered), and "type of challenge" you want to be set to "gift exchange".
and then on this page the only other things of concern are places where you can put in an FAQ, a description and some instructions, but those are all optional! I normally host the FAQ on tumblr, so I just say "go check the tumblr at [link]".
And then you hit the submit button.

Now we get into the nitty-gritty.

First up is some optional stuff— you can add in the times that you're going to do things! This is useful for communication, but not necessary. We're still setting everything up, so you do not want Sign-Ups to be open, that is only selected once you have everything ready to go.
Then scrolling down, you get to Requests and Offers.
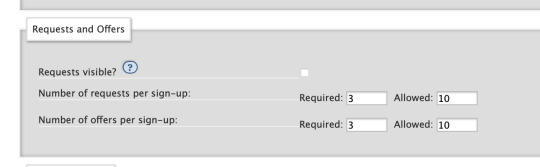
This is where you specify the absolute minimum ships or characters that you want people to give you to sign up. 10 is the maximum Ao3 allows, so I always set it to 10 for both "allowed", which is the maximum the site will allow. And required is the low number. I usually set it to a minimum of three, to make sure someone doesn't sign up with "i will only write one ship" or something. This way, people will have to do a minimum of three separate requests and offers.
The "requests visible" is part of the back end thing, and it's up to you if you want to select it or not. If you keep it unselected, the only person who will be able to see requests is the mods, and eventually each person will see their assignment. If you select it, people will be able to browse everyone's requests and both maybe target offers so they can write for a specific person, and be able to find treats (extra bonus gifts) to write for people whose requests they like. Each side has its own benefits or negatives, it's up to you which ones you want to go with!
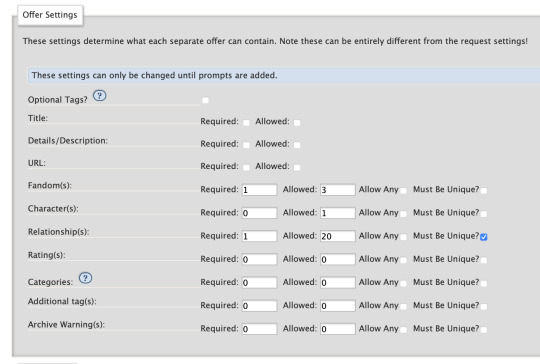
And here we get into more of the matching info! Let's look at Request Settings.

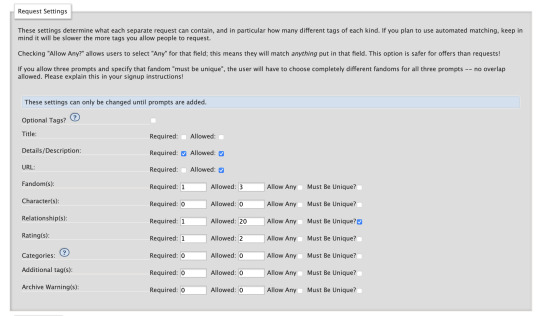
Now this is what the settings would look like for a multi-fandom exchange. The "details/description" box you want to make mandatory because that is where people will put their DNW and their prompts (and you absolutely want to make sure everyone has a DNW), and the url is an optional one which lets people link an off-site letter on google docs or dreamwidth.
Fandom allowing up to three fandoms means that people can do crossovers if they want (or tag a request something like 3rd life/hermitcraft), and if I wanted to say that people had to request 3 separate servers I would say "must be unique" but I'm okay if people sign up with three Dream SMP relationships in this idea hypothetical exchange, so I'm not selecting the unique button.
I'm ignoring the characters button cause that's extra complication, the only other thing I want to look at is the relationship button. A minimum of 1 ship per request (and there's a minimum of three requests), and let's say you can go up to 20, so people can request LOTS of different ships. I did select "must be unique" so someone can't sign up with the same ship three times. The "allow any" button is off, which means that I will have to select relationships that fit under the fandom that I selected one up, I can't request Shubble/Niki Nihachu (Origins), and put it with a fandom request for Hermitcraft. This has set it so that the absolutely minimum someone can sign up with is 3 relationships (3 requests * 1 relationship each), and the absolute maximum is 200 relationships (10 requests * 20 relationships each).
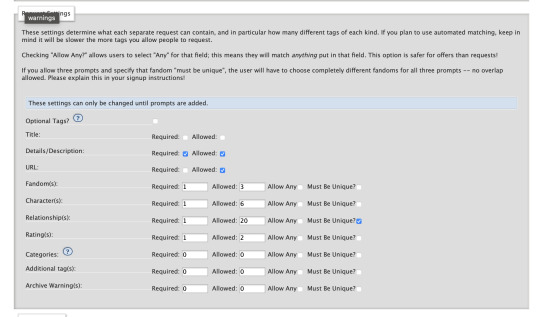
Requests will look much the same, except I am not putting down details/description or a URL, because I'm not letting people submit requests about what ship they "really" want to match on, they are going to be equally matchable to everyone they offered. Some exchanges will let you submit a requests DNW, but honestly that is so much extra work for the mods, I would not recommend it unless you think it's necessary to stop people from dropping their gifts later.
Okay, so now we take a brief digression into a tag set.
THE TAG SET
Okay so basically a tag set is an extra set of sliders that lets you fine-tune your exchange. If you do not use a tag set, when people sign up they will be able to use every canon tag on the archive, and only canon tags. Which is a LOT of tags, but when I ran an exchange without a tag set there were multiple times of hitting non-canon relationships or tags. But it's also a definite extra complication, tag sets are extra fiddly work and they are even less intituive. If you just want to go without a tag set, skip down to the matching segment. If you do want to avoid hitting people signing up with non-canon tags, keep reading.
I'm gonna say right off the bat that tag sets are the single most like "oh I am getting into the GUTS of the machine" part of running Ao3 exchanges, but if you can make them work they can super streamline both the sign-up (for your participants ) and the matching process (for you).
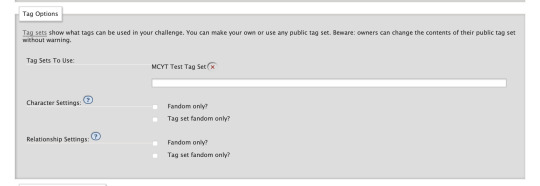
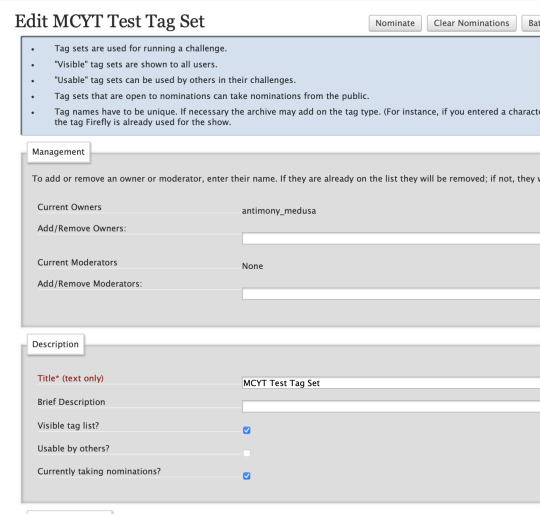
Oh boy, tag sets. Here we start getting into how exchanges start squeezing the interface to make it do what we want it to. I'm using a tag set, so first I clicked on the "tag set" url there and I made my tag set, and then I came back and selected its name from the drop-down menu on the collection. I leave all the tick boxes open, because selecting them will again restrict you to canon tags, and we specifically want to be open to noncanon tags both because of issues like "ijevin & tiny tim" not being a canon tag, and because the way MCYT tags are wrangled and made canon does not work for how the exchange machine reads information. We specifically want a collection of non-canon tags tuned for our needs. More on that later.
So, I started a new tag set, and I'm over there on that screen, looking at it. What does that screen look like?
Okay so, part of the appeal of a tag set is that your participants are able to specify the difference between "Rendog & InTheLittleWood" and "Rendog/InTheLittleWood". You don't have to worry about people getting undesired shipping, because people were specifying if they wanted shipping when they signed up. You can reduce a great deal of people getting matched badly by using relationship matching, because most of the time even if people want a Tommy-centric fic, there's a pretty big difference between people who want "Tommy & Technoblade" and "Tommy & Dream". By specifying who you want the gift to be about, you remove a big hurdle of matching right away. That's why most exchanges run on relationship matching.
However, if there are 37 people on a given server, that's something like 2,600 possible combinations of people if you include both romantic and platonic, and that's before you start getting into trios, and that's just way too many tags for the mods to enter manually. So what you do is run a nomination period, and for a week or two weeks you go to all your participants and you go "do you want to sign up for this exchange? Nominate the tags you want to use now! If it doesn't get nominated, it can't be used!" And then people head to the tag set to nominate.
So, on this page, you want "visible tag list" to be selected, because you want people to see what's already been nominated so they don't duplicate, and you want "currently taking nominations" to be selected because you will be taking those nominations instead of doing them all yourself.
So you have to set up limits on those nominations.

The point of taking nominations is to make matching easier, so people normally use the same fandom and relationship limits as they are going to use on the sign-up, to make sure there aren't dozens of tags in the tag set that nobody's using, just cluttering up the space. It also helps stop the issue where someone sees a tag in the tag set, goes "oh man I love that ship" and signs up, but its an extra tag that no one intended to offer, so they don't match to anyone. That's why sometimes people keep the amount of tags that can be nominated low, I've seen people limit this to 10 tags, or even 7, so that's up to you.
And you save, and now when you link your participants the tag set, they will have a "nominate" button.

They will hurry over to press that button, and then they will see a page that looks like this.
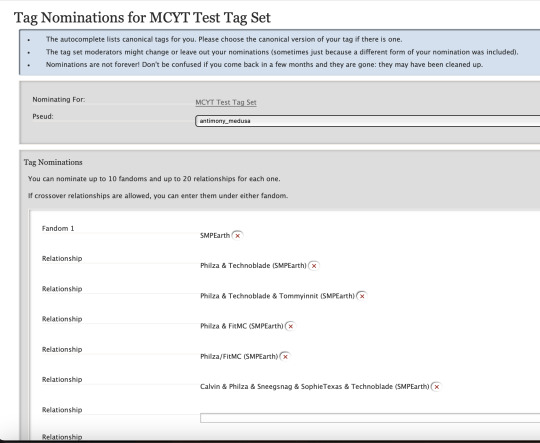
This is a thing where you absolutely want to give your participants detailed instructions, because what Ao3 will try to do is auto-fill people's nominations with canonical tags. WE DO NOT WANT CANONICAL TAGS. CANONICAL TAGS ARE THE ENEMY OF EXCHANGES. CANONICAL TAGS ARE THE ENEMY OF MCYT EXCHANGES IN PARTICULAR.
Remember back when we clicked the button that says tags have to be unique? The canonical tag for Philza & Technoblade doesn't have a server on it, and people might want to be requesting that relationship for SMPEarth, Dream SMP, Origins SMP, or arguably even QSMP. If you only have the canonical tag, people can only request a specific dynamic once, for one server. And that is a problem for every situation where people interacted on multiple servers, and with the network of overlaps that is Empires/SOS/3rd Life/Hermitcraft and DSMP/Origins/SMPEarth/QSMP, that's going to lead to unhappy participants. So you tell people to nominate the ship and also "disambiguate" it, and add the server in parentheses. And then all your participants will hit the button to submit, and you will go into the "review nominations" button, and you will let those tags into the tag set.

Now I just distributed the tag set to a couple friends, so let's look at what this looks like behind the scenes.
Brace yourself, it's gonna be wild, but I believe we can get through it.

Now here is a perfectly standard look at tag set nominations after a few people have gotten into the tag set. This is why they pay tag mods the big bucks.
As you can see, there are a few things to be gathered. The first things is a bunch of people used the canon tags (because that's what Ao3 tries to get them to do), someone else nominated an x-reader ship, we have one tag there twice (spelled differently), and the tags are Piped (they have both the person's tax name and the username). (You can let tags in that are Piped, but I find that it makes the tag set harder to read, and usually exchanges are character-focused unless you're writing video blogging rpf anyways, so I ask people to submit tags unpiped, using usernames.) And for the tags that were nominated in a way that I want (unpiped, and disambiguated so they're unique), Ao3 is trying to get me to use the canon tag. But I don't want the canon tag, I want a unique tag, with the server on it, with no pipes. So.
So were I moderating the tag set, after a few minutes it would look like this.
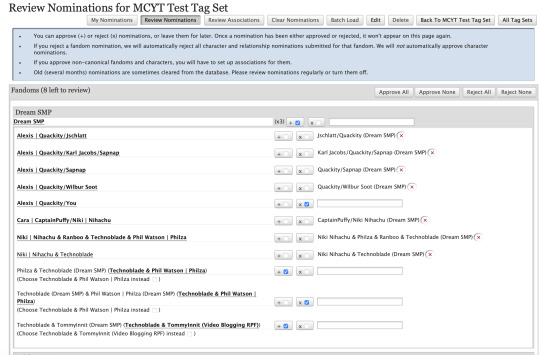
That's going through and disambiguating the tags (adding the server, which I could tell because of the fandom it was nominated under), removing the piping and using the usernames instead of tax names, and then re-ordering the names so they're alphabetical so people can find them on the list later, rejecting the x-reader tag, rejecting the duplicate and allowing the one that's spelled correctly through. Amazing. I have tags that I want to use (I did some other tags that were ready to go in other fandoms as well). I hit submit. Am I ready to go?
No, because tag sets are the most complicated part of exchanges.
I open up my tag set, and if I scroll down to "Unassociated characters and relationships" there are a bunch of tags that are are lost, Ao3 doesn't know where to put them. This is because we very carefully made unique tags that have not been wrangled anywhere, and Ao3 said "i don't know where these go" and shoved them all together in a garbage bin at the bottom of the page. So we have to manually go in to associate them to the right fandoms.
You hit the Edit button on the tag set, and scroll down to the bottom, to "tag associations", and start selecting where tags go.

Honestly this is a great time to be listening to a stream or a podcast or something, and then you have the tag set open in another tab so you know what all the unassociated tags are, and you just go down the list like a databasing machine. It is not hard, cause you disambiguated each tag with its own server, it's just time consuming. Note. This is why people go in and accept tags regularly during the nomination period, because if you do this all at the end you've got a BIG job ahead of you.
So, you turned on your VOD playlist and you associated all your tags, and all the tags are where they are supposed to go. You have a beautiful tag set.

But wait, you say, looking at this beautiful tag set. Some of those tags look at little different. What is the "Dream smp and only dream smp" that a couple of them have?
Well.
You see.
Ao3 designed tag sets to work a certain way, and nobody uses them that way. It turns out that "Quackity/Wilbur Soot (Dream SMP)" is a wrangled canon tag, and the system goes "ah, I know where this goes, this is a sub-tag of the major tag, and the top-level tag is Video Blogging RPF, so it goes under Video Blogging RPF, as all MCYT tags do. I am very smart. I have stuck this Dream SMP tag under Video Blogging RPF. I am a good machine". And then you go AUUUUUUUUGH, and then you turn up the podcast a little louder, and then you sit down and you delete the old tag and you write out a new tag that the system doesn't know what to do with, and it goes uhhhhhhh and sticks it in "unassociated tags" and then you go in again and you manually associate it into the right server.

It's not hard, it's just time consuming. Shouting at the tag set like STOP TELLING ME WHAT TO DO as it helpfully tries to stick dsmp tags in SMPearth and you wrestle it out of SMPEarth and into the right fandom bucket.
Deep breath moment. Honestly that's the most fiddly part of a fiddly process, so if you can get through this you're absolutely golden.
Anyways. You got clean disambiguated unique tags, and then you associated them in the right spot, and then you found the ones that got sorted to the wrong spot and you associated them yourself, and now you have a beautiful tag set ready to go. It's a thing of beauty. Shed a tear. Your participants can select from anything in this tag set, and you know they want to use these specific relationships, because they submitted them to you. What next?
THE MATCHING
Okay. You have your tag set set up and it's accepting nominations. Your participants are filling it out right now. You go back to your collection. it's time to tell it how to match.

This is the "minimum number to match" pane, and this is the minimum numbers to make a successful match. You want 1 for Fandom, and 1 for Relationship, and that's it. People will show up to the machine as a viable match as long as they have submitted a fandom and relationship that matches someone else's offered fandom and relationship.
This is a minimum viable exchange. You're ready to go. As soon as your tag set is done (or immediately if you're not using a tag set), you're ready to go back and open your exchange to sign-ups.
Congratulations!
FURTHER TWEAKING
HOWEVER. There is more that you can do. For example, do you want to allow people to request or opt into NSFW? There's an easy way to do that! First thing is you go back to your tag set, and you scroll down to the "ratings" section that you've been ignoring.

You select G and E, and that way, if people are opting into explicit that means they're okay with NSFW, and if they only select G, that means they only want a non-explicit piece.
Then on the collection you switch the requests and offers sections to include a place to specify a rating.
You want them to definitely specify at least one, and if you maximum allowed is 2, people can opt into both and say "i'm good with whatever"!
Then you scroll down to the matching section, and you tweak that to make sure that people will match on Fandom, Relationship, and at least one Rating.

Bingo. You now have a toggle to turn NSFW on and off.
But a lot of people like to match by TYPE of gift too, specifying if they want art or fic or playlist or web weave etc. How do you do that? Ah, at this point you are master of all you survey, and you can make tag sets do absolutely anything you want. You go back to the tag set and you scroll down to "characters".

Now we were matching on relationships, so the character box is unused. And it lets you put in your own tags. So what you do is you start to add in custom tags.

And then you go back to the Collection settings, and on the requests and the offers you go in to the "characters" section and you say "must select at least one, can select up to six".
And then, you guessed it— you go back to "minimum number to match" and you set that "characters" tab to 1 minimum, 6 maximum. Now people who specified that they wanted Art can be matchable to artists who Offered Art. You have unlimited power, the world is at your fingertips.
There's even more customization that you can do, too! There's "additional tags", which is entirely custom tags you add yourself, that can be anything from specifying if people want fluff or horror or hurt/comfort etc— with the recursive exchange we used it to specify the works people were recursing— I'm considering using it for holidays with the holiday exchange. You can let people opt in or out of major archive warnings by selecting "archive warnings" as a thing that's in the tag set and that you're matching for. Once you understand how the underpinnings of how the machine works, you can wrestle it into almost any shape you want.
So. Whew. That's how exchanges work, under the hood. When I say that this is significantly easier than hand matching the holiday exchange, I ask you to picture just how complicated hand matching gets. Go forth! Thrive! Set up exchanges if you want! The world is your oyster!
Feel free to message me if you have further questions.
236 notes
·
View notes
Text
URGENTLY NEED NEW HOUSING ‼️

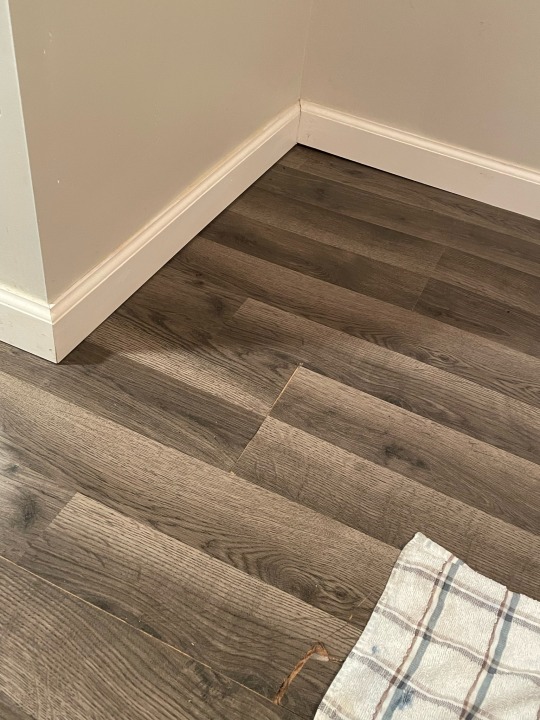
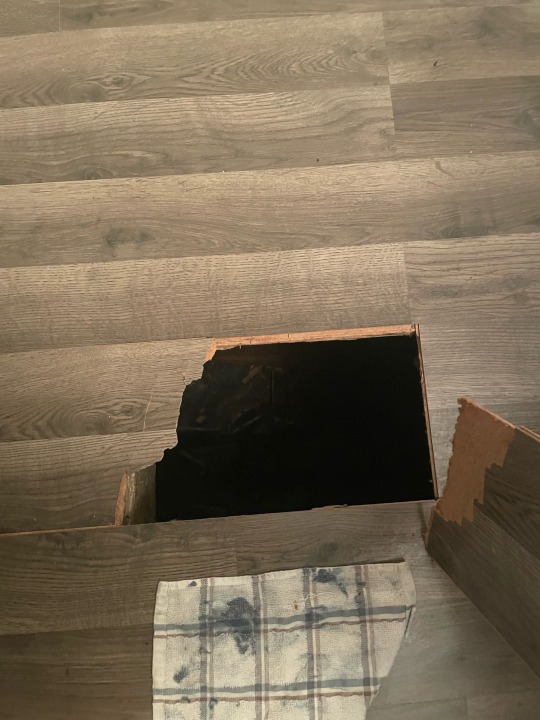

i think the other post was too long bc people are just ignoring it. we haven’t received anything in a week. the pics are the cracks, gaps in walls & floors and the giant hole in the floor.
long story short: we are needing help moving out of our crumbling, mold infested, pest infested, and poorly built home. we have used all we have to make repairs and they’re getting too costly; like majorly costly. to the point where it would just be cheaper to sell and to move into an apartment. we have a hole in our kitchen floor and a quarter of it is unusable unless you wanna fall into the crawl space, shifting/crumbling foundation; so we have cracks all in our walls and door frames, doors that won’t shut/open, floor dips, the list goes on. on top of this we have no ventilation so we are breathing in moldy air! we were scammed into this place and need out!! we are needing 1250 to do this - uhaul fees (100ish?), application fees, deposit(225?), pet deposit and rent (325), one months rent (650-750). if anyone has the means to help, please do so. we are wanting out of here asap. and that being said, we are able to contribute to our fund; but only little amounts and only every 2 weeks which won’t get us anywhere fast enough without help. but anyway, thank you so SO much. prayers are much appreciated. reblogs help greatly! again thank you so much!
pp: paypal.me/valerielay
vmo: @Valerie-Lay
CA: $geminimoonz
125/1250
505 notes
·
View notes
Text
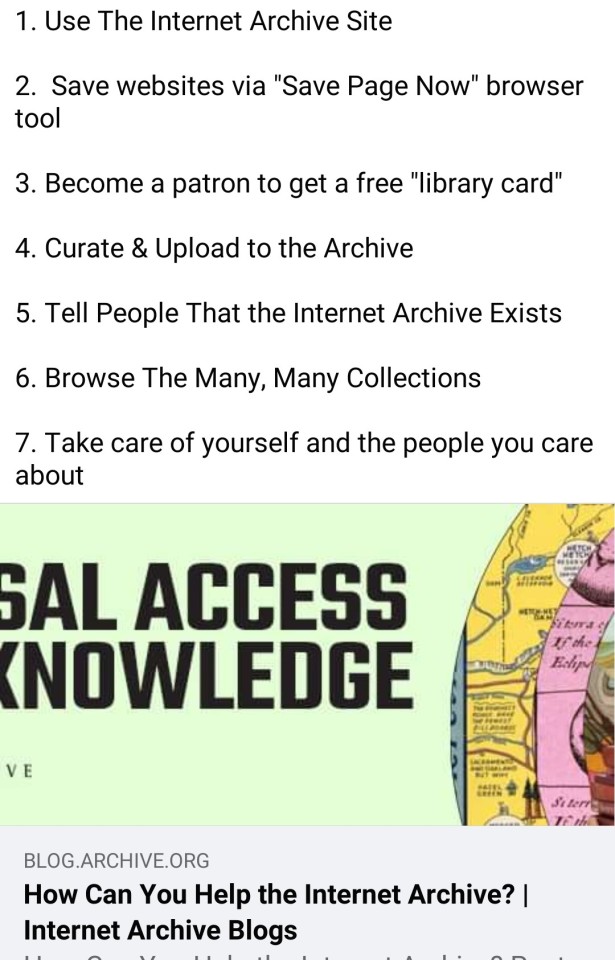
The Internet Archive is under attack by corporations seeking to wrest more and more of our fair use rights, our public spaces and our communities from the public good. The Archive was recently forced into a settlement for scanning and digitizing legally purchased books. They are now facing a $325 million lawsuit for accepting donations of old 78 RPM historical music records that were digitized by volunteers. The goal is not only to stop the distribution of these works, but to create new legal precedents that make it illegal to preserve or archive for any reason. This will have a significant impact on our culture, our communities, and our future
Here is how you can help them
1. Use The Internet Archive Site
2. Save websites via "Save Page Now" browser tool
3. Become a patron to get a free "library card"
4. Curate & Upload to the Archive
5. Tell People That the Internet Archive Exists
6. Browse The Many, Many Collections
7. Take care of yourself and the people you care about
(Link will take you to a blog article that goes into these suggestions in detail)
#the internet archive#internet archive#fair use#copyright abuse#capitalism#digital archiving#digitization#digital preservation#archiving#fandom history#our culture#our voices#our past#our present#our future#libraries
499 notes
·
View notes
Text
Indian IT Worker Designs New Eco-Friendly Sewage Treatment Method with the Sacred Cow as His Inspiration https://www.goodnewsnetwork.org/indian-it-worker-designs-new-eco-friendly-sewage-treatment-method-with-the-sacred-cow-as-his-inspiration/
Tharun Kumar began to imagine ways to build a better sewage treatment method that could produce good quality water without chemicals.
In 2017, Kumar started ECOSTP with the chambered stomach of the cow as his “bovine inspiration.”
Typical wastewater plants use aerobic bacteria, or metabolism with oxygen, to break down sewage, but this requires the ventilation system that continually runs on energy. Regular sewage treatment also tends to use chemicals, and has the presence of a full-time employee. Kumar has eliminated almost all of these drawbacks.
At the base of the ECOSTP septic tank is a layer of cow dung that provides the bacterial workers. With the water moving via gravity, it enters the second bacterial chamber before passing into the third space which is a filter of sand and gravel. The fourth chamber lies under a garden of select vascular plants which removes suspended solids, pathogens, nitrogen, and phosphorus, the latter two going to feed the plants.
The resulting water is graded by health inspectors as good quality for toilet water and gardening applications. With the aid of a grant from the US-based Biomimicry Solutions, ECOSTP now has 325 clients across 22 states in India, and their septic tanks are unmanned and unpowered, saving thousands in running costs.
“We are proud to have reclaimed 2 billion liters of sewage so far without power or chemicals.”
ECOSTP is now seeing if it’s possible to identify anaerobic bacteria that can remove the harmful compounds of industrial effluent.
youtube
#good news#science#microbiology#india#waste water treatment#wastewater#green technology#biomimicry#environmentalism#environment#nature#animals#climate change#climate crisis#Youtube
254 notes
·
View notes
Text
masterlist
˗ˏˋ꒰ 💭 ꒱ . . . the winner option in the poll i did, using @rae-reblogs , was to post the drabbles with the character i had in mind (in a specific-character way). so, here y'all have the second one (and last one for now).
˗ˏˋ꒰ 💭 ꒱ . . . lowercase intended, 325 words, wrote in the second form for mc, very ooc raphael.


even after so much time with you, raphael couldn't help but wonder how you ended up falling into the sweet branches of love, how it was that someone like you fell for someone like him.
curious forms of destiny, a sarcastic destiny that wanted to see you two together.
lifting his chin, he let his red eyes meet yours. oh, beautiful orbs of intricate beauty that neither the most poetic writer nor the most virtuous painter could capture the authentic magic of them.
a touch, a delicate touch that caressed his left cheek, brought him out of his deep thoughts. thus, with such an action, you quietly demanded his attention. your thumb slid tenderly over his fair skin, small smiles forming on both your faces.
❝what is on your mind that makes you look distracted, dear?❞
❝if i'm honest, my mind is always on you.❞
his hand, giving off an almost exaggerated warmth, rose to rest on yours, letting him tenderly caress your skin with the pads of his thumb, returning that soft touch at the same time as he let himself lean against your soft palms.
a growing feeling of bloom in his chest, almost suffocating pressure that caused the archangel to stop breathing for a few seconds; although, he quickly recovered from that lack of air. breathing easily once again as his gaze didn't dare to leave yours even for a thousandth of a second.
the reason why raphael was so in love with you was… it was special, especially confusing. neither you nor he knew how or why you ended up in this relationship exactly; but, you weren't complaining about it either.
before you could even continue with your train of thought, he didn't allow you that enjoyment he drew nearer, his face getting closer to yours, and his lips made that space that once existed between both of you disappear.
how could such a brutal being be so sweet?
#— thoughts.#— what in “hell” is bad?#he may be my favourite angel in the game#who knows...?#whb raphael#raphael whb#raphael what in hell is bad#raphael x reader#whb x you#whb x reader#whb x mc#what in hell is bad#whb drabble#whb fanfic#what in “hell” is bad#what in hell is bad x reader#what in “hell” is bad?
187 notes
·
View notes
Text
Noelle: How do you cook?
Gauche: You've never done this before?
Noelle: How hard could it be? We just got to get this turkey out of here. It's taking up all the space in the one oven that works.
Gauche: Charmy said two more hours at 325.
Noelle: Sounds like one more hour at 650 to me.
Gauche: Or 39,000 degrees for one minute.
Noelle: Did you just do that in your head? Damn, you're a good chef!
Gauche, who never cooked in his life: Thank you.
#black clover#noelle silva#gauche adlai#black clover incorrect quotes#source: speechless#noelle#gauche#the black bulls#50
78 notes
·
View notes
Photo

Jeff Feld, Untitled. 2022
60″ x 30″ x 18″. Steel, wood, pom pom.
#Jeff Feld#sculpture#objects#contemporaryart#conceptual art#kunst#space 325#artists on tumblr#abstract art#Artist Run Spaces#Ridgewood#Bushwick#works on paper
19 notes
·
View notes
Text

Installation view - Hints, Clues and Evidence
Isabelle Schneider (left) Tom Butter (sculpture right of center) Brian Karlsson (back wall) Dushka Vujovic (back left)
photo credit - Beth O'Brien
#dushka vujovic#tom butter#brian karlsson#isabell schneider#325 project space#jeff feld#art gallery#contemporary art#ridgewood#artists on tumblr#beth o'brien#bushwick#sculpture#photography
2 notes
·
View notes
Photo

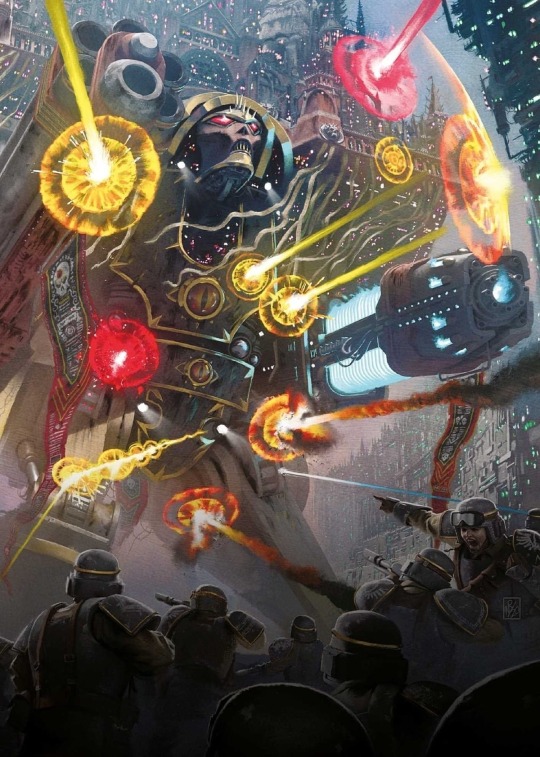
2024 February 20
AM1054: Stars Form as Galaxies Collide
Image Credit: NASA, ESA, STScI; Processing: J. English (U. Manitoba); Science: M. Rodruck (Penn State U. & Randolph-Macon C.) et al.;
Text: Jayanne English (U. Manitoba).
Explanation: When galaxies collide, how many stars are born? For AM1054-325, featured here in a recently released image by the Hubble Space Telescope, the answer is millions. Instead of stars being destroyed as galaxy AM1054-325 and a nearby galaxy circle each other, their gravity and motion has ignited stellar creation. Star formation occurs rapidly in the gaseous debris stretching from AM1054-325’s yellowish body due to the other galaxy’s gravitational pull. Hydrogen gas surrounding newborn stars glows pink. Bright infant stars shine blue and cluster together in compact nurseries of thousands to millions of stars. AM1054-325 possesses over 100 of these intense-blue, dot-like star clusters, some appearing like a string of pearls. Analyzing ultraviolet light helped determine that most of these stars are less than 10 million years old: stellar babies. Many of these nurseries may grow up to be globular star clusters, while the bundle of young stars at the bottom tip may even detach and form a small galaxy.
∞ Source: apod.nasa.gov/apod/ap240220.html
135 notes
·
View notes
Text
Top Thoughts of the Day 2023
1. 325 notes - Aug 17 2023

Thought of the Day: Analysis is the bane of conviction.
---
2. 278 notes - Feb 23 2023

Thought of the Day: There are no walls strong enough to protect the enemies of Mankind.
---
3. 251 notes - Jun 13 2023

Thought of the Day: Mercy is a sign of weakness.
---
4. 246 notes - Apr 11 2023
Thought of the Day: The greatest man is but a ripple on the surface of space
---
5. 240 notes - Oct 10 2023

Thought of the Day: Mercy is a sign of weakness.
---
6. 239 notes - Jun 14 2023

Thought of the Day: Vigilance is the brother of truth
---
7. 234 notes - Nov 17 2023

Thought of the Day: Enlightenment is a myth we do not need to understand in order to hate.
---
8. 234 notes - Aug 15 2023

Thought of the Day: All Daemons are Falsehood. They are lies given the shape of creatures by the fell power of Chaos.
---
9. 189 notes - Mar 16 2023

Thought of the Day: Honor is what a pure mind knows about itself.
---
10. 188 notes - Jan 12 2023
Thought of the Day: Cleanse yourself in the blood of our enemies.
56 notes
·
View notes
Text
Hi I'm here to share Watcher World headcanons AKA come witness a category 5 autism event
So this is. Super self indulgent, because my family are coaster enthusiasts. And I was thinking last night, I wonder exactly what kinda rides Watcher World has!
So Watcher World DEFINITELY has a Vekoma slc
Vekoma slcs are known for being Horrible and painful because they cause a ton of headbanging against the restraints.

These aren't uncommon coasters by any means, but most of the time, they're in more low budget parks since they take up small amounts of space and attract unsuspecting guests. And Watcher World is not low budget!
The Tear Jerker is fuckin weird! It's described as being 425 ft tall, five feet taller than the real life tallest Midwestern coaster Top Thrill Dragster (soon to be known as Top Thrill 2 after improvements but abababa I'm talking about the original!) Top Thrill Dragster, and all stratacoasters (400+ft) for that matter, are launch coasters. The train launches on a straight track, up a gigantic hill, and then back down.
Given all of this, I assumed Tear Jerker would be an Intamin launch, like Top Thrill. But upon looking at the script... It doesn't seem like a launch? The train is described as climbing the hill, and if it was a launch, it'd be mentioned! Stratacoasters need to be FAST, or else you can't consistently get over the hill. It is possible for the car to roll back or stop right at the top of course, but there aren't exactly stairs up there as described in the story, as the train goes up the hill at a very steep angle. If the Tear Jerker has a lifthill, it's probably a full circuit coaster, beating out Fury 325 (irl tallest full circuit) by an entire 100 feet!
What's crazy is that real life is even weirder because intamin is currently working on a 600ft full circuit coaster with Six Flags right now. I dunno if it'll WORK but it certainly shows that Tear Jerker is not as unrealistic as I first thought, so it likely could be an Intamin!
I could totally see Watcher World having an Arrow looper too. Arrow loopers are a bit rinky-dinky. They are old, and rickety. I. Personally find them a little charming for that, even though they Will Hurt Me. But I'm not gonna act like the clanking sound the slow ass lifthills make aren't at least a little off-putting.
Taking inspiration from the real life Nightmare Park Mount Olympus, Watcher World has got to have a sketchy ass wooden coaster. Smth like Pegasus that. Okay so for some reason, Pegasus ends with a fuckin. 90° turn into the brakes???? Which is a Choice because it WILL hurt your neck. Watcher World absolutely pulls some bullshit like that.
So, more historic inspiration. The first ever looping roller coaster was the Flip Flap Railway opened in 1895. And it was horrible. It used a tiny, perfectly circular loop, rather than the teardrop shape used today. Thus causing the loop to have a G force of TWELVE. Today high G force coasters are in the range from around 3 - 6 Gs. So yeah. Horrible Back Breaker Ride.
Uhhh that's all the ideas I have now. Feel free to add on guys :3!
66 notes
·
View notes
Text
DO SHADOWS APPEAR ON THE MOON'S SURFACE??
Blog#325
Wednesday, August 23rd, 2023
Welcome back,
The moon is utterly familiar. We see it all the time, in the blue sky during the day, among the stars and planets at night. Every child knows the outlines of the moon’s lava seas: they trace the Man in the Moon or, sometimes, a Rabbit.
This familiarity goes beyond appearances. The moon is actually made of Earth. According to modern theories, the moon was born some 4.5 billion years ago when an oversized asteroid struck our planet. Material from Earth itself spun out into space and coalesced into our giant satellite.

Yet when Apollo astronauts stepped out onto this familiar piece of home, they discovered that it only seems familiar. From the electrically-charged dust at their feet to the inky-black skies above, the moon they explored was utterly alien.
On the next sunny day, step outdoors and look inside your shadow. It’s not very dark, is it? Grass, sidewalk, toes–whatever’s in there, you can see quite well.

Your shadow’s inner light comes from the sky. Molecules in Earth’s atmosphere scatter sunlight (blue more than red) in all directions, and some of that light lands in your shadow. Look at your shadowed footprints on fresh sunlit snow: they are blue!
Without the blue sky, your shadow would be eerily dark, like a piece of night following you around. Weird. Yet that’s exactly how it is on the Moon.
To visualize the experience of Apollo astronauts, imagine the sky turning completely and utterly black while the sun continues to glare.

Your silhouette darkens, telling you “you’re not on Earth anymore.”
Shadows were one of the first things Apollo 11 astronaut Neil Armstrong mentioned when he stepped onto the surface of the moon. “It’s quite dark here in the shadow [of the lunar module] and a little hard for me to see that I have good footing,” he radioed to Earth.
The Eagle had touched down on the Sea of Tranquility with its external equipment locker, a stowage compartment called “MESA,” in the shadow of the spacecraft.

Although the sun was blazing down around them, Armstrong and Buzz Aldrin had to work in the dark to deploy their TV camera and various geology tools.
“It is very easy to see in the shadows after you adapt for a while,” noted Armstrong. But, added Aldrin, “continually moving back and forth from sunlight to shadow should be avoided because it’s going to cost you some time in perception ability.”

Truly, moon shadows aren’t absolutely black. Sunlight reflected from the moon’s gently rounded terrain provides some feeble illumination, as does the Earth itself, which is a secondary source of light in lunar skies. Given plenty of time to adapt, an astronaut could see almost anywhere.
Almost. Consider the experience of Apollo 14 astronauts Al Shepard and Ed Mitchell:

They had just landed at Fra Mauro and were busily unloading the lunar module. Out came the ALSEP, a group of experiments bolted to a pallet. Items on the pallet were held down by “Boyd bolts,” each bolt recessed in a sleeve used to guide the Universal Handling Tool, a sort of astronaut’s wrench. Shepard would insert the tool and give it a twist to release the bolt–simple, except that the sleeves quickly filled with moondust. The tool wouldn’t go all the way in.

The sleeve made its own little shadow, so “Al was looking at it, trying to see inside. And he couldn’t get the tool in and couldn’t get it released–and he couldn’t see it,” recalls Mitchell.
“Remember,” adds Mitchell, “on the lunar surface there’s no air to refract light–so unless you’ve got direct sunlight, there’s no way in hell you can see anything. It was just pitch black. That’s an amazing phenomenon on an airleuss planet.”
(Eventually they solved the problem by turning the entire pallet upside down and shaking loose the moondust. Some of the Boyd bolts, loosened better than they thought, rained down as well.)
Originally published on universetoday.com
COMING UP!!
(Saturday, August 26th, 2023)
"WHAT IS THE GREAT SILENCE??"
#astronomy#outer space#alternate universe#astrophysics#universe#spacecraft#white universe#parallel universe#space#astrophotography
73 notes
·
View notes
Last Seen Blogs

nariarts
Nari Arts

t3l3k1n3t1c
my brain is marinating in a pickle jar

crankyzeus
CeZil

swansinflight
Swans in Flight

easterwings
07:43