#Fun recipe: red cabbage with eggs :)
Explore tagged Tumblr posts
Visit Tumblr Blog
Explore Tumblr blogs with no restrictions, modern design and the best experience.
Last Seen Tumblr Blogs


Fun Fact
In February 2021, Tumblr had 518.6 million blog accounts.
Text
Disney Recipes: From Animation to Inspiration
Online listing of the book
Here's a new post to hold the recipes and contents of the book I've been posting recipes from.
Old Posts: 1 | 2
[Warning: This book came out in 2003 and will have some outdated characters, names, and references. I'll be posting everything as shown in the book, so some recipes may be offensive or use outdated language.]
---
Table of Contents
[Note: Anything underlined has a post, anything that isn't will be uploaded and posted eventually. Feel free to request recipes, and/or vote in the polls.]
Preface by Ira L Meyer
Foreword by Marcello Garofalo
Introduction
--
APPETIZERS AND CONDIMENTS
Ariel's "Under the Sea" Tempura
Baloo's Jungle Ambrosia Salad
Lumiere's Appetizers
Si and Am's Appetizers
Basil's Smoked Salmon Tartare
The Big Bad Wolf's Dream: Barbecued Spareribs with Blackberry Sauce
Mushu's Egg Rolls and Juk
Philoctetes' Onion Marmalade with Raisins
Princess Aurora's Berried Honey Butter
--
PASTAS
Clarabelle Cow's Tagliatelle
Genie's Free-Form Lasagna
Gus the Goose's Spaghetti with Peas
Lady and the Tramp's Spaghetti Bella Notte
Minnie Mouse's Pasta with Three Cheeses
Pinocchio's Farfalle with Leeks and Sausages
Stromboli's Penne with Grilled Vegetables
"So Dear to My Heart" Pasta
Willie the Whale's Pappardelle with Shrimp
Horace Horsecollar's Cool Pasta with "Salsa Fresca"
--
SOUPS
The Black Cauldron's Forest Soup
Cinderella's Herb and Egg White Soup
The Grasshopper and the Ant's Lentil Soup
Merlin's Magical Broth
Louis's Seafood Chowder
Treasure Planet's Astral Soup
Robin Hood's Creamy Carrot Soup
Snow White's Winter Vegetable Soup
Widow Tweed's Cheddar Soup with Herbed Crisps
Wise Little Hen's Roasted Corn Soup
Madam Mim's Dragon Soup
Make Mine Music's Double Soup
--
ENTRÉES
Captain Hook's Codfish Fillet
Cookie's Special Chili
Esmeralda's Turkey Piccata
Figaro's Trout in Crazy Water
Oliver & Company's Dry-Roasted Chicken
King Hubert's Veal Roast with Apricots and Thyme
King Midas's Hamburger Stuffed with Holden Onions
Simba's Seared Fillet of Beef
Mulan's Mahogany Chicken
Pecos Bill's Grilled Rib-Eye Steak with Red-Eye Gravy
Peg Leg Pete's Seared Swordfish with Mint Bread-Crumb Sauce
Pluto's Cold Roast Turkey Breast
Quasimodo's Multicolored Cabbage Salad and Chicken
The Scat Cat Band's Crispy Fried Sole Fillets with Raw Tomato Sauce
Sir Ector's Whiskey-Glazed Ham
Ichabod's Roast Turkey with Giblet Gravy
--
SALADS, DRESSINGS, AND SANDWICHES
Alice's Warm Mushroom Salad
The Cheshire Cat's Marinated Fish Salad
Humphrey the Bear's Sandwich
Bambi and Thumper's Green Goddess Dressing
Lilo & Stitch's Hawaiian Sandwich
Melody Time's Cold Poached Shrimp with Melons
Mowgli's Mixed Vegetable Salad
The Walrus and Carpenter's Fresh Oyster Salad
Tinker Bell's Golden Herb Melange
Willie the Giant's Mixed Sandwich
--
VEGETABLES AND VEGETARIAN ENTREES
Mrs. Price's Cabbage Buds with Braised Nettles
Peter Pan's Crispy Spinach with "Pixie Dust"
Fun and Fancy Free's Ratatouille
Kuzco's Spinach Puffs
Pocahontas's Savory Indian Corn Pudding
Uncle Scrooge's Golden Risotto
Three Caballeros' Vegetarian Burritos
Pumbaa and Timon's Potatoes with Caramelized Onions
The Three Little Pigs' Potato Pancakes and Applesauce
--
DESSERTS
The Aristocats' "Crème de la Crème" with Milk and Honey
The Rescuers' Sweet Potato Pie with Cheese
Daisy Duck's Orange-Flavored Brownies
Huey, Dewey, and Louie's Chocolate Pie
Winnie the Pooh's No Bake Honey Cookies
Tarzan and Jane's Grilled Tropical Fruits with Passion Fruit Coulis
Dumbo's Roasted Peanut Pie with Chocolate
Maid Marian's Blackberry Pie
Fauna's Birthday Cake
King Louie's Bananas with Honey and Coconut
Goofy's Birthday Cake
Elliott's Caramelized Red Apples
Johnny Appleseed's Apple Pie
The Mad Hatter and March Hare's Cheesecake
Tigger's Frozen Dark Chocolate Orange Mousse
Witch Hazel's Pumpkin Pie
Santa's Cookies
Chip and Dale's Corn "Chips"
Snow White's Gooseberry Pie
--
BAKED GOODS
Aladdin's Rice Pudding
The Beast's Breakfast Porridge
Cookie Carnival's Boys and Girls
Mary Poppin's Corn Muffins with Sun-Dried Cherries
The Reluctant Dragon's Breakfast with the Upside-Down Cake
Mickey Mouse's Special Breakfast
Mr. Toad's Irish Soda Bread
The 101 Puppies' Kanine Krunchy Dog Biscuits
Fantasia's Pizza
The Hundred Acre Wood's Carrot Bread
Fantasia/2000's Pizza
Jiminy Cricket's Banana Bran Muffins
Donald Duck's Pancakes and Waffles
--
DRINKS
Heroes' Herculade
Rafiki's Coconut Drink
Saludo's Amigos' Gazpacho
--
Walt Disney's Recipes
The Recipes
Index
Filmography
Acknowledgements
4 notes
·
View notes
Note
ask game: 43 (can i add a question? if you like them, I'm open to new recipes :D)
43. what’s your take on spicy foods?
YES. (while my gf and i were discussing this we did say it's my toxic trait that i am a spicy food snob lmfao)
a lot of my faves when it comes to spicy foods are basically traditional goan comfort cuisine. i don't really have a recipe on hand but those should be easy to find! i love sarapatel/sorpotel, prawn curry, balchão, xacuti, and goan sausage which adds a nice something spicy even if i'm just sauteeing some veggies with it! the thing about goan cuisine is it goes hard on the sour curries. it's very typical and imho very yummy!
one i make really often and just eyeball is a simple dahl. i start with onion, a powdered curry spice mix that my grandfather makes (it has ground chili for the spice), and olive oil in a pan until the onion is soft and fragrant, add garlic, wait a bit, add diced tomato/tomato paste (i really prefer just dicing the tomatoes myself), red lentil, coconut milk (i eyeball, but this is what lets you tone down the spicyness if need be), stock, wait for ~5-10 minutes, then make a nest or two to drop an egg into, wait a bit for the egg to cook, stir in some spinach leaves, and when done garnish with lemon or a bit of greek yogurt (you could go with coriander but i am cursed with the coriander soap gene. the fun part is i got that from my indian dad LMFAO). sometimes i use pre-cooked chickpeas instead of lentil, sometimes i use savoy cabbage for the vegetable and add it at the start before the tomato.
8 notes
·
View notes
Text
Several Sentence Sunday...
I'm going to do something a little different today, since I am currently working on a story where Kaz takes Inej out for their first real date in public.
I've had a lot of fun researching various foods that I think would occur within a Suli and Ravkan restaurant. I've pulled from eastern European, Russian, Romani, and Middle Eastern foods, figuring the Suli have picked up a variety of cuisines in their travels, and perhaps each caravan has family recipes and specialties. So here's what I've worked up for Pelegrini's menu:
Suli & Ravkan cuisine as seen at Pelegrini:
Skillet bread: A variety of unleavened bread is available, similar to naan, including plain, garlic stuffed, and almond and raisin.
Spiced tea: Somewhere along the lines of chai. (Inej’s favorite tea; Kaz declines, ordering Ravkan black tea instead.)
Djuveci: a curry-like fish stew. (Inej offers it up, but Kaz decides on the cabbage rolls instead.)
Sarma: stuffed cabbage leaves, filled with a mixture of ground meat and rice, mildly spiced. (Inej recommends these for Kaz as they will be milder.)
Tzatziki: thick yogurt sauce with garlic, chives, and dill. (Inej shows Kaz to dip the sarma and bread into it.)
Ajvar: red pepper sauce. (Also for dipping various foods into. Way too spicy for Kaz.)
Paprikas Csirke: chicken, onions,and potatoes in a medium spicy paprika curry sauce. (Inej orders this for herself, but lets Kaz sample some.)
Pirogo: a sweet noodle casserole dessert, with eggs, raisins, walnuts, cream and cottage cheese. (They share this for dessert.)
Pomdrakon: dragonbowl, a Ravkan dish created by lighting raisins on fire. (Kaz opts out of this one, says he’ll try it next time!)
Here's a few sentences from the story. (I love that we all seem to agree Kaz has a Kerch palate when it comes to spicy food...)
They munched mostly in silence for a while, until Inej insisted he at least try a bite of the garlic stuffed skillet bread with ajvar. There was just enough challenge in her tone that he felt obligated to rise to the occasion. Besides, Inej had described it as milder than her father’s version of the sauce. She dipped the bread, and held it up for him with a grin. The moment the sauce hit his tongue, three thoughts occurred in quick succession.
Oh fuck, that’s spicy!
How hot does her father make this?
I’m going to need more tea.
He didn’t cough, sputter, or spit out the bite. He did note his eyes start to water. His glass of iced tea was in hand before he’d even swallowed. Inej tried valiantly to stifle her giggle, but failed. “Okay, no more ajvar for you. Sorry about that.”
“I think…” He cleared his throat. “I think I’d believe that apology if you weren’t still laughing.”
“Have some more tzatziki, it will help more than the tea.”
I've added the info about Pelegrini to my Wiki, sampled here:
And in full here:
#soc fandom#kaz brekker#inej ghafa#kanej#kaz x inej#six of crows#crooked kingdom#grishaverse#date night#food#writing about food#Kerch palate#Suli food#Ravkan food#Inej loves spicy food#Kaz might need a moment#first date#food research#soc fan fiction#soc fanfic#soc headcanon#soc kaz#soc inej#a03 writer#DreamTigress Wiki
4 notes
·
View notes
Photo

Have you ever wondered what you could serve your guests beyond the usual, traditional dishes? Tacos might just be the perfect choice—not only for their magical taste but also for the comforting, wholesome experience they bring. While anyone can easily order tacos online at any time, what truly makes them special is the joy of cooking them yourself and mastering the art of preparation.At this point, many might ask: can tacos be made at home with that same restaurant-quality flavor? The answer is a resounding yes. By using natural ingredients and a few simple hacks, you can create fantastic tacos that will linger on your guests’ taste buds long after the meal is over. To get you started, here are some unique taco recipes that deserve a spot on your weekend brunch menu or at your next backyard party.Check out yummy taco recipes to try that’ll impress your guests…#1. Thai Peanut Chicken Tacos with Crunchy SlawPhoto: Ekkasit JokthongThis taco recipe doesn’t just whisper flavor—it shouts it. With the richness of Thai peanut sauce paired perfectly with the crisp, vibrant slaw, it’s an unexpected combination that grabs attention and satisfies every craving.Bringing It All TogetherBegin by marinating thin slices of chicken breast, then grill them until they’re juicy with just a hint of char around the edges. While the chicken cooks, prepare the slaw by tossing together shredded red and green cabbage, chopped cilantro, and thin carrot sticks. A splash of rice vinegar and a pinch of salt bring the slaw to life with brightness and crunch.For the sauce, you can either pick up a store-bought Thai peanut sauce or whip up your own at home. Simply mix creamy peanut butter with soy sauce, fresh lime juice, minced garlic, and a dash of sriracha. Stir until smooth and luscious.Next, warm your tortillas and spread a generous layer of the sauce on each. Then, build your taco by layering in the grilled chicken and the crunchy slaw. Finish with an extra drizzle of sauce, a sprinkle of crushed peanuts, and a big squeeze of lime. Every bite bursts with bold, nutty, and fresh flavors that are truly unforgettable.#2. Brunch Waffle Tacos with Chorizo and EggsThese tacos bring Mexican cuisine to life—right on your dining table. With indulgent flavors and a creative twist, like using waffles as taco shells, they’re sure to have your guests coming back for more.Turning Breakfast into a TacoStart with mini waffles—either homemade or toasted from frozen. Next, scramble eggs until soft and fluffy. Meanwhile, cook spicy chorizo or breakfast sausage until it’s crisp and bursting with flavor.Now comes the fun part: layering. Place the waffles on a plate, then pile on the scrambled eggs. Spoon the hot chorizo over the top, and sprinkle generously with shredded cheddar or pepper jack cheese. To balance the savory, drizzle warm maple syrup or hot honey for a sweet kick that surprises and delights.Finally, add a sprinkle of chopped cilantro or chives for a pop of color and freshness. These tacos are best served warm, and if you have a mini waffle iron, you’ll nail that perfect taco shape every time.#3. Slow-Cooked Lamb Tacos with Mint Yogurt and Pickled OnionsPhoto: Roman Odintsov/PexelsElegant, aromatic, and deeply satisfying—these lamb tacos are made for sit-down dinners where every bite feels like a special occasion.Assembling Layers of ComfortBegin by slow-cooking boneless lamb shoulder with garlic, cumin, rosemary, and a splash of broth. Let it simmer until the meat is tender enough to pull apart effortlessly with a fork, allowing the rich, deep flavors to fully develop.Meanwhile, prepare the cooling yogurt topping by mixing creamy Greek yogurt with freshly chopped mint and a generous squeeze of lemon juice. The result is a tangy, refreshing complement to the lamb’s warmth.For a bright contrast, quick-pickle thin red onion slices by soaking them briefly in vinegar with a touch of sugar and salt. This adds the perfect pop of acidity.To assemble, shred the lamb and pile it high on warm pita or tortillas. Layer on fresh greens, dollops of mint yogurt, and the pickled onions for a sophisticated taco experience without any fuss. And if time’s tight? No worries—ordering in can be just as satisfying. Either way, you’re in for a seriously tasty treat.#4. Vegan Roasted Cauliflower Tacos with Romesco and PepitasHearty, plant-based, and bursting with umami, this cauliflower taco recipe proves that meatless doesn’t mean missing out. Even devoted carnivores won’t look back after one bite.Building Bold, Plant-Powered FlavorStart by tossing cauliflower florets with olive oil, smoked paprika, garlic powder, and a pinch of salt. Roast them until they’re golden, crispy at the edges, yet tender in the center.Meanwhile, whip up a smoky romesco sauce by blending roasted red peppers with almonds, garlic, olive oil, and a splash of sherry vinegar. Blend until smooth and luxuriously rich.Warm your corn tortillas and spread a generous spoonful of romesco on each. Next, pile on the roasted cauliflower, followed by a handful of finely shredded purple cabbage for a satisfying crunch. Top it all off with toasted pepitas for added texture.Finally, finish with a pinch of flaky sea salt. And honestly, make extra romesco—it’s way too delicious not to have on hand.Final BitePhoto: ROMAN ODINTSOV/PexelsAt the end of the day, tacos are everything at once: comforting, exciting, familiar, and adventurous. Whether you’re feeding a crowd or simply shaking up your weeknight dinner routine, you can always order tacos online—or better yet, experiment with recipes in your own kitchen and surprise your guests with every bite.So next time you’re planning a meal, don’t ask yourself what kind of tacos you should make. Instead, ask what kind of tacos you’ve never imagined before. Then go ahead—make them happen.Featured Image: Wirestock/iStockFor the latest in fashion, lifestyle, and culture, follow us on Instagram @StyleRave_—Read also!function(f,b,e,v,n,t,s) if(f.fbq)return;n=f.fbq=function()n.callMethod? n.callMethod.apply(n,arguments):n.queue.push(arguments); if(!f._fbq)f._fbq=n;n.push=n;n.loaded=!0;n.version='2.0'; n.queue=[];t=b.createElement(e);t.async=!0; t.src=v;s=b.getElementsByTagName(e)[0]; s.parentNode.insertBefore(t,s)(window, document,'script', ' fbq('init', '496558104568102'); fbq('track', 'PageView');!function(f,b,e,v,n,t,s)if(f.fbq)return;n=f.fbq=function()n.callMethod? n.callMethod.apply(n,arguments):n.queue.push(arguments);if(!f._fbq)f._fbq=n; n.push=n;n.loaded=!0;n.version='2.0';n.queue=[];t=b.createElement(e);t.async=!0; t.src=v;s=b.getElementsByTagName(e)[0];s.parentNode.insertBefore(t,s)(window, document,'script',' fbq('init', '1453079628754066'); fbq('track', "PageView"); Source link
0 notes
Text

The calendar has just flipped to May, which means Cinco de Mayo will be here before we know it! There’s no better way to partake in next Monday’s nationwide celebration of Mexican American heritage and culture than by enjoying this fun holiday’s most popular dishes made with fresh, local ingredients sourced from the farmers market.
Breakfast Burritos The burrito, which means “little donkey” in Spanish, likely originated in northern Mexico as a way to make a portable meal. Legend has it that the name may have been inspired by the rolled packs and bedrolls that donkeys carried on their backs or the burrito's ability to hold a lot of filling, similar to a donkey's load-carrying capacity.

Break your nighttime siesta and get a head start on your Cinco de Mayo fiesta with this super filling, healthy and delicious breakfast burrito recipe:
1 pound Sun Sprout Farm small yellow potatoes, cut into ½-inch pieces
Extra virgin olive oil, for drizzling
1 red bell pepper
1 cup Halal Pastures Farm fresh spinach
½ cup Jersey Farm Produce shredded red cabbage, optional, for color and crunch
3 (12-inch) tortillas
9 Yellow Bell Farm eggs, scrambled
¾ cup cooked black beans, drained and rinsed
½ cup Halal Pastures Farm tomatillo salsa
1 ripe avocado
½ cup Jersey Farm Produce fresh cilantro leaves
1 lime, for squeezing
Sea salt and freshly ground black pepper
½ teaspoon smoked paprika
Red pepper flakes
Cilantro Lime dressing, for dipping
Steak Fajitas Fajitas are a beloved Tex-Mex dish made from grilled meat, usually beef or chicken, cooked in a sizzling hot skillet with grilled onions and peppers, and served with warm tortillas, guacamole, sour cream and salsa. The origins of fajitas can be traced back to the cattle ranches of West Texas and Northern Mexico, where vaqueros (Mexican cowboys) would slow-cook tougher cuts of beef, such as skirt steak, directly over an open flame with a mix of onions, peppers and spices.

In the early 1930s, fajitas started gaining popularity in South Texas, in and around the Rio Grande Valley. The dish was often served at outdoor festivals where the sizzling sound of the hot skillet was a draw for curious onlookers. Skip the wait for a restaurant table and the fiesta crowds by whipping up this easy steak fajita recipe at home:
Ingredients for 6 servings:
2 pounds Great Joy Family Farm skirt, flank, sirloin, or hanger steak, sliced into ½ inch strips
1 red pepper, deseeded and sliced into thin strips
1 yellow pepper, deseeded and sliced into thin strips
1 Sun Sprout Farm medium onion, peeled and sliced into thin strips
3 tablespoons olive oil
1 tablespoon lime juice
½ teaspoon chili powder
1 teaspoon ground cumin
Pinch cayenne pepper
½ teaspoon coarse salt
½ teaspoon ground black pepper
2 Jersey Farm Produce cloves garlic, minced
6-8 tortillas, warmed
Optional garnish:
Sour cream
Guacamole
Salsa
Arroz Con Leche (Mexican Rice Pudding) Rice was introduced to Mexico by the Spanish colonists and has since become a ubiquitous and integral part of Mexican cuisine. This recipe for Arroz Con Leche substitutes regular milk for the condensed milk found more commonly in traditional preparations, making it a lighter, lower calorie option for dessert.
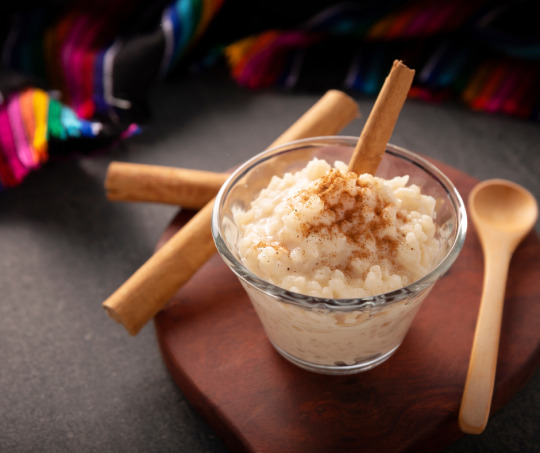
Ingredients for 8 servings:
1 cup raw, uncooked Great Joy Family Farm’s Hudson Valley-grown long grain Fragrant White Rice
1 cinnamon stick
Pinch salt
2 cups water
4 ¼ cups of 2% or whole milk
¼ teaspoon vanilla extract
1 cup granulated sugar
Ground cinnamon for serving
Of course, if you prefer to skip the kitchen prep, the farmers market has plenty of fiesta-ready options:
Goode and Local by Don Rodrigo’s Mexican chorizo is available loose or in links and is perfect for making tacos. It's seasoned with a blend of spices, giving it a bright color and spicy flavor. It's not cured or smoked like Spanish chorizo, and needs to be cooked before eating.
Jalapeño peppers are native to Mexico, specifically the Xalapa region of Veracruz. The name "jalapeño" is derived from the native Nahuatl people’s word for Xalapa. Doc Pickle's Jalapeño Stuffed Olives will go great when sliced and thrown atop a pile of nachos!
Chipotle is a classic Mexican spice made from smoke-dried ripe jalapeños. Simple Fine Foods’ Spicy Chipotle Squeeze will add smokey, spicy chipotle flavor to everything you love. It goes wonderfully with eggs, both scrambled and hard cooked. Or use it as a topper for your wings, sandwiches, brats, and burgers.
Halal Pastures Farm’s tomatillo salsa is made from their own farm-grown tomatillos including the Chupon de Malinalco, an heirloom variety from Mexico that grows up to four inches long. This unusual fruit is lemon yellow in color with a cone shape and tapered tip. It tastes sweet and fruity with a slightly tart taste.
We wish you a Feliz Cinco de Mayo and look forward to seeing you in the farmers market this weekend!
0 notes
Text

大家好! So, I unveiled parents' new sandwich recipe - prawn sandwiches according to their dietary needs, with the usual roasted sesame and chia seeds. Pa's sandwich had prawns with mixed bell peppers and red pepper hummus. Mummy is allergic to nightshade vegetables, so I made her sandwich with prawns, grated celery and coriander hummus. For the bread, I used sourdough with multigrains, cereal and rye. As usual, I don't stinge on parents and piled on as many prawns as I could. They adored this and said the prawns were very sweet. This is easily 1 of their favourites, along with the crab and pine nuts as well as salmon, so I'll try to make them once a month. Knowing Pa, if I don't, he'll start badgering me for it 😅

Mummy and I returned to the cafe which got our order so horribly wrong. I got to eat my wat dan hor fun (silky egg flat rice noodles) - YAY! - Mummy ordered chicken rice and we shared stirfried kangkong with minced garlic. To our delight, the manager said not only would my main be on the house, so would Mummy's and when she rang up the bill for the vegetables, she gave us a 10% discount. We were really impressed by her service levels that from not wanting to return again, we will visit again in future. Besides, their wat dan hor fun was quite tasty - eggy, flavourful, although it lacked wok hei, an important trademark where good hor fun is concerned.


youtube
youtube
Pa and I revisited the Hong Kong food court for see yow gai (soya sauce chicken) from the stall that's well known for silky smooth, fresh, tender and juicy chicken. I ordered their see yow gai meen (soya sauce chicken noodles). Pa had a very heavy breakfast, but couldn't resist sharing a portion of chicken and Hong Kong choy sum (Chinese flowering cabbage) with me. Due to Israel's siege on Gaza, chicken and meat are largely absent from Palestinians' regular meals. Remembering their immense suffering, Pa and I felt very humbled and grateful for our lunch. This isn't a luxurious meal. We don't want to splurge unnecessarily during a period of global economic uncertainty. But it was a nutritious, delicious, moderately healthy and balanced one.

youtube
Food businesses which exploited the excuse of rising costs to pass all of them on to customers, hike prices to unreasonable levels or massively shrink portion sizes are reaping the bitter fruit from the seeds they sowed. This is happening in many countries and Singapore isn't spared. Our latest national data showed that growth in the F&B services industry contracted by 5.6%, broken down as follows: restaurants (⬇️10.2%), fastfood outlets (⬇️8.2%) as well as cafes, food courts and others, including hawker centres (⬇️3.1%). As people tighten their belts and host gatherings and parties at home or in the office, the only food business which posted positive growth was food catering, at 6.6%.

Some high-end restaurants brag about their dishes incorporating premium ingredients and use it as an excuse to charge exorbitant prices but as parents now know after enjoying my crab and pine nut sandwiches, those of us who cook can buy the same premium ingredients, prepare similar versions of what is served at fine dining restaurants and bring a slice of luxury to our dining tables. Sure, it may involve more time and effort, but the cost savings are well worth it. Times are lean and the global economic situation is volatile; if dining establishments don't offer us good value for our dollars, we aren't coming. 下次见!
0 notes
Photo

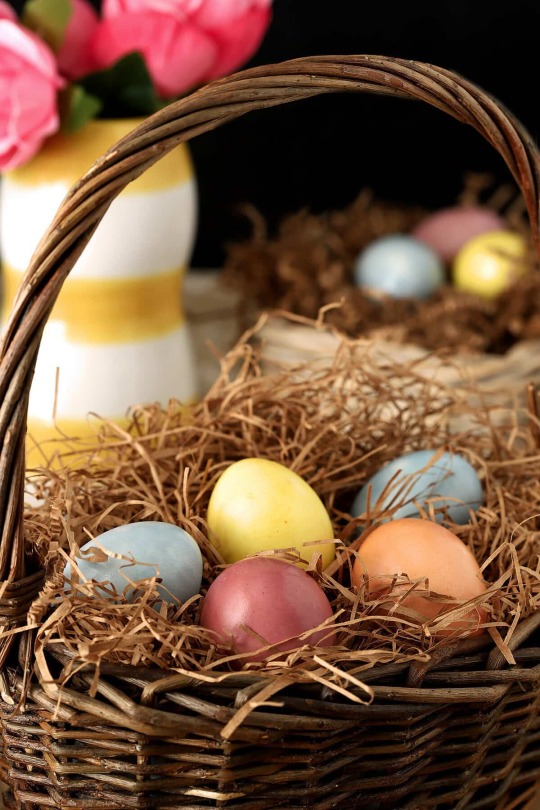
These Naturally Dyed Easter Eggs are fun to make and result in subtle colors using only natural ingredients; no more bottles of colored dyes! I’ve wanted to do a special post on Naturally Dyed Easter Eggs for at a couple of years. Time always escapes me though and it doesn’t happen. One year I bought a special dye kit with natural ingredients that I wanted to share with readers so I saved it and thought I was all ready to go. EXCEPT. I got out the packets of Batik dye and had my water boiling and read the instructions. Want to save this recipe? Enter your email & I’ll send it to your inbox. Plus, get great new recipes from me every week! No problem, simple enough; just combine the dye with some vinegar in the water…until I got to the tiny disclaimer. ‘This product should not be used on edible eggs.’ I don’t know about you, but we actually eat our Easter Eggs in this dish of Creamy Hard Boiled Eggs on Toast Points so there I was, last moment and foiled again, doggone it! Well I’m nothing if not a punter, after all I have to bake at high altitude, so in lieu of reverting to the dyes I have for frostings, I decided to try something I’ve been curious about for a long time. How about making Naturally Dyed Easter Eggs with all natural ingredients? This was fun…and I was so pleased with the results. I knew that I could use Turmeric spice for yellow and purple cabbage for blue (it’s true!), both of which I had on hand. I would need to run and get some beets if I wanted pink but also found upon doing some discovery for Naturally Dyed Easter Eggs that yellow onion skins would dye eggs orange, but I only had white onions, so yellow went on my grocery list too. I plucked a dozen eggs into my Instant Pot Pressure Cooker; hard boiled eggs might be the single thing I love most about it! It’s no less time consuming than on the stove BUT the shells peel off so easily, I’ll never make them another way. (See Recipe Notes for Pressure Cooker Instructions). I pulled the eggs out to cool and headed out to the grocery store. First things first when I got home was the purple cabbage. Everything I’ve read about using purple cabbage assured me the purple water would result in blue eggs and that this color would take the most time so I wanted it done first. The purple cabbage was a bit problematic. Even the smallest amount of vinegar turned the purple water to pink and my hopes of blue eggs were momentarily dashed. I made a second batch without vinegar, crossed my fingers, and they turned out fine even if they did take the longest to pick up color. Orange would require a couple of cups full of yellow onion skins…really, that’s it. I peeled some onions for the skins and got the water boiling. Second one on it’s way! Next came beets, simply grated and boiled until the water gets a deep red. Just be careful with the beets; that juice stains everything! The last color was made with Turmeric, a spice, and it was also the easiest; the color turned immediately and I just boiled it for a minute or two to get a pretty yellow. Because this isn’t dye, there really is no quick dipping and done. Plan to do them early. I left them in from 2.5 hours to overnight; only removing them from the water when they had reached the color intensity I wanted. Since I made mine I’ve read that you can also make blue with either grape juice or blueberries. I’m thinking I need to try purple; experimenting with grape juice and beets combined. You can make brown with coffee…but why? I’ve also considered spinach but it looks like it makes sort of an Army green; not exactly what I want in a basket with the other colors so I’ve not tried it…not a favorite color. If I ever find more colors that I love I’ll add them here; if you have had success with other colors, please share in comments too! The only ‘not so simple’ part is the waiting. I used mason jars for soaking and only two eggs at a time could be dyed in my jars. Since this method requires more than a minute or two that the artificial dyes take, I suggest making enough to cover at least 3-4 eggs total for each color; I did four each using from a carton of 18 eggs. Couple of notes about each process. Beets do the job easily; heck their juice dyes everything it touches…so be careful when peeling and grating them. I wasn’t so I did have pink palms for a bit. Onion skins were the most surprising. I peeled three large onions, about 2 loose cups of just the skins, and it really made for a potent mixture for orange; I was pleasantly surprised. Turmeric was my favorite; easy and fast and a really vibrant yellow result. I rubbed some vegetable oil on all of the eggs once they were finished and completely dry and it made them even prettier but that’s personal preference and an option if you want that same bit of sheen. This was fun and anyone can make these Naturally Dyed Easter Eggs easily as long as you give yourself enough time. Saturday night might be stretching it on that blue variety. 🙂 When my girls were little, our Easter morning routine always included these Hard Boiled Eggs with White Sauce on Toast Points, a real benefit on that morning of the year when hard boiled eggs are in over supply. If not for breakfast, my other favorite use would be for making these Deviled Eggs with Lemon Zest, Capers and Chives or my favorite Potato Salad; both dishes are simply the best! Happy Easter Egg Dyeing! PIN IT! ‘Naturally Dyed Easter Eggs’ Naturally Dyed Easter Eggs Barb A fun way to decorate Easter Eggs using all natural vegetables and spices for subtle and beautiful dyed Easter eggs. Prep Time 1 hour hrCook Time 30 minutes minsAdditional Time for time in dye 3 hours hrsTotal Time 1 hour hr 30 minutes mins Course Appetizers, Breakfast, lunchCuisine American Servings 12 EggsCalories 58 kcal 1 head purple cabbage3 medium beets3 large yellow onions peeled, peels only1 tablespoon turmeric¼ cup white vinegar12 hard-boiled eggs See Notes for using a pressure cooker.vegetable oil for polishing For BLUE – Purple Cabbage2 cups shredded purple cabbage + enough water to cover cabbage by 1 inchBoil all ingredients until color is noticeably leached out of cabbage, about 10 minuteStrain and put into vessel to be used for dipping eggs; let cool a bit before dyeing.Add hard-boiled eggs and let sit in dye for minimum 8 hours; overnight if necessaryLet dry completely and then rub the eggs lightly with vegetable oil if you want a light shineFor PINK – BeetsTwo cups water + two cups peeled, grated beets + 1 Tbsp vinegarBoil the water and beets for about 10 minutes until color is a deep redStrain and put into vessel to be used for dipping eggs; let cool a bit, add the vinegar and stir.Add hard-boiled eggs and let sit in dye for approximately 15-20 minutesLet dry completely and then rub the eggs lightly with vegetable oil if you want a light shineFor ORANGE – Yellow Onion SkinsTwo cups water + two cups yellow onion skins + 1 Tbsp vinegarBoil for about 15 minutes until color is a deep orangeStrain and put into vessel to be used for dipping eggs; let cool a bit, add the vinegar and stir.Add hard-boiled eggs and let sit in dye for approximately 15-20 minutesLet dry completely and then rub the eggs lightly with vegetable oil if you want a light shineFor YELLOW – Turmeric SpiceTwo cups water + 1 Tbsp turmeric + 1 Tbsp vinegar creates this vibrant yellow.Boil for about 15 minutes until color is a deep yellowPour into vessel to be used for dipping eggs; let cool a bit, add the vinegar and stir.Add hard-boiled eggs and let sit in dye for approximately 15-20 minutesLet dry completely and then rub the eggs lightly with vegetable oil if you want a light shine Pressure Cooking Hard-Boiled Eggs Ingredients 3-12 large eggs 1 cup water Ice and water for water bath Instructions Put a rack or steamer basket and 1 cup of water in an electric pressure cooker: Add your eggs to the basket and lock the lid in place. Turn on the pressure cooker and set to LOW: For eggs, you want LOW pressure (not HIGH). Cook your eggs for 5 minutes on low and then leave in pressure cooker for 5 minutes on natural release. Manually release to allow any remaining steam to escape. Combine water and ice in a large bowl and let sit while the eggs cook. Once the eggs are finished, remove them from the pressure cooker and Immediately plunge them into the ice bath: Let them cool completely in the water for a minimum of 5 minutes. Color according to directions. Nutrition FactsNaturally Dyed Easter EggsAmount per Serving% Daily Value** Percent Daily Values are based on a 2000 calorie diet. Keyword dyed, Easter, eggs, natural, organic, vegetables Source link
#KITCHEN_AND_DINING#BEETS#CABBAGE#DYED#EASTER#EGGS#HARDBOILED#NATURAL#NATURALLY#ONION_SKINS#ORGANIC#VEGGIES
1 note
·
View note
Photo

These Naturally Dyed Easter Eggs are fun to make and result in subtle colors using only natural ingredients; no more bottles of colored dyes! I’ve wanted to do a special post on Naturally Dyed Easter Eggs for at a couple of years. Time always escapes me though and it doesn’t happen. One year I bought a special dye kit with natural ingredients that I wanted to share with readers so I saved it and thought I was all ready to go. EXCEPT. I got out the packets of Batik dye and had my water boiling and read the instructions. Want to save this recipe? Enter your email & I’ll send it to your inbox. Plus, get great new recipes from me every week! No problem, simple enough; just combine the dye with some vinegar in the water…until I got to the tiny disclaimer. ‘This product should not be used on edible eggs.’ I don’t know about you, but we actually eat our Easter Eggs in this dish of Creamy Hard Boiled Eggs on Toast Points so there I was, last moment and foiled again, doggone it! Well I’m nothing if not a punter, after all I have to bake at high altitude, so in lieu of reverting to the dyes I have for frostings, I decided to try something I’ve been curious about for a long time. How about making Naturally Dyed Easter Eggs with all natural ingredients? This was fun…and I was so pleased with the results. I knew that I could use Turmeric spice for yellow and purple cabbage for blue (it’s true!), both of which I had on hand. I would need to run and get some beets if I wanted pink but also found upon doing some discovery for Naturally Dyed Easter Eggs that yellow onion skins would dye eggs orange, but I only had white onions, so yellow went on my grocery list too. I plucked a dozen eggs into my Instant Pot Pressure Cooker; hard boiled eggs might be the single thing I love most about it! It’s no less time consuming than on the stove BUT the shells peel off so easily, I’ll never make them another way. (See Recipe Notes for Pressure Cooker Instructions). I pulled the eggs out to cool and headed out to the grocery store. First things first when I got home was the purple cabbage. Everything I’ve read about using purple cabbage assured me the purple water would result in blue eggs and that this color would take the most time so I wanted it done first. The purple cabbage was a bit problematic. Even the smallest amount of vinegar turned the purple water to pink and my hopes of blue eggs were momentarily dashed. I made a second batch without vinegar, crossed my fingers, and they turned out fine even if they did take the longest to pick up color. Orange would require a couple of cups full of yellow onion skins…really, that’s it. I peeled some onions for the skins and got the water boiling. Second one on it’s way! Next came beets, simply grated and boiled until the water gets a deep red. Just be careful with the beets; that juice stains everything! The last color was made with Turmeric, a spice, and it was also the easiest; the color turned immediately and I just boiled it for a minute or two to get a pretty yellow. Because this isn’t dye, there really is no quick dipping and done. Plan to do them early. I left them in from 2.5 hours to overnight; only removing them from the water when they had reached the color intensity I wanted. Since I made mine I’ve read that you can also make blue with either grape juice or blueberries. I’m thinking I need to try purple; experimenting with grape juice and beets combined. You can make brown with coffee…but why? I’ve also considered spinach but it looks like it makes sort of an Army green; not exactly what I want in a basket with the other colors so I’ve not tried it…not a favorite color. If I ever find more colors that I love I’ll add them here; if you have had success with other colors, please share in comments too! The only ‘not so simple’ part is the waiting. I used mason jars for soaking and only two eggs at a time could be dyed in my jars. Since this method requires more than a minute or two that the artificial dyes take, I suggest making enough to cover at least 3-4 eggs total for each color; I did four each using from a carton of 18 eggs. Couple of notes about each process. Beets do the job easily; heck their juice dyes everything it touches…so be careful when peeling and grating them. I wasn’t so I did have pink palms for a bit. Onion skins were the most surprising. I peeled three large onions, about 2 loose cups of just the skins, and it really made for a potent mixture for orange; I was pleasantly surprised. Turmeric was my favorite; easy and fast and a really vibrant yellow result. I rubbed some vegetable oil on all of the eggs once they were finished and completely dry and it made them even prettier but that’s personal preference and an option if you want that same bit of sheen. This was fun and anyone can make these Naturally Dyed Easter Eggs easily as long as you give yourself enough time. Saturday night might be stretching it on that blue variety. 🙂 When my girls were little, our Easter morning routine always included these Hard Boiled Eggs with White Sauce on Toast Points, a real benefit on that morning of the year when hard boiled eggs are in over supply. If not for breakfast, my other favorite use would be for making these Deviled Eggs with Lemon Zest, Capers and Chives or my favorite Potato Salad; both dishes are simply the best! Happy Easter Egg Dyeing! PIN IT! ‘Naturally Dyed Easter Eggs’ Naturally Dyed Easter Eggs Barb A fun way to decorate Easter Eggs using all natural vegetables and spices for subtle and beautiful dyed Easter eggs. Prep Time 1 hour hrCook Time 30 minutes minsAdditional Time for time in dye 3 hours hrsTotal Time 1 hour hr 30 minutes mins Course Appetizers, Breakfast, lunchCuisine American Servings 12 EggsCalories 58 kcal 1 head purple cabbage3 medium beets3 large yellow onions peeled, peels only1 tablespoon turmeric¼ cup white vinegar12 hard-boiled eggs See Notes for using a pressure cooker.vegetable oil for polishing For BLUE – Purple Cabbage2 cups shredded purple cabbage + enough water to cover cabbage by 1 inchBoil all ingredients until color is noticeably leached out of cabbage, about 10 minuteStrain and put into vessel to be used for dipping eggs; let cool a bit before dyeing.Add hard-boiled eggs and let sit in dye for minimum 8 hours; overnight if necessaryLet dry completely and then rub the eggs lightly with vegetable oil if you want a light shineFor PINK – BeetsTwo cups water + two cups peeled, grated beets + 1 Tbsp vinegarBoil the water and beets for about 10 minutes until color is a deep redStrain and put into vessel to be used for dipping eggs; let cool a bit, add the vinegar and stir.Add hard-boiled eggs and let sit in dye for approximately 15-20 minutesLet dry completely and then rub the eggs lightly with vegetable oil if you want a light shineFor ORANGE – Yellow Onion SkinsTwo cups water + two cups yellow onion skins + 1 Tbsp vinegarBoil for about 15 minutes until color is a deep orangeStrain and put into vessel to be used for dipping eggs; let cool a bit, add the vinegar and stir.Add hard-boiled eggs and let sit in dye for approximately 15-20 minutesLet dry completely and then rub the eggs lightly with vegetable oil if you want a light shineFor YELLOW – Turmeric SpiceTwo cups water + 1 Tbsp turmeric + 1 Tbsp vinegar creates this vibrant yellow.Boil for about 15 minutes until color is a deep yellowPour into vessel to be used for dipping eggs; let cool a bit, add the vinegar and stir.Add hard-boiled eggs and let sit in dye for approximately 15-20 minutesLet dry completely and then rub the eggs lightly with vegetable oil if you want a light shine Pressure Cooking Hard-Boiled Eggs Ingredients 3-12 large eggs 1 cup water Ice and water for water bath Instructions Put a rack or steamer basket and 1 cup of water in an electric pressure cooker: Add your eggs to the basket and lock the lid in place. Turn on the pressure cooker and set to LOW: For eggs, you want LOW pressure (not HIGH). Cook your eggs for 5 minutes on low and then leave in pressure cooker for 5 minutes on natural release. Manually release to allow any remaining steam to escape. Combine water and ice in a large bowl and let sit while the eggs cook. Once the eggs are finished, remove them from the pressure cooker and Immediately plunge them into the ice bath: Let them cool completely in the water for a minimum of 5 minutes. Color according to directions. Nutrition FactsNaturally Dyed Easter EggsAmount per Serving% Daily Value** Percent Daily Values are based on a 2000 calorie diet. Keyword dyed, Easter, eggs, natural, organic, vegetables Source link
#KITCHEN_AND_DINING#BEETS#CABBAGE#DYED#EASTER#EGGS#HARDBOILED#NATURAL#NATURALLY#ONION_SKINS#ORGANIC#VEGGIES
0 notes
Photo

These Naturally Dyed Easter Eggs are fun to make and result in subtle colors using only natural ingredients; no more bottles of colored dyes! I’ve wanted to do a special post on Naturally Dyed Easter Eggs for at a couple of years. Time always escapes me though and it doesn’t happen. One year I bought a special dye kit with natural ingredients that I wanted to share with readers so I saved it and thought I was all ready to go. EXCEPT. I got out the packets of Batik dye and had my water boiling and read the instructions. Want to save this recipe? Enter your email & I’ll send it to your inbox. Plus, get great new recipes from me every week! No problem, simple enough; just combine the dye with some vinegar in the water…until I got to the tiny disclaimer. ‘This product should not be used on edible eggs.’ I don’t know about you, but we actually eat our Easter Eggs in this dish of Creamy Hard Boiled Eggs on Toast Points so there I was, last moment and foiled again, doggone it! Well I’m nothing if not a punter, after all I have to bake at high altitude, so in lieu of reverting to the dyes I have for frostings, I decided to try something I’ve been curious about for a long time. How about making Naturally Dyed Easter Eggs with all natural ingredients? This was fun…and I was so pleased with the results. I knew that I could use Turmeric spice for yellow and purple cabbage for blue (it’s true!), both of which I had on hand. I would need to run and get some beets if I wanted pink but also found upon doing some discovery for Naturally Dyed Easter Eggs that yellow onion skins would dye eggs orange, but I only had white onions, so yellow went on my grocery list too. I plucked a dozen eggs into my Instant Pot Pressure Cooker; hard boiled eggs might be the single thing I love most about it! It’s no less time consuming than on the stove BUT the shells peel off so easily, I’ll never make them another way. (See Recipe Notes for Pressure Cooker Instructions). I pulled the eggs out to cool and headed out to the grocery store. First things first when I got home was the purple cabbage. Everything I’ve read about using purple cabbage assured me the purple water would result in blue eggs and that this color would take the most time so I wanted it done first. The purple cabbage was a bit problematic. Even the smallest amount of vinegar turned the purple water to pink and my hopes of blue eggs were momentarily dashed. I made a second batch without vinegar, crossed my fingers, and they turned out fine even if they did take the longest to pick up color. Orange would require a couple of cups full of yellow onion skins…really, that’s it. I peeled some onions for the skins and got the water boiling. Second one on it’s way! Next came beets, simply grated and boiled until the water gets a deep red. Just be careful with the beets; that juice stains everything! The last color was made with Turmeric, a spice, and it was also the easiest; the color turned immediately and I just boiled it for a minute or two to get a pretty yellow. Because this isn’t dye, there really is no quick dipping and done. Plan to do them early. I left them in from 2.5 hours to overnight; only removing them from the water when they had reached the color intensity I wanted. Since I made mine I’ve read that you can also make blue with either grape juice or blueberries. I’m thinking I need to try purple; experimenting with grape juice and beets combined. You can make brown with coffee…but why? I’ve also considered spinach but it looks like it makes sort of an Army green; not exactly what I want in a basket with the other colors so I’ve not tried it…not a favorite color. If I ever find more colors that I love I’ll add them here; if you have had success with other colors, please share in comments too! The only ‘not so simple’ part is the waiting. I used mason jars for soaking and only two eggs at a time could be dyed in my jars. Since this method requires more than a minute or two that the artificial dyes take, I suggest making enough to cover at least 3-4 eggs total for each color; I did four each using from a carton of 18 eggs. Couple of notes about each process. Beets do the job easily; heck their juice dyes everything it touches…so be careful when peeling and grating them. I wasn’t so I did have pink palms for a bit. Onion skins were the most surprising. I peeled three large onions, about 2 loose cups of just the skins, and it really made for a potent mixture for orange; I was pleasantly surprised. Turmeric was my favorite; easy and fast and a really vibrant yellow result. I rubbed some vegetable oil on all of the eggs once they were finished and completely dry and it made them even prettier but that’s personal preference and an option if you want that same bit of sheen. This was fun and anyone can make these Naturally Dyed Easter Eggs easily as long as you give yourself enough time. Saturday night might be stretching it on that blue variety. 🙂 When my girls were little, our Easter morning routine always included these Hard Boiled Eggs with White Sauce on Toast Points, a real benefit on that morning of the year when hard boiled eggs are in over supply. If not for breakfast, my other favorite use would be for making these Deviled Eggs with Lemon Zest, Capers and Chives or my favorite Potato Salad; both dishes are simply the best! Happy Easter Egg Dyeing! PIN IT! ‘Naturally Dyed Easter Eggs’ Naturally Dyed Easter Eggs Barb A fun way to decorate Easter Eggs using all natural vegetables and spices for subtle and beautiful dyed Easter eggs. Prep Time 1 hour hrCook Time 30 minutes minsAdditional Time for time in dye 3 hours hrsTotal Time 1 hour hr 30 minutes mins Course Appetizers, Breakfast, lunchCuisine American Servings 12 EggsCalories 58 kcal 1 head purple cabbage3 medium beets3 large yellow onions peeled, peels only1 tablespoon turmeric¼ cup white vinegar12 hard-boiled eggs See Notes for using a pressure cooker.vegetable oil for polishing For BLUE – Purple Cabbage2 cups shredded purple cabbage + enough water to cover cabbage by 1 inchBoil all ingredients until color is noticeably leached out of cabbage, about 10 minuteStrain and put into vessel to be used for dipping eggs; let cool a bit before dyeing.Add hard-boiled eggs and let sit in dye for minimum 8 hours; overnight if necessaryLet dry completely and then rub the eggs lightly with vegetable oil if you want a light shineFor PINK – BeetsTwo cups water + two cups peeled, grated beets + 1 Tbsp vinegarBoil the water and beets for about 10 minutes until color is a deep redStrain and put into vessel to be used for dipping eggs; let cool a bit, add the vinegar and stir.Add hard-boiled eggs and let sit in dye for approximately 15-20 minutesLet dry completely and then rub the eggs lightly with vegetable oil if you want a light shineFor ORANGE – Yellow Onion SkinsTwo cups water + two cups yellow onion skins + 1 Tbsp vinegarBoil for about 15 minutes until color is a deep orangeStrain and put into vessel to be used for dipping eggs; let cool a bit, add the vinegar and stir.Add hard-boiled eggs and let sit in dye for approximately 15-20 minutesLet dry completely and then rub the eggs lightly with vegetable oil if you want a light shineFor YELLOW – Turmeric SpiceTwo cups water + 1 Tbsp turmeric + 1 Tbsp vinegar creates this vibrant yellow.Boil for about 15 minutes until color is a deep yellowPour into vessel to be used for dipping eggs; let cool a bit, add the vinegar and stir.Add hard-boiled eggs and let sit in dye for approximately 15-20 minutesLet dry completely and then rub the eggs lightly with vegetable oil if you want a light shine Pressure Cooking Hard-Boiled Eggs Ingredients 3-12 large eggs 1 cup water Ice and water for water bath Instructions Put a rack or steamer basket and 1 cup of water in an electric pressure cooker: Add your eggs to the basket and lock the lid in place. Turn on the pressure cooker and set to LOW: For eggs, you want LOW pressure (not HIGH). Cook your eggs for 5 minutes on low and then leave in pressure cooker for 5 minutes on natural release. Manually release to allow any remaining steam to escape. Combine water and ice in a large bowl and let sit while the eggs cook. Once the eggs are finished, remove them from the pressure cooker and Immediately plunge them into the ice bath: Let them cool completely in the water for a minimum of 5 minutes. Color according to directions. Nutrition FactsNaturally Dyed Easter EggsAmount per Serving% Daily Value** Percent Daily Values are based on a 2000 calorie diet. Keyword dyed, Easter, eggs, natural, organic, vegetables Source link
#KITCHEN_AND_DINING#BEETS#CABBAGE#DYED#EASTER#EGGS#HARDBOILED#NATURAL#NATURALLY#ONION_SKINS#ORGANIC#VEGGIES
0 notes