#reconstituting dried eggs
Text
Learning To Can Safely
I have been canning for close to twenty years. I already knew how to water bath can, from watching my mom and grandmother’s, as I was growing up. But I had to have my mom actually show me how to run the pressure canner. The picture above was from ten years ago. I had gotten my sea legs for canning by then.
When I can things, I follow the “Ball Blue Book for Canning” directions and only water…

View On WordPress
#dehydrating food#digital canners#pressure canning#reconstituting dried eggs#Safely canning at home#water bath
0 notes
Text

So, finally: got the photoshoot done for the “Eggs Devilled with Pepper and Marigold” from The Door Into Fire. (Despite the wine bottle’s capsule having sliced like a knife into the tip of my index finger when I was pulling the capsule off, due to it being actual lead [or soft thin sharp metal, anyway] and not plastic.)
…Leading to me shooting image after image at top speed while late-afternoon light in the kitchen faded minute by minute and the finger would not. stop. doing what newly-sliced and extremely fecking vascular flesh does when it’s, you know, sliced. (eyeroll) Shooting on a mobile phone while trying not to bleed on the screen is a pain in the butt.
Anyway: now to write up the recipe. The marigold worked surprisingly well, even though (due to the season) it was dried, not the optimal fresh petals, and had had to be reconstituted / rehydrated* with vodka. Who knows, maybe I’ll reshoot it in the summer when I can actually score some fresh marigolds.
*…What? “Vodka” literally means “little water”. …And of course there’s water in there. I know this because (a) how else would it even be liquid? and (b), @petermorwood told me the bottle in the freezer actually froze last night (because we hold our freezer at -26° C). …So.
149 notes
·
View notes
Text
Honey and Apple Challah

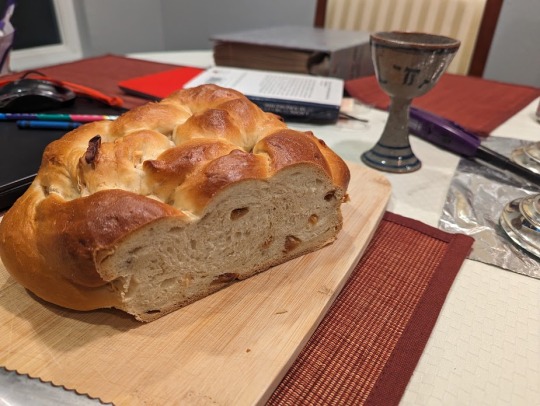
I know that raisins are the traditional mix-in for High Holiday challahs, but a) raisins suck, at least according to everyone in our family, and b) apples are the Official Fruit of Rosh Hashanah, right? So for the past three years (since I started baking challah regularly) I've tried to make an apple-studded challah for the holidays, but this has proved very difficult: no matter how I tried to prepare them, how small or big I chopped them, or when I added them to the dough, fresh apple chunks inevitably turned everything slimy and required me to add a TON of extra flour to bring the texture back into line, which in turn led to dense, stodgy bread.
But this year! This year I finally figured it out, because previous experimentation with varying the recipes in The Modern Jewish Baker (an amazing book) revealed that you could do a LOT with reconstituted dried fruit. So I got a big bag of dried apple rings from Trader Joe's, hunted around online for a recipe that promised to infuse as much honey flavor into the dough as possible, and squished them together.
The results were fabulous -- not only did it taste of honey and have a very satisfyingly dense distribution of apple chunks, but it even stayed fresh (in an airtight bag) for a full four days after first being cut into.
Recipe below the cut:
HONEY & APPLE CHALLAH
½ oz instant yeast
½ tsp sugar
1½ cups warm water (110° to 115°)
5 large eggs, room temperature
⅔ cup honey (raw honey if you can get it – quality makes a difference here!)
½ cup canola oil
2 tsp salt
6 to 7 cups bread flour
1 cup boiling water or apple juice
2 cups dried apple rings, chopped small
1 Tbsp water
1 tsp honey
Pour boiling water or apple juice over the chopped apple rings in a small bowl; let stand for 5 minutes then drain and pat dry very well.
In the bowl of your stand mixer, sift together yeast, sugar, 3 cups of flour and salt.
Separate 2 of the eggs, and refrigerate the whites. Add the yolks, the other 3 eggs, warm water, honey, and oil to the mixing bowl, then beat with a dough hook on medium speed for 3 minutes. Slowly add enough of the remaining flour to form a soft (but still sticky) dough.
Turn dough onto a floured surface (or just leave it in the mixer…) and knead until smooth and elastic, another 6-8 minutes. Knead in apples.
Place in a greased bowl, turning once to grease the top. Cover and let rise in a warm place until almost doubled, about 1½ hours.
Punch down dough and turn onto a lightly floured surface. Divide dough by weight into 8 balls, then roll them into ropes – you will want 4 ropes for each challah. Assuming you’re making this for the High Holidays, braid into circles (pdf link) and place the loaves on a parchment-lined baking sheet. Cover with kitchen towels and let rise in a warm place until almost doubled, about 30 minutes.
Preheat oven to 350°. In a small bowl, whisk together the 2 chilled egg whites, teaspoon of honey and tablespoon of water; brush over loaves. Bake 30-35 minutes or until bread is golden brown and the internal temperature has reached 195°.
Adapted from Taste of Home and The Modern Jewish Baker
3 notes
·
View notes
Text
Chicken Ramen

Ingredients
Marinade for the Chicken
2 tbsp mirin
1 tbsp dark soy sauce (or mushroom dark soy sauce) if you don't have this, you can substitute with light soy sauce
2 tbsp light soy sauce
¼ tsp cayenne pepper
2 garlic cloves chopped finely
4 pieces chicken thigh boneless, skin off or on
Glaze for the Chicken
2 tsp brown sugar
2 tbsp dark soy sauce (or mushroom dark soy sauce) or 1 tbsp light soy sauce + 1 tbsp water
Shoyu Ramen
4 - 5 cups good quality chicken stock preferably no sodium or low sodium
4 spring onions / scallions trimmed and cut into 3 inch pieces, or just in half
4 - 5 cloves garlic whole cloves are fine
2 inch piece of ginger sliced
4 fresh red chili or 1 tbsp dried chili flakes (crushed red pepper). Omit this if you don't prefer spicy food.
¼ cup light soy sauce
¼ cup mirin
8 ounces fresh shiitake mushrooms stems trimmed and sliced, or cut in half
6 pieces dried shiitake mushrooms optional. See recipe notes below.
12 - 13 oz dried ramen noodles or 4 portions (or 4 portions of fresh ramen noodles)
Soft Boiled Eggs (if you don't want to make ramen eggs)
4 large eggs
Steamed Greens
1 large bunch of yu choy OR spinach or any Asian greens
Soy sauce to taste
Sesame oil a drizzle
2 - 3 cloves garlic finely sliced, to taste
Ramen Topping (Optional, can be substituted for your preference)
4 spring onions / scallions finely sliced
Sliced radishes or bean sprouts
Ramen eggs marinated or plain
Chili garlic oil
Method
Caramalised Soy Chicken
Place all the ingredients for the chicken marinade in a bowl. Mix well to coat the chicken. If time permits, allow the chicken to marinate for at least 1 hour.
Preheat the oven to 425°F / 218°C, and place an oven rack in the top third of your oven. Line a baking sheet with parchment paper.
Place the chicken pieces on the baking sheet, skin side down (or smooth side down), evenly spaced apart. Then place the baking sheet in the preheated oven (upper third).
Let the chicken roast for 15 minutes. While the chicken is cooking, mix the brown sugar and dark soy sauce for the glaze, and start making the ramen.
After 15 minutes, flip the chicken pieces over and spoon the glaze over them. Let the chicken cook for a further 10 - 15 minutes. Then remove from the oven and let them cool down.
Slice the chicken and set aside.
Ramen
While the caramelized soy chicken is cooking in the oven, make the ramen base.
Place two saucepans on the stove.
As an optional step, you can chop the garlic and ginger. Or you can add them whole or sliced, and strain the ramen stock to remove the large pieces of garlic and ginger later.
In one saucepan (Pot 1), place the stock, ginger, garlic, spring onions, chili (if using), soy sauce, and mirin. Stir and cover the pot. Let it come to a boil at medium high - high heat. Then lower the heat to medium and let it simmer for 20 - 25 minutes. Taste the base and add more salt if needed.
To add more flavor to the stock base, you can also add dried shiitake mushrooms to the broth. The dried mushroom will reconstitute as the stock heats up and add a lot of umami flavor to the broth.
While Pot 1 is simmering, add water to the second pot (Pot 2), and bring it to a boil. Add the dried noodles to the boiling water and cook according to package directions. I prefer to cook the noodles for ONE MINUTE LESS than what's recommended on the package, since the noodles will continue to cook for a bit longer when served with hot broth. The straight ramen noodles I use here take 3 minutes to cook. Drain the noodles and divide into 4 bowls and set aside.
When the ramen base in Pot 1 has cooked for about 20 - 25 minutes, strain to remove the garlic, ginger, chili, and spring onions (or only the spring onions and chili). If you added dried mushrooms, remove these. Slice these mushrooms and set aside.
Add the strained stock back into the pot and add the mushrooms (fresh and reconstituted dried mushrooms) , and let it cook for a further 5 minutes until the fresh mushrooms have softened. The ramen base is now ready.
Ramen Egg or Unseasoned Soft Boiled Egg
Make ramen eggs the day before, according to this recipe. OR make regular soft boiled eggs to top your ramen bowl. (Ramen eggs need at least 2 hours to marinate.)
To make regular soft boiled eggs - bring a pot of water to a boil. Lower 4 large eggs carefully into the water and cook the eggs for 6 - 6 ½ minutes.
Immediately place the eggs in cool running water or an ice bath for a few minutes. Peel and set aside until ready to serve. This can be done BEFORE you cook the ramen as well.
Steamed Greens
Wash the greens and cut them in half, or into sections if necessary, to separate thick stems from the leaves.
Place the greens in a bowl and drizzle a little soy sauce and sesame oil (and garlic) on top. Toss to combine.
Cover and microwave in 1 minute increments until the greens have softened, but not too wilted.
Alternatively, you can heat a non-stick pan with a little oil, and pan fry the greens with soy sauce and garlic for about 2 - 4 minutes.
You can also blanche the greens in the ramen broth for about 1 minute. Remove the greens and then drizzle soy sauce, sesame oil, garlic, and toss to mix.
To Serve
Evenly divide the hot stock between the four bowls with ramen noodles.
Top with the steamed greens, sliced soy chicken, ramen eggs, spring onions, radishes, and other toppings you like.
0 notes
Photo

へしこ
近畿の料理
へしこは、塩漬けにした魚や魚の卵などを乾燥させた伝統的な日本の食品です。しばしば鮭や鯖、鰯の卵巣などを用いて作られます。塩分で加工された後、乾燥させて保存性を高めるため、保存食としても利用されています。
1. 保存食としての役割 魚介類や魚の卵を塩漬けにしてから乾燥させたもので、保存が利く特性があります。古くから保存食として利用されてきました。
2. 塩辛い味わい 塩漬けにされたため、非常に塩辛い味わいが特徴的です。塩分を抜くために水で戻してから食べることが一般的です。
3. 地域ごとのバリエーション 地域によって作り方や使用する魚種、食べ方が異なります。地域ごとの伝統が色濃く残っています。
へしこは、一般的にはご飯のおかずとして食べられることが多いですが、おつまみとして飲み物と一緒に楽しむこともあります。特に酒肴として愛されることが多いです。地域によって味や作り方が異なりますので、その土地ならではの風味を楽しむことができます。へしこは、塩漬けにした魚や魚の卵などを乾燥させた伝統的な日本の食品です。しばしば鮭や鯖、鰯の卵巣などを用いて作られます。塩分で加工された後、乾燥させて保存性を高めるため、保存食としても利用されています。
✄🔪🥄🍽✄🔪🥄🍽✄🔪🥄🍽✄🔪🥄🍽
Heshiko
Kinki cuisine
Heshiko is a traditional Japanese food made from dried salted fish or fish eggs. It is often made using salmon, mackerel, or sardine ovaries. After being processed with salt, it is dried to increase its shelf life, so it is also used as a preserved food.
1. Role as a preserved food Seafood and fish eggs are salted and then dried, and have the property of being well preserved. It has been used as a preserved food since ancient times.
2. Salty taste Because it is pickled in salt, it has a very salty taste. It is common to reconstitute it with water to remove the salt before eating.
3. Variations by region The preparation, type of fish used, and way of eating differ depending on the region. The traditions of each region remain strong.
Heshiko is generally eaten as a side dish with rice, but it is also sometimes enjoyed as a snack with drinks. It is especially loved as an appetizer for sake. The taste and method of preparation differ depending on the region, so you can enjoy the unique flavor of that region. Heshiko is a traditional Japanese food made from dried salted fish or fish eggs. It is often made using salmon, mackerel, or sardine ovaries. After being processed with salt, it is dried to increase its shelf life, so it is also used as a preserved food.
0 notes
Text
A favorite Italian cookie, Cuccidati (coo-chi-dah-tee) is actually easy to make and can be done over a number of days. The pasta frolla, an Italian pastry, encloses a filling of black mission figs, dates and raisins highlighted with orange and lemon zest finished with rum. The cookies are glazed and sprinkled with colored nonpareils.
I'm convinced this is the inspiration for our Fig Newtons. But the Cuccidati filling has so much depth to it.
Check out the other Italian cookies on my blog : Chocolate Spiced Olive OIl Biscotti, Baci di Dama, and Amaretti Cookies.
Why This Recipe Works
Both the dough and the filling can be made ahead. The dough can be made several days ahead and refrigerated or frozen for a couple of months. The filling can be made 10 days ahead and refrigerated.
The ratio of filling to dough is balanced for its incredible taste.
Two steps in the processor and the filling is done. No cooking or intricate prep. Soak the raisins and trim the stems from the figs - that's it.
The Cuccidati themselves last at least 10 days in an airtight container.
Recipe Ingredients
Pasta Frolla Dough
Ingredients read left to right.
FRONT ROW: Salt, vanilla, baking powder
MIDDLE ROW: Unsalted butter
BACK ROW: Flour, eggs, granulated sugar
Filling Ingredients
Ingredients read left to right.
FRONT ROW: Cinnamon, rum, lemon and orange zest
MIDDLE ROW: Walnuts, honey, almonds
BACK ROW: Dried Mission figs, dates and raisins
FRONT ROW: Nonpareils, water
BACK ROW: Powdered Sugar
I use Korintje Cinnamon but other cinnamons can be substituted.
Dark rum, such as Meyer's Dark Rum imparts the most taste.
Both the walnuts and almonds are toasted to bring out the most flavor.
There are varying degrees of drying when it comes to the Mission Figs. Mission figs are generally smaller and a dark purple, almost black when fresh. The ones I use are moist. They will yield in the bag when squeezed. I have seen some that are really dry. Those should be reconstituted in boiling water for several minutes until they are plumped up.
The raisins should be soaked in the hottest tap water while the rest of the ingredients are gathered. Alternatively, they can be added to the water for 5 to 8 minutes with the figs if they are being reconstituted. When they are ready to use the raisins, squeeze all of the water from them.
While I like Medjool Dates, others can be substituted if these can't be found.
The nonpareils can be found in most grocery stores.
Be sure to see the recipe card below for the exact ingredients and instructions.
Step by Step Instructions
Step 1. Cut the butter into small pieces. The easiest way is to cut a stick vertically, then horizontally 8 down. Keep the dough refrigerated while prepping the rest of the recipe. Step 2. Place the dry ingredients into the processor bowl. Pulse several times to mix. Step 3. Place the butter over the dry ingredients and process to cut in until the butter is indistinguishable. Step 4. Add the eggs and vanilla.
Step 5. Process the ingredients until the mostly form a ball. Remove to a work area and knead a few times to bring together. Step 6. Divide into four pieces and shape into rectangles. Wrap in plastic wrap and refrigerate for several hours or overnight. Step 7. Soak the raisins in really hot water. Step 8. Squeeze the water from them when ready to use.
Step 9. Figs come with the stems on generally. Step 10. Cut them off before proceeding. Step 11. Place the toasted almonds and walnuts in the processor bowl. There is no need to clean it from the dough made. Just wipe it out. Step 12. Process them until they are very finely cut. However, don't make a paste of them.
Step 13. Place all of the ingredients (with the squeezed out raisins) in the bowl of the processor with the nuts. Step 14. Process the ingredients until them a paste. Add water, starting with a tablespoon, to the mixture to obtain a spreadable consistency. Continue adding water as necessary.
Step 15. It is difficult to remove all of the contents of the processor since it is on and under the blade. Step 16. For a really easy way to do this, put the top back on the processor and pulse it or 5 times. The filling will be slung off the blade by centrifugal force to the sides of the bowl. Simply remove the blade and scrape out the remainder. You can find more tips on using the food processor on my post Food Processor Tips When Baking. Divide the filling into fourths. Roll each piece into a 12" rope. See the instructions on the Recipe card for more detail. Freeze for several hours or overnight.
Step 17. Roll the dough out into a 12"x5" rectangle. Step 18. Place a filling rope down the center of the dough. Step 19. Flatten the rope so it is equal on both sides. Step 20. Fold the left side over the filling. It should cover a little over half of the filing.
Step 21. Lightly wet the length of the edge of the dough. Step 22. Fold it over on top of the left side of the dough. Step 23. Seal the edge of the dough by pinching it together and flattening it out. Step 24. Turn the roll over and slice the cookies 3/4 to 1" thick.
Recipe FAQs
When are Cuccidati mostly eaten? They are considered a Christmas cookie and as such eaten during the holidays. What are traditional Cuccidati made of? Figs, dates and raisins along with almonds, walnuts and citrus zest are wrapped in a pastry dough. After baking, the tops of the cookies are dipped in a powdered sugar icing which are sprinkled with nonpariels. Where do they come from? Cuccidati, which means "little bracelet" comes from Sicily
Expert Tips
While the filling should be moist, it should not be loose or too wet.
Toasting nuts brings out the most flavor and enhances any dish to which they are added.
Don't skip the icing and nonpareils - they are traditional and add a lot to the cookie as these are not very sweet on their own.
Both the dough and the filling can be made ahead.
When finishing the cookies, place them on rimmed baking sheets after dipping in icing and sprinkling with nonpareils. This will keep them from rolling all over the kitchen.
If you love the Cuccidati or any other recipe on my website, please leave a 🌟 star rating in the recipe card and let me know how it went the in 📝 comments below. Thank you and I appreciate each of you being here!
Cuccidati - Italy's Finest Cookie
A favorite Italian cookie, Cuccidati (coo-chi-dah-tee) is actually easy to make and can be done over a number of days. The pasta frolla, an Italian pastry, encloses a filling of black mission figs, dates and raisins highlighted with orange and lemon zest finished with rum. The cookies are glazed and sprinkled with colored nonpareils.
Pasta Frolla Dough1 cup unsalted butter (225 grams)4 cups all-purpose flour (560 grams)3/4 cup granulated sugar (150 grams)2 teaspoons baking powder1 teaspoon salt4 large eggs2 teaspoons vanilla extractFilling1/2 cup slivered almonds (60 grams)1/2 cup walnuts (60 grams)1/2 cup raisins (75 grams)12 ounces Mission black figs (340 grams)1/2 cup dates (100 grams)3 tablespoons honey2 tablespoons dark rum1 teaspoon cinnamon1 orange zest1 lemon zestFinishing and Decorating3 cups powdered sugar (390 grams)5 tablespoons waterMulticolored Nonpariels as needed
Pasta Frolla DoughCut the cold butter in small pieces as shown in the step-by-step photos. Keep it refrigerated as you prep the rest of the ingredients. It is important that it be kept refrigerated until needed.Place the flour, sugar, baking powder and salt in the bowl of a processor. Pulse several times to mix.Place the butter over the dry ingredients and process until the butter is indistinguishable. Add the eggs and vanilla and process until the dough forms a ball.Remove from the processor. Divide it into 4 pieces about 285 grams each. Shape each piece into a rectangle about 3 1/2 x 4 1/2 inches. Wrap each piece in plastic wrap and refrigerate several hours or, prefe
rably overnight. The dough can be held in the refrigerator for several days or frozen, well wrapped for a couple of months. Thaw in the refrigerator overnight to use.FillingI used moist figs and raisins but if yours are really dry, place the figs in a small pan. Cover with hot water. Simmer for 5 to 10 minutes until plumped. Toast the almonds and walnuts at 350°F for about 7 minutes until lightly browned and fragrant. Cool completely before using. Cover the raisins with really hot tap water and let them plump while gathering the rest of the ingredients.Without cleaning the processor bowl (just wipe it out with a paper towel) add the nuts. Process them until very fine but do not turn the into a paste.Squeeze the water from the raisins and figs if they were plumped. Add the remaining ingredients and process until a spreadable paste forms. If it is too thick to spread, add about a tablespoon of water at a time until it is spreadable. It will be sticky. Divide the filling into fourths (about 190 grams each). This measurement may vary depending up if and how much water was added. Roll each piece into a 12" log. This is sticky business but here are a few tips to make it easier. Keep your hands slightly wet. Re-wet them as necessary. Form the piece into a sausage shape and then, pinching and pulling to 12 inches. Roll it onto a piece of plastic wrap and roll up. While in the wrap, roll it several times to smooth it out. Freeze for several hours or overnight. They will never get rock hard but they will be easier to manage. They can be kept in the freezer, wrapped in for for several months. Use from the freezer. Assembly - See the how to photos Preheat the oven to 400°F. Line several baking sheets with parchment paper. Set aside. Remove one piece of dough at a time from the refrigerator and roll between wax paper into a 12" x 5" wide rectangle. Square the sides, top and bottom. An easy way is to use a ruler and lightly tap the dough on each side to square it. Refrigerate it, keeping it on the wax paper while you roll out the other 3 pieces. Place one piece of dough on the work area. Remove the top piece of paper, but keep it on the bottom one. Mark the dough 1 1/2" from each side, leaving 2" in the middle.Place one rope of filling in the center. Flatten and spread the rope to about 2" using yur fingers or a moist offset spatula. Fold the left side of the dough over the filling using the paper as an assist. Pull it tightly against the dough.Wet the edge of the right side of the dough slightly and, again using the paper, fold it over the edge of the left side. Pinch the seam to seal. Flatten the seam. Turn it over. Refrigerate while assembling the remaining dough and filling. If the last roll is soft after assembly refrigerate. The rolls can also be assembled and frozen, well wrapped for several months. Thaw in the refrigerator overnight before cutting and baking.Cut the cookies 3/4" to 1" thick. place them on the prepared sheets 5 across and 4 down. Bake for 13 to 15 minutes until lightly browned. Cool on the paper.Finishing and DecoratingCombine the powdered sugar and water. Stir to combine. If it is too thick, add water by droplets. If too thin, add powdered sugar a bit at a time. Theicing should be very thick and stick to th e top of the cookie without running down the sides too much.Dip the top of the cookies into the icing and place it on parchment lined rimmed baking sheets. After dipping 5 ord 6 cookies, immediately sprinkle with the nonpareils. If you wait too long, the icing starts to dry and the nonpareils won't stick. The rimmed baking sheets keep the nonpareils from rolling all over the kitchen.Allow to dry completely before storing in an airtight container with paper between the layers. These will keep well for at least 10 days and ship well.
Both the dough and the filling can be made ahead. The dough can be made several days ahead and refrigerated or frozen for a couple of months. The filling can be made 10 days ahead a
nd refrigerated.
The ratio of filling to dough is balanced for its incredible taste.
Two steps in the processor and the filling is done. No cooking or intricate prep. Soak the raisins and trim the stems from the figs - that's it.
The Cuccidati themselves last at least 10 days in an airtight container.
While the filling should be moist, it should not be loose or too wet.
Toasting nuts brings out the most flavor and enhances any dish to which they are added.
Don't skip the icing and nonpareils - they are traditional and add a lot to the cookie as these are not very sweet on their own.
Both the dough and the filling can be made ahead.
When finishing the cookies, place them on rimmed baking sheets after dipping in icing and sprinkling with nonpareils. This will keep them from rolling all over the kitchen.
CookiesItalianCuccidati,, fig cookies, Italian Cookies
0 notes
Text
David Chang's roasted Summer corn with miso butter
Momofuku is a famous restaurant in NYC, which David Chang founded. One day I hope to eat there.
This dish was apparently such a hit there that at the time no one wanted to order anything else. It was a victim of its own success and got taken off the menu.
Fresh sweetcorn is still in season, so I thought I'd make this dish, with the colour of sunshine, as Autumn truly takes hold.
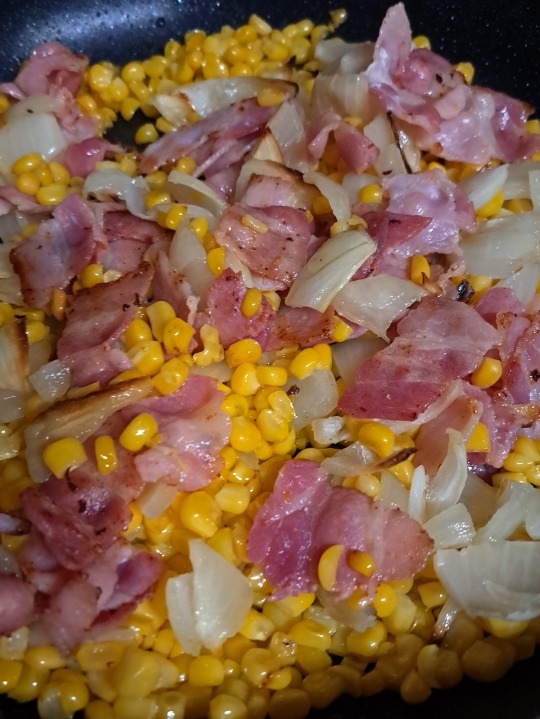
First up, I roasted an onion, peeled and cut into wedges. I made up the room temperature miso (2tbsp) and room temperature butter (2tbsp) into a mix at the same time (not pictured). The miso and butter were mixed together into a paste. I made 120ml of chicken stock.

I used fresh corn rather than frozen or tinned, in keeping with David Chang's recipe. Shearing the kernels off three whole corn cobs is a messy task, so you need plenty of space to work in to catch errant niblets. I sliced up 6 slices streaky bacon and 4 spring onions with both green and white parts into thin circle slices. The bacon was dried fried in a non stick pan.
Frying off the sweetcorn on a high heat in 1 tbsp of groundnut oil was the next step. No pictures, as I was stirring and moving the niblets constantly.
Then the roasted onion and cooked bacon went in.
Next was the miso and butter mix and the chicken stock.
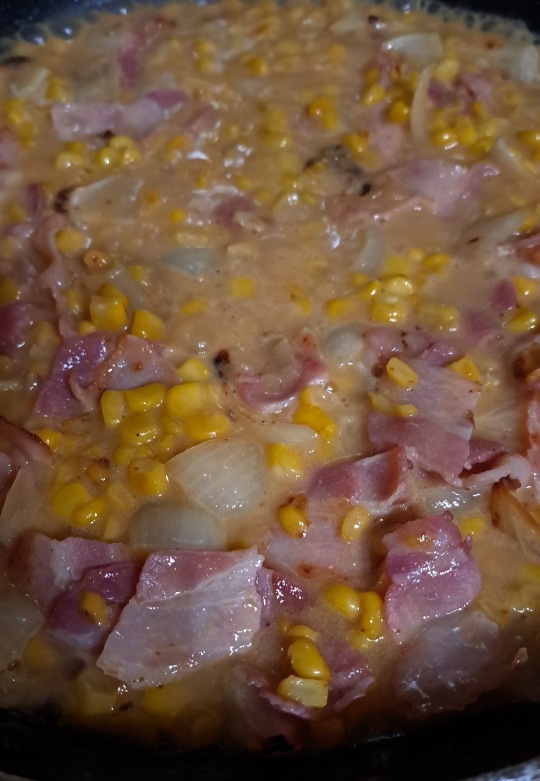
After cooking for a few minutes, the "sauce" thickens and becomes less watery, more glossy and coats the onion, bacon and corn.
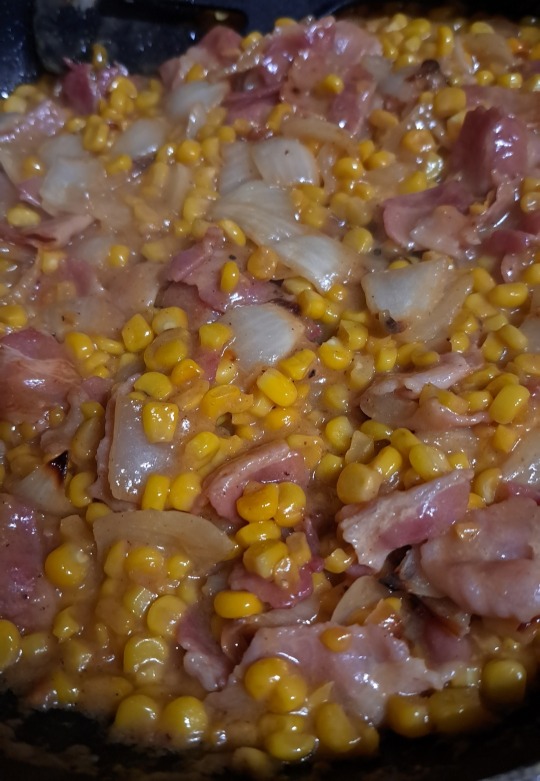
When there is no water hanging around at the bottom of the pan, it's time to serve up, with half of the spring onion mixed in...

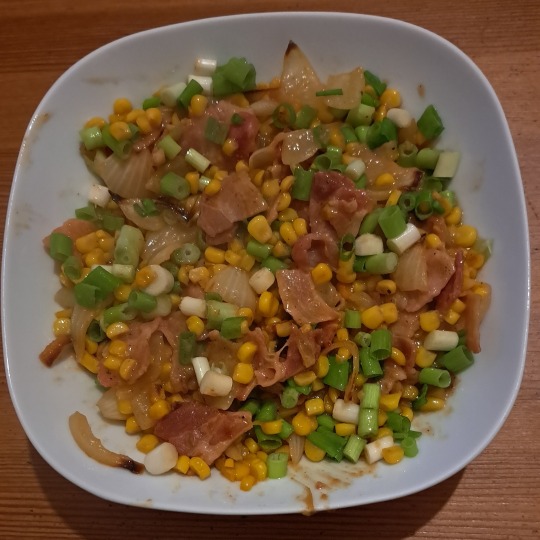
The other half goes on top.
The miso butter is full of flavour. The creamy and indulgent umami flavours complement the sweetness of the last of the summer corn. The streaky bacon gives texture and meatiness. The spring onions give crunch and freshness. A fab summer or early autumn recipe.
I was asked on social media about what to substitute for the bacon for a vegetarian version of the dish. I suggested dried porcini and dried shiitake mushrooms, reconstituted and sliced would make a good substitute. Porcini for flavour and aroma, shiitake for texture.
The original recipe can be found here:
We made far too much of the miso butter corn for one dinner, so we had some to spare.
We decided to use the rest in jacket potatoes.

We had one with cheese, one with egg.


0 notes
Photo

Dried Cherry Cake
Dried cherries are reconstituted with almond extract to give this cake recipe a delightful flavor that goes great with coffee. 1/2 cup chopped dried cherries, 1 cup white sugar, 1/2 cup vegetable oil, 1 tablespoon white sugar, 1/2 teaspoon almond extract, 1.5 cups all-purpose flour, 1/2 cup hot water, 2 teaspoons baking powder, 1 container vanilla yogurt, 1 egg white, 1/4 teaspoon salt, 1 egg, 1/4 cup chopped pecans
0 notes
Text
How Laboratory Spray Dryer Helps Various Industries
Laboratory spray dryer is used in producing fine powders. It helps in making things like detergent powder, instant coffee, and etc. In this blog post, we'll look at the top 5 industries that use spray dryers and how they utilise this equipment.
Top Industries that use laboratory spray dryer
Food and Beverage Industry
In the food and drink industry, spray dryers help in making instant coffee, powdered milk, spice powders, infant formula, and fruit juices. It works by spraying a liquid onto a hot surface, vaporising it, and leaving behind a dry powder. Spray drying is an efficient way to produce a consistent product. In addition, spray drying is often used to preserve fruits and vegetables and make powdered milk and eggs. Spray drying is a simple process, but it can have a big effect on the final product's quality. Therefore, it is essential equipment for any food or beverage manufacturer.
Detergent Industry
Powder detergents are one of the world's most common household cleaning products. Moreover, a large percentage of these powder detergents come through the spray drying technique.
Spray drying is the most common method of manufacturing powdered detergents. A laboratory spray dryer takes the water out of a liquid or slurry by floating it in a hot gas stream. The advantage of using a spray dryer is that it can produce a powder with very little residual moisture, which helps prolong the detergent's shelf life. Spray drying is also a relatively efficient way to dry a lot of material at once. The downside of spray drying is that it can be tricky to control the particle size of the resulting powder. It is also important to ensure there is no dust or other dirt in the drying chamber. Nonetheless, spray drying remains a critical process for the detergent industry.
Pharmaceutical Industry
Lab spray dryer is also used in the pharmaceutical industry to create drugs in powder form. It includes medication for various illnesses. The process is simple: liquid medication is pumped into the drying chamber, where it atomisation happens and converts into tiny droplets. Hot air passes through the chamber, evaporating the water and leaving behind a fine powder. This powder can be quickly packaged and transported and has a long shelf life. In addition, spray-dried powders can be easily reconstituted into liquid form when needed. As a result, spray dryers offer an efficient and cost-effective way to produce and store medications.
Biotechnology Industry
In biotechnology, spray dryers help dehydrate biological materials into powder form. This process helps create dry cultures of bacteria or enzymes. Spray drying also makes it possible to mix different cultures, which is hard to do with other drying methods. Spray-dried cultures also last longer and are less likely to be damaged by things in the environment. As a result, they are helpful in the production of food and pharmaceuticals. Given the many benefits of spray drying, it is no wonder that this technology is so important in the biotechnology industry.
Chemistry Industry
In the chemical industry, spray dryers help in removing solvents from reaction mixtures and make powders. In addition, spray drying helps to purify products and recover valuable chemicals. For example, spray drying helps remove water from aqueous solutions like acids or bases. The process helps in preparing powder products, such as detergents or cosmetics. Lab spray dryer can also coat particles with different things, like oils, waxes, or plastics. They are widely used to create pigments, plastics, and even ceramics. Because of this, spray drying is used a lot in the chemical industry.
Takeaway
As you can see, spray dryers have a wide range of applications in different industries. If you are ever curious about the manufacturing process of your favourite products, there's a good chance that a laboratory spray dryer was involved in the manufacturing process.
Are you looking for reliable laboratory spray dryer manufacturers in India?
0 notes
Text
powdered eggs for sale
I am not a medical professional and the statements on this blog site have not been examined by the FDA. Any items discussed are not planned to detect, treat, cure, or prevent any disease. It is perfect for outdoor camping, travelling, long-term food storage, and as a handy replacement when you run out of eggs in your home. This item may be stored for approximately 12 months opened, and approximately ten years in airtight sealed cans. To reconstitute the egg, mix 1 Tablespoon of powdered whole egg with 3 Tablespoons of water. When using with other dry components, it is not necessary to reconstitute the egg. Merely contribute to other dry components and boost water measurements in mixture to necessary quantity. Powdered whole eggs can be used in any application where fresh eggs are called for including rushed eggs, omelets, desserts, baking, and as a protein supplement in your favorite healthy smoothie or health beverage. Given that powdered eggs have been pasteurized, there is no requirement to prepare the item. Once a powdered egg has actually been re-hydrated it should be dealt with as a fresh egg and used instantly. The long storage life and ease of transportation make Future Fundamentals Powdered Eggs perfect for outdoor preparation. Future Fundamentals Powdered Whole Eggs can be accumulated to ten years sealed and unopened, and approximately 12 months when opened. When using with other dry components, it is not necessary to reconstitute the egg. Merely contribute to other dry components and boost water measurements in mixture to necessary quantity. Ingredients: Entire Eggs, Sodium Silicoaluminate (Less than 2% added). Allergen Info: Consists Of Egg.
Correct handling and storage can substantially make it longer-lasting. Check out on to discover how long exactly powdered eggs are good for. We'll also share some tips on how to keep them fresh longer. On average, powdered eggs will last anywhere from five to ten years. Some are even claiming that it can last longer than 15 years, offered that it remains in an ideal location. There is no requirement for refrigeration, as long as it is not yet opened. Similar to other dehydrated dairy items, it is susceptible to spoilage in the absence of proper handling. More about its proper storage will be discussed later. Of all the types of eggs, powdered eggs are the ones with the longest life span.
https://powderedeggsforsale999.blogspot.com/2022/10/powdered-eggs-for-sale.html
powdered eggs for sale
powdered eggs for sale
where can i get powdered eggs
best dried eggs
best powdered eggs for camping
https://heaterinstallationwhitingserv805.blogspot.com/
https://heaterinstallationwhitingserv805.blogspot.com/2022/10/heater-installation-whiting-services.html
https://heaterrepairwhitingserviceshe236.blogspot.com/
https://heaterrepairwhitingserviceshe236.blogspot.com/2022/10/heater-repair-whiting-services-heating.html
https://persianrugrepairnorthtustin.blogspot.com/2022/07/persian-rug-repair-escondido.html
0 notes
Text
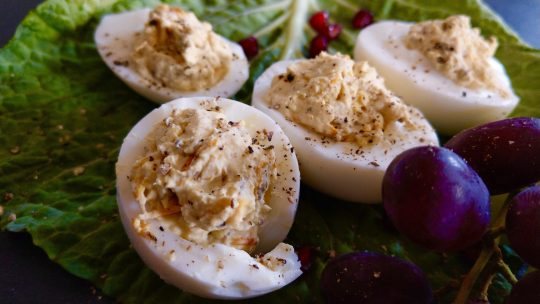
Food and Cooking of the Middle Kingdoms: Eggs Devilled with Pepper and Marigold
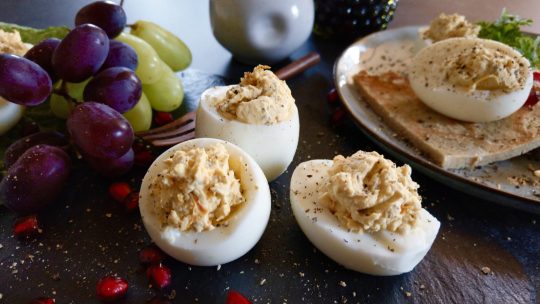
At the beginning of Freelorn's and his people's dinner with the proprietor of the Ferry Tavern at the edge of the Waste Unclaimed, the Lady serves the guests this dish as what used to be called a “whet”: a starter meant to take a little of the edge off the diners' immediate hunger while at the same time sharpening it for the courses to follow.
As such dishes go, this one's relatively simple and quick to prepare...
What makes it stand out is a combination of the local spicery—unmistakably Steldene in nature, with its emphasis on combining sharp and arresting flavors—and a touch of the seasonal, with the inclusion of fresh marigold petals. Marigold as a flavoring agent is much used on the eastern side of the Middle Kingdoms' continent, especially in northern parts, where their version of the common "pot marigold", Calendula officinalis, comes earliest into bloom (or remains in flower right through the North's temperate winter).
Though the text describes the preparation of the eggs as "devilled," this is plainly just a translator's convenience. On our Earth, the term—its diabolical or infernal associations originally associated with strongly spiced meat dishes—started in the 1800s to creep into usage for other foods, specifically eggs. But whether for meat or not, such usages are nowhere to be found in the Middle Kingdoms. Since the eschatology common to the Four Realms contains no afterlife scenario in which the deeds of the wicked are punished with eternal torment, there are also no devils—and for that matter, no fallen angels.* The actual term used for the eggs would have been the Steldene word miwhitvhej, a pun on an old word for "double-yolked"—the "doubling" here meant to hint at the extra labor involved in producing the dish.
The peppers associated with this recipe in its description are exclusively what Middle Kingdoms cooks would describe as "berry-peppers"; and a great number of spices fall into this category despite neither being berries nor peppers. Mostly (as has been discussed elsewhere), when cooks in the Four Realms use "berry-pepper" as a generic term, they almost always mean our common black peppercorn, Piper nigrum.
In this recipe, though, there's an implicit suggestion (cf. ingredients listed in Darthene cookery texts such as the famous Endeidwhë hIrrhéillnu) that the cook should feel free to add spice to the dish by playing mix-and-match with their favorite local varieties of berry-pepper. And though we haven't yet attempted this recipe with Sichuan pepper, that would certainly work well. Complaints in the text from Freelorn's friend Moris about "the aggressive spices and sours of Steldene food" most likely have more to do with traditional regional-Darthene attitudes toward the Kingdoms' variant of the Sichuan pepper... which would have turned up either in the goose dish or the parsnips they were served at dinner, and maybe in both. Make no mistake, though: Moris wouldn't have been complaining about nothing. The Kingdoms' Xenozanthoxylum microdraconis—containing from six to ten times our Earth's Sichuan "pepper's" amount of the capsaicin-analogue hydroxy-alpha-sanshool—packs quite the punch.
As for the other main flavor additive to these eggs: the Wikipedia page for Calendula officinalis describes it as "a short-lived aromatic", and so it is. Those using it for culinary purposes do best to use it fresh... though it can definitely be used as a dried herb if reconstituted and used soon afterwards. Its flavor and savor are gently peppery, light, and surprisingly fresh. To dishes to which it's been added, marigold lends a fragrant herbal grace-note that's evanescent at best.
In an egg dish like this, therefore—routinely served cool or cold, and with a taste, texture and quality that points up seasonings rather than overwhelming them—marigold makes a perfect addition. A favorite foil for it, either in the eggs themselves or on the side as a conserve, is lemon or citron... though when varying the recipe in this way one must be careful not to allow the citrus flavor to overwhelm the delicate flavor of the flower.
*The closest that Kingdoms-based folklore gets to this concept is in tales of the medveilh folk (OArl. "foregoers"), a class of powerful but nonphysical beings said to have been created by the Goddess when She was still learning Her craft, and now (by their own choice) said to be estranged from Her. Nor are the Shadow-affiliated beings whose descriptions are translated in the text by terms like "demonic" ever connected with hot or spicy foods. If any quality of temperature is folklorically associated with demonkind in the Kingdoms, it wouldn’t be heat, but cold.
…Click on the right-hand tab at the top of the dish’s dedicated page for the recipe.
#Food and Cooking of the Middle Kingdoms#FACOTMK#recipes#fantasy recipes#well they don't have to be FANTASY recipes#you could make them at home#it's not like they call for grilled corkindrill or anything#not THIS one anyway
139 notes
·
View notes
Text
Food of the Continent
Alright kids this is a little different from my normal stuff and entirely self indulgent! I recently worked on a fic that involved mention of quite a bit of food, and me being myself, I put a decent amount of research into it. I decided to compile that for those who, like me, get to a scene where the boys are eating and find themselves at a loss. What would a medieval witcher and bard eat on an average day? I’ve based my findings on medieval Poland, which isn’t, obviously, the Continent. If you want to add potatoes to your fantasy world, go ahead! The Witcher 3 certainly did. But if you’re looking for accuracy, please see an extensive list of medieval appropriate foods below the cut!
Medieval Polish Cuisine
Meat
Pork
Beef
Poultry
Fish
Royalty/Nobility only: Venison
Most common: Pork, Beef
Breads
Rye bread - Used mostly commonly for trenchers
Common white bread - Often used for harvest feasts
Rusks or binavice - A hard tack-like bread used for soldiers' rations
Manchet breads - Essentially wheat rolls
Boiled breads (bagels, ring pretzels) - Also called circuli or bracellus if you don’t want to say that Geralt is eating a bagel, but he could have! They were a very common street food.
Rogale or crescent rolls
Most common: Trenchers, white wheat rolls
Vegetables
Field peas
Cabbage
Onions
Fava beans (used for animal fodder, peasant food, and flour)
Mushrooms
Leeks
Beats
Kale
Lentil (lower class food, often stewed)
Parsnips
Cucumbers (treated as a fruit, a type of melon)
Skirrets
Rutabagas
Turnips
Radishes
Lettuce
Alexanders
Carrots (VERY rarely)
Most common: Peas, cabbage, onion; parsnips and skirrets in the winter
Notes: Pickling and dry storage were extraordinarily important for surviving the winter months. Peas could be saved dry and reconstituted by soaking them in water, and cabbage was turned into sauerkraut. Also note the lack of potatoes! Anytime you think of potatoes in a meal, substitute them for turnips.
Fruits and Nuts
Apples
Pears
Plums
Cherries
Hazelnuts
Strawberries
Blueberries
Raspberries, sloes, cranberries, and rowans (all used to make juice or in fermented beverages)
Raisins
Almonds (expensive)
Figs (expensive)
Most common: Apples, pears
Notes: Serves always after the main meal, fresh or cooked. Apples were often dried and eaten year round, or made into a butter and jarred. While not part of the Polish diet, I posit that more exotic fruits like oranges (used for cooking, not eating), peaches, lemons, and dates could probably be brought north from Nilfgaard, but they would be more rare and expensive the further north you went!
Herbs
Parsley (helps kill the onion smell)
Dill
Garlic
Mustard
Fennel
Most common: Parsley and dill
Oil
Lard
Butter
Poppy and hemp oil
Notes: Butter and lard were extremely important. Medieval people burned a lot of calories, so fats were a critical part of their diet. Almost every meal would have been smothered in some kind of animal fat, unless it was a Friday.
Drinks
Honey water/milk
Hydromel (similar to mead, less alcohol)
Mead
Ale
Wine
Desserts
Placki, flat cakes
Tortae, high quality desserts made only with high grade bolted flour. Could have been a type of strudel with rich cheese based filling. Also could refer to small, flat cakes. Also could have been similar to cheesecake.
Marzipan (expensive)
Notes: In a contradictory fashion, when you read sweetmeats, that means desserts. It usually refers to a highly sugary confection, such as candied fruits or nuts. Sweetbread on the other had, does refer to meat, and is made from offal. I know.
Common Dishes
Gruel of mixed grains - Side dish, served with meat and a wheat bread
Courtier's Pottage - One pot dinner made with millet, peas, bacon, onion, vinegar and parsley. Would have been quite thick due to the millet. Extremely common.
Parsnip, Leek, and Alexander Stew - Common in early spring, typical one pot meal for a noble family. Served with cheese dumplings.
Pears stewed with Cucumbers and Figs
Chicken baked with Prunes - Common in noble establishments. Either cooked in a covered pot, or wrapped in dough to form a kind of giant turnover on festive occasions.
Ham stewed with Cucumbers - A rich dish made with butter, onion, beer, and cucumber, raisins, and cranberries. Sour cream was added to the stew to thicken it.
Lentils and Skirrets with Bacon - Stew
Beer Soup - A classic stew made with leeks, cabbage, flour, beer, eggs, and cheese
Fish Aspic - A kind of savory gelatin, usually used as an ornamental component of a larger banquet display
Game stewed with Sauerkraut - Bigos, served at royal banquets. Peasants probably had their own versions using pork or beef instead of venison.
Crepes - Probably served not as a dessert but during dinner, with beer soup and cheese or fish aspic.
Krepel - Flat cake of layered cheese and bread, fried and served with strawberries or fruit
Praskury - Wafers
Apple flat cake - Essentially like an apple pizza
Honey cakes - Kind of flat cake saturated with honey.
If your characters are eating Breakfast, they're probably eating millet porridge, eggs, or bacon. If they are eating Lunch, they are probably eating trencher bread with lard or cheese or soaked in beer, or stew. If they are eating Dinner, they are probably eating some kind of meat, usually pork or beef, with vegetables like cabbage, peas, onions or parsnips, either in some kind of one pot stew or plain. Desserts are almost always sweetened with honey, and include fried breads and wafers.
Roadside meals would probably consist of fresh meat from hunts (mostly poultry and rabbit), either roasted or put in a stew; rusks, eaten plain or soaked in water or ale; wild berries or apples; reconstituted peas; sauerkraut; and root vegetables like parsnips, turnips, radishes and onions that would save well over several days. Wild parsnips could probably be found easily in the Northern Realms.
I hope this was helpful to someone! This is meant to help you generate ideas, not to be used as a strict guide for what to include in your fics. This is fantasy, so you can absolutely do whatever you want, and besides that it will always be hard for us to be accurate about what exactly went on in the medieval kitchen. However I hope this helps give you an idea about what the average tavern might be serving, and you can worry a little less about what to include in those pesky meal scenes.
Source: Food and Drink of Medieval Poland by Maria Dembinska, English translation by William Woys Weaver
740 notes
·
View notes
Text
trying to log other food i’ve made this week for future refence for myself too.
made kasha varniskes almost entirely from this recipe (super rare for me to just stick with one recipe lol but it just was better than all the others i saw. one other one i saw called to caramelize onions for 5 minutes lmao)
notes for myself
next time i want to be more efficient with how i render schmaltz when i use it i just barely had enough and i think i couldve had more if i did it differently
accidentally made the kasha slightly too soft probably because i forgot to preheat the oven and so it was just soaking in the stock for a while
used almost a pound of baby bella mushrooms (would love more but literally made this to use up leftover after using only a tiny bit for another recipe), dried porcinis, and also a small bit of dried black trumpet mushrooms i already had around.
used the water from rehydrating the dried mushrooms to reconstitute the condensed mushroom broth i used for the sauce
thickening the mushroom gravy took way shorter than it shouldve but i think thats bc my fucking left front burner is broken and runs wayyy too hot as of this past week with our just replaced stove when the last one of the same model just had that burners glass top shatter for no reason one day. i hate glass top electric stoves and how ppl act like theyre good theyre really not even easier to clean. also just know my apartment got the cheapest stoves possible lmao. idk how much of a difference simmering vs boiling made for flavor and texture tho im curious?
my one problem was there was just sooooooo much kasha to egg noodles/onions/gravy proportionally. i think i assumed the 2 cups of it was dried but it was just way too much (maybe also not helped by looking up how much egg noodles expand in volume with cooking so only cooking 2 cups at first assuming itd be 4 cooked but idt it was and had to make more. so if i made this again id make a lot less kasha and more onions and gravy. maybe the gravy was less that it shouldve been bc how quickly i boiled it down tho idk
onions i just need a bigger saute pan honestly. there were way too many to fit even in batches as they shrunk a bit without ending up just steaming them which made caramelizing them take longer than it probably couldve and i still didnt have quite enough. i had medium onions not small but weighed them to see how many to put in compared to the large in the recipe but still ended up using slighlty less than the smallest amount that could be bc i just didnt have room in the pan :(
good recipe largely! but used so so many pans lol and def a lot easier when other ppl are helping make it bc a lot can be done at the same time
2 notes
·
View notes
Text

Low-Cost Protein Sources About Which You Don't Have Any Idea.
Read here - https://www.livingwithabhi.com/post/low-cost-protein-sources-about-which-you-don-t-have-any-idea
Protein is a nutrient your body needs to grow and repair cells and to work properly. Protein is found in a wide range of food and it’s important that you get enough protein in your diet every day. How much protein you need from your diet varies depending on your weight, gender, age, and health. Meeting your protein needs is easily achieved by eating a variety of foods. Protein from food comes from plant and animal sources such as meat and fish, eggs, dairy products, seeds and nuts, and legumes like beans and lentils.
Proteins are made of amino acids
Proteins are made up of building blocks called amino acids. There are about 20 different amino acids that link together in different combinations. Your body uses them to make new proteins, such as muscle and bone, and other compounds such as enzymes and hormones. It can also use them as an energy source.
Some amino acids can be made by your body – there are 11 of these and they’re known as non-essential amino acids. There are nine amino acids that your body cannot make, and they are known as essential amino acids. You need to include enough of these in your diet so that your body can function.
Nutritional value of protein
The nutritional value of a protein is measured by the number of essential amino acids it contains.
Different foods contain different amounts of essential amino acids. Generally:
Animal products (such as chicken, beef, or fish and dairy products) have all of the essential amino acids and are known as 'complete protein (or ideal or high-quality protein).
Soy products, quinoa, and the seed of a leafy green called amaranth (consumed in Asia and the Mediterranean) also have all of the essential amino acids.
Plant proteins (beans, lentils, nuts, and whole grains) usually lack at least one of the essential amino acids and are considered 'incomplete' proteins.
People following a strict vegetarian or vegan diet need to choose a variety of protein sources from a combination of plant foods every day to make sure they get an adequate mix of essential amino acids.
If you follow a vegetarian or vegan diet, as long as you eat a wide variety of foods, you can usually get the protein you need. For example, a meal containing cereals and legumes, such as baked beans on toast, provides all the essential amino acids found in a typical meat dish.
Protein foods
Some food sources of dietary protein include:
lean meats – beef, lamb, veal, pork, kangaroo
poultry – chicken, turkey, duck, emu, goose, bush birds
fish and seafood – fish, prawns, crab, lobster, mussels, oysters, scallops, clams
eggs
dairy products – milk, yogurt (especially Greek yogurt), cheese (especially cottage cheese)
nuts (including nut pastes) and seeds – almonds, pine nuts, walnuts, macadamias, hazelnuts, cashews, pumpkin seeds, sesame seeds, sunflower seeds
legumes and beans – all beans, lentils, chickpeas, split peas, tofu.
Some grain and cereal-based products are also sources of protein but are generally not as high in protein as meat and meat alternative products.
How to get your Protein needs?
Your daily protein needs can easily be met by following the Australian Dietary Guidelines. The Guidelines group foods into five different food groups, each of which provides key nutrients.
The two main food groups that contribute to protein are the:
‘lean meat and poultry, fish, eggs, tofu, nuts and seeds, and legumes/beans group
‘milk, yogurt, cheese and/or alternatives (mostly reduced fat)’ group.
As part of a healthy diet, the Guidelines recommend particular serves per day from each of the five food groups.
The human body can’t store protein and will excrete any excess, so the most effective way of meeting your daily protein requirement is to eat small amounts at every meal.
So, what is a serve? The standard serving size of ‘lean meat and poultry, fish, eggs, nuts and seeds, and legumes/beans’ is one of:
65g cooked lean meats such as beef, lamb, veal, pork, goat, or kangaroo (about 90 to 100g raw)
80g cooked lean poultry such as chicken or turkey (100g raw)
100g cooked fish fillet (about 115g raw weight) or one small can of fish
2 large eggs
1 cup (150g) cooked dried beans, lentils, chickpeas, split peas, or canned beans (preferably with no added salt)
170g tofu
30g nuts, seeds, peanut or almond butter or tahini or other nut or seed paste (no added salt).
A serve of ‘milk, yogurt, cheese and/or alternatives (mostly reduced fat)’ could include:
250ml (1 cup) fresh, UHT long life, reconstituted powdered milk or buttermilk
120ml (1/2 cup) evaporated milk
200g (3/4 cup or 1 small carton) yogurt
40g (2 slices) hard cheese such as cheddar
120g (1/2 cup) ricotta cheese.
Protein requirements for children and teenagers change as they grow. Read about the recommended number of serves for children, adolescents, and toddlers for all 5 food groups.
Getting more protein into your day, naturally
If you’re looking for ways to get more protein into your diet, here are some suggestions:
Try a peanut butter sandwich. Remember to use natural peanut butter (or any other nut paste) with no added salt, sugar, or other fillers.
Low-fat cottage or ricotta cheese is high in protein and can go in your scrambled eggs, casserole, mashed potato, or pasta dish. Or spread it on your toast in the morning.
Nuts and seeds are fantastic in salads, with vegetables and served on top of curries. Try toasting some pine nuts or flaked almonds and putting them in your green salad.
Beans are great in soups, casseroles, and pasta sauces. Try tipping a drained can of cannellini beans into your favorite vegetable soup recipe or casserole.
A plate of hummus and freshly cut vegetable sticks as a snack or hummus spread on your sandwich will give you easy extra protein at lunchtime.
Greek yogurt is a protein-rich food that you can use throughout the day. Add some on your favorite breakfast cereal, put a spoonful on top of a bowl of pumpkin soup or serve it as a dessert with some fresh fruit.
Eggs are a versatile and easy option that can be enjoyed on their own or mixed in a variety of dishes.
Getting too little protein (protein deficiency)
Protein deficiency means not getting enough protein in your diet. Protein deficiency is rare in Australia, as the Australian diet generally includes far more protein than we actually need. However, protein deficiency may occur in people with special requirements, such as older people and people following strict vegetarian or vegan diets.
Symptoms of protein deficiency include:
wasting and shrinkage of muscle tissue
edema (build-up of fluids, particularly in the feet and ankles)
anemia (the blood’s inability to deliver sufficient oxygen to the cells, usually caused by dietary deficiencies such as lack of iron)
slow growth (in children).
Protein – maintaining muscle mass as you age
From around 50 years of age, humans begin to gradually lose skeletal muscle. This is known as sarcopenia and is common in older people. Loss of muscle mass is worsened by chronic illness, poor diet, and inactivity.
Meeting the daily recommended protein intake may help you maintain muscle mass and strength. This is important for maintaining your ability to walk and reducing your risk of injury from falls.
To maintain muscle mass, it’s important for older people to eat protein ‘effectively’. This means consuming high-quality protein foods, such as lean meats.
Protein shakes, powders, and supplements
Protein shakes, powders and supplements are unnecessary for most Australians’ health needs. According to the most recent national nutrition survey, 99% of Australians get enough protein through the food they eat.
Any protein you eat on top of what your body needs will either be excreted from your body as waste, or stored as weight gain.
The best way for you to get the protein you need is to eat a wide variety of protein-rich foods as outlined in the Australian Dietary Guidelines, as part of a balanced diet. But if you are still interested in using protein shakes, powders and supplements, talk to your doctor.
Protein and exercise
Soon after exercising, it’s recommended that you have a service of high-quality protein (such as a glass of milk or tub of yogurt) with a carbohydrate meal to help maintain your body’s protein balance. Studies have shown this to be good for you, even after low to moderate aerobic exercise (such as walking), particularly for older adults.
People who exercise vigorously or are trying to put on muscle mass do not need to consume extra protein. High-protein diets do not lead to increased muscle mass. It’s the stimulation of muscle tissue through exercise, not extra dietary protein, which leads to muscle growth.
Studies show that weight-trainers who do not eat extra protein (either in food or protein powders) still gain muscle at the same rate as weight-trainers who supplement their diets with protein.
Very high protein diets are dangerous
Some fad diets promote very high protein intakes of between 200 and 400g per day. This is more than five times the amount recommended in the Australian Dietary Guidelines.
The protein recommendations in the Guidelines provide enough protein to build and repair muscles, even for bodybuilders and athletes.
A very high-protein diet can strain the kidneys and liver. It can also prompt excessive loss of the mineral calcium, which can increase your risk of osteoporosis.
Where to get help
Your doctor
Dietitians Association of Australia Tel. 1800 812 942
The cheapest protein source in India
Proteins are very essential macronutrients for the human body. They are responsible for muscle growth. For this reason, they are considered as building blocks of the body. This is the reason why most gym-goers include a lot of protein in their diet. Your body requires protein, even if you don’t work out.
General recommendations say that a normal healthy person requires approximately 50 – 60 grams of protein for both men and women. When you talk about gym and protein. The first thing that comes to your mind is protein supplements. However, they are more costly and many people cannot afford them. Let me make you clear that, to build muscle you don’t need any supplement.
The body absorbs protein as a whole. Your body doesn’t bother about the source it comes from. There are several alternatives and many cheapest high protein foods available in India.
In this article, I’ll tell you what protein is and the 5 cheapest protein sources in India, with cost per gram of protein.
As I said earlier, proteins are a very important macronutrient for the human body same as carbohydrates and fats. Every cell in the body has protein in it. It helps the body to recover, repair, and build cells and tissues. It is clear that proteins are responsible for muscle growth and hence they are considered as building blocks of the body. Protein is made up of a long chain of 20 amino acids. The specific order of amino acids arranged in a long chain determines the structure and function of each protein.
These food sources provided in this article are easily available in the Indian market and are the cheapest protein source in India.
1. Soya chunks:
Soya chunks are also called ‘vegetarian’s meat’. They are the byproducts left after extracting soybean oil from soya seeds. Soya chunks are full of polyunsaturated fats, omega 3 fatty acids, proteins and they are also rich in calcium and iron while providing no extra sugar or sodium to the body. Soya chunks are a good protein source for vegetarians.
Total calories per 100 grams of soya chunks: 345 calories
Cost per 100 grams of soya chunks: 20 INR approximately.
Protein per 100g: 52 grams
Cost per 1 gram of protein: 0.4 INR approximately.
However, soya on the other side is one of the most controversial food items these days. Having too much soya or other soy products can increase estrogen and uric acid levels in your body. If you consume soy regularly, you’re more likely to develop female characteristics of the body. An increase in uric acid levels may also damage your liver and kidneys. Therefore, it is safe to only have 25 to 30 grams of soya chunks per day. Eating within these limits will not increase estrogen levels and uric acid levels in the body.
2. Eggs:
Eggs are the most affordable and easily available protein on the earth. Including eggs in your diet has several health benefits. One large egg contains 18 different vitamins and minerals. This is also among the most controversial food items. Many people consume only egg whites and throw away the most nutritious part ‘egg yolk’ for the only reason, it contains fat and cholesterol.
However, the cholesterol present in egg yolk is dietary cholesterol. It does not interfere with blood cholesterol levels. There are no general recommendations on egg consumption. You can have up to 6 whole eggs in a day. The only thing you’ve to do is, keep a note on your fat consumption. If you eat more egg yolks, fat consumption in a day increases. As a result your daily calories also increase and you’re more likely to gain weight.
Cost of an egg: 5 INR
Total calories: 78 calories.
Protein in 1 whole egg: 6 grams
Cost per 1 gram protein: 0.83 INR
Click here to know the difference between a white egg and a brown egg.
3. Chicken breast: Chicken is the most common poultry available in the world. It is not only the best non-veg protein source, but it also contains fat in the lowest proportion compared to its counterparts. If you are looking for a lean protein, then the chicken breast is your go. It is also a good source of vitamin B, vitamin D, calcium, iron, zinc. Chicken contains healthier fats than those found in red meat. Usually, chicken breasts are higher in cost compared to wings and thighs. If you can afford few extra rupees, I would recommend you to go for boneless chicken breast.
Total calories per 100g of chicken breast: 120 calories
Cost per 100g: 25 – 30 INR
Protein per 100g: 23 grams
Cost per 1g protein: 1 rupee approximately
4. Green moong:
Green moong is also called mung bean. This is the most nutritious and less exposed food. This is the cheapest protein source in India. It is a plant species in the legume family and is mainly cultivated in the Indian subcontinent. It is a traditional ingredient in Indian cooking, often used in curries. Like other legumes, green moong is low in fat and high in protein and fiber. It is also a rich source of magnesium, iron, potassium, and vitamin B-6.
You can consume green moong either soaked or roasted. Soak it overnight in enough water. Remove the water in the morning and consume it directly or roast the dal directly on the pan on a low flame for 1 minute. Wash and soak the mung beans in enough water for an hour and use as per recipe requirements.
Total calories per 100 grams: 334 calories
Cost per 100 grams: 10 INR
Protein per 100 grams: 24 grams
Cost per 1 gram protein: 0.41 INR
5. Milk:
If you are looking for a complete protein other than chicken, here’s milk. Female mammals produce milk to feed their young since evolution. It is an excellent source of vitamins and minerals. It provides potassium, B12, calcium, and vitamin D, and is also a good source of vitamin A, magnesium, zinc, and thiamine (B1). Additionally, it’s an excellent source of protein and contains hundreds of different fatty acids, including conjugated linoleic acid (CLA) and omega-3s.
The nutritional content of milk varies, depending on factors like its fat content and the cow’s feed and treatment of the cow it came from. For instance, milk from grass-fed cows contains significantly higher amounts of conjugated linoleic acid, omega-3 fatty acids, and antioxidants, such as vitamin E and beta-carotene, which help reduce inflammation and fight oxidative stress.
If you are too cautious about your daily fat intake, then I suggest you go ahead with skimmed milk. Other forms of milk such as flavored milk are always a NO as they contain sugar in huge amounts. A glass of milk (250ML) can serve to be a good protein option. Either it is fat loss or weight gain, including a glass of milk at any time of the day.
Total calories in 250ML skimmed milk: 105 calories
Cost for 250ML: 10 INR
Protein in 250ML: 9 grams
Cost for 1gram of protein: 1.1 INR
The conclusion
The 5 cheapest protein sources suggested in this article are completely on my experience. You can add these foods to your daily diet to get enough protein. These foods are not to treat or cure any disease. Consult your doctor before changing your diet patterns. The cost of these foods may vary a little depending on your location.
#protein #proteinbar #proteinfood #proteinshake #proteinpacked #proteinsnacks #proteinpowder #proteinpancakes #proteinsmoothie #diet #dieting #dietplan #diettips #dietfood #dietarysupplement #dietitiansofinstagram
#protein#proteinbar#proteinfood#proteinshake#proteinpacked#proteinsnacks#proteinpowder#proteinpancakes#proteinsmoothie#diet#dieti
5 notes
·
View notes
Text
Sour Cherry Scones
This blog would not exist without sour cherry scones. After I finished reading Carry On I was very curious about the scones. I had not been a fan of the bakery scones I had tried at Panera or Starbucks. Too dry. Ugh on the raisins. So when I stumbled on a recipe at http://www.fiction-food.com/ I knew I had to make it. This is the recipe I’ve used for almost two years. This is the recipe that inspired me to write my first Carry On fanfic— the cherry scone based fic “Friday I’m in Love”
So it’s impossible for me to cook my way through Carry On without the iconic cherry scones. This recipe today will use dried cherries, which I haven’t used before—I prefer to use fresh (but in the course of this blog I will attempt to make cherry scones with dried cherries (today), with frozen, and with fresh in the summer). I’m also quite tempted to try Jamie Oliver and Mary Berry’s recipes too. So be prepared—we may be doing multiple taste tests in search of the perfect sour cherry scone.
So let’s go with dried cherry scones today. I’ve made some adaptations to the basic scone recipe found at the link above.( If you want my recipe without all the method photos just scroll to the bottom of this post).
Sour Cherry Scones (using dried cherries):
Ingredients:
1 1/4 Cups Flour
1/2 Cup Sugar
1/2 Tbsp. Baking Powder
3/4 tsp. Salt
1 Stick (1/2 Cup) Butter, frozen (this makes things easier, trust me)
1/4 Cup coconut creamer (I have this in the house while I rarely have the heavy cream the original recipe calls for so I made this substitution the first time I made these scones and I’ve always made them with this)
1 Egg
1/2 Cup Dried Sour/Tart Cherries chopped into quarters.
1 Egg White (in addition to the previous egg mentioned)
Sparkling Sugar and Sea salt, for topping scones
A NOTE ABOUT DRIED CHERRIES:
you can use them dried but just make sure you chop them up before adding. Or you can reconstitute them to add more moisture–either by soaking them for an hour in lukewarm water or boiling them in one cup of water and then once they reach a boil letting them simmer for ten minutes. Drain them, chop them up and then add them to the mix as noted.

Directions:
Pre-heat your oven to 375ºF. Whisk the flour, sugar, baking powder, & salt together in a bowl. I grate the frozen butter into the flour mixture with a big cheese grater so it’s easier to cut it into the mixture. I use a pastry blender but you can also use two knives to slice across the butter/flour mixture. Alternatively you could use your hands and just rub the butter into the flour (but I don’t like all that butter on my hands so I use the pastry blender).


Being who I am I always tighten the screws on the pastry blender before I get going because I hate it when the handle spins. This is likely a legacy of testing equipment in the OR before I’d do a case.
This is what a pastry blender looks like, if you weren’t sure what I was talking about.

In a separate bowl whisk the coconut creamer with the egg. Pour this mixture into the dry mixture & then add in the cherries. Stir everything together (I use the pastry blender) until it gets crumbly, and then you can mix it with your hands until a dough forms or you can do what I do and keep using the pastry blender, just cleaning off the blades periodically.


A NOTE ABOUT DRIED CHERRIES: you can use them dried but just make sure you chop them up before adding. Or you can reconstitute them to add more moisture--either by soaking them for an hour in lukewarm water or boiling them in one cup of water and then once they reach a boil letting them simmer for ten minutes. Drain them, chop them up and then add them to the mix as noted.

A NOTE ABOUT DRIED CHERRIES:
you can use them dried but just make sure you chop them up before adding. Or you can reconstitute them to add more moisture–either by soaking them for an hour in lukewarm water or boiling them in one cup of water and then once they reach a boil letting them simmer for ten minutes. Drain them, chop them up and then add them to the mix as noted.

Ball the dough together & then pat it down on a lightly floured work surface to about a little under an inch thick. I use my Silopat because it doesn’t stick as much. Cut with a circle cutter (like a biscuit cutter or a cookie cutter), and then put the scones on a Silpat or parchment-lined baking tray about 2" apart.


Whisk the egg white well & then brush a little on each dough disc. Sprinkle a pinch of raw sugar and pinch of sea salt onto each, & then bake for about 20 minutes. Remove from the oven & serve warm with lots of butter (salted butter is great)


close up with the sea salt and sparkling sugar (I buy the sparkling sugar directly from King Arthur website but I use regular Morton sea salt).

Be liberal with your use of butter.
Note:
Circle scones are easier to make but if you prefer triangle scones then when you have the dough on the mat cut it into triangles like a pizza instead of cutting out circles. I’ve noticed in the US the stores sell triangle scones but talking to my friends in the UK (and @basic-banshee in specific) I decided to go traditional and make circle scones. These turned out a bit flatter than the ones I make with fresh cherries but they were not dry and the cherry taste was evident.
Here’s the whole thing written out without photos:
Sour Cherry Scones (using dried cherries):
Ingredients:
1 1/4 Cups Flour
1/2 Cup Sugar
1/2 Tbsp. Baking Powder
3/4 tsp. Salt
1 Stick (1/2 Cup) Butter, frozen
1/4 Cup coconut creamer (I have this in the house while I rarely have the heavy cream the original recipe calls for so I made this substitution the first time I made these scones)
1 Egg
1/2 Cup Dried Sour/Tart Cherries chopped into quarters
1 Egg White (in addition to the previous egg mentioned)
Sparkling Sugar and Sea salt, for topping scones
A NOTE ABOUT DRIED CHERRIES:
you can use them dried but just make sure you chop them up before adding. Or you can reconstitute them to add more moisture–either by soaking them for an hour in lukewarm water or boiling them in one cup of water and then once they reach a boil letting them simmer for ten minutes. Drain them, chop them up and then add them to the mix as noted.
Method:
Pre-heat your oven to 375ºF. Whisk the flour, sugar, baking powder, & salt together in a bowl. I grate the frozen butter into the flour mixture with a big cheese grater so it’s easier to cut it into the mixture. I use a pastry blender but you can also use two knives to slice across the butter/flour mixture. Alternatively you could use your hands and just rub the butter into the flour (but I don’t like all that butter on my hands so I use the pastry blender).
In a separate bowl whisk the coconut creamer with the egg. Pour this mixture into the dry mixture & then add in the cherries. Stir everything together (I use the pastry blender) until it gets crumbly, and then you can mix it with your hands until a dough forms or you can do what I do and keep using the pastry blender, just cleaning off the blades periodically.
Ball the dough together & then pat it down on a lightly floured work surface to about a little under an inch thick. I use my Silopat because it doesn’t stick as much. Cut with a circle cutter (like a biscuit cutter or a cookie cutter), and then put the scones on a Silpat or parchment-lined baking tray about 2" apart.
Whisk the egg white well & then brush a little on each dough disc. Sprinkle a pinch of raw sugar and sea salt onto each, & then bake for about 20 minutes. Remove from the oven & serve warm with lots of butter (salted butter is great)
#cooking my way through carry on#Carry On#cooking#sour cherry scones#dried cherry version#carry on food#simon snow#baz pitch#snowbaz#recipes for sour cherry scones
231 notes
·
View notes
Last Seen Blogs

fapstohentai
Faps To Hentai

tanahoy
Untitled

mercatoitinerante
Mercato Itinerante

die-like-a-virgin
Send Bingo requests o3o

bisbis2-blog
bisbis2