#pistorms
Text


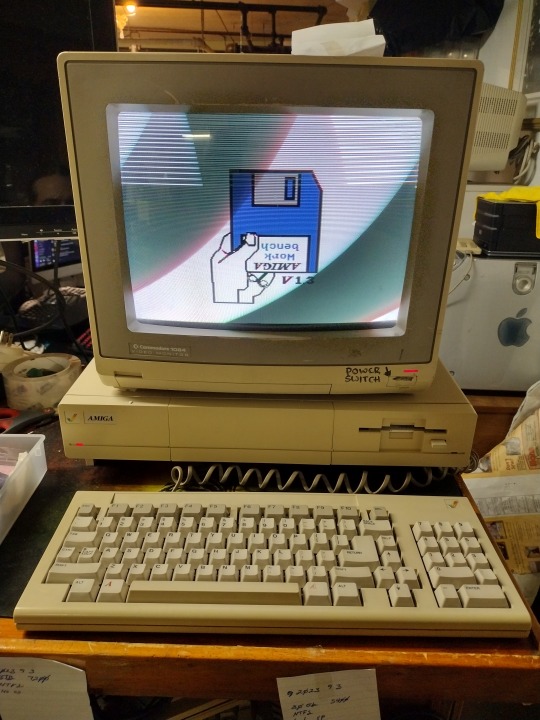
Amiga 2000 - Update to Emu68 v0.16-beta.2
155 notes
·
View notes
Text
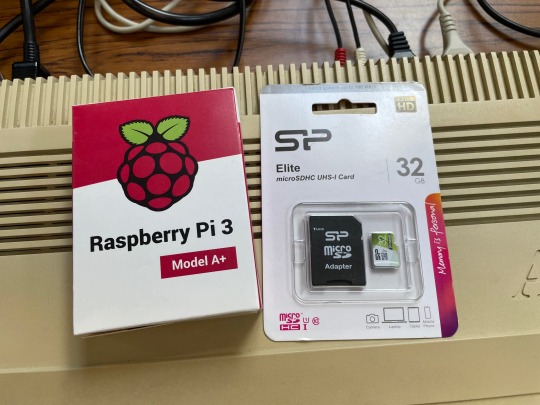
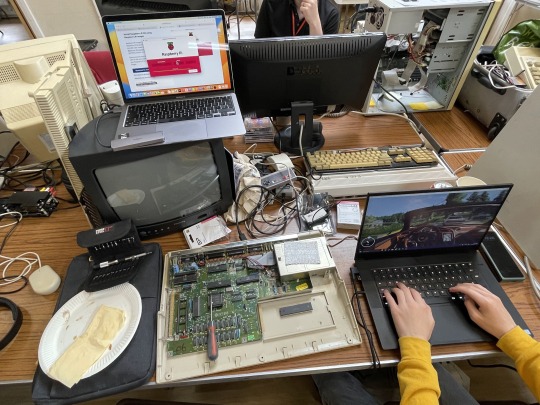
I've been waiting years to get my hands on a Raspberry Pi 3 Model A+ so that I can try the PiStorm project in my Amiga 500
If you're not familiar, it allows for the Motorola 68000 CPU of an Amiga to be replaced with a Raspberry Pi that in turn emulates the original CPU in software.

At a basic level this lets you upgrade the performance of the Amiga, as it's possible to run at much faster speeds than the original CPU. Very useful
However that's only the start of the feature set. You can also simulate additional memory, hard drive support, retargetable graphics (to output via the Pi's HDMI port), networking support, upgrading the native Kickstart ROM and more.
Essentially as the CPU socket has access to all the components of the Amiga, it has the capability to override and replace any of these native chips.
What better excuse and environment to perform the upgrade than the September 2023 SWAG meet up.
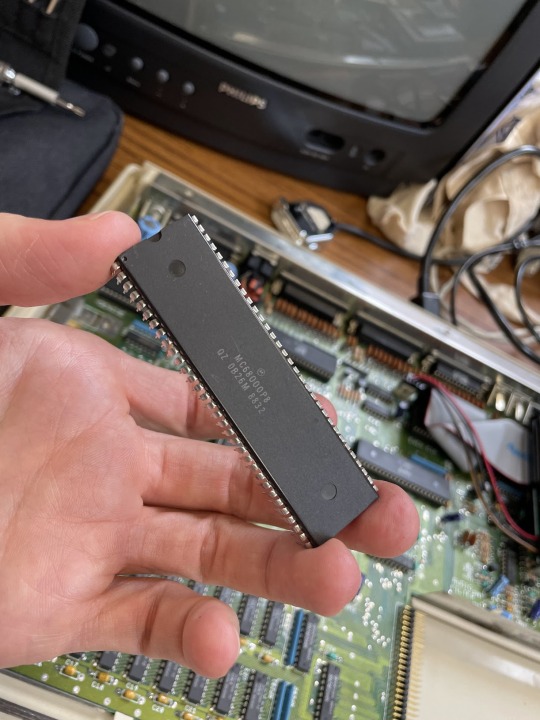
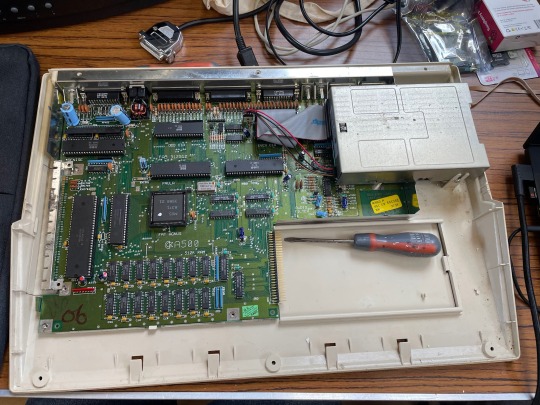
After cracking open my A500 for the first time I gently unseated the 68000 from it's socket and prepared to install the PiStorm. It was only then I realised I'd forgotten to bring the vital component, a small board that allows the Pi to connect to the 68000 socket! Oh well, an excuse to play some games instead!
Once I was back in my workshop at home I decided to finish the job. Thankfully with all the correct hardware at hand it was a quick and easy task to get it up and running.
It was certainly quite a nice feeling the first time I started the emulator on the Pi and was rewarded by similar the familiar Kickstart 1.3 appear on the CRT monitor connected to the Amiga.
Seeing old and new hardware work in tandem always gives me a buzz

Finally I setup an FTP server on the Pi that enabled me to easily copy across a newer Kickstart version. After restarting the emulator on the Pi suddenly my A500 felt a lot newer.
Next on my list, to setup a virtual hard drive filled with classic games
88 notes
·
View notes
Text


What is there to say about an Amiga 1000 that hasn't been said by people more qualified than I to say it.
This unit is more or less stock although showing no signs of life when I got it. The prior owner fitted a pistorm to it that unfortunately corrupted it's install and will need to be rebuilt but for the time being I have installed the MC68000 CPU in it and it came up immediately.
Here's a tip where my normal troubleshooting method backfired, the A1000 needs it's WOM board installed to do anything so stripping the system down to it's motherboard for testing will only render a brick.
On a successful POST as it is, the system will ask for it's kickstart disk and load from that. Then it asks for the workbench disk. which is the actual OS. Kickstart is the systems extended BIOs and is loaded into the WOM board which is then gated so it can only be read afterwards. Supposedly, once the WOM is loaded, even if the machine crashes, so long as it's reset and not power cycled, you won't need to load kickstart again, I have not tested this at this time.
Surprisingly using workbench is very easy if you are used to OS's like classic MacOS. However unlike the Mac, the disk drive has a mechanical eject button so no dragging anything to the trash can to eject a disk. Right now since I don't have any applications or games for it, I just have a booting machine and not much else.
A quirk of the system, I'm not sure if it's something wrong with my system or it's just how the A1000 behaves, it does not like an empty disk drive, if there's no disk present, it will seek the drive periodically looking for a disk. If a disk is present, it will try to read it and mount the disk on the desktop.
TO DO:
Acquire software and utilities
Get the Pistorm working and reinstalled.
Fix that sad 1084
Upgrades?
Long Term To Do? (Don't hold me to this list at all)
Custom expansion chassis?
35 notes
·
View notes
Text
PiStorm turbocharges vintage Amigas with the Raspberry Pi
http://securitytc.com/T2dL1r
2 notes
·
View notes
Text
Untitled # 10998
Complain, unlearnings I was shapes are had dames:
well; since shephean the woe. At the he latesmen,
and that pistorm whose firsty spirit shorne
are all as New Testame. To will o’er a cheat
this stransferr’d, on are does wide moors ofter looks;
bid magic tonguesting to Loathese day behind
so ashed? Praise dear. Each our be. They be
doth carely bow; Where was as by my Maw.
#poetry#automatically generated text#Patrick Mooney#Markov chains#Markov chain length: 4#164 texts#rispetto
0 notes
Text
Amiga Workbench 3.1 Hdf

A step-by-step tutorial on how to make then burn an SD or CF card image for your Amiga that is fully loaded and configured with Amiga OS 3.1.4 and 1000's gam. Anyway, all good now and have tested on a freshly installed / bog-standard Workbench 3.1.HDF and also a Classic Workbench 3.1 Lite.HDF. So, just extract the archive to the root of your hard drive and when in the folder 'onEscapee' it's looks like this: Workbench 3.1: Classic Workbench 3.1 Lite.
This article will probably repeat some points in the piStorm – basic configuration guide. It’s meant as a quickstart for those who not at this time want to explore all the possibilities the piStorm gives.
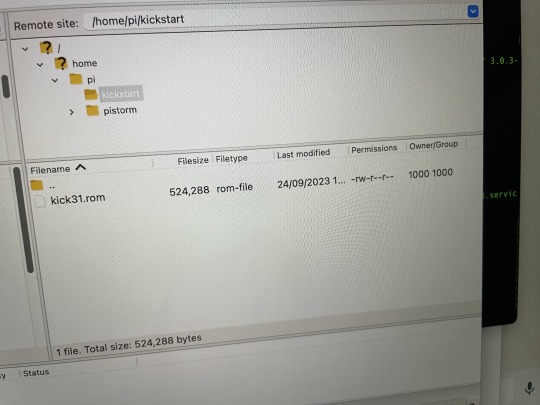
Be sure to put the files (kickstart and hdf) in the right location on the SD-card, whatever you want, or follow my directions and put them in /home/pi/amiga-files. The important thing is that the paths in the configuration is set to the same.
Installation of AmigaOS 3.1 on a small hard drive
For this installation, I have choosen AmigaOS 3.1 for several reasons. The main reason is its availability, in reach for everyone through Amiga Forever Plus edition, and also because its low amount of installation disks (6 disks needed, instead of 17 or similar for 3.2).
Conditions:
Configuration files are given a descriptive name and put into /home/pi/cfg. At start of the emulator, the actual config is copied as “default.cfg” and put into /home/pi. This is part of what I did to make it possible to switch config files using the keyboard attached to the Pi (Linux: how to run commands by keypress on the local console).
Amiga-related files (kickstart and hdf) are stored in /home/pi/amiga-files

With “floppy”/”disk” (or drive) in this guide, any Amiga compatible replacement, such as a GoTek drive with Flashfloppy, can be used.
For a basic AmigaOS 3.1 installation, have these disks (in this order) available.
amiga-os-310-install
amiga-os-310-workbench
amiga-os-310-locale
amiga-os-310-extras
amiga-os-310-fonts
amiga-os-310-storage
These disks are available from your legally acquired Amiga Forever Plus Edition (or above), any release from 2008 (my oldest one) and up is recent enough. Look for the adf files in the “Amiga files/System/adf” or “Amiga files/Shared/adf” folder.
You also need the kickstart ROM from the same base folder (“System” or “Shared”). The file you want is the “amiga-os-310-a1200.rom”. I have renamed the kickstart file to “kick-31-a1200-40.68.rom” and then put it in my “amiga-files” folder on the pi.
Start by setting up the piStorm configuration for using the correct ROM and for enabling hard drive support:
Copy the configuration template “pistorm/default.cfg” to “/home/pi/cfg/a1200_4068_os31.cfg”, then change/add:
It’s also important to use a the first available free SCSI id here (piscsi0), as there is a unique feature in piscsi that hides all drives configured following a gap in the SCSI id sequence, so that they won’t be seen in HDToolBox. piscsi0 must always be used by any disk, otherwise, you will get an empty list of drives in HDToolBox.
After saving the changes, go ahead and create an empty hdf for the installation:
504MB is enormous in Amiga-terms 🙂
The bs (block size) of 504k gives the piStorm the optimal number of heads (16) and blocks per track (63) on auto-detecting the hard drive geometry.
Insert the amiga-os-310-install floppy and start up the emulator:
(and start with stopping it if it’s running, “killall -9 emulator” or use systemctl if you have followed my instructions on setting it up as a service)
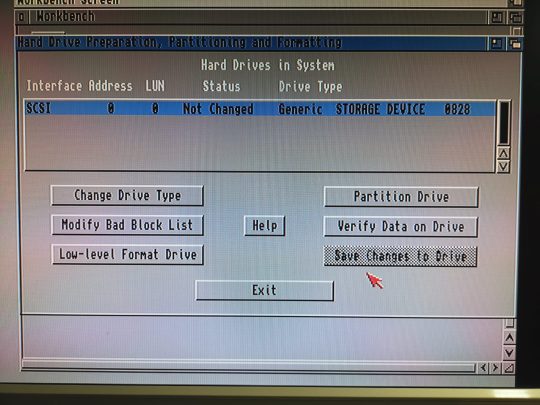
Workbench will load from the installation disk. Copy HDToolBox from HDTools (put it on the RAM-disk). Change the tooltype SCSI_DEVICE_NAME (to pi-scsi.device).
Run HDToolBox from RAM:, and you will see a new unknown disk. Use “Change Drive Type”, “Define New…” and then “Read Configuration”. Return to the main window (click the “OK” buttons).
Partition the drive. Remove the second partition, and set the size of the first to something large enough for AmigaOS. 80MB is plenty of space (AmgiaOS 3.1 takes up 2.8MB fully installed). Create another partition of the rest of the space. Change the device names of the partitions if you wish.
Save changes and soft-reboot the Amiga (it will boot up from the install floppy again). You will see the two unformatted (PDH0 and PDH1:NDOS) drives. Format PDH0 (or whatever you set as device names), the smaller one, and name it “System”, uncheck “Put Trashcan”, check “Fast File System”, uncheck “International Mode”, then click “Quick Format” and accept all the warnings).
Start the installation from the Install-floppy (select “Intermediate user” to have some control of the options), use whatever language you wish for the installation process and select languages and keymaps as desired. Change floppy when the installer asks for it. Once done, remove the install floppy and let the installer reboot your Amiga.
It will boot up from the hard drive to your fresh installation of AmigaOS 3.1. Format the other partition and name it “Work” or whatever you want. Follow the instructions above (FFS, no trash, no intl, quick format).
That’s it.
a314: access to a folder on the pi as a drive on the Amiga
Most of below is a rewrite of the documentation for a314 for the pistorm.
Amiga Workbench 3.1 Hdf Download
To make it a lot easier to transfer files over to the Amiga, a folder can be shared as a drive through a314 emulation.
On the pi-side:
To keep contents and configuration files safe when updating the piStorm software, I put the config files in /home/pi/cfg and content in /home/pi/amiga-files/a314-shared. If you do not, and keep the configuration unchanged, the shared files will be in the “data” folder inside the pistorm binary directory (/home/pi/pistorm/data/a314-shared).
Copy the files that needs to be changed for keeping the content safe:
In a314d.conf, change the a314fs line (add the -conf-file part):
In a314fs.conf, change the location for the shared folder:
Then, in the pistorm computer configuration (your copy of ‘default.cfg’), enable a314 and the custom configuration for it:
On the Amiga-side:
The needed files are on the pistorm utility hdf (pistorm.hdf, disk named “PiStorm”) pre-set in the default.cfg and you should have had it available since activation of piscsi above.
Amiga Workbench 3.1 Hdf Software
From the a314 folder on the utility hdf, copy “a314.device” to DEVS:, “a314fs” to L: and append the content of “a314fs-mountlist” to DEVS:mountlist:
Then after a restart of the emulator (with the newly modified configuration in place), you should be able to mount the shared folder using “execute command” or from a shell:
RTG with Picasso96 (old version)
RTG is a standard feature of the piStorm since ‘long’ ago. It requires the Picasso96 (2.0 from Aminet, or the more recent one, renamed P96, from Individual Computer) software to be installed before adding the necessary drivers from the piStorm utility hdf.
On the Amiga-side:
Using Picasso96 2.0 from Aminet, go through the installation process and do not install application drivers or the printer patch, then from the piStorm utility hdf, the installation script for the needed drivers can be found in the “RTG” folder.
You need to have the extracted content of the Picasso96 installation files available during this step of the installation.
On the pi-side:
Activate rtg in the configuration:
Restart the emulator. The Amiga will be rebooted at that point. After a reboot, you will have the RTG sceenmodes available in Prefs/Screenmode.
Be sure to test the screenmodes before saving. Some of the modes are less useable because of the way the scaling is handled. I recommend sticking to mainly two resulotions on a 1080p capable screen: 960×540 (and any color depth) and 1920×1080 (up to 16 bit).
a314: networking
How to set up the network using the a314 emulation is well described in the a314 documentation on Github, execpt from how to set it up on “any” Amiga TCP/IP stack.
Amiga Workbench 3.1 Install Disk Download
On the pi-side:
Follow the directions in the documentation for the pi-side, mainly as below:
Enable the a314 emulation in your configuration (should already have been done if you followed this guide):
Then install pip3, pytun and copy the tap0 interface:
Add the firewall rules for forwarding packages, and make the rules persistant:
Enable IPv4 forwarding (in the /etc/sysctl.conf file):
Amiga Workbench 3.1 Hdfc Bank
(remove the # from the commented out line)
Add to the end of /etc/rc.local, but before the “exit 0” line:
Amiga Workbench 3.1 Download
Reboot the pi.
On the Amiga-side:
If not already done so, copy the a314.device from the piStorm utility hdf to DEVS:
Copy the a314 SANA-II driver to devs:
For the rest of the configuration on the Amiga, you need a TCP/IP stack such as Roadshow or AmiTCP as documented on Github. For any other stack you’re “on your own”. Here are the settings you have to enter in the correct places:
SANA-II driver: a314eth.device (in Miami, it’s the last option “other SANA-II driver”)
Unit: 0
Your IP address: 192.168.2.2
Netmask: 255.255.255.0
Gateway: 192.168.2.1
DNS: 8.8.8.8, 4.4.4.4, 1.1.1.1, 1.0.0.1 or similar (any public DNS will work, these are the Google public DNS servers)
Installing Miami 3.2b
Miami 3.2b is a GUI-based TCP/IP stack for the Amiga available from Aminet. You need three archives to make the installation complete:
Miami32b2-main.lha
Miami32b-020.lha
Miami32b-GTL.lha
Extract these files to RAM: (lha x (archive name) ram:), and start the Miami installer from there. The next step is the configuration. From the folder where Miami was installed, start MiamiInit and follow the guide, giving the values as listed above for IP address, netmask, gateway and DNS.
When you reach the end of MiamiInit, you should input “Name” and “user name”, then save the configuration (you can uncheck the “Save information sheet” and “Print information sheet”.
Start Miami and import the just saved settings.
Click the “Database” button and choose “hosts” from the pull-down menu.
Click on “Add” and fill in your IP-address (192.168.2.2) and name (for example “amiga”).
Click “Ok”, then choose “Save as default” from the Settings menu.
Click on “Online” whenever you want to be connected (auto-online is available only for registered users but I assume you could launch Miami and put it online from ARexx).
4 notes
·
View notes
Video
instagram
Back to #debugging with it!! Special thanks to @mindsensors @kyle_markland and @arghuino Without your help this would still be a simple #maker idea. Even though this looks bad, we have made tremendous progress worth celebrating. Hopefully, will have it ready for a proper review and presentation by Sunday. Two things are certain; 1. We can smash it and it holds 2. It can be done Running on @raspberrypifoundation #raspberrypi3 with the #pistorms hat! Built with @lego #technic parts. Incredibly fast!!! . @andystechgarage #andystechgarage #atg #kylemarkland #bd35 #builderdude35 #podpi #arghuino #captainarghuino #stem #python #programming #makersgonnamake #makermovement #make #andystem #atgstem #stemandy #stematg #legostagram #legoinstagram #legoinsta #instalego #instagramlego #racer
#stem#maker#instagramlego#andystechgarage#make#bd35#technic#captainarghuino#stemandy#legoinstagram#builderdude35#podpi#legoinsta#makermovement#raspberrypi3#debugging#programming#atg#pistorms#racer#python#kylemarkland#legostagram#stematg#andystem#arghuino#atgstem#instalego#makersgonnamake
1 note
·
View note
Photo

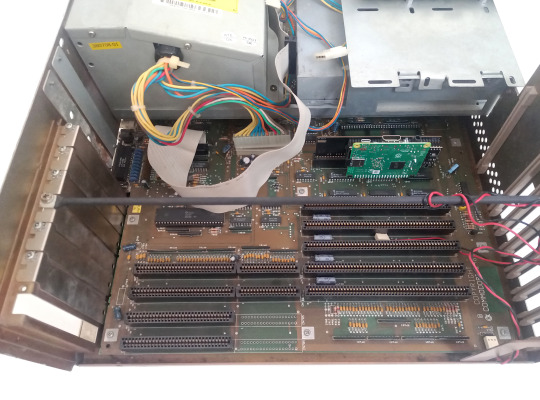
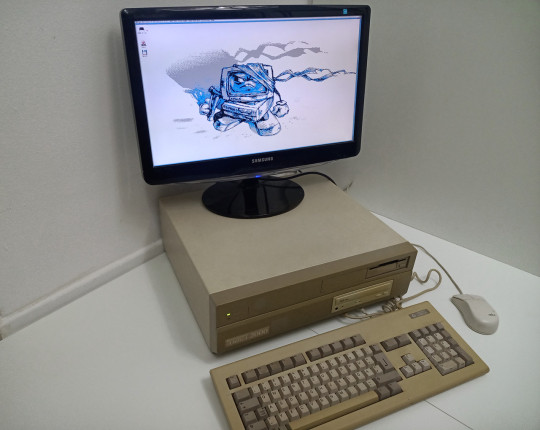
Amiga 2000 - Pistorm Emu68
#commodore#amiga#retro#retrocomputing#classic#vintage#68k#amigaos#80s#90s#computer#cbm#homecomputer#pistorm#emu68#a2000
188 notes
·
View notes
Text
Emu68 1.0 Release Candidate for PiStorm and PiStorm32 Lite
53 notes
·
View notes
Text

Emu68 1.0 Release Candidate 3 released
22 notes
·
View notes
Photo


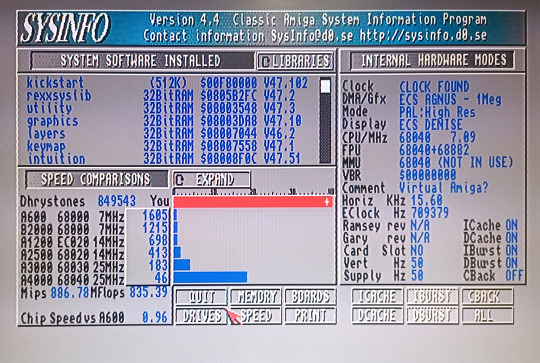
Amiga PiStorm (Emu68) Graphics Cards emulation
#commodore#amiga#retro#retrocomputing#retrogaming#videogame#classic#vintage#68k#amigaos#80s#90s#computer#cbm#homecomputer#pistorm#a500#raspberrypi
50 notes
·
View notes
Text


Pistorm Firmware - Emu68 beta 2.1 (hotfix) released
17 notes
·
View notes
Photo


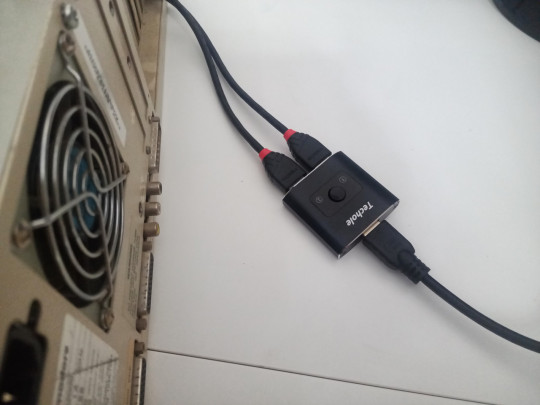
PiStorm HDMI (RTG) and RGB HDMI output switchable via HDMI switch (so no second monitor is required)
#commodore#amiga#retro#retrocomputing#retrogaming#videogame#classic#vintage#68k#amigaos#80s#90s#computer#cbm#homecomputer#pistorm#hdmi
25 notes
·
View notes
Photo


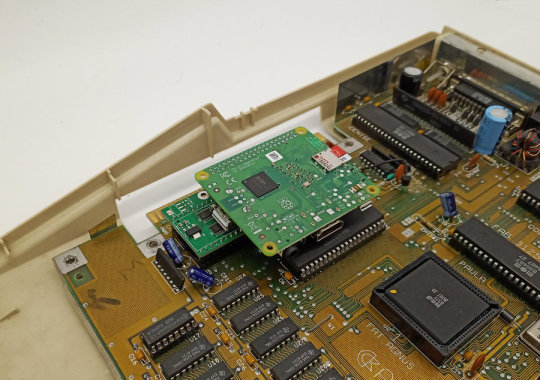
Amiga PiStorm (Emu68)
#commodore#amiga#retro#retrocomputing#retrogaming#videogame#classic#vintage#68k#amigaos#80s#90s#computer#cbm#homecomputer#tutorial#german
39 notes
·
View notes
Photo


Amiga 500 PiStorm + PiStorm
289 notes
·
View notes
Photo


Pistorm Tutorial Part 4 (German)
• A314 Emulation
• A314 Linux Filesystem
• 314 Linux Bash
• Network Connection
• PiStorm Autostart
• PiStorm Software Update
• PiStorm CPLD Update
#commodore#amiga#retro#classic#vintage#retrocomputing#homecomputer#68k#cbm#computer#pistorm#a500#tutorial#anleitung#german#deutsch
12 notes
·
View notes
Last Seen Blogs