#makes the sketching process easier c:
Text

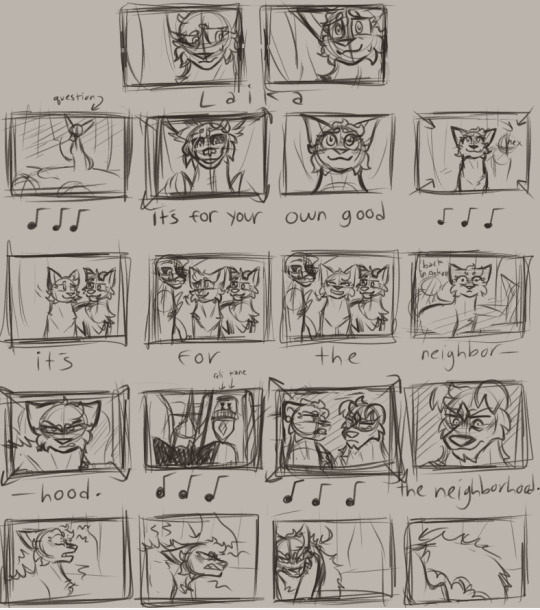
Thumbnail sketch for my next Beastos doodle 🤔
#paige’s w.i.ps#I should gather all my thumbnail sketches and post them lol#it’s the most bare bones of my work#I use thumbnails for planning any and all art pieces#makes the sketching process easier c:
8 notes
·
View notes
Note
i rlly like ur composition, i wanna know about your process :D
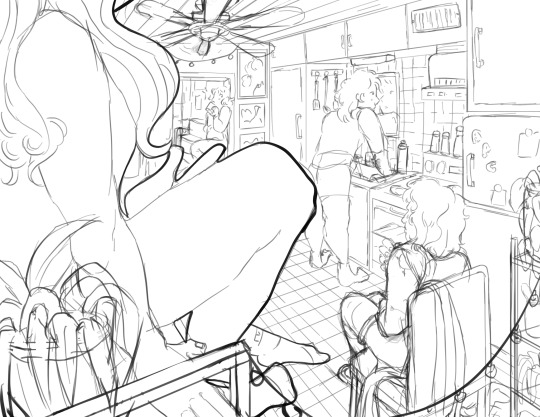
thank uuu !! yeah so like. composing a scene for me generally begins with a vague idea that i want to get down as quickly as possible- and for me that usually starts with finding a setting. I knew that i wanted to draw a) a group of roomates gossiping in a crowded kitchen and i wanted there to be b) one figure in the extreme foreground and c) lots of plants. i do use some tools to figure out perspective, mainly the csp perspective ruler. Usually i start by finding a picture i like similar to the vibe im going for- but instead of referencing anything else- im purely interested in perspective. sorry to anyone who is shocked i dont generate all of my perspective purely by myself- i can draw in perspective fairly well but i struggle to make straight lines and this is easier to make grids with than the line tool lol ^_^ i try to use it kinda more like spellcheck on typos than like something to fully rely on. this is the video i learned this trick from:
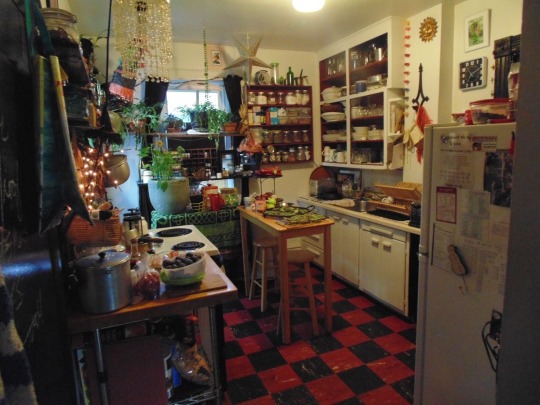
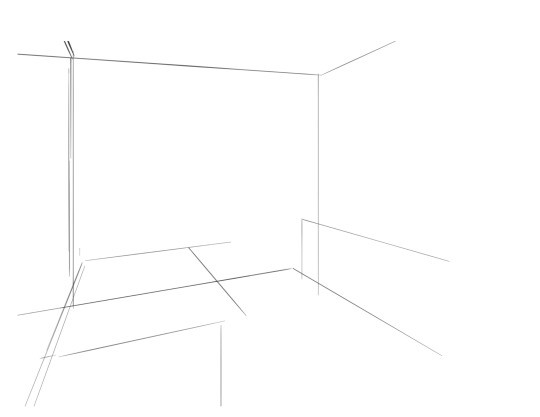
i saw the left photo and realllly loved how the cabinets alligned with the wall- so i used my ruler tool to draw out my inital plotted points from the image- basically the linear movements i was most interested in and then i turned off the image layer and worked with those lines and the ruler tool to move on. eventually i had this:

which was enough for me to put my characters in for the inital round. if you notice- i made a looot of further adjustments as i go on. this sketch is not a final layout, its so my characters have somewhere to be! i cannot draw someone standing on a floor if theres no floor, nor leaning on a table that doesnt exist. i can’t draw my characters without a background, but i also cant finish my background without accounting for how my characters can comfortably exist in it!!

this was the like.. very basic start. i knew the positions of two characters- but i needed to change a lot not only to fit them better but to allow for the other two figures i had planned.
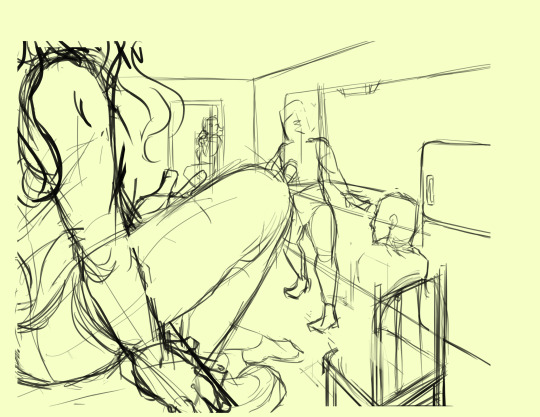
okay.. a little better. i widened the kitchen, closed the fridge door.. added a chair and fit in all the figures.. but this is waaay too dramatic. only two figures are actually interacting- and they are at wildly different energy levels!

this is where things started to make a little more sense characterwiss, so i was ready to refine backgrounds and figures and unite the two.
inital base sketch. much better layout.
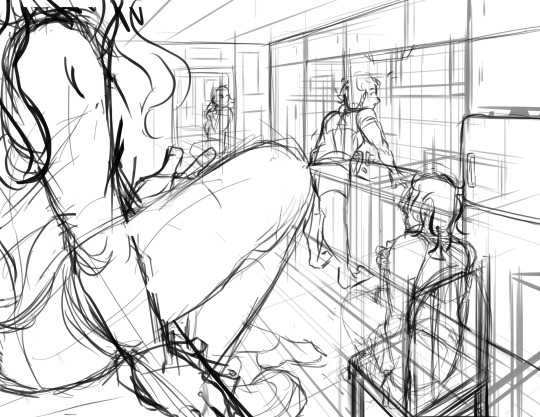
okay- this is where im getting my footing but things seem.. really really off. You can see me working on my framing here- theres some good linear movement from left to right here- but not vertically. It’s hard to notice the figure in the far back, so i need to redirect the viewers eye to move upwards as well!

this is where i decided to zoom out, add an interesting vertical element to the left of the image and make it clearer whats happening in the foreground. i had to account for some stuff by adjusting the cropping, but i paid attention to that as well.
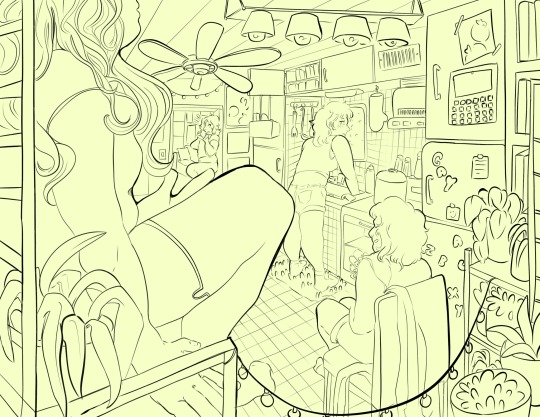
annnd- thats what a clean sketch looks for me! i have all the elements of my scene accounted for, and things are clean enough to read.
the next step for me would be transfer! essentially- I print the image of my sketch out, resizing and taping pages together so my sketch matches the size of the paper i want to paint on, and then i use a lightboard to transfer my sketch with pencil onto my paper. Then i refine the sketch a few times on paper before stretching my watercolor paper (essentially just prepping for painting) and inking with a brush and colored ink before going in with watercolor, gouache and ink, then usually finishing with marker, colored pencil, pastel and ink. it’s a lengthy process but a lot of fun lol. but sketches for me can be like.. 15 layers of different roughs until im happy with just the sketch. there were more images but im on mobile and theres a 10 image limit 😭😭 im a bit masochistic but i believe that if i dont have a good sketch i dont have a good painting!!
101 notes
·
View notes
Text
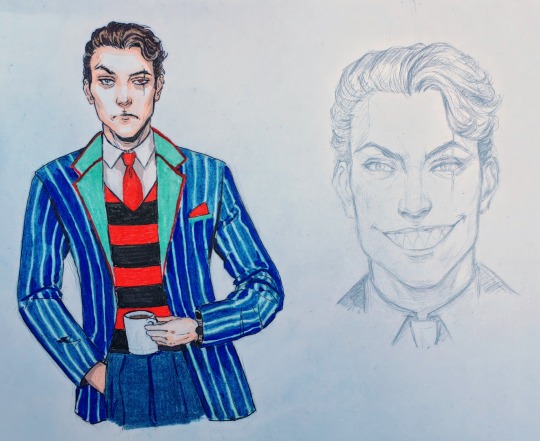


"Hey, hey, hey. Fuck my life"(c)
That's the last thing I expected from myself, that I would sketch the humanization of a character who so categorically does not attract me by design. Seriously, is his head a flat-screen TV? That's how it's easier for me to take Vox seriously.
As we know, Vox died in the 50s. I love this era.
Headcannons:
📺 Died, literally burned out at work. To catch a fatal heart attack shortly before forty, you need to make an effort, but Vox is diligent. He did it.
He worked, of course, as a TV presenter.
📺 Died on the air. That's partly why it looks like this.
📺 Since in the 50s, in order to be at least some kind of media personality, it was necessary to have at least a passable, pleasant appearance (we are talking about television), he took his new posthumous appearance very hard. He still has a complex, but he hides it perfectly.
📺 Hidden sexist, 50s! But admitted Velvette in the end.
📺 Divorced three times. More precisely, he died in the process of the third divorce.
📺 Coffee, whiskey, sleeping pills, cigarettes. Strangely enough, but he almost quit smoking after his death. He had enough, sort of.
📺 Extremely nervous work during his lifetime, wild competition and underhand intrigues. That's why he's paranoid.
📺 A workaholic. A careerist. He is extremely vain and scrupulous about his status. A painful ego.
📺 Vox loved dancing, but where would he find time for it?
📺 He is categorically not a womanizer, despite his profession in the media. Practically monogamous by default. That's partly why there are three marriages, not just affairs.
📺 There is a nervous tic in my humanization. Under that scarred and red eye.
📺 A dead and extinct red eye, a tenacious and cold blue one.
📺 Deeply depressed.
📺 Coffee in liters. He likes whiskey from alcohol.
📺 If desired, he will intimidate his employees almost as well as Val.
📺 Without a wristwatch, he feels undressed, and it doesn't matter that there is a watch in the phone)
📺 Alastor is the canonical theme of "code red". That awkward case when you weren't even in a romantic relationship, but you still act like exes. facepalm And it's fucking noticeable. To everyone.😅
#hazbin hotel#hazbin hotel fanart#hazbin#hazbin alastor#hazbin hotel vox#hazbin vox#vox#vox hazbin hotel#the vees#radiostatic#staticradio#vivziepop#vox headcanons#humanization#Could it be#could it be that you’re joking with me#А может#может#ты шутишь надо мной#human vox
114 notes
·
View notes
Text


a double commission feature for @ornatehorizon, I designed him a wolf and a blue carpenter bee character! It was very fun making these c^^
creative process:
Ornate gave a lot of direction for both designs. first was the wolf which he had a specific color pallet and hex values for me to work with, this meant I had to switch from my usual CMYK environment to a standard RGB one


starting out, he was happy with what I had going already but also was thinking of him being more fat, and asked if I could sketch both body types to compare

so I did that! plus, cause I was felling like a geanius, I offered two versions of the fat alt to pick from, one having boy boobiess

and he was a big fan! c^^


(shaded version)
Ornate ended up asking if I could render both versions, since I already usually did two renders for design refs, I said yes
now for the bee!

for this one Ornate didn't specify a body shape either but I had a good idea of what he'd want already, I wanted to give it a anatomy inspired by Leavanny, in how the abdomen extends from the torso, and how the legs are attached from it, plus some other style traits

He really liked it! after a few edits, such as a larger abdomen and wider body, we were ready to go for the ref


the hoodie was also part of the character prompt, including the print on it, the ref Ornate gave had a jp script on it, but I took the liberty to make it flowers instead for the sake of making it easier to draw
he also had two different shades of blue for the hair for me to pick from, I ended doing both, the lighter color being the bang c^^
#bowties art#commission art#kritaart#other people's ocs#I had to redo this post twice cause tumblr did a hiccup#augh
22 notes
·
View notes
Note
Fanworks creator here with some tips:
A. If you want more comments/kudos, you should:
--regularly comment on and recommend other writers/artists' work b/c its more likely they will then do the same for you
--make fandom friends who can cheerlead/beta and who will recommend your work to others when it is published
--generally converse with the fans around you, treat them like peers, and befriend them on their own merits, rather than acting like they are just potential readers for your work.
--participate in exchanges or other fandom events: there will already be eyes on the event so getting readers will be easier.
--Fandom is a community: act like a community member and the community will be more likely to embrace you; act like a wanna be fic influencer and the going will be harder and, more importantly, infinitely less pleasant.
B. If you are insecure about your writing you should:
--not read fanfic related confessions
--find friends who can cheerlead for you and tell you how great you are at writing and how good your story is
--find people who can beta your fics and act as mentors so that you can get targeted feedback on ways to improve.
--seek out fiction craft essays both within fandom and outside of fandom to learn more about writing tecniques
--experiment with your writing and set goals for new things to try and explore
--save particularly uplifting feedback so you can look at when you get down
--don't look at the number of kudos or comments other writers get, because comparison helps no one. There will be fics more popular. There will be fics less popular. So it goes.
--make other writer friends so you can commiserate about your writer problems together
C. Miscellaneous thoughts:
--writing is hard. If you want an easy hobby this ain't it. If you want to be a good writer you have to put the work in: not just in butt in the chair writing time, but with research and revision. Dashing something off quick is fine, but accept that it's like a sketch in an artist's sketchbook. Sometimes the dashed off thing might look good, but it will more often be mishapen and not quite right. It's still part of the learning process. You have to do the work. You cannot expect people will do the work for you.
--readers are going to react to your writing in unpredictable ways. That's just how it is.
--If a reader is putting more thought into how they read your fic than you put into writing it, that means the problem is usually with the writing, not with reading. An invested and engaged reader is to be treasured. A great way to lose readers is to tell them that it's only fic and they are thinking too hard about it. This is fandom: thinking too hard about media is a huge part of what we do here.
--you can control who interacts with your personal social media accounts and your ao3 account, but you can't control the entire internet. The earlier you accept that, the better.
--if you are just here for quick validation in the form of people telling you how great you are you will almost certainly be disappointed.
--The author is dead. Try to embrace your experience of after life with grace.
.
20 notes
·
View notes
Note
Super curious because I'm getting into animation memes n stuff and I know some people like to script theirs. I've been just basically coming up with mine as I go but I'm considering scripting them to make it easier on me.
Do you script your animation memes, and if so, how do you do it? I've always assumed people script memes similarly to multi-animator projects (basically, type/write out the audio, then add what the characters are doing during certain parts of the audio) but I'm not completely sure so I'm basically looking for advice I guess.
Anyway, have any advice on scripting animation memes? Entirely fine if not, I just thought I'd ask since I figured you have experience with animation memes!
so for this i would ask what type of animation memes do you want to do and what do you want them to convey? theres a lot of types of animation memes that scripting may or may not go well with. for me, i try to choose animation memes with a lot of story potential rather than more repetitive head-bobby memes (though those ones are fun for me to do on occasion!) because of that, most of the memes i do may look a lot more like pmvs than your typical animation meme.
for example, my heaven says and good in me videos are animation memes, but they don't really repeat and are much more like short-form pmvs with backgrounds, shading, and a clear story to them. if you want to do something like that, then yeah scripting may be a good idea if it works for you! but if you wanted to do something like my big shot meme, where the focus is less on storytelling and more on repetition and simplicity, i usually jump into it without much forethought.
as for what i do specifically, i dont really script my pmv-like animation memes only because i tend to have a really hard time putting whats exactly in my head into words. so instead of scripting, i do animatics and storyboards.
heres a very small snippet of one of my storyboards for a full-length pmv i want to do as an example
this storyboard isnt for an animation meme,(its for an entire song) but its pretty much the same process. its a bunch of thumbnails sketches of what i have in mind for each of the song's lyrics (if there are any) and beats. in a way its just like scripting, but more visual(?idk if thats the right word) and with more of a clear idea of what exactly i have in mind. storyboards dont have to be detailed by any means (mine certainly arent) but its the most effective way for me to quickly get my ideas down and letting it stick!
its also sorta how i plot out comic pages before properly sketching them

(also heres that storyboard completely zoomed out)

all in all it really depends on what works for you! storyboards are more effective for me but if writing down everything as words is more helpful then do that! its really up to the individual person. c:
12 notes
·
View notes
Text
how to design [guide]
Well, it's kind of hard to explain how to design, there are a lot of things, techniques you kind of just learn on the way. But I will still kind of guide you through the process.
If you're a complete beginner on designing or drawing in general, it can seem a bit intimidating at first. But I assure you, it's as easy as writing an essay. However it is time consuming, just like mastering any other hobby.
I was lucky enough to kind of settle on a style within 1 year or so of on-and-off designing, it may take longer for some. But with enough time and patience, I'm sure you'll get to where I am, if not, better!!!
To motivate you, here's a comparison of two designs I've made after 1.5 ish years of progress. :)

☆
step 1: find your reference
Unless you're a creative mastermind, you will most likely need inspiration / a reference for your design. Most designers, including me, go to Pinterest to do so!
my pinterest board can be found here
This step is pretty ez, just find an outfit you want to recreate. However, if this is your first design, try to go for something easy and simple, to avoid overwhelming yourself with something complicated.
I scrolled for a bit and found this design I would like to recreate!
This is optional, but I usually match my designs with a UGC item so it's easier to make outfits with! For the design above, I'm planning to match it with the UGC below:

☆
step 2: line art
It's kind of hard to guide you exactly since I don't know what you're designing, but a really important tip to keep in mind is just to not overthink the details. I tend to overthink on really small things that probably no one will notice and then get really anxious over it, and then it results on me taking wayy longer than I should, just keep it simple!!!!
I've seen people sketch a base before they design, but I don't, ummmmmm, mainly because I'm lazy + my style is pretty simple so I don't think it's needed.
Some other random tips:
1. Use a thin line art pen
Pretty self explanatory, try using a pen that is about 1-1.5px thick. (I use 1.4px!)
Thinner line art can allow more details to be added! I only recommend using a thicker pen if you're doing no shading, and just line art + base color.
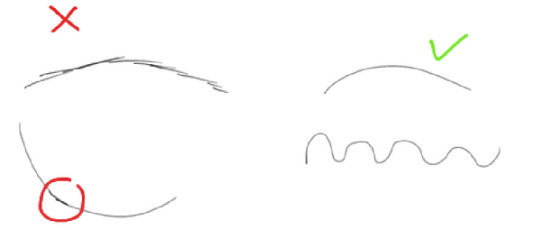
2. Keep it clean
Not sure why, but people always do that weird "sketchy lines" with the choppy and broken strokes??? Please, no. Just keep your lines continuous, it ends up being messy and hard to color if you do make it choppy.
3. Use different opacities
I normally don't straight up use the pen at 100%, I use it at about 70%, then from there, I'll adjust it depending on what I'm drawing! Something like below:

Those are like the most important tips I can think off the top of my brain, but I'll update this section if I remember to say something.
Here's the line art of the example design:

☆
step 3: add a base color
Time to colorrrrrr, once again, I'll be giving some random tips!!!
1. Pls don't use the bucket tool
It's obvious when someone uses a bucket tool and it makes the coloring look uneven, just spend an extra few minutes and color in manually.

2. Keep all your colors in separate layers
This is especially important, but if you want to ever do recolors of an outfit, keep all your colors in separate layers. Ex, all of color A in one layer, all of color B in another layer.
3. Use patterns and textures
Use patterns and textures it looks more fun. Use patterns like stripes, polka dot, plaid, gingham, etc. For textures, you can do things like knit and denim.
4. color palettes (for non-UGC designs)
a. color theory
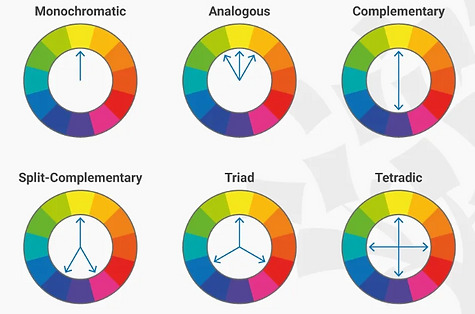
b.) Monochromatic palettes: I still do this at times, but it's important to incorporate the right amount of colors in your design! I use to only design with two colors (white and color A) and sure it works, buuuuut it ends up looking really bland and boring. Right now, I try to use about 2-3 hues (not including white)!
An example when sprucing up a monochromatic palette:

c.) white: I try not to use pure white when making a design because it makes it harder to shade with something that has a color, so I use off-white! For example, if your design is made up of mostly blue, I would use a white that has a slight hue in blue.
Examples to reference:

My design looks like this after coloring:

☆
step 4: shading
I'm going to make the bold assumption that this is the step most people get stuck on. Ngl, I love shading, it gets easier once you find a consistent style to stick to!
I will be listing some do's and don'ts when shading!
1. DON'TS
a. over blur: Keep the blurring minimal, I've seen a lot of beginner designers just rely heavily on the blur effect (gaussian blur) and simply put, it just makes your design look really messy.
Examples of over-blurring (MY OLD DESIGNS):
b. weird highlights: I stopped doing highlights, simply because I don't see the need in it (unless you're doing realism ofc). My old designs always have weird, unnatural, sharp highlights in places that just don't make sense???

c. sharp edges: It just looks unnatural.

d. ???: I never done this, but the shading technique that looks like this:

e. oversaturated shading: Try to use shading colors that are less saturated than your base color. IT JUST LOOKS BETTER TRUST ME!!

2. DO'S
a. motion blur: Motion blur is literally so good, especially when you're shading legwarmers or the boobs area!!!
b. don't be afraid to use darker colors to shade: I use to think that kawaii = light colors, and therefore restrict myself to using bright colors to shade. But using darker colors can help to form contrast and makes your designs pop more.
c. liquify patterns: Liquify the patterns on your design, it makes it look more 3D.

Ok, now here's how my design looks after shading:

☆
step 5: uploading
Before actually uploading, I recommend to first upload your templates as decals so you can see how your clothing looks in game.
Then once they are approved, you can go to roblox studio, load in a mannequin, and test your clothing!

After that, you can upload and you're done with your design! :D

☆
you made it to the end!! lmk if u have any questions, suggestions to making this tutorial better, etc.
credits: ayzen#1111 or @ayzenly on roblox
contact me: ayzen#1111
9 notes
·
View notes
Text
Why Rapid Prototyping Services Are a Game-Changer for Startups

1. Introduction
Rapid prototyping services have become a vital asset for startups looking to create, iterate, and launch their products quickly. In today’s fast-paced market, the ability to test and modify ideas efficiently is often the difference between success and failure. This article explores the importance of rapid prototyping services and how they are revolutionizing startup development, particularly in the UK. We’ll cover everything from its benefits to industry-specific applications and expert insights.
2. The Rise of Rapid Prototyping Services
a. Evolution in the UK
In the UK, rapid prototyping services have grown exponentially, especially in sectors such as technology, healthcare, and manufacturing. With an increase in demand for quick iterations and user-centered design, companies are offering innovative services that support startups in bringing their products to market faster.
b. Key Sectors Utilizing Rapid Prototyping
Industries such as tech startups, e-commerce platforms, and medical device manufacturers have been early adopters of rapid prototyping in the UK. These sectors rely heavily on fast innovation cycles to stay competitive.
3. Rapid Prototyping Services for Startups
a. Reducing Development Costs
Startups often have limited budgets, and rapid prototyping allows for early identification of potential design flaws. This reduces the cost of product development by eliminating the need for multiple revisions in later stages.
b. Shortening Time to Market
By using rapid prototyping, startups can reduce their product’s time to market, making it easier to stay ahead of competitors and meet consumer demand swiftly.
4. Benefits of Rapid Prototyping Services
a. Early Stage Validation
Rapid prototyping provides a tangible model of a product early in its development cycle, allowing startups to validate their ideas before committing significant resources.
b. Cost-Effective Iteration
Being able to quickly modify a prototype based on feedback ensures that costly errors are avoided, enabling startups to make informed decisions without breaking the bank.
c. Enhanced User Feedback
Early prototypes give users a hands-on experience, allowing for direct feedback. This user-centric approach leads to improved products that cater more closely to market needs.
5. Custom Web Development Services and Prototyping
a. Integration with Web Development
Many startups rely on custom web development services alongside rapid prototyping. Integrating these services allows for the development of Minimum Viable Products (MVPs) that can be tested and iterated quickly.
b. Importance for MVPs
Prototyping is critical in creating MVPs, as it helps to showcase the core features of a product without investing too much in fully-fledged development.
6. Types of Rapid Prototyping Services
a. 3D Prototyping
3D prototyping involves creating tangible models, often used in product design, manufacturing, and engineering startups.
b. Wireframing
For web-based and software products, wireframing allows designers to map out the structure and user interface, providing a blueprint for the final product.
c. Software Mockups
Software startups often utilize mockups to test functionality and design before coding begins. This saves time and ensures a smoother development process.
7. How Rapid Prototyping Works
a. The Step-by-Step Process
The rapid prototyping process typically involves creating an initial model, gathering feedback, making revisions, and then repeating the cycle until the final product meets expectations.
b. Tools and Technologies
Popular tools for rapid prototyping include 3D printers, CAD software, and wireframing tools like Sketch and Figma. These tools make it easy to create and refine prototypes quickly.
8. Rapid Prototyping vs Traditional Methods
a. Comparing Timeframes
Traditional product development methods can take months or even years, while rapid prototyping allows for the creation and iteration of models within days or weeks.
b. Cost Differences
While traditional methods often require significant upfront investment, rapid prototyping is more budget-friendly, especially for startups looking to minimize costs.
c. Effect on Product Quality
Rapid prototyping ensures that any issues with the product are addressed early, leading to a higher-quality final product.
9. The Role of Rapid Prototyping in Product Design
a. User-Centric Design
Rapid prototyping focuses on user feedback, allowing for continuous design improvements. This leads to a product that better fits user needs.
b. Improving Usability
By testing prototypes with real users, startups can identify and fix usability issues before launching, improving the overall experience for the end-user.
10. Industry-Specific Applications of Rapid Prototyping
a. Tech Startups
Tech startups leverage rapid prototyping to quickly iterate software and hardware solutions, ensuring they can stay ahead in a competitive market.
b. E-commerce
E-commerce platforms use rapid prototyping to test new features, ensuring their website or app provides a seamless user experience.
c. HealthTech
In the HealthTech sector, rapid prototyping helps in creating medical devices and applications, ensuring compliance with strict regulations and improving patient outcomes.
11. Challenges of Rapid Prototyping for Startups
a. Budget Constraints
While rapid prototyping can save money, startups with extremely tight budgets may still struggle to afford some of the more advanced prototyping tools and services.
b. Over-reliance on Prototyping
There’s a risk that startups may become overly reliant on prototyping, neglecting the importance of thorough planning before development.
c. Managing User Feedback
Balancing conflicting user feedback can be a challenge for startups, as it may be difficult to decide which changes to prioritize.
12. How to Choose a Rapid Prototyping Service Provider
a. Factors to Consider
Startups should evaluate providers based on their industry expertise, technology stack, and track record of successful projects.
b. Evaluating UK Providers
With a growing number of rapid prototyping service providers in the UK, startups should focus on companies with proven experience in their niche.
13. Case Study: UK-Based Startup Success Using Rapid Prototyping
a. Example 1: E-commerce Startup
This startup used rapid prototyping to launch an MVP within three months, allowing them to pivot their business model based on early user feedback.
b. Example 2: SaaS Platform
A SaaS startup leveraged rapid prototyping to refine their software product, cutting development time in half and achieving a successful product launch.
14. Future of Rapid Prototyping Services
a. Emerging Trends
As technology continues to advance, the future of rapid prototyping looks promising. One of the most exciting trends is the rise of AI and machine learning tools that can automate parts of the prototyping process. These tools enable startups to optimize designs, reduce human error, and improve accuracy. Additionally, virtual and augmented reality are becoming valuable assets in rapid prototyping, allowing designers to test their products in simulated environments.
b. Advancements in Tools and Techniques
New materials, such as biocompatible polymers and advanced composites, are expanding the possibilities of what can be achieved with rapid prototyping. The adoption of cloud-based tools has also enabled remote teams to collaborate more effectively on prototypes, making the process more agile. Tools like generative design software are transforming how startups create and iterate products, allowing for complex designs that were previously unattainable.
15. Conclusion
a. Summary of Key Benefits
Rapid prototyping services offer a wealth of benefits for startups, particularly those operating in the UK. From reducing development costs and time to market to enhancing user feedback and product quality, rapid prototyping is a game-changer for businesses looking to innovate quickly. By integrating with custom web development services, startups can ensure their products are designed to meet user needs and market demands effectively.
b. Final Thoughts
For startups aiming to stay competitive, rapid prototyping is not just a luxury but a necessity. The ability to iterate quickly, test ideas, and adapt to user feedback allows businesses to develop high-quality products that stand out in today’s fast-paced market. As the tools and techniques surrounding rapid prototyping continue to evolve, startups can look forward to even more innovative ways to bring their ideas to life.
16. FAQ Section
a. What are the common tools for rapid prototyping?
Some of the most commonly used tools for rapid prototyping include 3D printers, CAD software, and wireframing tools like Sketch and Figma. These tools allow designers to create both physical and digital prototypes quickly.
b. How does rapid prototyping help startups?
Rapid prototyping helps startups by reducing development costs, speeding up the time to market, and allowing for early-stage validation of ideas. It ensures that products are iterated upon based on user feedback, resulting in a better final product.
c. Is rapid prototyping expensive for small businesses?
The cost of rapid prototyping varies depending on the tools and services used. While advanced 3D printing and prototyping tools can be expensive, there are more affordable options available, especially for digital prototypes. For startups, the cost savings from avoiding design flaws and improving product quality often outweigh the initial investment.
d. How to find reliable prototyping services in the UK?
When searching for reliable rapid prototyping services in the UK, consider factors such as industry experience, the range of technologies offered, and client testimonials. It’s also important to look for service providers that specialize in your niche or product type to ensure they can meet your specific needs.
0 notes
Text
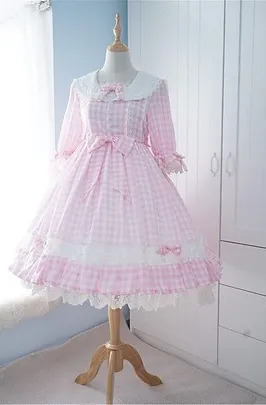
*.·:·.✧ 𝐁𝐨𝐮𝐭𝐢𝐪𝐮𝐞 𝐏𝐚𝐧𝐢𝐜! ✧.·:·.*

Being an actor, in general, meant that stars would always be prettied up before the filming starts. Each major actor and actress gets to have their dressing room where a couple of make-up artists and costumier would attend to them. No matter what kind of industry it is or how small or well-known the production company is, it is a given that presentation is important to its stars.
And working as an actress for a mobile game company such as Clover, [Y/n] knew all too well that the fan community is very attentive to character clothing. After all, that's how cosplay exists. Furthermore, since Lord of Heroes is a mobile game, it is also a given that various alternative appearances of each character exist in the form of skins, costumes, or outfits.
Although the young girl was fascinated by how the creative team of a particular game designed their characters and the outfits they wore, she never thought that her experience with it would be this hectic. Since they would inevitably do this every few months as part of their job, [Y/n] thought that the process would take only a few hours. She even hoped that she could have a fun bonding time with others as well. But, those hopes and dreams shattered in an instant.
"Creative director said that the first outfit collection to be released is called 'Ancient Collection'. So it's our modern clothing in the game," Aurea stated, looking down at the clipboard she had in her hand. After a few minutes, she scanned the actors inside the fitting room. "And there have to be two variants of the outfit for each character..."
For this first collection, 15 heroes were chosen to have their themed outfits. The actors arrived at the building early in the morning, ready to have their measurements taken and try on some attire examples. However, it is easier said than done and the process would take longer than they expected.
"I know that I always envied rich people having the opportunity to go to a designer store and order a personalized article of clothing to add to their enormous closet but... I never wanted to spend a long and tiring day trying out every clothes there is! Now I understand the pain of the female characters I read in a manhua with a Western fantasy setting... Huhu..."
[Y/n] frowned, her shoulders slumping after the people attending to her finally left her side. The young actress with a few of her co-stars was at the fitting room, getting their measurements done and trying out every clothing design to finalize their outfit to be released soon in the game.
"You doing alright, [N/n]?" Dietrich spoke, making the girl turn around to look at him. Noticing the haggard and annoyed look on her face, he can't help but snicker. "I guess you're not."
"Uh-huh," she rolled her eyes, sarcasm lacing her tone. Then, she glared at her older brother who was comfortably relaxing on a couch. "I hate that you and Big Sis only have one outfit in the game..."
"That's to be expected. We're the stand-in for the players, after all — we're not the ones seen fighting in the game," the ravenette replied, chuckling lightly. "Besides, you're always looking cute no matter what you wear."
Rolling her eyes again, the [h/c]ette gave him a playful scowl. She stood patiently by the side as Aurea, the head designer, was instructing her co-staff about the different sizes of each piece and which dressings would be used on the outfits that the players were to wear. The girl's [e/c] hues watched as people made their way around the room back and forth — some were carrying multiple articles of clothing in their arms, others were measuring the actors, while the remaining ones were sketching design ideas and consulting the blonde designer afterward.
[Y/n] knew that the creative director of the team left the responsibility of coming up with unique and on-character outfits for the actors to Aurea. After all, they hired the greatest fashion designer of all who owned Moon River Boutique which famous people frequented. The young actress occasionally saw Aurea in magazines and television live show talks, and she is fascinated by her outfit designs. What's more, it amazed her that Clover was able to hire such a great talent like her to work on a mobile video game.
However, most of her co-actors were also respectable and well-known in their rights even before they got hired to work as an actor.
"I wonder how the others were faring..."
The girl's gaze once more drifted toward everyone in the place. She finally decided to take a break and sit on the couch next to her brother. Johan, Mikhail, Krom, and Aslan kept walking in and out of the fitting station, trying out the apparel that the staff gave them and having to see which one suits best for the character's overall appearance.
The girl let a sympathetic smile grace her lips, knowing full well how awful the experience is to try and match different sets of clothing just to see which looks great on the individual. Especially when some pieces of clothing only have a minor difference from each other. After all, every little detail matters.
On the opposite side, Charlotte, Astrid, Mei Ling, and Olivia were browsing through the accessories. They took a couple of them and tried them out with the current outfit they were wearing, a staff assisting them and analyzing the compatibility of the accessories to their current look.
Whilst Fram, Zaira, Lumie, Alev, and Solphi were by the vanity mirrors. Alev and Lumie were sitting down as their hair was being done by the assistants, trying out what style would fit their outfits. Zaira was trying out different earrings and necklaces that would fit perfectly into the attire she was wearing. Meanwhile, Fram was standing still whilst an assistant placed a couple of coats in front of the ravenette to see which one would be a perfect combination without having the actress wear it.
For the past few hours, the young girl already tried about 20 types of clothing just to find the perfect outfit for the Ancient Collection. She tried on a couple of dresses, all having different colors and designs to see which would be on theme with her character's portrayal. Then, they would have her wear a skirt and different upper articles of clothing, trying to mix and match what looks good and appropriate with the depiction.
"If it were me, I would just wear any available dresses there is and have that as my character's outfit for the Ancient Collection. But seeing that it must be appealing for players to buy it in-game and have it worn on their favorite characters, this process shouldn't be half-assed..."
[Y/n] huffed, placing both elbows on her thigh and her cheeks leaning against her palms. She had a pout on her lips as her eyebrows knitted once more. "I'm bored... Can I borrow my phone now, big bro?"
Dietrich's onyx hues peered at her. "No."
"Tch."
After a few minutes, the young girl was once again called by the staff who had her try out another set of dresses. Despite not wanting to, she begrudgingly complied. As if weighted down by something, her body movements were sluggish and heavy. The raven-haired [L/n] noticed this, chuckling to himself at the girl's eventual display of habit.
The man watched as [Y/n] talked with Aurea, the blonde showing her clipboard. She took the item, flipping through the pages of various outfit designs that the assistants worked on. There were even notes scribbled on the paper to show the ideas they had on each intricate detail of the outfit, as well as detailed descriptions of the fabric used and how it would be assembled.
Her older brother noticed how her [e/c] hues lit up with life, however, that was only short-lived when the realization dawned upon the girl moments later. The corner of his lips curved into a smirk, amusement swimming in his black orbs when the young girl paled seeing two assistants pushing a rack of dresses in front of [Y/n].
"Do I have...to try all these?" she nervously asked, pointing a finger toward the rack. She glanced at Aurea, hoping that she wouldn't be stuck here dressing and undressing once more to see which one would suit her character best.
However, despite her hopes, the blonde woman only gave her an apologetic look. "Sorry, dear, but you need to. We need to finish the initial sampling of designs today so that we can work on the final drafts once the creative director approves the designs. The more dresses you try out, the faster it would be for us to narrow down which design we would make for your outfit."
The [h/c]ette pursed her lips, a defeated expression washed over her face. "... right..."

"Uwah~! I'm so tired!" a certain girl moaned out in displeasure, slumping into her seat.
Finally, after a whole day of trying out every piece of apparel there is at the fitting room, the crew was able to leave the company building and return home. Some of them decided to head straight home, seeing that the sun was almost setting on the horizon. Whilst for a select few, they decided to have a light snack at a nearby cafe before going home.
"Mhm. I never expected that it would take us that long to try out clothes for the collection," Johan said, letting out a small yawn.
"My whole body hurts just from the various corsets and tight lacing. It feels like I'm being cut in half," [Y/n] pouted, lightly caressing her stomach which suffered a lot in the entire process. "I hope that the next batch of outfits won't be too daunting..."
Mikhail hummed, eyes fixated on his treat. "I doubt that."
"Ugh..."
"There's no use in complaining, [N/n]," Dietrich sighed, shaking his head at the girl's attitude. He placed a hand on top of her [h/c] tresses, making the girl slump deeper into her seat and almost slide down into the floor below. "Finish your cake so that we can go home soon."
"Okay..." [Y/n] fixed her posture after, taking a slice of her favorite cake and shoving a large piece into her mouth.
The [L/n] siblings, Johan, Mikhail, Lumie, Olivia, and Astrid stayed for another hour at the cafe, enjoying the relaxing after-work hours just bonding with their colleagues. They shared their stories and experiences with the earlier dress-up session, both positive and negative. Yet, despite their hectic schedule, their admiration for a certain blonde seamstress increased significantly.
Without a doubt, Aurea is a great talent to have on the creative team.

#fanfiction#fanfic#alternate universe#oneshot#one shot#reader insert#fluff#x reader#drabble#female reader#lord of heroes#loh#moments in archive
1 note
·
View note
Text
Dive into the Best Notepad 2023 Tablet here Now!

Top Notepad 2023 Tablet
Top note-taking tablet here.
Tablets are for games, movies, and the online, but you may take notes. Professionals, artists, and students may quickly take notes to recall crucial information.
Tablet selection might be challenging with so many options. A portable Notepad 2023 Tablet with an ergonomic design and responsive stylus pen is optimal.
Choose a Notepad 2023 Tablet that balances affordability and performance for most tasks. A long-lasting battery is important if you use your tablet regularly.
Will have chosen the best laptop-replacement note-taking tablets to help you pick.Compared battery life, display size, weight, and other features from various manufacturers to help you select. Guidelines will be updated as we add information.
The Samsung Galaxy Tab S9 provides premium features for the best Notepad 2023 Tablet .
The Tab S9’s Snapdragon 8 Gen 2 CPU running Android 13 should handle gaming and photo editing.
An 11-inch Dynamic AMOLED 2X screen with a 120Hz refresh rate and Vision Booster improves vision in harsh sunlight.
With its 1.65-pound weight and good screen visibility, it should be easy to carry and use when hiking or traveling. The S Pen also makes sketching and taking notes easy.
The Tab S9’s refined Armor Aluminium finish and ultra-slim bezels help you focus and provide durability in case of bumps or drops, making it ideal for seniors and children. See the best elder tablet for more options.
It also boasts a 12MP ultra-wide front and 13MP back camera for photo and video aficionados, which should provide quality photos and videos for meetings and conferences. The 45W fast charger charges the battery quickly, enabling you to work longer with minimal downtime.
The tablet is a terrific deal since it supports WiFi 6E and 5G cellular networks for fast streaming and downloads, has quad speakers with Dolby Atmos for immersive sound, and can be used with a keyboard and DeX Mode to expedite processes. It must be purchased separately and may cost more. See our best keyboard-equipped Notepad 2023 Tablet for more options.
The reMarkable Bundle 2 lets you quickly take notes and read and review papers on a tablet that feels like paper.
The digital tablet is tiny and lightweight at 4.7 mm (0.19 in). It’s lightweight and portable, so extended sessions won’t weary your hands or wrists. Linux eliminates pop-ups and alarms, improving focus.
The kit includes a 10.3-inch 1872 x 1404 LCD screen. No lighting or glare makes reading notes, eBooks, or PDFs for hours easier on this Notepad 2023 Tablet . Additionally, the Marker Plus pen with a built-in eraser lets you scribble notes or drafts and use advanced features like undo, erase, and resize for a paperless and digital experience.
8GB of internal storage should be plenty for notes, to-dos, and sketches. The 12-month Connect subscription provides unlimited Google Drive, Dropbox, and OneDrive cloud storage and device protection, solving storage and security issues.
The maker claims two weeks of usage each charge, therefore this device must be charged twice a month. Batteries function differently depending on application, ambient temperature, and more.
The mobile and desktop apps let you write, edit, and revise notes on any device, including a phone or laptop, keeping you on track.
This Notepad 2023 Tablet contains a USB-A to C charger and 9x additional marker tips for extended usage. The characteristics and specifications of this tablet make it the best for handwritten notes.
A powerful MediaTek octa-core CPU and 4GB RAM are its first features. It should handle multitasking, casual gaming, and streaming. The model’s 128GB of storage should be enough to store files, programs, and other stuff without clearing other things.
Display is 11.5 inches Full HD with 2K resolution. This means clear, vivid images and movies and a terrific gaming or streaming experience. See our top large-screen tablets guide for more options.
4G, WiFi, and Bluetooth should be enough to connect peripherals and keep things running if one fails. USB-C allows fast charging and headset compatibility.
Use may diminish or prolong the manufacturer’s 7700 mAh battery’s 10-hour life. The tablet’s 8MP front and 13MP rear cameras should be plenty for conference calls, casual video chats, and random images and videos.
This tablet includes quad Dolby Atmos speakers for better movie and gaming experiences. Finally, the Lenovo Tab p11’s keyboard and pen make it ideal for mobile work and casual pleasures. See our best keyboard-equipped tablets for more options.
The tablet’s intended function may restrict your options. A low- to mid-range tablet should suffice for casual schooling. Professional designers choose high-end tablets with powerful processing and storage. Choose a Notepad 2023 Tablet purchase goal to reduce clutter and research.
Your Notepad 2023 Tablet ‘s battery life depends on its use. Leisurely surfing or reading may prolong battery life. Playing games may need recharging it a few hours before the manufacturer’s time. Consider these considerations, but buy a device with a large battery capacity to maximize your chances.
Display
Tablet screens matter. While an inexpensive screen can display images and do basic tasks, your pen or fingers won’t glide as smoothly. Some scrape readily. Consider the tablet’s display and choose one with a great display within your budget.
Extra Features
Extra features are great since you get more for the same money. In the short and long term, keyboard, pen, and other peripheral support and interoperability with cloud services like Google Drive are essential.
Read more on Govindhtech.com
0 notes
Text
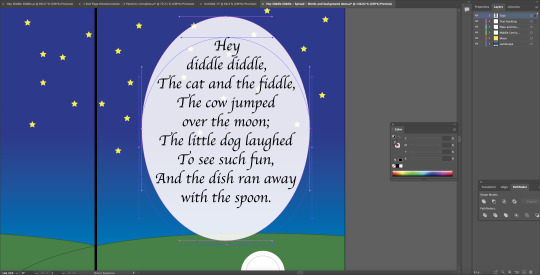
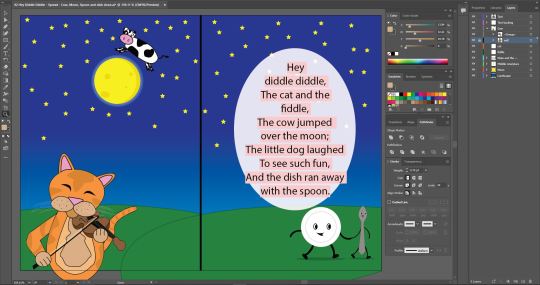
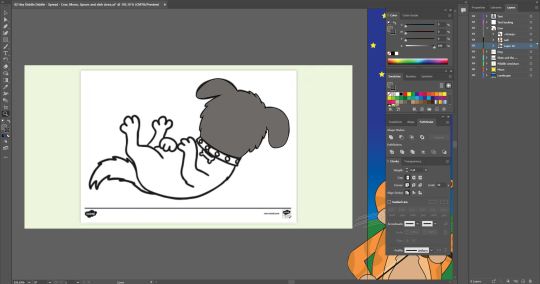
Fundamentals - Children's Story Book - Middle spread.
This week we began work on our final task which is to be a 12-page children's storybook that includes up to 5 children's stories, nursery rhymes, or songs. The stories I have chosen are This Little Piggy, Hickory Dickory Dock, Hey Diddle Diddle, Little Miss Muffet, and Thre Blind Mice.
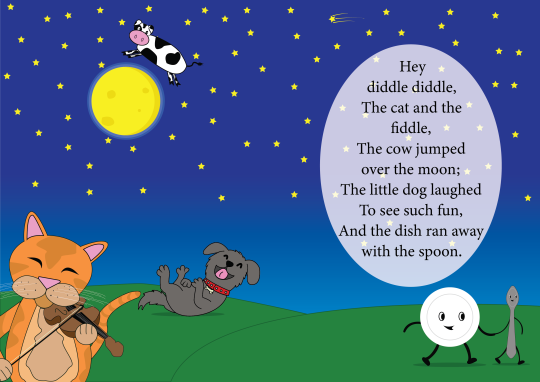
I decided to start with Hey Diddle Diddle as I figured it would involve the most amount of illustrative work and would take some time to complete as it was important to me that given the length of the story, all visual elements should be present.
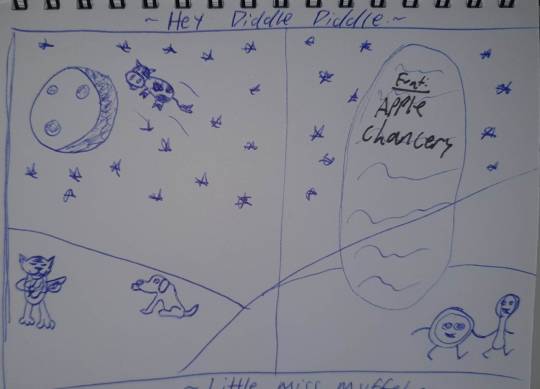
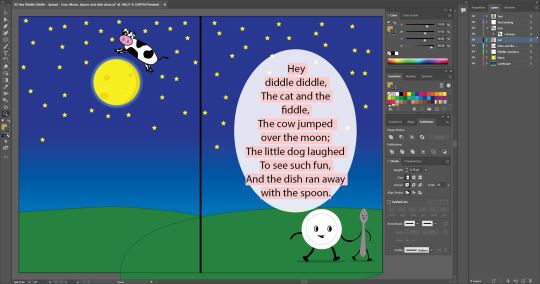
Because of this, I decided I would go for a 2 page spread in order to avoid clutter amongst the different elements within my scene. the text box (seen on the right of my sketch above) was inspired by memories of Nursery rhyme books I'd had as a child we're parts of the illustration would be whited out to make space for text. In my case though I plan on creating a transparent elliptical so that elements of the background will be able to be made partially visible to help integrate it within the overall image.
I began by creating the back and foregrounds (both separate layers) of my image using the pen tool with a green fill combined with a slightly darker green outline, to create rolling hills across the bottom as well as the rectangle object tool combined with the gradient tool to create the night sky. To polish this off I used the Star object tool and a lot of copy-paste (Command + C, Command + V; Option + Left Click + Drag) to fill the sky with stars.
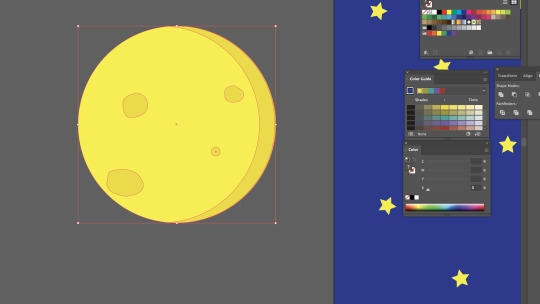
creating a new layer, the first of the elements I decided to draw was the Moon. I created this by using the Elliptical object tool, creating the basic shape of the moon, and then placing 4 ellipticals on the moon and adjusting them using the selection tool. I also made use of the Pathfinder tool in order to create a shadow on the right side to add depth to the subject. I grouped these and added them to the scene.

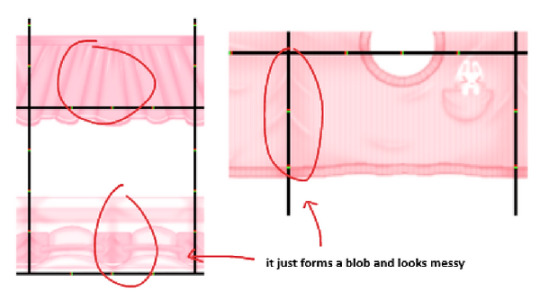
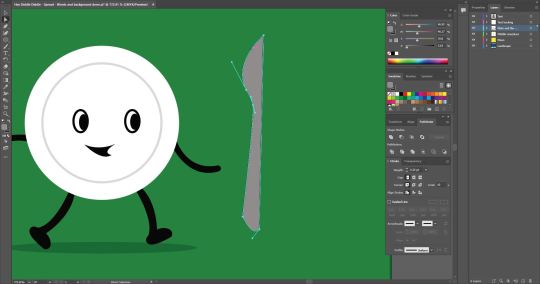
The first character I decided to draw was the dish (the dish ran away with the spoon) which I began by setting to its own layer and again with the elliptical object tool created the main body of the dish, followed by a light grey elliptical outline to create the center of the dish. the legs and arms of this subject proved to be my first hiccup within my process, while being rusty, I wanted to use simple outlines for the legs and arms of the subject but for reasons at the time, I couldn't get it to happen. I have since figured out why this was not working. Drawing the shapes for the legs and arms using the pen tool, I placed them behind the dish to avoid any clipping or disruption of flow between the body and limbs.
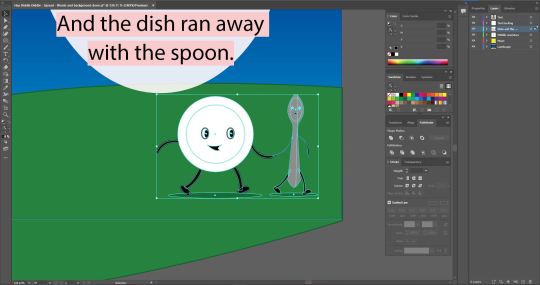
It was at this point I noticed I should have already planned out my text box and size so as not to make any mistakes further on with placement and spacing. I added this to its own layer and placed it at the top of my layers palette as nothing should be able to be placed over the top of it.
I chose to lay out the text in a way that each section would be somewhat self-contained for it to be easier to read for children while also being able to follow the objects from left to right alongside reading.
I also added a black line through the centre of the page to represent the centre of the spread to avoid my subjects falling into the fold of the book. I created another elliptical and lowered its opacity slightly and added a rounded text box. The font I chose was 'Apple Chancery' as it fits the fairytale-esque tones and nostalgic feeling I had envisioned within my sketch.
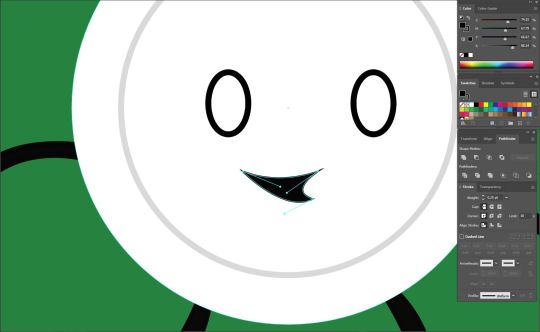
Moving on, I added eyes onto the dish and using the pen tool, created a mouth using Bezier curves.

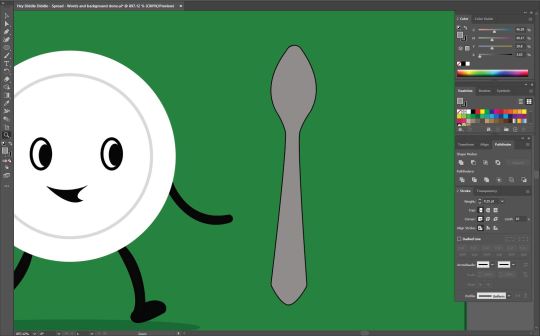
after adding pupils to the dish and a transparent black elliptical for a shadow, I began work on the spoon. I began by first drawing half of the object with the pen tool and reflecting it onto itself to create a symmetrical object and removed the middle line.
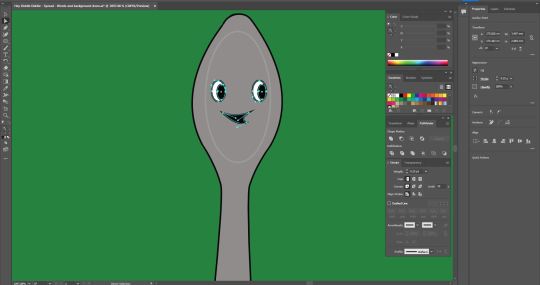
I copied the eyes and mouth from the dish and adjusted the curves of the mouth to make it unique from the dish. Also adding another elliptical around them to create the illusion of a face/add depth to the head of the spoon.

much like the dish, I drew the arms, legs, and feet to match the dish so it would appear that they were in motion and running away together as the story tells.


After creating a new layer, I began work on the cow. I started by drawing a long, uneven-shaped oval to act as the body of the animal. After switching the fill of the shape to white, I then added a snout using the elliptical tool with a black outline and fill, with two smaller ellipticals with a darker shade for nostrils. for the top portion of the head, I used a rectangle and pulled in the inner nodes to soften the corners as much as possible then altered the lines with the direct selection tool to create a less flat-topped head shape. The ears were free-handed using bezier curves and turned out far better than I was anticipating and exactly as I envisioned them.
I grouped all objects making up the cow and placed it within my scene above the moon. I could not be happier with how it had turned out, the subject fit perfectly into the scene and didn't look out of place over the moon. I did however feel like something was missing. I decided to add some more depth to the moon by taking three, slightly bigger, ellipticals and layering them, changing them to different shades of blue, and placing them behind the moon to give the moon a glowing effect and have it feel more prominent within the scene.
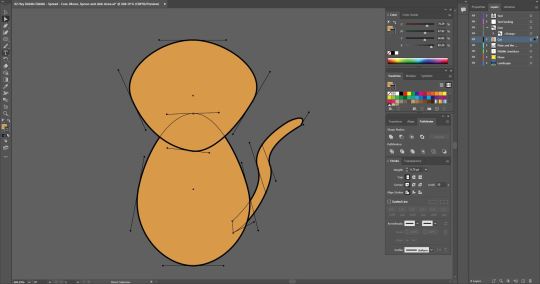

Now this, I was very nervous for. But I accepted the problem-solving to come. I began drawing the Cat and the Fiddle. I started again with two ellipticals and experimented with their shape using the direct selection tool to see what I could make in relation to a Cat. After a while of experimentation, I settled for what is seen in the screenshot on the right. But next came the really hard part. The fiddle.
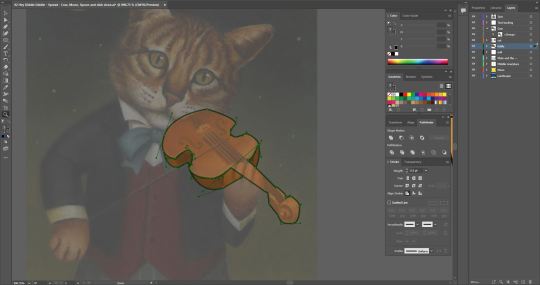
Not having any idea how I would even begin drawing a fiddle, let alone one being played, I looked to the internet for some inspiration where I found an image that looked as if it would fit perfectly in what I had already created and what I was envisioning.
Placing the image on its own layer and turning it's opacity down to 12%, I began tracing the image using the Pen tool.

entering the layers within this layer, I was able to place the Fiddle onto my subject and it was a perfect fit! Out of curiosity, I decided to lay the image over my subject to get a sense of how my subject should be posed. This urged me to rotate the head slightly as if it were resting on the fiddle, holding it in place much like the image itself. This also aided me in figuring out where I should place the eyes and ears of my subject.
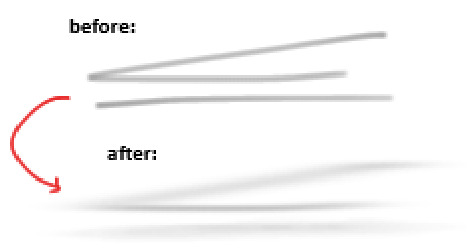
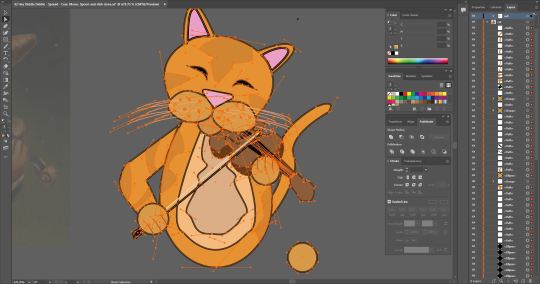
I drew some eyes using the pen tool but felt they did not give off the very friendly or playful tone that the rest of my scene gave off. Because of this, I decided to remove the eyes and pupils and 'closed' the backing shape of the eyes to give the result seen above.
I added some darker details to represent the patterns of the cats fur and added it to my scene.
Even more so than the cat, I was very nervous about drawing my next subject. I again took to Google and found a .PNG of a laughing dog which would be used as a reference as I'm not very good at hand drawing dogs and wouldn't quite know where to begin digitally either.

Having the reference image made things a lot easier in this portion of my spread. I set the image to a separate layer and set it's opacity to 12%. I began tracing the image using bezier curves and broken points, occasionally hiding the image to make sure everything was looking the way it needed to and to clean up any stray lines. The eyes, mouth, Tongue, Nose, Studs on the collar (ellipticals), and bone (Bezier curves) were all made as separate entities and placed onto the subject after the initial shape was formed.
I added the dog to the scene and placed a Shadow beneath it and I have to say, boy did it tie everything together! After a few finishing touches (resizing the cat, recolouring the cat, adding a shooting star) I was over the moon with how well everything worked! (no pun intended...)
I feel like there is a pretty consistent art style across the subjects present in the scene and don't feel there are any colours that don't belong or don't work together. I feel pretty confident that I have accomplished everything I set out to achieve with this in terms of art style and overall feeling of the image. I had so much fun creating this spread and look forward to moving on to the other pages in my book and the challenges they may present. Not only in subject matter but in the use of space also. (sizing restrictions A5 as opposed to A4).
#otago polytechnic#adobe#adobe illustrator#editing#student#bezier curves#design#digital art#digital artwork#Nursery Rhymes#Hey Diddle Diddle
1 note
·
View note
Text
The Best In Kitchen Remodeling
Since the kitchen is a high traffic area on a regular basis, creating a functional layout is key when planning your kitchen remodeling ideas. When creating your kitchen remodeling ideas you should think about the available space you have and then get creative.
Using Kitchen Remodeling Software
Most of the kitchen remodeling software is very user-friendly; the steps are as easy as 1-2-3 or A-B-C. A typical or conventional kitchen remodeling, if patterned in the past decades should have the "triangular" basics, wherein the sink, refrigerator, and stove are on triangle angles with a big space in the kitchen center, so that it would be easier for the mother or the woman of the house to move around.
kompacplus Malaysia
Making a great small kitchen remodeling design points you to the many different cabinet designs and surface patterns providing your small kitchen a superb sense of space. Whether you design the kitchen yourself, work with a kitchen remodeling contractor or home center, formulating a plan will be the first step. Another pro to remodeling your kitchen is the fact that you will, essentially, be getting a new kitchen.
Any remodeling idea for a small kitchen must address the following issues: counter space, storage, built-ins, and pantry. When planning on a kitchen remodeling project, the budget is the first thing to consider. Whether you've got a big budget or a small one for your kitchen remodeling project, it's wise to try to make sure your spending doesn't spiral out of control as the process continues.
Solid top Malaysia
Don't worry if it will take time for you to create and sketch out your plan or model, great and perfect kitchen remodeling ideas have to be developed, because it has to be perfect and valuable to you and your family. Also ensure that your kitchen remodeling ideas are not that far-out or far-fetched, align it in your family's lifestyle and daily activities; this would give you a brighter plan on your kitchen design and style. The interactive kitchen design remodeling design plans distinctively are real-life award winners, and with its innovative process, the entire plan is certain to please with its client-driven method.
After all the information is collected you can begin to put all the pieces together, and figure out how you can balance your kitchen remodeling project desires with you budget restraints. Once you've finally decided on the general picture of your remodeled kitchen, then find the best yet affordable kitchen remodeling services in your area.
Though remodeling a kitchen can be a huge disruption to the homeowner, the finished product will quickly erase the brief inconvenience. If you have a large kitchen remodeling project you will need to set up a temporary kitchen a different part of the house. One of the many other pros to kitchen remodeling is one that you might not necessarily have thought of before.
0 notes
Text
Technology Used in Steel Detailing
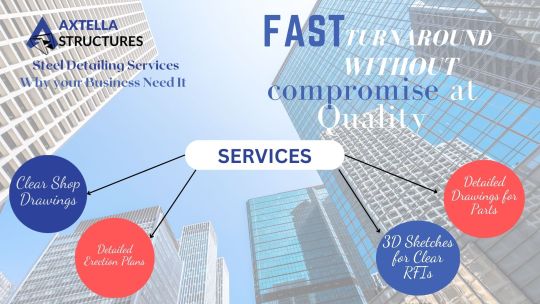
Today’s technology has taken over to simplify and diversify the work of Steel Detailing Companies in us. Today, manual drafting is no longer used in this industry, which was once run with pencils, pens, protractors, and subsequently calculators. The majority of detailers now use CAD, or computer-aided drafting. Steel detailers can express their creativity on a digital pad, which can then be reproduced as a 3D model or out on paper for 2D projects.
BIM in 3D technology
3D BIM is one of the newest technologies (Building Information Modelling). The 3D BIM software TEKLA is well-known in the field and has placed fourth in the last two years as a crucial and effective tool for the pre-engineered building sector. It can address any issue regions and is quicker than 2D detailing. After design is complete, modelling is done using BIM software. A list of raw materials, a dispatch list, shop floor plans for fabrication, etc. are sent once the model is finished.
For large projects, BIM is helpful in integrating important and essential services. Compared to 2D drafting, 3D models have several advantages.
It is simpler to implement changes and manage complex shapes.
Since all organisations involved in detailing, manufacturing, and erection follow the same model, there is little risk of misalignments occurring on project sites.
Software for nesting and site fabrication
The PEB business frequently and extensively uses site fabrication, yet there are better options available. High speed CNC plate cutting machines that use plasma or oxygen as fuel and nesting software to reduce scrap creation are available in PEB facilities. CNC punching and drilling are crucial for accurate site alignments and for creating holes for connections. Clips and other items can be welded using MIG equipment. Surfaces are prepared for painting using methods like shot and sand blasting.
CNC devices
C/Z purlins, roof and wall cladding are made using CNC cold roll forming equipment with auto pinching and shearing. Trims and accessories are produced by CNC folding machines. Other specialised equipment are employed in the production of various components, including anchor bolts, clips, and downtake pipes.
Designing Softwares
The majority of structural engineers conduct structural analysis using STAAD (from Bentley). The widely used and well-liked software MBS (Metal Building Software) provides the most accurate estimate, designing, and detailing of PEB buildings, together with shipping lists and 3D drawings. The PEB sector is now demonstrating its prowess in the construction of infrastructure, including high-rise and multi-story buildings, electricity transmission lines, metro tracks, and complicated constructions like airports.
There are some more internal softwares utilised for detailing in addition to MBS.
Benefits of Structural Steel Detailing Software
Employees in the structural steel sector possess a mastery of logic and reason as well as specialised training in all branches of mathematics.
The main advantage of using a Structural Steel Detailing Servicesis that the user gains further computer and programme knowledge. Once they have it down, trigonometry and geometry may be easily accessed without having to be memorised or manually calculated.
Why Having a 2D print version allows the steel detailer to provide a mock-up to the client before spending the time and money necessary to create a 3D representation. Any alterations or revisions made to the original blueprints are likewise recorded by the steel detailing programme. When input can be applied, the workflow is streamlined and the customer and creative can choose what works best for them both.
Using Structural Steel Detailing software decreases human mistake, promotes coherent brain-storming, and makes the process easier. Quick adjustments can be made instead of sketching numerous rounds, and maintained in notation in case there is a need to reverse back later.
The PEB industry is prepared and ready to take on a far larger role. The most cutting-edge technology are employed. The new airports serve as a superb illustration of PEB business. RCC structures have long dominated the housing market, but new PEB technologies are intended to displace RCC. The use of steel buildings with composite constructions can be significant in the provision of affordable housing for large numbers of people. Structural Steel Detailing Companieshas been employed in high rise structures, but the fact that it also presents fantastic opportunities in low and medium rise structures is a game-changer.
#structural steel detailing services#steel detailing companies in us#structural steel detailing companies in usa#top steel detailing companies in usa#structural steel detailing services in us
0 notes
Text
MIDTERM ASSIGNMENT

Artist statement:
a) I approached this project through a chaotic lens and utilized an opposing combination of colors.
b) I made sure I had quality products such as good scissors and quality glue to make the process easier. I also sketched out each of the 4 squares and the ideas I had for each of them beforehand to also ease the process of the final outcome. Additionally I also swatched a number of colors together beforehand on a separate piece of paper to determine what 4 colors would create the desired effect I was aiming for.
c) I feel fairly confident about my work as I composed each piece to the best of my ability and conveyed the mood I was going for with the vastly opposing color scheme.
0 notes
Text
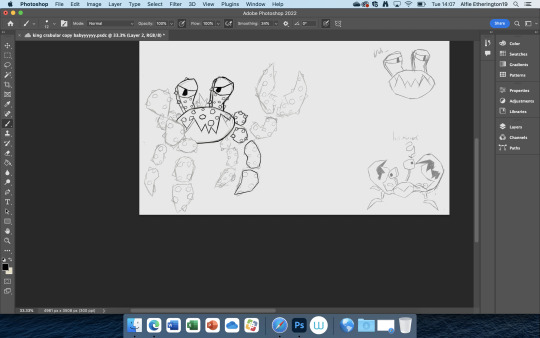
an update report of the new sketch I made for my angular crab boss design I later dubbed “King Crabular” a name inspired by the fact that the Boss was based off a King crab but also combining the words “Crab” and “Angular”
the next few pictures of the character are small showings of process on the enhanced sketch I made of Him
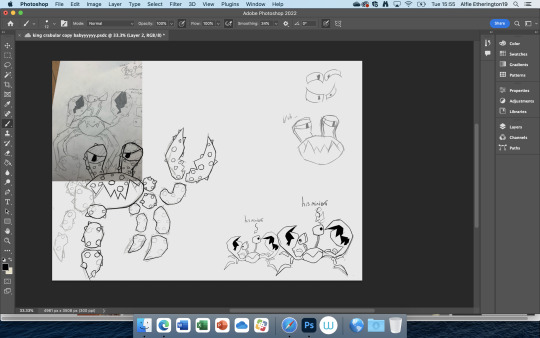
the next few images also show the line art and next colour for King C and his minions, Kysrtie recommended the idea of having the smaller minions being lighter in colour and more orange and I liked that enough to implement it in the duplicate of the minions as well as moving some of there Eyes around to make them stand out a bit from each other instead of just being full on copy pastes with different sizes and colours
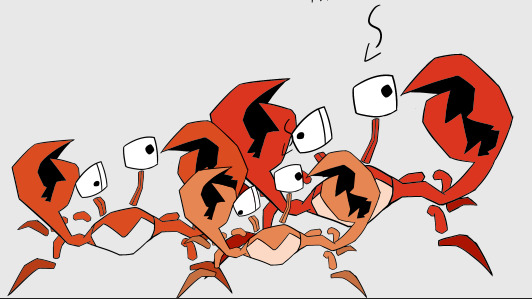
I didn’t have the time to get a bit fancier with the shading and such for King C and his minions which is unfortunate but it probably makes the process of talking about the colouring a bit easier as it was mostly just me using the good ol paint bucket tool to help me out but using a different brush for some parts of his limbs to give some extra colour variety to this dude
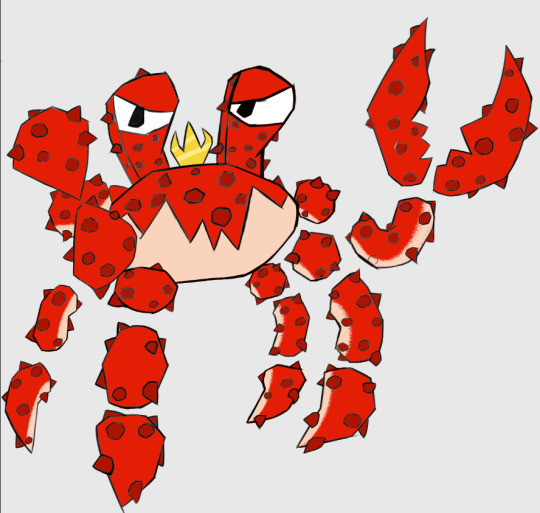
overall happy with this guy but wish I had more time to do more poses and expressions for him.
0 notes
Last Seen Blogs

babyranchkins
Untitled

jlyoung08
Untitled

comfortableshoesblogsposts
Comfortable Shoes Blog Sposts
meescuchasahoraofficial
Me Escuchas Ahora?
meescuchasahoraofficial
Me Escuchas Ahora?