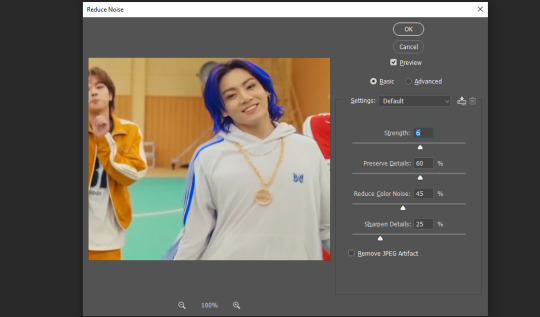
#i know this looks so grainy but i was trying like 500 new things and i like how it turned out😭!!!
Text


I want to help the weak, show the world how Bushinryu ninja do things. With any luck, that'll inspire others to follow the same path.
#myedits#street fighter#streetfighteredit#street fighter 6#sf6#kimberly jackson#gamingedit#dailygaming#videogamepoc#i know this looks so grainy but i was trying like 500 new things and i like how it turned out😭!!!
95 notes
·
View notes
Note
I love your daily gifs and I've been trying to learn but have no idea what I'm doing 😿 mine are embarrassing and ugly. please help me
Oh dear! Um, honestly it's hard to give tips if I don't know exactly where you're at in the process or what you're using, your methods, etc. If you ever want to message me and go over specifics I'll help as much as I can though. ♥
My only general advice probably sounds pretty pathetic but that doesn't make it any less true...just have fun. Don't be afraid to suck. Seriously, the vast majority of us sucked at first (I still do fairly often) but we have to start somewhere. The more you do it, the more improvement you will see, but you won't ever see improvement if you don't just do the damn thing. Try not to compare your gifs to anyone else's (I still do that like the clown I am 🤡) because everyone eventually settles into their own style and truthfully, that's what makes their gifs special. I'm not just blowing smoke up your ass, I've been in some fandoms for so long that I can tell who made a gif just by looking at it because I know their style and five different people can gif the exact same scene and it feels new and interesting each time because their styles are unique to them.
Also, every person has a different eye and while some gifs might not be super HQ works of art, they still might capture a specific moment/angle/etc that others may have overlooked and those gifs are equally appreciated, if not more so in most cases. Example, I love the nape of a man’s neck and I’ll save 500 grainy nape gifs before I ever save one of a beautifully colored/sharpened gif of some boring aesthetically-perfect shot.
Anyway, I'm sorry, I tend to word vomit. But just have fun because there's no point if you aren't enjoying yourself and keep at it when you have the time. And don't be embarrassed because every gif maker knows how it felt in the beginning. (And still feels 🙃) ♥
#and again yes feel free to message me if you have a specific question and i can try to help!#gif the shit you want to see and you can't really go wrong
7 notes
·
View notes
Text
Ice Cream For Breakfast On A Sunday Morning (nsfw)
Pairing: Wilhemina Venable x Fem Reader
A/N: this is, once again, soft smut, in which I give Wilhemina a new kink which I think fits her well. @blacksmokieee25 you see, this really got out of hands 😂 No angst for once, just fluff xx
Word count: ≈ 4 500
Warning: smut (dub con, strap-on), bad English and too many mentions of the Bible because I’m obsessed with analysing Christianity
A soft moan echoed through your dream and woke you.
You weren’t quite sure it had been real. As you rubbed your cheek on the pillow, mind hazy and confused, you slowly became aware of the light, painting thousands of clustered stars under your eyelids, and of the warmth, pressed against your front. Something hard and hot was pushing against your nose, making it hard to breathe.
You groaned and made to move, but the warmth wouldn’t let you go and moved with you. With your next breath you realised the thing against your nose smelled like Wilhemina’s skin. Instinctively then you moved toward it instead of away.
Still lost in your half-asleep haze, you pulled one hand out from wherever it was trapped and slid it up Wilhemina’s body until you found a place that was perfectly shaped to let it rest. You buried your face deeper in the warmth to block out the light and breathed Wilhemina’s familiar, beloved scent.
Another moan. This time, it pierced through the haze in your head, still soft and faint, but clear. And very real.
Your eyes fluttered open.
Dark. Your face was so deeply buried in Wilhemina’s chest you couldn’t see anything. She was nestled against you, one of your legs possessively trapped between hers. Your hand was resting on the dip of her waist.
Gently, so as not to disturb her, you pulled away to take a look at her face.
This had quickly become your favorite part of the day. No longer waking up to an empty room but to her, brown eyes fondly watching you, or bright red hair tickling your nose and flooding your view, or pale skin painted gold in the morning sun, an arm draped lazily over your stomach.
Today she was completely naked but for a pair of black lace panties. Your eyes followed the delicate line the dark fabric traced on the pale skin across her waist. Then they travelled up the gentle swell of her tummy, that you loved to graze with a fingertip to feel the muscles tense and the skin turn grainy with goose bumps. Up to her breasts, nipples peaked, that even in sleep seemed to be calling for the caress of your palms. You followed the line of one collarbone to the dip like a small lake at the base of her neck, to her jaw, to her mouth.
She was still asleep, lips parted and brow pushed up, eyes dancing under her eyelids as if she were caught in a dream with too many intriguing views to contemplate. You were about to stroke a finger across her cheek when her teeth sank into her lower lip and a soft whimper escaped her.
Your finger froze in the air. You lay still, heart quickening. You had heard this noise before, countless times, but never in sleep. You knew exactly what it told off. So you waited, fighting a smile, pricking up your ears in the hope to catch the beloved note again.
Wilhemina let out a short breath, shifted closer to you. She pushed her hips towards you as her face found your neck and her lips rubbed against the soft skin above your collarbone. You felt her next breath out, hot against your skin.
Quietly you called Wilhemina’s name, to make sure she was still asleep. And then you held your breath and moved your leg that was trapped between hers to investigate what you already knew.
When your bare thigh made contact with the damp lace of her panties, Wilhemina moaned again, louder this time, as if aware that this touch wasn’t just that of a dreamland ghost.
You froze, heart drumming in your ears, but you were not sure what to do, what was the right thing to do. Your fingers stuttered on her skin and you were contemplating waking her up before taking this any further, when Wilhemina, with a needy, sleepy whine, started rolling her hips.
You bit back a moan and automatically pressed your thigh deeper into her. And then you moaned, audibly this time, at the feel of the moist heat against your skin.
Wilhemina’s movements were clumsy, blinded by sleep, so you held her hips in your hands to guide her. Slower, more precise. Her mouth brushed over your collarbone, eyelashes fluttering like soft butterfly wings against your skin as sleep slowly started to loosen its grip on her.
You tilted your thigh and certainly pressed against her clit just right, for her hips bucked into your hands and another low moan escaped her, thick with lust. It stole the breath from you. Let her have it all, you thought, grazing your nails over her hips as they slid back and forth against your palms, all the air from you.
One of her hands closed around your arm as her grinding picked up pace and determination, her arousal soaking through the lace and smearing slickness over your thigh.
Eyes still closed, Wilhemina moved her head up until her lips met yours, pushed her tongue inside your mouth, licked your teeth, her breath bitter from sleep. You hummed into her and playfully nipped her tongue. Her hips bucked again and rubbed against your palms, a familiar meeting of warmth and warmth, lust and lust.
“Y/N,” Wilhemina breathed.
“Yes,” you breathed back.
You pressed her closer against you, desperate to feel and to hold and to stroke.
Wilhemina’s breath stuttered, and then was held back as her body went rigid. And then her hips were shaking between your hands and her teeth sinking into your lower lip as her body vibrated with pleasure, small, breathless whimpers echoing in your mouth.
Oh what a beautiful, beautiful scene to wake up to.
You slid your hands up her back, palms drunk on the softness and warmth of her skin, to hold her as her orgasm swept over her. You pushed your hips against hers, to feel the heat of her pressed against the heat of you. Bodies glued to each other. Your sweat and your love was the glue.
Playfully you rubbed your thigh on her clit, to draw a whimper out of her, and send one last wave of pleasure rolling through her body. Wilhemina’s mouth found your mouth again, hot and damp and beloved, lips lazily moving with yours until she broke the kiss with a sigh, and you pulled away to look at her.
A soft “hey” dropped from your lips at the sight of the sunlight-softened, sunlight-lightened brown of her eyes. Your palm flattened against the curve of her cheek, fond smile tugging at your lips at the soft pink your lovemaking had painted over her face.
Wilhemina’s gaze hardened a little in mock offense. “I cannot believe the nerves of you, you pervert.”
You snorted. “Excuse you,” and she couldn’t help but mirror your smile at the sound of your raspy morning voice, “I’m not the one who was moaning in my sleep, and who started grinding on my partner’s thigh.”
The colour in Wilhemina’s cheeks darkened, from soft pink to the gorgeous red of lush roses.
“I certainly did not do that,” she said curtly.
You nodded, arm holding her loosely as you started moving your thigh against her center again, and Wilhemina bit down on a whimper.
She rolled you onto your back and pressed herself down on you, red hair grazing the bare skin of your shoulders. You hummed at the familiar weight of her body on top of yours and dug your fingers into her ass to encourage her grinding against you.
“Today’s Sunday,” you managed to whisper, eyes fluttering closed as Wilhemina pressed burning kisses down your chest, each one setting a new part of your body alight.
“Is it?” There was smug laughter in her voice, and you felt it vibrate in your lower stomach where she pressed her lips next. She sucked on your skin, knowing this was a sensitive spot for you, and you couldn’t help but moan softly, your body wriggling of its own on the bed. And you thought, it was almost as if Wilhemina’s touch was that of a puppeteer, knowing exactly which string to pull to make your body, not come to life, but come to lust.
Your hands slipped up her shoulders as she crawled lower down the bed, pressing kisses on your inner thighs.
“Mina,” you breathed.
“Yes,” she breathed back.
Another kiss, hot and sloppy, and then her hand slipped up to cup your center.
“Oh baby,” Wilhemina whispered, and this time her voice was thick and quivering with desire, “you’re soaked.”
“Yes, well,” you heard yourself mumble, hips lifting to meet her touch, “I think you underestimate just how hot you are when you come.”
She let out a self-conscious chuckle, fingers trailing across your lower stomach. You whined and pushed your center against her palm.
Her fingers stopped where your hip met your thigh, and there hesitated, asking, How do you want me? She’d asked before and she would ask again because she would never want to be a disappointment, to you or to anyone else. She would only ever do the best. And if you were a bully suffering like her you would sneer and ask, What’s that you’re trying to compensate for? but as her lover in love with her, you smiled at her and gently guided her head between your legs.
Truly you adored her body, you thought, but then you stopped thinking for Wilhemina pushed her tongue inside you and licked you up as if she were licking her favorite ice cream running down a cone. Ice cream for breakfast, you almost laughed. On a Sunday morning.
Wilhemina had always had a sweet tooth.
Your fingers buried in her hair and tugged as you choked on moans and felt yourself drip unashamedly into her mouth. Oh this woman was driving you insane, completely crazy and utterly mental and God! her lips sucking on your clit, teeth grazing it and the sensation making you cry out her name and you swore you could feel her smirk at the sound.
You whined and pressed her face deeper into you, and then whined again when she pulled away.
You opened your eyes, frowning, to find her peering at you with shame tightening her brow.
“I’m sorry,” she said, wiping her chin on her hand. “I have to move, I can’t… my…” Her voice trailed off, gaze falling dejectedly on the bed as she sat up straight.
“No no no,” you growled, at the sadness you could see slowly falling over her eyes. “No.” You tugged on her arm to pull her on top of you, and cupped her face as you pressed kisses on her cheeks. “No,” before the sadness could settle in the corners of her lips like a weight, pulling them down.
A tearless sob pushed out of her mouth as she kissed you back, and then a laugh, as she pressed her forehead against yours and you nudged her nose with yours. You searched her eyes, saw her blink away fear and hatred and pressed another kiss, sweet and loving, on her lips.
And then, still holding her face in your hands, you pushed her slightly away and smiled proudly at her, for there had been a time when she wouldn’t have stopped, but pushed on through the pain instead.
Wilhemina settled in a more comfortable position and pressed her open mouth against your core again. And her tongue, hot and wet, working you so deliciously, her sinful, sinful tongue –
She moaned into you when you came sobbing her name, your fingers clawing at her back and making her dig her nails in your thighs in retaliation. You pulled on her hair when the sensations became too much.
She tenderly gathered you in her arms and stroked your hair as you lingered in your post-bliss haze.
Safe in your cocoon of warmth, you lazily ran one fingertip back and forth just below her left breast, in rhythm with the beating of her heart. Wilhemina hummed contentedly and dropped a kiss on your hair.
Truly you adored her body. Hated that she hated it. You wanted to touch every part of it and rename them, as it had always been Mankind’s duty ever since Adam and Eden. What she called “stomach” and “neck” and “nose” in a voice that was meant to sound uninterested and detached from the hatred the words aroused in her, you would rename something that would sound and feel beautiful on her tongue, like a line of poetry from her favorite poem. Damn it you would take Adam’s job and do it so much better than him because you were so much more in love than he had been. No one had ever been more in love than you.
You whispered that in her ear and she let out a chuckle because she didn’t believe it was true but still thought your naivety was charming. And then she asked you if you had ever been a little bit less in love with someone else before her.
There had been, you answered as you eagerly removed her underwear, a sunset on a beach in May, and the Santa Maria Del Fiore in the summer light and certainly the white monster of the cliffs of Dover at 3am when you had opened your eyes on a windy ferry deck – but those loves had been unrequited. They lived in you, but they hadn’t changed you.
“Did I change you for the better or for the worse?” Wilhemina asked, breathless, shivering at the feel of your fingertips trailing up the inside of her thigh. You leaned in and pressed a kiss on her parted lips.
“Definitely for the worse,” you smiled, pushing two fingers inside her – Wilhemina’s back arched off the bed. “I am a sinner, now. You made me bold. I have stolen for myself the knowledge of what it is to love and to be loved.”
Shivering against you. You massaged her clit with your thumb. If you closed your eyes you could almost feel it throb against your fingertip.
When you felt her walls tighten around your fingers you pulled away, selfishly, just so you could hear her whine and see her wriggle underneath you. Her eyes opened to meet yours, greedy and wildly blown like the wind on a stormy night.
“In which language did Adam name all the things in Eden?” you asked, but she didn’t hear you because you were pushing into her again. She moaned, dug her nails into your lower back to keep you there.
You pushed one more finger inside her, gave her a second to adjust.
“Y/N,” she breathed.
“Yes,” you breathed back.
Of all the things you cherished in this life, none came close to the way her moans would tangle with your tongue when she came, as if you could drink some of the pleasure from her mouth. This time you didn’t stop. You rubbed harder at her clit and pushed deeper into her to have her crying out in bliss again, and when your wrist went numb you replaced your fingers with your tongue and sucked on her clit until she panted that she couldn’t anymore, and came two more times in your mouth.
You both dozed off after that, limbs entangled and chests falling and rising in rhythm. When Wilhemina opened her eyes again, the clock scolded that it was already 1pm.
You were drawing circles with your nail around her freckles when you felt her stiffen and make to sit up.
“No,” you whined, brushing one hand against her arm, “where are you going?”
“I’m getting up. It’s very late, Y/N.”
You wrapped your arms around her waist to hold her back. “Today is Sunday,” you mumbled, burying your face in her stomach and smiling when you felt her shiver. “We have all the time in the world. Please stay.”
There was a pause. Her fingers started stroking your hair.
“It does not do to waste a day in idle pleasure,” she said softly.
“It does,” you breathed. “It does do very well.” You pulled away to look at her, sticking out your lower lip to fake a pout. “Stay here.”
Wilhemina hesitated. As she searched your eyes thoughtfully, you took her hand in yours and peppered soft kisses over her knuckles. “We can stay in bed and make love all day.” You smirked up at her. “Wouldn’t you like that?”
A shy, self-conscious smile. “I’m hungry,” she tried.
“Then I’ll go get some food. You stay here. I’ll be right back.” You sat up, planted a quick kiss on her lips. “And I’ll take a very quick shower because someone made quite a mess on my thigh,” you added with a smirk, picking up her ruined panties from the floor and waving them at her.
You had half expected to find her up and fully dressed when you walked back into the bedroom carrying a tray of food. Instead she was lying on her side, facing the door, hands tucked under her cheek. She opened her eyes when she heard you coming in, and gave you a sweet, fond smile.
“I didn’t know what you wanted, so I grabbed a bit of everything,” you started; and then you set the tray on the bedside table, because you knew that look in her eyes. And sure enough, she giggled and wrapped her arms around your waist, pulling you in and pressing you against her naked body.
“I got cold food,” you breathed into the kiss. Her teeth sank into your lower lip and tugged, nipping gently before they let it go.
Something hard dug into your thigh.
A quick peek under the sheet and your eyes widened at the sight of the lubed strap-on she was wearing.
You looked up again, found her scanning your face with a mischievous light in her gaze.
You had bought the strap-on a few months ago after Wilhemina had complained about the depravity of such a toy. The forced impassivity of her voice had betrayed her. Since that day, you two had spent hours exploring what worked best for you both, speed, depth and positions.
While it still felt weird for you to look down and see the dildo attached between your legs, Wilhemina had quickly grown to love wearing it herself. She delighted in the feeling of power it gave her, and thought there was no better sight in the world than that of your ecstatic face as you rode her. More than once you had surprised her wearing the strap-on as she tidied the bedroom, or worked at her desk, or read a book. You had been more than eager to kiss away the self-consciousness from her face, and on several of these occasions had played with the dildo, studying how she reacted to different positions of the toy on her body, only satisfied when you had her coming from clitoral stimulation.
“I got it while you were in the kitchen”, Wilhemina smiled smugly.
“Of course you did, you infuriating, precious, gorgeous, ridiculously sexy woman,” you groaned, voice suddenly raspy with the excitement and anticipation you could feel growing inside you.
Biting down on a grin, Wilhemina leaned in to kiss you, tongue parting your lips to brush against yours. You nipped her playfully, hand coming up to caress her breast as she rolled you onto your back. You hummed and pulled away.
“How’s your back?” you rasped, running your thumb over her lip, breath coming out in short pants as you took in the wild, hungry look in her eyes.
“I’m fine, sweet –”
“Move, lie down. Let me ride you.”
You knew she wouldn’t say no to that. And sure enough, something bright and dangerous flickered in her eyes, that made you shiver with want.
With shaky movements you straddled her, letting out a gasp when she gently scratched her nails down your stomach to rub your clit in fast, small circles. You let her take the lead, more than happy to give her that pleasure. Your head fell back, small gasps falling from your lips as she sparked and fueled a low fire between your legs. When she decided you were wet and relaxed enough, she gave your thigh a gentle tap, and you eagerly positioned yourself on top of her.
And then you slowly lowered yourself onto the dildo, letting out a low moan at the feel of it stretching you and of Wilhemina’s warm skin coming to press against your inner thighs.
“I love you,” she choked, in just that low and husky voice that would send red hot arousal straight down to your core. You felt the tickle of her fingertips as she brushed them against your hips, and then the delicious bite of her nails when, rolling your hips to adjust to the toy, you made the hilt of it press down on her clit.
You forced your eyes open as you found your pace, feasting on the sight of Wilhemina sprawled on the bed under you, cheeks flushed, lips parted, eyes half-lidded and dark with lust and pride.
“Gorgeous,” you whined, choking on the word. “So hot. So so fucking hot.”
Wilhemina let out a small whimper at the praise. One of her hands found your clit again, the other still on your hip to guide your movements as you picked up your pace.
“Slow down baby, take your time,” Wilhemina rasped. “Let me watch you.”
You groaned something incoherent as you adjusted to the rhythm of Wilhemina’s fingers on your clit, slow, tight circles that you feared would drive you absolutely crazy in a second or two. Shivering, moaning at the pleasure that built between your legs and rippled through your body.
You shifted, no longer supporting yourself with your hands on her ribs but on her thighs so that the dildo would sink deeper into you. You rolled your hips again to push it against Wilhemina’s clit. Her eyes closed briefly at the sensation, and then met yours again, before moving down to your breasts and stomach. And it should have made you feel self-conscious, the unashamed hunger with which she watched you bounce on the dildo, but her touch on your hip and clit was so soft, so incredibly tender that you felt your chest would burst from the adoration and pride she was smearing on your skin. And so instead you felt so warm, so full and so dearly loved.
It was the sight of Wilhemina gasping in pleasure that sent you over the edge. You fought to keep your eyes open as you clenched around the dildo and Wilhemina poured out words of praise, her hand gripping your hip to support you as you shook and moaned on top of her.
And then you heard her own breath hitch, and felt the telltale bucking of her hips into yours.
You looked down at her. She closed her eyes and pushed her head back against the pillow to try and hide from you, a noiseless gasp pushing past her lips.
“Oh baby,” you panted, brushing your fingers against her stomach to feel the muscles jump, “did you come untouched?”
You let out a chuckle, entirely too pleased at the idea. Your hand gently cupped her cheek to make her look at you again.
Half-lidded eyes met yours, soft and foggy with contentment.
“Yes, well,” Wilhemina rasped, a note of shy playfulness in her voice, “I think you underestimate how hot you look when you come.”
You chuckled at that, and collapsed on top of her, feeling like you had spent entirely too much time without the feeling of her skin against yours. Wilhemina’s arms wrapped around you, holding you close.
You pressed your ear between her breasts so you could hear the quick beating of her heart.
After a few minutes of simply basking in her warmth, your fingers tugged playfully at the harness around her hip.
“Do you want me to take a turn at it?” you asked, looking up at her with a cheeky glint in your eyes.
Wilhemina smiled back at you, one hand coming up to stroke your hair. “I’d rather wear it a little longer, if you don’t mind,” she answered, not exactly shy, but voice lower than you had expected it to be.
Simple joy, you thought, to be picked like daisies at the sight of her cheeks turning a soft pink again. As you held her gaze, your smile grew bigger and bigger.
“Okay,” you breathed, before planting a soft, chaste peck on her mouth. Wilhemina greedily captured your lips with hers to deepen the kiss.
You reached out for tissues to wipe the dildo dry, pretending not to notice how Wilhemina’s eyes were riveted on your every movement as you handled it.
Wilhemina insisted you drank at least two glasses of water and ate an apple. And then you were dozing off again, with your head on her lap, as she spread jam on a piece of bread.
When you opened your eyes next, Wilhemina was asleep. She was snuggled up to you with one hand in your hair and the other possessively pressed against your back.
You made to pull away to go to the bathroom, but she groaned and tightened her grip on you.
“I’m not leaving, sweetheart,” you chuckled, planting a kiss on her cheek.
She mumbled something unintelligible, shifted closer to you, and buried her face in your chest.
With another chuckle you started combing her hair, gently working your fingers through the knots. Oh yes, you thought, in which language had Adam named all the things in Eden? Was it Hebrew? But it seemed to you that if Adam had come to life already knowing how to speak, then his language must have been completely his own, something secret, something that had been lost with his death.
Yes, you thought, as you watched the red strands of hair glide between your fingers, if Adam had named the things of the world in his own language, then every word in English was a counterfeit. It all made sense now. Adam in love with Eve would never have gazed at Eve’s cheek and called it “cheek”. “Cheek” was a word someone who didn’t know love had randomly and thoughtlessly picked. Writing it down on their piece of paper, they had thought that certainly it would do. But it wouldn’t, you insisted, running the pad of your index over Wilhemina’s brow, so gently so as not to wake her. It would never do. No word in any of the counterfeited languages would ever be good enough a signifier of any part of her body. Only Adam’s language would, which lived on in the hearts of lovers.
You drew breath to share this discovery with Wilhemina, only to remember that she was sound asleep. So you pressed a kiss on her temple and held her tight, and closed your eyes, too, so that you could meet her even in sleep.
Tag list: @mssallymckenna @supremeinlilac @pluied-ete @rainbow-hedgehog @pearplate @angelxsarahp @paulawand @asktammyr @peggycarter-steverogers @coconutlipss @saucy-sapphic @thesupremewife @paulsonpills @billiedeansbottom @lilypadscoven @winslctrg @simpforpaulson @venablesgirl @mckennamayfairgoode @ka-s @lntlmate @talulahmae @okpaulson
#ahs imagines#ahs#sarah paulson#sarah paulson x reader#wilhemina venable x reader#wilhemina venable#fics
271 notes
·
View notes
Text
GIF Tutorial for Beginners
People keep asking me to teach them how to make gifs and I end up writing them long confusing messages, so I figured maybe it’s time to just write up an actual clean tutorial instead! This is supposed to be for total beginners! (Or people who want to switch to a new process that I’ve curated and streamlined over 8 years of making gifs.) I’ll try to keep this as barebones as possible, and won’t include all the advanced stuff I usually add. I hope it’s easy enough to follow, and I’ll include some links at the end for more stuff. I really do think it’s better to make a few simple gifs before doing more complicated stuff though, just to get used to it!
There will be three sections in this tutorial:
#1 Basics - How to make a gif in PS at all
#2 Sharpen - How to use sharpen/denoise filters in an easy way
#3 Colouring - Just a few very basic adjustment layers
What you need:
A video (most common formats should work, although .mkv doesn’t always)
Photoshop (I use PS CC 2018 - this one because I'm morally opposed to Adobe’s subscription model - but versions aren’t super different from each other)
In the end, you should hopefully be able to make something like this:

This is gonna be so long. Sorry. You can make a gif with just part #1! The rest is just to make it look better.
#1 Basics
If any of the tools/functions aren’t where they should be for you, your best bet is googling it, you might need to change something in your preferences!
Make sure to save your PS file... often. PS has a tendency to crash, especially on laptops.
First, you need to get the video file. I recommend a shorter video, a few minutes long, if it’s longer you might want to cut it into shorter parts beforehand. This is just because PS’s video import tool sucks.
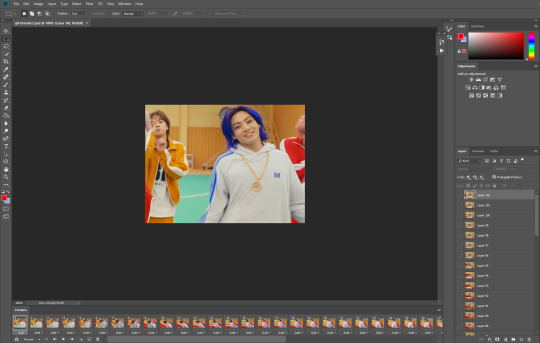
I chose the Butter MV, specifically Jungkook’s body roll at 1:24 because that’s what I want to look at for the duration of this tutorial. No further questions, thanks.
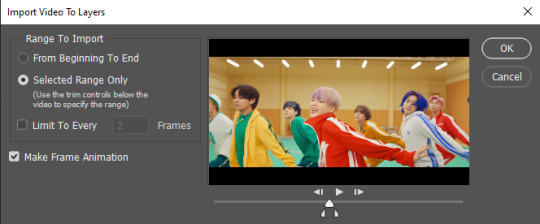
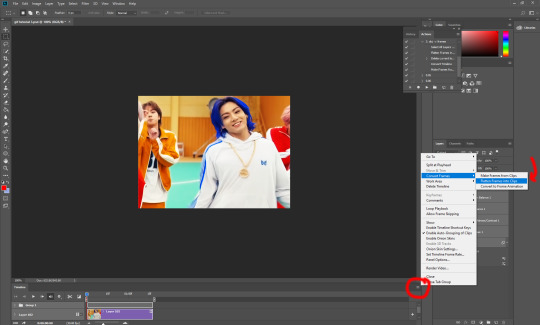
1. Open PS, go to File > Import > Video Frames to Layers

2. In the little pop-up, choose the part of the video that you want to gif. This will import every frame of the video into PS as a layer, so it has to be a relatively short part, or it’ll take ages (and gifs can’t be that big anyway). Now you can also see why it’s almost impossible to select the correct part if the video is too long.
The little controls at the bottom are for trimming, the one in the middle just for the preview. Make sure “Make Frame Animation” is selected! Then click OK.
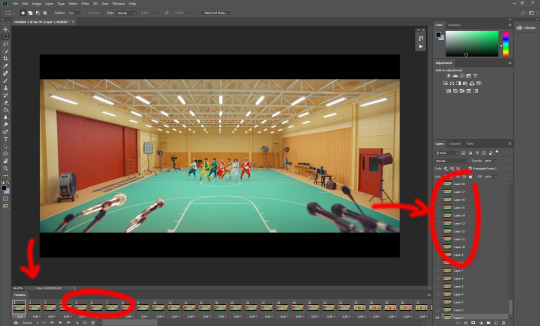
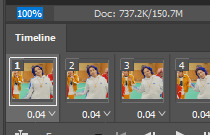
3. Now you have your layers, and you have a frame animation! On the right are your layers, that’s where we’ll apply the colouring etc. later on. On the bottom, that’s your timeline or frame animation - that’s what the gif will be in the end! So if you delete frames, the layers will still be there, but they won’t show up in the gif. If you click on a frame, you can see the little eye checkmark on the layer that’s currently visible.
4. The timeline controls at the bottom that are relevant right now: set to “forever” so the gif will loop, you can play the animation with the play button, and you can delete the selected frame(s). The number on each frame is the speed of the gif, depending on the video I usually set it to 0.05 or 0.06 (photoshop lies to you when you play the animation, the only way to test this is to open the finished gif, preferably on tumblr or wherever you want to upload it).
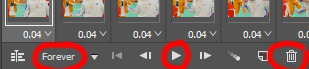
5. As you can see, the animation starts a bit before the actual part that I want, so go ahead and delete all the frames in the animation that you don’t want! You can delete the corresponding layers too if you want, to make the PS file smaller, but it has no influence on the gif. (Hold Shift to select multiple frames as usual)
6. Next, we’re gonna crop the gif however we want! You can do this with the crop tool in the left sidebar, but with gifs like this where there’s a lot of moving parts, I sometimes just use the selection tool in the left sidebar, like so:
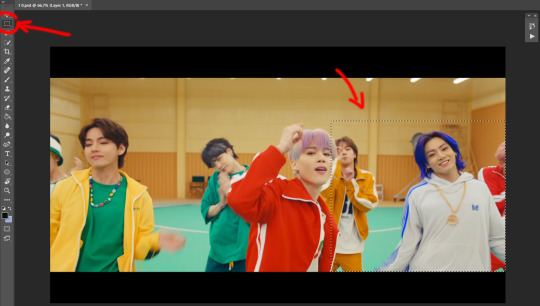
When you click on different frames, the selection stays, and you can check to make sure Jungkook doesn’t suddenly go out of frame if you crop it like that!
At this point, make sure the selection/crop isn’t smaller than you want the gif to be! For tumblr, what matters is the width (in pixels) of gifs. In the end, the width dimensions on tumblr should be 540px (1 gif per row), 268px (2 gifs per row), or 177/178px (3 gifs per row). Anything else will lead to very shitty resizing!
For this gif I’m going full sized, meaning 540px wide, so I made sure my selection isn’t smaller than that.
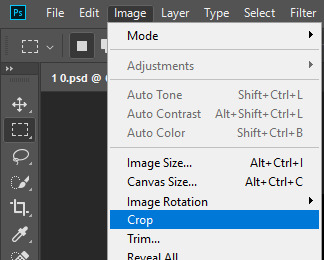
Then just go to Image > Crop, and it’s done!
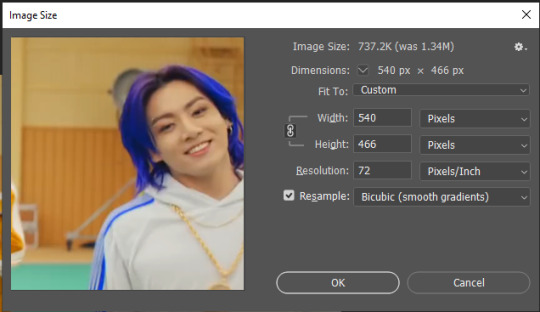
7. Check to see if this is what you want, then resize: go to Image > Image Size to resize the picture. Make sure the little “link” between Width and Height is active (to keep the same aspect ratio), then set the width to 540px or whatever you chose. I always set the resample option to Bicubic.
Once that’s done, set the zoom to 100% right above the timeline, to see what it really looks like.
Almost done! A little note about the sizing: width is the important part for tumblr, but if you want to make a whole gif set (especially with more than 1 gif per row!!!) make sure to make all the gifs the same height, otherwise they won’t line up and tumblr will do whatever it wants.
I ended up making mine 540 x 400 and ended up with this:
8. Time to save the gif!! Go to File > Export > Save for Web (OR just use the shortcut Ctrl + Shift + Alt + S) (or whatever it is on Mac).
In the pop-up, you can change things about the gif, but most things should already be the way you want it (Image size, Looping option forever). Selective should be the default, just like the rest.
You can choose between Pattern and Diffusion, some gif makers swear on one or the other, I go back and forth.
On the bottom left, you can see the size of your gif. Keep an eye on that! I believe Tumblr allows every single gif to be up to 10mb, but I try to keep mine under 5mb or close to it, because I think tumblr adds compression if it gets closer to 10mb?? Anyway back in my day you couldn’t upload anything over 1mb. You’ll never know our struggles.
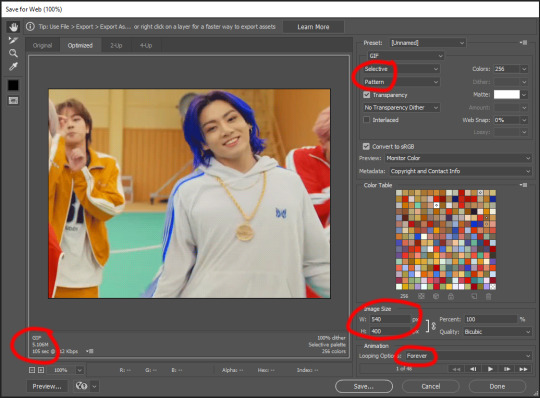
Then just save it, and that’s it, you made a gif! Well done!! Here’s the end result:

:)
#2 Sharpen
There are countless ways out there to make gifs as smooth and clean as possible! Here I’ll show you the easiest way, but it also provides a good basis for other methods. The main difficulty is that you you need to sharpen the layers, but you don’t want to 100 layers one by one. So what we’re gonna do is convert the layers into a Smart Object, which functions as one layer!
1. Convert the frame animation timeline to a video timeline with the little button right underneath on the left:
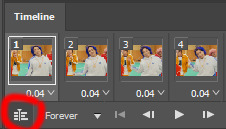
It should look like this, and I’m sorry but I can’t explain this one because I’m not an expert here, but you can just ignore it:
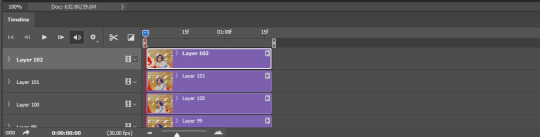
2. Select all layers: Select > All Layers, or just manually.
Then right click on the layers > Convert to Smart Object. Now there’s only one layer left, but don’t worry, the frames are still there!

3. De-noise! It reduces noise, takes away some of that grain. More necessary in some videos. It also makes it less sharp, so I do this one first. Filter > Noise > Reduce Noise

My default settings are, Strength: 6, Preserve Details: 60, Reduce Color Noise: 45, Sharpen Details: 25, Remove JPEG Artifact: No. But you can play around, especially with the strength, and see how the little preview looks. Don’t apply too much of it! Or it will look weirdly smooth with no details in the end.
4. File > Sharpen > Smart Sharpen.
Settings: I usually have mine at Amount: 500, Reduce Noise: 5, and Radius at either 0.2 or 0.3, depending on the video. I’ll actually do 0.3 here, because I find it a bit blurry otherwise. If you sharpen more, it can quickly get grainy.
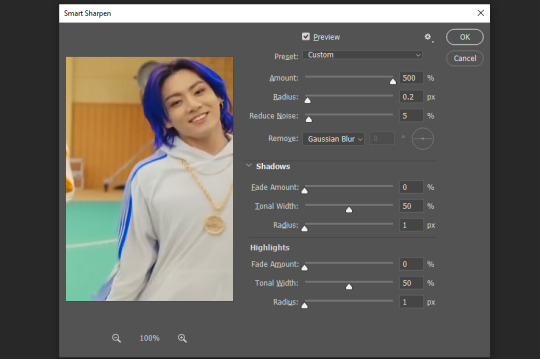
The difference isn’t huge, but here’s a little before and after denoise & sharpen:

5. Technically you can just save it as a gif (save for web) as shown above now, or you can convert it back to a frame animation, which I’d recommend especially if you use certain other sharpening methods (I’ll show you how to convert it back at the end of the colouring part), but for now, let’s go straight to the next part:
#3 Colouring
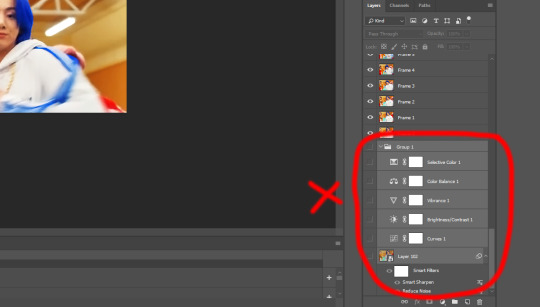
Now, you CAN do this part right after part #1, still in frame animation, without a smart object. I prefer it like this because sometimes PS acts weird, but if you want to skip the smart object stuff: select all frames, and add the adjustment layers at the very top, above all the other layers. (It only affects selected frames; and it only affects the layers under it.)
The adjustment layers should be above the layer tray, and these are the ones we’ll use today: Brightness/Contrast, Curves, Vibrance, Color Balance, Selective Color.
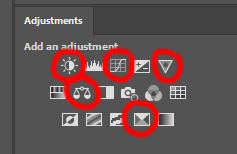
All of these are optional! You can do one, or all, or any combination. This is just the very most basic for me to get a gif to a point that I like. I’d recommend sticking to these for a start, but once you get the hang of it, definitely feel free to play around! It’s fun! Every gif maker has different preferences here, too, so there’s tutorials for everything.
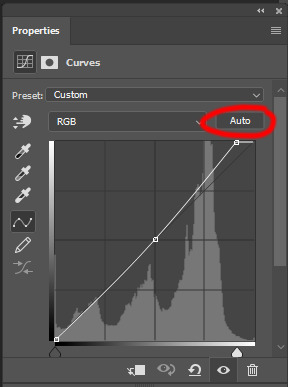
1. Curves: Just click Auto, tbh. You can play around, but Auto works fine for me as a start, just to brighten or darken some parts as a base.

2. Brightness/Contrast: Usually videos are a bit dark, and contrast can help to make it seem sharper AND cut down on gif size, so I usually just up both of them a bit (but not too much! Or it’ll look cheap). Here I put them at B: 19, C: 23


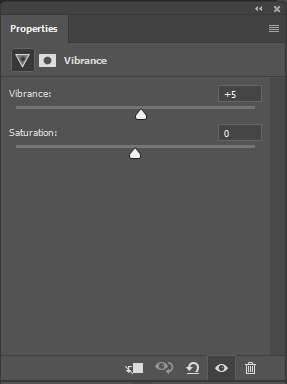
3. Vibrance: I love very vibrant and colourful gifs, so I usually up the vibrance (and sometimes the saturation). This one is already very vibrant, so I only put +5, but if you try to colour, say, a very moody tv show, this can help wonders, especially if you want to work with the colours more later.
If you prefer less vibrant gifs, you can also lower the values here!
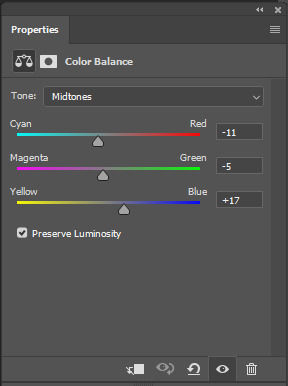
4. Color Balance: getting a bit more complicated now. Often, videos will have a slight yellow or green or blue tint, and this is where you can correct that. This video is a bit yellow, so I added +17 Blue. It was still too warm, so i added -11 Cyan as well. This neutralized the yellow tint, but I wanted some of the reddish tone back, so I added -5 Magenta. I usually do a similar process like that, depending on the tone.
Instead of Midtones, you can also do this for Shadows and Highlights individually.

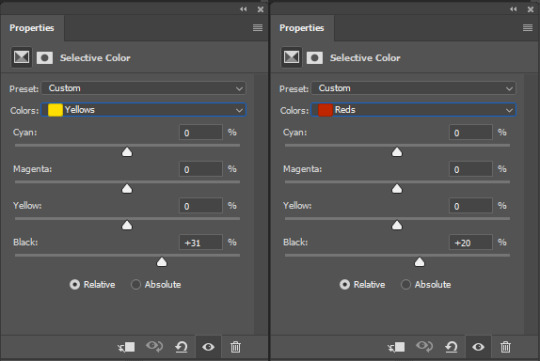
5. Selective Color: now this is the most complicated, but also the most fun to play around in my opinion! Be careful here, if you do something too extreme it’ll look like shit or make the gif super grainy. I some rough goals in mind here: make the blue hair as blue as possible, make their skin tone a bit less pale, and enhance the black and white (which I always do).
You choose a colour at the top, and then add or subtract cyan/magenta/yellow/black values for that colour.
Skin tone: yellow and red. For this gif, I just added black to both, making them darker. Sometimes, if you change one or both those colours for a different part of the gif (for example, if I wanted to make the background less yellow, I’d subtract yellow from the yellows - but then I’d add yellow to the reds, to make the skin tone natural again.)

Blue hair: Just ramp up the cyan for the blues. Be careful with putting anything to +100, but here it’s already so bright that it should be fine. His roots are more purple, so I changed the magentas by adding cyan and black, and subtracting magenta and yellow. It’s not super clean, but fine for our purposes.
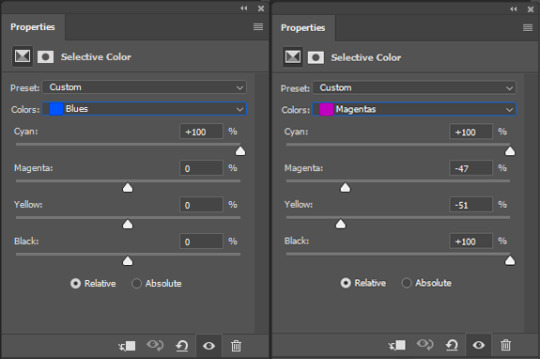

Black/white: depending on the gif, I often either add or subtract black to the whites. Adding makes the highlights less blinding, a bit darker, and flatter (I like to do that if one side of the face is bright white in the sunlight, for example). Subtracting creates contrast, makes it brighter, can wash it out. It can also lessen the gif size, and here it’s mostly just the tracksuit instead of important details, so I subtracted black. For the blacks, I almost always just add a bit of black, to make it more intense. Just like adding contrast, this can make the gif seem sharper and less grainy.

And done!
6. You could just save it as gif now, but as I said, I prefer to convert it back to frame animation timeline first, if only because I like to let it play through before I save it, and it works better for me there than in the video timeline.
Select all frames, then click the little menu on the top right of the video timeline > Convert Frames > Flatten Frames into Clips
7. When you scroll down to the bottom of the layers now, the old smart object + adjustment layers should be at the bottom, under all the new layers. Delete the old ones, we don’t need them anymore.
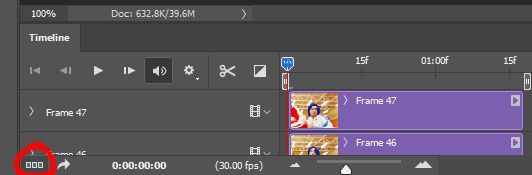
8. Convert the timeline back to frame animation, by clicking the little button at the bottom left of the video timeline:
9. Click on the menu top right of the timeline again > Make Frames from Layers
10. Now, just some potential cleaning left to do. Sometimes, there’s a doubled or empty frame or layer at the beginning or end, just delete those as necessary. The timing of the frames is probably off, too, just select all frames and set the delay time to 0.05 (or whatever).
Now your done! Save as gif, and you should get this:
I included some bonus links and tips after this but tumblr ate that whole part so I guess it’s going into a separate post. (Here is is)
Anyway, I tried to make this as easy to follow as possible for beginners, but feel free to send me an ask for clarification anytime. Hope this helps, now go make gifs and have fun!!
#photoshop#tutorial#gif tutorial#ps tutorial#btsgif#*#*tutorial#this took so much longer than i expected i'm not giffing for at least a week now
228 notes
·
View notes
Text
Pain is Inevitable.
This is kinda lifted from the novel I'm working on. The character, ironically also called Benny, is in the middle of an apocalypse and suffers from mental health stuff. I changed some stuff to fit better with the quote, swapped out the main character for a reader insert, and voila!
Also, I don't know why but I think the tenses are a bit off with this one? But it's a first draft so we're just gonna ignore that. 😅
Pairing: Benny Miller (Triple Frontier) x Neutral Reader
Words: 500
Genre: Angst
Warnings: Mental health, panic/anxiety attack.

“Pain is inevitable. Suffering is optional.” – Haruki Murakami, What I talk about when I talk about Running.
---
Breathing is hard when his lungs are on fire. Each inhale igniting a new match until smoke rose from the flames, suffocating him from the inside.
It was worse than drowning, he guessed. He had never actually drowned before. But at least with drowning there was an end. At some point his chest would overflow with water, stop his heart. At least he’d be dead and wouldn’t have the feel the pain of trying to push out another strangled breath.
But, then again, who was to say this wasn’t the end? Maybe his heart would beat a little faster, another hundred beats and maybe it’ll finally give in after all because, really, how long could a heart go at this rate? Thirty minutes? An hour, tops?
Why won’t this pain stop?
The bed creaks, the mattress dipping behind him. A shadow dances on the wall and he can’t stop watching, silhouettes by the grainy TV playing across the dark room, looming over him like Death in all those movies he’s ever watched and he’s left wondering is this it? Finally? Did his body do something right for once?
‘You doing okay?’ Concern laced your voice though you were trying to hide it.
Could you see the smoke? The thick, black clouds pooling from his ears and nose? Seeping like a house on fire as it desperately clung to its foundations? Flames like dragon’s breath, screaming for help while everyone ran in the opposite directions to grab their pitchforks?
Would you be scared? Would you grab your sword like the rest of them, slay the dragon before it got too big to handle?
‘Ben?’
‘I’m alright.’ No, you’re not. Why would you lie like that? Right to their face, of all things.
‘You haven’t moved in half an hour.’
‘I’m okay.’ See, he even turned back and smiled. May have been a bit wobbly, eyes a bit red as he squinted against the harsh light, but it was proof he was okay. Right?
And either way, you nodded, flashing your own weak little smile that didn’t match the saddened look in your own eyes. ‘Okay.’
You fell into bed next to him, going still and he imagined you staring at the ceiling or watching the sketchy pictures on the screen, Alien or some other movie he couldn’t quite make out from the shitty quality, but hey, it worked and it did enough of a job covering the sound of his pulse hammering in his chest.
The bed creaks, sheets rustling and you’re pressed up against his back. You’re not asleep, he can tell by the way you nuzzle into the crook of his neck, pressing small kisses along the burning skin of his back. He doesn’t really think as he brings your hand to his heart, holding onto you for dear life because at least it reminds him he’s not burning from the inside out.
#jessie writes#triple frontier#triple frontier angst#benny miller#benny miller angst#garrett hedlund#garrett hedlund fanfic
25 notes
·
View notes
Note
Hi! I hope I'm not bothering you, but I love your mood board edits and was wondering if you could explain how you go about making/colouring them? I see lots of places to find gifs but turning them into a set is so hard. Thank you in advance!
hi! first of all thank you so much and second of all it’s not a bother at all! i am happy to give some of my own tips even if my explanation probably isn’t super helpful. i won’t give like a ps tutorial but below the cut (since i included example gifs, it’s VERY long) is my process for my latest jily aesthetic:
i keep track of all my ideas/sets in a spreadsheet (which i won’t show bc there’s a lot of info i’d have to blur/black out) but i always have a list of what scenes i need to gif/what gifs i’m editing and where i’m getting them from. i also include a couple extra ideas in case the gifs i have planned end up being too hard to color or don’t fit in the set. i’ve found it’s best/easiest to start w the list bc there is literally nothing worse than spending hours on a set and then not being able to complete it.
as for actually finding the material, i have a pretty healthy number of scene packs saved in my giffing folder, esp. for things i know i will gif frequently. most of the time i will peruse youtube, vimeo, and instagram for any aesthetic scenes. i also have a lot of gif packs saved specifically for the purpose of making mbs (usually i mix my own gifs w gif packs), if you msg me i’m happy to direct you to some gif packs i use regularly or you can check my #resources tag. a couple tips for finding material:
always opt for download when possible, i used to screen record and the difference when i switched to downloading was astronomical. (it’s easy to lose quality and esp if you’re on mac, quicktime duplicates frames so either you have to manually delete those extras or you get sort of choppy gifs when you load them into ps.)
always use 1080p or better, 720p will work in a pinch for 268px or 177px gifs since you can make up some of that resolution loss with sharpening, but don’t go any lower than that, just love yourself.
for pale sets, look for the right colors. i tend to look for scenes w high color contrast especially if it features poc so it’s easier to color without whitewashing, ie if the subject is a person then i look for light colored or blue/green/violet/white backgrounds. it’ll make your life wayyyyy easier. this also means if you’re making a set try to find scenes with already similar lighting bc you won’t have to work so hard to make it look cohesive.
here’s a quick rundown of what i do before coloring:
import all frames and save all the files in a folder together!!
play around with frame delay so all the gifs are moving at about the same speed, usually keep it between 0.03-0.05s
crop and resize gifs (i use 268x145 most of the time)
convert to timeline
when it comes to coloring it can be really hit or miss, i’ve recently gotten back into my groove but i was having sooo much trouble earlier this year. in general, don’t stress yourself out!! sometimes it’s easier to just find a new scene/gif (hence my list of extras!) than to try too hard to fit a gif into your set. i color all my gifs by scratch (ie no psds) but i tend to follow the same pattern, i’ll explain using these gifs/psd as an example since then i can also explain how to fix white-washing:


first off when you’re coloring gifs with poc always always always make a layer mask so you can compare the edited and unedited skin tones directly! i use the marquee tool to make a selection in the middle of the character’s face, select the folder of my adjustment layers, and hit ‘add vector mask’ (the third button from the left on the layers panel, it’s a white rectangle with a circle in it).
i almost always begin by using hue/saturation layers to highlight and delete certain colors. here i highlighted red and raised the lightness on yellow by a lot since it’s a very yellow scene. then i use a combination of brightness/contrast, levels, and curves layers to brighten the scene. here’s what i have now:

i add a gradient map set to black/white, change the blending to exclusion, and lower the opacity to between 5-10% (depending on the scene) to lighten the contrast further:

then i add back a little depth with selective color in neutrals and blacks:

now i have two main goals: 1. add contrast between the background and the subject, and 2. brighten the scene into a pale gif. to do this, i use color balance to tweak the color of the background, taking out the yellows. this step works best if there’s at least some shade difference between your subject and background, otherwise isolating the two will be impossible. here’s what i have after adding color balance:

i use hue/saturation to selectively highlight the background color. in this case i chose to adjust magenta and used the color picker (the first eyedropper on the left) to identify the exact shade i wanted to lighten. now i have a fairly neutral background and a colorful subject, which gives a sort of pale effect:

and now i use a curves layer and a selective color (white) layer to brighten further:


before i go further, i start fixing white-washing. keep in mind that some variance is normal since you are naturally changing the lighting of the scene; this gif shows it rlly clearly bc of how yellow and dim the lighting is, so some lightening is to be expected. however, both because the vector mask shows a lot of whitening and because i’ve giffed dev patel before and have a general idea of what he looks like in this type of lighting, i know what needs to be fixed, so i go back in under the psd/adjustment layers with a combination of selective color (red and neutral) and hue/saturation layers to darken his skin again:

now that some more contrast has been added in, i can go back to working on the psd and use curves and selective color to play around with the background again:

i use another hue/saturation layer and a black/white gradient to tone down oversaturation:


usually i leave those layers on top, so if i want to make any adjustments (like lightening the background more), i go in under those two. in this case i tweaked the whites and reduced the contrast a little to get this:

again, you can see his skin tone has changed from the original, but variation is to be expected given how much brighter the room is, the fact that i took out a lot of yellow lighting, and the brightening effect of the computer screen in front of him. some other things to keep in mind when coloring:
when you add layers to correct white-washing, you’re likely to end up with overly red/orange skin tones (red-washing). this can be fixed by upping cyans in the reds, desaturating/darkening the reds, or adding b/w or desaturation later on.
when in doubt, it’s better to be darker than lighter (the issue with white-washing is that it promotes colorism, and there is nothing inherently wrong with a darker skin tone) but really. just put in the effort to color poc correctly.
when changing the lighting a lot it helps to look at pictures of the subject in natural/bright lighting, since you get a better idea of what their normal skin tone is.
don’t try to squeeze all your selective color layers into one. you’ll get less grainy gifs if you separate them out and work one by one.
TURN OFF NIGHT SHIFT/NIGHT MODE! yes i KNOW it’s bad for your eyes (especially if you’re like me and gif at night, when the lighting outside isn’t changing every 20 seconds) but your gifs will look VERY different under f.lux or night mode compared to daytime screens. especially if you’re giffing at different times of day, blue light filters can really change the way your coloring appears. best to keep it consistent.
my sharpening settings vary depending on what i’m giffing but in general i do two layers of smart sharpen (500% with radius between 0.2-0.4, 10% with radius at 10px) and then gaussian blur at 2.5px and adjust the opacity so it’s somewhere between 15-20%. i try to strike a balance between smoothing out the graininess from selective color, and sharpening details like clothes and hair. here’s what i ended up with for the gif above:

then i rinse and repeat for the rest of the gifs in the set! i tend to start with the gifs that i know will be hardest to color, which is usually the darker ones (coloring is limited by how much i can brighten the scene) and those that include poc (again, limited by how much i can brighten and adjust the scene’s lighting without white-washing). then i check set cohesion as i go, using those first few gifs as benchmarks. once i have all 8 (or 9 or 10) gifs, i play around with composition and try to balance and vary the subject, colors, and composition of gifs next to each other. i go back and make a couple of adjustments here and there according to what i observe and what i think might improve the overall appearance.
and that’s pretty much it! i hope this was helpful, if you have other questions feel free to message me and i’d be happy to help/troubleshoot. happy giffing!
#Anonymous#*#resources#answered#sorry this was sO long but i hope it helped on the coloring end#tbh i exceeded my own expectations with the dev gif lol#yeahps#completeresources#chaoticresources#tutorial#coloring tutorial
54 notes
·
View notes
Link
It was clear from the beginning what Shayne Oliver was trying to convey with Hood By Air, a brand he founded in 2006 with Raul Lopez that was originally named Elite Urban Brigade. At one of their first fashion shows, which took place at New York Fashion Week in 2007, Mobolaji Dawodu, The Fader’s former style editor-at-large, asked Oliver where he saw Hood By Air going. Oliver, then 18, who looks cherubic in the grainy clip, said he wanted to create a lifestyle brand for the new generation that appreciates what’s going on in the streets, but understands urban culture influences the mainstream.
In that moment, Oliver prophesized the impact his brand would have on an industry that spent years looking to Black communities for cues, but rarely exalted the culture, credited it, or brought people from it into the fold. But the 2010s changed that, and the generation Oliver spoke of 12 years ago became the designers private equity firms want to invest in, luxury brands want to partner with, and stores want to carry.
When something is happening, it’s hard to assess its influence, but as the decade comes to a close, it’s apparent that Hood By Air helped create the luxury streetwear category that’s been fueling fashion. You can’t think about the last 10 years without thinking about Hood By Air, which defined style and trends for almost half the decade. Oliver put his very Black, very queer, and very cool world on a pedestal and changed the way brands design, the way retailers merchandise their stores, they way companies approach casting, and, for many, the way they see themselves and their place in fashion.
“SHAYNE OLIVER’S EXISTENCE AND THE CULTURE THAT CREATED HOOD BY AIR, IN MY MIND, ARE VITAL TO WHAT WE HAVE TODAY AS A MIXTURE OF FASHION AND SO-CALLED STREETWEAR.” - VIRGIL ABLOH
“Shayne Oliver’s existence and the culture that created Hood By Air in my mind are vital to what we have today as a mixture of fashion and so-called streetwear,” writes Virgil Abloh, founder of Off-White and artistic director of Louis Vuitton men’s, over email. “In one word, I would say HBA and Shayne’s vision showed the fashion system at large what the word freedom meant. From garments to runway shows, everything exudes freedom.”
Musician Ian Isiah, a longtime member of the Hood By Air collective, calls 2007 HBA’s official birth year. Urban fashion brands like Sean John, Baby Phat, and Rocawear hit a peak in the late ’90s and early 2000s, but lost their cachet—most of them expanded distribution to department stores like Macy’s. Isiah says there was a void of Black-led brands, and Hood By Air was an attempt to fill it. Dominican tailors made Hood By Air’s first T-shirts and they retailed around $200, which wasn’t typical at the time. The initial T-shirts, which were sold out of aNYThing, a now-closed streetwear brand and store on Manhattan’s Lower East Side, were meant to transition from day to night, another new concept. HBA also became known for a plexiglass Hood By Air nameplate necklace that Kid Cudi wore and Kanye West purchased from Seven New York.
Isiah says although the brand was stocked in a couple of stores, their main priority was “selling it to culture and getting it on the right girls and in the right looks.” GHE20G0TH1K (pronounced “ghetto gothic”), a party series founded by Jazmin Soto, better known as Venus X, in 2009, embodied that culture. Oliver DJed on some nights for a crowd made up of streetwear kids, punks, and queer folks. They would all wear HBA. ASAP Rocky was also a part of that culture Isiah mentioned. Isiah says they met Rocky through Jabari Shelton, better known as ASAP Bari, who would bring his friends from Harlem downtown—members of the ASAP Mob appeared in one of HBA’s early lookbooks. Rocky, who would mix brands like Rick Owens and Hood By Air with Jeremy Scott’s Adidas sneakers and Supreme, adopted the line early on, which brought it greater visibility and hype. The brand went on a hiatus in 2009 and became almost a collector’s item for those in the know.
POST CONTINUES BELOW
“It was sort of like this thing that everyone was still talking about but no one knew how to get it,” says Zachary Ching, Oliver’s longtime friend. “They didn’t have a website. There wasn’t even an Instagram. It was just like this mythical thing that you would see someone wearing once.”
Because of the buzz surrounding the brand, Ching called Oliver as soon as he was tasked with turning VFILES’ space on Mercer into a store, but Oliver, who was taking a break from the line to tour with GHE20G0TH1K, didn’t have any product. VFILES produced the pieces and purchased them from Oliver—Ching remembers ordering about 500 T-shirts across six styles—and on June 12, 2012, VFILES held an opening party for the shop that seconded as an HBA relaunch event. Oliver and Venus DJ’d, ASAP Rocky performed—most of the ASAP Mob came through—and on that night both HBA and VFILES were solidified as relevant movements in fashion. Following the party, the HBA pieces sold out within two days, and VFILES had to upgrade its payment systems to accommodate demand, which Ching describes as bananas.
“It was a pivotal moment in VFILES’ history,” says Julie Anne Quay, the founder of VFILES. “To physically see both the community come together, celebrate one of their peers, and shop it was really rewarding to me. It further galvanized me in my passion to really build VFILES into this community platform that was unlike the traditional fashion world at large and embraced a community that I thought was not only overlooked, but was disrespected.”
“IT WAS SORT OF LIKE THIS THING THAT EVERYONE WAS STILL TALKING ABOUT BUT NO ONE KNEW HOW TO GET IT.” - ZACHARY CHING
POST CONTINUES BELOW
Hood By Air helped set the tone for VFILES’ assortment, which eventually included Abloh’s Pyrex, which transitioned to Off-White, Been Trill, and Fear of God—this was before luxury department stores picked them up. Been Trill and Hood By Air even released a collaborative T-shirt in early 2013, which Oliver said started out as a brunch gift for friends and family but turned into something bigger without him knowing. Because celebrities like ASAP Rocky wore HBA and it had an aesthetic and name that resonated with the hood, Danielle Greco, who managed VFILES at the time, says the early consumers who lined up for the product—she describes them as “big, burly, tough men”—probably had no idea who Oliver was or what some of his messaging and graphics meant. Oliver said many of the logo placements for HBA were inspired by documentaries on gays in prison.
“Streetwear was very much a boys’ lane, and all of the brands that were trending at the time spoke to a very straight man’s world,” says Vashtie Kola, who met Oliver and Lopez in the early 2000s and hosted a Hood By Air TV series on her blog. “I remember they made a tank top with the term ‘Realness’ on it, which comes from the ball scene. And so I remember straight boys wearing tank tops that said realness or banjee. It was really nice to see.”
Because HBA was doing so well, VFILES and MADE helped Oliver secure an official spot on the New York Fashion Week calendar at Milk Studios in September 2013. It was Oliver’s big introduction to the industry and a chance to bring showgoers, who included Abloh, fashion editors, and longtime friends of the brand like Kola, into his world. The music was loud, the lights were dark, and the models weren’t A-typical. Boychild, a trans performance artist, jerked her body in a haunting way as she walked down the runway. This was followed by an appearance by ASAP Rocky, who closed the show wearing a neoprene Hood By Air Jacket. Kevin Amato, a photographer who had never worked on fashion shows until he met Oliver, handled the casting, which became a hallmark of HBA.
“The Hood By Air narrative for me was always just the underrepresented, really,” says Amato, who was casting from the streets. “And that’s what I tried to do with the casting. It was very organic. Rocky wanted to walk the show, but we didn’t just want a celebrity to walk the show. So we cast Boychild and had this contrast of different people and cultures colliding. It wasn’t meant to be hype. But I think after HBA and the casting, the whole fucking industry changed.” You now see this gender-fluid casting from luxury houses like Gucci and Balenciaga. The Yeezy Season 3 collection/Life of Pablo listening party at Madison Square Garden in 2016 featured a mix of professional models and real people, in 2017 Nike dedicated a campaign to voguing, and Victoria’s Secret recently cast its first transgender model, Valentina Sampaio.
In 2013, style was moving beyond the heritage #menswear look. The Watch the Throne Tour with JAY-Z and Kanye West had just ended, ushering a dark, goth aesthetic into streetwear with brands like En Noir and Black Scale. Riccardo Tisci’s Givenchy T-shirts and hoodies were popular—his rottweiler graphic was a hit—and Hedi Slimane’s pieces for Saint Laurent—skinny jeans, tailored coats, and flannel shirts—were selling well at retail.
POST CONTINUES BELOW
Most consumers had known HBA for its T-shirts, but after this show, it was clear HBA wasn’t operating in the same space as its peers. Oliver was playing with gender fluidity before it became a talking point and presenting new silhouettes that played on the familiar, but elevated it. Long-sleeve leather shirts with zipper closures right below the chest could be worn open or closed, depending on the situation; puffer jackets were recreated into capes; and collared shirts were covered in HBA logos. The New York Times’ Guy Trebay questioned if Alexander Wang and Tisci took notes from Hood By Air.
“It was definitely a reinvention. It wasn't a copy-and-paste, which is commonly seen these days,” says Kola. “Shayne understood the hood, but also had aspirations of creating his own unique look and vision. He merged those two worlds so effortlessly.”
Jennifer Williams, wife of Matthew Williams, who was part of Been Trill at the time, handled sales and started showing the line to buyers in Paris, which is where Wanda Colon, Barneys New York’s former vice president of menswear, discovered HBA. Colon says at the time, the luxury/contemporary category was dormant, and the brands Barneys was selling felt “safe and a bit staid.”
“I felt there was an opportunity to offer our customer a new point of view as it related to menswear beyond the brands that were being offered,” says Colon, who purchased the collection. “HBA filled a void in the industry that wasn't being addressed. The brand came to embody the mid-2000s zeitgeist of hybrid XXL silhouettes, deconstructed streetwear, couture fabrics, immaculate tailoring, genderless silhouettes, and big logos—Shayne was there first.”
The HBA merch plan included Hood By Air Classics, which made hood basics like tall T-shirts and sweatshirts, investment pieces, and the more progressive ready-to-wear line, which reconstructed and recontextualized American sportswear. Ching says this changed the way department stores looked.
POST CONTINUES BELOW
“Because of Hood By Air, you go into Barneys and look at a designer section and it has hoodies and sweatpants,” says Ching. “Hood By Air was like a crazy statement jacket, but then you had amazing T-shirts and graphic hoodies to go along with it. And you didn’t feel like you were wearing a Stüssy hoodie.”
On a cultural level, Oliver was a designer who wasn’t typically touted in fashion—he was Black, gay, didn’t have a degree from Parsons or financial backing from his parents. He also represented a movement that was happening in the background. Robin Givhan, fashion critic at the Washington Post, remembers being struck by how he and his team had been able to grab the attention of the industry in an aggressive way with clothes that she says, initially, weren’t well made, but had a bigger story to tell.
“It felt like it was shaking up the industry out of its doldrums and pushing it on a different course,” says Givhan. “The industry needed something that speaks to a moment that was demanding diversity, questioning gender identity, questioning the path that the next generation of designers were going to take the industry on, and into that giant question mark stepped Shayne and Hood By Air.”
While Hood By Air’s star was rising, so was ASAP Rocky’s, and his influence on fashion started to take hold. But in his song “Multiply,” released in 2014, he called HBA weak, and said Been Trill “was booty like ‘Tip Drill.’” At first, Rocky told Complex in 2015 that he dissed both brands because he wasn’t getting the acknowledgement he felt he deserved from them. But he recently revealed he was upset because he asked for ownership in HBA and Oliver said no. "You don't ask Rick to put you on an official level if you wear Rick Owens. You're wearing Rick and that's it. Why is it not the same with us?" aksed Oliver in an interview with Kerwin Frost and Isiah. Years later, Rocky called up Oliver and apologized. But the fashion industry was still intrigued, and Oliver won the inaugural LVMH Prize in 2014 and the Council of Fashion Designers of America’s Swarovski Award for Menswear in 2015.
Isiah says they were skeptical of the recognition, but happy about it, since it supported the idea of giving the underrepresented a seat at the table in fashion after years of going unrecognized. The awards were helpful, but not knowing how to deal with a new brand like HBA, the CFDA would suggest traditional business structures that weren’t in line with how HBA wanted to grow.
HBA had always been a collective, but it became more fully formed before and after the 2013 fashion show at Milk Studios. Leilah Weinraub, a filmmaker who was the acting chief executive officer; Isiah, HBA’s brand ambassador; and Amato, who continued to handle casting, remained on board. Newer additions included Ching, who left VFILES to join HBA full time as commercial director. He looked over T-shirts, jeans, hoodies, and graphic T-shirts so Oliver could focus on fashion pieces. Paul Cupo came on as design director to help elevate construction, and Akeem Smith joined as a stylist. Smith says that when he came on, HBA was going through a transitional phase and Oliver gave him free range “to add some more faggotry to the mix and add more chic elements to the brand.” By this time, HBA was showing about four times a year in New York and Paris. Oliver was the father of the house. He had the vision for HBA, and everyone brought their particular expertise to the table.
“It was almost like living in a nomadic community. Wherever it took us, we went and it just worked out. We were never starving, but I think any creative knows that money's not the motive. It was more about building,” says Amato.
Making money was not a primary concern for Oliver in the beginning. The brand was approached early on about investment, but Weinraub told the New Yorker she wanted to remain independent for as long as possible. HBA worked with Edison Chen for a little in Asia, where the brand was wildly popular—Chen brought it to Yo’Hood, a streetwear festival in China. Ching remembers K-pop stars coming to VFILES and buying up all the HBA, and walking through China and seeing the craziest HBA bootleg T-shirts with Hello Kitty on them. In 2014, Oliver partnered with the New Guards Group and moved HBA’s headquarters to Milan. The New Guards Group, the parent company of Off-White, Palm Angels, and Heron Preston, which was acquired by Farfetch earlier this year, handled HBA’s production, distribution, and sales. Everyone from HBA lived in a monastery, and during the day they worked out of a compound alongside Abloh, who produced graphics for HBA’s third major collection. "I was just like, 'Wait, who is this tall African man playing beats in the other room in this Italian studio?'" says Isiah.
POST CONTINUES BELOW
Isiah says he was hesitant about signing with the New Guards Group and that he and Oliver got into arguments about it, but he opened up to the idea. “Instead of working so hard and spending so much money to get 10 samples made in New York, we were now making 100 samples in Italy. It opened up our inventory,” he says.
The shows also got more sophisticated and ideas were better executed. In January 2015, at Pitti Uomo 87, which was Hood By Air’s first show under the New Guards Group, they took over a villa in Tuscany but outfitted the space with strobe lights, smoke machines, a DJ, Venus X, and a neon HBA light logo. The show was dominated by tailored pieces with a Hood By Air spin. Showing in Europe also helped some in the industry view Hood By Air as less of an underground group of misfits and more as a viable brand that presents new fashion concepts. At other shows, celebrities like Whoopi Goldberg, Rick Ross, Jaden Smith, and Naomi Campbell sat front row. Givhan says construction improved, but the show production, which compelled her to the brand, got increasingly tamer. She called it a smart decision to focus more on the clothes, but she did notice growing pains.
“I think they struggled, but I think that’s OK. Brands take a long time for full gestation,” says Givhan. “I think the industry is a bit like a voracious monster sometimes. And it has a tendency to gobble up new ideas and to elevate them sometimes before they are fully baked.”
By then, Amato had left the company due to a death in the family, but he observed HBA’s evolution from afar. Some things he liked, and some things he didn’t. He thought the casting, which was handled by his apprentice Walter Pearce, got more weird, less authentic. And he felt like other brands were trying to get next to HBA for attention.
POST CONTINUES BELOW
“Once business is popping and everything's crazy, it kind of loses some of the main vision, but that happens with every brand,” says Amato. “Instagram was new and it was just a way to strategically align yourself with a brand, and then, boom, all of a sudden, you're in the game. Like Been Trill was a movement, but was it a movement?”
From the inside, Ching also noticed changes. Sales were going well and distribution got wider. Once HBA partnered with the New Guards Group, it had 250 stockists, up from 50 in less than three years. At the end of each season, they would assess what stores they would drop and how to edit down different stores’ orders.
“It was always trying to control distribution, which I think towards the end got a little out of hand,” says Ching. “It was too easy to get it and shit was going on sale. It wasn't cute. It, like, really blew up, and then, you know, the market can only take so much.”
While at the New Guards Group, Hood By Air was selling a lot of product, but not the product they thought best represented the brand. Oliver told Numéro there was miscommunication between the business side of things and the management and a lot of decisions were made in a "very panicky way." A clear business structure was never created for HBA within the group, so after a few seasons, HBA got out of the deal. In 2016, Oliver came back to New York wanting to position HBA as a conceptual fashion brand, not just a hype, of-the-moment line. Ching eventually left because he didn’t feel job security anymore, and in early 2017 HBA canceled its Paris show, which led to rumors that there were issues. In March, Helmut Lang announced Isabella Burley, Dazed magazine’s editor-in-chief, would be the brand’s editor-in-residence. She tapped Oliver to design a Helmut Lang capsule collection to show in September 2017. In April, Hood By Air released a statement that the brand would go on hiatus.
“THEY DON’T KNOW HOW TO TITLE WITHOUT OFFENDING. SO, IT’S LIKE, ‘OH, HE’S IN FASHION? HE’S MAKING T-SHIRTS? THERE’S HIP-HOP INVOLVED? HE’S A HYPE DESIGNER.’” - IAN ISIAH
“I was so excited,” says Isiah about Oliver putting things on pause. “We needed a break. It was mood board overload. The culture couldn’t even keep up. We’ve already created so many daughters in so many fields, so it was time for them to flourish and grow. It was time for Virgil to flourish and grow. It was time for Heron to flourish and grow. It was time for Alyx to be born and then flourish and grow. The empire had to go silent for everyone else to rise as their own empire.”
In the midst of HBA’s trajectory, the industry was reaping the rewards of a market they helped form. Demna Gvasalia of Vetements, which was positioned as a collective of designers who embraced streetwear sensibilities, was named the creative director of Balenciaga, a position previously held by New York designer Alexander Wang. Gvasalia also won the same LVMH award Oliver received a year prior. And eventually Louis Vuitton tapped Abloh as their artistic director of men’s. Oliver went on to design capsule collections for brands like Diesel and Helmut Lang, but people, including Kanye West, questioned why the Helmut Lang partnership wasn’t longer or why Oliver wasn’t being propped up for a bigger luxury brand.
“When I saw it coming, it read to me that you had become the creative director of Helmut Lang —and it read to other people that way, too,” West said while speaking with Oliver earlier this year for Interview Magazine. “And it felt right, and it felt deserved. The reason I’m on the phone with you right now is that, of our generation of designers, you are the strongest of all of us. Of this entire crew that came up around the same time, you are the most deserving of one of these positions.”
POST CONTINUES BELOW
In a ShowStudio panel discussing the Spring/Summer 2018 collection for Helmut Lang Seen by Shayne Oliver, you get a better sense of how the industry views Oliver and Hood By Air. Olga Kuryshchuk, a Central Saint Martins graduate, founder, and editor-in-chief of 1Granary, a student magazine and showroom, says Oliver was chosen for his hype, not for his design skills. She later offered that no one would reference the collection because it wouldn’t present any new ideas—Oliver told Numéro that because it was only a capsule, it made sense to curate rather than produce something new. Towards the end, Georgina Evans, an editor at ShowStudio, makes a distinction of asking which graduates, not just designers, could take on the role after Oliver. Another panelists suggests that Helmut Lang should look to school in Europe and maybe not one in America or Britain—her logic was although Helmut Lang is identified as an American brand, Lang was Austrian. The video underscored the industry’s tendency to look towards the same funnels or type of person for talent.
“They don’t know how to actually title without offending,” says Isiah. “So it’s like, ‘Oh, Shayne’s a hype designer. Oh, he’s in fashion? He’s making T-shirts? There’s hip hop involved? They’re voguing? He’s a hype designer.’”
Givhan says the most accepted route to lead designer jobs at larger houses is usually graduating from design school, getting a job working for a larger designer, and then being considered for the job when someone retires or passes away. She believes it’s more challenging for designers of color to get into that pipeline and be considered for those positions, but she does think the industry is making progress. She references Abloh going to Louis Vuitton.
In 2019, Oliver announced the relaunch of Hood By Air. Plans around the reboot haven’t been explained in detail, but from different interviews, Oliver seems interested in developing a solid business structure, ensuring that HBA is seen as more than a T-shirt and hoodie brand, and providing a platform for youth to create and not be taken advantage of. Amato, who had dinner with Oliver in Los Angeles a couple of months ago, says he doesn’t want to make any sacrifices this time. “He said it has to be 500 percent or nothing, which I think is the best way to go. I mean, his vision is so strong that it’s hard to even explain half the shit he’s thinking,” says Amato.
The original collective is still cool, but they’ve moved on to other things. Isiah is traveling the world singing and sitting front row at fashion shows—he sang with Dev Hynes at Abloh’s second show for Louis Vuitton. Amato is doing less casting and more artistic directing on projects like Travis Scott’s Rodeo album. Smith is the fashion editor-at-large for Dazed magazine, Cupo is freelancing for different companies, and Weinraub’s film, Shakedown, was a part of the 2017 Whitney Biennial.
And Kola, who was voguing with Oliver and Lopez in her apartment just before the decade started, is no longer just a downtown sweetheart. She travels the world DJing, has her own Jordan, and is paid by brands for her influence—the same influence Oliver talked about at his first fashion show over 10 years ago. When asked what she thought when Oliver said HBA was taking a break, she can’t recall how she felt, exactly. She starts and stops her answer, trying to find the right words to describe her feelings around the hiatus. But when asked about his impending return, she perks up, knowing exactly what to say and how to say it.
“I’m all for it,” says Kola. “I feel like a lot of other brands and designers were birthed from his movement. So I feel like mutha needs to come back and take care of these children she birthed!”
17 notes
·
View notes
Text
Prologue/bg. part one. part two. part three:
~
He moves safe houses that night, driving out of town and down the highway until the sun is high in the sky and he’s another state away. It’s painful leaving the food--waste not, want not, his parents always said--but he can’t trust it not to be poisoned. Though his body could theoretically handle it, he’s not in the mood to be out of commission for eight hours while his system beats the toxin into submission.
He spends the drive trying to think of new ways to evade detection, rifling through one plan after another. This kind of thing was always Gabriel’s strong suit--
--Jack shakes the thought away, focuses on the traffic. That way leaves nothing but heartache.
He holes up in a former Blackwatch hideout. The keypad flashes the old “not in use” signal up at him when he types in its code, but it’s obvious someone has been using it as an intermittent base. It smells faintly of candle smoke, and the pistol strapped under the mattress just came out this year. Pictures are taped up in the bathroom--flowers, the corner of a girl’s smile, gloved hands flashing peace signs. Nothing incriminating, but enough to make it feel lived-in.
Jack makes sure to change the keypad signal to “occupied.” He’ll move out tomorrow, but for now he just wants to sleep. With luck, if the original occupants show up, they’ll remember 76 fondly.
He’s just settling into bed when the phone beeps. He stares at it, wondering why he didn’t just throw the damn thing away. It beeps again, and then begins singing a cheerful little tune. “Eschúchame! Eschúchame!”
With a groan, Jack rolls over and flips it on. Luckily, it’s just a text. He doesn’t think he could stand listening to Sombra right now.
We have a file of our initial findings for you. It’s followed by an address and a helpful little map.
Not meeting you, Jack types back.
One hour meeting window. 400 to 500.
Fuck you, Jack types, with perhaps more vehemence than necessary, and shoves the phone under the mattress.
~
He decides to go anyway, cursing his curiosity. There’s a nonzero chance of it being a trap.
At least being in a Blackwatch hideout means he’s not walking in blind.
There’s a little drone with a camera that Jack sends in around three am to map the area and send back initial recon information. The address turns out to be for a storage warehouse full of shrink wrapped palettes. There’s plenty of cover for a shootout, and the walls are flimsy enough that if needed, he could break his way out. Jack settles the drone in the rafters and falls back asleep for an hour.
When he wakes back up, there’s only one person waiting for him: the hooded shape of the Reaper, leaning casually against the wall and idly inspecting his claws. Jack narrows his eyes at the grainy figure and decides that the bastard can wait, and sleeps another half hour.
When he finally leaves the hideout, it’s looking like he’ll be late for the rendezvous. Some buried part of Jack protests the lack of punctuality, but he’s not Strike Commander anymore. 76 isn’t beholden to schedules unless he wants to be.
The drive is spent turning potential tactics over in his head, and when that’s exhausted, he begins puzzling over the... cleaning thing. There’s no reason for two Talon operatives to tidy up his safe houses. No reason to bring him food or make his bed or organize the desk so everything is easy for him to find. Unless it’s their way of playing with his head, showing him how little of a threat he is, toying with him like a cat with a mouse...
Jack snarls to himself. This mouse has a pulse cannon and isn’t afraid to use it.
Mind games are more Sombra’s field, though. Reaper tends to be as straightforwards as a shotgun blast to the face. There’s no benefit for him in this, as far as Jack can tell.
Might as well ask the damned skeleton himself. Jack pulls into the warehouse’s parking lot and strides to its door, takes a moment to make sure his pulse cannon is fully charged, and shoulders his way inside.
The Reaper is waiting, flipping a data stick from one hand to another. “You’re late,” he states, the mask staring unblinkingly up at Jack.
“Where’s your friend?” Jack shoots back, gaze flicking around the warehouse.
“Busy.” Reaper holds out the data stick. “Here.”
Jack doesn’t take the file. Narrowing his eyes, he growls, “What’s your game here?”
“There’s no game.”
“Bullshit,” Jack snaps. “What’s your angle? What’re you getting out of this? You can’t tell me you’ve been cleaning my rooms out of the fucking goodness of your heart.”
The Reaper’s claws twitch on the file, but he keeps his arm outstretched. “We told you, our information pooled is better than--”
“Stop lying,” Jack hisses, and lunges forwards. Sue him--he’s running on six hours of sleep and his safe houses have been compromised and he wants some answers, dammit. “You really think I believe you turning on Talon after watching you do their dirty work for six years?”
Reaper twists as they hit the ground, slipping out of Jack’s grasp and stepping back. “Gathering information for six years,” he hisses. “You don’t topple an organization like this overnight!”
“You did pretty well with Overwatch,” Jack growls back.
Reaper's claws twitch, and the noise that comes out of him is barely human. “I did not cause Zurich.”
“Tell that to the dead,” and Jack ducks under those claws, manages to get his hands around Reaper’s neck. It’s easier than it should be to lift him in the air--he’s lighter than expected, but he also doesn’t fight back, just snarls through a tightening windpipe.
“You idiot,” Reaper rasps. “I didn’t cause Zurich.” He claws at the mask, and when it falls free the sight is--
“Told you,” Reaper grins, all fangs and flayed muscle, single eye smoldering like a live coal. “Zurich caused me.”
“Fuck,” Jack breathes, staring at the raw flesh in front of him. He almost loses his grip, and Reaper seems to notice--eye flicks down and then up again, grin widening. Jack growls, and tightens his hands around Reaper’s neck. “So you messed up and got caught in your own blast--”
“They took everything from me!”
There’s a silence. Jack’s head rings from Reaper’s howl. Reaper himself looks surprised at his own outburst.
“They took everything,” Reaper repeats, quieter. His claws twitch against his mask. His single eye darts to the side and back and away again, as if searching for a way to change the subject. He finally glances down at 76 and huffs a mirthless laugh, mutters, “You’re still so sloppy. Emotion gets ahold of you and you lose your gun.”
The comment stings, but more than that-- “Still?”
Reaper freezes, and without the mask, it’s easier to read the mangled expression as a flash of panic. It smoothes out in a second, and Reaper says, “I knew you. Before.” He cocks his head, a growl winding through his voice. “You want to know why I want to take down Talon, 76? They took my--they took Overwatch from me. And it was my life.”
Jack feels a slow, dawning realization. “You were an agent.” But to have known him as 76 and not the Strike Commander, to have been in Zurich and immediately chosen to go undercover as a double agent-- “You were a Blackwatch agent.”
“Once.” Reaper finally slips his mask back on.
Belatedly, Jack lowers him down to the ground. He stares at Reaper’s figure, trying to place the wide shoulders and narrow waist (Gabriel, part of him sings, but Gabriel is dead and gone). “You said you knew me?”
“You worked with us.” Reaper’s mask focuses somewhere to the left of Jack′s face, as if he’s searching for something. “You worked with Overwatch--”
“I’m not a part of Overwatch,” Jack snaps, reflexively.
“Someone called you mother hen,” Reaper continues, almost to himself. The old nickname sparks right at the sore spot in Jack’s heart, and makes him glad the visor hides his eyes. “You helped us. You...” His mask refocuses. “You can help us now.”
"I don’t know you,” Jack manages. But he does know mother hen, knows the memory of Blackwatch’s junior agents teasing 76 just to make their commander laugh at his lover’s mock-frustration. It feels like centuries ago. He swallows. “Which agent were you? I can’t--”
“I don’t know.” Reaper huffs a mirthless laugh, gestures at his face. “Things got lost, after Zurich.”
Jack should know. Jack should recognize this agent, probably laughed with him, might have even dragged him back onto a plane after a mission went wrong, might have been teased by him after a mission went right and he and Gabe--
“The housekeeping,” he croaks. “You all-- you’d take turns doing that for each other. Ga--the commander would walk into a room and just start tidying. Is that why--”
This time, Reaper’s laugh is a little more genuine. “Old habits die hard, I guess.” He cocks his head. Jack gets the feeling he’s staring hard at the visor, trying to read his expression. “You believe me now.”
“Yeah.” Jack bends down, picks up the file. “Yeah, I do."
“You’ll help us?”
It’s what Gabriel would have wanted. It’s what 76 would have done, all those years ago. “Yeah,” Jack says, and offers his hand. Reaper takes it, cool leather against his palm, claws curling carefully around his wrist. They shake, and it feels--
( we got a deal, Jackie, Gabe laughs, warm fingers against his)
“Yeah,” Jack says. “I’ll help.”
96 notes
·
View notes
Note
henlo! can u post a gif tutorial cause your gifs are so pretty and look amazing, even on mobile which messes up with everythjng 😆
ahh anon u flatter me!! thank you for your kind words!!! i honestly have ways to go, but it means a lot that u say this thank you
so for starters i have a mac + photoshop cs5 so a lot of this tutorial will be based on what you do for that, but i’m sure u could do the same thing on pcs (actually pcs have more programs available so i highly recommend, if u have a pc, finding a tutorial that is based around pcs) and other photoshop versions too! but i think the general process is still the same, a different tutorial might just be more nuanced^^
1. Finding/downloading your video~so for normal mp4 videos on youtube i use this website. it’s pretty useful it can download from actually a wide variety of sites like naver (up till 1080p!) ~for v app videos i use this site~ts files i find on kpopexciting or kpop24hrs (u need an account for kpop24hrs i think to download video but! signing up isnt difficult and its nothing fishy. i use it a lot esp for older ts files it has a good archive, kpopexciting tends to be faster though.)~the higher quality files you find the better! i find that it tends to go mp4~honestly finding the right high quality video is a HUGE part of making gifs look nice2. Extracting your video~there are many many many ways to extract your video but I highly recommend downloading avisynth! There are ways to download it for pc! avisynth is beautiful because it doesn’t really reduce the quality of your video to the extent that photoshop does, plus it can extract 60fps from ts files. some gifs ive made through avisynth ( x x x ) if you’re interested in avisynth further, tumblr user @/brandinator is a good place to start! if you want to know more regarding how to use it and a different tutorial through that, let me know! ~now i’m not sure if there is an avisynth tutorial for mac anymore, BUT theres another great program, vapoursynth, that mac users can look into. here’s a tutorial that i’ve found~Before I got avisynth I used VLC player for ts files but I had to basically screenshot each frame individually. Some gifs I’ve made through this method ( x x x ). these gifs are 60fps only bc i found a user who uploaded the ts file in 60fps. usually you cant get 60fps w/o avisynth. but this is also me saying that if you cant get avisynth or vapoursynth, there are still ways to work around it i think! one of my fav giffers for the longest time didnt use either!! and sharpening and coloring were always on point.~I think pcs can use kmplayer? id look into that if you have a pc~for normal mp4 videos I just use photoshops ‘import video frames to layers’ option (under file in the menubar)! you can use avisynth as well, but for me it takes forever to extract what i want in avisynth (minimum like a minute ish), whereas ps can get the part of the video i want to gif in a couple of seconds. I think it’s self explanatory but basically you find the video you want to extract, find where u want ur gif to start, and for photoshop cs5, you hit the ‘shift’ key and let the part u want giffed in the video play. when youre done u lift the shift key and hit ‘ok’ (idk if it differs for different versions of ps). i extract all!!! frames!! it makes it look smoother too :)
3. Coloring/Sharpening/Cropping/Etc~now this is the step that I can’t really give a tutorial on because honestly it varies for everyone! but i feel that this is the step that a lot of ppl need guidance with (me included) because it is the hardest step, probably because it is so ‘up in the air’ for lack of a better word? there is no one right way of doing it the possibilities are literally endless but here are some tips~Coloring: ~most important rule: don’t whitewash ur gifs!! ~other than that, the world is yours. ~honestly have fun with this part! coloring is something that i haven’t fully learned yet ~i tend to play around mainly with the curves, selective color, hue/saturation, and color balance layers ~you can also download psds other ppl have made (i dont do this myself) and use those! ~also i feel that a lot of the times, the right coloring can make ur gif seem higher quality. coloring can also play a role in reducing gif size if u do it correctly. ~honestly this part is just a lot of experimentation, over the course of a gifset and over the course of time in general. some people find their coloring style easily, but i was not one of those people. ive spent a lot of time trying to figure out how to adjust what layers to get the colors that i want and i think only as of this era ive been able to execute the coloring i had pictured in my mind. so patience is a virtue!!! ~Sharpening: ~ah yes my biggest enemy: sharpening ~first things first, i sharpen my gifs using smart sharpen + topaz ~settings for my smart sharpen are 500%; 0.4 ~check the box that says ‘more accurate’ and i personally remove ‘gaussian blur’ ~some people also use topaz denoise, and/or topaz clean ~ honestly topaz is a lifesaver for me bc it smoothes out a lot of grain that can be introduced via coloring! also!!! it can reduce gif size by a lot!!!!!!!!!!! ~on topaz denoise i hit the ‘light’ setting on the side and adjust the settings accordingly ~idk how to use topaz clean even though I have it, because it refuses to work ~to apply topaz you have to hit ‘flatten frames into layers’ ~some gifs i’ve made with just topaz and no avisynth ( x x x x) ~there are ways to make it look nice without topaz but i’ve forgotten how after i got it ~id duplicate the frame then use smart sharpen and ‘gaussian blur’ under ‘blur’ ~then adjust the opacity levels in some way. ~my settings for the opacity levels aren’t good so i’ll refrain from sharing ~some gifs ive made through this method ( x x ) ~last but not least i’ll bring up avisynth again. avisynth is nice at preserving video quality ~a lot of ppl i know say they don’t even sharpen gifs out of avisynth ~here are some gifs i have made with avisynth + topaz ( x x x x x x x ) ~honestly when it comes to sharpening, im still floundering with it. my sharpening needs a lot of work but, amongst the people who i consider good sharpners, most of them use avisynth, topaz denoise and/or clean, and smart sharpen! so all the resources are here !
~Cropping: ~it’s super important to follow tumblr dimensions otherwise gifs come out looking grainy! even when they’re not ! (case in point: x in which i used 168 instead of 178 for the dimensions)~Timing: ~Timing is so important!!! I almost forgot!! Always make sure u dont have duplicate frames for starters! for 60fps source videos i use .03, for mp4s i typically use .04 but sometimes the frame rate is kinda funky so you may have to go slower accordingly! and the important thing about timing is that if u use smart object, when u save ur gif, it’ll be in a different timing? like .04 gets changed to .07 but in order to fix that, u can simply just save ur gif in the wrong timing, and then reopen the gif in ps, simply change the timing to what u want on all ur frames, and then save it again!! idk if that made any sense but laskdjf this was the biggest mystery for me for so long omg4. Saving the gif~personally the save settings I use are “Selective/Adaptive” ; “Diffusive”; Dither: 100%; 256 colors. sometimes this makes the gif super grainy so i use “pattern” instead of “diffusive” in those instances5. Pray Perseverance ~a lot of the time when you’re giffing, gifs won’t come out the way you want it (i’m sure for every gifset i’ve uploaded on tumblr, there’s a gifset that i started making and never finished because it looked really bad). idk sometimes it feels like photoshop has its own will, sharpenings wont always work the same way each time, video quality won’t be the way you want it, i’m honestly still very experimental right now I don’t have ps figured out at all. so yeah…sometimes all u can do is that when u hit that save for web button (that ruins everything alskf), pray that ps doesnt mess it up too bad ahahaha but also that even when it does, its okay and you can try again! or try something new!
this is a super generic guide! let me know if you need more information!
10 notes
·
View notes
Text
Photo Essay
A photograph of a photograph
In the ever-growing world to outdo and grab the attention of people, we have found creative ways to do so. One way to do this is taking a photograph of a photograph because it makes us ‘cool’ and ‘edgy’, it is effective and gets you the likes you want. But it is so much more than just the likes or being different, you can capture memories and creature new moments. I’m interested in this type of photography; the next 5 photographs will speak more to this.

Figure1.
Selfie? This is a photograph taken on a SX-70 Polaroid camera (see figure 1) on Wednesday 2nd May 1979 by filmmaker and photographer Jamie Livingston. (Livingston, 1979) Although this image doesn’t have an official title, I think a fitting name could be “early selfie”, cleverly the photographer has let his friend use the camera to take what we would call, a ‘selfie’ using the reflection of his sunglasses. This is a fun way to begin the subject of photographs in photographs, obviously because this is exactly that. The first recorded self-portrait was actually in 1839, so the photograph is behind the times but still a very cool image. Being a polaroid, the photograph has an almost grainy texture, visible scratches giving the image a candid feel. The warm umber tones really creature a inviting an almost relatable image. Polaroids in general give off a nostalgic energy, all of Livingstons collection of over 6,000 photographs are polaroid’s, (1979-1997) this gives him that endearing quality that some photographers will never be able to obtain. Livingston is the perfect example of picture within pictures, he uses it a lot in his work, especially the ‘Photo of the day’ collection. (This photo included)
Figure 2.
This a just a small cluster of polaroid’s from the ‘Photo of the day’ collection by Jamie Livingston. (See Figure 2) (Livingston 1979-1997) Once again falling into the pictures within pictures territory, all of these photographs were taken on the SX-70 polaroid camera, even the picture of all of these pictures was taken on the same camera. Picture-ception! The year this polaroid was taken was 1980, by this time Livingston had accumulated around 500 photographs apart of this collection. In Susan Sontag ‘On Photography’ she says photographs are evidence, to prove we’ve done something to people who we think might not believe us. (Sontag, 2005) Even if Livingston didn’t mean to do this intentionally, his many images of his images give off that he was trying to show people his polaroid’s because when you hear the title ‘Man takes photo everyday for 18 years’ you would think “no way!” “that sounds too farfetched” so Sontag is right, we use photos as evidence to prove what we’ve done with our lives, not only to boast but to look back on it ourselves and remember what we’ve achieved, the memories we created. It’s a twisted sort of reason to take the photos, but were all culprits of it.

Figure 3.
Speaking of memories, this next image is one of my own. (See Figure 3.) I decided to pay homage to Jamie Livingston photography project ‘Photo of the day’ (Livingston, 1979-1997) I started posting a photo every day on Instagram, using a polaroid app. The image itself is actually a screen-shot of my Instagram photos, so again photographs within photographs. I chose these images in particular because there all really different from each other, but have their hidden meaning behind them that only I know about. I’m currently on day 13 of posting and it’s a little more difficult than I thought. Livingston brings up the subject of ‘photo pressure’ in one of his polaroid’s, I definitely felt this pressure, I was thinking to myself “I don’t have anything interesting to post?” but over time I realised that it doesn’t really matter an the reason I want to post these phonographs is because I want to look back on the memories of that day, that’s the reason we take photos so we can remember moments in time. I was discouraged in the beginning because I didn’t get that many likes but then I realised that I don’t really care about the likes, I just enjoy having a project without pressure.

Figure 4.
Pressure to preform and outdo yourself is always a nightmare, but it pushes us to do great things. This is another of Livingstons (Livingston, 1986) polaroid’s from the ‘Photo of the day’ collection. (See Figure 4.) The image is of an exhibition of some kind, I couldn’t find specifics but It speaks to the pressure to creature the perfect photograph, but as Livingston has stated before “The photo doesn’t have to be nice”, that’s a motto we could all adapt in our lives, not just for photography but for allowing ourselves to create art without hurting ourselves to get this unrealistic standard of photography. I chose this image because it captures the feeling of most art exhibitions, and of course it has more pictures within pictures. photography has such a special ability to be work and art, some people will go crazy trying to get the perfect shot, some will pay millions to acquire these photos, but some of the most special photographs are one we take in our everyday life, the ones of pets, friends and family. They have that candid feel to them that is so easy to recognise but so hard to re-create.

Figure 5.
The last photo speaks more to the power of a photograph. (See Figure 5.) This polaroid is from Livingston ‘Photo of the day’ collection (Livingston, 1997) sadly the year of his passing away, actually most of his photos from 1997 are of his friends and family, I can only assume because he knew he was dying and wanted to remember those special to him. It has a very homely feel to it, just some good friends in the kitchen (it looks like) enjoying their company together. Although this isn’t a picture within a picture, it is because I have now shared the picture with the readers. When you think about it most of the pictures we share, physical or online are now pictures within pictures. Its an amazing ability that photography holds, we all care so much about the pictures we take nowadays that we make people change the way they appear so that our photo looks ‘better’ so we can get some likes? We should stop caring so much and just take pictures when it feels right and not spend so much times living behind a screen. Be present in the moment with the ones we love.
Bibliography:
The Economic Times. 2018. World Selfie Day: Who took the first-ever selfie? [online] Available at: <https://economictimes.indiatimes.com/magazines/panache/world-selfie-day-who-took-the-first-ever-selfie/articleshow/64676143.cms> [Accessed 10 March 2021].
Sontag, S., 2005. On Photography. Arrangement with Farrar, Straus and Giroux, p.12.
Jaruseviciute, G., 2018. This Man Took A Polaroid Every Day For 18 Years Until The Day He Died, And It’ll Break Your Heart. [online] Bored Panda. Available at: <https://www.boredpanda.com/polaroid-photo-every-day-jamie-livingston/?utm_source=google&utm_medium=organic&utm_campaign=organic> [Accessed 10 March 2021].
Crawford, H., n.d. Jamie Livingston: some photos of that day. [online] Photooftheday.hughcrawford.com. Available at: <https://photooftheday.hughcrawford.com/> [Accessed 10 March 2021].
0 notes
Text
kmplayer gif tutorial
hello all! i’m gonna show you how i make my gifs! I use kmplayer and avisynth to make gifs, but I’m going to focus on kmplayer for this one. This tutorial is long and quite in depth so if you’re a beginner, this should be good for you!
also! this is purely just a gif tutorial and not a coloring tutorial lol
what you will need:
photoshop (im using cs5)
kmplayer
any video downloader (I use 4k download or savieo)
Screencapping
Okay first find a video and/or a scene that you want to gif. You’ll want to get the highest quality video possible. Don’t download anything under 720p or else your gif will look grainy. Try to get 1080p as much as possible.
Once you get that downloaded, open your video in kmplayer and go to the scene you want. I like to go a few seconds beforehand to make sure i don’t miss any frames. Now on your keyboard press Ctrl + G to open up the screen cap menu.
I don’t remember the default settings but here are the settings you’ll want:
Extract to: you’ll want to create a folder to hold your screen caps and then direct that folder here
Format: JPEG and Bitmap are both good options. Bitmap (i believe) is going to be a higher quality image
Numbers to extract: continuously
Size to extract: original size. You want the full size image
Frames to extract: every frame. This ensures that you’re getting every frame and helps your gif look smoother
also the “prefix” is just going to be the first part of the image name, so put whatever you want for this! :)
Once this is done, press Start in the menu and play the video. When the scene is done, press pause on the video. Open the menu again (Ctrl + G) and stop that as well. Now all you want to do is go into the folder with your screen caps and delete the ones you don’t want.
Frame timing and converting to smart objects
Open photoshop: we are now going to start the giffing process! Before you start, make sure you have the animation window and the layers window open. To do this, go to Window > Animation and Layers, if it’s not already showing.
Now, click on File > Scripts > Load multiple DICOM files. Find your screen caps folder and load them in. You’ll see in your animation bar that it only has one image showing.

In order to pull your screen caps from this, go to the top right hand corner of the animation bar and click this button. Click “Make frames from layers”.

This is so your gif actually plays all the frames and not just the one showing. Next, change the timing of the gif. Personal preference is a big thing in giffing so you’ll want to play around with what works for you. The average timing used by a lot of people is either 0.04 or 0.05 (for screencaps i should say). I find that 0.04 can be a little fast for my liking, so 0.05 is good. To do this, click the “0 sec” and then “Other...” and type in your timing. Make sure you select all the frames before doing this, unless you want to change each frame individually ^.^
P.S. if you ever want to delete a frame in your gif, you can delete the layer in the layer window but in the animation bar, you’ll have to click on the frame and click the tiny trash can next to the bottom scroll bar.
The next step is to click the button in the bottom right hand corner of the animation bar. It looks like it has two sliders on it. It will change your animation from frames to timeline.
Next, right click on a frame in your layers window and select “similar layers”. Then right click again and select “convert to smart object”. This may take a moment btw.

If you see that your animation timeline shortened into one line instead of multiple lines, you’re on the right track! Next thing to do is to crop the part of the scene you want.
Image size, sharpening and canvas size.

Image size will change the photo size without cropping anything out. Canvas size will change the size without transforming the image. What I like to do is to change the image size to about 5 or so pixels larger than what I actually want for either the width or height. In this case, I want my gif to be 268 x 150. So my cropped photo is going to make my height much larger than I’m going to want it, if that makes sense.
P.S. For sizing, make sure your width is either 177px for 3 panel gifs, 268px for 2 panels, or 540px for a single panel. If you want a 3 panel gifset, make the middle gifs 178 px (i know, it’s a little dumb but if you don’t, it’ll make the middle gif slightly blurry)
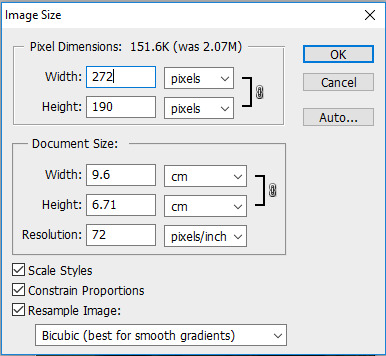
(This is what I’m going to resize my cropped image to)
You can just make the width or height automatically what you want (268 in the width for my case), but I find that after sharpening, a line can form around your image. I prevent this by making the image slightly larger than what I want and then cutting that part out later.
Now I want to sharpen my gif! Again, this is about personal preference, but I think this is what a lot of people use as well. Right click on your smart object in the layers window and select “New Smart Object via Copy”. I’ve seen people select “Duplicate layer” instead but I honestly don’t know what the difference is lkasndfllanslk.
Set the top layer’s opacity to 50% and leave the bottom layer at 100%. To actually sharpen the gif, go to Filter > Sharpen > Smart Sharpen.
For the top layer:
1. Smart sharpen: Amount 500%, Radius 0.4
2. Gaussian blur: 0.3 (its also under filter)
For the bottom layer:
1. Smart sharpen: Amount 500%, Radius 0.4, no gaussian blur

After this, go to canvas size and change it to your actual gif size. For my gif, it will take my 272 x 190 to my desired 268 x 150. Then combine your two smart objects by selecting both of them and clicking “Convert to Smart Object”.
Gif without sharpening vs gif with sharpening

Now you’ll want to edit it to your liking, just make it sure it’s under 3mb for tumblr’s image limits.
I’m not going to get too much into coloring bc it can be a real pain sometimes but! I will say that selective coloring is your best friend, just don’t saturate/over color or the gif will look more grainy.
After coloring and such, this is what I get:

We’re almost there! Save your new gif under “Save for web & devices” and not for “Save as”. When it opens, it’ll look really confusing, but all you need to worry about is that the “Looping options” says forever and not once, or else your gif will stop after it plays the first time.
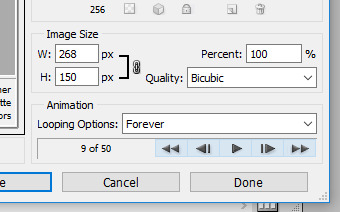
The last step that I didn’t even learn until recently is that you’ll have to open up your gif again in photoshop. When you do this, you’ll find that the timing has changed from 0.05 to 0.07. Idk why it does this, but your gif will look smoother if you change it back. (It might only be for screencap gifs but idk)
Here’s a comparison of the gif as is vs the gif when i changed the timing again:


And then you go through the process again if you’re making other gifs! I wrote a lot but it really isn’t that hard once you practice a couple times. I’m still learning too! (as you can see since my gifs are still grainy and such) but i hope this was helpful for people who don’t know where to start! Happy giffing!
#text#im not the end all be all but i will say that I know i've improved ever since learning some of these things#if anyone wants to share their knowledge i would lvoe that
13 notes
·
View notes
Text
The People’s Kitchen Collective Is Feeding a Movement by Putting People First

Jocelyn Jackson speaks to the crowd at a People’s Kitchen Collective event. | Sana Javeri Kadri
Co-founder Jocelyn Jackson on how the Oakland group uses shared meals to spark discussion, connection, and long-term change
Jocelyn Jackson cooks, but to call her a chef and leave it at that would be an error. She’s the co-founder of People’s Kitchen Collective in Oakland, California, an organization that shares the contrasting foodways of its three founders, while bringing the larger community together through dinners, workshops, and an annual free breakfast program. The free breakfast — inspired by the meals served to the black community by the Black Panthers — happens yearly at a park named for Bobby Hutton, a 17-year-old Black Panther recruit, who died on April 6, 1968, after he was shot more than 10 times by police. Oakland residents gather by the hundreds to pay their respects and enjoy the meal.
This rich layering of history, food, and celebration can be felt in pretty much every project Jackson is a part of. She also brings this energy to her not-quite-a-catering-company Justus Kitchen, cooking meals that connect ecology, spirituality, and food. During shelter-in-place, Jackson tells Eater that she’s started offering one-on-one virtual versions of these meals for women and femme-identifying black people around the country. In response to the near-constant news and imagery of police brutality, Jackson uses these events to create space for her guests to decompress and process as they cook and eat together. Whether dinner happens in person, or over a grainy video call, each of these events is a small protest, a therapy session, a celebration of black life. — Elazar Sontag
I’m from Kansas, a Midwestern girl who had the benefit growing up in a large family. My mom’s family is a singing one — and a large one too, she’s the eldest of 13 kids. Both of my parents’ families came from the South. In my mom’s case, it was a three o’clock in the morning train escaping Mississippi in order to survive, in the face of family members and friends of the family being lynched.
That’s part of the story of who I am, and how I developed. I have parents who humored my quirkiness. I was able to have so many experiences: raising sheep, spending years in a ballet tradition that was trying to erase my blackness with pink tights and pink shoes. These are typically white undertakings, and because of my parents I got to be a little black girl doing these things, and stealing all my freedom.
Fifteen years ago, I signed up for the Peace Corps, and I intentionally chose a country that was a colonized French-speaking country in West Africa. I went to Mali, and spent two years there as a natural resource management volunteer. That was a lightbulb moment: ‘Oh, my God, it’s the best thing ever to be surrounded by black people, finally.’ I was so grateful. It was a magical moment of seeing what the source of my lived experience in the U.S. was.
To spend two years in a small village, with less than 500 people, in the Sahel area was all the sadness and it was all the beauty, it was all the joy and it was all the sorrow. And being able to hold those things simultaneously was one of the biggest gifts of that experience. And I was also really clear that my education wasn’t quite done yet.
Back in the States, I got a M.S. degree in environmental education. I got to see so much of the world during that time. The Pacific Northwest. The Big Island of Hawaii. The Eastern Seaboard. This traveling, experiential, student-centered education had its own difficulties. These were primarily white undertakings. Whiteness was a surrounding theme, and it was hard to return to that after being in Mali; this beautiful immersion of blackness. I was overwhelmed by a sense that there was still something missing in my life, and how I was putting together all of my experiences. That’s when I came to the Bay Area.
In Oakland, I found the community of people that I resonated most with. I realized that food was that missing piece, a way to connect with the people I was with. It created a common thread amongst all the folks that were at my table.

Sana Javeri Kadri
Before the pandemic, hundreds of people gathered at the Collective’s yearly event, which honored the work of the Black Panther Party.
I started out as a volunteer at People’s Kitchen, the precursor to People’s Kitchen Collective, before I became a co-founder of the collective. This was the environment that I needed, to bring all of those other pieces of myself together: the art, the law, the environmental education, the sense of large family and being in that place of protection and cultivation. With People’s Kitchen Collective and with Justus Kitchen, the personal project that I started to care for other black women and femmes, there’s a real attention paid to this diasporic relationship. We are very clear that our liberation is bound up in this family of black and brown folks that are constantly in this place of survival and struggle.
One of the fundamental differences between what my work looked like before the pandemic, and now, is not being able to hold each other close, and see each other’s eyes, and see the pain that we collectively hold, as well as the liberation that we collectively hold. The experience of being up close and personal cannot be duplicated in this mode of physical distancing.
In a moment of pandemic, so much racialized violence is happening that we will die in order to prevent our deaths.
One of the largest events we did before the pandemic at People’s Kitchen Collective welcomed up to 800 people, sitting and eating family-style, serving each other with utensils, sharing those utensils, making sure we were taking care of one another as we enjoyed the meal and shared each other’s stories at that table. There’s an electricity and there’s a full-hearted presence that can take place in that setting. The same is true of my Justus Kitchen experiences, where I’m doing these one-on-one sessions. I’m able to look into someone’s eyes and really see the impact of a flavor. I’m able to do that in a way that’s not possible in this physically distanced and virtual world. We are very clearly mourning the anticipation of continued distance, a lack of togetherness. We look forward to gathering together, but we know that the length of time is going to have an impact. And how do we prepare for that?
During the pandemic, we’ve shifted to a food distribution model that’s similar to a lot of the mutual aid work that’s being done right now. This pandemic is part of our new lexicon. We are tasked with the responsibility of integrating this present moment of coronavirus and protest into all that we do. And, quite frankly, that also includes acknowledging the heartbreak of knowing these protests may create another coronavirus wave.
It is so heartbreaking that in a moment of pandemic, so much racialized violence is happening that we will die in order to prevent our deaths. We will die in order to prevent our deaths. And I don’t know if that has sunk in for the broader community yet. But that is the difficult non-choice at this moment. If not now, when? Our black and brown community is risking their lives.
We have never known ourselves during this level of uprising. So we need to be really gentle and tender as we get to know ourselves anew. I want us to meet the needs of this moment. And that includes a deeper relationship with our foods. That means with every bite acknowledging the source of it, going all the way through the entire chain of hands and hearts that bring this food, on this plate, to us. Being very real about the fact that there are so many people that don’t even have a plate. A basic need in humanity is not being met. It’s the work of everyone to reverse that tragedy. Our liberation is bound up with one another.
We all need to be offering social programs at this point. There’s no such thing as just saying ‘I have a product’ or ‘I have a service.’ I can’t even tell you what a disservice that is to our society during this pandemic, and during this mass realization that folks are having around the deep, oppressive nature of racism and white supremacy. We need a holistic, whole person response. If we’re not tending to the whole person, we’ve missed this opportunity. And quite frankly, it won’t be the forever-change that we need. Because if we miss our chance for change this time, oh, honey, we can’t. We can’t do it. This time has to be the one that counts.
from Eater - All https://ift.tt/37462Yr
https://ift.tt/30jAcpc
Jocelyn Jackson speaks to the crowd at a People’s Kitchen Collective event. | Sana Javeri Kadri
Co-founder Jocelyn Jackson on how the Oakland group uses shared meals to spark discussion, connection, and long-term change
Jocelyn Jackson cooks, but to call her a chef and leave it at that would be an error. She’s the co-founder of People’s Kitchen Collective in Oakland, California, an organization that shares the contrasting foodways of its three founders, while bringing the larger community together through dinners, workshops, and an annual free breakfast program. The free breakfast — inspired by the meals served to the black community by the Black Panthers — happens yearly at a park named for Bobby Hutton, a 17-year-old Black Panther recruit, who died on April 6, 1968, after he was shot more than 10 times by police. Oakland residents gather by the hundreds to pay their respects and enjoy the meal.
This rich layering of history, food, and celebration can be felt in pretty much every project Jackson is a part of. She also brings this energy to her not-quite-a-catering-company Justus Kitchen, cooking meals that connect ecology, spirituality, and food. During shelter-in-place, Jackson tells Eater that she’s started offering one-on-one virtual versions of these meals for women and femme-identifying black people around the country. In response to the near-constant news and imagery of police brutality, Jackson uses these events to create space for her guests to decompress and process as they cook and eat together. Whether dinner happens in person, or over a grainy video call, each of these events is a small protest, a therapy session, a celebration of black life. — Elazar Sontag
I’m from Kansas, a Midwestern girl who had the benefit growing up in a large family. My mom’s family is a singing one — and a large one too, she’s the eldest of 13 kids. Both of my parents’ families came from the South. In my mom’s case, it was a three o’clock in the morning train escaping Mississippi in order to survive, in the face of family members and friends of the family being lynched.
That’s part of the story of who I am, and how I developed. I have parents who humored my quirkiness. I was able to have so many experiences: raising sheep, spending years in a ballet tradition that was trying to erase my blackness with pink tights and pink shoes. These are typically white undertakings, and because of my parents I got to be a little black girl doing these things, and stealing all my freedom.
Fifteen years ago, I signed up for the Peace Corps, and I intentionally chose a country that was a colonized French-speaking country in West Africa. I went to Mali, and spent two years there as a natural resource management volunteer. That was a lightbulb moment: ‘Oh, my God, it’s the best thing ever to be surrounded by black people, finally.’ I was so grateful. It was a magical moment of seeing what the source of my lived experience in the U.S. was.
To spend two years in a small village, with less than 500 people, in the Sahel area was all the sadness and it was all the beauty, it was all the joy and it was all the sorrow. And being able to hold those things simultaneously was one of the biggest gifts of that experience. And I was also really clear that my education wasn’t quite done yet.
Back in the States, I got a M.S. degree in environmental education. I got to see so much of the world during that time. The Pacific Northwest. The Big Island of Hawaii. The Eastern Seaboard. This traveling, experiential, student-centered education had its own difficulties. These were primarily white undertakings. Whiteness was a surrounding theme, and it was hard to return to that after being in Mali; this beautiful immersion of blackness. I was overwhelmed by a sense that there was still something missing in my life, and how I was putting together all of my experiences. That’s when I came to the Bay Area.
In Oakland, I found the community of people that I resonated most with. I realized that food was that missing piece, a way to connect with the people I was with. It created a common thread amongst all the folks that were at my table.
Sana Javeri Kadri
Before the pandemic, hundreds of people gathered at the Collective’s yearly event, which honored the work of the Black Panther Party.
I started out as a volunteer at People’s Kitchen, the precursor to People’s Kitchen Collective, before I became a co-founder of the collective. This was the environment that I needed, to bring all of those other pieces of myself together: the art, the law, the environmental education, the sense of large family and being in that place of protection and cultivation. With People’s Kitchen Collective and with Justus Kitchen, the personal project that I started to care for other black women and femmes, there’s a real attention paid to this diasporic relationship. We are very clear that our liberation is bound up in this family of black and brown folks that are constantly in this place of survival and struggle.
One of the fundamental differences between what my work looked like before the pandemic, and now, is not being able to hold each other close, and see each other’s eyes, and see the pain that we collectively hold, as well as the liberation that we collectively hold. The experience of being up close and personal cannot be duplicated in this mode of physical distancing.
In a moment of pandemic, so much racialized violence is happening that we will die in order to prevent our deaths.
One of the largest events we did before the pandemic at People’s Kitchen Collective welcomed up to 800 people, sitting and eating family-style, serving each other with utensils, sharing those utensils, making sure we were taking care of one another as we enjoyed the meal and shared each other’s stories at that table. There’s an electricity and there’s a full-hearted presence that can take place in that setting. The same is true of my Justus Kitchen experiences, where I’m doing these one-on-one sessions. I’m able to look into someone’s eyes and really see the impact of a flavor. I’m able to do that in a way that’s not possible in this physically distanced and virtual world. We are very clearly mourning the anticipation of continued distance, a lack of togetherness. We look forward to gathering together, but we know that the length of time is going to have an impact. And how do we prepare for that?
During the pandemic, we’ve shifted to a food distribution model that’s similar to a lot of the mutual aid work that’s being done right now. This pandemic is part of our new lexicon. We are tasked with the responsibility of integrating this present moment of coronavirus and protest into all that we do. And, quite frankly, that also includes acknowledging the heartbreak of knowing these protests may create another coronavirus wave.
It is so heartbreaking that in a moment of pandemic, so much racialized violence is happening that we will die in order to prevent our deaths. We will die in order to prevent our deaths. And I don’t know if that has sunk in for the broader community yet. But that is the difficult non-choice at this moment. If not now, when? Our black and brown community is risking their lives.
We have never known ourselves during this level of uprising. So we need to be really gentle and tender as we get to know ourselves anew. I want us to meet the needs of this moment. And that includes a deeper relationship with our foods. That means with every bite acknowledging the source of it, going all the way through the entire chain of hands and hearts that bring this food, on this plate, to us. Being very real about the fact that there are so many people that don’t even have a plate. A basic need in humanity is not being met. It’s the work of everyone to reverse that tragedy. Our liberation is bound up with one another.
We all need to be offering social programs at this point. There’s no such thing as just saying ‘I have a product’ or ‘I have a service.’ I can’t even tell you what a disservice that is to our society during this pandemic, and during this mass realization that folks are having around the deep, oppressive nature of racism and white supremacy. We need a holistic, whole person response. If we’re not tending to the whole person, we’ve missed this opportunity. And quite frankly, it won’t be the forever-change that we need. Because if we miss our chance for change this time, oh, honey, we can’t. We can’t do it. This time has to be the one that counts.
from Eater - All https://ift.tt/37462Yr
via Blogger https://ift.tt/3h802To
0 notes
Photo
Requested by anon here is a basic tutorial on how I make my gifs with pictures included.
1. Download the episode that has the scene you want to gif. For Inuyasha specifically I use this amazing link here that has both the original series and the Final Act along with the movies. Also to make things easier I would recommend having all your videos in one folder, as you can see I have downloaded a lot of episodes.

2. Have Photoshop. I use Photoshop Portable CS6, I know there are other programs you can use to make gifs but for me Photoshop is my weapon of choice. There are several links on tumblr that show you how to get photoshop or you can look it up on piratesbay if your feeling risky.
3. Capturing the frames. For this I use KMPlayer but there are several programs that can do the job. My version of Photoshop doesn’t let me open videos directly in the program so I have to import the scene I want as a folder of frames. I make a folder with a name I can remember to place the frames in, as you can see I have very creative naming methods (I also separate my caps by series so these are all sub-folders in my huge Inuyasha folder).

Now I open up the episode in KMPlayer and find the scene I want to gif and then right click > Capture> Extract which will open up the window I need to capture the frames.
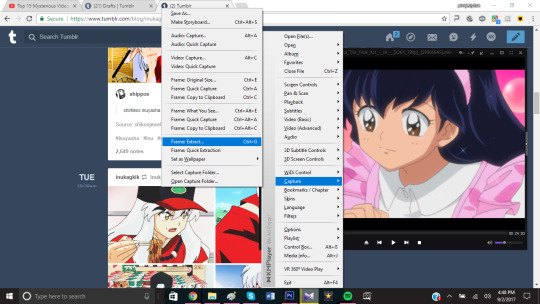
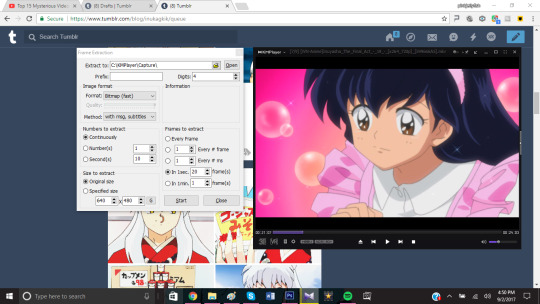
Then you go over to Extract to and find the folder you created for your frames, in this case my folder is called “tutorial”.
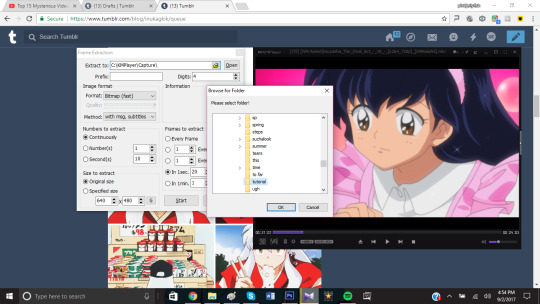
These are my personal settings for extracting the frames, I used to extract every frame but then I ended up with folders with over 200 frames which take a long time to load in photoshop and usually create gifs that excede the tumblrs limit.I keep them at their original size to not distort the quality. *You can have as many or as few frames per second as you want but keep in mind how many frames you have when giffing*
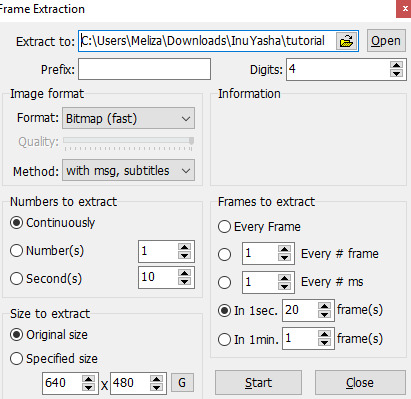
When your ready to go just press start and stop it once you have your scene. Your folder should look like this once your done, since no one is perfect you will most likely need to delete some frames you don’t want, this will make giffing easier.
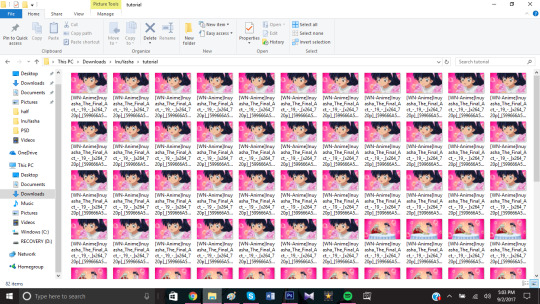
4. Exporting the frames to Photoshop. Open and run photoshop and select File> Scripts> Load Multiple DICOM files. (I think some version of photoshop might have you select “Load Files into Stack” so if that doesn’t work try that)

A little screen should pop and and once again you find and select the folder that has your frames. Once you find it click okay and the frames will begin to load into photoshop.
And now you wait, this could take a few seconds or a few minutes depending on how many frames your folder has ( usually I just go watch some youtube videos while i wait and forget I’m even making a gif lol)

3 minutes later the frames are loaded and its time to make the gif.
5. Creating the gif. Make sure you have your timeline turned one, mine is part of my default settings but I know a lot of versions don’t include it with their default view so you have to manually turn it on. Also make sure the timeline is set to frame animation and not video timeline, click on “Create Frame Animation” to start.


Click on the icon on the far right of the timeline that looks like an upside down triangle and 4 lines and then select “Make Frames from Layers”.

Click on the icon again and this time select “Select all Frames”, we’re going to input the frame delay.
You select a random frame and go down to where it says 0 sec and click on the icon next to it and choose other. If you leave it at 0 seconds your gif will be too fast.
Because of the number of frames I have I’m going to use a 0.1 second frame delay. If your scene has a lot of frames you can decrease this number, if you have few you can increase it. Back when I used to use every frame I would use 0.03 seconds. Its really up to you how fast or slow you want the gif and if you don’t like it you can easily open up the gif again, change the time and re-save it.

Once you’ve decided your frame delay and have clicked okay click the icon on the far right of the timeline again and click on “Convert to Video Timeline”

Now select every frame in the window on the far right, you can do this by clicking on the first and last layer while holding down shift.
Click on the icon in the upper right hand corner of this window and select “Convert to Smart Object”.

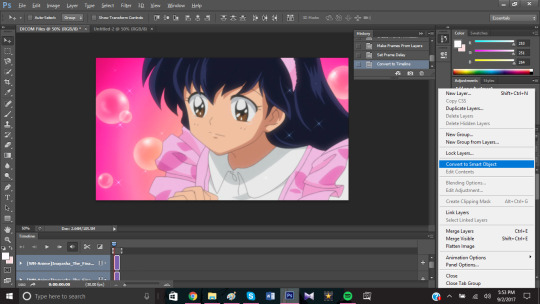
And now you have a gif, a really big gif, so its time to resize it. Tumblr uses 540px for big gifs and 268px for smaller gifs, I also cropped my gif a bit. Go to Image >Image size to resize your gif by changing the width size.

6. Surface Blur and Smart Sharpen. Now you could save your gif like this but it will most likely be grainy and will have lost some of its quality. To fix this go to Filter> Blur> Surface Blur to make the gif nice and smooth, for this scene I used a Radius of 7 and a Threshold of 7. For gifs I try not to exceed 10 on either one but I often go as high as 15 when editing grainy scans.
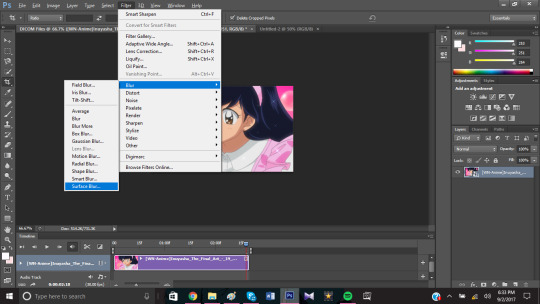

After that I like to Sharpen my gif so the lines stand out by going to Filter> Sharpen> Smart Sharpen.
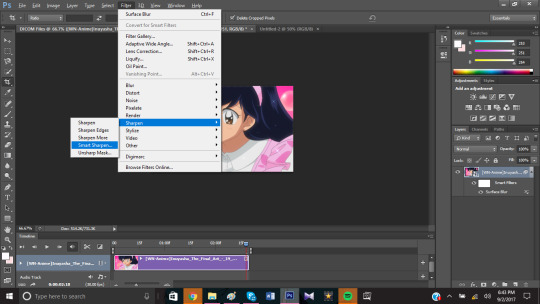
Usually for big gifs I only go up to 100% but with this scene I felt it looked best with 125%. Its best to tinker with these settings until you find what you think looks best, I like my gifs to be sharp so I tend to use a good amount of shapening. When I giffed the stage play I went up to 500%, live action is on another level. If you don’t like it you can edit this and the blur layer to fit your needs later on.

7. Saving. It’s time to save our gif, to save a gif you need to go to File> Save for Web. You can not save a gif the way you would save a png of jpg, it must be Save for Web.

Once you do that this screen will open up and it will have your settings for your gif. This is where you decide how you want your gif to be saved and get a view of how it will look like. Make sure your looping option is set to Forever!

I play around with these settings a lot because some scenes look smoother in different settings. I recommend trying a few combinations to see what produces the smoothest gif before saving. In this case it looked best with Selective and Diffusion.

Also make sure your gif does not exceed 3.00M, tumblr does not support gifs that big and all your work will be for nothing. You can make your gif smaller by changing the size or editing the colors.

Once you’ve check everything you can go ahead and click save and save your gif under an appropriate name.

And now you have a gif.

8. Coloring. Coloring is an important step when making gifs and I don’t think there is a wrong way to color, its just what you think looks best. When starting out I think its important to download PSDs to better understand how coloring works and what each of the little icons on photoshop do. I have an entire folder filled with PSDs, some made by me and some made by the wonderful people on here kind enough to share their PSDs with the world.
I’m going to show a couple of different coloring styles you could do with this gif.
Black and White

Achieved by putting a black and white gradient over a gif that was colored with this PSD.
Pale

This PSD over a gif with darker blacks and blue.
Pastel

This PSD at 50% Opacity.
Vibrant

This PSD (this psd is actually one of my favorites I use it a lot)
This is how I would choose to color this gif.

I would recommend following resource blogs, especially when your starting out because they have a lot of PSD you can download and use. PSD are also usef in making graphics and these blogs offer a lot of help too. Find a style you like or try something new every time. Coloring gifs can be hard so if your stuck you can ask them or look through their blog for tutorials that go more in depth on how to color certain types of scenes. Dark scenes, bright scenes, cartoons, live action, anime, music videos, pale, or color isolation its all there.
#im so sorry this took so long anon#my wifi is still out but hopefully it gets fixed today#requested#gif tutorial#not sure how to tag this lol#put under read more because it is kinda long especially with the screenshots#also included links to some nice psds i often use#and blog recommendations
49 notes
·
View notes
Photo


“To look at life without words is not to lose the ability to form words- to think, remember, and plan. To be silent is not to lose your tongue. On the contrary, it is only through silence that one can discover something new to talk about. One who talked incessantly, without stopping to look and listen, would repeat himself ad nauseam.
It is the same with thinking, which is really silent talking. It is not, by itself, open to the discovery of anything new, for its only novelties are simply arrangements of old words and ideas.”
images from a walk round’ macritchie last sunday; anddd a quote from one of my most beloved 2019 reads, The Wisdom of Insecurity by Alan Watts.
***
Life is weird because it’s nothing like beautiful grainy nature photos. i just spent an entire week dealing with a sprained ankle, & also clearing out a cigarette beetle infestation in my room, which happened because one of their moms laid eggs in a satchet of tea-scented air refreshener; i found out that they actually had tea, which is what those little bastards love to feast on. clearing out an almost 500-strong army of pests made me think also of the neglect i’ve had towards my own room, my private life; that (micro) locusts creeping in and chewing up everything without my notice. things have been in twists and turns, it’s difficult having to stay faithful and content yet be bold enough to reach for change (in the midst of trying to swtiching jobs) but the cost of it is a negligence towards the small, important things. as mad men taught me, it’s so untrue that nothing happens even in a normal small life; my office plants have sprouted and i still have an entire charity campaign to plan for. so many things do, and I must stop acting like i’m chained but free to transform the world --however small--- as it is. In the end I am a fortunate & blessed human who’s also very very looked after, the curse is forgetting it.
i guess being a literature student for so long helped me to analyze and critique the details my life pretty well. coming out to the real world, you realize a poison in society is how people really don’t bother being introspective or open-minded at all. because, who cares about death anymore? who knows what a real life is? some illusion of immortality technology provides us; it’s so strange that none of us questions it.
0 notes
Text
tips for new + seasoned gifmakers alike:
tutorials are your best friend! see here & here (there are also tutorials listed for graphics and editing in general)
if you see a gifset that you like, and you want to make something similar, try asking the creator to make a tutorial; oftentimes, they’ll be willing to at least give some tips on how they did certain things. everyone starts somewhere, and it takes practice!
use hd videos whenever possible! this makes a huge difference and your gifs will look much smoother and be higher quality
after you finish making your gif (sharpening, coloring, etc), open it back up in photoshop and adjust the frame speed, since ps tends to speed them up after you sharpen them and the frame times won’t be accurate (for gifs with less than 40 or so frames, i usually use a speed of .06; otherwise, i stick with .05)
depending on the video, sometimes frames will repeat, and this will just make your gif look less smooth and increase the file size. i suggest clicking through the animation frames and deleting any repeats
learn how to convert between timeline and frame animation early on. trust me, it will make your life a lot easier. when i got started, i didn’t realize that i wasn’t sharpening properly, because i didn’t convert to timeline!
when adding text to a gif, i suggest making the entire gif first, converting to timeline, and then adding the text layer on top. that way, you don’t have to worry about it only showing up on one frame of the gif.
if you want to center an object/text, go to the ‘select’ tab and click on ‘all’ (or, if you’re on windows, hit ctrl + a), and then go to the ‘layer’ tab, go down to ‘arrange,’ and you’ll be able to center it vertically and horizontally (this is so much easier than just eyeballing your text and hoping it’s in the middle!)
take some time to learn how to color your gifs. psds are fine, but they often will end up whitewashing poc and just not look nice. mess around with selective coloring, curves, levels, vibrance, brightness, and contrast
tumblr’s gif size limit is now 3mb instead of 2! this will allow us to use more frames in our gifs, and allow for more complex gifsets :,)
to make gifsets without tumblr stretching the gifs (and therefore making them look grainy and blurry) or cutting them off: for gifs/photos in a row of 3, the width should be 177px; for rows of 2, 268px; and for a single gif, 500/540px (it’s really up to you; personally, i use 500px).
if you want to try to put some fancy gif effects on top of photos (or premade gifs, though that’s a more complicated process), check out this
if you’re putting multiple gifs into a single canvas (like i did here), all the gifs have to have the same number of frames, and the canvas itself has to have the same number of frames as well (aka you have to duplicate the canvas until you have the same number of frames as your gifs).
if you want to make smoother, higher quality gifsets using 4k videos, you can try avisynth (though it’s only for Windows). There are tutorials on this blog
if you’re looking for a photoshop download, check out the photoshop blogs on tumblr, which have safe/reliable downloads. i got my photoshop here, but i can’t guarantee that it will remain up, since the files tend to get taken down pretty quickly
if you need me to explain anything further, you can just ask me! i know that some of this can be hard to get a handle on. i love to help, so don’t hesitate to ask!!
#no one asked for this but? idk i thought it would be helpful#i'm not an expert at photoshop by a long shot#but these are just some things i've picked up along the way!#mine#gifs#who knows maybe i'll add to this as time goes on#photoshop
7 notes
·
View notes
Text
Insta360 Evo: Now Anyone Can Make Movies for VR
Our verdict of the Insta360 EVO :
Great quality footage for immersive viewing makes this convertible 360/180 stereoscopic device the best way to start making VR movies right now. It's only let down by a non-removable battery and weak plastic clips to lock the position. 910
If you have a VR headset, you’ll know how immersive 180-degree 3D videos can be. But the hardware to produce such videos has been either too pricey or only capable of grainy, low-resolution video. Insta360 EVO changes that. Now you can make beautiful 5.7K resolution 3D, VR180 videos … for less than $500. I’m confident in saying it’s the best consumer-grade camera around for VR moviemaking.
If that wasn’t enough, the convertible design means it can transform back to a 360-degree camera. This gives it the same “shoot now, point later” magical freedom of the Insta360 OneX.
Check out our video review below–preferably on a VR headset if you have one–to find out exactly what we thought of the Insta360 EVO. Nearly all of the review was shot directly on the EVO, so there’s no better way of sampling the footage. And as always, at the end of this review, we’re giving one of these amazing devices away to one lucky reader. Enter using the competition widget at the bottom of the review.
youtube
Insta360 EVO: Specifications and What’s In The Box?
Insta360 EVO Insta360 EVO Buy Now On Amazon $419.99
Insta360 EVO Hybrid 360/180 stereoscopic camera
Mini Tripod
Clip-on phone lenses for previewing videos on your phone
Felt carry case
Max video resolution (combined): 5760×2880 @30FPS
Max photo resolution: 6080×3040
Fixed f2.2 lenses
1200mAh non-removable battery, about 45 minutes continuous shooting
Bluetooth 4.0, micro-USB port
MicroSD storage slot (no card included in the basic set)
I’m not usually one to comment on packaging, but the unboxing experience of the EVO was exquisite. The camera is secured in the box mounted to a large metal stand with a tripod screw from underneath. I’m not sure if this is supposed to serve a later function given the inclusion of a mini tripod, but it’s quite dramatic if you want to keep your device out on display.
Also in our review set was the Holoframe, an accessory for your phone that enables you to view 3D content without the need for a VR headset or special glasses. More on that later.
Convertible Design
You can either use the EVO as a 360-degree camera, with each sensor recording a hemisphere of video; or it can be flipped open to become a stereoscopic 180-degree camera, with sensors recording the left and right eye viewpoint respectively.
When folded, the EVO is a neat little two-inch cube, weighing no more than four ounces. It’s minuscule and extremely easy to carry around.
Swapping between the two modes and locking them back involves some flimsy plastic clips. These seem like they’ll be the first things to break. The buttons to unlock those plastic clips are small and fiddly too. I found myself not actually knowing if it was locked, or halfway in. Just keep it unfolded if you’re unlikely to use the 360-mode.
Controls and indicators on the EVO device itself are sparse: there are two buttons and two LEDs on top, and two LEDs on the front. One button is a dual purpose power and shutter button; the other switches mode between photo and video. The current mode is indicated by one of two LEDs. All of the LEDs flash alternately when recording. There is no menu system or LED panel: any setting beyond photo/video and record/power are done through the app.
The battery is a little larger and therefore lasts longer than the OneX, but on the flip-side it’s non-removable. Still, when shooting for VR, it’s easy to plug the camera into an external power source, since the rear view is invisible (unlike 360-degree videos, where you can’t hide anything).
360-Degree Features Too? Why Would Anyone Buy the OneX Then?
Despite being a convertible design, don’t think this model is a replacement for the OneX device. They do share many of the same features: the core ability to shoot now and point later, automatic removal of the magic selfie stick, TimeShift and FlowState Stabilization, as well as some of the more obscure modes like Tiny Planet. You’ll find all that when shooting in 360-mode on the EVO. I’ve glossed all of this, despite being incredible, because they can all be seen in our Insta360 OneX review.
But two features are noticeably absent. You can’t LiveStream to social platforms, nor can you record Bullet Time sequences. If those were things that really stood out to your from the One X, stick with that. In addition, the lenses are physically further from each other, so the stitching along the horizon may contain more errors. This is a relatively minor gripe, but my point is that if 360-degree shots are your primary intent, buy the OneX instead.
FlowState Stabilization for VR Too
One feature that really differentiates the EVO from competitors is the FlowState Stabilization technology, which gives you ultra-smooth footage by using the onboard gyroscope. This works in both the standard 360-degree mode, as well as 180-degree stereoscopic.
That said: it’s important to remember that most new VR users (and even some experienced ones) will find artificial motion in VR makes them nauseous. It’s a bit like motion sickness, only in reverse. Your eyes perceive movement, but your body isn’t feeling it. For a while, the advice when filming for an intended VR audience was to remain static and simply observe the scene, but this has relaxed a little as most users develop their “VR legs” quickly. Still: know your audience before deciding whether to use camera movement.
If you do intend to move the camera, do it slowly. The FlowState Stabilization certainly helps to smooth things out compared to not having it all.
youtube
Preview the Shot in VR
When previewing something intended for VR on a flat screen, it’s practically impossible to get an idea of scale or presence.
But if you have a Vive Focus, Oculus Go or Oculus Quest, you can preview the footage live through the Insta360 VR app. This is yet another standout feature that sets apart the Insta360 EVO. You can view both the videos already taken and stored on the microSD card, as well as a live viewfinder. You can stream directly from the camera, while you’re shooting. This takes away the guesswork of framing correctly or ensuring objects aren’t too close. There is, of course, a small delay when streaming over Wi-Fi, and you can’t watch at the full resolution.
While it is an incredible feature to have, I didn’t find myself using it to preview shots that much. It was useful for checking out what I’d already recorded, though, and the whole process is about as seamless as it could be. Put on your headset, connect to the camera’s Wi-Fi, open the app. Done.
The Editing Workflow
If there’s one serious drawback to the EVO, it’s the amount of effort required to edit the video. This isn’t a unique problem to the EVO, but it is compounded by such high resolutions!
While the mobile app is perfectly functional for short clips, it’s limited to producing 4K content. For the full quality 5.7K resolution, you’ll need to process the files from the Insta360 Studio desktop app. It took about half a day just to output all the footage I took for the review video, with my MacBook Pro fans running full speed. You’ll also need an enormous hard drive: it works out at about 1 GB per minute.
That’s just to output the raw footage: you’ll need a professional editing suite like Adobe Premiere or Apple Final Cut Pro X to take advantage of 360-degree editing. (Pro-tip: For Final Cut, make sure you select horizontal 360-degree stereoscopic top/bottom as your output format. It’s the last option on the list, and not the default).
After you’re done editing, it will, of course, take longer than usual to render your final video, given such a high resolution.
But you’re not finished yet: for uploading to YouTube and displaying it as a VR180 video, you’ll need to use Google’s free VR180 Creator tool to inject the required metadata. Otherwise, YouTube doesn’t know it’s designed for VR, and will just try to compress it to a regular viewing window.
In short, it took an inordinate amount of time to process, edit, render, inject metadata, then upload the 15 GB review video you see embedded!
You’ll need a powerful machine, a big hard disk, an unlimited internet connection, and a mountain of patience. I should note that there is apparently a more direct integration with Adobe Premiere, but I don’t have that to test with.
The Holoframe and Clip-on Glasses
The Holoframe looks like a regular gel phone case, and is designed to be used as one when you’re not previewing videos. When you do want to use it, just snap it off the back and clip it onto the front of your phone instead. It works in a similar way to other glasses-less lenticular screens, but uses the phone’s front camera to see where your eyes are and adjust the 3D effect accordingly. Previous attempts at glasses-less 3D viewing through lenticular screens required you to sit in a particular place; the Holoframe uses the phone’s processing to adjust the image, rather than you needing to adjust your seat. If you want this, you’ll need to buy the model that matches your phone. Only a handful of the latest handsets are supported.
It works, but the 3D effect was overall unsatisfying, I felt.
In fact, I preferred the stereo separation and depth offered with the included clip-on 3D viewing glasses, which work with any phone.
Moreover, use of the Holoframe requires a scene to be processed before you can watch it. The processing time depends on the length of the clip, but even a relatively short clip will take a minute or so. And if you move your eyes, the app will need to “capture” where they are before you can resume watching. It just felt like far more effort than it was worth. The clip-on glasses could be used without any additional processing time: it’s just a generic side-by-side 3D output.
Should You Buy an Insta360 EVO?
The main attraction of the EVO is the ability to shoot for VR. If you’re not sure you even want to do that, and are primarily interested in the 360-degree features, go for the OneX model instead. You’ll get better quality stitching, a removable battery, and a few other features like the ability to shoot bullet-time that aren’t found on this device. Consider the EVO mainly for VR video production, with 360 features as a little bonus.
Insta360 EVO Insta360 EVO Buy Now On Amazon $419.99
The hardware isn’t perfect. The non-removable battery and flimsy plastic clips are annoying, but not enough to detract from the overall fantastic package on offer here. Finally, it’s feasible for everyone to produce good quality VR video content.
Just don’t bother with the Holoframe. The included clip-on glasses are fine for previews on your phone. For the ultimate live VR preview, put on your Oculus Go or Quest!
Enter the Competition!
Insta360 EVO VR180/360 Convertible Camera Giveaway
Read the full article: Insta360 Evo: Now Anyone Can Make Movies for VR
Insta360 Evo: Now Anyone Can Make Movies for VR published first on http://droneseco.tumblr.com/
0 notes
Last Seen Blogs
ta-pia
RECS+INSPO

official-hartwin
Harry and Eggsy

greenbbeanbro
Beanie (Commission open)

higgs-the-god
Dear Diary, I Nuked A City Today
ta-pia
RECS+INSPO