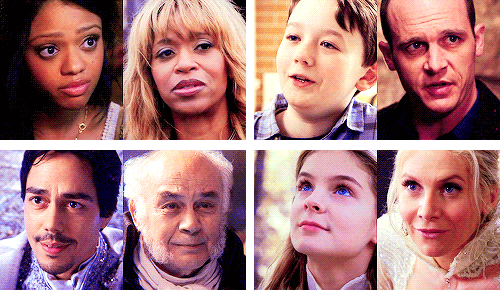
#i have some psd templates that i have uploaded in the past
Text

current project: streamline my editing process
#i've been using other people's psds forever#today i decided i'll make some of my own#ts4 psds#ts4 templates#i thought about what i would realistically use for my own posts#and this is what i came up with#one day i'll upload and share but i don't think she's quite ready yet#the weather and location things have FOLDERS of the appropriate icons#i even made pngs of a few world icons bc i couldn't find any past komorebi#:((#i plan on introducing new characters using the name tag lol
167 notes
·
View notes
Text
Tutorial: How to Make a CAS Background With Functional Mirror
Overview
This is something that has been highly requested so I hope this tutorial will be helpful for the sims 4 cc community!
This tutorial will have 2 parts for creating 2 different types of CAS "room" backgrounds. Part 1 (The Easy Way) uses a template I created for you to use your own 2D images/screenshots with a simple rectangular mirror. Part 2 (The 3D Room) will result in a better quality background, but it’s not a beginner friendly project so I don’t recommend trying it if you’ve never made any cc before. I will not cover the basics of cc making here, only what’s relevant to making a CAS bg using my template specifically. The Sims 4 Studio forum has a ton of great tutorials for everything else.
In my own research & experimentation, I noticed that (as far as I can tell) EVERY other CAS room with a functional mirror seems to be derived originally from LittleDica's CAS room [link] I want to acknowledge credit to LittleDica for their CAS background which I studied as a reference. But to be clear this tutorial and my templates are NOT derived from another creators' work; I created mine from scratch and it took a lot of time and effort. My version is much more simple and more compatible with Sims 4 Studio because there are no extra mesh groups or diffuse maps. I also made a great effort to make the reflection in the mirror more realistic for the size of the room. I hope you will be able to use this resource to create your own beautiful CAS backgrounds! ♥
Also in case you missed it, you can download my CAS background used in the preview [here] (it is slightly different from the template package.)
Requirements:
Sims 4 studio
Image editor (Ideally photoshop)
my templates (attached below)
—————
Part 01: The Easy Way
The easiest way to create a CAS background with mirror is to use my attached templates.
The PSD template is the best option, but for those of you that don’t have Photoshop, there is a PNG version as well.
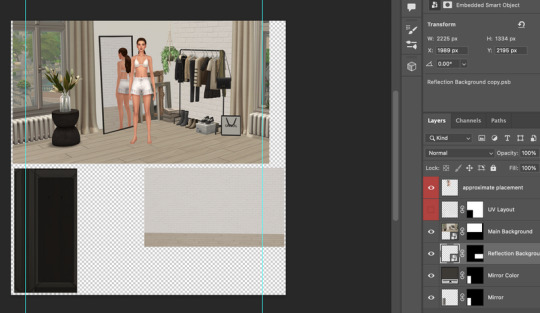
You will need 2 images; one for the main background, and one that will be reflected in the mirror. The large top area is the main background, and the smaller rectangle at the bottom is what will be reflected in the mirror behind your sim.
In the image editor, paste your images and resize them to fit into the outlined areas.
For framing your screenshots, it’s important to understand that the mirror is actually just floating in space in front of a flat background. That means you’ll have to fake the perspective a bit and that may require some trial and error to get right. I recommend taking multiple screenshots at a variety of angles so you have options to work with. Use the model sim as a guide to help you with placing your background image. (Don’t forget to hide the model sim and UV layout when you’re done!)
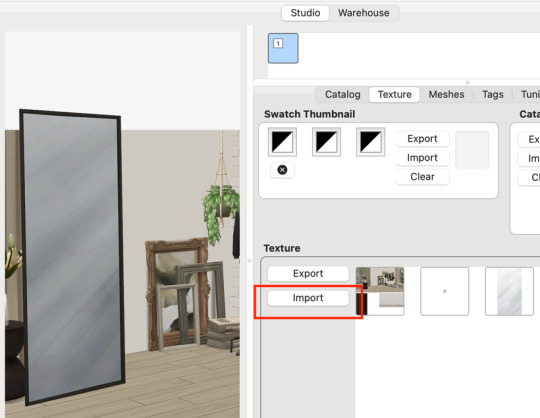
Save as .PNG or .DDS and import it into the template package in Sims 4 Studio.
That’s it! My goal was to make it super easy for you. Remember to only use one CAS background in your mods folder at a time since it's an override. Also note that it is not compatible with 'cas blob remover' since the instance for the dropshadow is now used as the mirror.
TOU — PLEASE READ:
I give permission to the Sims community to use my template files and modify them as needed to create your own CAS backgrounds. This took months of work, researching and experimenting, so please respect the effort I put into creating this resource by agreeing to these simple terms:
Don’t re-upload my files.
Don’t claim my work as your own.
If you use my templates for your cc, please share credit with my username (Lijoue) and link to my Patreon page.
If you make any money from cc created with my templates, please consider making a donation via my Patreon. It is greatly appreciated.
download template files here
Part 02: The 3D Room
to be continued…
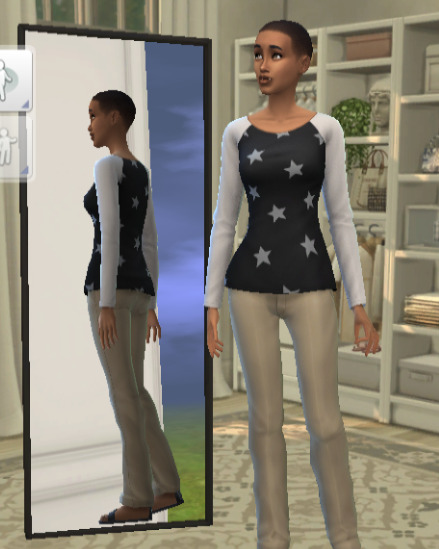
This part will take more time to finish because there’s a lot more steps involved in creating a 3D CAS room. In the meantime, the template should be enough of a starting point for those of you that already know how to make cc objects, since I already handled the hardest parts. Just understand that the mirror reflection is not automatically calculated, meaning that if you move the mirror in the mesh, you will need to change the Mirror Plane Normal and Mirror Plane Offset in S4Studio Warehouse to match the new angle or position. Otherwise it may look unrealistic or worse, it could reflect the eerie wasteland world that the CAS room is set in. (pictured below)
#sims 4 creator#sims 4 tutorial#the sims cc#ts4 maxis cc#maxis match cc#sims 4 maxis match#ts4 tutorial#sims 4 studio#ts4 custom content#ts4 cc#cas backgrounds#sims 4 cas
171 notes
·
View notes
Text

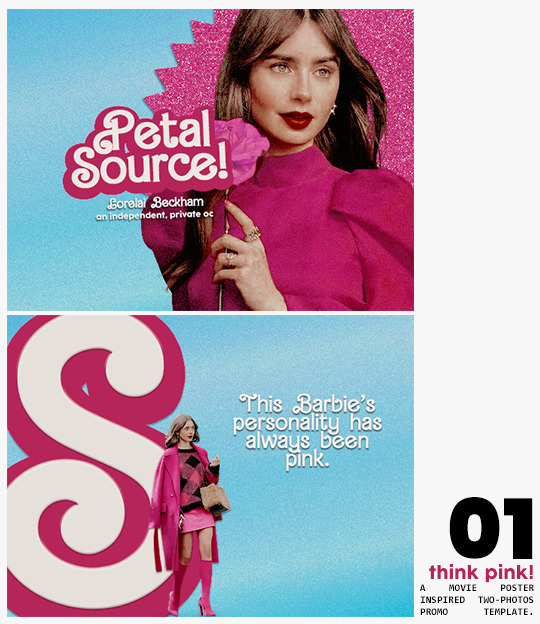
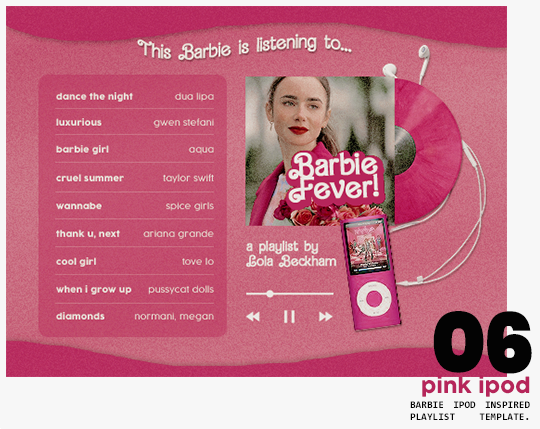
⋆ barbie fever . . . by petalsource .
. . . a complete blog makeover inspired by barbie .
hi, barbies! today, i bring you a complete makeover fully inspired by our favorite pink lady, barbie herself, to allow all of you to bring your own characters into her world in plastic!
feel free to tweak and adjust to your needs, add different background colors and overlays, but kindly do not claim as your own or use it for commercial purposes. feel free to tag me on your creations with this on #petalsource! seriously... i can't wait to see what comes of this!
💐 click the source link to get it as a package or individually on deviantart or payhip !
and . . . keep reading to find more details about the graphics, hq live previews and important tips to use the templates !
✩ about the items!
➷ think pink! -- a two-picture promo template inspired by the iconic 2023 movie posters. you'll need: two pngs of your faceclaim of choice, and the custom fonts (listed below). the glittery polygon of the first picture is available in 7 different glitter colors! high quality examples.
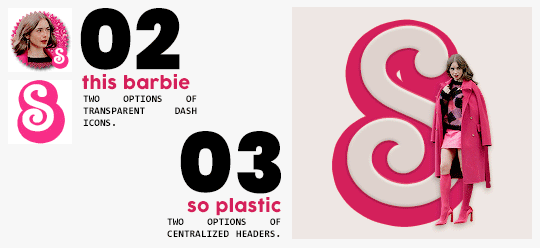
➷ this barbie -- two options of transparent dash icons; one matching the "initial" poster and one matching the "glittery polygon" poster. high quality examples.
➷ so plastic -- two options of centralized headers; one matching the "initial" poster and one matching the "glittery polygon" poster. to use it at its best quality, disable the "stretch header image" option when uploading the header. high quality examples.
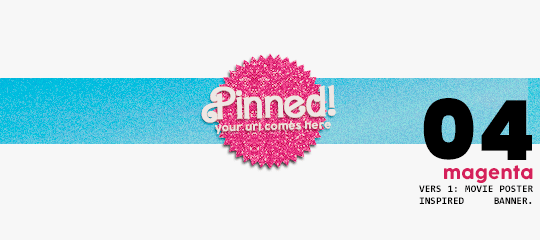
➷ magenta -- version 1.0: pinned post (or miscellaneous) banner inspired by the 2023 barbie poster. version 2.0: pinned post (or miscellaneous) pair of banners mimmicking the layout of a barbie doll box. one banner goes on top of the postbox, insert pinned post or text, and the other banner goes on the bottom! high quality examples.
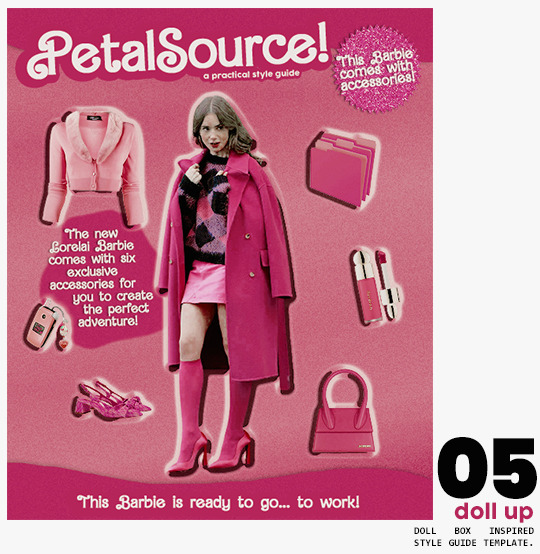
➷ doll up -- lookbook template inspired by the barbie doll box, featuring a "doll" picture and six customizable objects / accessories. you'll need: full body png of your faceclaim of choice, custom fonts (listed below), and 6 pngs of random objects or clothes to "come with" your doll. i've added a short tutorial down below on how to find and use some easily! high quality examples.
➷ pink ipod -- playlist template inspired by the barbie ipod, featuring a cover art and nine songs. high quality examples.
you can purchase all items as a package (deal price) or individually!
✩ important tips & useful information!
➷ needed fonts: bartex, cocogoose.
➷ object pngs + removing background of images: i found a super useful pinterest board with photos that can be used on your graphics: oxfordcommah's object pngs. additionally, the clothes png search on p*nterest is really diverse, and you can narrow your interests like "pink clothes png" or "vintage shoes png" and find a lot of options. once you found your images, go to remove.bg and paste their urls in there. it'll remove the background of those images for you and you can just paste them on your template and have fun!
➷ used coloring psds: the beautiful and super pink psds i used on the previews were not made by me and are NOT included in the downloads. in case you want to use them, they can be found here: dreams, 003.
➷ styles: the download includes two styles, one for a subtle drop shadow used in a few layers and one for the plastic box effect in the lookbook template. you can install them by opening the styles tab on photoshop > the four lines > load styles > find the barbie styles on your downloads!
➷ in case you have any questions, pop into my inbox or ims and i'll be happy to help you!
#template psd#template psds#barbie psd#character psd#character psds#𓂅 ♡ ⋆ 𝐦 ‚ templates .#i really really really hope you guys like this!!! i had so much fun doing it
321 notes
·
View notes
Text
Resources!
Here is a list of the resources I use to make my graphics as somebody who doesn’t have Photoshop or Illustrator! All my graphics are made by me, except for my manga icon base which were made by solaariicons. My Carrd was made by poohresources who has free templates but some may require a pro account.
Photopea - is what I use for adding gradients and spot correcting unwanted marks in manga icons, but it has a lot more tools than that! It’s very similar to Photoshop and can open various file formats including PSDs! So if you’re looking to make your own edits to templates you find on tumblr, I highly recommend this!
Pixlr - which has sadly gone paid and has begun to use AI. As somebody who used this religiously for icons for the past several years, I was bummed out. But quickly realized that it still functioned in Wayback Machine! Everything but “Add element” still works but might take a little to load in. You can still upload your own elements to place in though. This is what I use for lighting correction, color correction, toning, and adding my borders around my icons.
Photoscape X Free - is not my favorite. It has it’s uses of course but it’s pretty limited and the Pro version isn’t worth it in my opinion. Free comes with some basic tools, basic borders, and some pretty tints, overlays, and textures as well as some stylization options.
Canva - mostly free and what I use for my borders, banners, promos, dividers, etc.. I’m able to use the Pro version since my sister is kind enough to share it with me! It consists primarily of simple tools and premade graphics, but of course you can also upload your own! You can save graphics in the form of JPGs, PNGs, GIFs, MP4s, and PDFs. If there’s a graphic you’d like to use but it’s locked behind the Pro account, let me know! I can try see about saving it myself and sending it.
CGI icons - are made with The Sims 4 and Blender 2.93 both of which are free! It was a little bit of a process to learn since it required moving a lot of things around, as well as figuring out the virtual photography aspect, but I’ve eventually managed some good results over time! I use custom content from various creators to make my Sim look and pose the way I want to.
The process of creating a Sim to look like your character is a little broad, but there’s a vast community of Sims 4 modders. I’ll at least share my favorite rendering tutorials here. This is the one I used to learn lighting, this one covers the basic process of exporting and rendering, and this one is the one I used to get rid of seams on models. For framing and lighting, I recommend looking for photography inspiration on Pinterest! If this is something you’re interested in doing, hit me up! I’m more than happy to help others!!
Unsplash - Is my primary resource for stock images! Most photography there has a nice modern look and covers a wide array of subjects. It is mostly free, and all images are free to use for commercial and noncommercial use.
Check out my Ray's Leftovers tag for graphics or edits I ended up not using or made for fun! Feel free to modify them to your liking as well and there's no need for credit, though it is appreciated.
My Ray Made tag is where you can find roleplay graphics that I have made, for myself and others!
#Resource#Posting this for my RP partners but if somebody I don't know stumbles upon this. . .Go ham!!
18 notes
·
View notes
Note
9, 24 and 27 for the creator asks!
9: Would you say your style has changed a lot since you first started creating?
oh for SURE. regardless of what i consider my start bc i used to gif from like 2015-2017 and then i didn't start up again until april of 2023. this time around, i have learned SO much, and i'm sure part of that is just bc of how much gif styles have changed in the last 6-8 years, but also bc i joined a couple gifmaking networks and have gotten so much help through them, found so many resources, and learned tons!
to compare, here's one of the sets i was proudest of from Back In The Day. now, it's definitely not horrible, but the coloring and the slow framerate make me borderline homicidal. this one is marginally better, and i remember thinking i was really Doing Something with that typography 😂
here are some of the sets i made early on in my Return to Gifmaking this past April/May. this was one of the first times i'd ever combined multiple gifs into one and girl. what the fuck happened. why are the framerates Like That? what is this typography? i had no business making early l&o gifs 540px wide bc the quality is bad enough at 268px 💀and i think this one is a good example of i got the spirit! the execution just wasn't quite there. i like the main gif with the overlay of the sky, but i'd do the typography very differently and idk if i'd do it in b&w? i could try and remake it tbh, it's been 9 months since i made and posted it.
24: What’s your step by step? How do you organise your editing process?
buckle up 😂
make clips of the scene(s) i want to use if i don't already have them
import video frames to layers
action 1: grouping and timing (groups all layers and sets frame rate to 0.05)
delete any extra frames
crop to whatever dimensions i'm using
action 2: sharpening (two smart sharpen layers) + vivid sharpening (i used this tutorial and i usually keep that folder at 30% but sometimes drop it down to 10-15%)
coloring! it depends on what i'm giffing, but i color everything from scratch at least the first time. i save a LOT of my psds, like there's one psd that i use for almost all my tfothou gifs, a couple for hill house depending on the tint of the scene i'm giffing, one for law & order that sometimes needs to be adjusted just a little, one for the good wife, one or two for satc, etc. but they're all psds that i created myself.
typography (if applicable) which almost always involves scrolling through the entire list of fonts just to use one of my go-tos
action 3: this save action from anyataylorjoy
export > save for web!
upload to hellsite (derogatory) and gifsets always immediately go to my drafts, even if i want to post them right away, just so i can make sure i'm happy with everything and try to catch any last-minute mistakes
as for general organization, i'm organized on my computer to a near-ridiculous standard, but it works for me lmao. my psds, templates, and project psds (where i save an entire finished gif if it's for a larger, complex set and then never get rid of them lmao), and all overlays, textures, icons, graphics, transitions, etc. are meticulously organized. my finished gifs are also organized into their own folders.
27: What’s your favourite font to use?
in general, monsterrat. i use it for everything in google docs, and it's my fave sans serif to go with serif or script fonts. when i'm using it for giffing, i usually use semibold.
1 note
·
View note
Text
oh my god. i’m alive again. thank you @staff @support asddhahjshshs
#big phew!!!!!#man yall#okay basically what happened was i was marked as spam because#i have some psd templates that i have uploaded in the past#and the link to those are adfly links cause uou knkw#i thought i could pull a fast one on tumblr and make a little money off my creativity lol#and yesterday i was about to post my polaroids templates and i think that triggered it#anyway#i was not aware but i am reviewing guidelines again now!#yay thank god#i was so sad#dlt ltr#that one time my acct got terminated#<< in case im gonna look back on this hahhaa
8 notes
·
View notes
Note
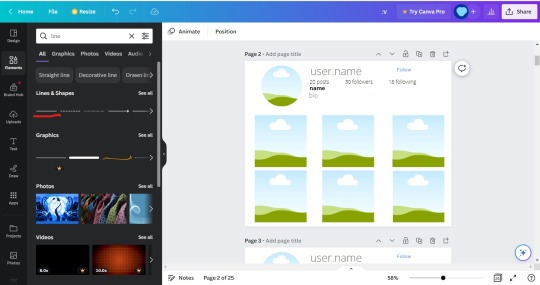
Can you tell me how to make an Instagram moodboard? I’ve asked several people and they try to avoid it for some reason, I’ve searched up and all I can find is about the app, I just wanna make my friend a gift 😭
I've gone through the exact same thing, and the ones that did help said they used a PSD (which is photoshop, which is something i cannot afford) so I had to break down and design my own. I actually use Canva for this (it's free so no hassle!)
Kind of obvious but get yourself a Canva account
On the top of the website next to your profile, it'll say "create design" in purple. Hit that and it'll have a list of templates. Search or scroll to find the photo collage option (the dimensions are 20 x 25)
Now that your blank template is loaded, You want to go to the side bar and click the "elements" tab and search for 'frame'. Hit the circle one and add it to the template
Shrink and move in the corner like so...

make it a little smaller if you need to. I shrink it so the width and height are equal at 5
5. Search in elements again for 'line'. This will be your border. I'm having a lot of trouble finding the original line I used earlier in my designs so use whatever you can find. The one I got for this one is from a past design that I copied and pasted on to this current one.
!!EDIT!!: search 'line' in elements and choose the first one under "lines & shapes" (the one underlined). (its a little chunky but its the only one i could find)
Add it. you might want to move the circle frame further up so it doesnt get in the way and adjust it later. Change the color to a light grey and stretch it until your liking. Don't stretch it all the way across though. leave space on either so it basically ends up like this or longer depending on how you want it (use my designs for reference):

(the line is a little tricky to use and maneuver so give it time and you'll get it ^^)
6. Search for more frames and look for a square frame. Add six of these below your border line. It should look like this,

7. Feel free to fix the sizes on the frames and move them around (mine right now looks a little wonky).
8. Go to the text tab, and hit the "add the subheading" (the middle option). Change the color to a light grey color and the font to 'Open Sans Light'. Type your username (Or if you're using this as a blank template like me, write something like "user.name") Make it a little bigger (even stretch it) and add it next to your circle frame.
9. Add the smallest option to your template (the one that reads "add a little bodytext"), change the font to Open Sans Light, and write your number of posts, followers, and following. I add spaces in between them so they're farther apart (I'm doing 12 spaces in between). Now shrink it to the size you are comfortable with and move it so it's underneath but alined with your username (but measurements for mine for w&h are 12.9 and 0.7)
10. Add the smallest option again and you're going to want to aline it below your posts, follower count, etc. Change it to the same font as before ("Open Sans Light"), change the color to black and bold it. Type your display name, or again, if you using this as a blank template, I just wrote 'name' in my text. Shrink the text box so the width and height is around 1.9 and 0.8.
11. Add more text (still the littlest option) and change the color to light grey. This will be your bio. You can either write a bio or just keep it written as "bio". Aline this under your display name. It should look like this now,

12. Start adding your images. This is the fun part. Luckily, with Canva, it's easy to add images because you just copy and paste them to the template (or you can upload them from your files). So go onto google (or wherever you get your images) and copy/download the image and paste it (Ctrl v).
(But!! before you add any images, I'd recommend duplicating the page so you'll always have a blank version if you want to make more. That way, you won't be constantly remaking this template. So when you feel like making another, just duplicate the blank template)
13. Drag them and hover them over the frame and it'll be inside the frame now. Do that until your frames are filled up. If you need to crop them or the frame is covering an essential part of the image, either double click the image and you'll be able to move it around or you can click the image in the frame and look at the top and they'll be a "crop image" option in between the "edit image" and "flip" options
14. For the sake of this tutorial, I will show how it should look so I'll add my images...

I decided to make a green one, your's doesn't have to look like this. In fact, make it however you want! Rather it be for aesthetics or for a more realistic approach.
15. When you're done with your mockup, hit the share button in the corner, go to download, choose your file type (I always choose PNG), select what file you want to download (make sure you don't hit "download all") then hit download. Your instagram moodboard should be in your recently downloaded now.
And that's all! I hope this was helpful and that your friend likes your gift!
#asks#anon#anon ask#anonymous#instagram#instagram moodboard#aesthetic#instagram au#insta#instagram mockup#tutorial#online tutorial#instagram template#template#moodboards#social media au
44 notes
·
View notes
Conversation
I Am An Expert WordPress Designer And Developer.
I Have Been Working On WordPress Past Few Years on another some popular platform.
After the working a Lots of Successful Projects with Elegant WordPress theme.I will try To Provide your DREAM website with in My Hard Work
Skill Set (Web & WordPress/ Front & Backend Expertise)
======================================
☛ Custom Web/ Software using Laravel Framework
☛ WordPress theme development & customization
☛ WordPress plugin development & customization
☛ Personal/Business Website using wordpress
☛ Bootstrap coded responsive PSD to HTML/Bootstrap
☛ Custom Javascript designed custom plugin
☛ Jquery Plugin integration
☛ Landing Page/ Lead pages
☛ App & Games launching/ Product-Service based Landing page.
☛ PSD TO HTML/ HTML TO WordPress
✎ Mailer Lite/Mailchimp/ Aweber/ Get Response Email Template/Campaign
☛ HTML, CSS. BOOTSTRAP, JAVASCRIPT, JQUERY, WordPress Bug/ Error Fixing.
✎ Login Registration Form, Sign in- SignUp Page Creation.
☛ Contact US Form/ Social Button & social sharing, Auto Responder/ facebook pixel.
✎ Maintain your site for 6 months, follow up malware, speed & content edit issues.
☛ jQuery plugin integration(Accordion, wow-js, owl-carousel2, wow-slider)
☛ Single or multi Page HTML website
✎ Create a Responsive business website using Bootstrap grid system
☛ eCommerce/woocommerce Website
☛ Website speed increase & SEO
☛ Page Builder - visual composer, elementor, divi, thrive, ux builder
☛ Payment gateway - Paypal & Stripe Integration & FB Pixel
☛ Sign up, Member & Social Sharing Features
☛ Zoominfo Pro & Email Finding
☛ Lead Generation/ Virtual Assistant/ Web Researcher/ Data Entry Expert
☛ Signup & Pop Up Form
☛ Mailchimp - Zaiper & Zoho Automation
☛ Mailchimp - Subscriber pop up & automation & woo automation
☛ By refind/ abandoned cart mail/ product target template
☛ Get Response & Aweber
☛ Web & WordPress Expertise to Create any web sites and web applications
☛ Shopify Store design & Premium Theme Customisation
☛ Shopify Product upload & customise / Domain Transfer(Shopify to domain)
☛ Shopify & Aliexpress Dropship & Import product by Oberlo app
☛ Shopify Sales Channel & Apps Customize
☛ Shopify SEO & Speed Up & Backup-Migration
☛ Click Bank Affiliate Marketing
☛ Click Funnels/ Upsell / Lead collect/ sales funnels product/service marketing
if your project isn't listed, just send me a message to see if its something I can do! I usually respond within an hour. And I promise to get back to you within 12 hours.
========== Language ==========
WORDPRESS, MYSQL, MARIA DB, HTML, CSS, BOOTSTRAP, JAVA SCRIPT, JQUERY
1 note
·
View note
Note
Hi Esotheria, can you tell me how you made this incredible collage of skintones /post/177741334392/for-all-this-talk-about-townified-and-geneticized? I'm trying to go through my skins as well and I'm struggling with having to extract just the simpe face one at a time - is that the only way? Or is there a faster way? And how did you label them all? Thank you so much!
Hi! I hope you don’t mind me answering this publicly.
[post in question] Sadly, there’s no quick&easy way to make such an elaborate collage, or at least, none that I’m aware of. I was also opening my skin files in SimPE, extracting the faces & pasting them into Photoshop, then geneticizing/townifying the skins themselves since I already had them open. Pasting the face pics into PS actually helped me determine which genetic values I should give my skins, as I could move the faces around and compare them to my default skins and the other skins I already had on the collage. I think it took me some two or three days of on-and-off work to get everything looking the way it does, so it’s definitely a labor of love! For what it’s worth, I can give you a quick rundown of my work process and share a few tips and tricks that will hopefully make the whole deal a bit easier. Putting it behind a cut since it got kind of long.

The first thing I did for my reference sheet was to open my DEFAULT skin files in SimPE and extract a body, face, and scalp for each of the four shades (s1-s4). I pasted the pics into my collage and put down their genetic values, so I could use them as a point of reference for deciding what genetic values to give my other skins (for example, the Sunheat shade of Silvain’s ‘Heartbeat’ skin is darker than my default S3, but lighter than my default S4, so its genetic value should logically fall somewhere between 0.60 and 0.90. The value I ended up assigning to it is 0.77, as I found it was closer in shade to S3 than to S4). Once I had the defaults down, I minimized my Photoshop window and ran Bodyshop. At that point I wasn’t yet sure which of my skins I wanted geneticized, and rather than opening skin files in SimPE blindly, I figured it’d be easier to see the skins on an actual sim. So I open BS and click through my skins, noting which sets I want to make genetic/townified. The skins’ tooltips should reveal their names, and in case a given skin isn’t tooltipped, just package your sim with nothing but the skin, open the Sims2Pack with CleanInstaller and read the skin’s file name.
Write down the names of the skins you want to work with, and since you’re already in BS, you could also compare them visually to your default skins and figure out what genetic values they should have (it’d be useful to note those values down for later use). Once the Bodyshop portion is done, you can exit and start the extraction/geneticization process. It’s tedious to have to open every skin in SimPE, I know, but you can speed the process up a bit by opening multiple skin files one after another. I use the search option in Windows to bring up all skins of a certain set (e.g. Pooklet Rehash), and then I double-click the files and wait for SimPE to read them. As I said, you can open multiple skin files simultaneously, but it should be done by clicking the files ONE AFTER ANOTHER, not by selecting multiple files at once (SimPE will probably crap itself if you do that). Once the skins are loaded, change their genetic values to the ones you noted down earlier and extract a face file for your collage. For organization’s sake, make a separate folder where you’ll be saving all the face files to, and give each facefile a name that tells you which set it’s from and which genetic value it was assigned. An example from my own folder: Lilith Spattergroit_1paledust_0.07, Lilith Spattergroit_2lightrose_0.10, Lilith Spattergroit_3sunkissed_0.41, etc… You can simultaneously work on your collage while you geneticize the skins, pasting the extracted face files into your document and noting down their names and genetic values as you go. That’s what I did, anyway. :)
This being said, I kept the .PSD version of my collage, so I could upload it for you if you want? It’s kind of messy and huge and definitely not meant as a template, but if it’s going to be of any help I’ll gladly share it. Anything to help a fellow simmer out! :)
13 notes
·
View notes
Note
Edits! Yes! I thought I'd seen that you make those sometime
I do!! Although I’ve had to stop now because they don’t show up in tags so nobody sees them... thanks @staff
Okay so. The first step of course is to figure out what you want your photoset to be about, which will also define the type of edit you’ll want to make. For example, if you want to do a photoset about a character or ship in general, it can be a collection of small “aesthetic” pics related to them (like this or this), or it can be bigger but fewer pictures (aesthetic like this or with pictures of the characters like this). I’m going to focus on the small collection of pics type because I think it’s easier if you’re just beginning!
Now you have your subject, you need to find pictures of things that make you think of them. It can be helpful to make a list, but if not at least think of those elements and keep them in mind while doing your image search. For example, for a Han/Leia edit you might want to search a picture of starry skies, the Falcon, guns, a vehicle dashboard, tools, braids. For a Ron/Hermione edit you can look for books, chocolate frogs, a chess set, tea, a cat, an owl, letters. (It does not matter if it seems cliche!! Trust me) You can also look for images of quotes that make you think of them, couples where the faces are not too visible (like a tall/short couple, a couple fighting side by side), or use pictures of them from the movies, even. To search for pictures I generally use Pinterest, but I found that Pexels offers free stock photos so you can try that one too. There’s also Google Images, of course, but as with Pinterest, it’s hard to find untagged pics.
Next you need to give all your pictures the same size---that’s a very important step. I always use a template so that all my pictures are in the same image (like this). If you want to do that, some basic good templates are x x x These are for Photoshop, which is the only editing softward I can give advice on! It’s not really hard; you open your template, open your pictures, copy and paste each picture into the template and resize them so that they fit the shapes.
If you don’t have Photoshop, use any other program to resize/crop each of your images the same size. A good size is 270x159, for example. Then you can upload all your pictures and arrange them into your Tumblr post, no problem.
After that, ideally you should edit the colours of your pics so that they all have a similar vibe. If you have Photoshop, a good idea is to browse psd files to find a colouring you like (here). You download the psd, open it on Photoshop and drag it to your edit file. You’ll have to play a little with the settings to find out what works. You can also do it yourself by adjusting things like brightness and contrast.
If you don’t have Photoshop, you can use any other software or site to adjust the colouring of your images too. The first time won’t be perfect, but the more you do it, the more you learn!
That’s pretty much it! I recommend checking @itsphotoshop, particularly their masterlist for beginners.
Good luck, and let me know if you have more questions!
4 notes
·
View notes
Text
Neomatch is live!
Neomatch is a “dating site” made for the purpose of pairing the neotag’s lonely neopet OCs together with the intention of finding them friends, and maybe a little something more :)
Like all fun things, NeoMatch has some guidelines we would like you to read before submitting apps to help clear up any confusion or concerns! Please click to read more about this project and learn how you can be part of it.
Guidelines
Neomatch is intended to be a fun, community building activity and resource for people in the neopets fandom who would like to incorporate other’s neopet OCs into their stories/character development and need somewhere to start. We want to keep this site as drama free as possible and ask everyone to abide by the following rules:
Neomatch is purely for fun and not meant to be taken too seriously, so please refrain from starting conflict if your neopet does not find a partner or is turned down by the partner you wanted for them. This site is for making friends, not enemies!
We ask everyone to respect the boundaries of the other individuals associated with this site. That means that if someone isn’t looking for romance for their pet, don’t ask! If they don’t want to RP or have ship art drawn of their pet then please be sure to respect that. What this also means is, regardless of the pet’s sexuality, if the user has stated they are only looking for a specific gender of partner for their pet, please abide to that as well. (I.E. someone’s OC is bisexual but only interested in girls, don’t pursue them with your male OC! Neopets can have preferences, too)
The minimum OC age to use this service is 16, and RELATIONSHIPS BETWEEN UNDERAGE OCS AND ADULT OCS ARE NOT ALLOWED!!!! We have created tags with the purpose to seperate the adults from the teens, but while searching through other tags on our blog PLEASE keep an eye out for which OCs are “neominors” and “neoadults” respectively. The only exception to this is the “2 year age gap” rule which basically means that if your OC is 16, the oldest OC they can date is 18. If your pet is 17, the oldest OC they can date is 19. Please be mindful of this rule regardless of what your opinion is of age gaps irl. Anyone found to be purposely breaking this rule will be removed and blocked from Neomatch and will not be allowed to participate in events related to it.
Contact us ASAP if you receive any form of harassment from someone related to using this service. This includes disrespecting pre-established boundaries (unsolicited RP/ship art), pressuring or giulting someone into having your OCs date/be friends, and anything related to shipping minors/adult OCs together (that breaks the 2 year age gap rule). Anyone who is found to be breaking the rules will either be given a warning or be blocked and banned from using the service (depending on the severity of the situation).
Now that is over with, let’s get to the fun part!
1. Making your Application
Below are examples of the templates available to you at this time, the first one is the Neomatch Application which is required to fill out in order to use this service.
Here’s a beautifully illustrated and completed version of the template made by Zji:
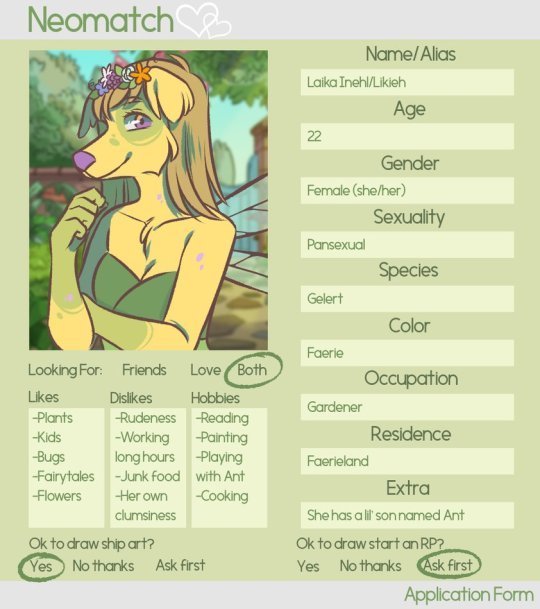
Here is where you can download the template yourself! The folder includes a Visual Guide, a blank PNG, and a blank PSD.
The second template is the Neomatch Profile which is completely optional!
Here’s Zji’s version of the profile:
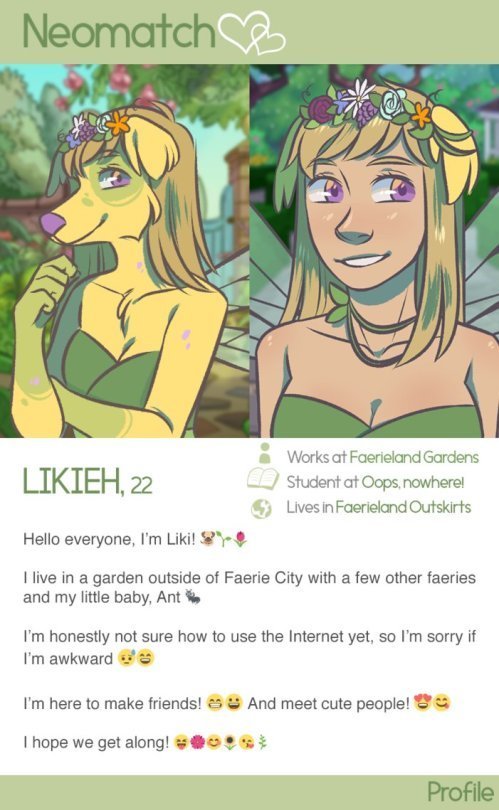
Here is where you can download the blank version of the profile, as well as the visual guide +PSD! This template is easiest to fill out in Photoshop, but if you don’t have Photoshop you can add text to the blank profile in another art program like Paint. If you want to add emojis to your profile but don’t have them on your computer, I would type up the bio on tumblr mobile, save as a draft, screenshot it, then paste into the profile :)
Here is a brief rundown of what is OK and not ok to do when filling out the templates:
Feel free to
change the color of the background, text boxes, and font as you wish (as long as you can still read it)
add multiple pictures into picture box
use a different font to fill out the form
Please refrain from
Changing the color of the header/footer (This is fine on the Profile, but we want to keep the grey top and bottom on the Application)
Removing or editing the Neomatch logo
Leaving info boxes blank (except for the “Other” box)
Filling out the form illegibly (if you really want to write in the info yourself just make sure other people can read it)
Using images you don’t have permission to use as the profile picture
If you have any problems filling out the form or have questions for us related to it, please send us an ask or DM and we will help you ASAP.
Here is where you can see some more of Zji’s apps/profiles if you want to see more examples.
2. Submitting your application
If you go to the Submit page you will see we have a few more rules and stuff to follow just to help keep stuff organized. I will briefly address them here as well as some other things
We prefer at this time if you don’t post your applications to tumblr on your main blog/other blogs. You are absolutely welcome to reblog submissions from us, but we would like to keep everything in one place and don’t want to clutter people’s feed’s with the same picture over and over again.
You can submit as many apps as you want, but if we receive a lot of submissions at once we may put them into a queue to try to space out the posts.
It’s very important to use that you tag your submission correctly to save us a little bit of time when uploading them, we can’t tag them for you because we aren’t at liberty to assume what your OC is looking for
If your application or something related to your submission is incorrect we will send you a message and explain how you can fix it
If you have any questions or are confused about the submission process please shoot us an ask and we will try our best to help you
It is also required to fill out the following form in the description of your submission to be accepted:
Contact: (your blog[s] here)
Is it OK to draw your OC interacting with other OCs platonically?: (yes/no/ask first)
Is it OK for Neomatch to send you “Matches’ via DM with similar characters your OC may be compatible with, or would you like to look by yourself?: (yes or no) [BE SURE TO HAVE YOUR DMS OPEN IF YOU SAY YES OR ELSE YOU WONT GET MATCHES FROM US]
If you marked “No” above, is it still okay for us to match your OC with other’s OCs? (you won’t get a DM from us but someone might DM you): (yes/no)
Other important info: (maybe include a bit of your character’s backstory & if you are looking for characters to add to your story, etc? or anything else at all you would like to include)
3. Receiving Neomatches
We intend on providing a little matchmaker service to those who opt into it, what it consists of is the admins of this blog helping you find friends/romance for your OC by taking mutual interests, location, age, and so on into consideration and pairing your OC with someone else’s based off of that. These “Neomatches” will be DMed to you privately (SO KEEP YOUR DMs OPEN) and it’s completely up to you on whether or not you’d like to pursue it or not. The message will consist of something like “_____ has a new match!” and we’ll DM you the profile of the other OC. If you find this service annoying or are not interested in using it you can let us know and we will stop sending them to you :)
I think that basically covers the jist of it, so keep an eye out for future updates and announcements! Feel free to send us an ask here if you have any questions or concerns related to using this service! We hope you all have as much fun with this as we will!
#neotag#neomatch#neopets#all posts will be tagged with neomatch btw incase anyone wants to blacklist it
55 notes
·
View notes
Text
Angel Sketch

Find angel drawing stock images in HD and millions of other royalty-free stock photos, illustrations and vectors in the Shutterstock collection. Thousands of new, high-quality pictures added every day. Electric guitar and angel wings in sketch style template for music festivals poster, tattoo or t. Hand drawn symbol vintage vector illustration. Cute angel sketch. Merry Christmas Abstract Vector Classy Label, Sign or Card Template. Hand Drawn Golden Angel Sketch Illustration with.
Angel Sketch Quotes
Free Pencil Drawings Of Angels
Home » Drawings Of Angels » Angel Drawings
If angel are your favorite, then I'll show you with some realistic angel portraits made by very talented drawing artists.
Elvira Amrhein - In Truth There Is Love
Elvira Amrhein - Flower Angel
Elvira Amrhein - Guardian Angel
Anonymous - Christmas Angel Carrying an Armful of..
Sheila Wolk - Day Surrendering Unto Night
Wilhelm Von Kaulbach - The Guardian Angel
William Adolphe Bouguereau - Angels Playing Violon
Joyce Birkenstock - Baby Angel
Joyce Birkenstock - Baby Angel II
Nicolas Poussin - Adoration of the Sheperds
Carl Bloch - Agony in the Garden
Edward Tadiello - Radiant Angel
For beginners, before you start your drawings, make sure you get some photos or buy few pictures of angels.
Food logo free. You can find & download the most popular Food Logo Vectors on Freepik. There are more than 19,000 Vectors, Stock Photos & PSD files. Remember that these high-quality images are free for commercial use.
You can learn to draw angels from angel images. Choose the one which is convenient to you. You can practice to draw based on pictures or photos. As practice makes perfect..
So, what you need to do before you draw your angel are:
a nice place to sit..because it might take you long hours before you finish your drawing.
a good art drawing pencil set consists of different grade of graphite pencils (B, 2B and 4B). Faber Castell, Mont Blanc, Bic or Steadtler are among the best art pencil brands.
Another thing you need is a pencil eraser and a pencil sharpener.
a light, smooth surface paper holder (preferably with a clip), and
of course, a piece of A4 paper (preferably a 80gm photocopy paper).
You can purchase your art drawing pencil set at your local art suppliers. Otherwise you can get it here..
If you already have all that is required, than you can start your angel drawings in pencil.
Create your own angel portrait based on what you see. Start with few basic pencil sketches forms as I've mentioned in my drawing pencil sketches.
Already have one? Hang it on your room's wall. I highly recommend that you scan your artwork or at least take a few snaps using a digital camera and then store your images at any available free image hosting company like Photobucket.
Or, you can have your own personalized t-shirts from this dolphin drawing. Visit Custom T-Shirts to have yours.. There is no minimum order required.
Okay, here are some examples of angel drawings that will inspire you to draw an angel. I have prepared a slideshow from these drawings and paintings. Enjoy..
Angel Drawing by Elvira Amrhein - In Truth There Is Love
In Truth There Is LoveElvira Amrhein
Back to top
Angel Drawing by Elvira Amrhein - Flower Angel.
Flower AngelElvira Amrhein
Back to top
Angel Drawing by Elvira Amrhein - Guardian Angel.
Guardian AngelElvira Amrhein
Back to top
Angel Drawing by Heilige Schutzengel.
Heilige Schutzengel
Back to top
Christmas Angel by Anonymous.
Christmas Angel Carrying an Armful of..
Back to top
Day Surrendering Unto Night by Sheila Wolk.
Day Surrendering Unto NightSheila Wolk
Back to top
The Guardian Angel by Wilhelm Von Kaulbach
The Guardian AngelWilhelm Von Kaulbach
Back to top
Angels Playing Violon by William Adolphe Bouguereau.
Angels Playing ViolonWilliam Adolphe Bouguereau
Angel Sketch Quotes
Back to top
Baby Angel by Joyce Birkenstock.
Box 5460 Bethlehem, PA USA Phone: 610-865-5366 Fax: 610-601-4517 Toll Free: 888-SING-OUT E-mail. The book was written by the cast of Sing-Out '66 so that you could join them in, 'what has been the greatest adventure of our lives.' In the book, you'll hear the cast of Sing-Out speak out, see dozens of black and white photographs, find music and lyrics, and get practical and technical details about such things as risers, stage lights, spotlights, costumes, chorus backup and orchestration. Sing out songbook. Has a long history with songbooks. Going back to our early days at the dawn of the folk music revival (read: 1950s) we shared office space, and often staff, with both Folkways Recordings and Oak Publications, probably the foremost folk music publisher of the period. So as we were re-emerging in the early 1980s, looking for additional programs to nestle under our non-profit umbrella, the idea of publishing songbooks.
'>Baby AngelJoyce Birkenstock
Back to top
Free Pencil Drawings Of Angels
Baby Angel II by Joyce Birkenstock.
Baby Angel IIJoyce Birkenstock
Back to top

Adoration of the Sheperds by Nicolas Poussin.
Adoration of the SheperdsNicolas Poussin
Back to top
Agony in the Garden by Carl Bloch.
Agony in the GardenCarl Bloch

Back to top
Radiant Angel by Edward Tadiello.
Radiant AngelEdward Tadiello
Back to top
Couldn't find things that you are looking for? Use the tool below..
Amazon.com Widgets
Wanna Share Your Favorite Drawings Of Angels?
Do you have a great tip or idea about pencil drawings of angels? Share it! You can share your favorite video too!
Tips to upload your video:
Goto YouTube.com or Metacafe.com. Signup (if you're not a member yet). Upload your video. Once published, copy the embed code and paste it in the text box below.
Want some more?
I update Pencil-Drawing-Idea.com frequently. So, please subscribe to my monthly newsletter. It tells you each month about the new information that I have added, including interesting drawing ideas and favorite drawings by other artists.
Then
Don't worry -- your e-mail address is totally secure.
I promise to use it only to send you Pencil-Drawing-Idea.com Newsletter.
Otherwise, you can subscribe to my Drawing Blog (no e-mail necessary), right-click on the orange RSS button, , copy and then paste the URL into your RSS reader.
If you are not sure what RSS and blogging is all about, click here.. What's an RSS Feed? Or click on the My Yahoo! button or My MSN or Add To Google button if you keep a personalized home page there. Once you start, you will be amazed at what RSS can do.
Back to top of Angel Drawings
Discover Beautiful Drawings of Angel Wings
Return to Drawings of Angels Topics
Return to Pencil Drawing Home Page
0 notes
Text
An anon inboxed me today asking if I could explain how I make gifsets that appear to have more than ten gifs in them (see, e.g. (x) (x) (x)) so here’s a tutorial answering that. Hopefully by the end of it you’ll be able to create something like this (which looks like many gifs but is saved as only one):
(Note: I realise that not everyone is like me and still stubbornly using the old Tumblr dimensions, so I’ll try to accommodate those that choose to use the current dimensions where appropriate.)
I’m using Photoshop CS5. This tutorial assumes that you already know how to make a basic gif. Fair warning that this will be image and text heavy.
When creating gifs like these, always remember the maximum dimensions and gif size Tumblr allows. Here is a current template: (x)
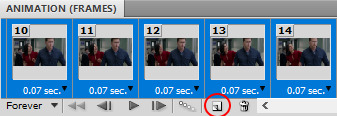
Firstly, we’ll start with something simple and combine two separate gifs to form one. I’ll be using this gif as an example so that I can include a few extra tips:

Important: Before you make your gifs, keep in mind that each separate gif must contain the same number of frames, be set to the same speed as the one(s) you intend to combine it with, and for the sake of this tutorial, be the same height.
Here, I’m using 33 frames each set to 0.07 seconds for both separate gifs, with a height of 130 px.
To begin, you need to make both gifs individually as you normally would but without text, colouring and (if you prefer the easy route and sharpen your gifs after converting animation frames to timeline, converting image layers for smart filters and then sharpening rather than sharpening each frame one-by-one), sharpening. You’ll end up with something like these sad things:
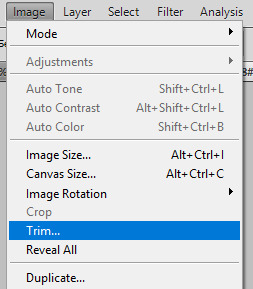
Then, for any of this to work, you’ll need to ‘trim’ each gif. You’ll know if you haven’t when you try combining them later. To do this, go to image > trim > and then trim away all of the transparent pixels as shown below.

Save them as separate PSDs (I’m saving mine as ‘55.psd′ and ‘56.psd′ respectively).
“Now comes the fun part!” I exclaim unconvincingly with a forced smile in case my Photoshop crashes out of spite.
Create a new workspace with a transparent background and dimensions that will fit your two gifs. Because I’m using old dimensions and I want to combine my gifs horizontally and not vertically, I created one that is 500 px in width (and 130 px in height to match the gifs I made) as the two gifs are each 245 px in width and I need to allow for 10 px space between the gifs (245 + 245 = 490 + 10 = 500 px total width). These types of gifs can be a bit of trial and error in the Maths department. If you’re using new dimensions, you’ll want to make your gif 540 px wide, because your individual gifs will be 268 px in width and only have 4 px space between them when displayed in a gifset.
(Side note: Regardless of whether you’re combining your gifs horizontally (as I am here) or vertically, always remember the natural space between gifs. E.g. if you have two gifs 130 px in heigh you want to combine verticallyt, make your new workspace either 270 px in height (to allow for a 10 px gap) or 264 px if you’re using new dimensions.)
Now go back to the gifs you just trimmed and highlight all of your animation frames for one gif, click the button circled below and click ‘copy frames’.

Go to your new, empty workspace and, using the same menu as shown above, select ‘paste frames’. Then, select ‘paste over selection’.

You’ll end up with something like this:

Because I don’t want that gif to be on the left, I’m just moving it over to the right.
Repeat this ‘copy frames’ and ‘paste frames’ step for your second gif and then move it to the side you want it to appear on. If there isn’t a natural space between your two gifs, you forgot to trim them, so you’ll need to go back to that separate gif and do that. It’s only a minor setback.
Now, you should have this happening:
Which technically, if you wanted to, you could just sharpen, save now and walk away knowing how to make one gif appear as two separate gifs (following this, you could make your gifset appear to have 20 gifs without exceeding the 10 gif limit):

Not that I’d blame you, given the length of this tutorial, but if you leave now you’re going to miss out on all my tips. And BOY, let me tell you about my tips! ... They’re pretty okay. Please don’t go.
Anyway, if you’re staying, the next section is going to teach you some basics for what steps you can take to make life less painful when you’re working with changing text, how to colour if you intend to colour the two gifs differently (e.g. my left gif is going to be black and white, and I need to add more brightness to it), and what to do if you’re using a gradient/fill.
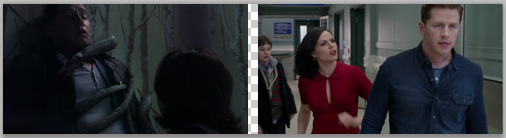
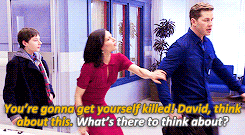
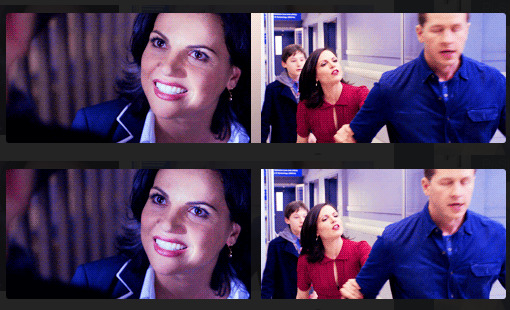
Tip 1: The next thing you can do is add any text you may have. If your gifs don’t have any text that changes, all you need to do is make sure that your text is centred for each gif and level with the other gif (for this tutorial, I assume you already know how to do this). However, if you have a gif that requires text changing like this:
You must make sure that you apply all of your text before converting your frames to timeline animation. I only stress this because sometimes I forget about that when I make combined gifs because I’m eager to sharpen them. It’s a lot more upsetting having to backtrack when you make this mistake for combined gifs than it is for regular, singular gifs. Trust me. I have pro status for it.
At this point, there’s no harm in converting to timeline for sharpening your gif. Before doing so, double check that your animation frame speed is consistent.
Tip 2: If you’re unsure as to what you can do if you intend to colour each gif individually or plan to make adjustments to your base colouring (as I am here), know that you can simply select one of the tools below (marquee or lasso), select the layer you don’t want appearing on both of the separate gifs, and erase (or add a layer mask then fill that section with black if you’re not certain that you want to delete it).
Tip 3: If you’re using a gradient fill or solid colour fill, using the same technique as above, you need to erase the parts of the fill that aren’t within your gifs. For example, this is what the space between my gifs looks like if I don’t erase the fill:

If you don’t erase the parts of the fill between your gifs, you’ll end up with something like this top picture when what you really want out of life is the very bottom image:
Know that I got an upload error when I tried adding that first gif to my drafts to check the gif gap. Even Tumblr has standards. Love yourself.
If the space between your gifs still isn’t transparent, the only other thing I can imagine being an issue is if you applied a blur layer in addition to your sharpened layer (if you’re someone who does this, you know what I’m talking about). Just go to those converted blur layers and do the same erasing technique for the gradient fill removal so that nothing overlaps between the two gifs.
Tip that cares about your OCD but not enough to be placed earlier in the tutorial: If one of your gifs is considerably longer than the other, say 50 frames, and you don’t want to delete any, you can make your shorter gif half the number of frames (e.g. 25) and then duplicate those frames to get the same number as your longer gif. Simply highlight all frames you intend to duplicate then click the button circled below. This way, you won’t have to sacrifice important frames and your gif will continue to loop naturally.
There are of course a number of ways in which you could combine gifs into one larger gif (some of which you will have seen if you clicked the links to the examples I have before the cut) so long as you correctly calculate the dimensions you’re working with:
But, if you’re interested in knowing how I created the very first mega gif at the introduction to this tutorial and you’re not confident that you can do it without some guidance, hold my hand because I’m going to teach you one last thing that you can combine with everything else you’ve learnt so far.
Lastly, we’re going to be making a gif like this:

Now, because I’m using old dimensions, which are 245 px width for gifs like this, I’m left with an odd number. Because I know I’m going to later be making this into a huge gif that is 500 px in width, I can go ahead and create a workspace that is 246 px. I do this because I want these side-by-side gifs to be the exact same width when I place them together.
Like before, start by giffing each gif separately. I have these set to 30 frames each, 123 px width and 140 px height. You’ll get two blurry gifs like this:

Trim them and go to your empty workspace (mine is 246 px, yours might be 268 px depending on your dimensions). Copying and pasting them into that workspace, position the gifs until they sit perfectly next to one another, touching but not overlapping. Save this gif but remember not to convert your animation frames to a timeline yet.
If you make four of these ‘joined’ gifs that have same amount of frames and then follow the tutorial above on how to add them all to a new larger workspace, making sure that if you’re using old dimensions you have 8 px separating them horizontally (because I added 1 px width for each 246 px gif to create an even number so I need to subtract that from the space between them) or 4 px of space separating them from one another using the new dimensions, you too can end up with something like this (which, if you’re wondering, is 500 px width and 290 px height):

And that brings us to the conclusion of this terribly long tutorial. I hope so much that it helped you! As always, feel free to message me if you need clarity for any of these steps or if you have any other Photoshop questions.
Until next time, remember to frequently save your work!
#yeahps#itsphotoshop#tutorial#ps tutorial#ps resources#my tutorial#resources#long post#7 hours of no regrets
30 notes
·
View notes
Note
I really wouldn't mind you aiding me with some tutorials love
giffing tutorial/resources
hi anon! sorry it took me so long to answer. i figured this might be helpful for others out there who have asked me similar questions, so i’ve compiled a pretty comprehensive list of tutorials/resources. idk about others but when i was new to giffing, it took me a lot of painful effort to go around and look for resources, so i’m putting it all here to make it a little easier!
i download videos using 4k video downloader. it will download very good quality 1080p videos in .mp4 format. if you’re downloading a 4k video, make sure to change the setting option to .mkv so that you get 4k and not 1080p—for obvious reasons since you want the highest quality.
i rely on kpopexciting to get .ts files — which are basically raw, very high quality video files for live performances. they are much less grainy than .mp4 versions of live performances—which are the ones you’ll see uploaded to youtube. i’ve found that 4k videos (in .mkv) are just as good quality as .ts, but obviously you will rarely see live performances in 4k, so get .ts when you can!! you can also try to find .ts files on twitter, but you may have to do a lot of digging. i wish i could recommend you twitter accounts, but the ones i used to go to have been very inactive/taken down all their drives :( but this website is really nice and updated frequently so i would recommend it!
vapoursynth links + download. the reason you would use vapoursynth is to resize your gif, while maintaining the optimal quality of the gif. if you gif without vapoursynth (.ie only using photoshop), it will still be fine, but the image quality may be grainier. also, you will definitely need vapoursynth to gif .ts files —more will be explained in the tutorial i’ve linked below. i would recommend that you have a high processing/lots of ram/newer desktop or laptop to use vapoursynth so that 1, your computer isn’t fried and 2, your vapoursynth process will go a lot faster. i am using a 2017 macbook pro for all my work, and it runs pretty well, but my laptop still gets pretty hot so just make sure you’re not running a million things in the background while using adobe products and vapoursynth lol. i used a pretty old and beat up 2011 model macbook air back then, and i will say that yes vapoursynth worked and ran on it, but it took much longer, and basically fried the laptop’s battery (aka i had to get the battery changed twice and the laptop would die randomly) but issok it was a school borrowed laptop so i didn’t feel too bad lol. im just saying this as a precaution, to preserve the health of your electronic devices!! but don’t be afraid to use vapoursynth! you should still try it at least once.
thank you to @realstraykids for this super detailed, really nice tutorial! it includes how and where to download videos, how to gif using vapoursynth, using photoshop, comparisons, coloring, and pretty much all you need to know. 10/10 would recommend
thank you to @dreamcolouring for this lifesaver!!! the best and easiest way to blur out unwanted captions/objects in your gifs. i recommend doing this step after converting your frames to video timeline and before you do sharpening and coloring. another tip i’ll add is to feather the selection you’ve made right before you click on “add vector mask” —this will make sense once you’ve read through the tutorial. feathering it will make the blurred spot less noticeable and more subtle.
i use this generator to create gradient colored captions! copy and paste your text, then select the colors you want. generate the code, and copy it. change the settings of the text editor on your post to HTML. paste the code, preview, and voila! add elements <blockquote>,<b>,<i>, etc as needed. see more on colored captions in this tutorial by @kylos --i believe op mentioned a different and better color generator but for some reason it won’t work for me :( hopefully it works for u! basically same idea as the previous generator i mentioned.
my own mini tutorial/workflow process of making gifs. this includes working with a .ts file, vapoursynth, photoshop, coloring, watermarking, etc. and a few of my own tips below:
if you are working with an .mp4, you do not have to make any changes to the preprocessor/denoise filters/sharpening in the resizing part of vapoursynth—it doesn’t make that big of a difference if you do. but if you are working with a .ts file, definitely do make those changes,, that’s the whole reason you have vapoursynth. with an .mp4, i like to use vapoursynth to just resize, but i don’t add any additional settings. i use smart sharpen in photoshop to sharpen it, which is pretty good on it’s own (at least in photoshop 2020!).
my rule of thumb is to do add .02 seconds when i am setting frame delay. so if when you first import the frames, they are at 0.04 seconds, i usually change them to 0.06. of course, this is my personal taste—you can make all your gifs faster or slower depending on how you want em to look.
if you are on a mac, you can screen record by pressing Command+Shift+5 (it’s a shortcut to quicktime screen recording). I only screen record for things like the beyond live concert or other live streamed events. the image quality of the screen recording, in my experience, is actually pretty good. when you gif the screen recording however, you may notice that it adds extra frames that you don’t need. by that i mean duplicate frames. you could keep the duplicate frames but that just means the size of your gif is going to be much bigger (keep in mind the limit is 8mb). in order to remove those duplicates, my only solution has been to remove them manually (by holding Command while selecting), or when you are importing the video to frames, select the option to “limit to every 2 frames”—but this method will be less precise and still not as good as manually removing frames. if you remove the duplicate frames, this means you will need to set the frame delay even slower, to make up for lost frames. in my experience, fps(frames per second) and frame delay work in conjunction. so for example, if i delete every other frame because they are duplicates, but the starting frame delay is 0.02, i am now going to change it to something like 0.05 (so i added 0.03 seconds rather than my usual 0.02). if the duration length and the image dimensions of the gif are short/small, feel free to keep the duplicate frames in—i only delete duplicate frames in order to keep my gif under the 8mb limit. then, if you keep the duplicate frames in, continue with your standard frame delay preferences. now that i’m writing this im realizing this might not make a lot of sense lol.. but don’t worry about it for now and if you run into trouble w screen recorded gifs then you can come back to this for reference. again, this is only my experience recording on a mac—it may be a lot different if you use a screen recording program or are on a pc.
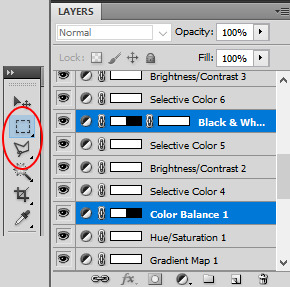
i don’t really use .psd templates because i like to give every gif/gifset it’s own unique coloring—so i remake the coloring every time, but if you get into a rhythm it’s pretty easy. there are a lot of nice coloring tutorials out there, too! my personal coloring adjustments in order: levels, exposure, color balance, selective color (if needed), vibrance, photo filter (if needed), color lookup (i use 2strip most often and i put it on ‘color’ blending mode). don’t forget to adjust the opacities and fills of the ‘color lookup’ adjustment layer in case it’s too strong. go back to correct each adjustment layer as needed. then, when you’re done and satisfied, group all those layers, copy the group (you can do an easy command+c), and paste it onto the next gif you’re working on for easy workflow.
if for some reason you can’t see the frames when you import your layers/video, it’s likely because your ‘timeline’ window isn’t showing up. just go to the window menu on photoshop, go to the bottom and you’ll see ‘timeline.’ make sure it has a check next to it.
i recommend watermarking your gifs because a lot of people like to repost tings these days 😠 - so make sure u got your brand on it! i keep my watermark saved to my ‘libraries’ in photoshop so it’s ready when i need it. i use the blending mode ‘overlay’ and adjust the opacity, but if you don’t want to do that you can also add a stroke/shadow to your watermark/do all sorts.
tag #nctinc for your nct creations and #jenonet for your jeno creations!!
here’s my own mini tutorial (well not much of a tutorial ig more like a work process vid?): took about ten minutes including the time to search and download the video (but i didn’t record that part i trust yall know how to do that), vapoursynth, and exporting. i hope this helps somewhat! feel free to ask more questions whenever :)
youtube
keep in mind that giffing takes a lot of patience, energy, and experience—so don’t worry if it takes you a bit to figure things out or if your gifs don’t turn out the way you want them to the first time around. we all start at the same place and all run into problems. i know giffing can sound intimidating and seem like a lot of work, but i promise, once you get into a routine, giffing is going to happen in minutes—and you’ll get beautiful gifs. have fun! 😊
#anon#answered#tut#tuts#giffing tutorial#should i make a tut/resources post on gfx? not rly sure if gfx can be taught.. it's like a lottt about personal style imo lol#hope this helps!#not just for anon but for anyone
117 notes
·
View notes
Note
Hey littlelittlesimmies! I love what you do with maxis meshes and Im a really big fan! Can I ask a quick question? I know you like to keep your download folder as thin as possible, about large is yours? do you have any special tips or tricks to save space? Thank you so much, you are my sim-spiration!
You sim-spiration ? Really ? Wow, let me thank you sooo much !!! You’ve just put a smile on my face
I will try to reply but I have to admit I’m not an expert about saving space. I’ve read so many different tricks but still did not tried them all. But, my way to do so is more or less this :
I only download new meshes when I really love them. It’s basic, but belive me, sometimes it’s hard to look at wonderful CC and not downloading them. Or, sometimes I download them just to keep the textures somewhere and maybe reuse it later. But in the end, I admit I have a lot of new meshes in my game anyway. I just try to have only meshes that really look different from the Maxis ones.
About BodyShop files :
I only townify low poly meshes. I have a few “high” poly hair meshes but as they are not townified, I can only use them if I think a particular Sim really need this one, so they don’t show up everywhere. I also try to use texture replacements for defaults than defaults with new meshes (but I started to use defaults only two month ago so I don’t have a lot of experience with defaults…).
Also, if any clothe miss a morph, I don’t download/keep it, even if the clothe is wonderfully looking.
And I only keep the recolors I really do love. If I’m not sure I will use something, I don’t keep it.
About hairs, I always use the Hair Binner to have all 5 natural colors in one package. This way, if I delete a hair from the game, It deletes all the naturals at once (but not the mesh itself : useful if I have custom colors, but a pain if not). Also, if I plan to share a Sim with CC hair, the people that will download it will have all the naturals at once too. I’ve heard that merging files makes the game run faster so it could be a positive point too, but I’m not 100% positive it’s true.
About clothes : if it can be slaved/repositoried, then it HAS to be. For exemple @deedee-sims let their followers to choose betwen a slaved or a standalone versions of other age groups than adult. I always take the slaved one. @rented-space has a lots of wonderful swim/underwear but they are all standalone, so I slave them myself before I add them to my game. @whattheskell has a lot of repositoried clothes for their repository project so this is also a very good place to download clothes and keep your Downloads folder as thin as possible. In general for clothes : AF&TF usually can share the same texture. EM,AM&TM can too. So if you learn how to repository things, you can 99% of the time slave one or two age groups to the second or third one. It doesn’t save a lot of space if you have few CC, but as your Downloads folder grows, it becomes useful.
In general :
I compressorize everything. Always. Sometimes I forget to compress things I do before I upload them (sorry…), but before I place something in my Downloads folder, The Compressorizer is used anyway.
I also use Delphy’s Downloads Organizer to check once a month if I have orphans or duplicates and then delete them (warning : defaults, omsps, face templates and a few other things are often considered as orphans by the program but they’re not : if you never used that program, always keep a copy of your entire Downloads folder before you delete anything, just in case).
It’s rare I have orphans or duplicates because I mostly delete things from my Download folder directly, and not from the game itself.
Also, about slaved/repository stuff : paintings ! I try to only keep meshes that takes their textures from Maxis paintings. This way, I only need a few recolors of Maxis paintings to have a very large choice of paintings in game. If you have all Ep/Sp or almost all of them, I think there is really enough shapes and sizes for paintings with the game, so I really don’t understand the need of new meshes, unless they really have something unique (but still : they can be slaved to Maxis, right ?)
Anyway : two or three times a year, it’s cleaning time in my Downloads folder. There are a lot of tutorials on how to do so in the internet. Usually I place on an empty lot everything I realize I don’t use or don’t like anymore, then package the lot, open it with Clean Installer to see the names of the files, and then delete them from my Download folder. As I keep all recolors sets inside the subfolder where the mesh is (no matter who did the recolors), it’s easy to delete everything at once.
To be clear, it’s heartbreaking sometimes, but if I don’t use something, even if I LOVE that something, I don’t keep it. Because there are things I really do LOVE but after a few months, I realize I don’t even use them in game, so let’s save space for something I WILL use.
Oh, and I also rename everything I download. Any special caracters are deleted or replaced with an underscore. My file names only can be letters, numbers, and underscore. Any other caracter is deleted. I’ve read somewhere it helps the game to load the files faster and a lot of people shared their experience to say it works (but I don’t remember if I’ve seen the difference the first time I did it because it was a long time ago).
About the size of my own Downloads folder :
I checked its size and it was 2,66Go ! But my game is running fine so I did’nt believed it… and then your ask made me realized I kept all preview/swatches/PSD inside my Downloads folder :D. Now that I’ve deleted them all (I hope), it’s exactly 1,84Go. Well I had almost 1Go of unecessary files in my folder, let’s facepalm together ! I think they were not loaded by the game but it’s still idiot to keep them here as I often move or copy/paste this folder at different places of my computer when I need to tests things or just backup my CC… so now copy/paste is faster.
Hope you have the answers you were looking for ! If not, please don’t hesitate to tell me :-) Also, if you need me to link at some tutorials, don’t hesitate to tell me. Most of the time they are easy to find with Google but if not, I can take a look for you (I don’t have them close anymore as I’ve learned them and don’t need them for my personal use, but I think i’m gonna add a page on my tumblr with links to tutorials one day). Have a nice day !
5 notes
·
View notes
Note
do you have/use photoshop actions, or could you maybe post the actual layers that you use to achieve your recolors? maybe a psd that's unflattened so i could dissect it to see what layers are?
I never use Photoshop actions to make recolors. The way I do them doesn't really lend itself to actions. It’s prepping the template that’s the work and actions can’t do it. It has to be done by hand, and sometimes it’s painstaking, depending on the object. But after that, making the recolor files themselves doesn’t need any actions because it’s just floodfilling a layer with a color and then saving a PNG. What I usually do for a simpler, straight-on recolor, in "short" form, is:
Layer up the original texture as needed (or if needed). As in, selecting out and then copying onto a new layer all the stuff I don't want/need to touch.
Desaturate what I do need/want to work with.
Add an adjustment layer above the stuff I need to recolor. This is usally a Curves layer or sometimes a simple brightness/contrast, or sometimes a Levels adjustment...or sometimes some or all of the above. The goal is to make the stuff below the adjustment(s) as light as possible without losing details of the original texture, like wood grain, for instance, or fabric texture.
The lightness is important because to actually do the recolor, I simply add a layer on top of everything but the stuff I don't want/need to recolor, floodfill that layer with whatever color I want, and then apply the "Multiply" layer blend to the floodfilled layer, which serves to mash the chosen color into the layers below. It'll replace any pure white in the layer below with the color of the floodfilled layer above and any grays with a corresponding darker shade of the color on the floodfilled layer. Voila! Recolor. :)
If I'm doing something more complicated, like replacing textures and/or increasing resolution, it's a little more complicated than that. It can be as complicated as completely redrawing the texture image from scratch, using the original as a guide, especially if increasing the resolution, as simply enlarging the original texture makes for a blurry, messy image. Usually, it's more like enlarging the original image and then pasting in appropriately-scaled new textures over the old ones. (I have a huge and ever-growing library of textures of various kinds that I've made/gathered over the years.) Then, repaint shadows/shading. (I paint them in black on different layers if there's more than one degree of shading and then use a gaussian blur on them to make them softer if needed, then reduce layer opacity to make the shadows/shading as dark or light as needed). And then doing the steps above.
I have previously uploaded a PSD for a couch I recolored (the “Bootlegged Comfort” one), which is a simpler one where I didn't increase the texture resolution and I only changed the texture of the blanket on the back of the thing. That's here. And I went ahead and uploaded the PSD for the stairs I just did, where I increased the texture resolution and retextured/recolored it. That’s here. If you have any questions, feel free to ask. :)
7 notes
·
View notes
Last Seen Blogs

carboysandbikemen
Unhinged Thoughts

iampoet7
Shon M. Chan

frociaggine
@ frociaggine

ahmedabad123
Ahmedabad Laser Piles

the-lady-frost
The Oddity of Obscure Creations